XIAO nRF52840 & Wio-SX1262 Kit

This kit combines the XIAO nRF52840 and Wio-SX1262, supporting BLE5.0, Thread, Zigbee and LoRa (862-930MHz), and operates with low power consumption. It can be applied in various fields such as Meshtastic®, sensor networks, environmental monitoring, asset tracking, education, and innovation.
Overview
Features
- Versatile Microcontroller: Incorporate the Nordic nRF52840 chip with FPU, operating up to 64 MHz, mounted multiple development ports, supported by Arduino / CircuitPython / Micropython
- Powerful LoRa Performance: Long-range LoRa on Semtech SX1262, supports 868/915 MHz bands.
- Dual-core communication: It supports both Bluetooth and LoRa dual modes, enabling cross-domain interconnection.
- With dimensions of only 8mm × 22mm × 23mm, it features an integrated antenna design.
Specification
| Product | Specifications |
|---|---|
| XIAO nRF52840 | MCU: Nordic nRF52840 Core: ARM® Cortex®-M4 with FPU, up to 64 MHz |
| Wio-SX1262 | LoRa Module: Semtech SX1262 Frequency: 862~930MHz |
| Wireless | Bluetooth 5.0 / NFC |
| Interface | XIAO nRF52840: - 1x UART, 1x I²C, 1x SPI (connects to SX1262) - 1x NFC, 1x SWD, 11x GPIO (PWM) - 6x ADC Wio-SX1262: - 1x SPI (connects to XIAO nRF52840) |
| Power | Input Voltage: - Type-C: 5V - Battery (BAT): 4.2V Battery Charging Current: 50mA / 100mA Standby Power Consumption: <5µA |
| Operating Temperature | -40°C ~ 65°C |
| Dimensions | 21 x 17.8mm |
Pinout


Get Started
The XIAO nRF52840 & Wio-SX1262 Kit comes pre-flashed with the Meshtastic firmware, allowing you to get started quickly.
Flash Firmware
Please don't use NRF-OTA to update the firmware, it may cause the device to be completely dead.
Video Instruction:
Visit Meshtastic Web Flasher.
Connect the kit to your PC, select the device to Seeed → Seeed XIAO nRF52840 Kit, and choose the latest firmware, then click Flash.


Click Enter DFU Mode, there will be a serial port named XIAO-xxx, click and connect it, and there should be a driver named XIAO-xxx display.

Drag the UF2 file to the DFU drive. Firmware should be flashed after the file is downloaded and the device reboots.
Check the Node Name
Visit Meshtastic Flasher and open the Serial Monitor, search for nodenum to find the corresponding node ID.

Connect via App
- IOS App
- Android App
- Select the target device on the Bluetooth panel.
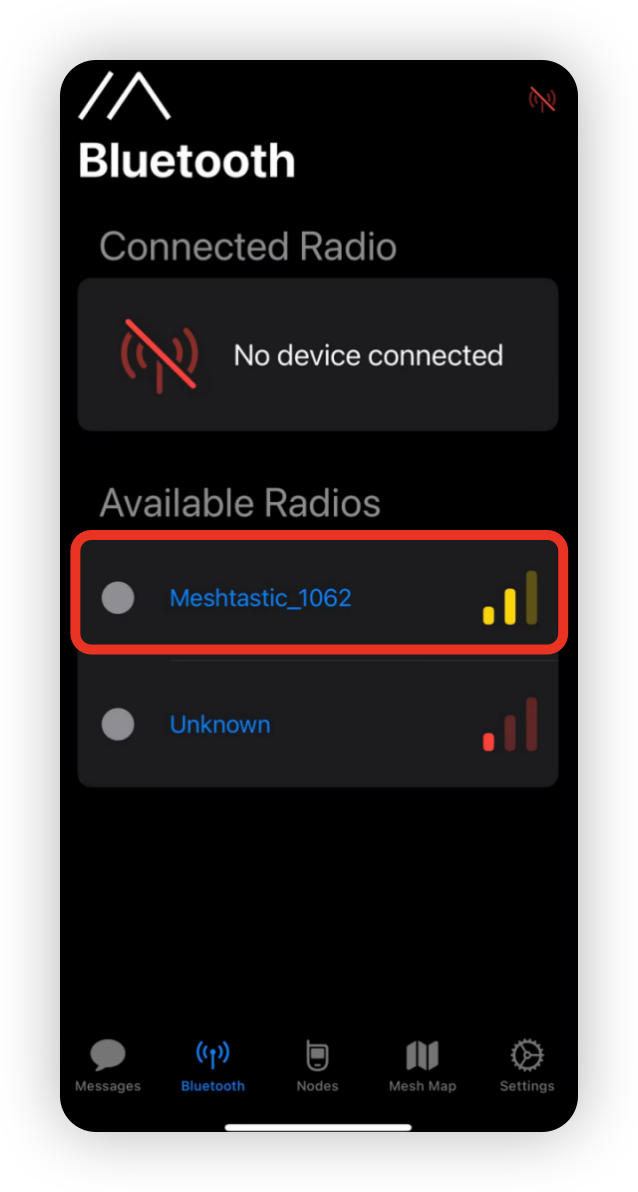
- Enter the code(default code is
123456) and then clickOKto connect the device.

- Click
+and choose the target device.

- Enter the code(default code is
123456) and then clickOKto connect the device.

Configure the Parameters
In order to start communicating over the mesh, you must set your region. This setting controls which frequency range your device uses and should be set according to your regional location.
- IOS App
- Android App


Region List
| Region Code | Description | Frequency Range (MHz) | Duty Cycle (%) | Power Limit (dBm) |
|---|---|---|---|---|
| UNSET | Unset | N/A | N/A | N/A |
| US | United States | 902.0 - 928.0 | 100 | 30 |
| EU_868 | European Union 868MHz | 869.4 - 869.65 | 10 | 27 |
Refer to LoRa Region by Country for a more comprehensive list.
EU_868 has to adhere to an hourly duty cycle limitation of 10%, calculated every minute on a rolling 1-hour basis. Your device will stop transmitting if you reach it, until it is allowed again.
Now that you have set the LoRa region on your device, you can continue with configuring any LoRa Configs to suit your needs.
GNSS Sensor Config
Connect a L76K GNSS Module to make a tracker.

The Compatible SX-1262
Click here to get the separately-selling SX1262.
Resource
File Resources
- [PDF] Xiao Reference Design
- [PDF] Seeed Studio XlAO nRF52840 BLE Communication Distance Test Report
- [ZIP] Seeed Studio XlAO nRF52840 CE |FCC|MIC
- [PDF] nRF52840 datasheet
- [PDF] Seeed Studio XIAO nRF52840 Schematic
- [ZIP] Seeed Studio XIAO nRF52840 KiCAD file
- [ZIP] Seeed Studio XIAO nRF52840 Eagle file
- [DXF] Seeed Studio XIAO nRF52840 Dimension in DXF
- [LBR] Seeed Studio XIAO nRF52840 Eagle footprint
- [XLSX] Seeed Studio XIAO nRF52840 pinout sheet
- 🔗 [Kicad] Seeed Studio XIAO nRF52840 FootPrint
- [RAR] Wio SX-1262 for XIAO 3D file
- [PDF] The Schematic Diagram of the SX1262 compatible with Xiao nRF52840
- [PDF] Wio SX-1262 Module Datasheet
Course Resources
Tech Support & Product Discussion
Thank you for choosing our products! We are here to provide you with different support to ensure that your experience with our products is as smooth as possible. We offer several communication channels to cater to different preferences and needs.