NRF Connect SDK with XIAO nRF54LM20A Sense
Introduction
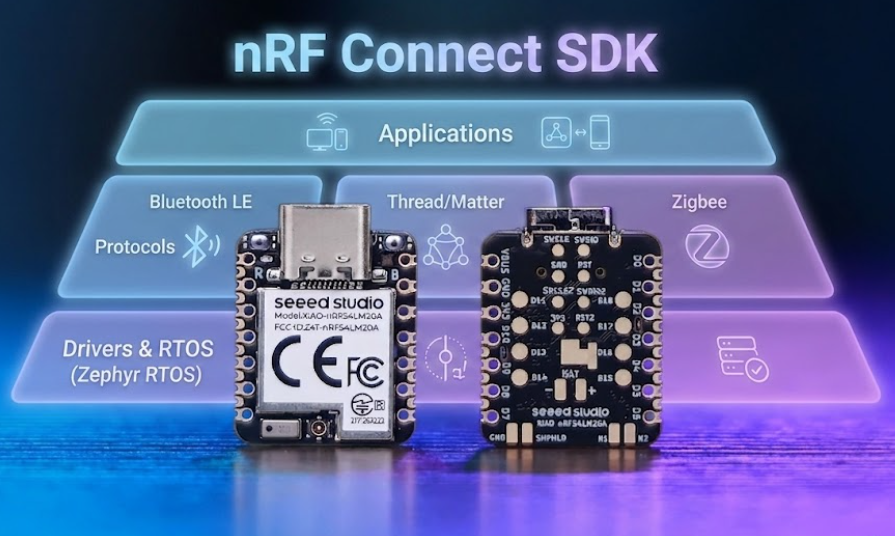
nRF Connect SDK (NCS) is Nordic Semiconductor's official software development kit, built on top of the Zephyr RTOS real-time operating system. It provides a complete, native, and highly optimized development framework for the nRF series chips. Compared with PlatformIO, NCS offers developers fuller access to the entire hardware capabilities of the nRF54 series, including native support for Bluetooth Low Energy (BLE), Thread, Matter, and other wireless protocol stacks, as well as finer-grained power management and peripheral control. Nordic officially maintains and updates this SDK continuously, ensuring optimal compatibility with chip firmware and early access to the latest features.
This tutorial will guide you step by step through the entire process — from setting up the nRF Connect SDK development environment and installing the toolchain, to creating and configuring your first project, and finally flashing your first example program onto the XIAO nRF54LM20A Sense to see it in action.
Getting Started with NCS
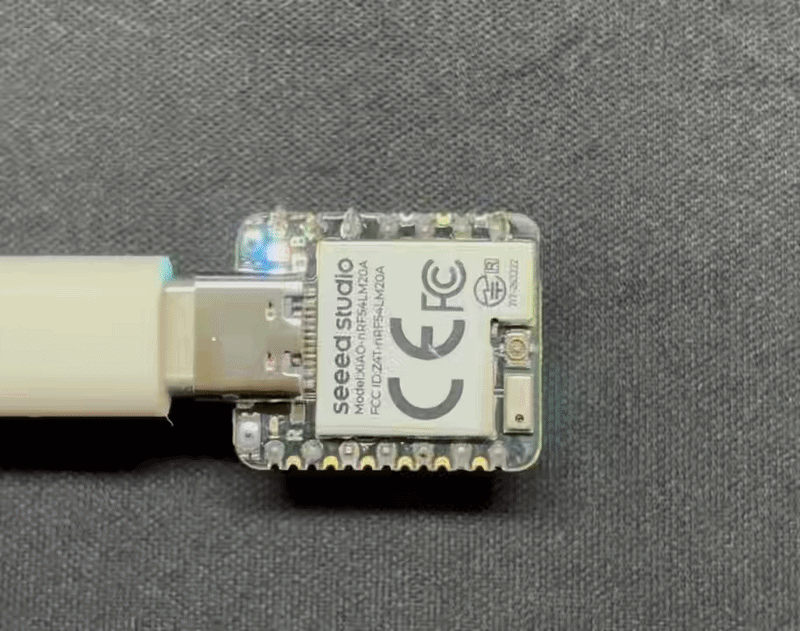
Hardware Preparation
| Seeed Studio XIAO nRF54LM20A Sense |
|---|
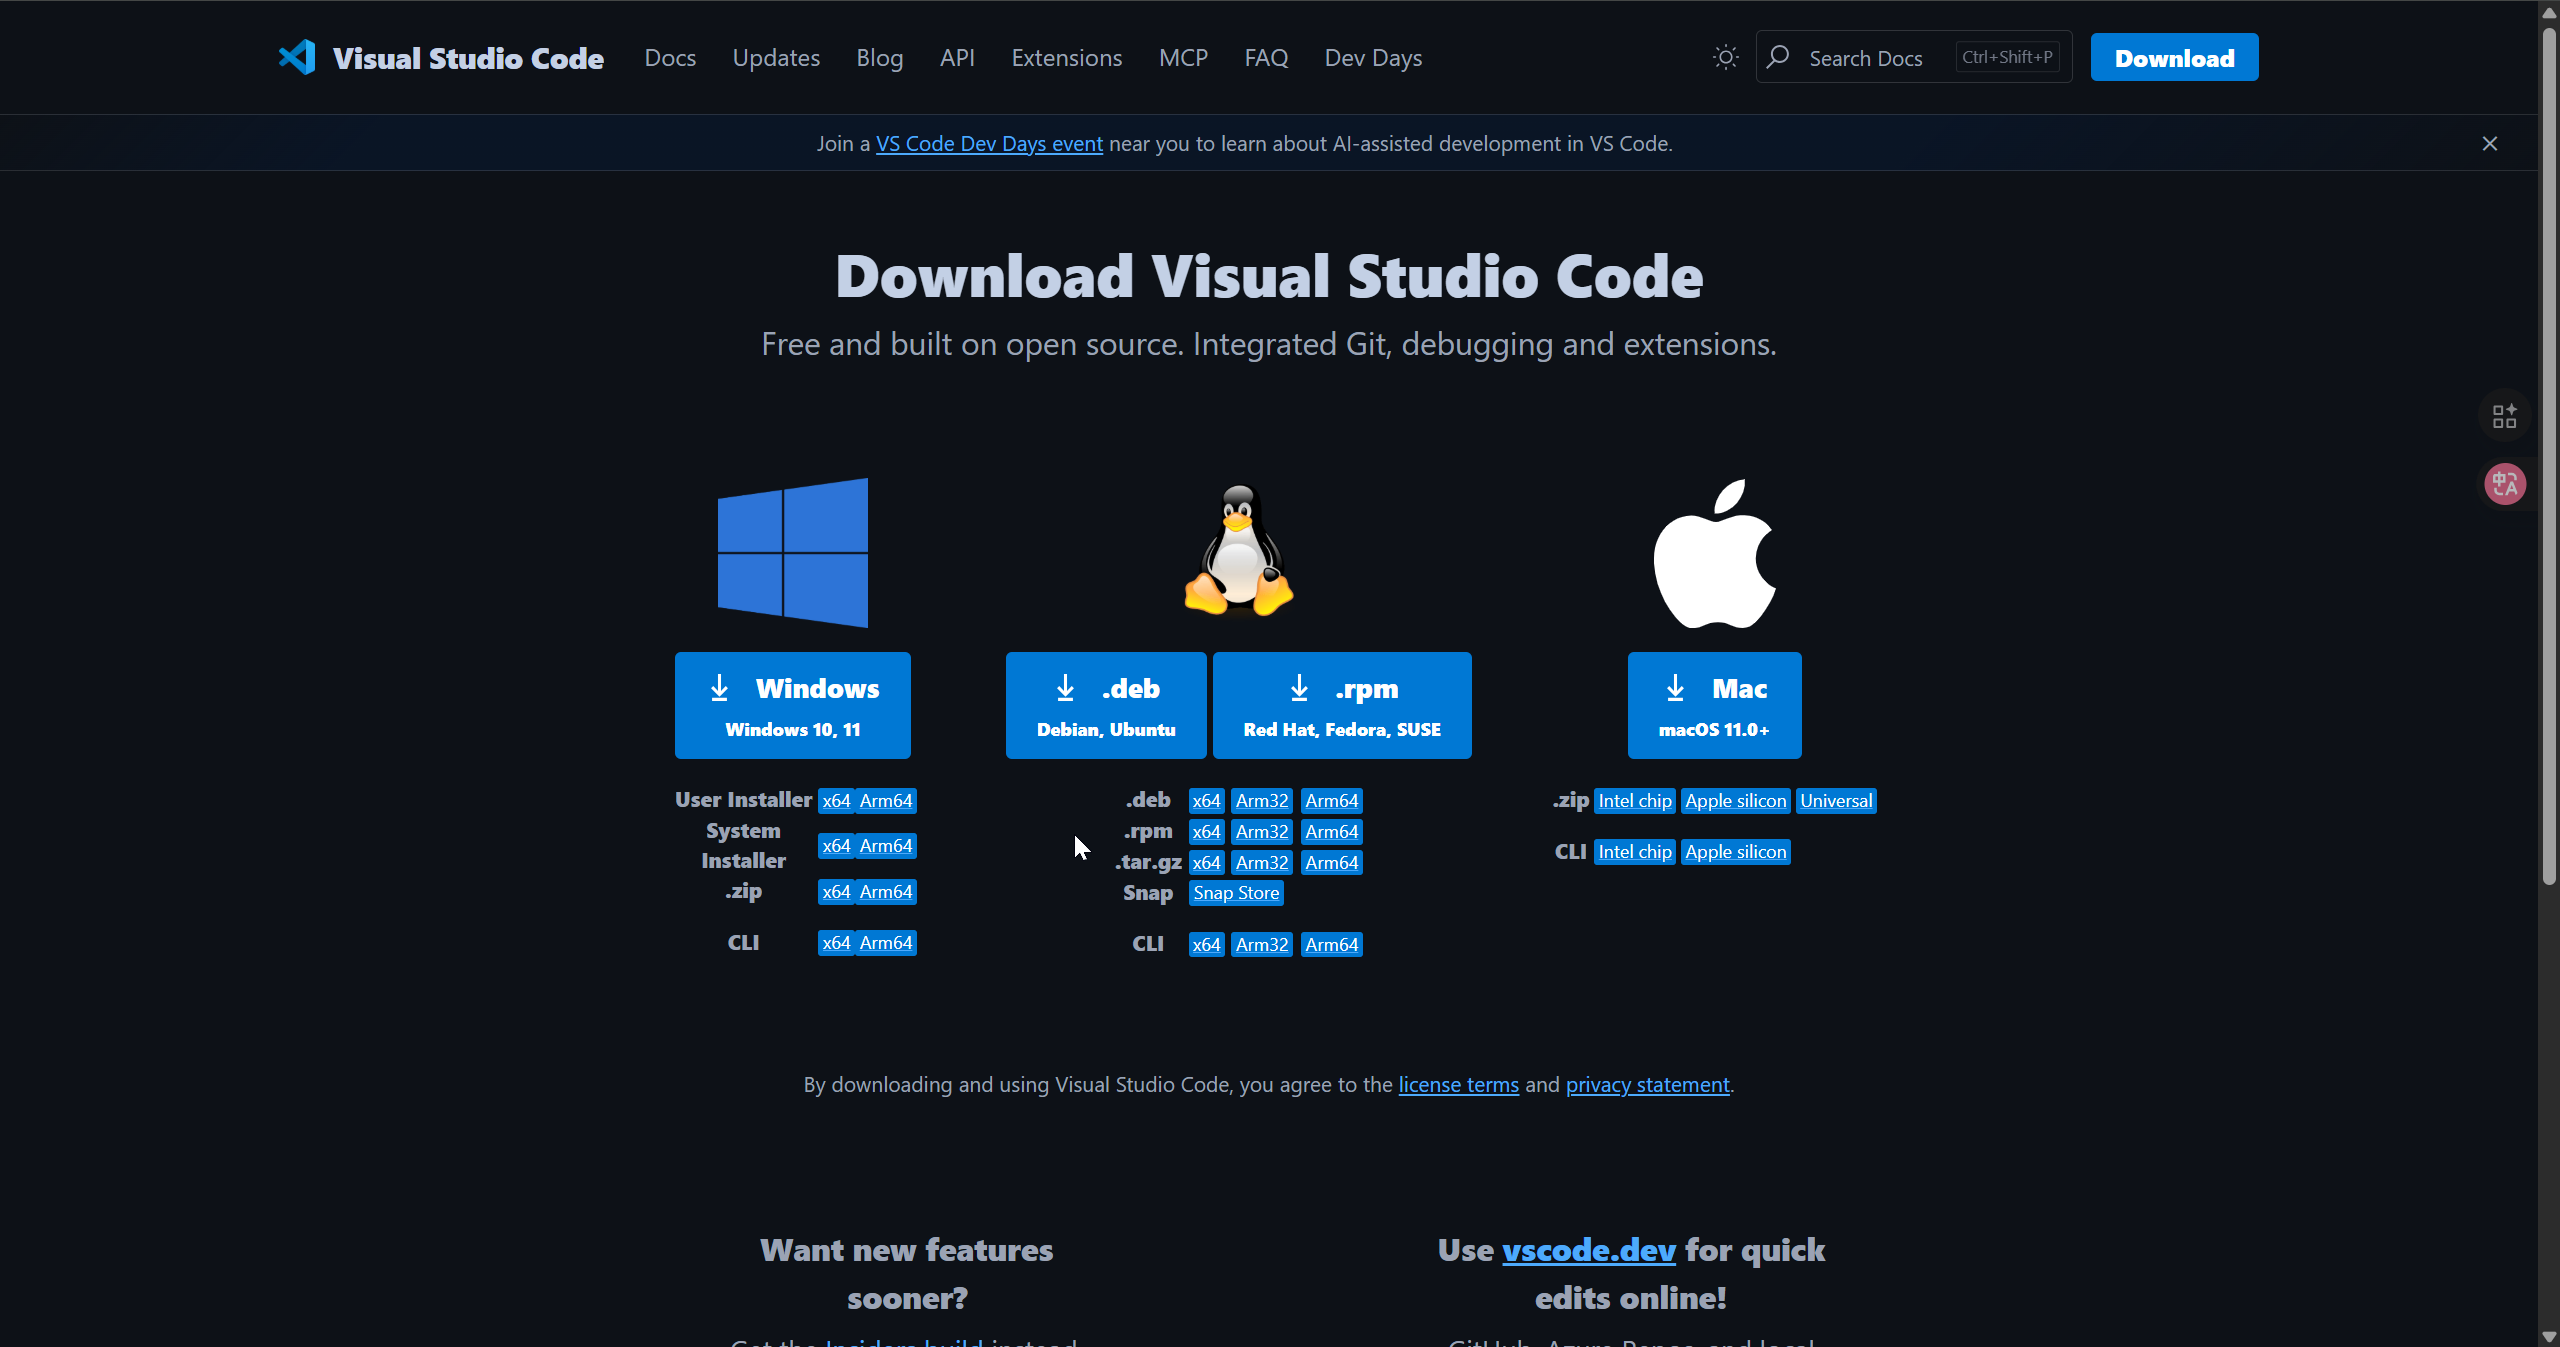
Download VS Code
Download according to the system you are using VS Code
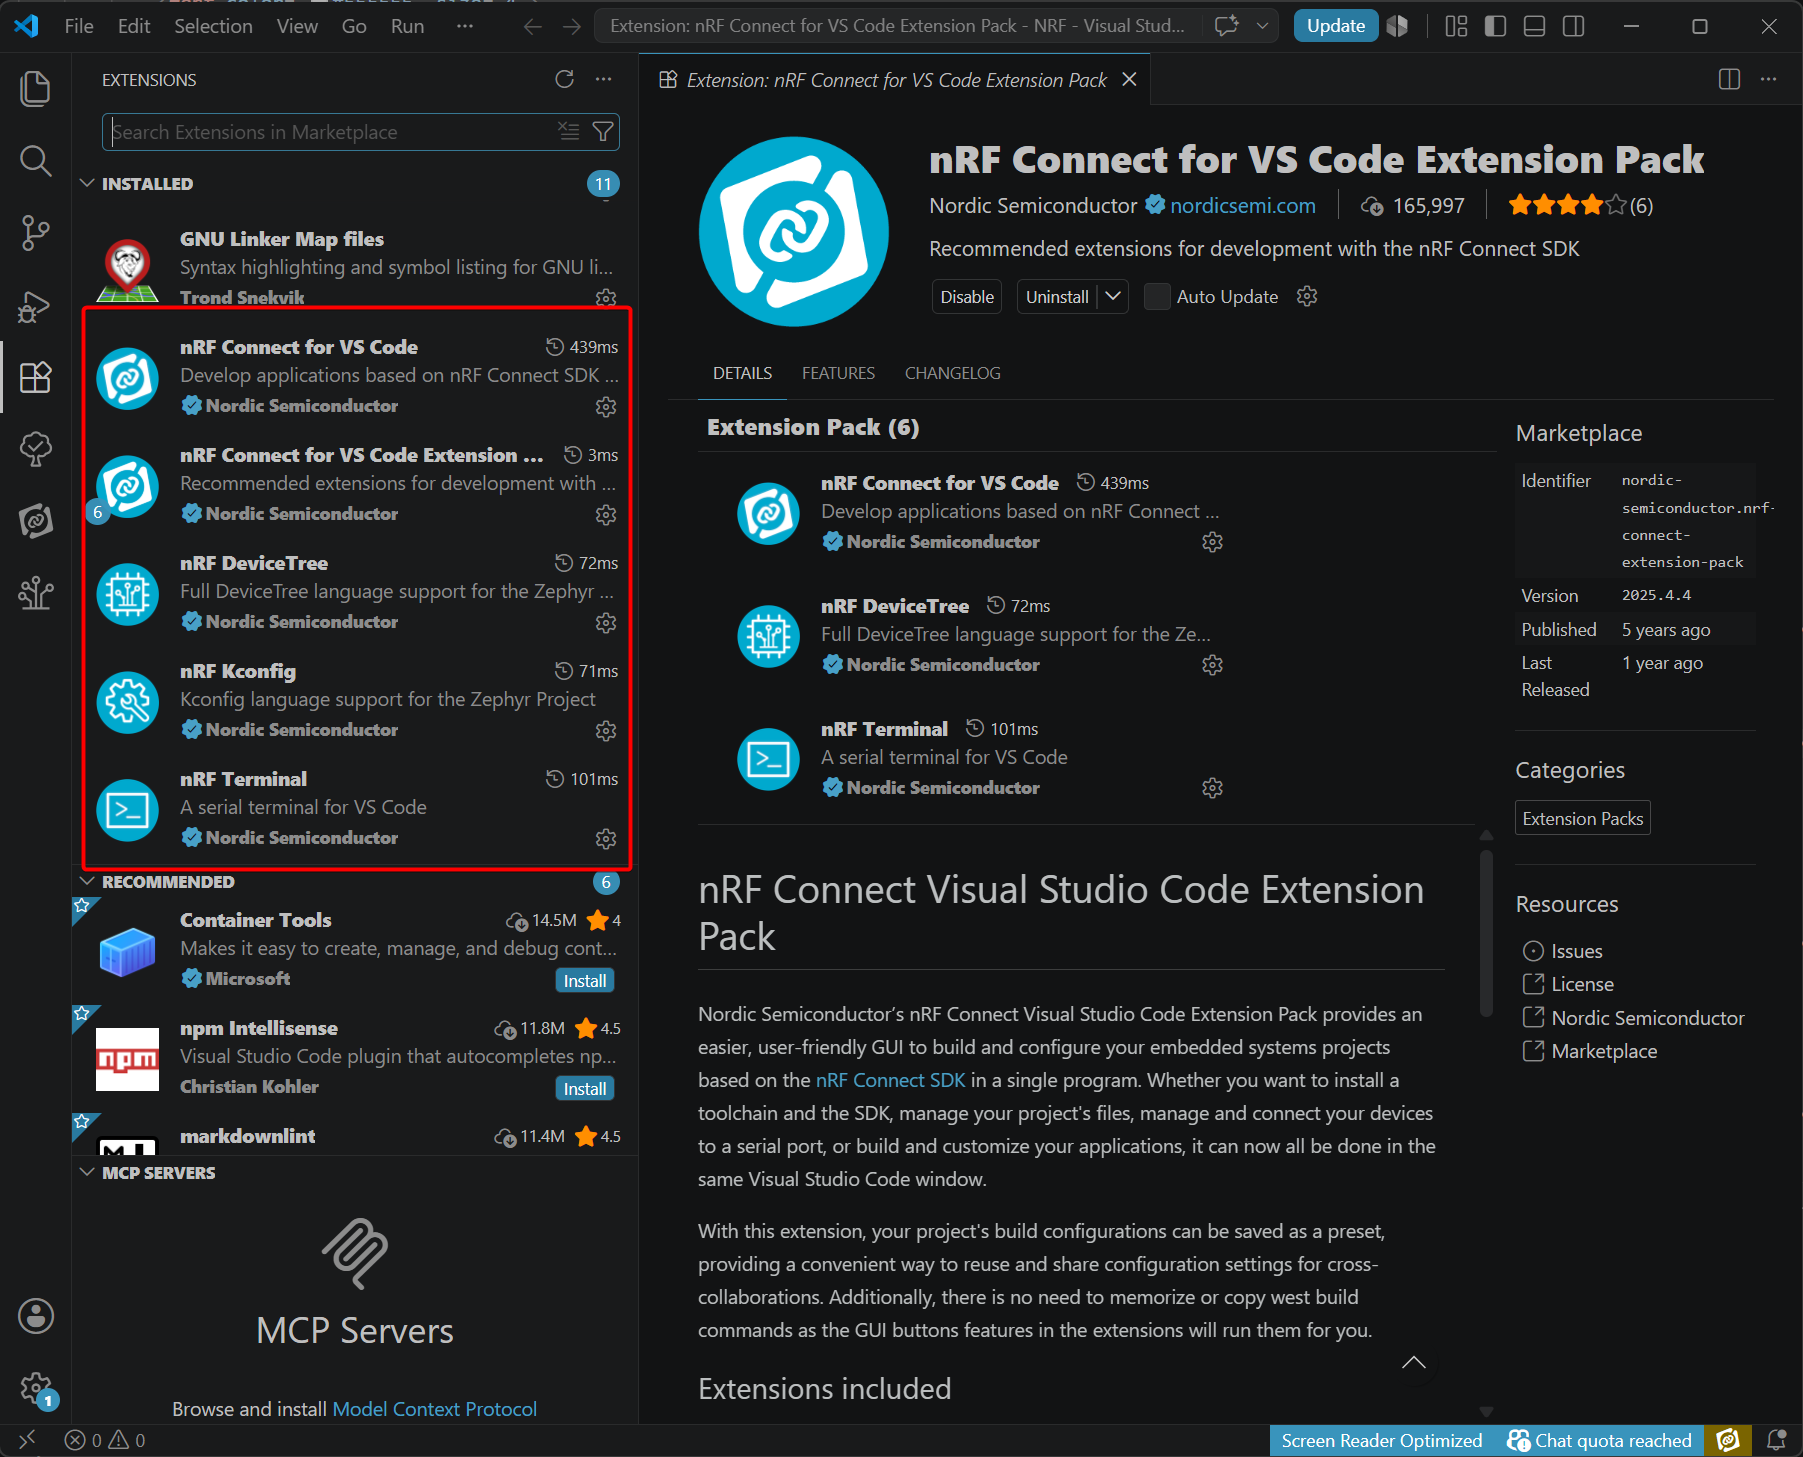
Install nRF Connect for VS Code Extension Pack Extension
- Open VS Code, search for and install the nRF Connect for VS Code Extension Pack. This extension will automatically install all sub-extensions required for the complete toolchain, including nRF Connect, Kconfig, DeviceTree and more.

- The nRF Connect for VS Code Extension Pack will automatically install the following extensions for you.
Install nRF Connect SDK and Toolchain
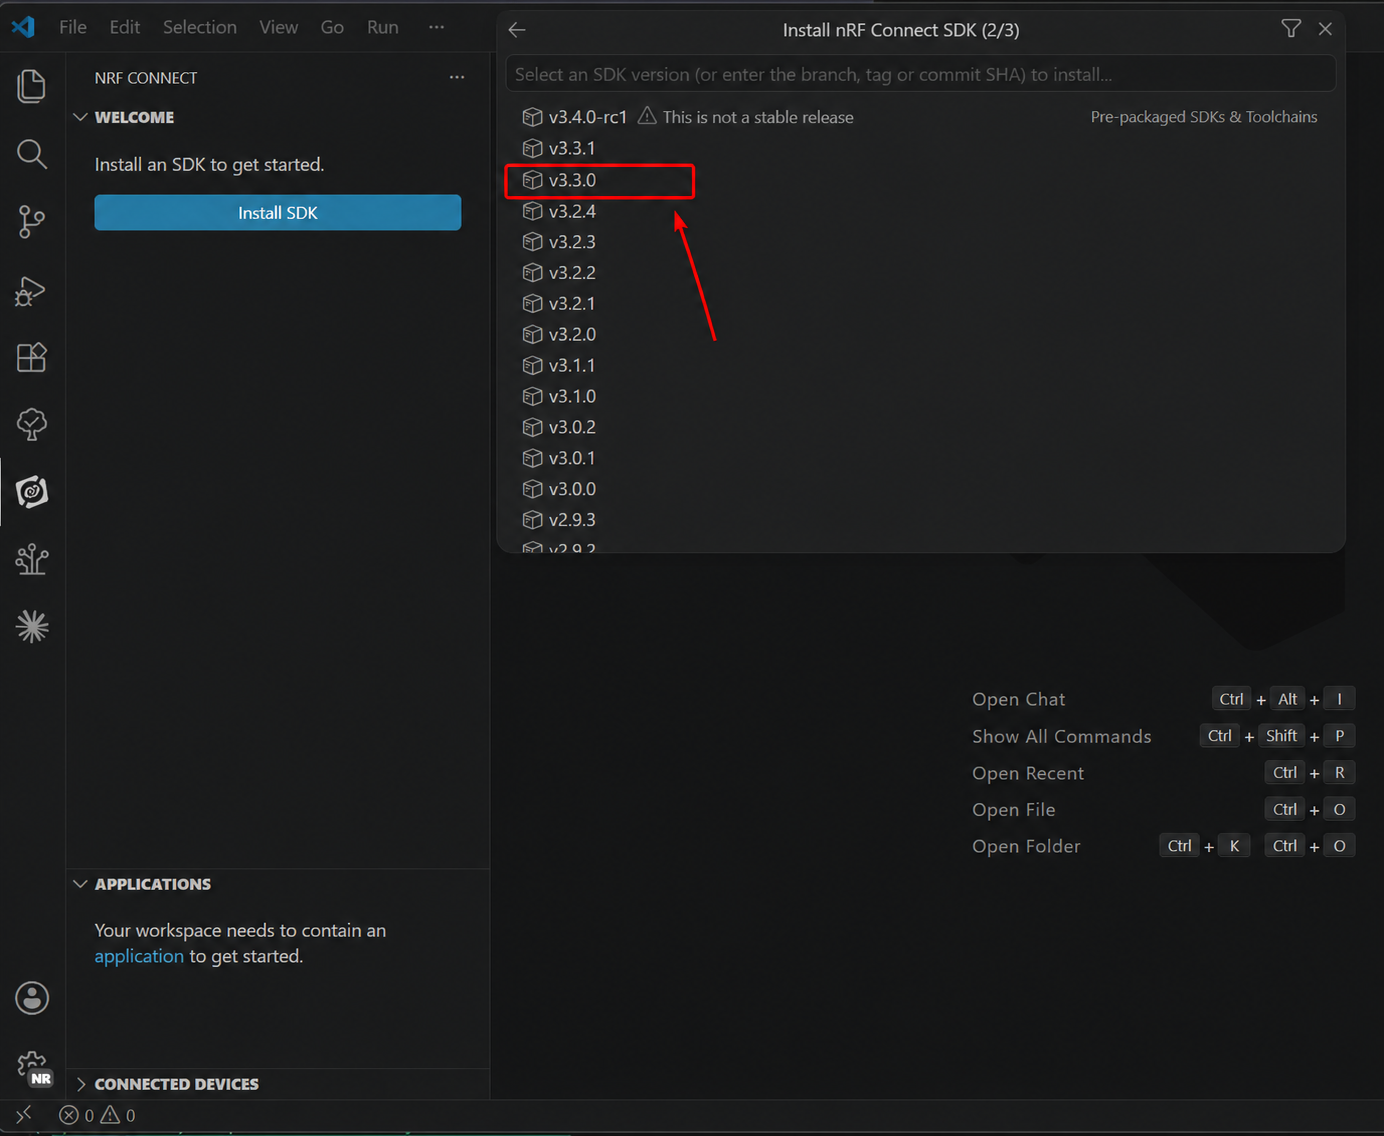
- Open the nRF Connect extension, select Install SDK, then choose nRF Connect SDK.

- Select v3.3.0 from the Pre-packaged SDKs & Toolchains list.
For nRF Connect SDK v3.3.0, the pre-packaged installation includes both the SDK code and the matching toolchain. You do not need to install the toolchain separately.
The nRF Connect SDK is quite large, and the initial installation will take some time. Please ensure a stable network connection during installation to avoid failures.
Environment Verification
After the installation finishes, the integrated environment for the nRF Connect SDK will be set up automatically. To ensure smooth subsequent development, we recommend verifying the environment at this step.
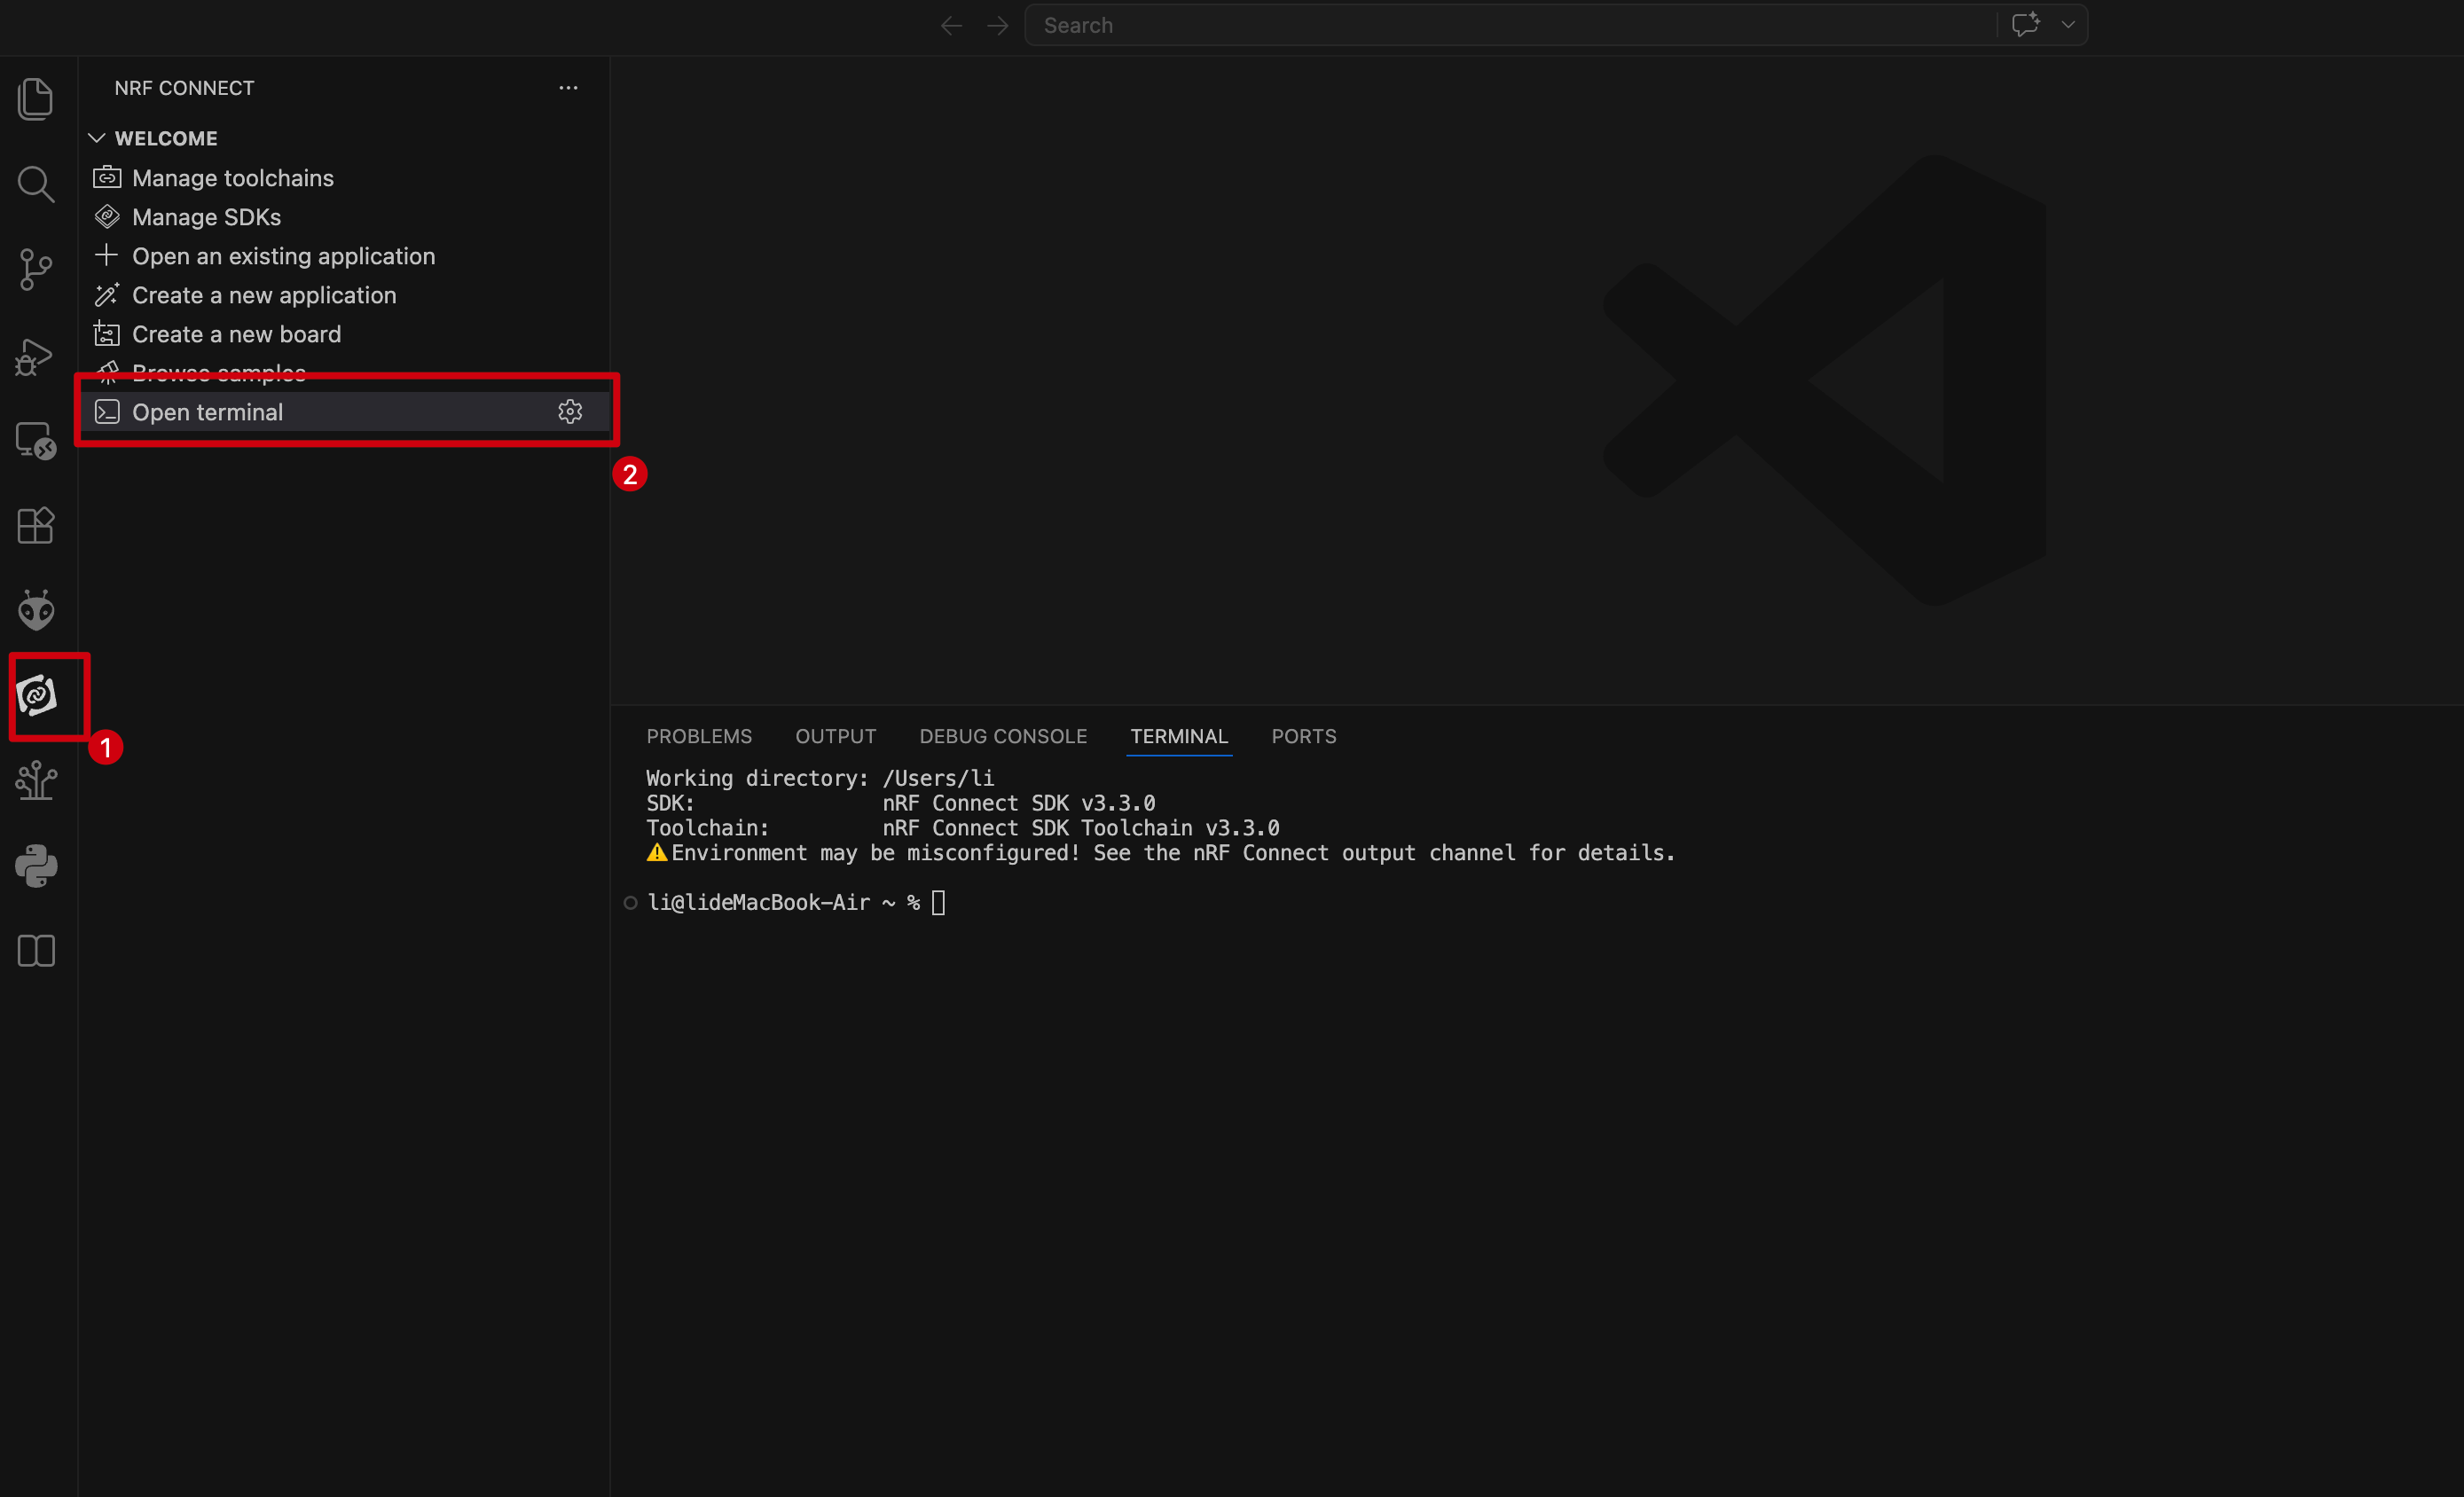
- Launch nRF Terminal, a built-in terminal of the nRF Connect SDK.
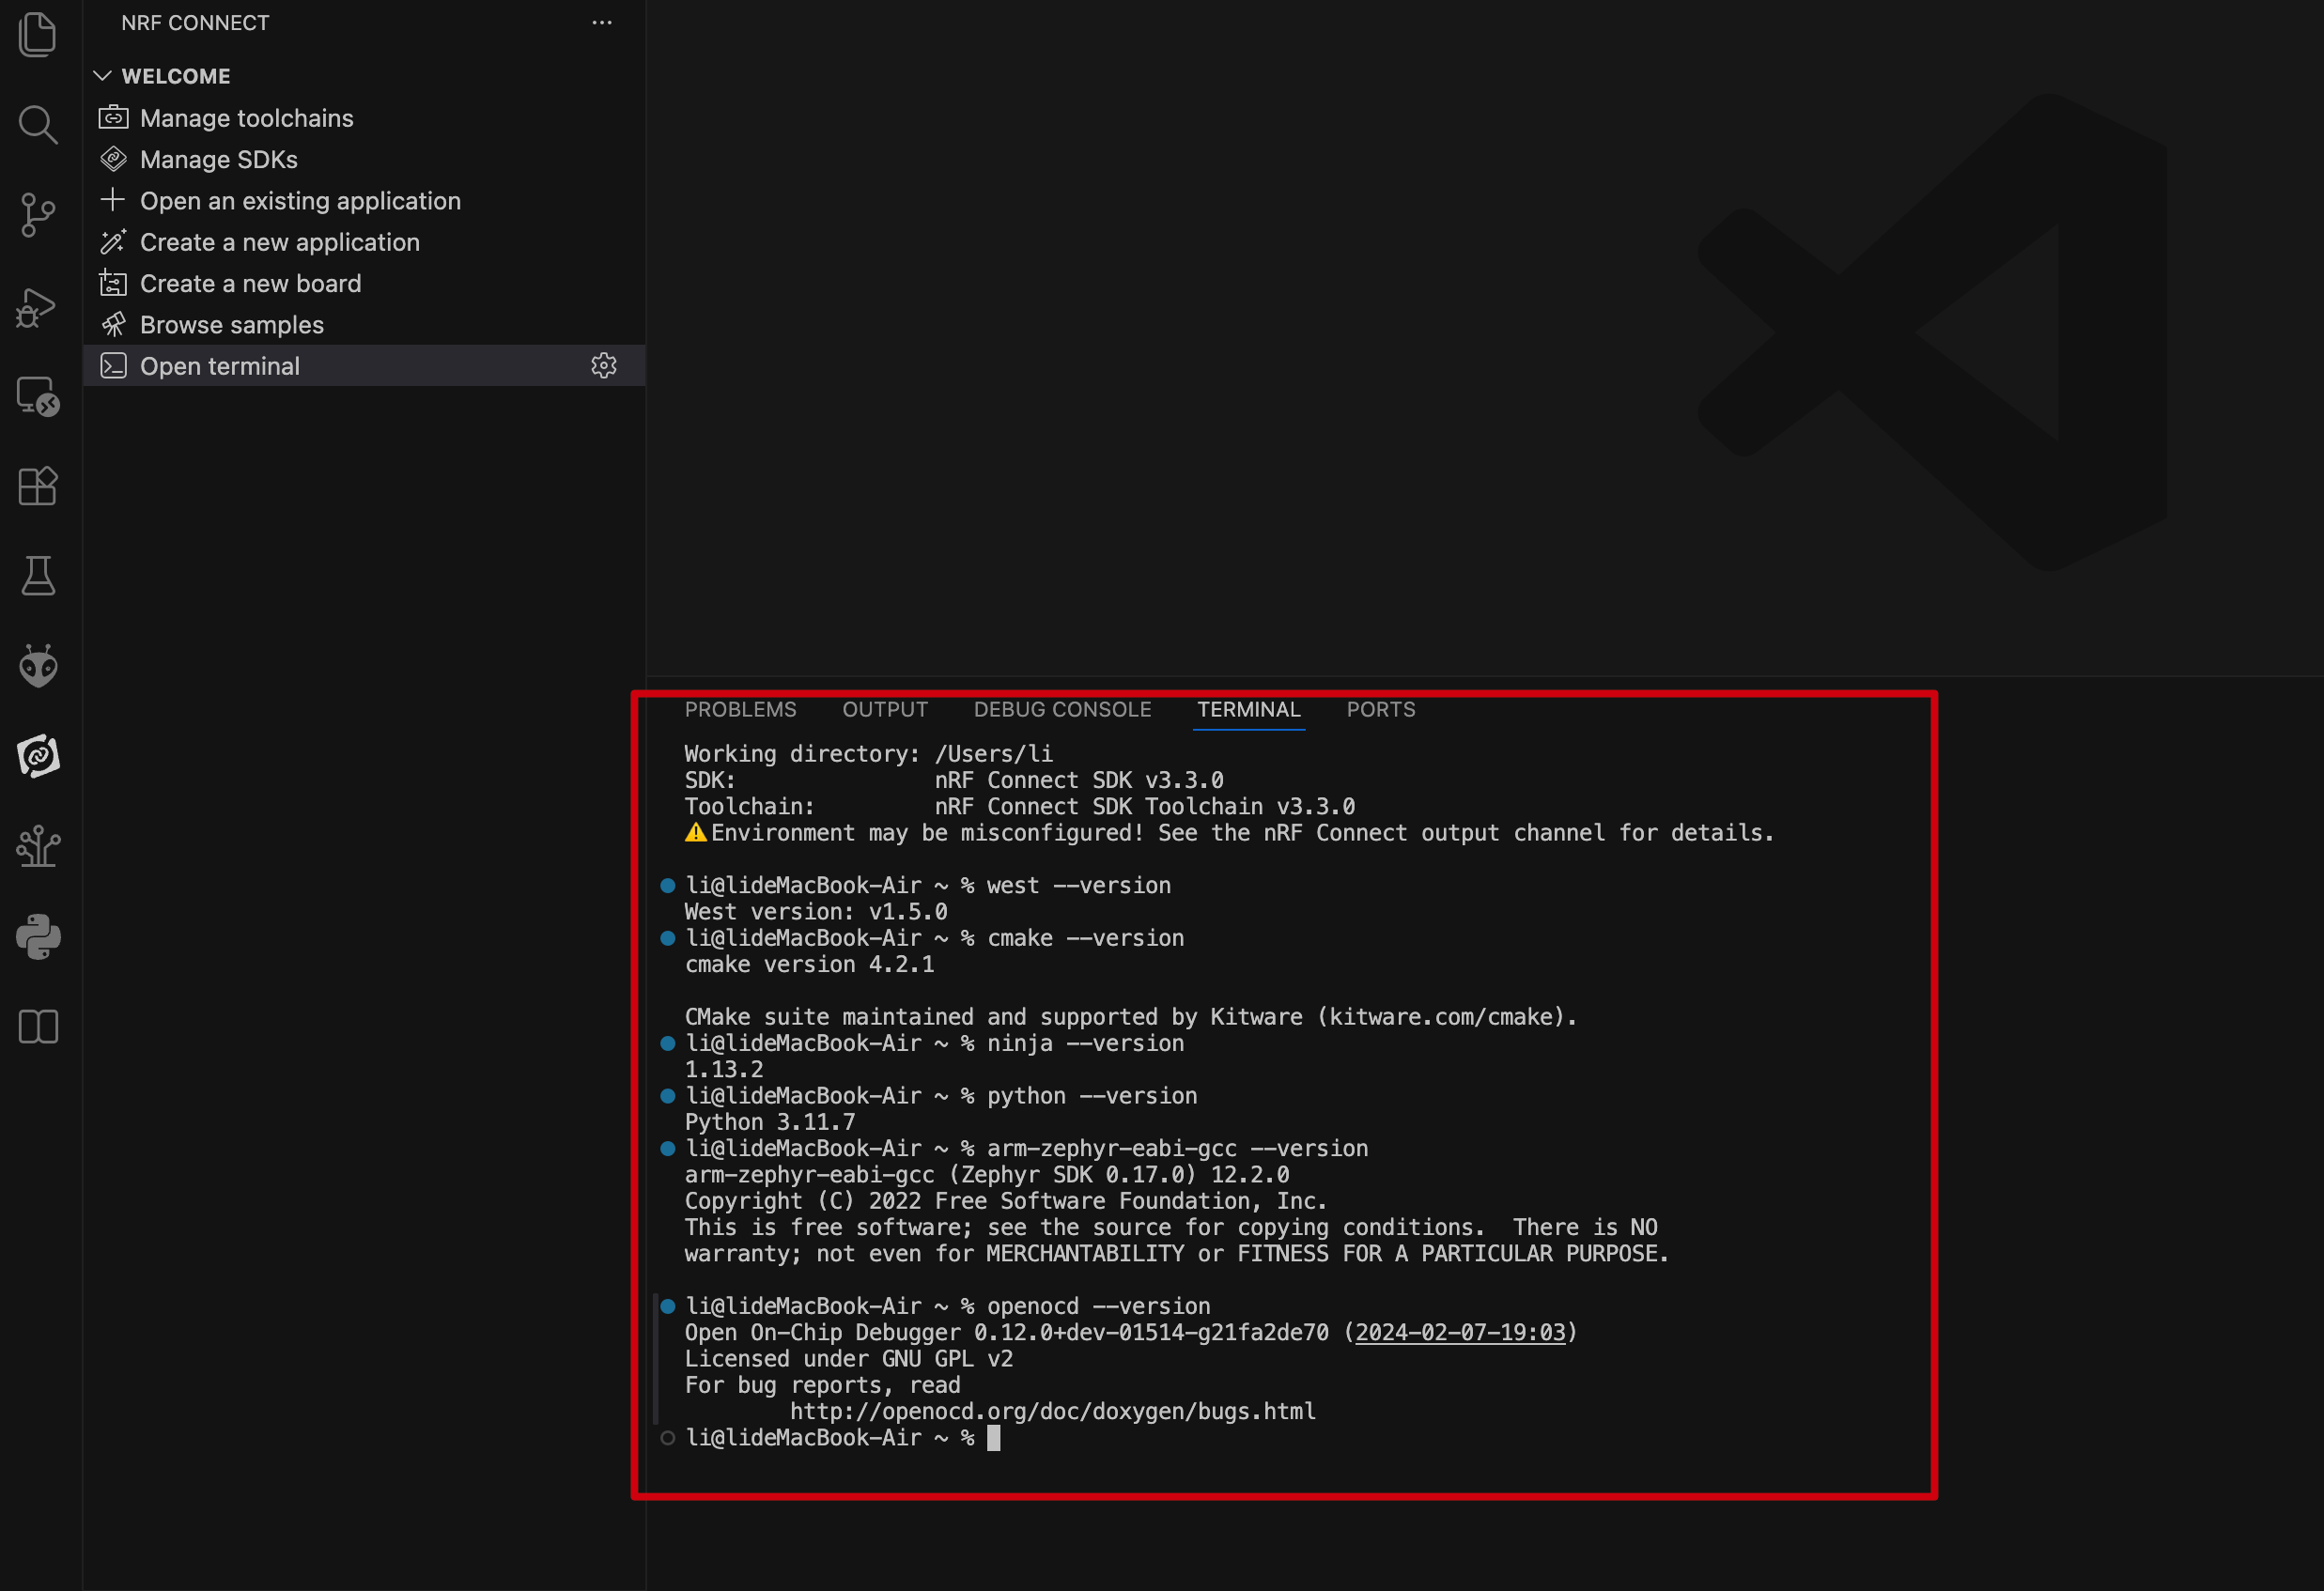
Please make sure that both the nRF Connect SDK (NCS) version and the Toolchain version are 3.3.0. Mixing different versions may cause build or compatibility issues.
- Enter commands to check the version information of required tools. You can copy and run the commands one by one for verification.
# Check west (project manager & build entry) version
west --version
#West version: v1.5.0

# Check CMake (build system generator) version
cmake --version
#cmake version 4.2.1

# Check Ninja (build executor) version
ninja --version
#1.13.2

# Check Python (scripting runtime for west & Zephyr tools) version
python --version
#Python 3.11.7

# Check ARM cross-compiler (Zephyr toolchain for Cortex-M) version
arm-zephyr-eabi-gcc --version
#arm-zephyr-eabi-gcc (Zephyr SDK 0.17.0) 12.2.0
#Copyright (C) 2022 Free Software Foundation, Inc.
#This is free software; see the source for copying conditions.  There is NO
#warranty; not even for MERCHANTABILITY or FITNESS FOR A PARTICULAR PURPOSE.

# Check OpenOCD (on-chip debugger & flasher via CMSIS-DAP) version
openocd --version
#Open On-Chip Debugger 0.12.0+dev-01514-g21fa2de70 (2024-02-07-19:03)
#Licensed under GNU GPL v2
#For bug reports, read
#        http://openocd.org/doc/doxygen/bugs.html
- The output is shown below. If any components are missing, reinstall the toolchain and ensure a stable network during installation.
Add Custom Board Path
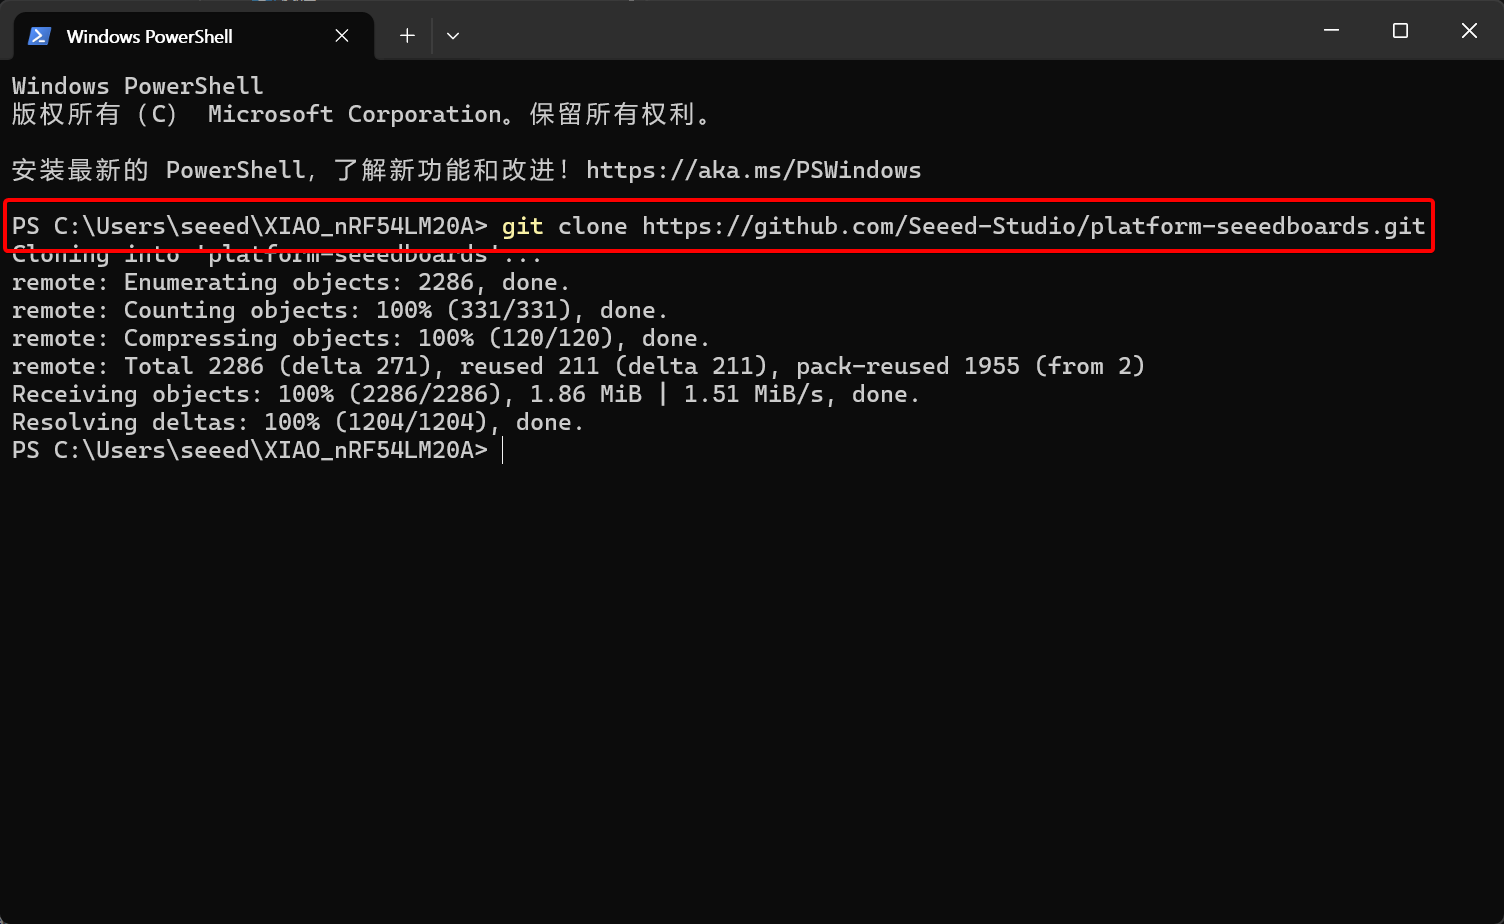
The board definitions for the XIAO nRF54LM20A series have not yet been merged into the official NCS repository, so you need to add the board path manually.
- Clone the platform-seeedboards repository to your preferred directory.
git clone https://github.com/Seeed-Studio/platform-seeedboards.git
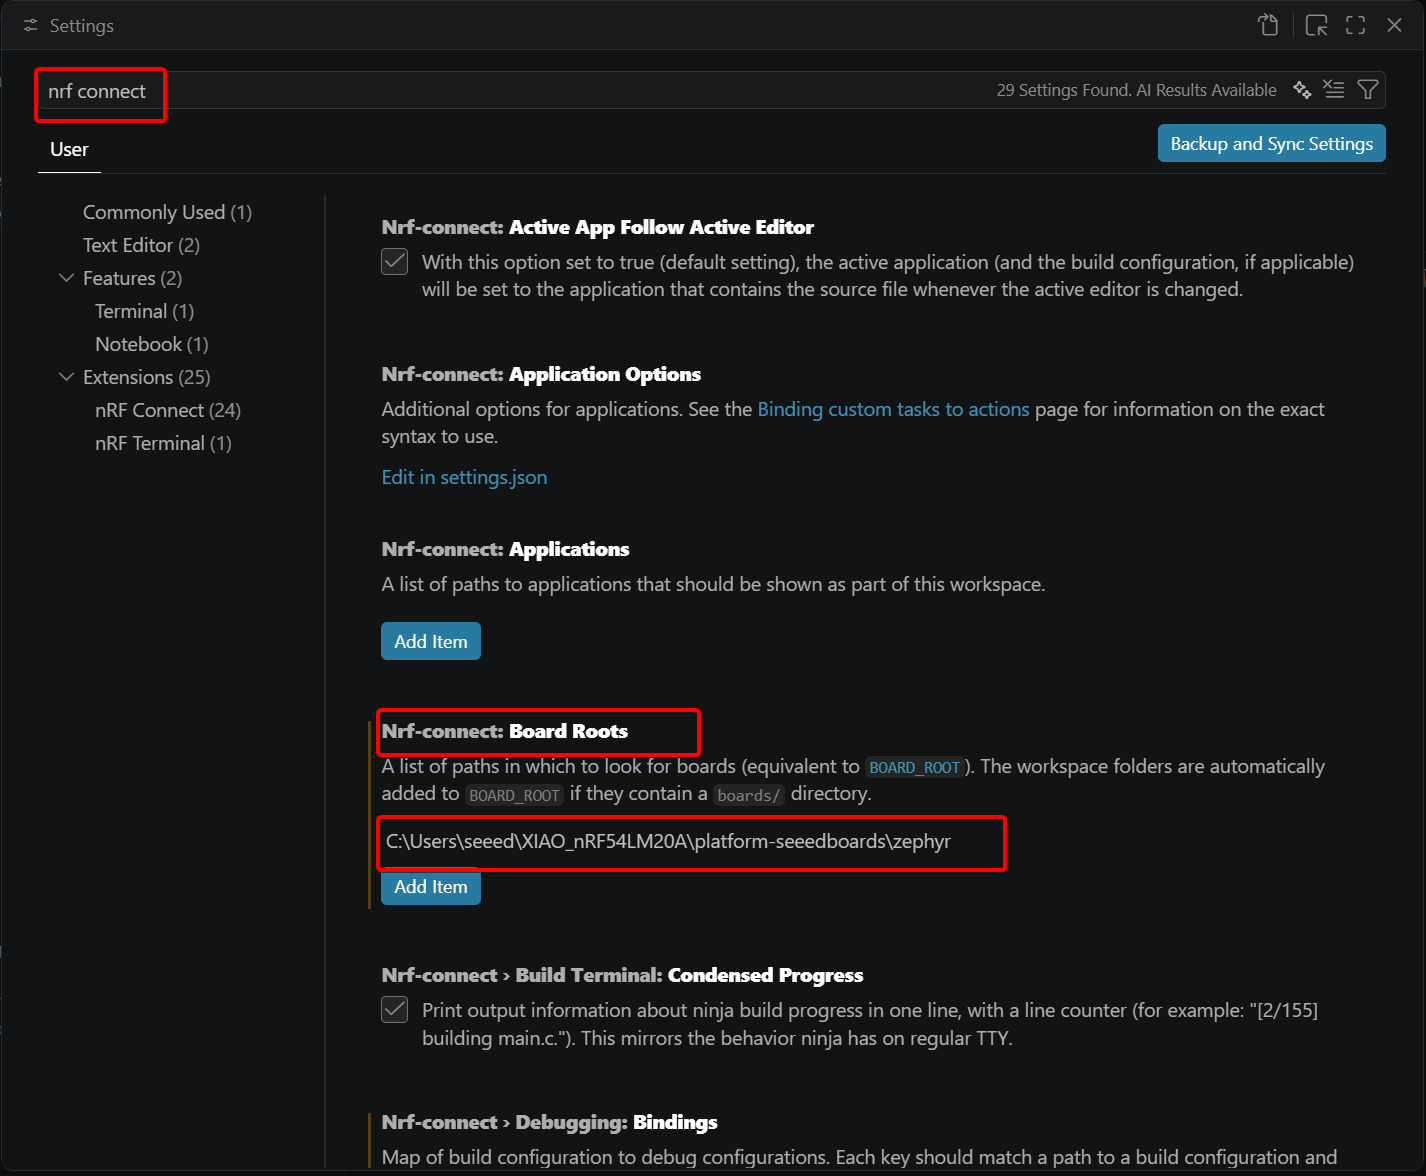
- Open Settings at the bottom left corner of VS Code.

- Search for nRF Connect, modify Board Roots, and add the path
~\your_path\platform-seeedboards\zephyr. The board definitions for XIAO nRF54LM20A series are stored here.
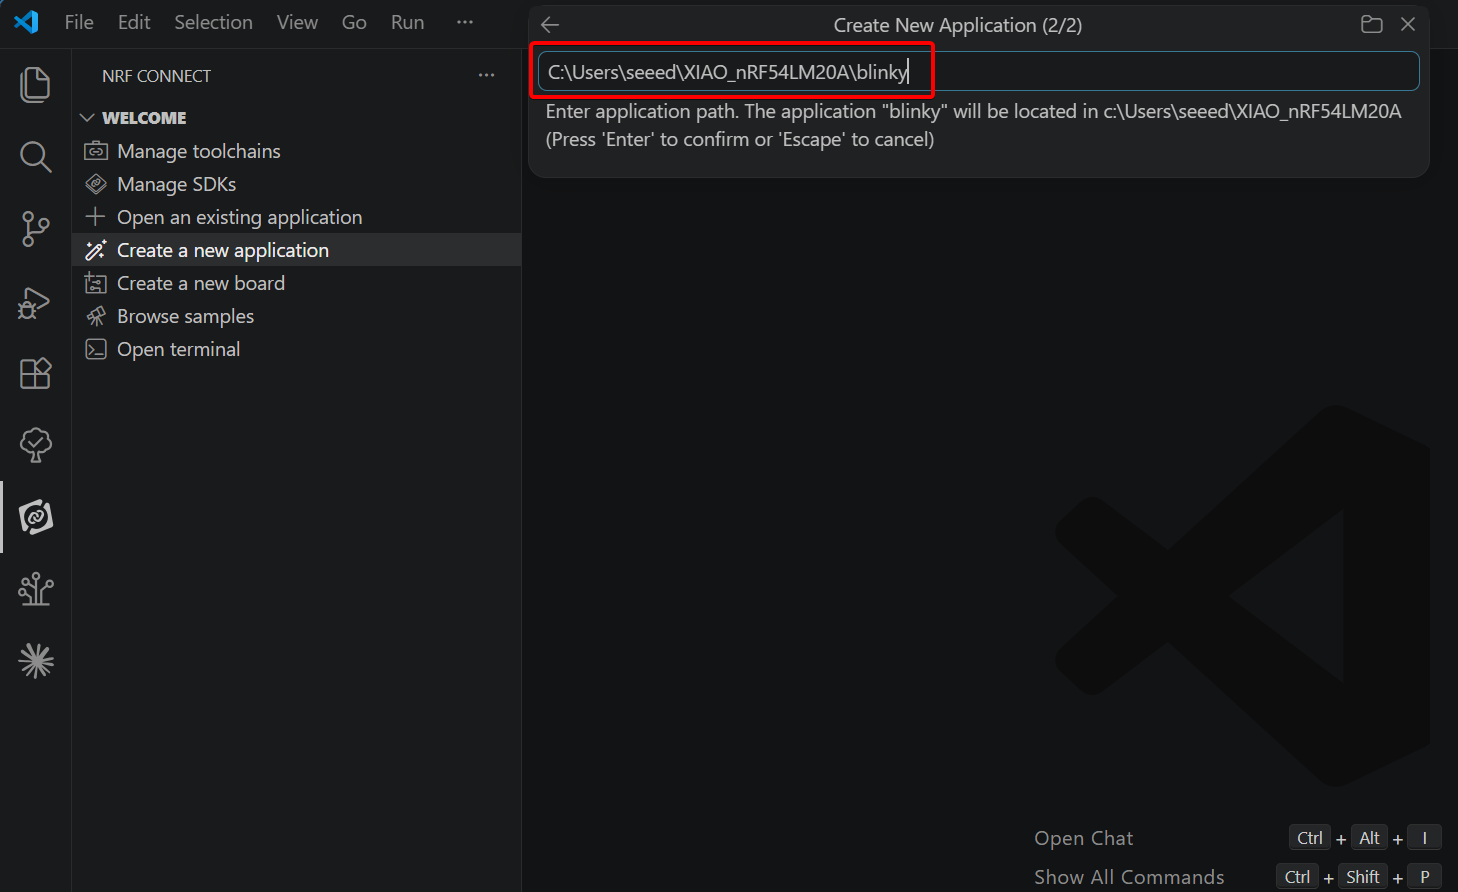
Create a new application
In this section, we will modify a blank sample project.
- In the extension, select Create a blank application to duplicate the template.
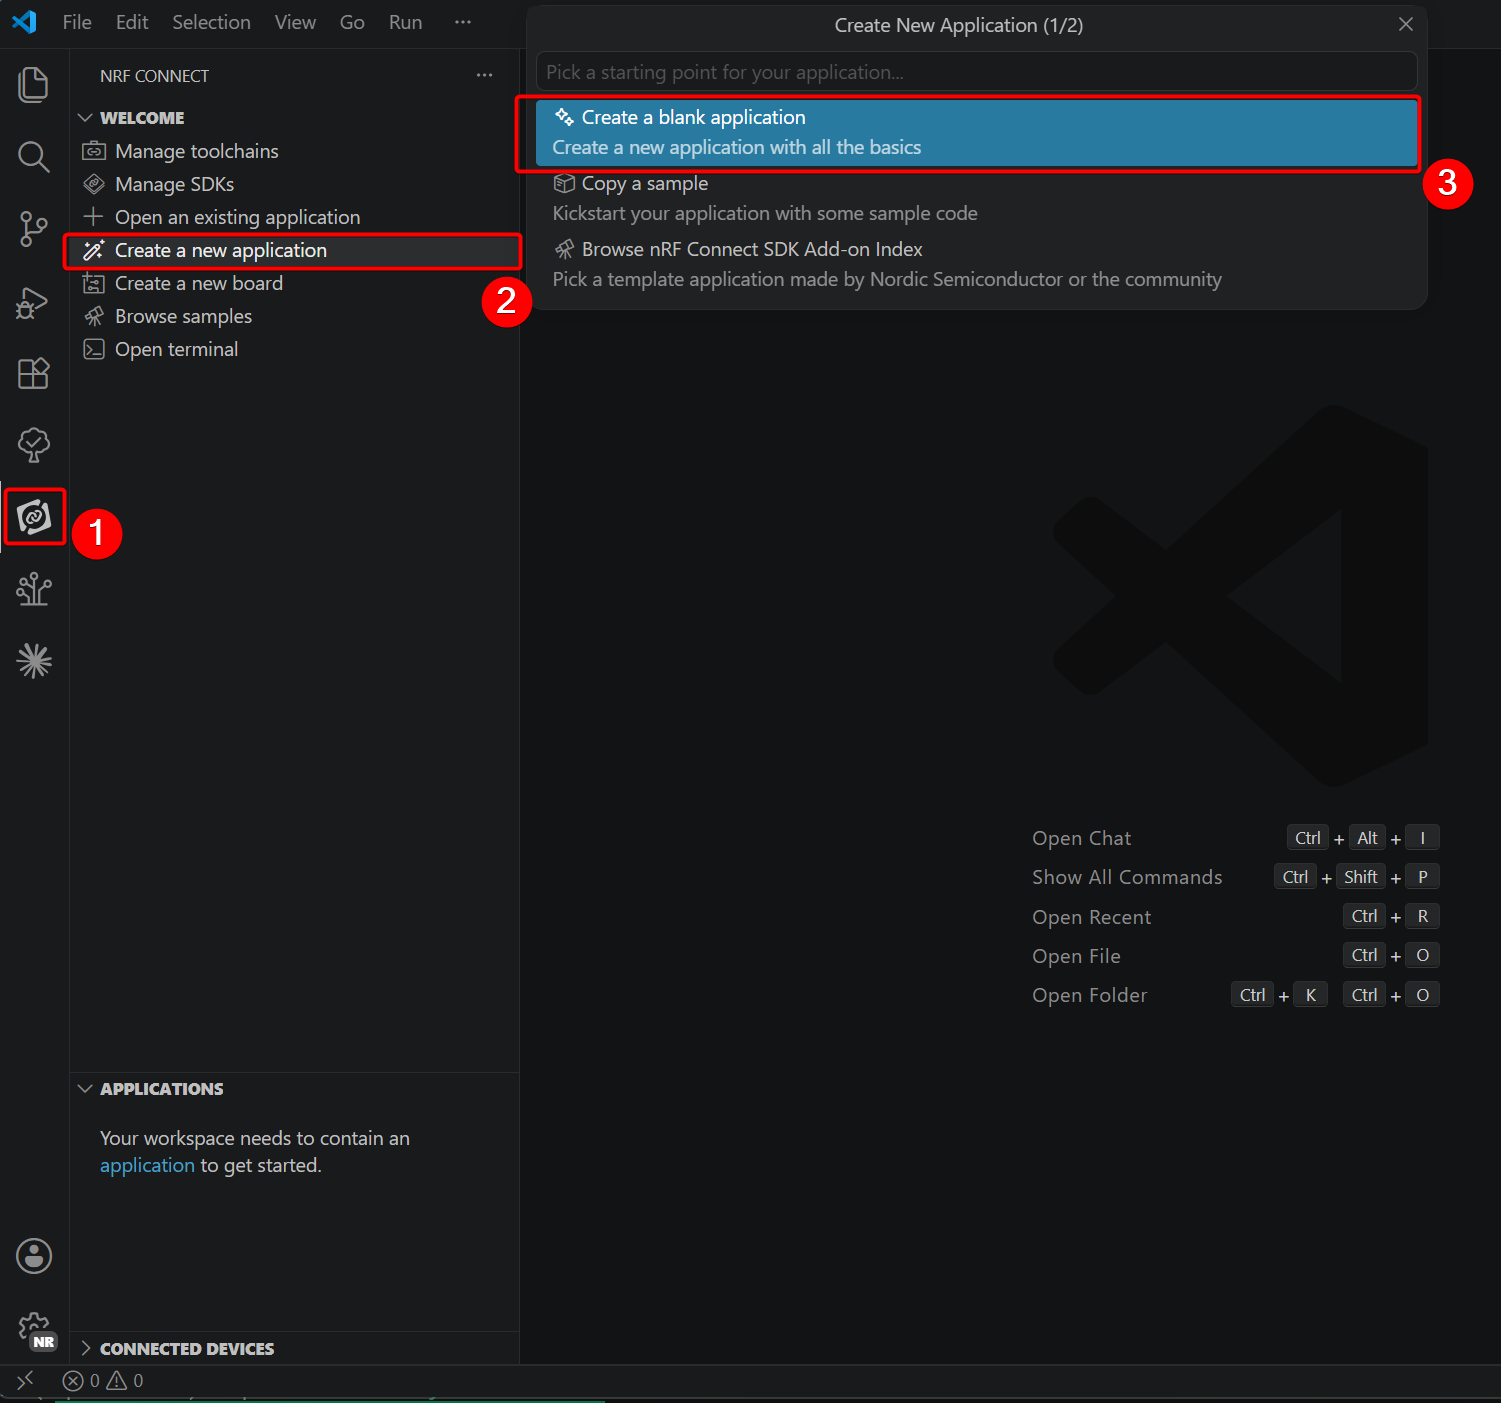
- Name the project
blinkyand choose a storage path.
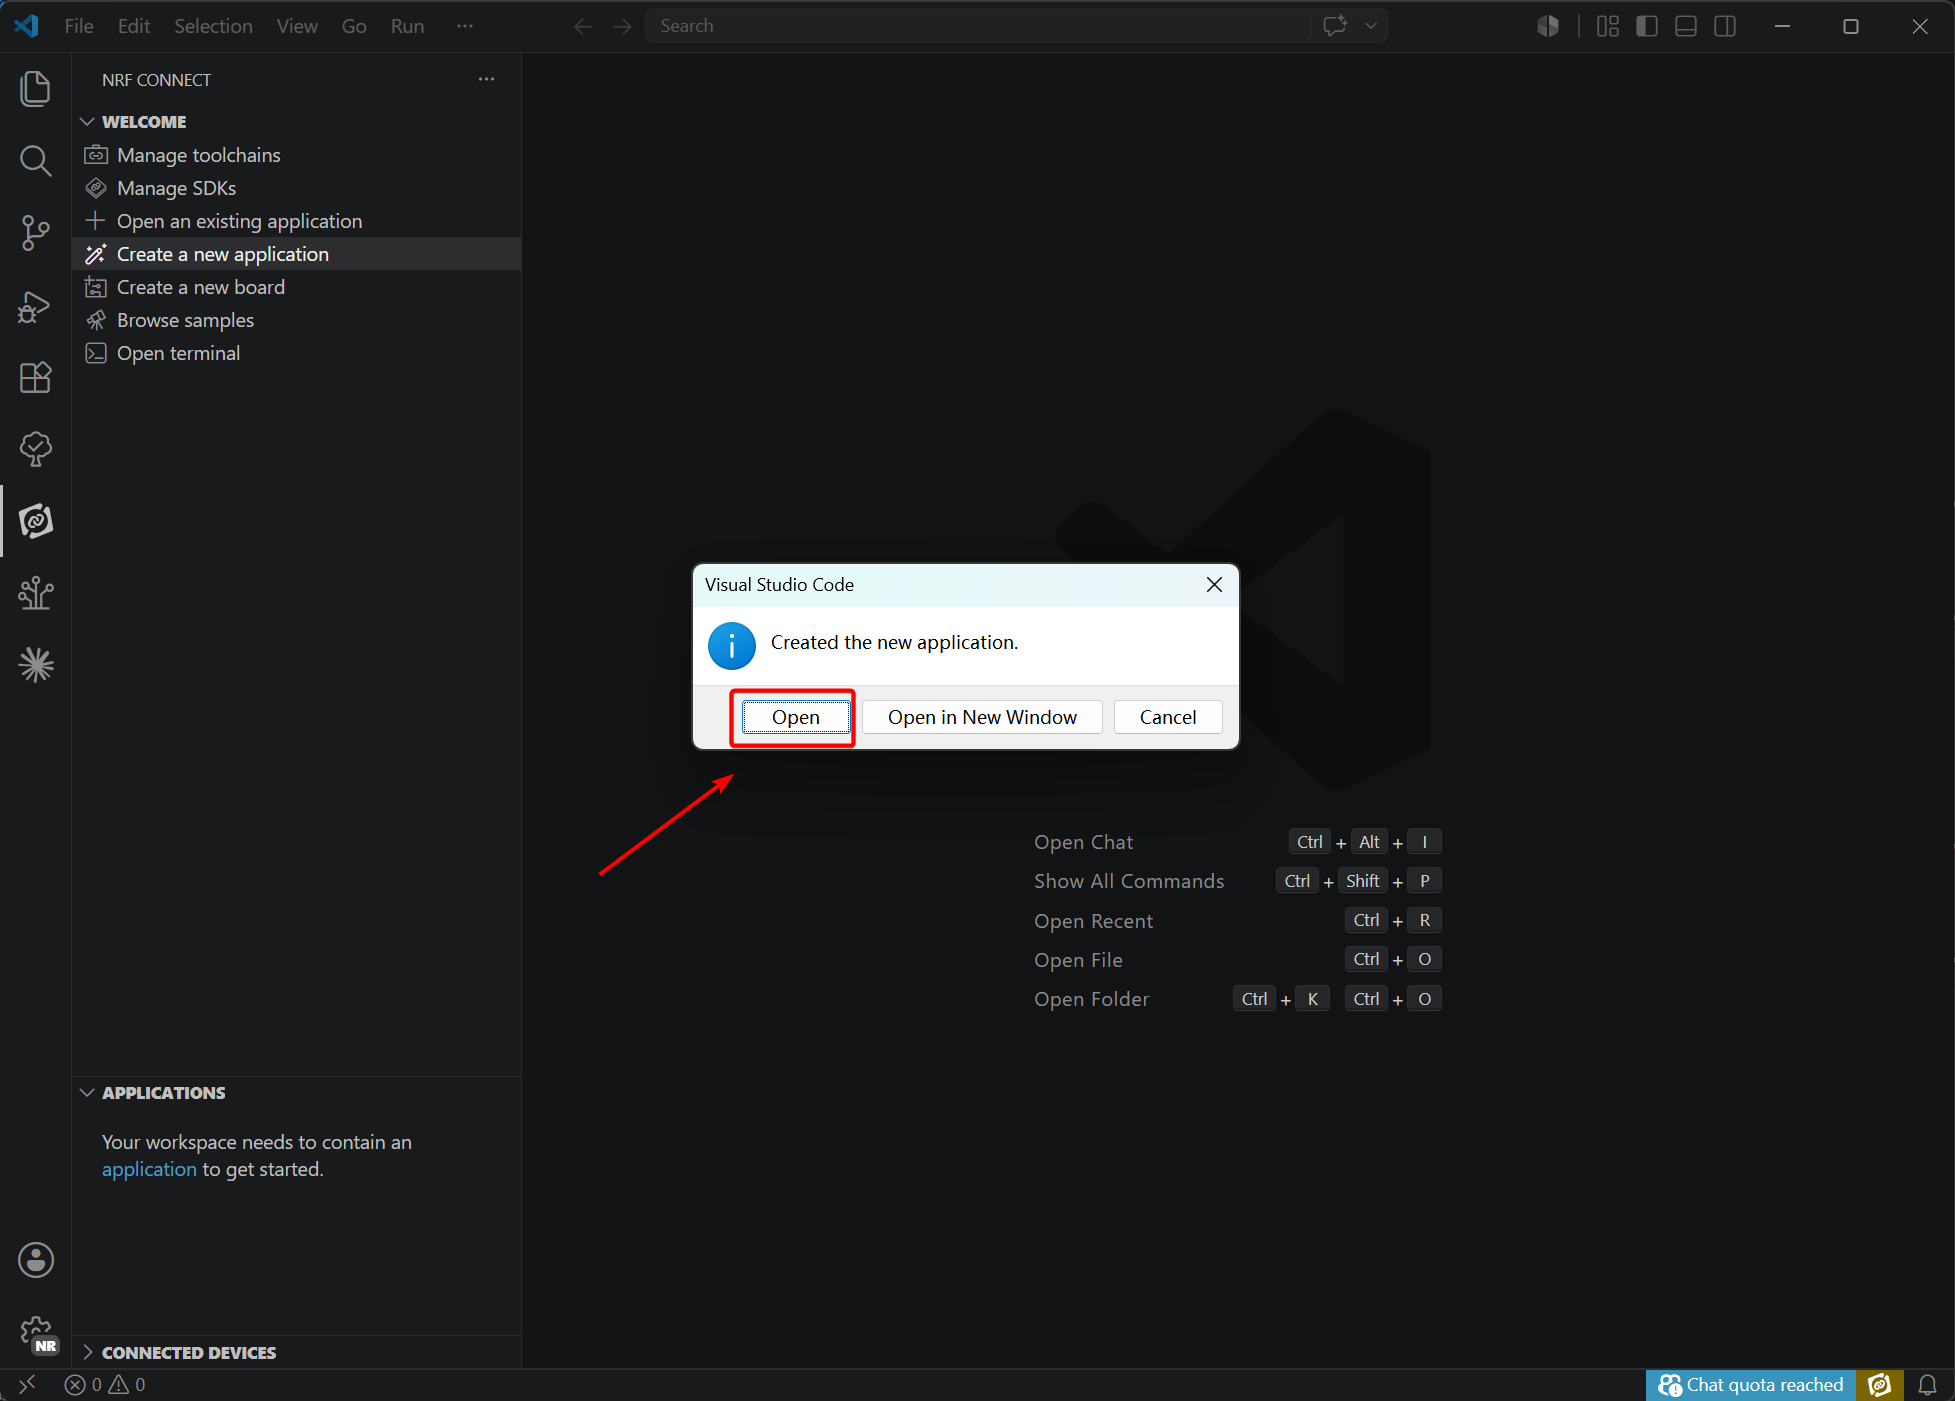
- Once created, open the copied project.
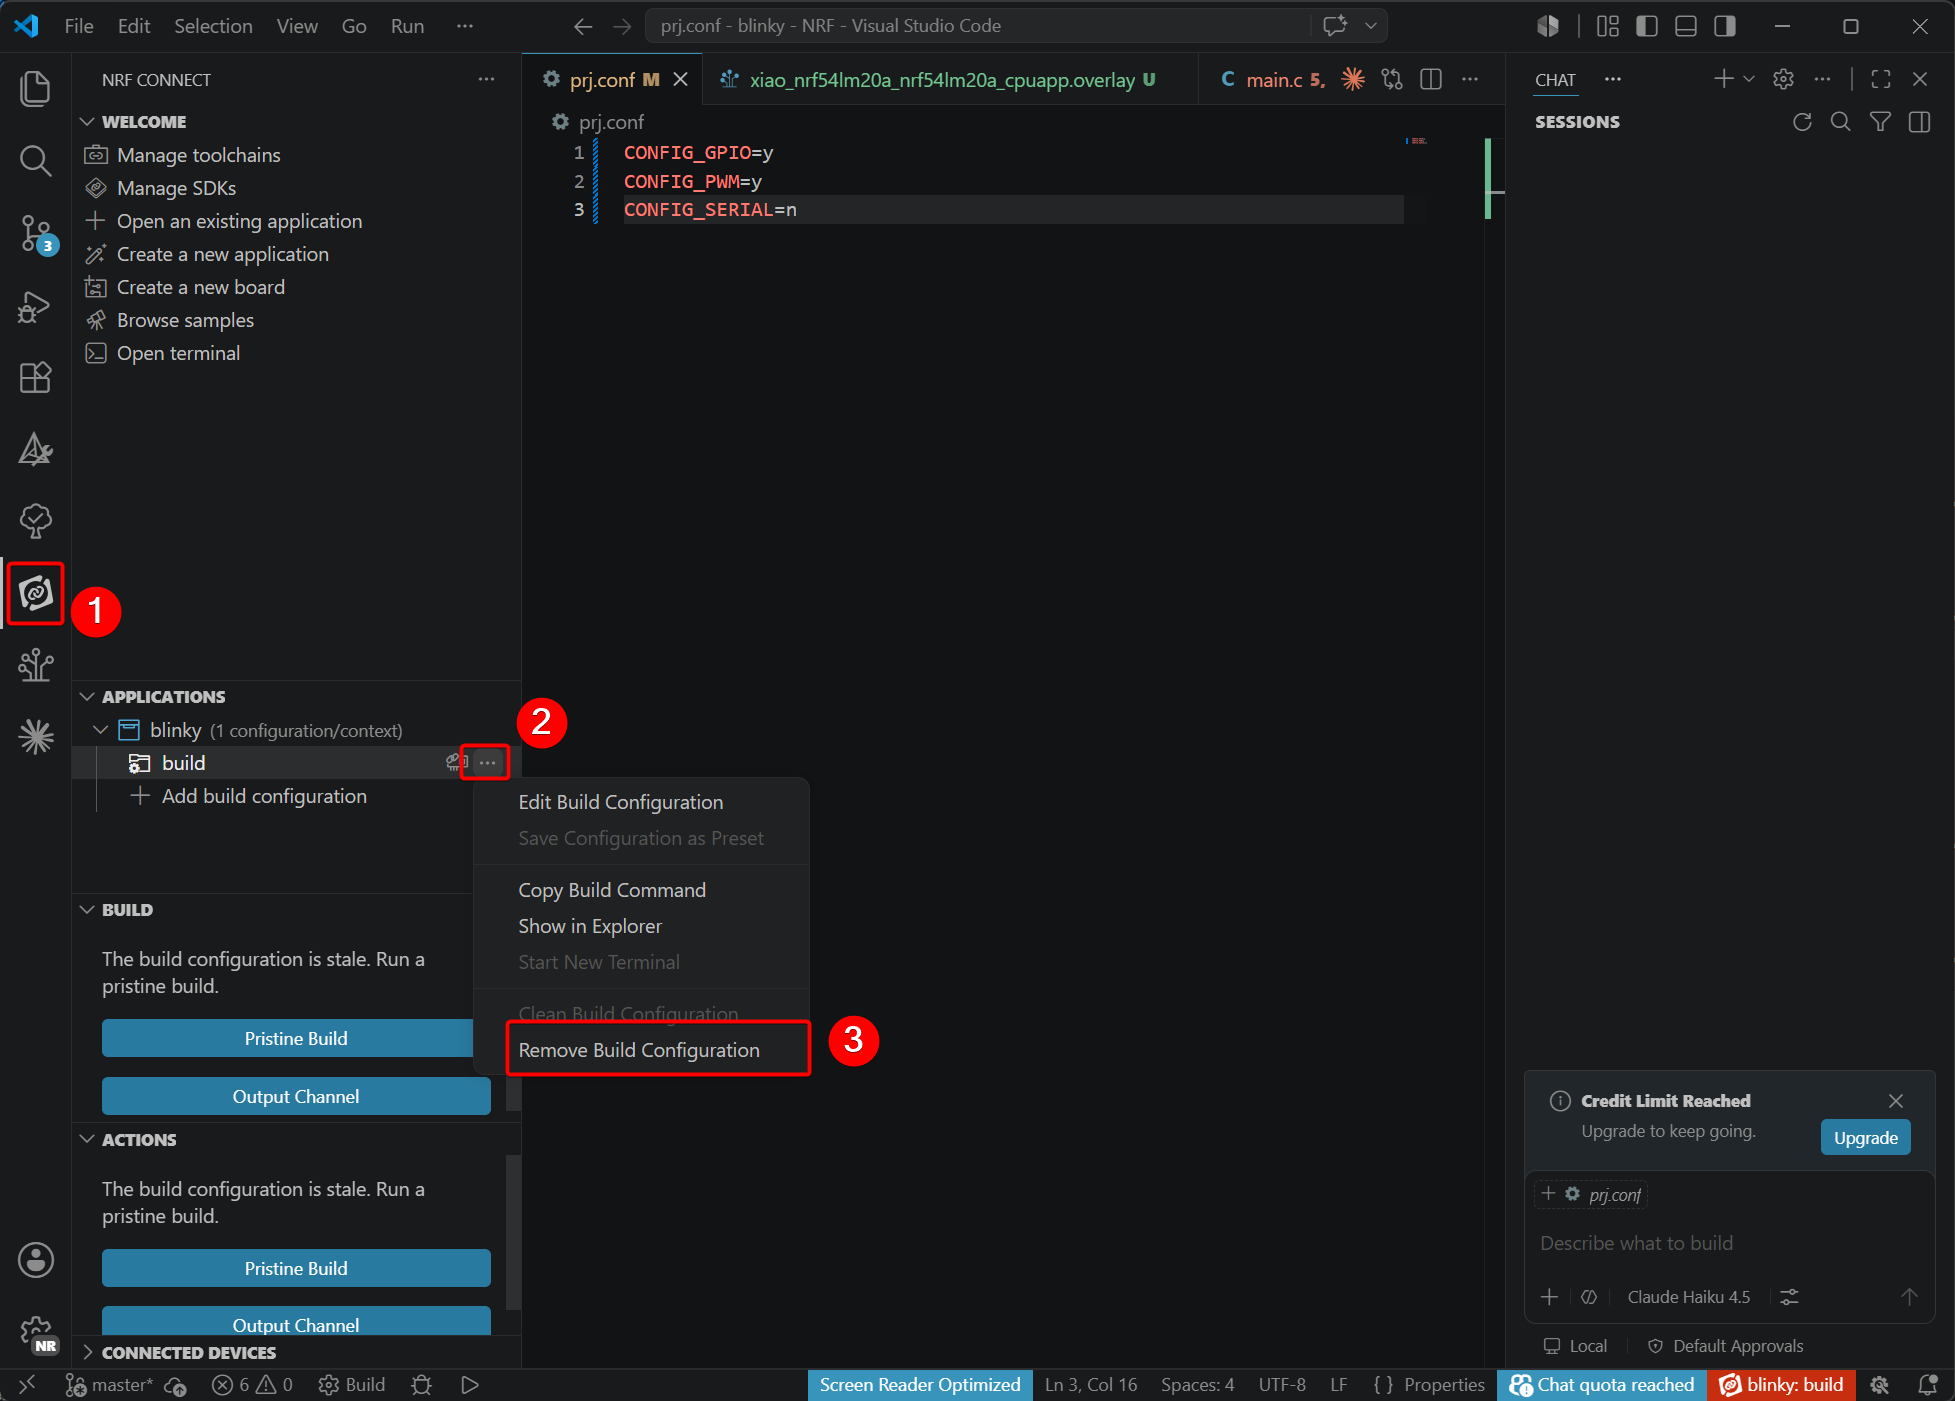
- Remove the original configurations. This step eliminates interference for setting up configurations related to XIAO nRF54LM20A in the next phase.(If your project does not have a build, you can skip this step directly)
Write the Blinky Program
Since the XIAO nRF54LM20A series features customized devicetree and hardware pin mappings, several files need to be modified. The files to be edited are listed below.
main.c: Main program that contains the application logic.app.overlay: Devicetree overlay file for hardware peripheral configuration.prj.conf: Project configuration file to enable required Zephyr modules.
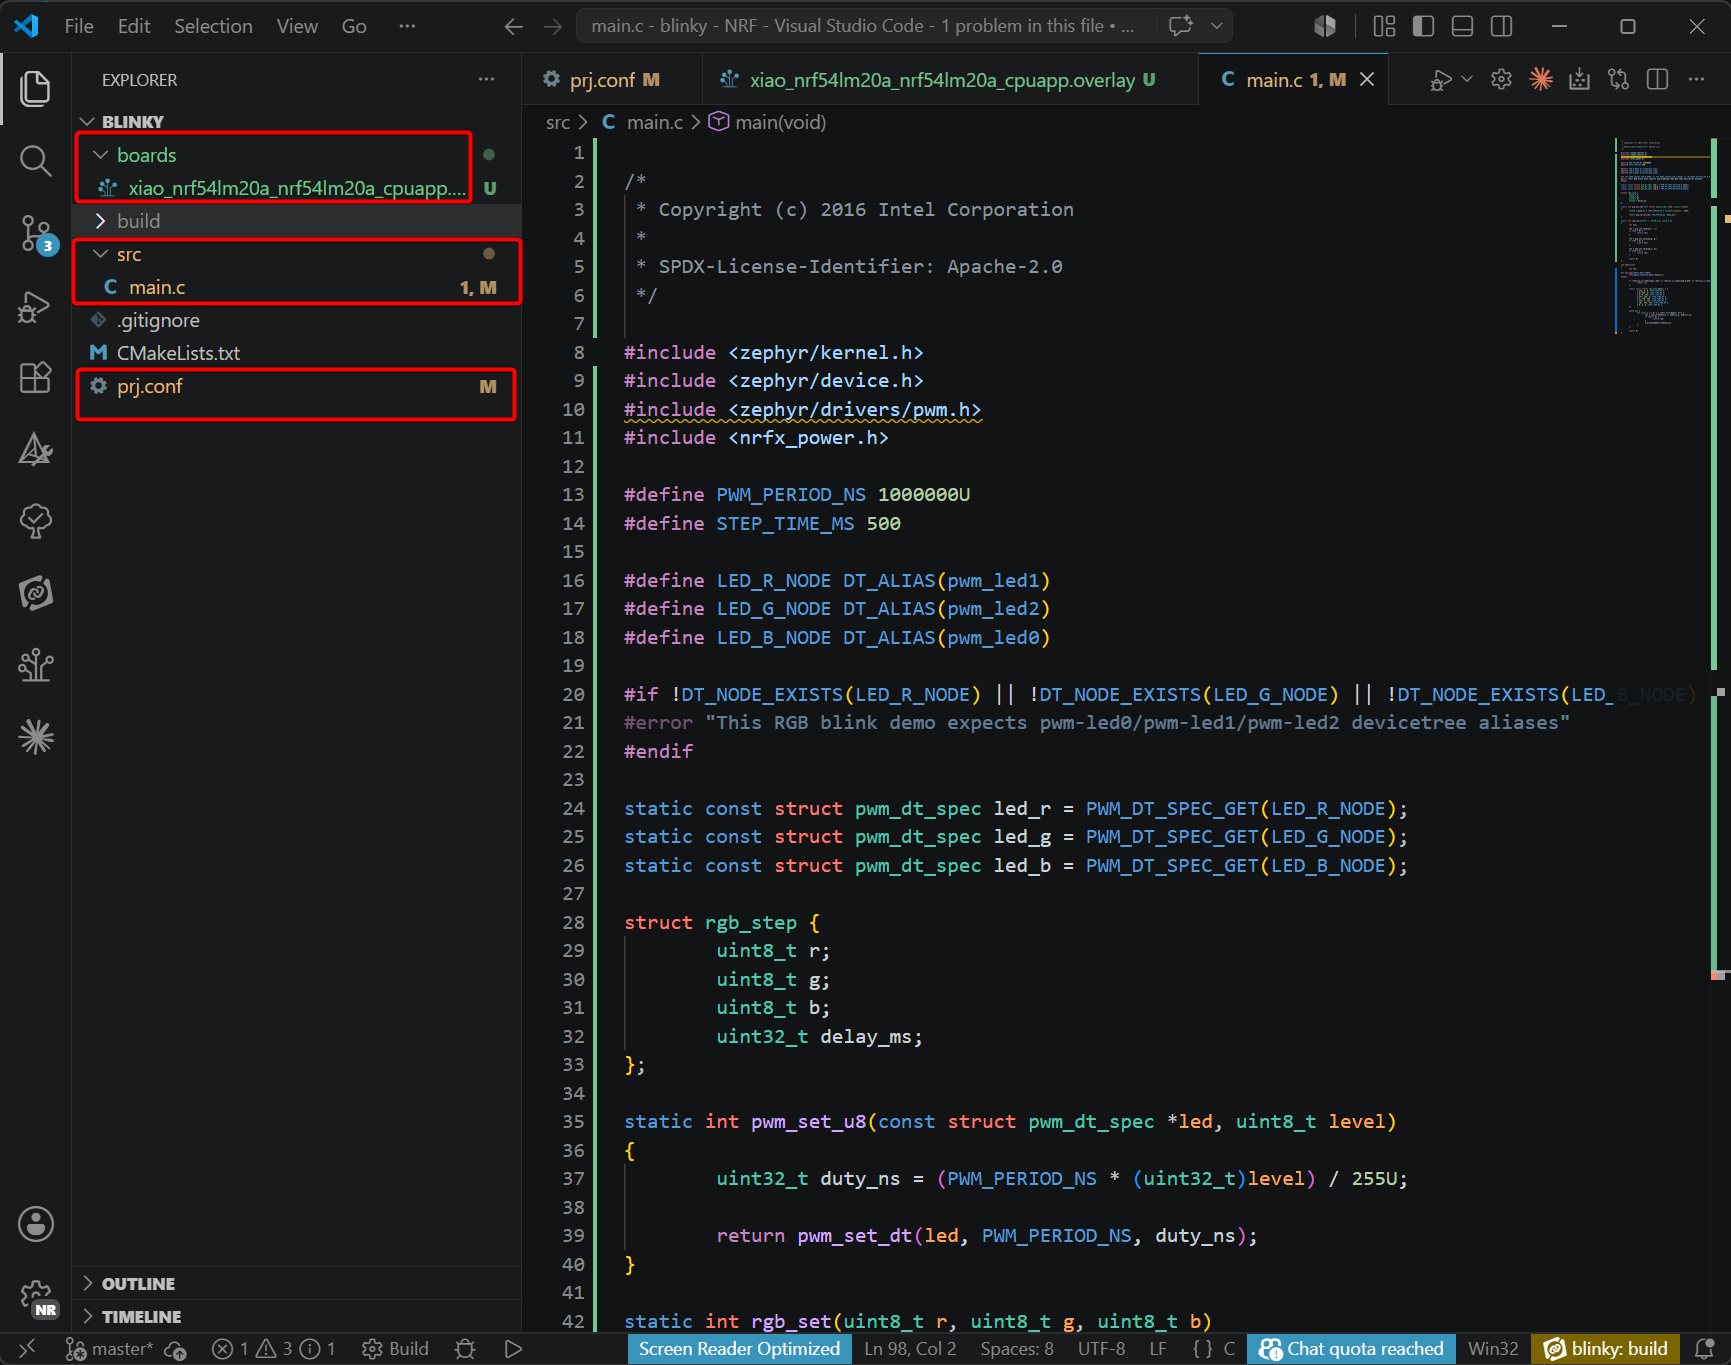
- Modify the code in main.c
main.c
/*
 * Copyright (c) 2016 Intel Corporation
 *
 * SPDX-License-Identifier: Apache-2.0
 */

#include <zephyr/kernel.h>
#include <zephyr/device.h>
#include <zephyr/drivers/pwm.h>
#include <nrfx_power.h>

#define PWM_PERIOD_NS 1000000U
#define STEP_TIME_MS 500

#define LED_R_NODE DT_ALIAS(pwm_led1)
#define LED_G_NODE DT_ALIAS(pwm_led2)
#define LED_B_NODE DT_ALIAS(pwm_led0)

#if !DT_NODE_EXISTS(LED_R_NODE) || !DT_NODE_EXISTS(LED_G_NODE) || !DT_NODE_EXISTS(LED_B_NODE)
#error "This RGB blink demo expects pwm-led0/pwm-led1/pwm-led2 devicetree aliases"
#endif

static const struct pwm_dt_spec led_r = PWM_DT_SPEC_GET(LED_R_NODE);
static const struct pwm_dt_spec led_g = PWM_DT_SPEC_GET(LED_G_NODE);
static const struct pwm_dt_spec led_b = PWM_DT_SPEC_GET(LED_B_NODE);

struct rgb_step {
	uint8_t r;
	uint8_t g;
	uint8_t b;
	uint32_t delay_ms;
};

static int pwm_set_u8(const struct pwm_dt_spec *led, uint8_t level)
{
	uint32_t duty_ns = (PWM_PERIOD_NS * (uint32_t)level) / 255U;

	return pwm_set_dt(led, PWM_PERIOD_NS, duty_ns);
}

static int rgb_set(uint8_t r, uint8_t g, uint8_t b)
{
	int ret;

	ret = pwm_set_u8(&led_r, r);
	if (ret < 0) {
		return ret;
	}

	ret = pwm_set_u8(&led_g, g);
	if (ret < 0) {
		return ret;
	}

	ret = pwm_set_u8(&led_b, b);
	if (ret < 0) {
		return ret;
	}

	return 0;
}

int main(void)
{
	int ret;

#if defined(CONFIG_NRFX_POWER)
	nrfx_power_constlat_mode_request();
#endif

	if (!device_is_ready(led_r.dev) || !device_is_ready(led_g.dev) || !device_is_ready(led_b.dev)) {
		return -1;
	}

	static const struct rgb_step demo[] = {
		{ 255, 0, 0, STEP_TIME_MS },
		{ 0, 255, 0, STEP_TIME_MS },
		{ 0, 0, 255, STEP_TIME_MS },
		{ 255, 255, 0, STEP_TIME_MS },
		{ 0, 255, 255, STEP_TIME_MS },
		{ 255, 0, 255, STEP_TIME_MS },
		{ 255, 255, 255, STEP_TIME_MS },
		{ 0, 0, 0, STEP_TIME_MS },
	};

	while (1) {
		for (size_t i = 0; i < ARRAY_SIZE(demo); i++) {
			ret = rgb_set(demo[i].r, demo[i].g, demo[i].b);
			if (ret < 0) {
				return ret;
			}
			k_msleep(demo[i].delay_ms);
		}
	}

	return 0;
}
- Add xiao_nrf54lm20a_nrf54lm20a_cpuapp.overlay
- Create a board folder in the root directory of the blinky project, at the same level as folders such as src.

- Create the devicetree file xiao_nrf54lm20a_nrf54lm20a_cpuapp.overlay inside the board folder.
xiao_nrf54lm20a_nrf54lm20a_cpuapp.overlay
/*
 * Device tree overlay for XIAO nRF54LM20A RGB LED PWM demo.
 *
 * PWM20 peripheral is used for RGB LED control:
 *   - Channel 0: P1.22 (Blue LED)  -> pwm_led0
 *   - Channel 1: P1.23 (Red LED)   -> pwm_led1
 *   - Channel 2: P1.24 (Green LED) -> pwm_led2
 */

&pwm20 {
	status = "okay";
};

/ {
	pwmleds {
		compatible = "pwm-leds";

		pwm_led0: pwm_led_0 {
			pwms = <&pwm20 0 PWM_MSEC(20) PWM_POLARITY_NORMAL>;
			label = "Blue LED";
		};

		pwm_led1: pwm_led_1 {
			pwms = <&pwm20 1 PWM_MSEC(20) PWM_POLARITY_NORMAL>;
			label = "Red LED";
		};

		pwm_led2: pwm_led_2 {
			pwms = <&pwm20 2 PWM_MSEC(20) PWM_POLARITY_NORMAL>;
			label = "Green LED";
		};
	};
};

/ {
	aliases {
		pwm-led0 = &pwm_led0;
		pwm-led1 = &pwm_led1;
		pwm-led2 = &pwm_led2;
	};
};
- Modify the prj.conf file to enable the corresponding configurations.
CONFIG_GPIO=y
CONFIG_PWM=y
CONFIG_SERIAL=n
- Navigate to the APPLICATIONS section of the extension and select Add build configuration. Verify the SDK and toolchain versions. Set the Board Target to xiao_nrf54lm20a/nrf54lm20a/cpuapp and the base configuration files to prj.conf. Scroll down the page, then click Generate and Build to generate the corresponding configuration files.
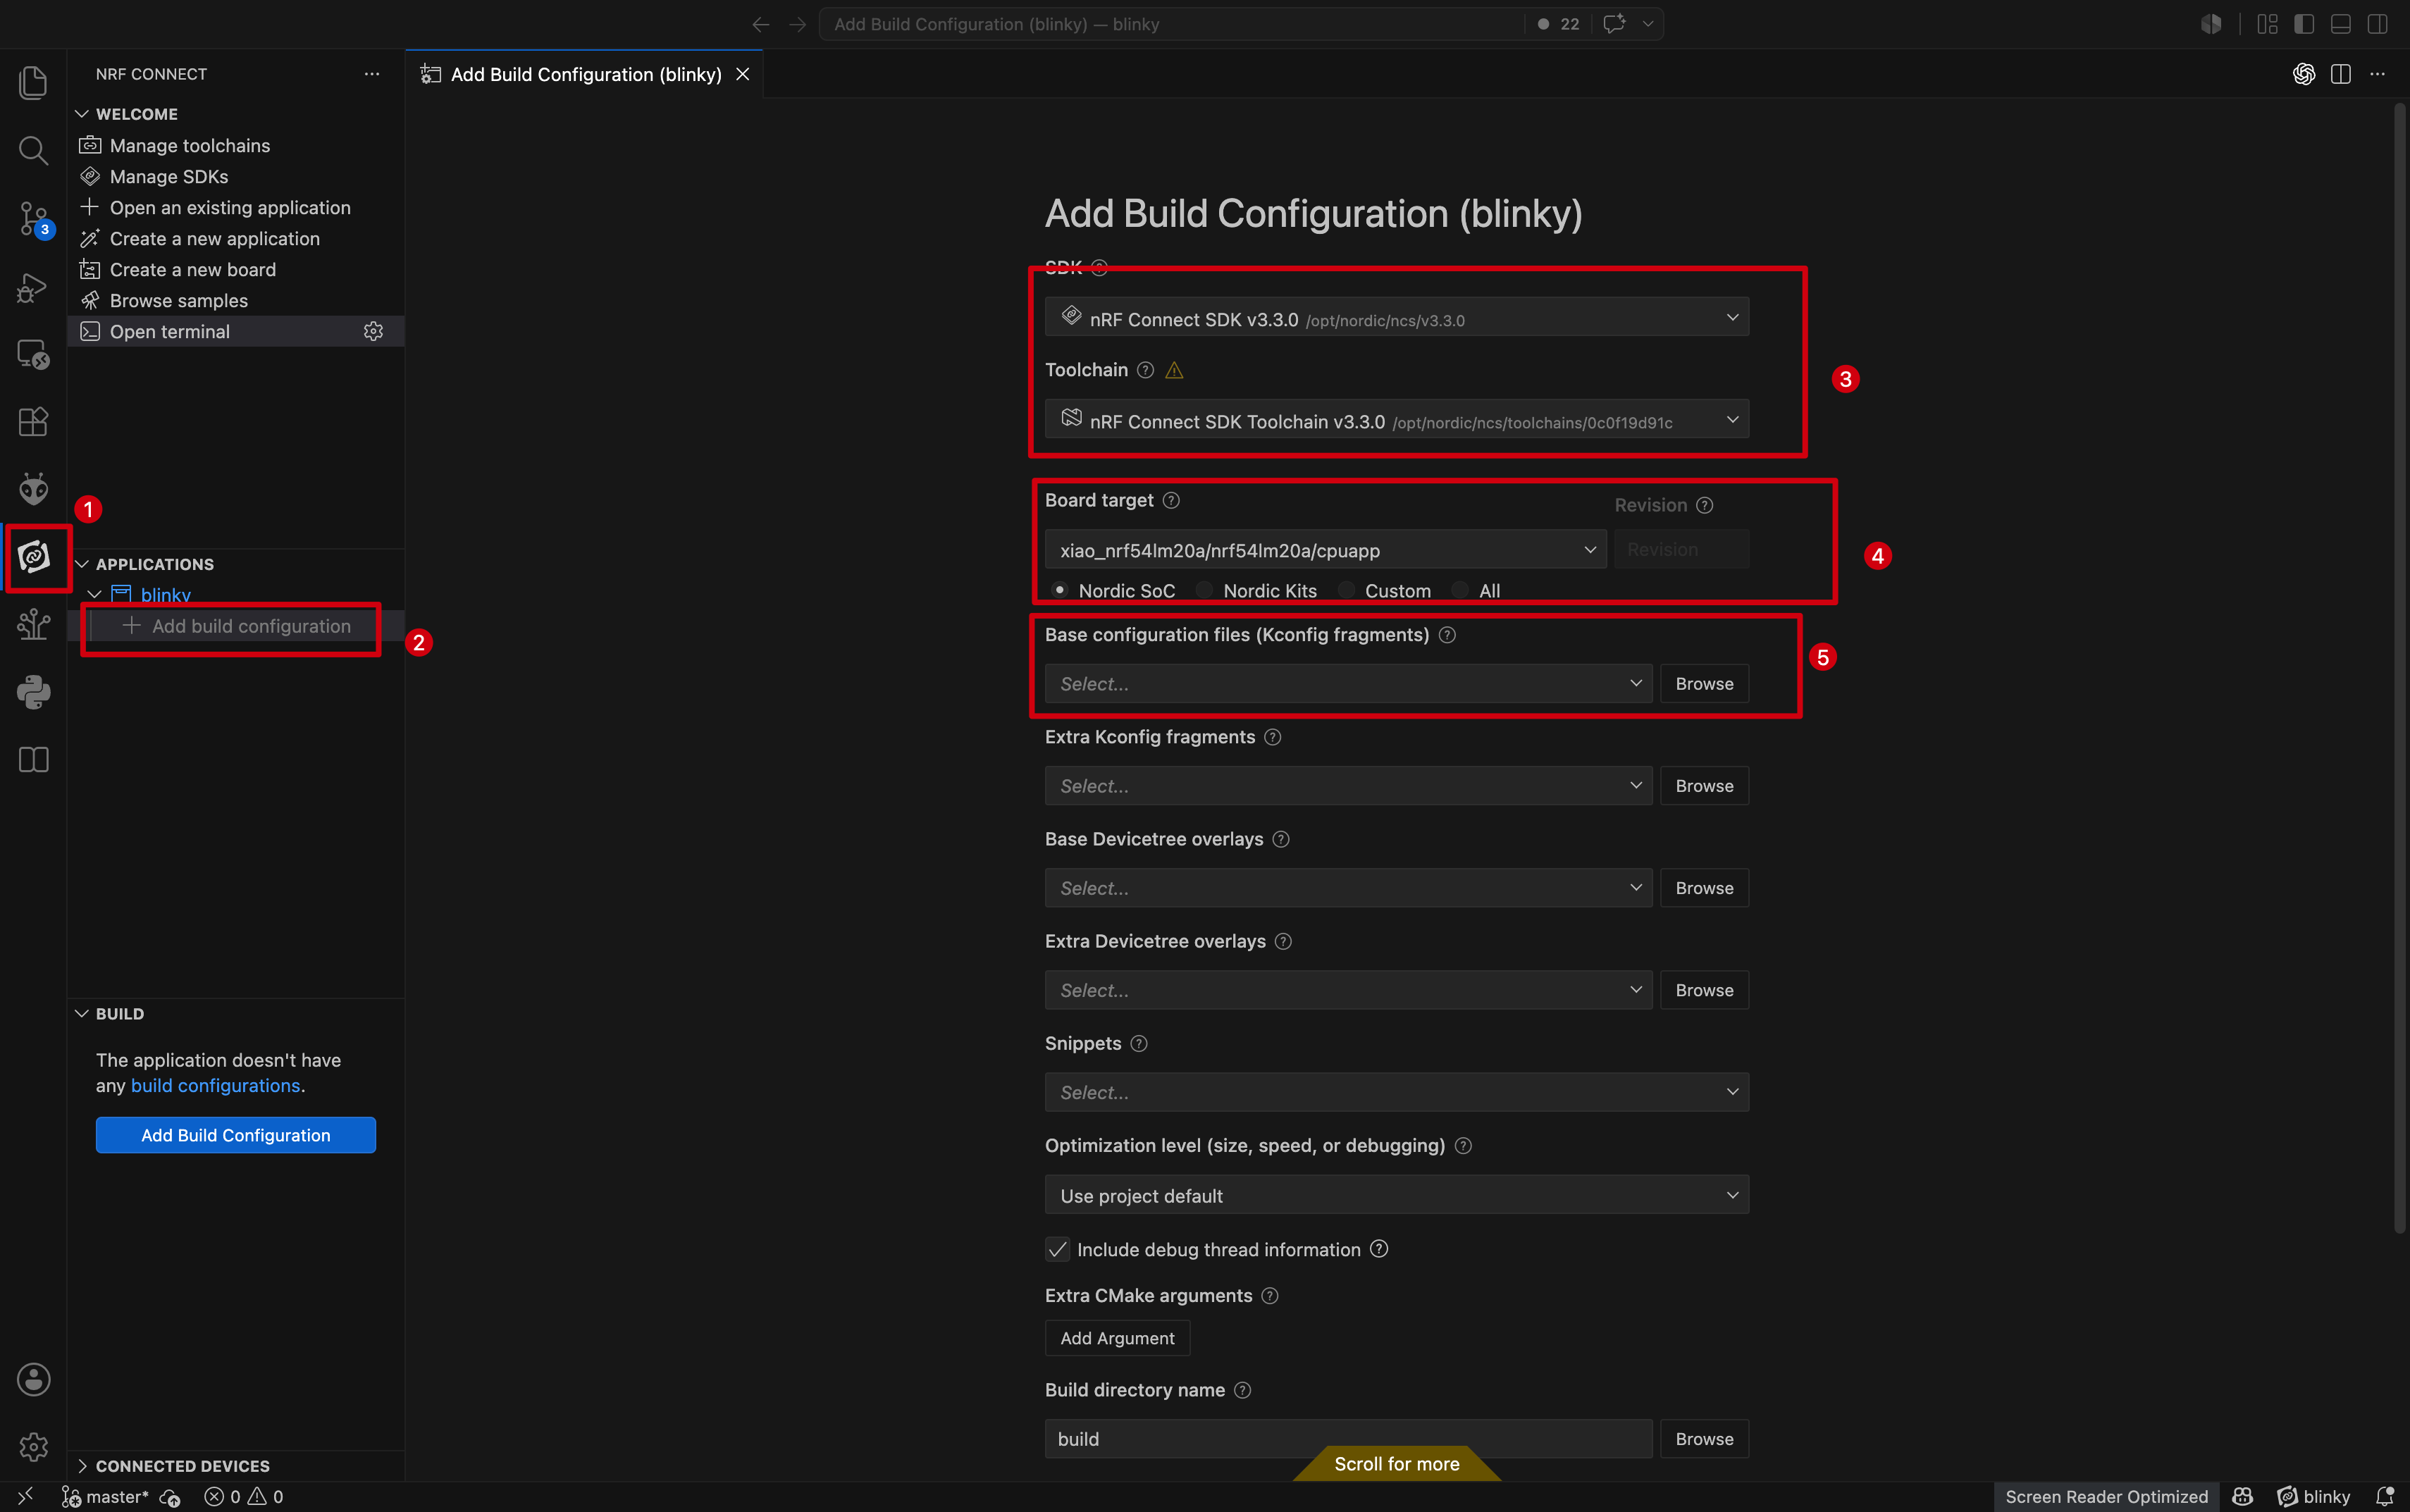
If xiao_nrf54lm20a/nrf54lm20a/cpuapp cannot be found here, check whether the path was added correctly in the Add Custom Board Path section.
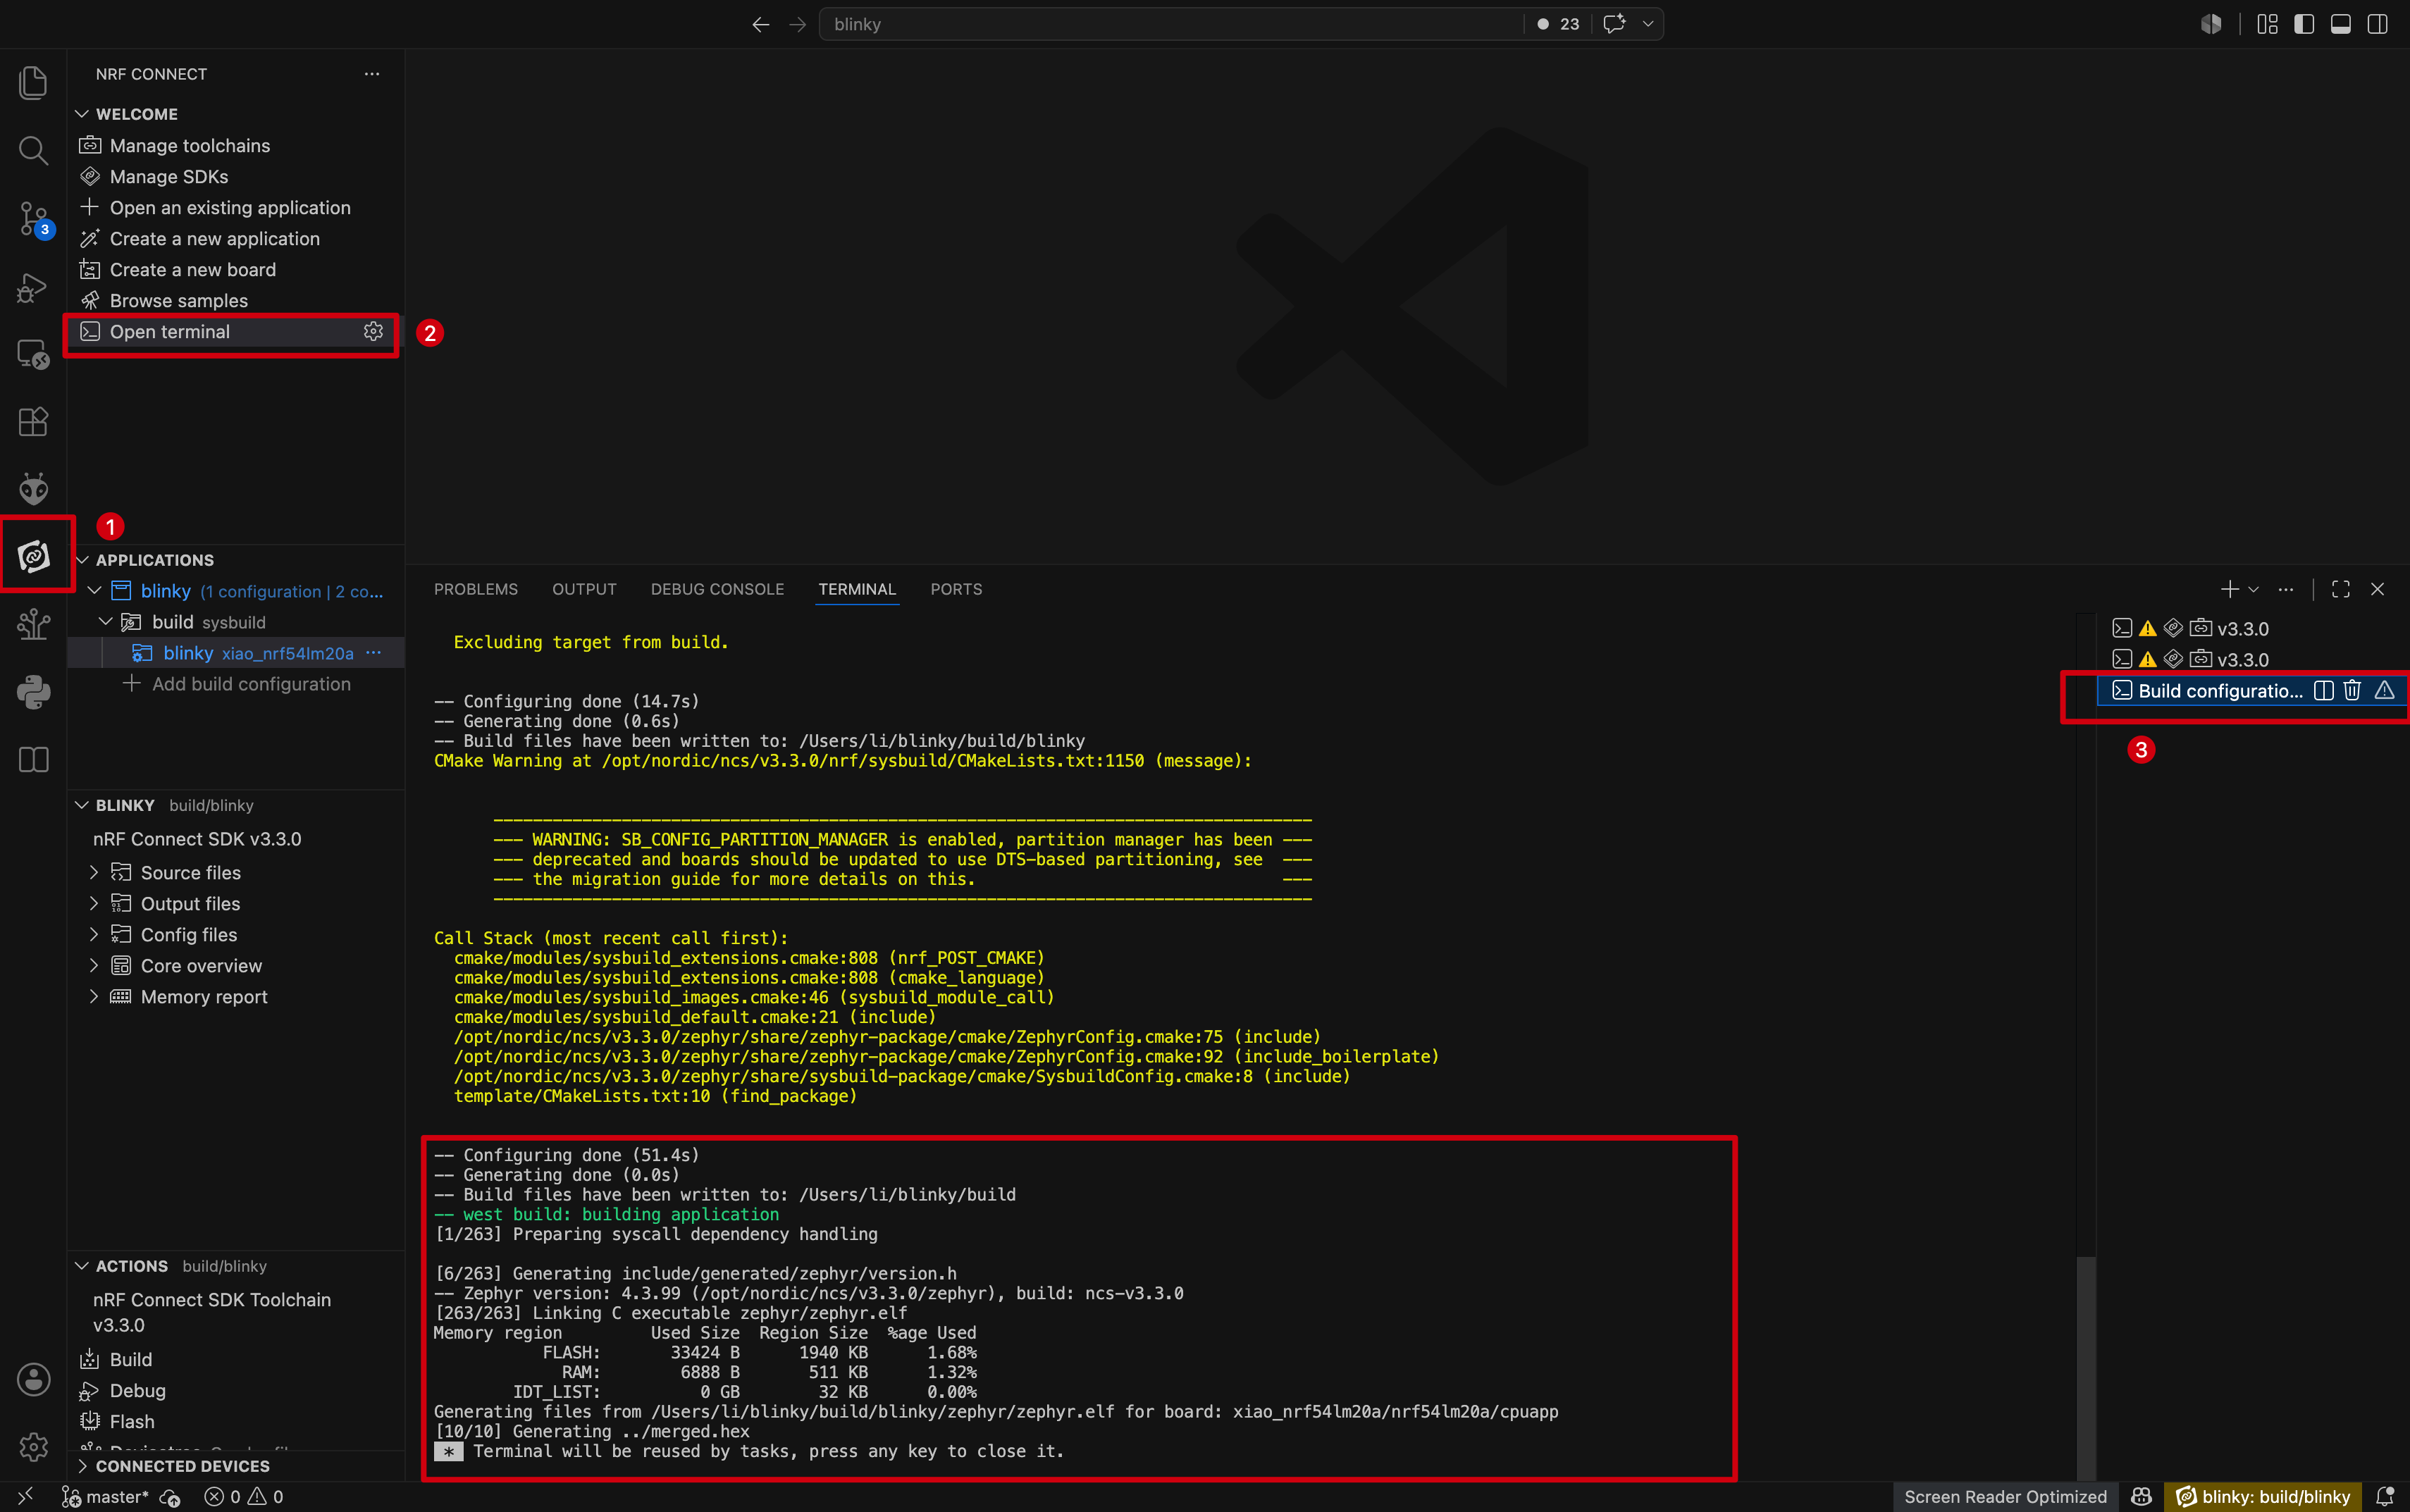
- If the build succeeds, the following information will be displayed in the terminal.
Program Flashing
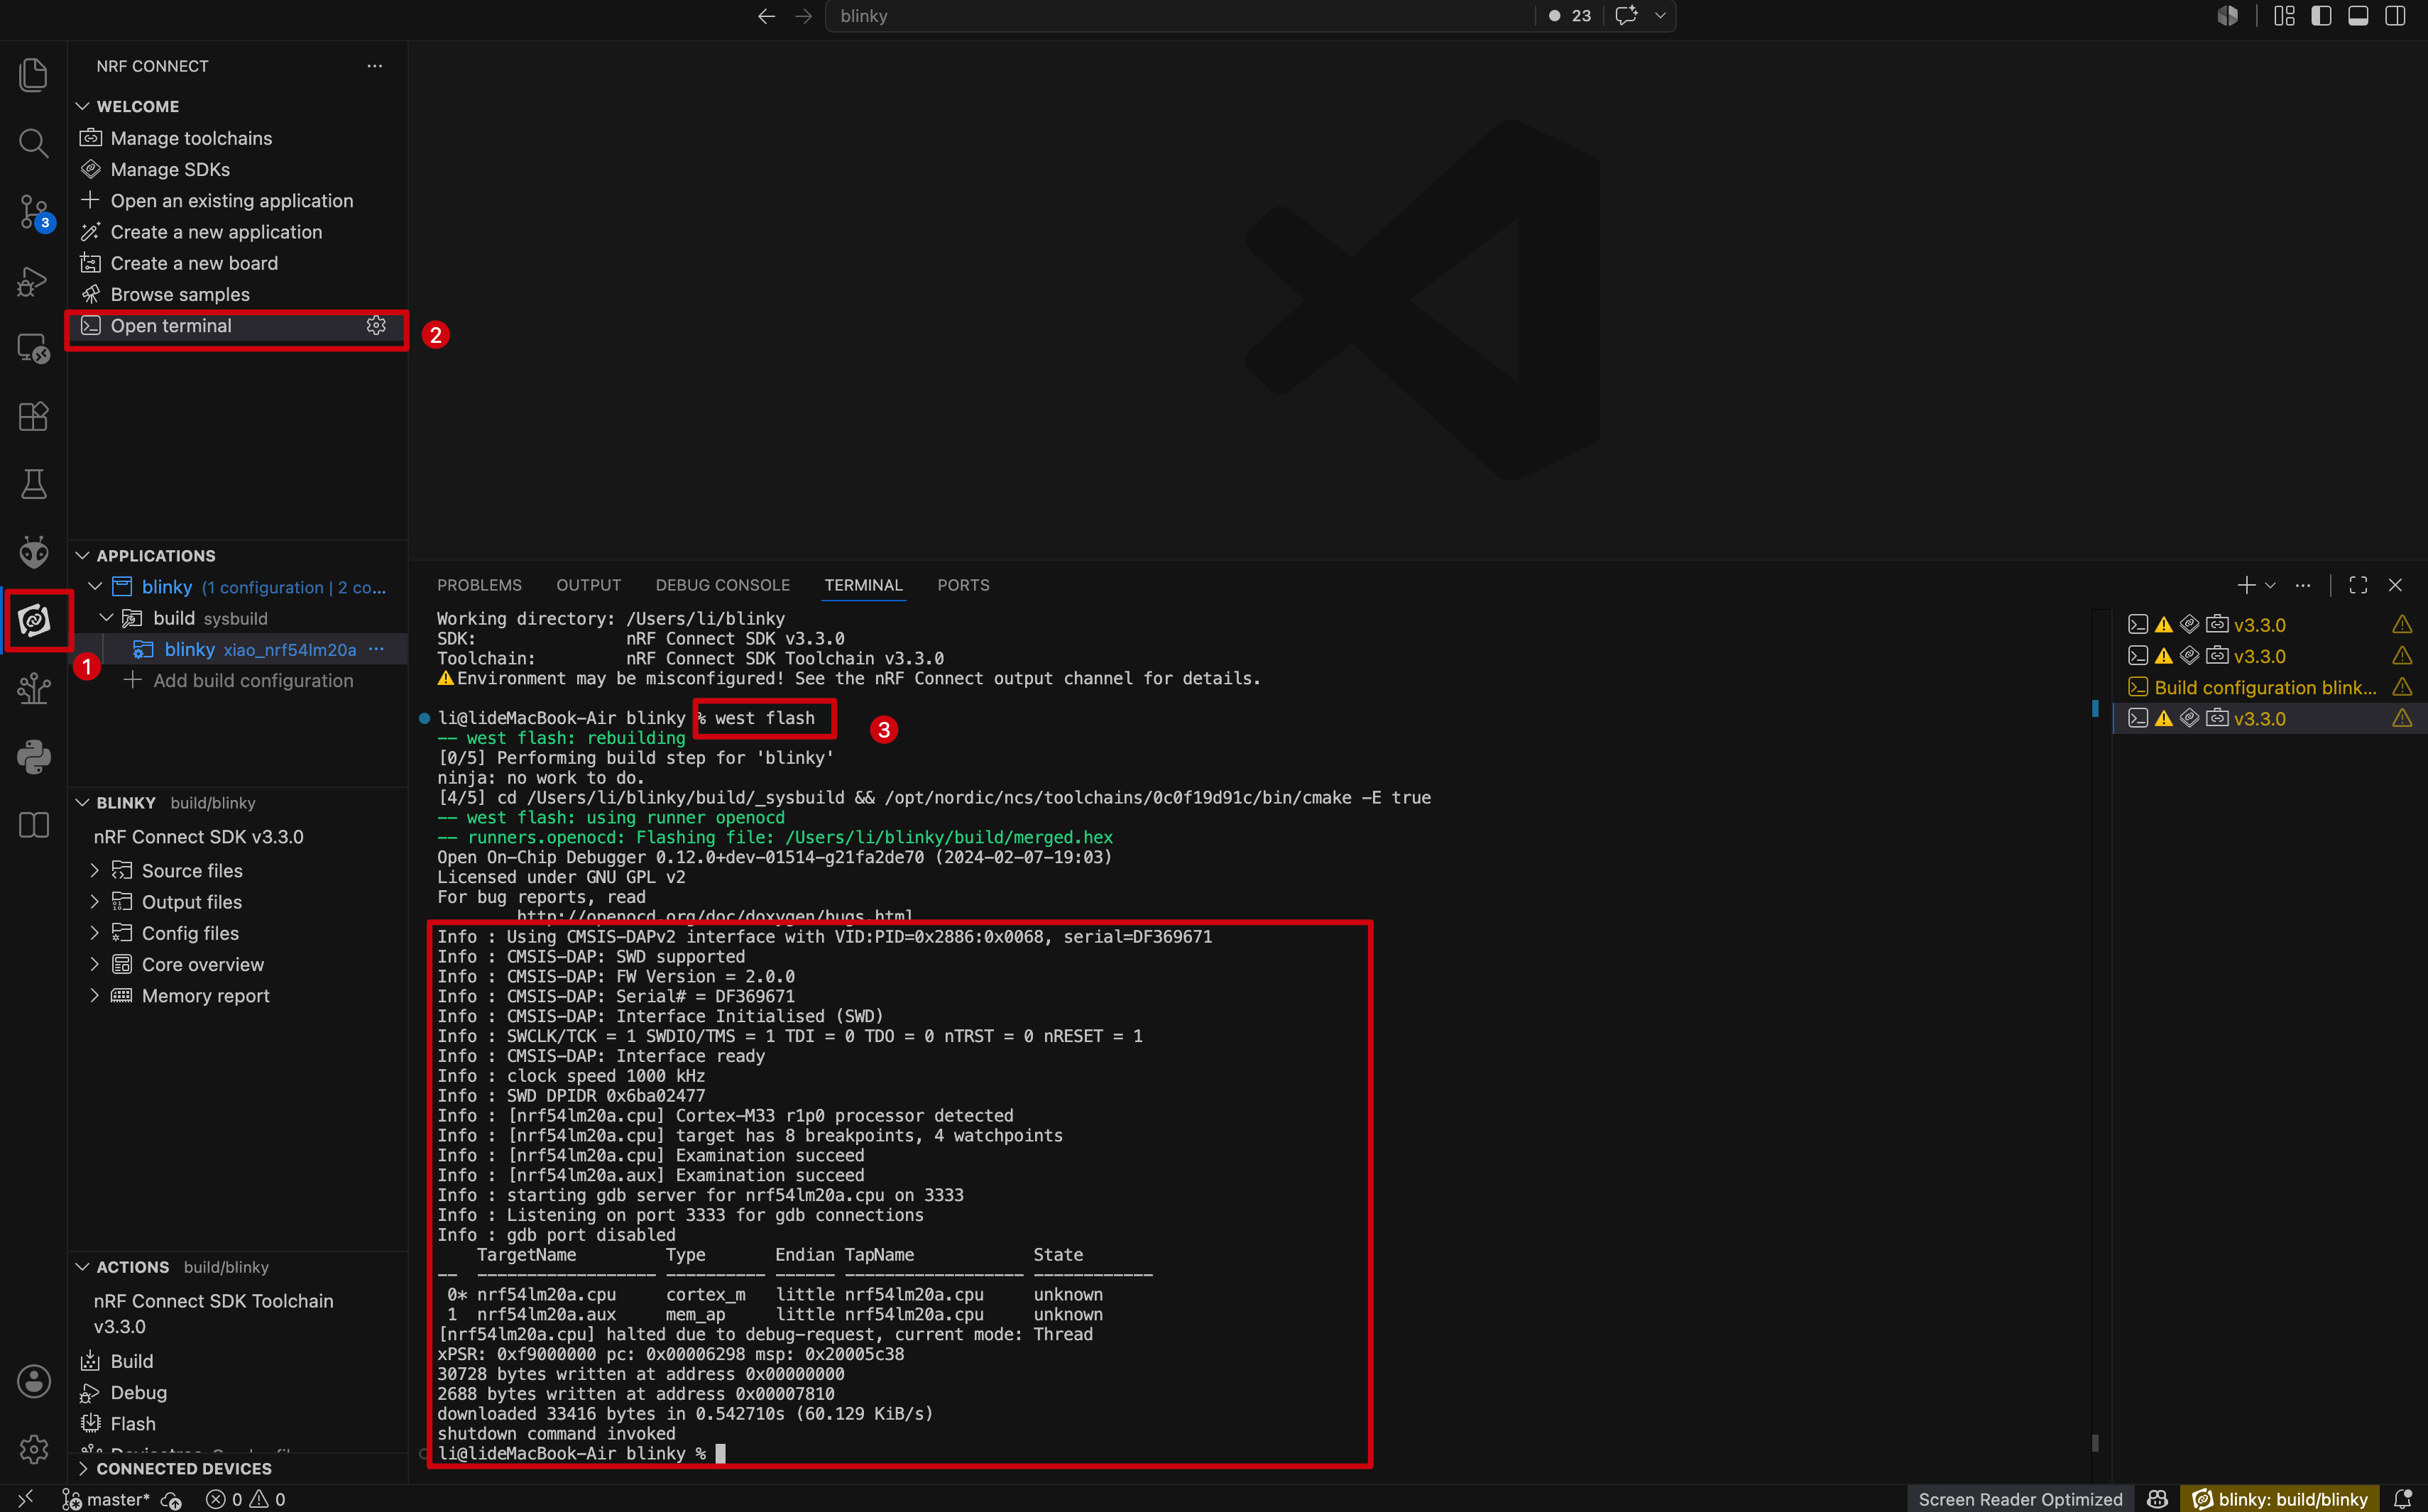
In this section, we use the west tool from the nRF Connect SDK to flash the program.
- Connect the XIAO nRF54LM20A Sense with a USB-C cable. Open the nRF Terminal and enter the west command to flash the program.
west flash
If the firmware to be flashed is generated from the first configuration file created in Add build configuration, you need to specify the configuration path when multiple configuration folders such as build and build_1 exist.
# examples: west flash configgration build_1
west flash --build-dir build_1
Observe the Result
FAQ
Q1: Downloading the nRF Connect SDK is very slow or gets stuck
If the SDK download is very slow or gets stuck, you can use aria2 to download the required packages with multiple connections, and then install the SDK using nrfutil.
Step 1. Install aria2
For macOS:
brew install aria2
For Windows:
winget install aria2.aria2
Step 2. Create the download directory
mkdir -p /opt/nordic/ncs/downloads
Step 3. Download the Toolchain Bundle
aria2c -c -x 16 -s 16 -k 1M --file-allocation=none \
  -d /opt/nordic/ncs/downloads \
  -o ncs-toolchain-aarch64-macos-0c0f19d91c.tar.gz \
  "https://files.nordicsemi.cn/artifactory/NCS/external/bundles/v3/ncs-toolchain-aarch64-macos-0c0f19d91c.tar.gz"
Step 4. Download the nRF Connect SDK Bundle
aria2c -c -x 16 -s 16 -k 1M --file-allocation=none \
  -d /opt/nordic/ncs/downloads \
  -o sdk-nrf-bundle-v3.3.0.tar.gz \
  "https://files.nordicsemi.cn/artifactory/ncs-src-mirror/external/sdk-nrf/v3.3.0/src.tar.gz"
Step 5. Install nRF Connect SDK v3.3.0
nrfutil sdk-manager install v3.3.0 \
  --sdk-path /opt/nordic/ncs/v3.3.0 \
  --type nrf
Tech Support & Product Discussion
Thank you for choosing our products! We are here to provide you with different support to ensure that your experience with our products is as smooth as possible. We offer several communication channels to cater to different preferences and needs.