Grove Base Kit for Raspberry Pi
GROVE SYSTEM

Grove is a modular prototyping system consist of a base unit and various modules with standardized connector. The base unit is generally a microprocessor which allows for communicates, processes and controls the input or output from the Grove modules. Every single Grove module typically addresses a single function, range from a simple button to a more complex heart rate sensor. the standardised Grove connector allows user to assemble Grove units with building block approach, compared to the jumper or solder based system it is much easier to assemble or disassemble, which simplifies the learning system for experimenting, building and prototyping. We also provide Grove to Pin Header Converter or Grove Base HAT available for variety developing platforms for those who wants to use grove sensor and actuator modules without Grove System Development Board.
Grove system users need to have at least some basic electronic knowledge background, otherwise you need go through this basic tutorial to learn some basic operations on the Grove system, the first part of this tutorial consists a list of basic information on the components included in the starter kit, followed by the basic setup of the Arduino IDE for Seeeduino Lotus. Then, the 11 tutorial sessions provide the basic operation on each individual components in the starter kit and the applications by combine multiple modules together, which gives learner some insight and basic knowledge on hooking up and coding with the Grove system.
GROVE BASE KIT FOR RASPBERRY PI

Grove start kit contains one Grove Base Hat(for Raspberry Pi ) and 10 Grove modules. The detailed information is listed below.
Product Detail
Grove Base Hat
Grove Base Hat for Raspberry Pi

Today, the grove series of sensors, actuators, and displays have grown into a large family. More and more grove modules will join the Grove ecosystem in the future. We see the Grove helps makers, engineers, teachers, students and even artists to build, to make, to create...We always feel it is our responsibility to make the Grove module compatible with more platforms. Now we bring you the Grove Base Hat for Raspberry Pi and Grove Base Hat for Raspberry Pi Zero, in another word, we bring the Raspberry Pi the Grove System.
The Grove Base Hat for Raspberry Pi provide Digital/Analog/I2C/PWM/UART port to meet all your needs. With the help of build-in MCU, a 12-bit 8 channel ADC is also available for Raspberry Pi.
Features
- Support Raspberry 2/3B/3B+/Zero
- build-in MCU
- 12-bit ADC
- Multi-type Grove port
Hardware Overview

GPIO:The same pin out as the raspberry pi.
PWM:The Grove PWM Port connect to GPIO/BCM pin12(PWM0) and GPIO/BCM pin13(PWM1), which is the hardware PWM pin of Raspberry Pi, in addition, you can use all the GPIO pin as the soft PWM pin.
-
All the silkscreen layer pin number besides the Grove port is the BCM pin number. The difference between BCM pins and the physical pins please refer to here
-
Compared with hardware PWM, the software PWM isn't so accurate and will have trouble at high frequencies.
-
The GPIO/BCM pin18 is also marked as PWM0, actually the GPIO/BCM 12 and the GPIO/BCM 18 share the same PWM channel, so they can't set to different rate.
-
The audio jack output also uses PWM 0 and PWM 1, so you can't have audio output on that socket and use the PWMs at the same time.
UART: The Grove UART port connect to the GPIO14(UART0 TX) and GPIO15(UART0 RX). UART is commonly used on the Pi as a convenient way to control it over the GPIO, or access the kernel boot messages from the serial console (enabled by default).It can also be used as a way to interface an Arduino, bootloaded ATmega, ESP8266, etc with your Pi.
Digital:There are 6 digital Grove sockets in this board, normally the yellow wire(which connect to the top pin of the 4 pins Grove socket as) of Grove cable is the signal wire, so we name the digital Grove port D5/D16/D18/D22/D24/D26.
Analog:As we know, there is no ADC in the Raspberry Pi, so it can not work with analog sensor directly. Now with the help of the build-in MCU STM32, the Grove base hat can work as an external 12-bit ADC, which means you can use analog sensor with your Raspberry Pi. Even more pleasing is that not one but four analog Grove sockets are available. The analog sensor inputs the analog voltage into the 12-bit ADC. After the ADC convert the analog data to digital data, it input the digital data to the Raspberry Pi through the I2C interface.
I2C:There are three I2C port available in this board, they all connect to the I2C pin of the raspberry directly. You can consider this part as an I2C hub. Most of seeed's new grove modules have I2C interface, you may find those three port is extremely useful.
SWD: We use SWD port to burn the firmware to this hat. In addition, you can see 3 GPIO pins in this section, i.e., pin 9/pin 10/pin 11. Those three pins do not used by any Grove port, you are free to use them without worrying about pin conflicts.
Grove Modules

This module uses piezo buzzer as the main component, it can produce high pitch tone while it is connected to digital output and logic level set to High, otherwise it can produce various tones according to the frequencies generated from the Analog PWM output that connected to it. (note: the frequency range that normal human ear can distinguish is between 20 Hz and 20kHz.)

The Grove - LED Button is composed of Grove - Yellow Button, Grove - Blue LED Button and Grove - Red LED Button. This button is stable and reliable with a 100 000 times long life. With the build-in LED, you can apply it to many interesting projects, it is really useful to use the LED to show the status of the button.

The Grove - Light sensor integrates a photo-resistor(light dependent resistor) to detect the intensity of light. The resistance of photo-resistor decreases when the intensity of light increases. A dual OpAmp chip LM358 on board produces voltage corresponding to intensity of light(i.e. based on resistance value). The output signal is analog value, the brighter the light is, the larger the value.

This Moisture Senor can be used for detecting the moisture of soil or judge if there is water around the sensor, let the plant in your garden able to reach out for human's help when they are thirsty. This sensor is very easy to use, you can just simply insert in into the soil and read the data. With this sensor, you can make a small project that can let the plant send a message to you like " I am thirsty now, please feed me some water."
Grove - mini PIR motion sensor

Grove - mini PIR motion sensorallows you to sense motion, usually human movement in its range. Simply connect it to Grove - Base shield and program it, when anyone moves in its detecting range, the sensor will output HIGH on its SIG pin.

Grove - Servo is DC motor with gearing and feedback system. It is used in driving mechanism of robots. The module is a bonus product for Grove lovers. We regulated the three-wire servo into a Grove standard connector. You can plug and play it as a typical Grove module now, without jumper wires clutter.
Grove - Temperature & Humidity Sensor (DHT11)

This temperature & humidity sensor provides a pre-calibrated digital output. A unique capacitive sensor element measures relative humidity and the temperature is measured by a negative temperature coefficient (NTC) thermistor. It has excellent reliability and long term stability. Please note that this sensor will not work for temperatures below 0 degree.

The Grove-Relay module is a digital normally-open switch. Through it, you can control circuit of high voltage with low voltage, say 5V on the controller. There is an indicator LED on the board, which will light up when the controlled terminals get closed.

This Grove - Ultrasonic ranger is a non-contact distance measurement module which works at 40KHz. When we provide a pulse trigger signal with more than 10uS through singal pin, the Grove_Ultrasonic_Ranger will issue 8 cycles of 40kHz cycle level and detect the echo. The pulse width of the echo signal is proportional to the measured distance. Here is the formula: Distance = echo signal high time * Sound speed (340M/S)/2. Grove_Ultrasonic_Ranger's trig and echo singal share 1 SIG pin.
Grove - 16 x 2 LCD (White on Blue)

This Grove – 162 LCD module is a 16 Characters 2 Lines LCD display, it uses I2C bus interface to communicate with the development board, thus these will reduce the pin header from 10 to 2 which is very convenient for the Grove system. This LCD display module also supports customise characters, you can create and display heart symbol or stick-man on this LCD module through a simple coding configuration.
GETTING STARTED
Minimum Requirement
- micro USB cable
- Raspberry Pi
- SD card
- Grove Base Kit for Raspberry Pi
Basic Tutorial
Arduino IDE basic setup
How to burn a Raspbian image
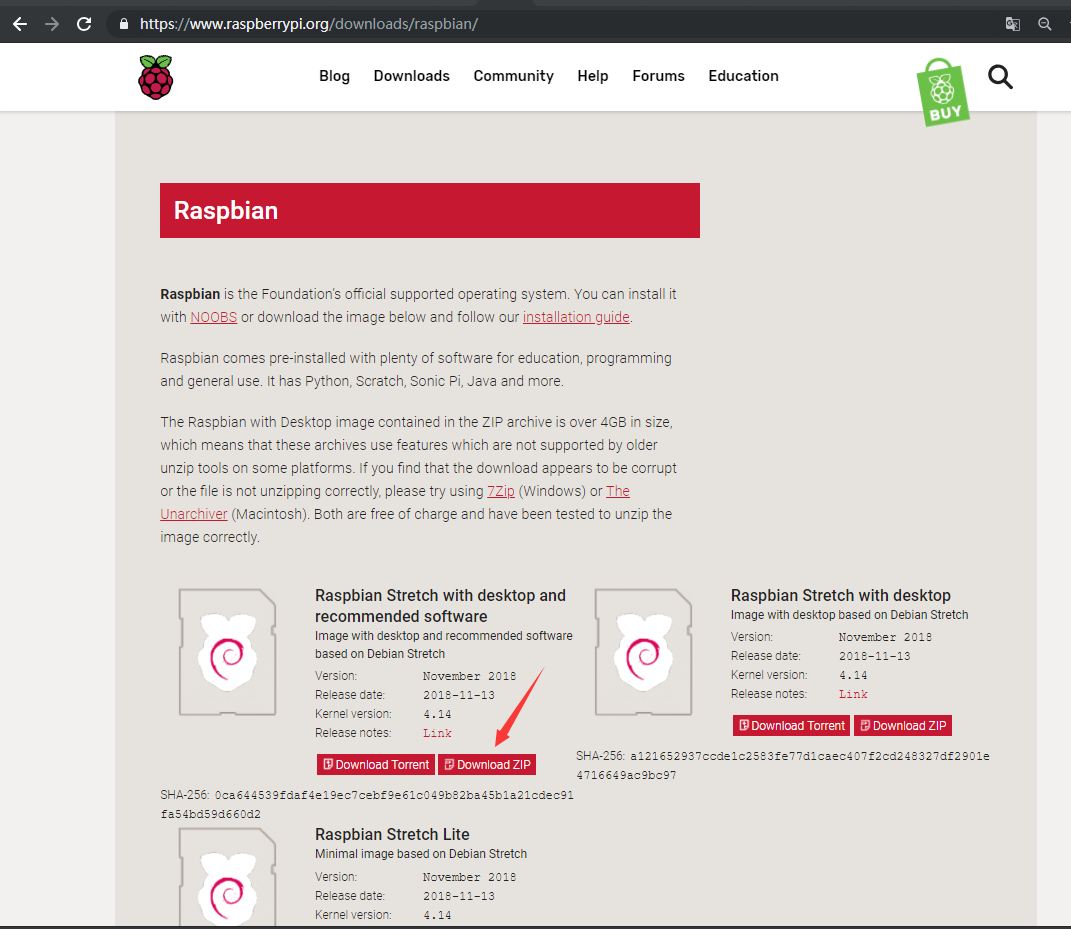
1. Raspbian Stretch download
Download Raspbian Stretch from Raspberry Pi official website and select “with desktop and recommended software” version.
2. Win32 Disk Imager
-
Download the Win32 Disk Imager from the Sourceforge Project page as an installer file, and run it to install the software.
-
Insert the SD card into your SD card reader and connect to your PC.
-
Run the Win32DiskImager utility from your desktop or menu.
-
In the device box, select the corresponding drive letter of the SD card. Be careful to select the correct drive: if you choose the wrong drive you could destroy the data on your computer's hard disk! If you are using an SD card slot in your computer, and can't see the drive in the Win32DiskImager window, try using an external SD adapter.
-
Click 'Write' and wait for the write to complete.

- Complete.

- Exit the imager and eject the SD card.
Basic Configuration
Wireless connection and SSH
1. Create a file called "wpa_supplicant.conf" into the /boot folder, and copy the following code.
country=CN
ctrl_interface=DIR=/var/run/wpa_supplicant GROUP=netdev
update_config=1

network={
ssid="WiFi-name"
psk="WiFi-password"
key_mgmt=WPA-PSK
priority=1
}
The Wi-Fi name and password should be the same as your local Wi-Fi which your PC connected to(make sure your PC and Raspberry Pi are in the same LAN).
2. Create a blank file called "ssh" into the /boot folder.
3. Insert the SD Card with Raspbian into the Raspberry Pi

4. Connect the Raspberry Pi to the power source and power it up.

5. Open putty to connect PC to Raspberry Pi.
Download putty: https://www.chiark.greenend.org.uk/~sgtatham/putty/latest.html

Raspberry Pi Default username : pi Default password : raspberry

VNC Configuration
1. Open raspi-config by typing following command in terminal.
sudo raspi-config
Arrow down to 5 interfacing Options and press "enter" to select.

Arrow down to P3 VNC and press "enter" to select.

Select "Yes" to enable it.

Select "Ok".

2. Install VNC Viewer
Downloadr VNC Viewe

Open VNC Viewer and enter the IP address of Raspberry Pi. You can find the IP address by typing ifconfig command in the terminal of Raspberry Pi (or you can enter raspberrypi.local).
If you use raspberrypi.local to login your Pi, you should make sure there is only one Raspberry Pi in use in your LAN.
Enter the default user name and password, and now you can enter the Raspberry Pi's remote desktop!

Success!

Base Hat Configuration
1. Shutdown the Raspberry Pi
sudo shutdown -h now
Plug the Grove Base Hat for Raspberry Pi into the Raspberry Pi.

**2.**Power up the Raspberry Pi with micro-usb cable to enable I2C
Open raspi-config by typing following command in terminal.
sudo raspi-config
Arrow down to 5 interfacing Options and press "enter" to select.
Arrow down to P5 I2C and press "enter" to select.

Select "Yes" to enable it.

Select "Ok".

Select "Finish" to save the changes.

3. One-click installation, quick start, what ever you call, with the single command below.
curl -sL https://github.com/Seeed-Studio/grove.py/raw/master/install.sh | sudo bash -s -

if everything goes well, you will see the following notice.
Successfully installed grove.py-0.6
#######################################################
Lastest Grove.py from github install complete   !!!!!
#######################################################
4. Besides the one-click installation, you can also install all the dependencies).
5. Clone the latest python.py repository library.
git clone https://github.com/Seeed-Studio/grove.py
Grove – LED button demo
After all the basic set up of Raspberry Pi, we can now run the LED demo code. Note: You should complete the steps above first in order to continue the following.
Hardware Connection
Step 1: Connect the Grove - Red LED Button to D5 port of Base Hat
Step 2: Insert Base Hat into Raspberry Pi
Step 3: Connect Raspberry Pi to the power source by a micro USB cable.

Upload Code
Step 1: Run the following commands to create a python file
cd grove.py
nano example.py
Step 2: Copy following code in python file
Please make sure the text editor is under unix format.
#!/usr/bin/env python

import time
from grove.grove_ryb_led_button import GroveLedButton

def main():
    ledbtn = GroveLedButton(5)

    while True:
        ledbtn.led.light(True)
        time.sleep(1)

        ledbtn.led.light(False)
        time.sleep(1)

if __name__ == '__main__':
    main()
Step 3:run the program
sudo chmod +x  example.py
sudo ./example.py
When you single click the LED button, LED will change to "ON" mode, "OFF" if you long press it. If you double click the LED button, the LED will bink.
pi@raspberrypi:~/grove.py $ sudo ./example.py
turn on  LED
turn on  LED
turn off LED
turn on  LED
blink    LED
^CTraceback (most recent call last):
  File "./example.py", line 17, in <module>
    main()
  File "./example.py", line 14, in main
    time.sleep(1)
KeyboardInterrupt
pi@raspberrypi:~/grove.py $
Explanation of the blink code
In python, as modules are referenced to each other, different modules may have different "main" definition, and there can only be one entry program each time. The selection of the entry program depends on the value of name. "if__name__=='main'" is equal, it means it is the entry of the python emulation.
if __name__ == '__main__':
    main()
Grove Base Kit for Raspberry Pi
Now, are you ready to explore the Grove system? We have designed 8 tutorials for you to start with some basic Grove modules. This section introduces you how modules can be combined and applied in real-life applications.
Prerequisite
To start on the Grove tutorial, you are required the fundamental knowledge of Raspberry Pi and Python programming language. Please make sure you have completed the basic setup tutorial above successfully and finished the LED Blink demo and ensure it is fully working with your Raspberry Pi with the Grove Base Hat.
Learning outcome
- Be able to use Grove Base Hat to build applications with Grove modules.
- Be able to demonstrate each components of Grove Starter Kit and utilise the relevant module to your own projects after this tutorial
- Be able to identify the type of modules include in this Kit and their applications.
- Understand the difference between the analog and digital signal.
Lesson 1: Buzzer
Objective
Using buzzer to generate some noise and also setting specific frequency to produce some tones.
Hardware requirement
Self-prepare
- micro-USB cable
- Raspberry Pi 3 Model B
- Computer
Included in the kit
- Grove Base Hat
- Grove cable
- Grove – Buzzer
Hardware connection
Step 1. Use Grove cable to connect Grove - Buzzer to PWM port of Base Hat and insert the Hat to the Raspberry Pi.
Step 2. Connect Raspberry Pi to the power source by a micro USB cable.

Software programming
Please make sure you have cloned the python.py repository library to your Raspberry Pi.
Step 1: Run the following commands to create a python file
cd grove.py
nano lesson_1.py
Step 2: Copy following code
#!/usr/bin/env python
import time
from mraa import getGpioLookup
from upm import pyupm_buzzer as upmBuzzer

def main():
    # Grove - Buzzer connected to PWM port
    buzzer = upmBuzzer.Buzzer(getGpioLookup('GPIO12'))

    CHORDS = [upmBuzzer.BUZZER_DO, upmBuzzer.BUZZER_RE, upmBuzzer.BUZZER_MI,
        upmBuzzer.BUZZER_FA, upmBuzzer.BUZZER_SOL, upmBuzzer.BUZZER_LA,
        upmBuzzer.BUZZER_SI]
    for i in range(0, len(CHORDS)):
        buzzer.playSound(CHORDS[i], 500000)
        time.sleep(0.1)

    del buzzer
    print('application exiting...')

if __name__ == '__main__':
    main()
Step 3:run the program
sudo chmod +x lesson_1.py
sudo ./lesson_1.py
If everything goes well, you should notice the buzzer is making “Do Re Mi Fa So La Si” sound.
Lesson 2: Red LED Button
Objective
Use Grove - Red LED Button to control the blinking of LEDs and let Grove - Buzzer to make different sound effects.
Hardware requirement
Self-prepare
- micro-USB cable
- Raspberry Pi 3 Model B
- Computer
Included in the kit
- Grove Base Hat
- Grove cable
- Grove - Red LED Button
- Grove – Buzzer
Hardware connection
Step 1. Use Grove cable to connect Grove - Buzzer to PWM port and Grove - Red LED Button to D5 of Base Hat and insert the Hat to the Raspberry Pi.
Step 2. Connect Raspberry Pi to the power source by a micro USB cable.

Software programming
Please make sure you have cloned the python.py repository library to your Raspberry Pi.
Step 1: Run the following commands to create a python file
cd grove.py
nano lesson_2.py
Step 2: Copy following code
#!/usr/bin/env python

import time
from mraa import getGpioLookup
from upm import pyupm_buzzer as upmBuzzer

from grove.button import Button
from grove.grove_ryb_led_button import GroveLedButton

def main():
    # Grove - LED Button connected to port D5
    button = GroveLedButton(5)

    # Grove - Buzzer connected to PWM port
    buzzer = upmBuzzer.Buzzer(getGpioLookup('GPIO12'))

    def on_event(index, event, tm):
        if event & Button.EV_SINGLE_CLICK:
            print('single click')
            button.led.light(True)
            buzzer.playSound(upmBuzzer.BUZZER_DO, 500000)

        elif event & Button.EV_LONG_PRESS:
            print('long press')
            button.led.light(False)
            buzzer.playSound(upmBuzzer.BUZZER_DO, 1000000)

    button.on_event = on_event

    while True:
        time.sleep(1)

if __name__ == '__main__':
    main()
Step 3:run the program
sudo chmod +x lesson_2.py
sudo ./lesson_2.py
If everthing goes well, you will find that when you long press the LED button, the LED will go off and the buzzer will emit a long "Do" sound. However, when you single press it, the LED will light up and the buzzer will make a short "Do" sound.
pi@raspberrypi:~/grove.py $ sudo ./lesson_2.py
single click
single click
single click
long press
single click
long press
long press
Traceback (most recent call last):
  File "./lesson2.py", line 34, in <module>
    main()
  File "./lesson2.py", line 31, in main
    time.sleep(1)
KeyboardInterrupt
^Cpi@raspberrypi:~/grove.py $

Lesson 3: Light Sensor
Objective
In this lesson, we will show you how to use Grove - Light Sensor to control Grove - Servo. In this case, servo roration angle varies with light intensity.
Hardware requirement
Self-prepare
- micro-USB cable
- Raspberry Pi 3 Model B
- Computer
Included in the kit
- Grove Base Hat
- Grove cable
- Grove - Light Sensor
- Grove - Servo
Hardware connection
Step 1 Connect Grove - Light Sensor to port A0,Grove - Servo to PWM port.
Step 2 Insert Base Hat into Raspberry Pi.
Step 3 Connect Raspberry Pi to the power source by a micro USB cable.

Software programming
Please make sure you have cloned the python.py repository library to your Raspberry Pi.
Step 1: Run the following commands to create a python file
cd grove.py
nano lesson_3.py
Step 2: Copy following code
#!/usr/bin/env python

import time

from grove.grove_servo import GroveServo
from grove.grove_light_sensor_v1_2 import GroveLightSensor

def main():
    # Grove - Servo connected to PWM port
    servo = GroveServo(12)

    # Grove - Light Sensor connected to port A0
    sensor = GroveLightSensor(0)

    while True:
        angle = sensor.light * 180 / 1000
        print('light value {}, turn to {} degree.'.format(sensor.light, angle))
        servo.setAngle(angle)

        time.sleep(1)

if __name__ == '__main__':
    main()
Step 3:run the program
sudo chmod +x lesson_3.py
sudo ./lesson_3.py
If everything goes well, the change of light intensity will result in different rotation angle of servo.

pi@raspberrypi:~/grove.py $ sudo ./lesson_3.py
light value 300, turn to 113 degree.
light value 80, turn to 80 degree.
light value 166, turn to 165 degree.
light value 498, turn to 132 degree.
light value 601, turn to 60 degree.
light value 200, turn to 21 degree.
light value 459, turn to 99 degree.
light value 172, turn to 173 degree.
light value 319, turn to 138 degree.
^CTraceback (most recent call last):
  File "./lesson3.py", line 23, in <module>
    main()
  File "./lesson3.py", line 20, in main
    time.sleep(1)
KeyboardInterrupt
pi@raspberrypi:~/grove.py $
Lesson 4: Motion Sensor & Relay

Objective
Use Grove - mini PIR motion sensor to detect the motion, light on if people come.
Hardware requirement
Self-prepare
- micro-USB cable
- Raspberry Pi 3 Model B
- Computer
Included in the kit
- Grove Base Hat
- Grove cable
- Grove - mini PIR motion sensor
- Grove - Relay
Hardware Connection
Step 1 Connect Grove - mini PIR motion sensor to port D5, Grove - Relay to port D16 of Base Hat.
Step 2 Insert Base Hat into Raspberry Pi
Step 3 Connect Raspberry Pi to the power source by a micro USB cable.

Software programming
Please make sure you have cloned the python.py repository library to your Raspberry Pi.
Step 1: Run the following commands to create a python file
cd grove.py
nano lesson_4.py
Step 2: Copy following code
#!/usr/bin/env python

import time

from grove.grove_mini_pir_motion_sensor import GroveMiniPIRMotionSensor
from grove.grove_relay import GroveRelay

def main():
    # Grove - mini PIR motion sensor connected to port D5
    sensor = GroveMiniPIRMotionSensor(5)

    # Grove - Relay connected to port D16
    relay = GroveRelay(16)

    def on_detect():
        print('motion detected')

        relay.on()
        print('relay on')

        time.sleep(1)

        relay.off()
        print('relay off')

    sensor.on_detect = on_detect

    while True:
        time.sleep(1)

if __name__ == '__main__':
    main()
Step 3:run the program
sudo chmod +x lesson_4.py
sudo ./lesson_4.py
If everything goes well, you should see the relay on/off once it detect a motion.
pi@raspberrypi:~/grove.py $ sudo ./lesson_4.py
motion detected
relay on
relay off
motion detected
relay on
relay off
^CTraceback (most recent call last):
  File "./lesson_4.py", line 33, in <module>
    main()
  File "./lesson_4.py", line 30, in main
    time.sleep(1)
KeyboardInterrupt
pi@raspberrypi:~/grove.py $

Lesson 5: Ultrasonic Sensor & Relay

Objective
In this lesson, we use Grove - Ultrasonic Ranger to detect the distance, once someone getting closer, the light on the Grove - Relay should be "ON".
Hardware requirement
Self-prepare
- micro-USB cable
- Raspberry Pi 3 Model B
- Computer
Included in the kit
- Grove Base Hat
- Grove cable
- Grove - Ultrasonic Ranger
- Grove - Relay
Hardware connection
Step 1 Connect Grove - Ultrasonic Ranger to port D5, Grove - Relay to port D16 of Base Hat.
Step 2 Insert Base Hat into Raspberry Pi
Step 3 Connect Raspberry Pi to the power source by a micro USB cable.

Software programming
Please make sure you have cloned the python.py repository library to your Raspberry Pi.
Step 1: Run the following commands to create a python file
cd grove.py
nano lesson_5.py
Step 2: Copy following code
#!/usr/bin/env python

import time

from grove.grove_relay import GroveRelay
from grove.grove_ultrasonic_ranger import GroveUltrasonicRanger

def main():
    # Grove - Ultrasonic Ranger connected to port D5
    sensor = GroveUltrasonicRanger(5)

    # Grove - Relay connected to port D16
    relay = GroveRelay(16)

    while True:
        distance = sensor.get_distance()
        print('{} cm'.format(distance))

        if distance < 20:
            relay.on()
            print('relay on')

            time.sleep(1)

            relay.off()
            print('relay off')

            continue

        time.sleep(1)

if __name__ == '__main__':
    main()
Step 3:run the program
sudo chmod +x lesson_5.py
sudo ./lesson_5.py
If everything goes well, the change of light intensity will result in different rotation angle of servo.
pi@raspberrypi:~/grove.py $ sudo ./lesson_5.py
253.722585481 cm
253.739028141 cm
252.896341784 cm
1.20442489098 cm
relay on
relay off
4.51762100746 cm
relay on
relay off
253.985668051 cm
^CTraceback (most recent call last):
  File "./lesson_5.py", line 34, in <module>
    main()
  File "./lesson_5.py", line 31, in main
    time.sleep(1)
KeyboardInterrupt
pi@raspberrypi:~/grove.py $

Now, compare the result from lesson four and lesson five, are you able to list the advantages and disadvantages of Grove - mini PIR motion sensor and Grove Ultrasonic Ranger?
Lesson 6: LCD
Objective
Uses Grove - 16*2 LCD screen to display “Hello World”.
Hardware requirement
Self-prepare
- micro-USB cable
- Raspberry Pi 3 Model B
- Computer
Included in the kit
- Grove Base Hat
- Grove cable
- Grove - 16*2 LCD
Hardware connection
Step 1 Connect Grove - 16*2 LCD to I2C port of Base Hat.
Step 2 Insert Base Hat into Raspberry Pi.
Step 3 Connect Raspberry Pi to the power source by a micro USB cable.

Software programming
Please make sure you have cloned the python.py repository library to your Raspberry Pi.
Step 1: Run the following commands to create a python file
cd grove.py
nano lesson_6.py
Step 2: Copy following code
#!/usr/bin/env python

import time

from grove.display.jhd1802 import JHD1802

def main():
    # Grove - 16x2 LCD(White on Blue) connected to I2C port
    lcd = JHD1802()

    lcd.setCursor(0, 0)
    lcd.write('hello, world!!!')

    print('application exiting...')

if __name__ == '__main__':
    main()
Step 3:run the program
sudo chmod +x lesson_6.py
sudo ./lesson_6.py
You should see “hello, world!!!” displayed on the LCD screen.

If you want to use the Grove - 16*2 LCD screen to display some other charaters, you can simply change lcd.write('hello, world!!!') in the code.
Lesson 7: LCD & Temperature and Humidity Sensor

Objective
Uses Grove - 16*2 LCD screen to display data(temperature and humidity) from Grove - Temperature and Humidity Sensor
Hardware requirement
Self-prepare
- micro-USB cable
- Raspberry Pi 3 Model B
- Computer
Included in the kit
- Grove Base Hat
- Grove cable
- Grove - 16*2 LCD
- Grove - Temperature and Humidity Sensor
Hardware connection
Step 1 Connect Grove - 16*2 LCD to I2C port,Grove - Temperature and Humidity Sensor to port D5.
Step 2 Insert Base Hat into Raspberry Pi.
Step 3 Connect Raspberry Pi to the power source by a micro USB cable.

Software programming
Please make sure you have cloned the python.py repository library to your Raspberry Pi.
Step 1: Run the following commands to create a python file and install seeed-python-dht.
sudo pip3 install seeed-python-dht
cd grove.py
nano lesson_7.py
Step 2: Copy following code
#!/usr/bin/env python3

import time

from seeed_dht import DHT
from grove.display.jhd1802 import JHD1802

def main():
    # Grove - 16x2 LCD(White on Blue) connected to I2C port
    lcd = JHD1802()

    # Grove - Temperature&Humidity Sensor connected to port D5
    sensor = DHT('11', 5)

    while True:
        humi, temp = sensor.read()
        print('temperature {}C, humidity {}%'.format(temp, humi))

        lcd.setCursor(0, 0)
        lcd.write('temperature: {0:2}C'.format(temp))

        lcd.setCursor(1, 0)
        lcd.write('humidity: {0:5}%'.format(humi))

        time.sleep(1)

if __name__ == '__main__':
    main()
Step 3:run the program
sudo chmod +x lesson_7.py
sudo ./lesson_7.py
If everthing goes well, you should see current temperature and humidity values display on the LCD screen
pi@raspberrypi:~/grove.py $ sudo ./lesson_7.py
temperature 23C, humidity 16%
temperature 22C, humidity 17%
temperature 22C, humidity 17%
^CTraceback (most recent call last):
  File "./lesson_7.py", line 28, in <module>
    main()
  File "./lesson_7.py", line 25, in main
    time.sleep(1)
KeyboardInterrupt
pi@raspberrypi:~/grove.py $

Lesson 8: LCD & Moisture Sensor & Buzzer

Objective
Use Grove - 16 * 2 LCD to display the current moisture level. When the moisture status is "wet", the Grove - Buzzer should alert you.
Hardware requirement
Self-prepare
- micro-USB cable
- Raspberry Pi 3 Model B
- Computer
Included in the kit
- Grove Base Hat
- Grove cable
- Grove - 16*2 LCD
- Grove - Moisture Sensor
- Grove - Buzzer
Hardware Connection
Step 1 Connect Grove - 16*2 LCD to I2C port, Grove - Moisture Sensor to A0 port and Grove - Buzzer to PWM port of Grove Base Hat.
Step 2 Insert Base Hat to Raspberry Pi.
Step 3 Use micro USB to connect Raspberry Pi with PC.

Software programming
Please make sure you have cloned the python.py repository library to your Raspberry Pi.
Step 1: Run the following commands to create a python file
cd grove.py
nano lesson_8.py
Step 2: Copy following code
#!/usr/bin/env python

import time
from mraa import getGpioLookup
from upm import pyupm_buzzer as upmBuzzer

from grove.grove_moisture_sensor import GroveMoistureSensor
from grove.lcd.sh1107g import JHD1802

def main():
    # Grove - 16x2 LCD(White on Blue) connected to I2C port
    lcd = JHD1802()

    # Grove - Moisture Sensor connected to port A0
    sensor = GroveMoistureSensor(0)

    # Grove - Buzzer connected to port PWM
    buzzer = upmBuzzer.Buzzer(getGpioLookup('GPIO12'))

    while True:
        mois = sensor.moisture
        if 0 <= mois and mois < 300:
            level = 'dry'
        elif 300 <= mois and mois < 600:
            level = 'moist'
        else:
            level = 'wet'
            buzzer.playSound(upmBuzzer.BUZZER_DO, 200000)

        print('moisture: {}, {}'.format(mois, level))

        lcd.setCursor(0, 0)
        lcd.write('moisture: {0:>6}'.format(mois))

        lcd.setCursor(1, 0)
        lcd.write('{0:>16}'.format(level))

        time.sleep(1)

if __name__ == '__main__':
    main()
Step 3:run the program
sudo chmod +x lesson_8.py
sudo ./lesson_8.py
If everything goes well, you will be able to see the moisture level on the LCD screen. Buzzer is used to alert people once the moisture level reach "wet".
pi@raspberrypi:~/grove.py $ sudo ./lesson_8.py
moisture: 0, dry
moisture: 0, dry
moisture: 396, moist
moisture: 398, moist
moisture: 407, wet
moisture: 418, wet
^CTraceback (most recent call last):
  File "./lesson_8.py", line 41, in <module>
    main()
  File "./lesson_8.py", line 38, in main
    time.sleep(1)
KeyboardInterrupt
pi@raspberrypi:~/grove.py $
Tech Support & Product Discussion
Thank you for choosing our products! We are here to provide you with different support to ensure that your experience with our products is as smooth as possible. We offer several communication channels to cater to different preferences and needs.