Arduino IDE for RePhone Kit

RePhone can be a learning tool for you to start interesting projects. Currently, RePhone supports various development environments and development languages, you can build applications either with C/C++ based on Eclipse IDE, Arduino IDE, or with Lua and JavaScript.
This wiki is a User Guide to help you start your RePhone project with Arduino IDE.
| Product Version | Order |
|---|---|
| RePhone core 2G-Atmel32u4 v1.0 | Buy Now |
| RePhone core 2G-AtmelSAMD21 | Buy Now |
Download Arduino IDE for RePhone
Before you download the Arduino IDE for RePhone, make sure you have an operation system as follows:
Windows XP/Vista/7/8/8.1
We have put the Arduino IDE for RePhone on our GitHub, and you are quite welcome to send us a 'pull request' to help us optimize and improve it.
If you ever used the Arduino IDE before, then this should be just a piece of cake. If you are not familiar with Arduino, which is fine as well, just follow the instructions, and you will be getting started with Arduino IDE easily and quickly.
Now click on

On the Github page, click the Download ZIP to download the file as shown in the image below:

When the download is complete, unzip the file to a proper location.
Install the Driver
Disable Driver Signature Enforcement under Windows 8 / 8.1
If you are using the Windows8/8.1, you would need to disable Driver Signature Enforcement first to be able to install the driver.
You should save the files you are editing before trying to turn off the 'Driver Signature Enforcement' as your system will be shut down during the operation.
Now follow the instructions below to disable the 'Driver Signature Enforcement.'
- Press “Windows Key” +"R"
- Enter shutdown.exe /r /o /f /t 00
- Click the "OK" button.
- System will restart to a "Choose an option" screen
- Select "Troubleshoot" from "Choose an option" screen
- Select "Advanced options" from "Troubleshoot" screen
- Select "Windows Startup Settings" from "Advanced options" screen
- Click "Restart" button
- System will restart to "Advanced Boot Options" screen
- Select "Disable Driver Signature Enforcement"
- Once the system starts, you can install the Arduino drivers as same as Windows
Normal Driver Installation
First, power up your RePhone by plugging in the battery or power it with external power sources (3.3 ~ 4.2V(no SIM)/3.5 ~ 4.2V(with SIM)) to the battery socket on the Xadow GSM+BLE, press and hold the power key (PWR) for 2 seconds to turn it ON (LED indicator shows GREEN), then connect your RePhone to PC with a Micro USB cable.

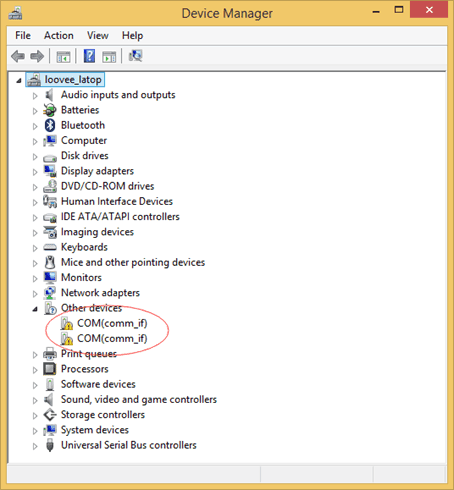
Open Device Manager by clicking the Start button, clicking Control Panel, clicking System and Security, and then, under System, clicking Device Manager. If you're prompted for an administrator password or confirmation, type the password or provide confirmation. In the Device Manager, you will be seeing unknown devices as shown below:
Right click on one of the unknown devices, choose Update Driver Software.

Choose Browse my computer for driver software.

Click Browse and the locate the folder which you've unzipped the Arduino IDE for RePhone .. \Arduino_IDE_for_RePhone\drivers\mtk . Click Next to start the driver installation.

When the driver software is successfully installed, you will be able to see the following complete page, click Close and start over from step 1 to 6 to install the driver for another unknown device.

Install the Driver Manually
You can also install the driver manually:
In "Browse for driver software on your computer" window, click "Let me pick from a list of device drivers on my computer"
Then click "Ports(COM&LPT)" and go "next"
Click "Have Disk"
Afterwards,
-- if you are using Windows Vista 64bit, locate "Arduino_IDE_for_RePhone-master\drivers\mtk\Vista\usb2ser_Vista64.inf\"
-- if you are using Windows 7 or higher with 64bit, locate "Arduino_IDE_for_RePhone-master\drivers\mtk\Win7\usb2ser_Win764.inf"
Install the Driver with LinkIt Assist 2502 SDK 2.0.46
LinkIt Assist 2502 SDK 2.0.46 also provides a driver installation program.

Then find the driver installer in the path "MediaTek_LinkIt_Assist_2502_SDK_2_0_46\LINKIT_ASSIST_SDK\Driver\InstallMTKUSBCOMPortDriver.exe"
Update/Flash the Firmware
Note
Please note that flashing the firmware will delete all the settings and files(images, musics) stored in the RePhone. Take a data backup before you flash/update the firmware.To make use of the Arduino IDE for RePhone, you have to update/flash the firmware as well. The process is as simple as follows:
Disconnect your RePhone with PC, press and hold the power key(PWR) for 2 seconds to turn it OFF (LED indicator turn RED and then goes out)
Open the FirmwareUpdater.exe under the path ...Arduino_IDE_for_RePhone\hardware\tools\mtk\FirmwareUpdater.exe, be sure your platform on the Firmware Updater is "RePhone" as showing below, if not, click "Others" and locate to ...Arduino_IDE_for_RePhone\hardware\tools\mtk\firmware\LinkIt_Device\RePhone\W15.19.p2-uart\SEEED02A_DEMO_BB.cfg, then click Download (The Green Button).

Now you will be asked to connect your RePhone to PC via USB cable, make sure your RePhone has been turned OFF and meantime a functional battery should be always connected ( Powered Up).

Wait until the downloading finishes. This might take about 1min, so it may remain stuck at 50% for quite a while, please be patient.

In the Complete page click OK to finish the firmware update.

Reset to default
Note
Please note that resetting your Rephone to default will delete all the settings and files(images, musics) in the RePhone. Take a data backup before you reset it to default.**To reset your RePhone to DEFAULT:
Follow the instructions in "Update/Flash the Firmware" section to flash the firmware
Download the RePhone_Create_Kit_VXP file

Copy everything under the file named "RePhone Create Kit VXP" into the RePhone 5MB mass storage.
Restart your RePhone then its done. As reset would have deleted all the files, you would have to put an mp3 file in the mass storage as well for the use of ringtone.
A demo: Hello World
Now you have prepared things required, we are ready to rock on with RePhone.
Let us start with a simple program Hello World
Press and hold the power key (PWR) for 2 seconds to turn it ON (LED indicator shows GREEN)
Open the Arduino_IDE_for_RePhone.exe in the folder where you unzipped the Arduino IDE for RePhone, the software interface is as follows:

Open Device Manager to check for the COM ports. There will be two COM ports:
- MTK USB Debug Port is used for uploading code
- MTK USB Modem Port is used for logs, like printing messages in the serial monitor with Serial.println()

On the Arduino IDE window, click Tool => Port, select MTK USB Debug Port, which is COM20 in this case, the COM number might be different in your PC, just make sure it corresponds to the Debug Port.

On the Arduino IDE window, click Tool => Board, select RePhone

Now copy the following code to your Arduino IDE:
// hello world for test RePhone
// loovee@10-18-2015

void setup() {
    Serial.begin(115200);
}

void loop() {
    // put your main code here, to run repeatedly:
    Serial.println("Hello World, Hello RePhone!");
    delay(100);
}
Now press the Upload button to upload the code to your RePhone. You will see the Done uploading when the code is successfully uploaded.

As RePhone uses different COM ports for uploading software and logs, to read the logs, we need to switch the selected COM Port to MTK USB Modem Port. On the Arduino IDE window, click Tool => Port, select MTK USB Modem Port, which is COM48 in this case.
Then open the Serial Monitor.

Now we can see the Hello World we have printed with Serial.println() .

More Example Code
Playing with some example code would be a good start if you are heading into some even more interesting projects.
Simply setup your sketchbook location in the preference as Arduino_IDE_for_RePhone-master\hardware\arduino\mtk (where you install the Arduino IDE for RePhone)

then restart the Arduino_IDE_for_RePhone.exe, you will be able to see the example codes.

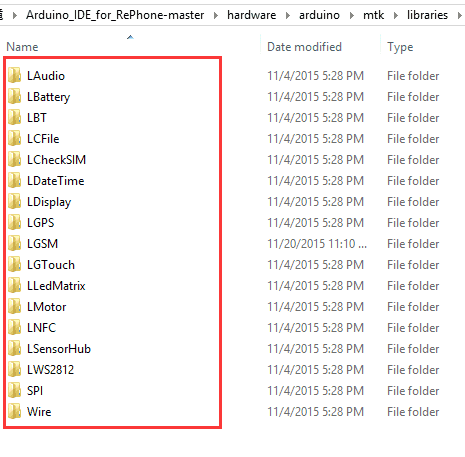
You can also find the Arduino example coded manually for all the RePhone modules in the following path: Arduino_IDE_for_RePhone-master\hardware\arduino\mtk\libraries
RePhone Community

We have been looking for a better place where our backers (RePhone Users) can sit together, warmly and comfortably, have conversations about RePhone, discuss technical problems, share ideas/projects, and give feedback on the modules’ development in the future. And then here we go, the RePhone Community.
Now join us in the RePhone Community!
Together we seek answers, make interesting stuff, care about each other, and share our experiences.
More
You have done a great job so far! RePhone comes with a big family of modules with different features and functionalities. Go to check the wiki for modules for more applications!
Tech Support & Product Discussion
Thank you for choosing our products! We are here to provide you with different support to ensure that your experience with our products is as smooth as possible. We offer several communication channels to cater to different preferences and needs.