reSpeaker 4-Mic Array for Raspberry Pi

ReSpeaker 4-Mic Array for Raspberry Pi is a quad-microphone expansion board for Raspberry Pi designed for AI and voice applications. This means that we can build a more powerful and flexible voice product that integrates Amazon Alexa Voice Service, Google Assistant, and so on.
Different from ReSpeaker 2-Mics Pi HAT, this board is developed based on AC108, a highly integrated quad-channel ADC with I2S/TDM output transition for high definition voice capture, which allows the device to pick up sounds in a 3 meters radius. Additionally, this 4-Mics version features an LED ring with 12 APA102 programable LEDs. With that 4 microphones and the LED ring, Raspberry Pi would have the ability to do VAD(Voice Activity Detection), estimate DOA(Direction of Arrival), do KWS(Keyword Search) and show the direction via LED ring, just like Amazon Echo or Google Home.
Features
- Raspberry Pi compatible (supports Raspberry Pi Zero and Zero W, Raspberry PiB+, Raspberry Pi 2B, Raspberry Pi 3B, Raspberry Pi 3B+, Raspberry Pi3 A+ and Raspberry Pi 4B)
- 4 Microphones
- 3 meters radius voice capture
- 2 Grove Interfaces
- 12 APA102 User LEDs
- Software Algorithms: VAD(Voice Activity Detection), DOA(Direction of Arrival) and KWS(Keyword Search)
Note: There is no audio output interface on ReSpeaker 4-Mic Array for Raspberry Pi. It is only for voice capture. We can use the headphone jack on Raspberry Pi for audio output.
Application Ideas
- Voice Interaction Application
- AI Assistant
Hardware Overview

- MIC: 4 analog microphones
- LED: 12 APA102 programable RGB LEDs, connected to SPI interface
- Raspberry Pi 40-Pin Headers: compatible with Raspberry Pi Zero and Zero W, Raspberry PiB+, Raspberry Pi 2B, Raspberry Pi 3B, Raspberry Pi 3B+, Raspberry Pi3 A+ and Raspberry Pi 4
- AC108: highly integrated quad-channel ADC with I2S/TDM output transition
- I2C: Grove I2C port, connected to I2C-1
- GPIO12: Grove digital port, connected to GPIO12 & GPIO13
Note: If you use the APA102 RGB LEDs, make sure to write HIGH to GPIO5 first to enable VCC of the LEDs.
Getting Started
Connect ReSpeaker 4-Mic Array to Raspberry Pi
Mount ReSpeaker 4-Mic Array on Raspberry Pi, make sure that the pins are properly aligned when stacking the ReSpeaker 4-Mic Array for Raspberry Pi.
Note: Hot-plugging ReSpeaker 4-Mic Array is not allowed. It will damage the respeaker.


Install driver
Make sure that you are running the latest Raspberry Pi OS on your Pi. (updated at 2021.06.30)
- Step 1. Get the Seeed voice card source code, install and reboot.
sudo apt-get update
git clone https://github.com/HinTak/seeed-voicecard.git
cd seeed-voicecard
sudo ./install.sh
sudo reboot now
- Step 2. Then select audio output on Raspberry Pi:
sudo raspi-config
# Select 1 System options
# Select S2 Audio
# Select your preferred Audio output device
# Select Finish
- Step 3. Check that the sound card name looks like this:
pi@raspberrypi:~ $ arecord -L
null
    Discard all samples (playback) or generate zero samples (capture)
jack
    JACK Audio Connection Kit
pulse
    PulseAudio Sound Server
default
playback
ac108
sysdefault:CARD=seeed4micvoicec
    seeed-4mic-voicecard,
    Default Audio Device
dmix:CARD=seeed4micvoicec,DEV=0
    seeed-4mic-voicecard,
    Direct sample mixing device
dsnoop:CARD=seeed4micvoicec,DEV=0
    seeed-4mic-voicecard,
    Direct sample snooping device
hw:CARD=seeed4micvoicec,DEV=0
    seeed-4mic-voicecard,
    Direct hardware device without any conversions
plughw:CARD=seeed4micvoicec,DEV=0
    seeed-4mic-voicecard,
    Hardware device with all software conversions
usbstream:CARD=seeed4micvoicec
    seeed-4mic-voicecard
    USB Stream Output
usbstream:CARD=ALSA
    bcm2835 ALSA
    USB Stream Output
If we want to change the alsa settings, we can use sudo alsactl --file=ac108_asound.state store to save it. And when we need to use the settings again, copy it to: sudo cp ~/seeed-voicecard/ac108_asound.state /var/lib/alsa/asound.state
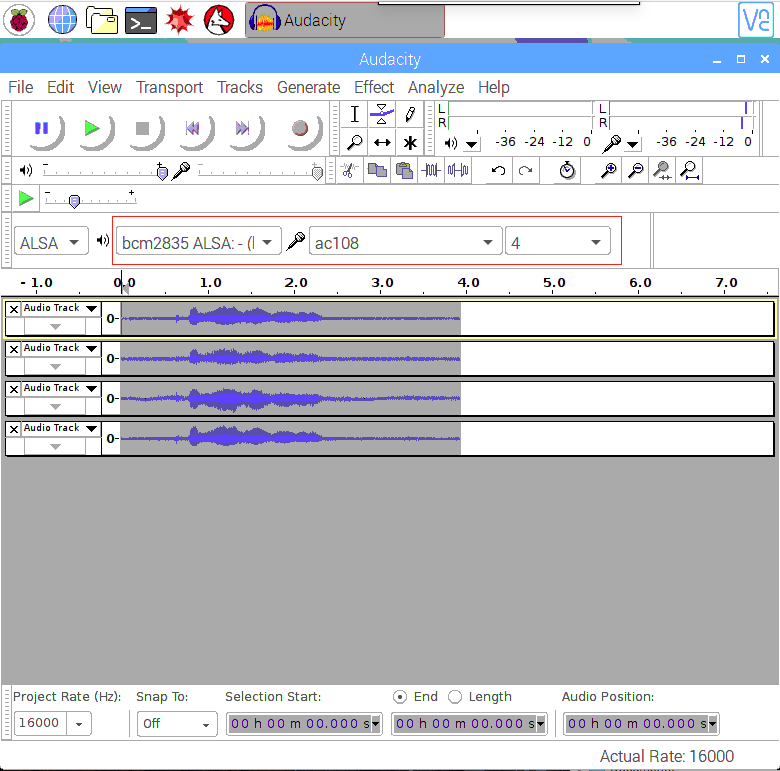
- Step 4. Open Audacity and select AC108 & 4 channels as input and bcm2835 alsa: - (hw:0:0) as output to test:
sudo apt update
sudo apt install audacity
audacity                      // run audacity
- Alternatively if you use Lite Raspbian Pi OS image and don't have GUI, you can record with
arecordand play withaplay:
sudo apt-get install sox                             //for audio conversion
arecord -Dac108 -f S32_LE -r 16000 -c 4 hello.wav    // only support 4 channels
sox hello.wav -c 2 stereo.wav                        // convert to stereo
aplay stereo.wav                                      // make sure default device
                                                     // Audio will come out via audio jack of Raspberry Pi
Usage overview
To run the following examples, clone 4mics_hat repository repository to your Raspberry Pi
git clone https://github.com/respeaker/4mics_hat.git
All the Python scripts, mentioned in the examples below can be found inside this repository. To install the necessary dependencies, from mic_hat repository folder, run
sudo apt-get install portaudio19-dev libatlas-base-dev
pip3 install -r requirements.txt
APA102 LEDs
Each on-board APA102 LED has an additional driver chip. The driver chip takes care of receiving the desired colour via its input lines and then holding this colour until a new command is received.

- Step 1. Activate SPI:
sudo raspi-config
- Select "Interfacing Options"
- Select "SPI"
- Select Enable SPI
- Finally , Exit the tool
- Step 2. Then run the example code, now we can see the LEDs blink like Alexa Assistant.
python3 interfaces/pixels.py
Record sound with Python
We use PyAudio python library to record sound with Python.
First, run the following script to get the device index number of 2 Mic pi hat:
python3 recording_examples/get_device_index.py
You will see the device ID as below.
Input Device id 2 - seeed-4mic-voicecard: - (hw:1,0)
To record the sound, open recording_examples/record.py file with nano or other text editor and change RESPEAKER_INDEX = 2 to index number of ReSpeaker on your system. Then run python script record.py to make a recording:
python3 recording_examples/record.py
- Step 6. If you want to extract channel 0 data from 4 channels, have a look at the content of
record_one_channel.py. For other channel X, please change [0::4] to [X::4].
python3 recording_examples/record_one_channel.py
To play the recorded samples you can either use aplay system utility, for example
aplay -f cd -Dhw:0 output.wav #for Stereo sound
aplay -D plughw:0,0 output_one_channel.wav #for Mono sound from one channel
Real-time Sound Source Localization and Tracking
ODAS stands for Open embeddeD Audition System. This is a library dedicated to performing sound source localization, tracking, separation and post-filtering.
- Step 1. Get ODAS and build it.
The executable file that we will call will be generated in the bin directory
sudo apt-get install libfftw3-dev libconfig-dev libasound2-dev libgconf-2-4
sudo apt-get install cmake
cd ~/Desktop
git clone https://github.com/introlab/odas.git
mkdir odas/build
cd odas/build
cmake ..
make
- Step 2. Get ODAS Studio and run it.
Install nodejs v12.22 and npm 6.14.
sudo apt update
sudo apt -y install curl dirmngr apt-transport-https lsb-release ca-certificates
curl -sL https://deb.nodesource.com/setup_12.x | sudo -E bash -
Ensure that the relevant compilation tools are installed
sudo apt -y install gcc g++ make
sudo apt -y install nodejs
Installing odas_web dependencies with npm
cd ~/Desktop
git clone https://github.com/introlab/odas_web
cd odas_web
npm install
Our purpose is to install the relevant dependent modules without having to rebuild so we can ignore errors during rebuild. Then run npm start.
npm start
Or we can downgrade Python to 2.7 for building old election-rebuild module. (We do not have to do this step)
sudo apt remove python3 -y
sudo apt install python2 -y
- Step 3. The odascore will be at ~/Desktop/odas/build/bin/odaslive, the config file is at ~/Desktop/odas/config/odaslive/respeaker_4_mic_array.cfg.
We need to modify the configuration to specify the sound card to our device
arecord -l #type this commond make sure u have arecord installed
You will see something like the following output
pi@raspberrypi:~/Desktop/odas/config/odaslive $ arecord -l
**** List of CAPTURE Hardware Devices ****
card 3: seeed4micvoicec [seeed-4mic-voicecard], device 0: bcm2835-i2s-ac10x-codec0 ac10x-codec0-0 [bcm2835-i2s-ac10x-codec0 ac10x-codec0-0]
  Subdevices: 1/1
  Subdevice #0: subdevice #0
Change the sound card designation in 18th line , in the cfg configuration file
vim ~/Desktop/odas/config/odaslive/respeaker_4_mic_array.cfg
# Then type :18
# Then press Enter
# Then press i
# Change card = YOUR CARD ;  # We found in "arecord -l"
# For mine is
# card = 3 ;
# Then type  :wq  # To save the configuration file
Then we open the odas web interface, where we can see the system monitoring data in the Local System Monitor interface and select the control kernel and the configuration file to read in the ODAS Control interface.
To start odas web GUI
cd ~/Desktop/odas_web
npm start
Click on the blank section under ODAS Core to bring up the file browser and select the core Path in "~/Desktop/odas/build/bin/odaslive"
Click on the blank section under ODAS Config to bring up the file browser and select the Config Path in "~/Desktop/odas/config/odaslive/respeaker_4_mic_array.cfg"
When configured correctly it will look like this

Enabling Voice Recognition at Edge with Picovoice

Picovoice enables enterprises to innovate and differentiate rapidly with private voice AI. Build a unified AI strategy around your brand and products with our speech recognition and Natural-language understanding (NLU) technologies.
Seeed has partnered with Picovice to bring Speech Recognition solution on the edge using ReSpeaker 4 Mic for developers.
Picovoice is an end-to-end platform for building voice products on your terms. It enables creating voice experiences similar to Alexa and Google. But it entirely runs 100% on-device. There are advantages of Picovoice:
- Private: Everything is processed offline. Intrinsically HIPAA and GDPR compliant.
- Reliable: Runs without needing constant connectivity.
- Zero Latency: Edge-first architecture eliminates unpredictable network delay.
- Accurate: Resilient to noise and reverberation. It outperforms cloud-based alternatives by wide margins.
- Cross-Platform: Design once, deploy anywhere. Build using familiar languages and frameworks.
Picovocie with ReSpeaker 4-Mic Array Getting Started
Step 1. Please follow the above step-to-step tutorial of ReSpeaker 4-Mic Array with Raspberry Pi before the followings.
Note: Please make sure that Audacity and the APA102 LEDs are working properly on the ReSpeaker 4-Mic Array with Raspberry Pi.
Step 2. Open Terminal and type following command to install pyaudio driver.
pip3 install pyaudio
Note: Please make sure you have pip3 installed in your Raspberry Pi
Step 3. Type the following command on the terminal to install the Picovoice demo for ReSpeaker 4-Mic Array.
pip3 install pvrespeakerdemo
Demo Usage
The demo utilizes the ReSpeaker 4-Mic array on a Raspberry Pi with Picovoice technology to control the LEDs. This demo is triggered by the wake word "Picovoice" and will be ready to take follow-on actions, such as turning LEDs on and off, and changing LED colors.
After the installation is finished, type this command to run the demo in the terminal:
picovoice_respeaker_demo
Voice Commands
Here are voice commands for this demo:
- Picovoice
The demo outputs:
wake word
- Turn on the lights
You should see the lights turned on and the following message in the terminal:
{
    is_understood : 'true',
    intent : 'turnLights',
    slots : {
        'state' : 'on',
    }
}
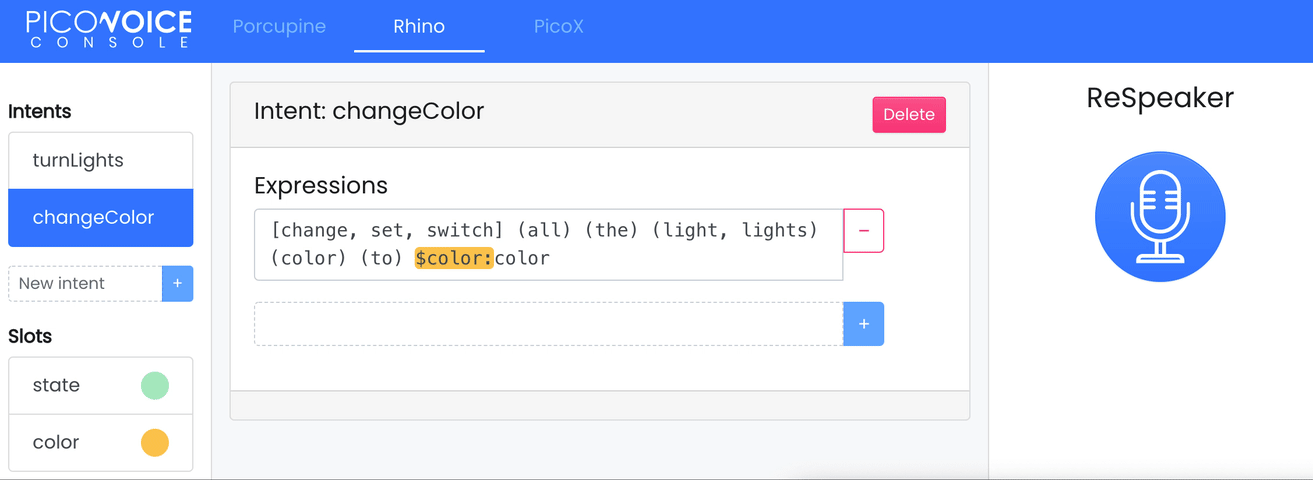
The list of commands are shown on the terminal:
context:
  expressions:
    turnLights:
      - "[switch, turn] $state:state (all) (the) [light, lights]"
      - "[switch, turn] (all) (the) [light, lights] $state:state"
    changeColor:
      - "[change, set, switch] (all) (the) (light, lights) (color) (to) $color:color"
  slots:
    state:
      - "off"
      - "on"
    color:
      - "blue"
      - "green"
      - "orange"
      - "pink"
      - "purple"
      - "red"
      - "white"
      - "yellow"
also, you can try this command to change the colour by:
- Picovoice, set the lights to orange
Turn off the lights by:
- Picovoice, turn off all lights
Demo Video Demonstration
Demo Source Code
The demo is built with the Picovoice SDK. The demo source code is available on GitHub at Picovoice Respeaker Demo
Different Wake Words
The Picovoice SDK includes free sample wake words licensed under Apache 2.0, including major voice assistants (e.g. "Hey Google", "Alexa") and fun ones like "Computer" and "Jarvis".
Custom Voice Commands
The lighting commands are defined by a Picovoice Speech-to-Intent context. You can design and train contexts by typing in the allowed grammar using Picovoice Console. You can test your changes in-browser as you edit with the microphone button. Go to Picovoice Console and sign up for an account. Use the Rhino Speech-to-Intent editor to make contexts, then train them for Raspberry Pi.
Multiple Wake Word Examples
To demonstrate the Picovoice's capability we have also prepared a multi wake word examples using ReSpeaker 4-Mic Array with Raspberry Pi! Different wake word can set to execute certain tasks.
This package contains a command line demo for controlling ReSpeaker 4-mic microphone array LEDs using Porcupine.
Porcupine
Porcupine is a highly-accurate and lightweight wake word engine. It enables building always-listening voice-enabled applications. It is
- using deep neural networks trained in real-world environments.
- compact and computationally-efficient. It is perfect for IoT.
- cross-platform. Raspberry Pi, BeagleBone, Android, iOS, Linux (x86_64), macOS (x86_64), Windows (x86_64), and web browsers are supported. Additionally, enterprise customers have access to the ARM Cortex-M SDK.
- scalable. It can detect multiple always-listening voice commands with no added runtime footprint.
- self-service. Developers can train custom wake word models using Picovoice Console.
Multi Wake Word Getting Started
Running the following command in terminal to install demo driver:
pip3 install ppnrespeakerdemo
Multi Wake Word Usage
Run the following in terminal after the driver installation:
porcupine_respeaker_demo
Wait for the demo to initialize and print [Listening] in the terminal. Say:
Picovoice
The demo outputs:
detected 'Picovoice'
The lights are now set to green. Say:
Alexa
The lights are set to yellow now. Say:
Terminator
to turn off the lights.
Wake Word to Colors
Below are the colors associated with supported wake words for this demo:
AlexaBumblebeeComputerHey GoogleHey SiriJarvisPicovoicePorcupineTerminator
Multiple Wake Word Example Source Code
Please see the complete source code of this example here: Porcupine Respeaker Demo
Picovoice Tech Support
If you encounter technical problems using Picovoice, please visit Picovoice for discussions.
FAQ
Q1: There is no response When we run kws_doa.py and say snow boy
A2: Please run audacity to make sure 4 channels are good. If there is one channel without data, there will be no response when we say snow boy.
Q2: #include "portaudio.h" Error when run "sudo pip install pyaudio".
A3: Please run below command to solve the issue.
sudo apt-get install portaudio19-dev
Q3: ...WARNING: memory leak will occur if overlay removed... message in journalctl
A4: There is a genuine one-off small memory loss when the driver is first loaded (after boot up). However, since it is per boot or per load, and the typical user only needs to load the driver once per boot, losing track of a few bytes per boot does not matter. So this is just an small issue unlikely to affect any users in a real way, other than seeing a worrying message about memory loss per boot.
Resources
- [PDF] ReSpeaker 4-Mic Array for Raspberry Pi(PDF)
- [DXF] ReSpeaker 4-Mic Array for Raspberry Pi v1.0
- [3D] ReSpeaker 4-Mic Array for Raspberry Pi v1.0 3D Model
- [AC108] AC108 DataSheet
- [Driver] Seeed-Voice Driver
- [Algorithms] Algorithms includes DOA, VAD, NS
- [Voice Engine] Voice Engine project, provides building blocks to create voice enabled objects
- [Algorithms] AEC
Tech Support & Product Discussion
Thank you for choosing our products! We are here to provide you with different support to ensure that your experience with our products is as smooth as possible. We offer several communication channels to cater to different preferences and needs.