Wifi Bee v2.0

Wifi Bee v2.0 is the update version of Wifi Bee v1.0. We replace transceiver module MRF24WB0MA which is SPI interface with RN-171 used UART interface. Wifi Bee v2.0 module incorporates 802.11 b/g radio, 32 bit processor, TCP/IP stack, real-time clock, crypto accelerator, power management unit and analog sensor interface. It can directly plug into the Bee sockets and use the UART port for communication. You can also use AT command for advanced configuration to meet your unique requirement.

Specification
Compatible with any Bee socket
Host interface: UART
Transmit power: 0dBm to 12dBm
Frequency:2402~2480 MHz
Channal:0~13
Integrated TCP / IP protocol stack
On-board Multilayer Chip Antenna
Demonstration
In this section, we will use Wifi Bee to create a Web server as an sample application. Let's follow the steps below to make it work! Note: In order to configure this module, you will need an adapter or Xbee shield that lets you communicate with the module, before you can plug it and use on other modules.
Hardware Installation
Here's all the hardware needed.
1) Wifi Bee
2) An adaptor,such as SBee, Grove -Xbee Carrier, Xbee Shield
3) Mini USB cable
Plug wifi bee into the Bee Socket of your adaptor, and connect adaptor to your computer via Mini USB cable. Before wifi bee donot connect to your network, the ASSOC indicator is in flash state.

Configure Wifi Bee
We need a serial monitor for configuring the Wifi Bee. So before configuring Wifi bee, you need perpare a serial tool. In this case, we choose usual SSCOM3.2

1) Choose the right serial port and click "Open Com" button,shown above, set the baud rate to 9600.
2) Donot select "SendNew", and send AT command $$$to the wifi Bee and it will reply "CMD" to indicate that it enter the configure mode properly.
3) Select "SendNew" after entering to configure mode,send AT command set u b 9600 to set the baud rate as 9600. Of cource,you can also set it as 38400.
4) Type show net and it will show current network settings.
5) Type scan to view a list of Wifi networks around.

6) Send AT command set wlan join 1,if the serial port reply "ADK" which indicates Wifi Bee enters to Auto control mode.
7)Type join your router's SSID (like join Seeed-STU)to connect to associate with an open access point. If we join a a secure network type like this:
set wlan ssid your router's SSID
set wlan pass your router's password
save
reboot
And the monitor replies with current ip address and opened port. It can be easily figured out that the ip address of my Wifi Bee is 192.168.0.28 and the port is 2000.

- 8) Use Web browser to access "http://ip:port", like:"http://192.168.0.28:2000", and the monitor receives the http request from the Web browser shown below. However, the Web browser will not receive anything due to the wifi bee replies nothing.

For more command, please view the Wifly Command Reference of Resource part.
Connect the TCP server and Wifi Bee
Here we select TCPUDPbg to work as an TCP client and send commands to the Wifi Bee.
- 1) Download and run TCPUDPbg. Click "CreatConnection", we can see this picture:
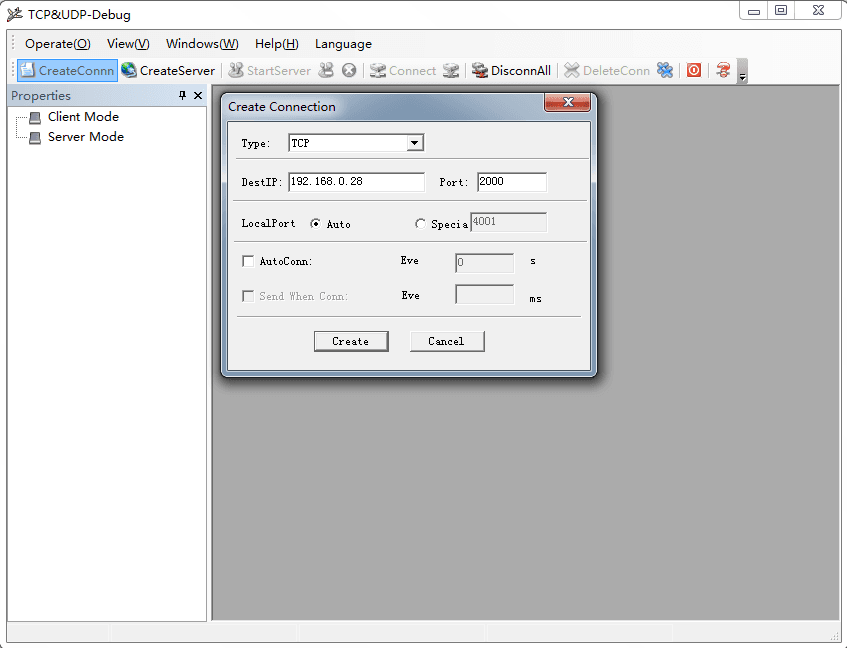
2)After selecting TCP Type, type IP address and port of Wifi Bee and click "Create".
3)Click"Connect" button in left sidebar,Now you could send commands via the TCP client simulated by TCPUDPbg to the wifi bee. Thus TCPUDPbg will receive the strings sent from the Serial monitor also!

Version Tracker
| Revision | Descriptions | Release |
|---|---|---|
| Wifi Bee v1.0 | transceiver module MRF24WB0MA which is SPI interface, and using a Atmega328p | Dec 13, 2011 |
| Wifi Bee v2.0 | replace MRF24WB0MA with RN-171, cancel Atmega328p chip | Nov 11, 2013 |
Schematic Online Viewer
Resource
Tech Support & Product Discussion
Thank you for choosing our products! We are here to provide you with different support to ensure that your experience with our products is as smooth as possible. We offer several communication channels to cater to different preferences and needs.