Seeed Studio XIAO nRF52840 on Amazon Sidewalk
Introduction
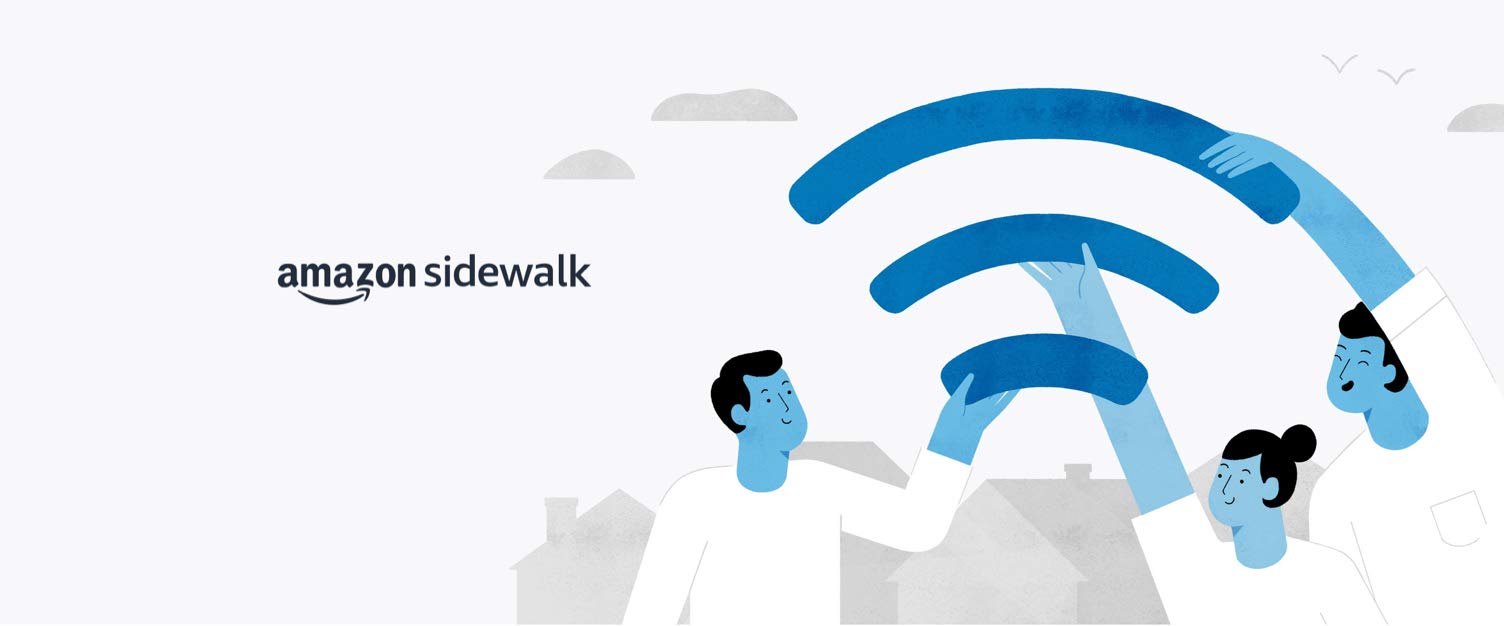
Seeed Studio is proud to be a part of the Amazon Sidewalk ecosystem partners, providing Sidewalk-enabled products and solutions that enable diverse IoT use-cases on the Sidewalk network.
Amazon Sidewalk is a secure wireless community network that uses Amazon Sidewalk Gateways (also called Sidewalk Bridges), such as compatible Amazon Echo and Ring devices, to provide cloud connectivity for IoT endpoint devices.
Amazon Sidewalk enables low-bandwidth and long-range connectivity at home and beyond using Bluetooth Low Energy for short-distance communication and LoRa and FSK radio protocols at 900MHz frequencies to cover longer distances. The Sidewalk Gateways share a small portion of the user’s internet bandwidth, which is then used to connect endpoints to the network. The strength of Amazon Sidewalk network increases with an increase in the number of gateways. Learn more about Amazon Sidewalk.
Amazon Sidewalk is currently available in the US. Developers are allowed to utilize the Sidewalk gateway functionality outside the U.S. solely for their Sidewalk-enabled endpoint development and testing purposes only. In addition, we recommend that you consult with your local regulatory bodies and verify if the gateway is permitted to operate its radio in your locale, as U.S. license-free band devices are only intended for development purposes.
Amazon Sidewalk’s differentiation
What makes Sidewalk different than other networks that are available today:
Persistent connectivity
Amazon Sidewalk network is powered by millions of participating Amazon Echo and Ring devices as Amazon Sidewalk Bridges, to give cloud connectivity to IoT devices. This ensures persistent connectivity for devices that are outside the range of a home Wi-Fi network or that depend on a mobile app or proprietary gateway for a cloud connection.
Connection versatility
Amazon Sidewalk allows smart devices to communicate via wireless protocols such as Bluetooth Low Energy (BLE) and 900MHz/sub-GHz wave. This offers a secure, reliable, and versatile connection to support a wide range of IoT use cases.
Automatic device onboarding
Amazon Sidewalk touchless registration process starts automatically when the Sidewalk gateway and an unregistered endpoint are in close range of each other. Customers can connect their Sidewalk-enabled devices to the Amazon Sidewalk network without any complex configuration. This ease of setup enhances the overall user experience.
Cost
Amazon Sidewalk is a free-to-connect network that offers coverage to more than 90% of the U.S. population. You don’t need to build or manage a separate network infrastructure, which helps in lowering capital investment and operational costs."
Simple development experience
Sidewalk-enabled devices come pre-provisioned with security certificates required to establish an encrypted connection with AWS IoT Core. This empowers you to create IoT solutions that rapidly connect your edge devices to AWS, facilitating a seamless plug-and-play setup experience for customers."
Privacy and Security
Amazon Sidewalk is designed with multiple privacy and security features to protect data traveling on the network, ensuring customer data and privacy protection.
Seeed Studio XIAO nRF52840 for Amazon Sidewalk
The XIAO nRF52840 is a wireless module qualified for Amazon Sidewalk, providing IoT device connectivity via Bluetooth Low Energy radio technology on Amazon Sidewalk network.
The model has a powerful and compact SoM (System-on-Module) design for Amazon Sidewalk integration. With its built-in nRF52840 chipset, this module offers BLE capabilities, enabling seamless connectivity for IoT applications. The Seeed Studio XIAO boasts a small form factor, making it ideal for space-constrained deployments. With its reliable performance and support for Amazon Sidewalk, it simplifies and accelerates the development of secure and reliable IoT solutions.
For more details of the module’s technical specification, click here.
The documentation will guide you through:
Install and configure Amazon Sidewalk's development environment.
Configure your cloud services and managing your XIAO nRF52840.
Run Amazon Sidewalk's BLE example program.
Once completed, you will be able to run a sample application and test it with Amazon Sidewalk.
Hardware preparation
The content of this tutorial will minimise the need for soldering or additional wiring. So we will use two expansion boards that are currently available to help us complete the project as quickly as possible. Of course, if you don't want the extra expense, you can also choose to connect the device directly to the XIAO via a breadboard or duplex cable. That said, the devices in Essential are the basic hardware you must have and Optional is not essential.
Essential
To complete the content of this sample tutorial, the following may be necessary to be prepared.
| XIAO nRF52840 Sense | Amazon Sidewalk gateway (Echo Gen4) | Grove - Red LED Button | J-Link | USB to UART |
|---|---|---|---|---|
 |  |  |  |  |
To facilitate Amazon Sidewalk testing and endpoint development for non-US developers working outside the US-East-1 (Northern Virginia) region, a VPN setup is necessary. This enables seamless access and ensures efficient participation in the development process.
Optional
For easy wiring and Grove expansion, or for easy connection to XIAO via JLink, you may need the following expansion boards.
| Seeed Studio Expansion board for XIAO | Seeed Studio Grove Base for XIAO |
|---|---|
 |  |
Configure Amazon Sidewalk's development environment
The original tutorial for the quick installation of the nRF Connect SDK can be read here.
The Amazon Sidewalk solution from Nordic Semiconductor is based on the nRF Connect SDK v2.3.0. You can set up your development environment by following one of the installation methods below:
- Automatic installation (Toolchain Manager)
- Manual installation
This section will focus on how to install the nRF Connect SDK via Toolchain Manager, the Automatic installation method. The system is based on Windows 11.
Complete the steps below to install the nRF Connect SDK automatically using the Toolchain Manager application. The application installs the full toolchain for the nRF Connect SDK, including the nRF Connect for VS Code extension and the nRF Connect SDK source code.
Install prerequisites
Before you start setting up the toolchain, install available updates for your operating system. See Requirements for information on the supported operating systems and Zephyr features.
Additionally, make sure you install the Universal version of SEGGER J-Link. This is required for SEGGER J-Link to work correctly with both Intel and ARM assemblies.
Install Toolchain Manager
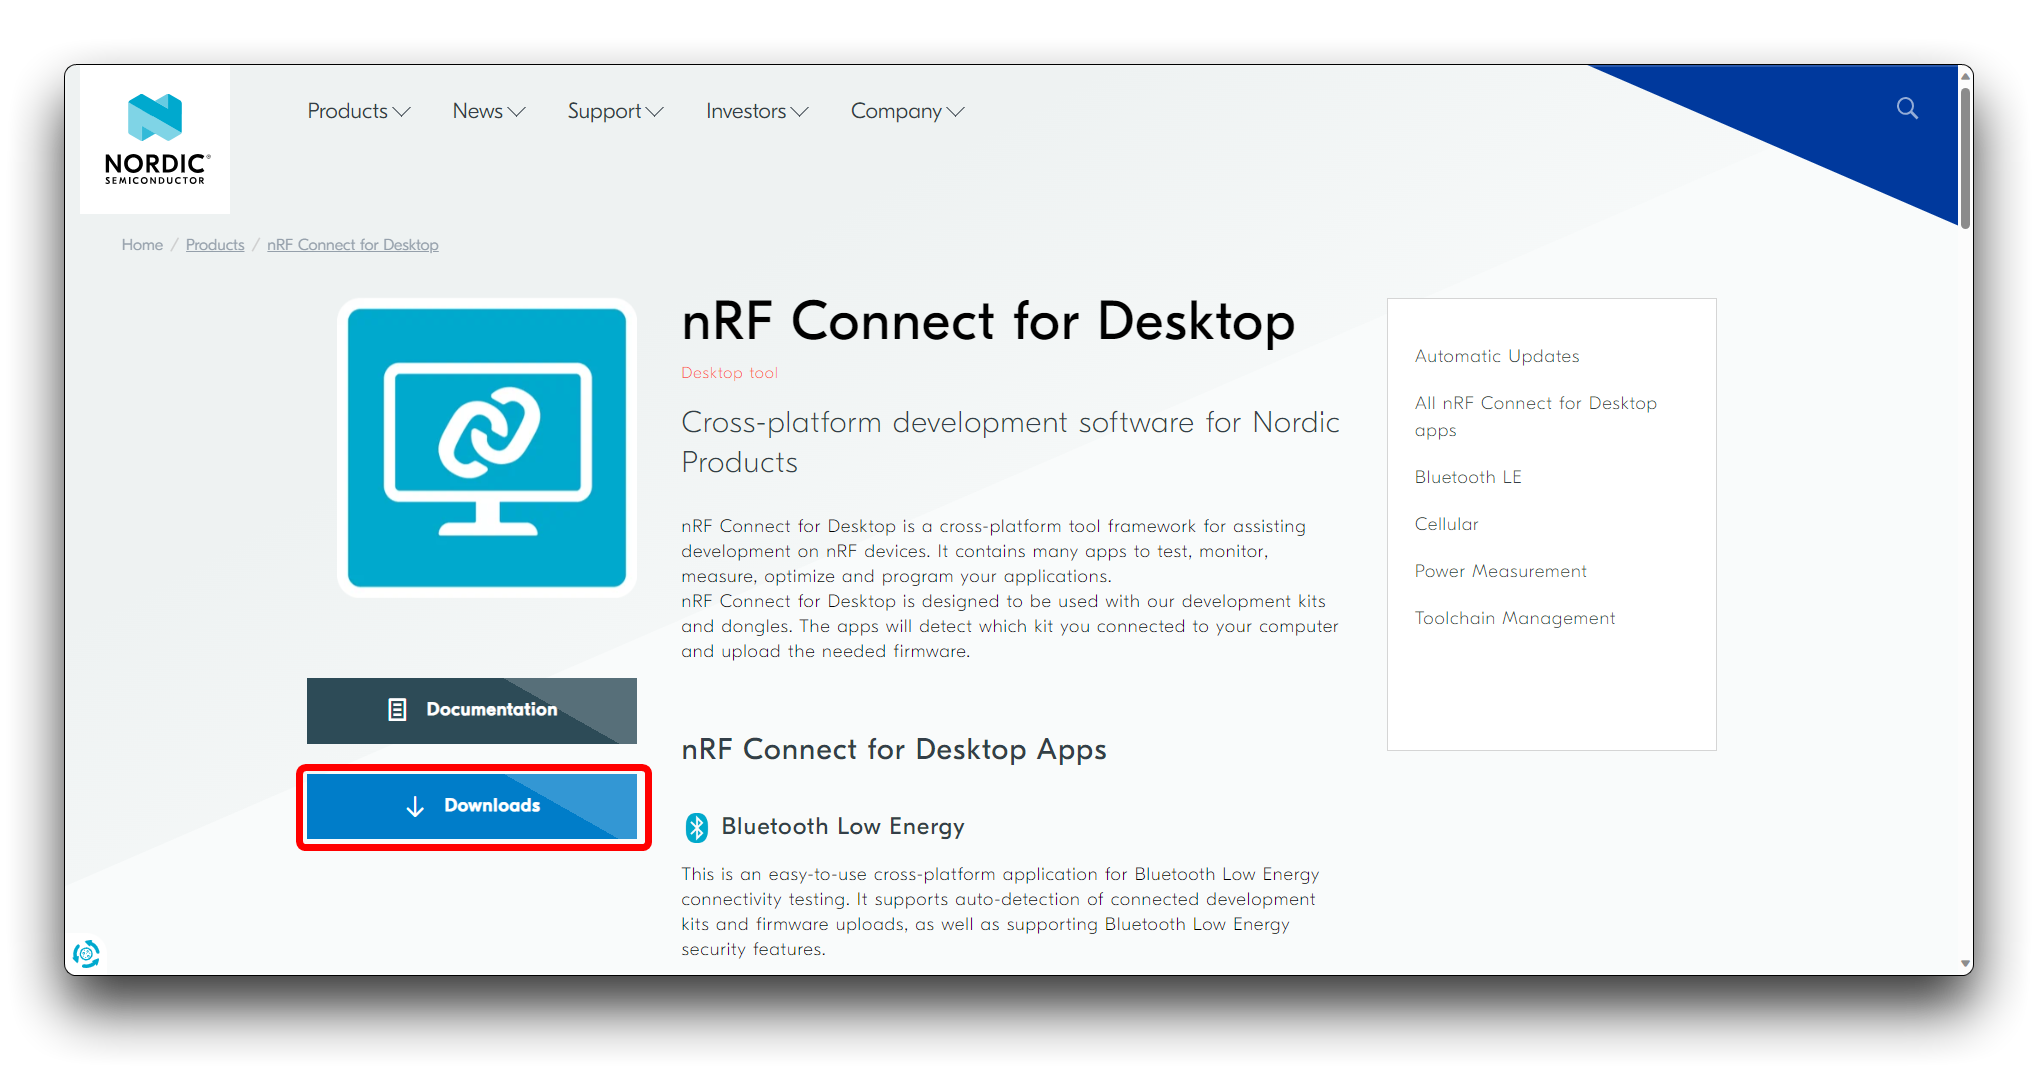
Toolchain Manager is available from nRF Connect for Desktop, a cross-platform tool that provides different applications that simplify installing the nRF Connect SDK. Both the tool and the application are available for Windows, Linux, and macOS.
Step 1. Download nRF Connect for Desktop for your operating system.
Step 2. Install and run the tool on your machine.
Step 3. In the APPS section, click Install next to Toolchain Manager.
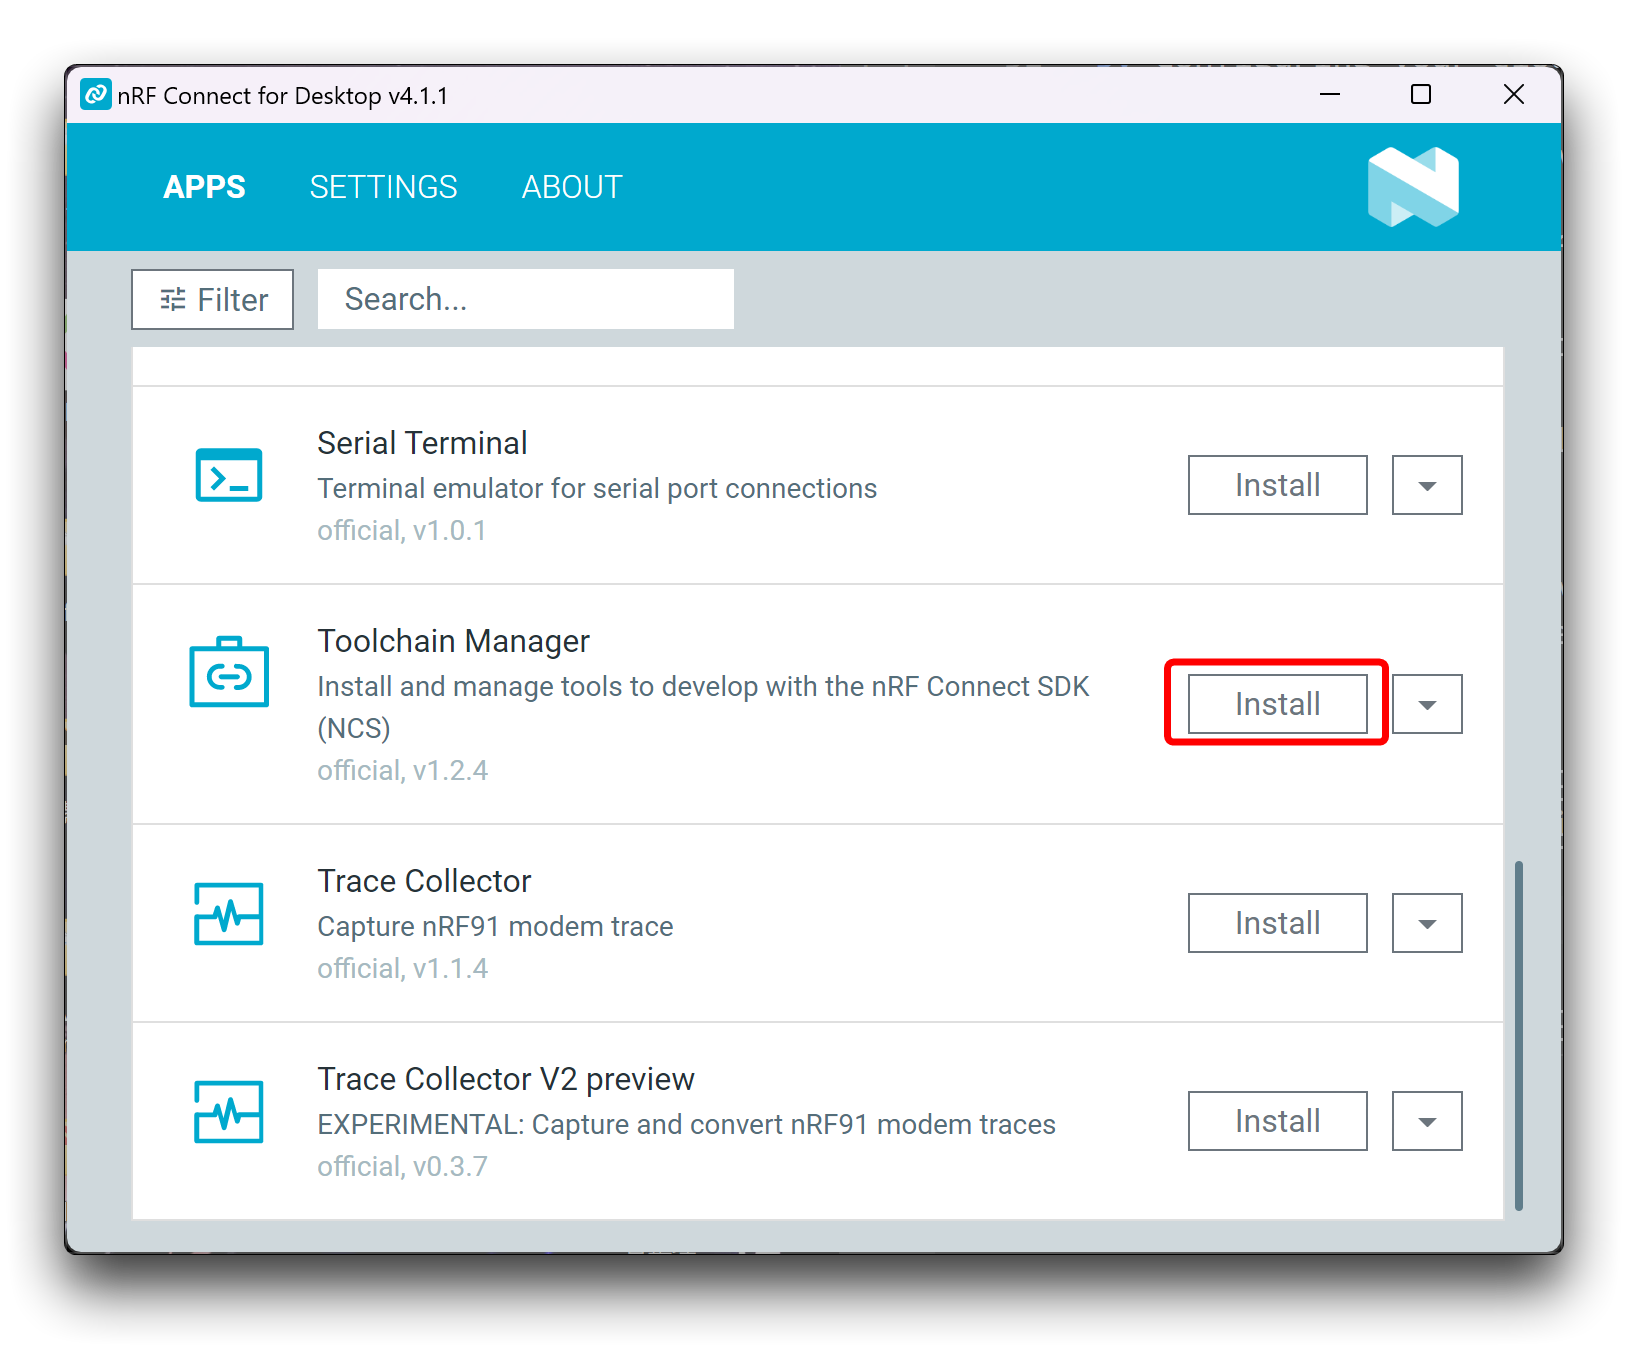
Step 4. The app is installed on your machine, and the Install button changes to Open.
Step 5. Open Toolchain Manager in nRF Connect for Desktop.
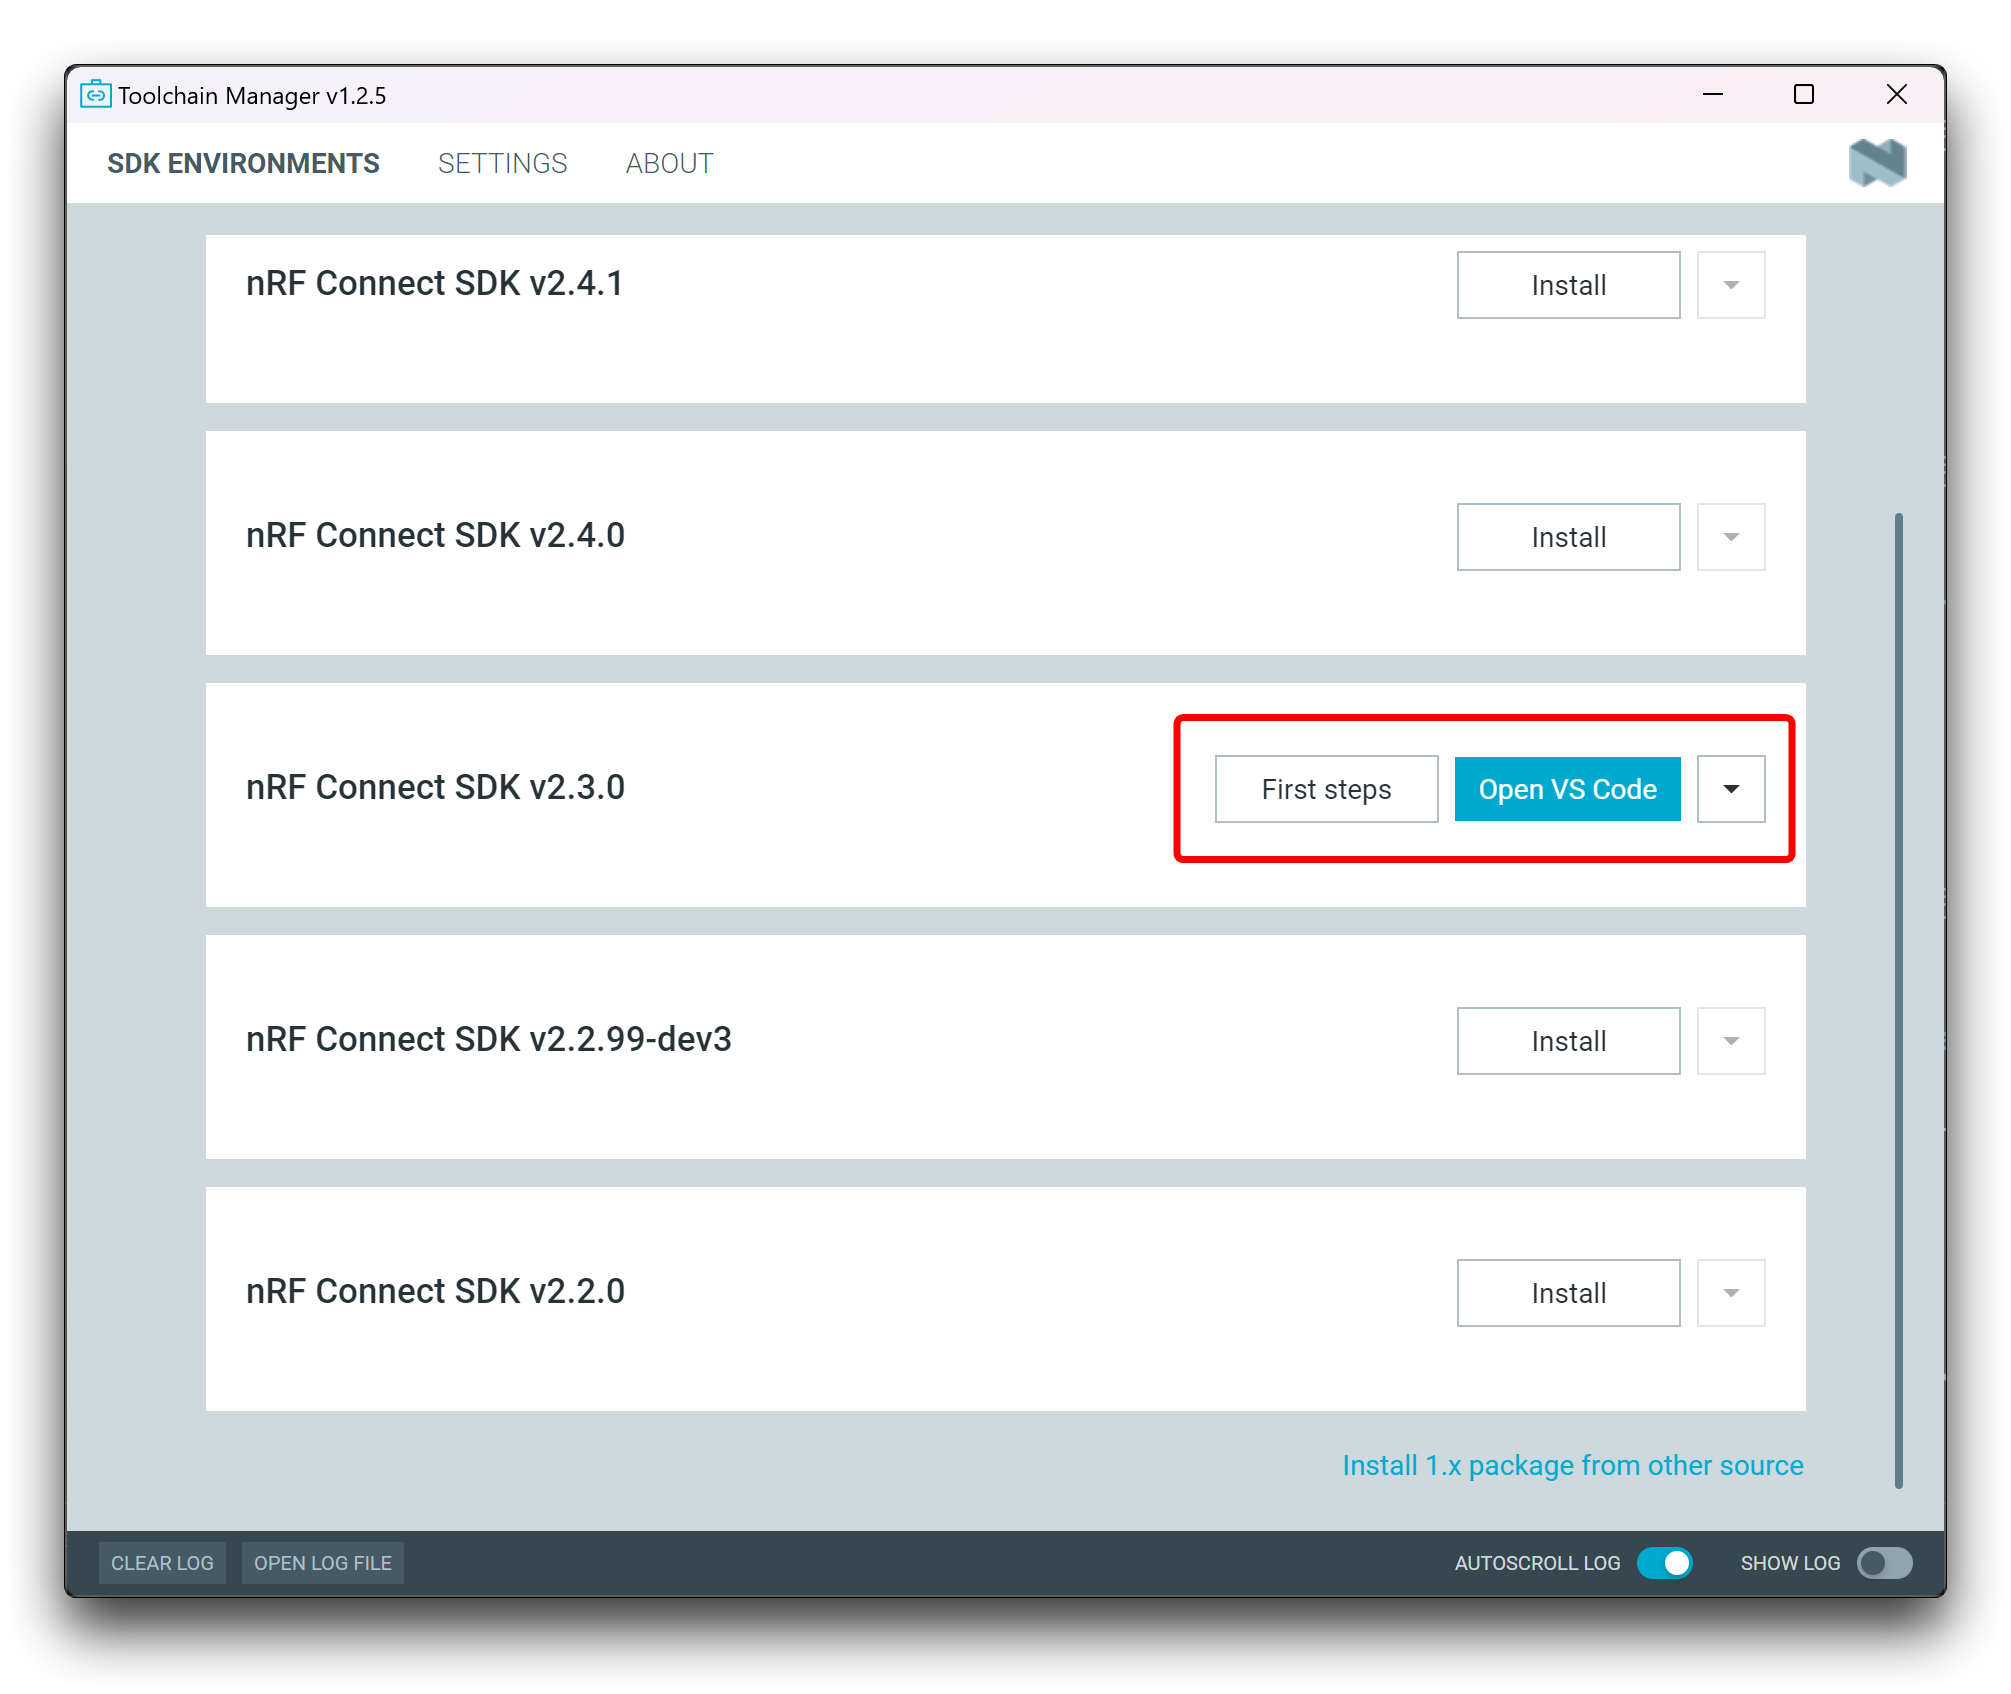
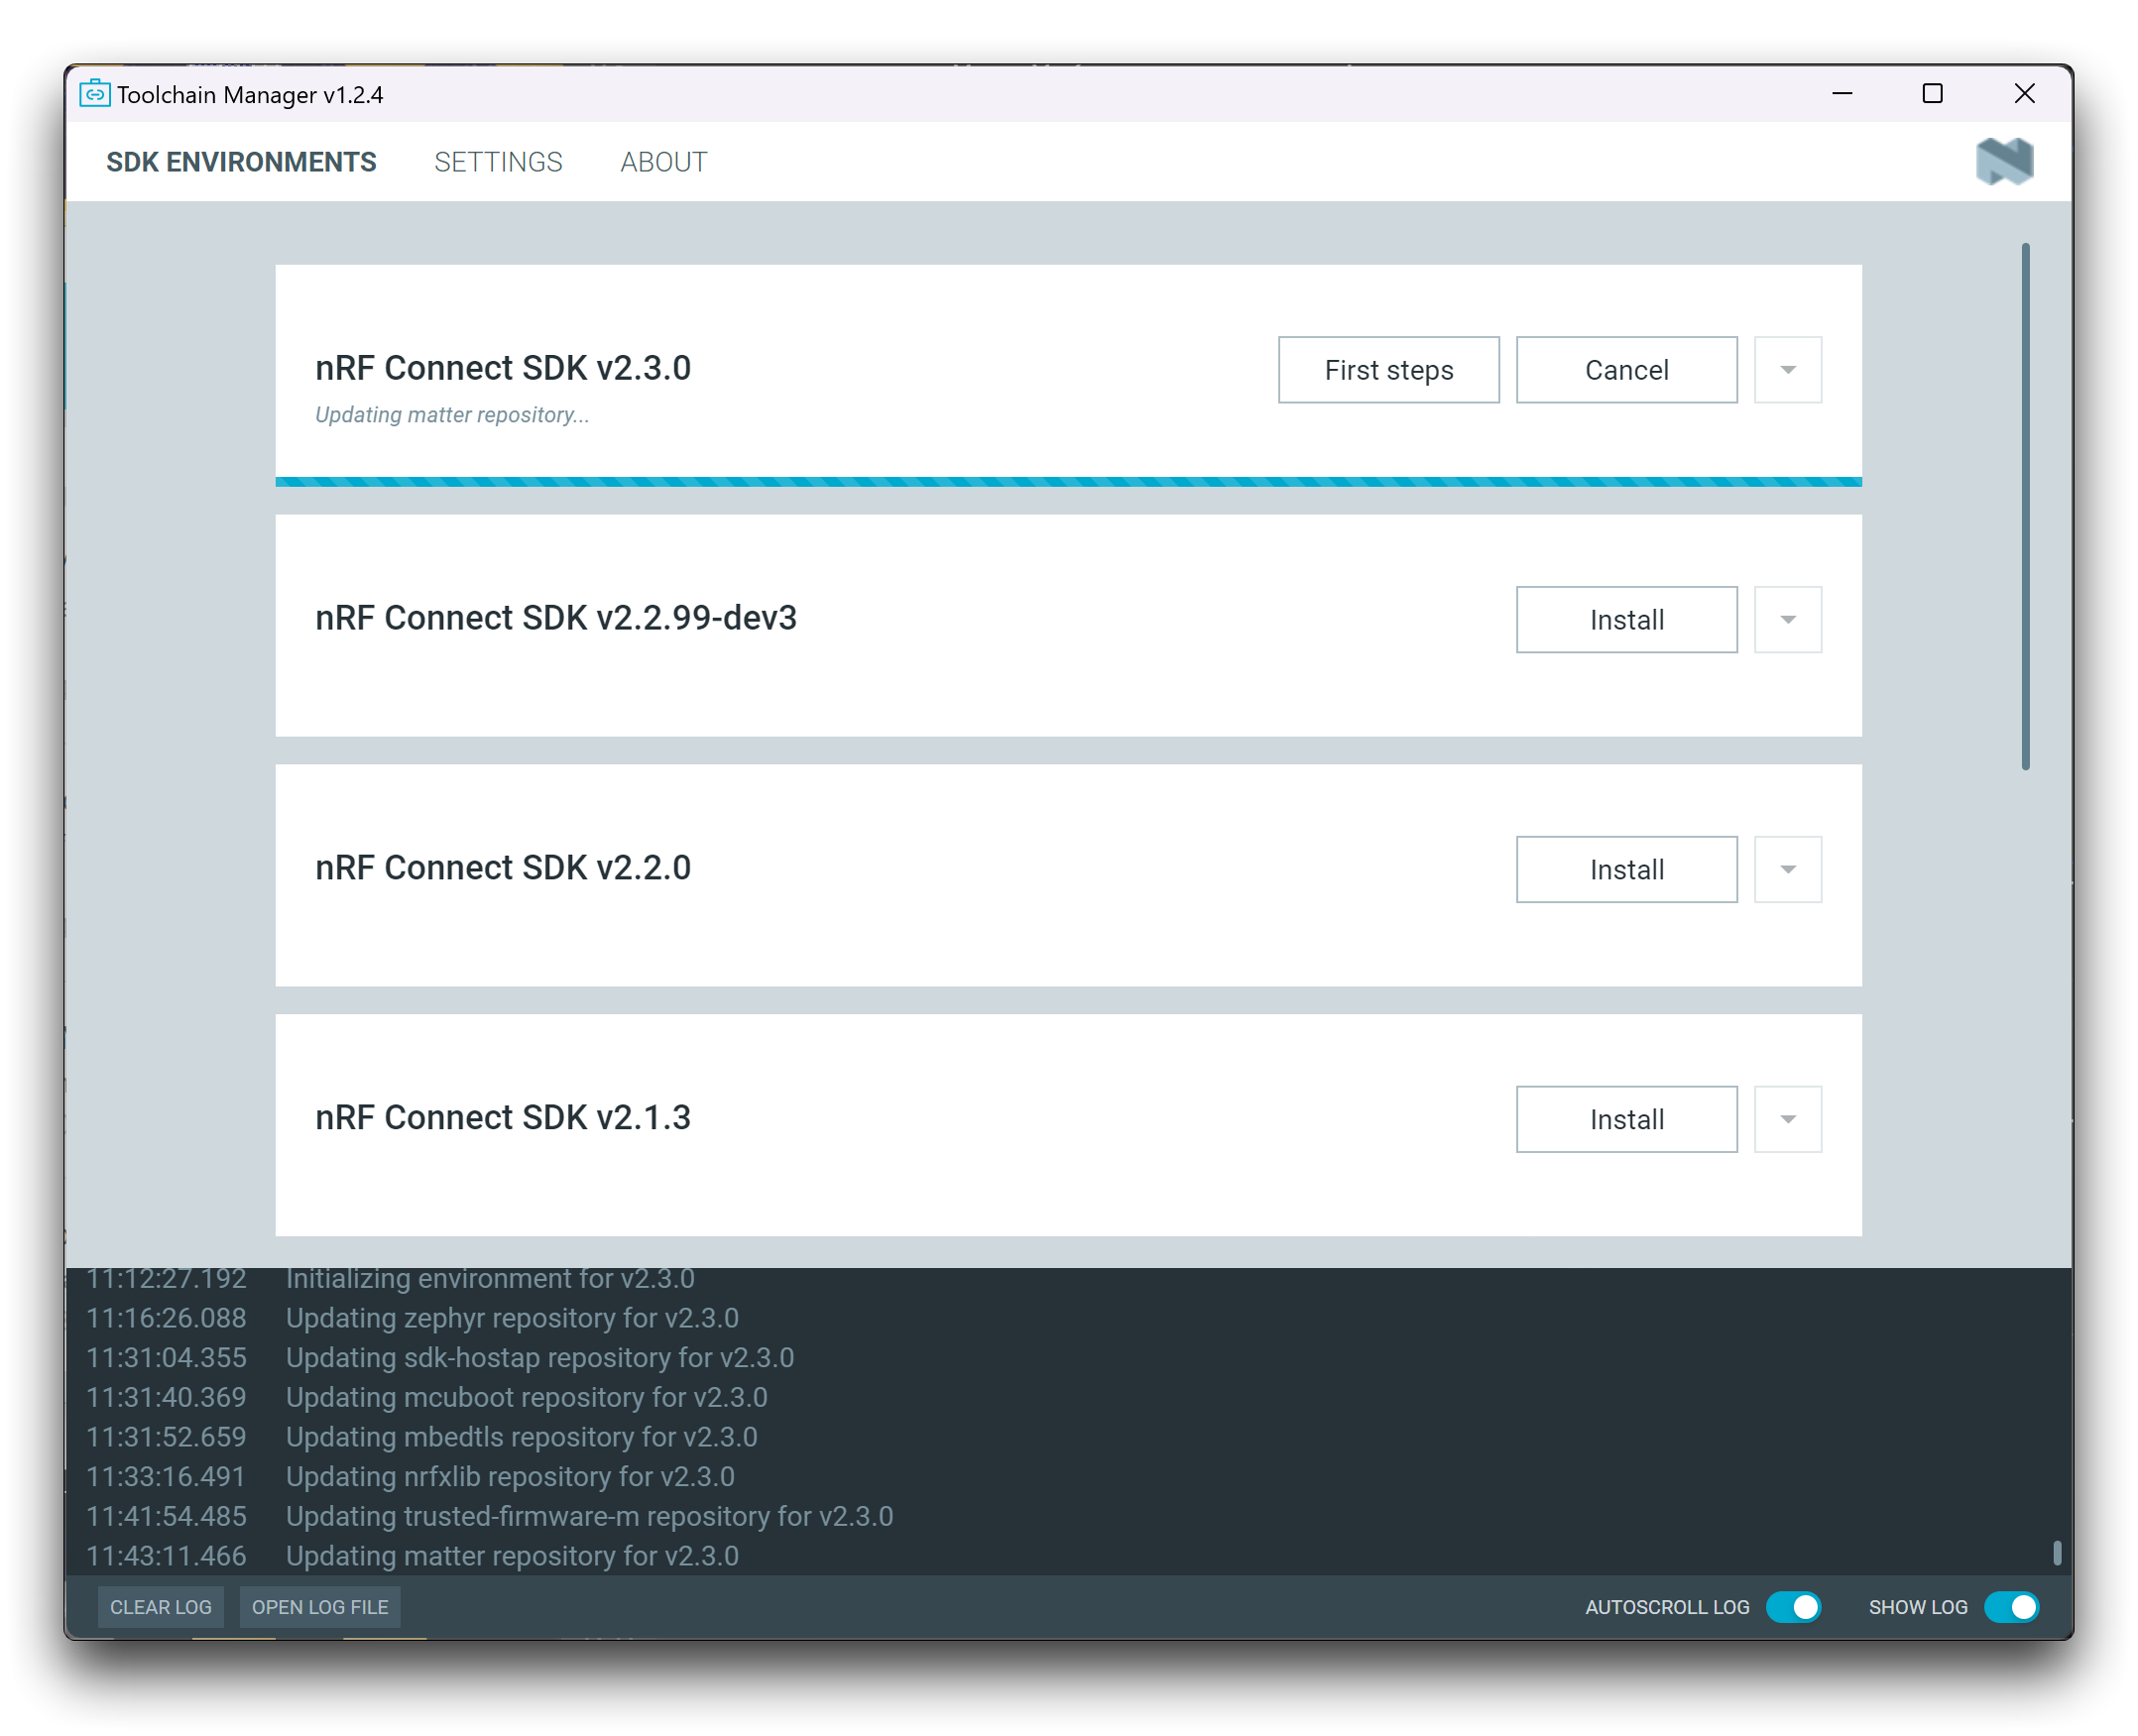
Click SDK ENVIRONMENTS in the navigation bar to specify where you want to install the nRF Connect SDK.

Step 6. In SDK ENVIRONMENTS, click the Install button next to the nRF Connect SDK version that you want to install.
The nRF Connect SDK version of your choice is installed on your machine. The Install button changes to Open VS Code.
The installation time is related to the network in your environment and the installation is expected to take about one hour. The software may not do anything during this time, so please don't assume that there is a jam, you can check the progress of the installation through the log.
Downloading Amazon Sidewalk repository
After installation, there are two ways you can build an application:
- Using Visual Studio Code and the nRF Connect for VS Code extension
- Using command line
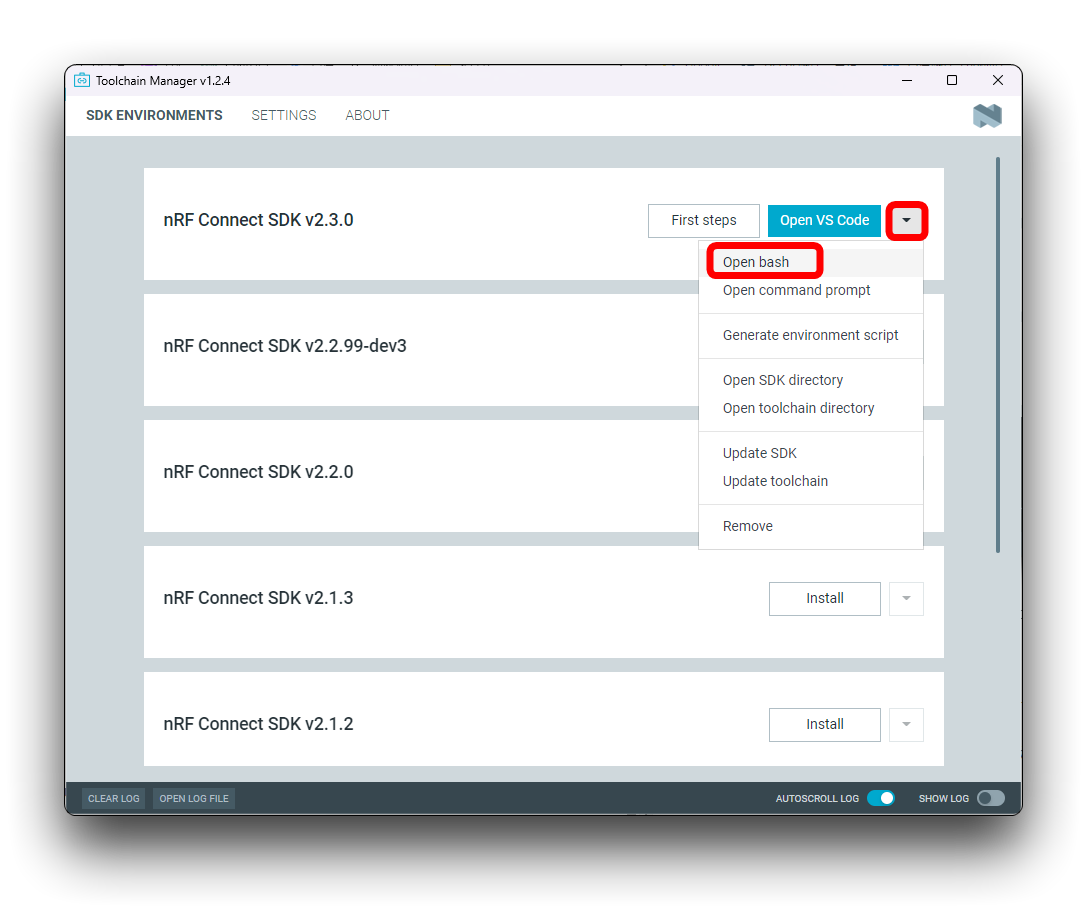
Step 7. For our project, the use of the command line is sufficient. Click the down arrow next to the version you installed, and select Open bash.
Your directory structure should look as follows:
.
|___ .west
|___ bootloader
|___ modules
|___ nrf
|___ nrfxlib
|___ zephyr
|___ ...
Step 8. Clone the Amazon Sidewalk application repository from the sdk-sidewalk repository to the nRF Connect SDK folder, and name it sidewalk by running the following command:
git clone https://github.com/nrfconnect/sdk-sidewalk.git sidewalk
Step 9. Install Python requirements for Amazon Sidewalk.
pip install -r sidewalk/requirements.txt
If your computer does not already have a Python environment installed, please read the tutorial here to install the latest Python 3 on your computer.
Step 10. Set the Amazon Sidewalk application manifest and update.
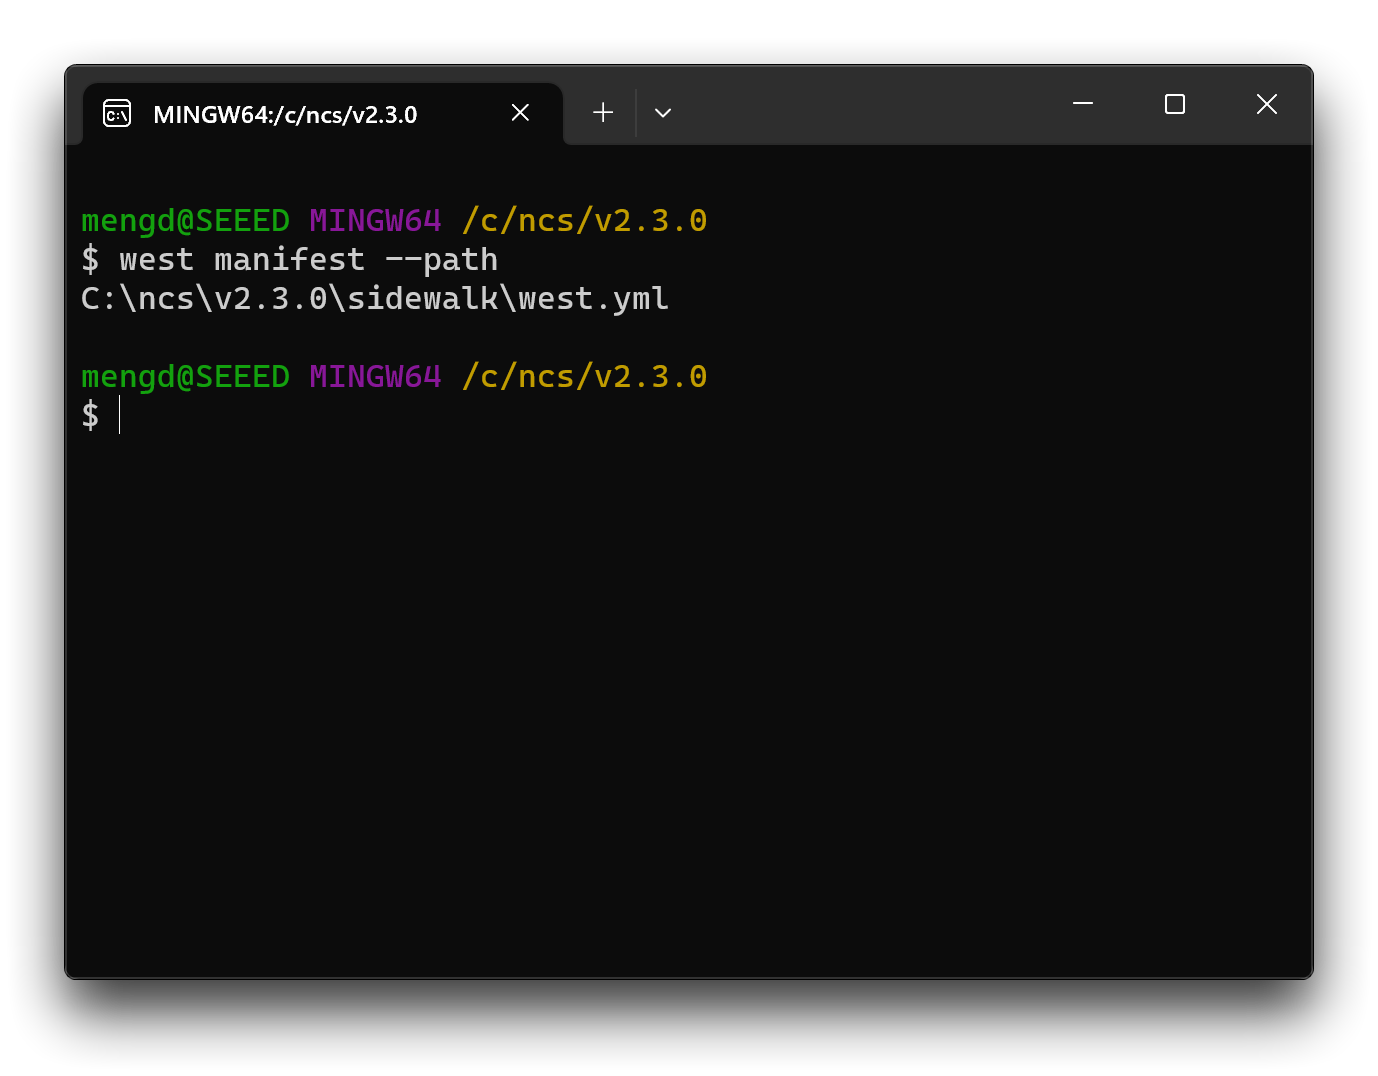
Check the current manifest path:
west manifest --path
The path returned should be similar to the following format.
> /path-to-ncs-folder/nrf/west.yml
Set the manifest path to the Amazon Sidewalk repository:
west config manifest.path sidewalk
Update all repositories:
west update
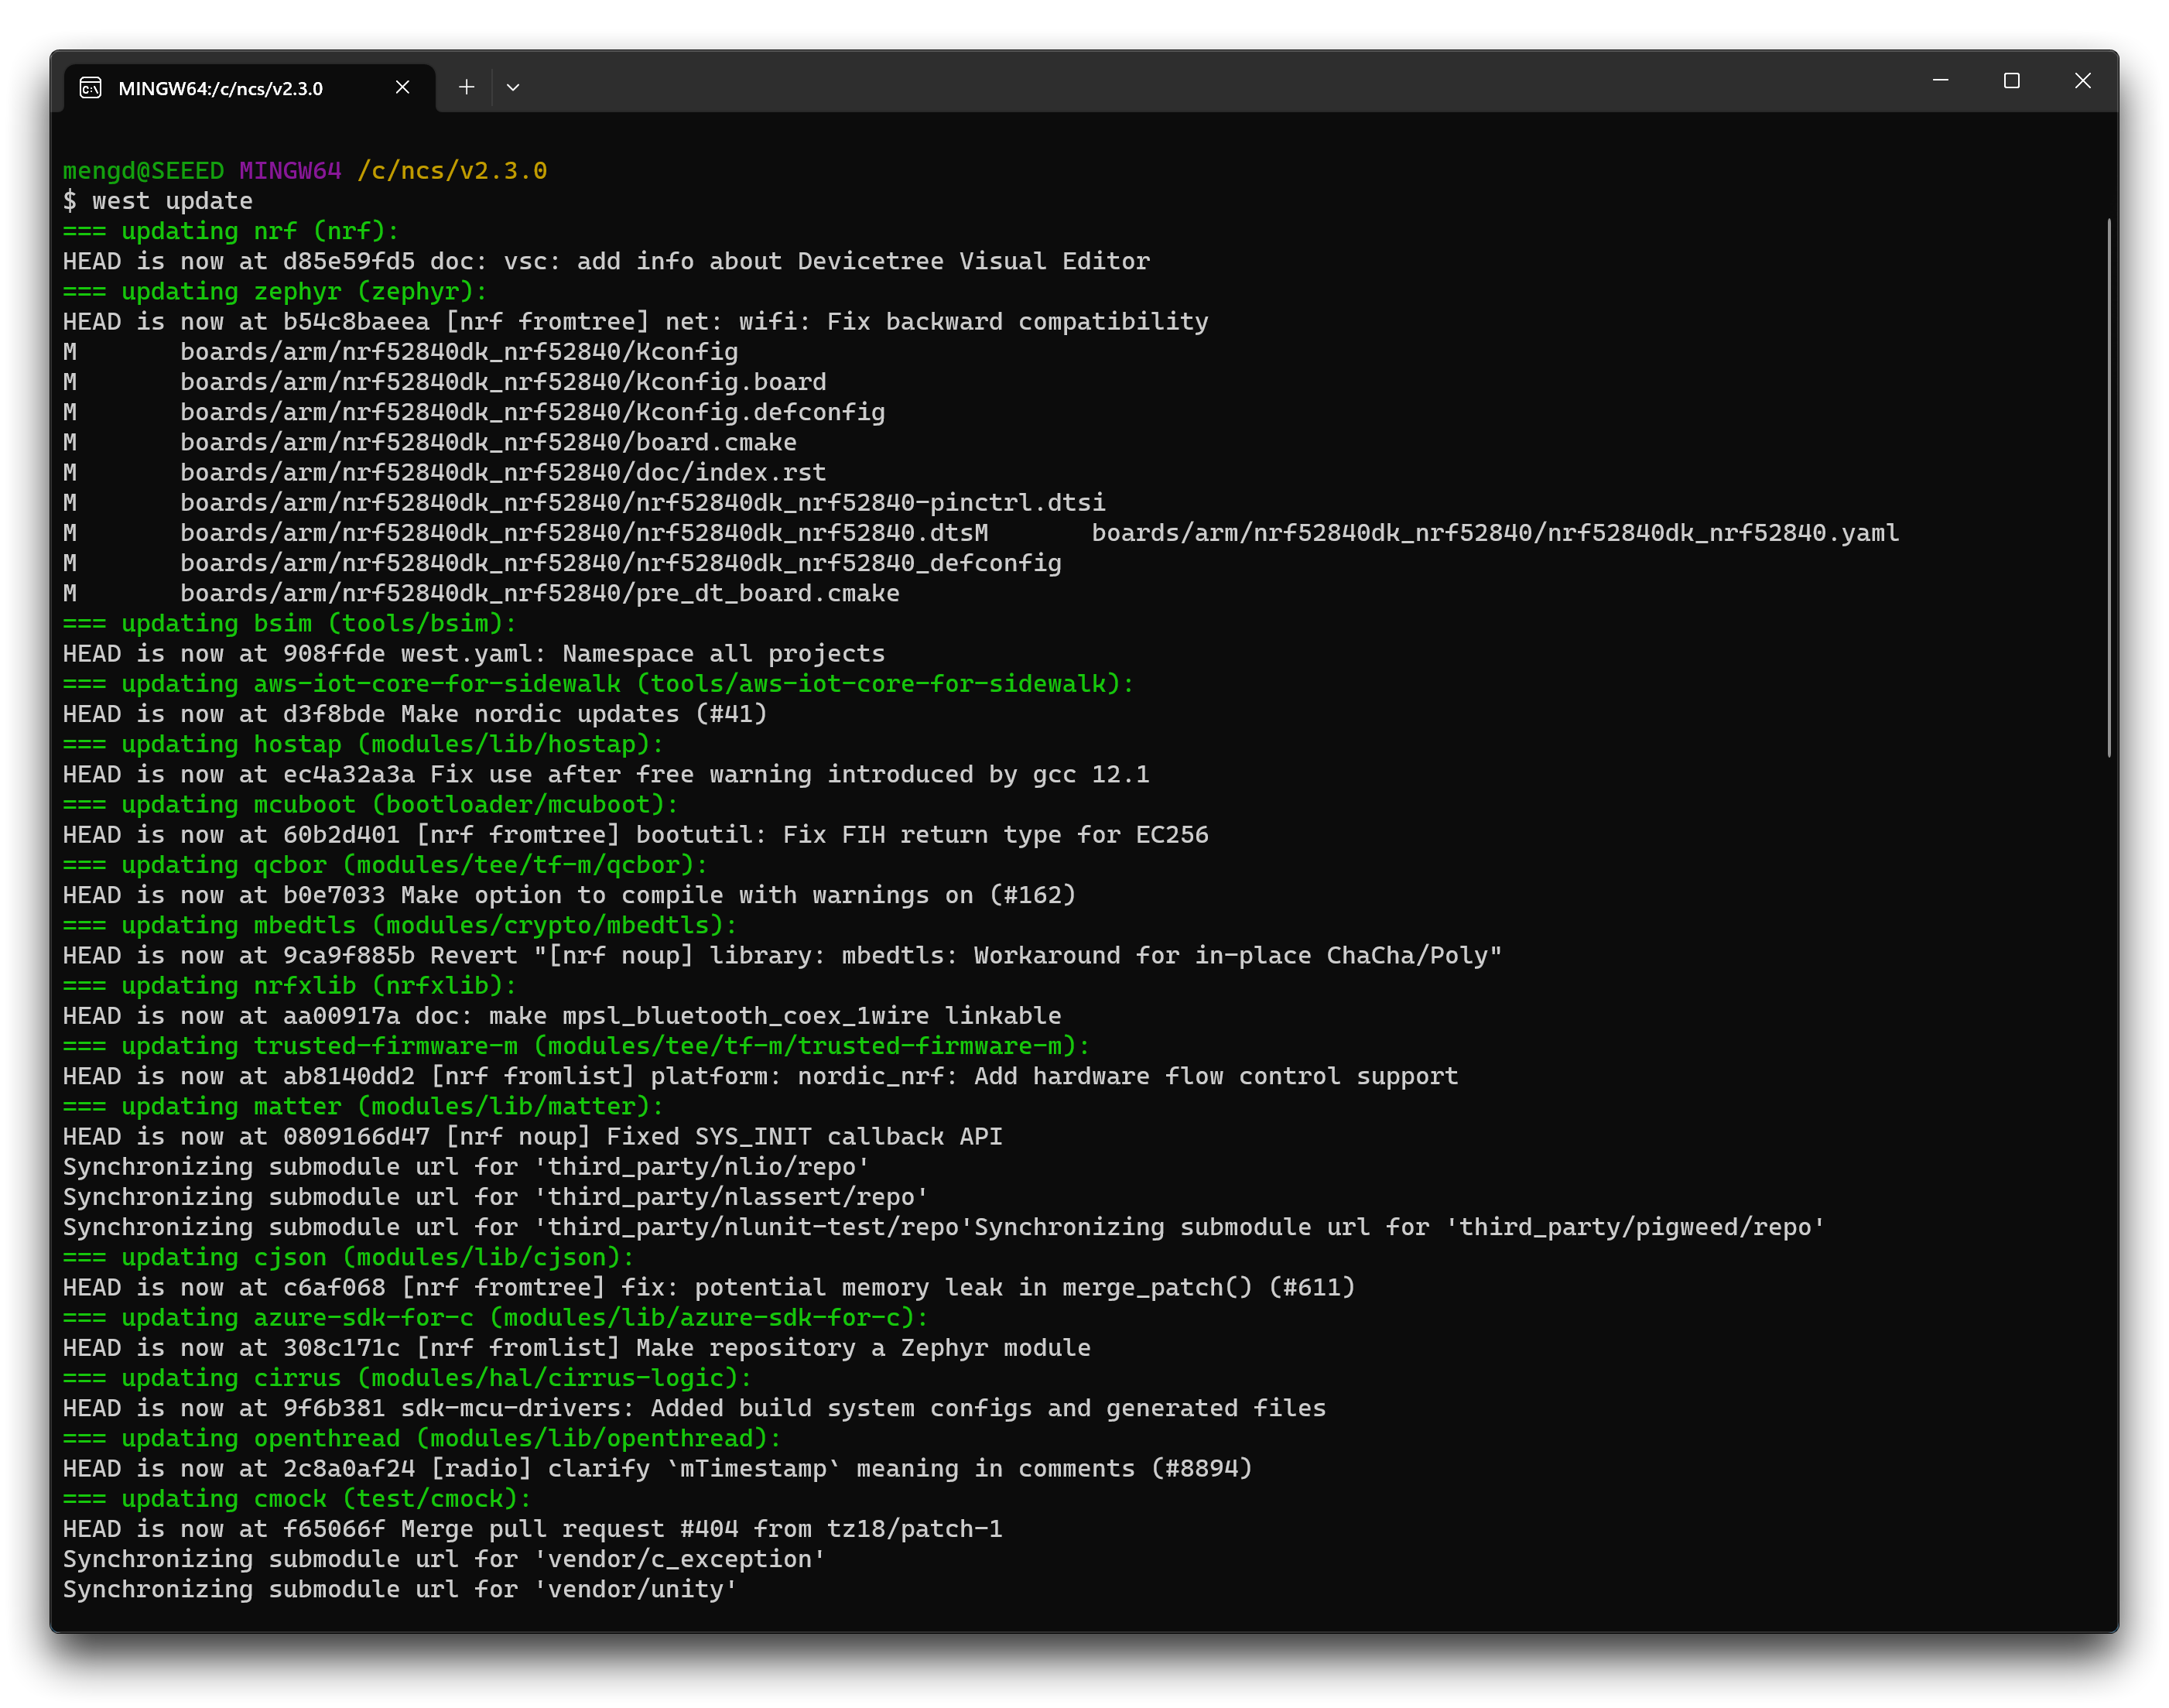
Depending on your connection, the update might take some time.
Verify the new manifest path:
west manifest --path
The path returned should be similar to the following format.
> /path-to-ncs-folder/sidewalk/west.yml
Please keep the Bash window open, we'll be back in a few minutes.
Configure your AWS cloud services
The original tutorial for the Setting up your Amazon Sidewalk product can be read here.
Next we need to configure AWS Cloud Services so that the device is connected to your AWS account via a key.
Step 1. Download the Amazon Sidewalk Sample IoT App Repository to your local machine. Open a new terminal (if you are using Windows, then open a new Powershell) and enter the following command to clone the repository.
git clone https://github.com/aws-samples/aws-iot-core-for-amazon-sidewalk-sample-app.git
Step 2. If you are using Amazon IoT Core for the first time, then you may need to sign up for a root account, or if you already have a root or IAM account, log in to the Amazon IoT Core console.
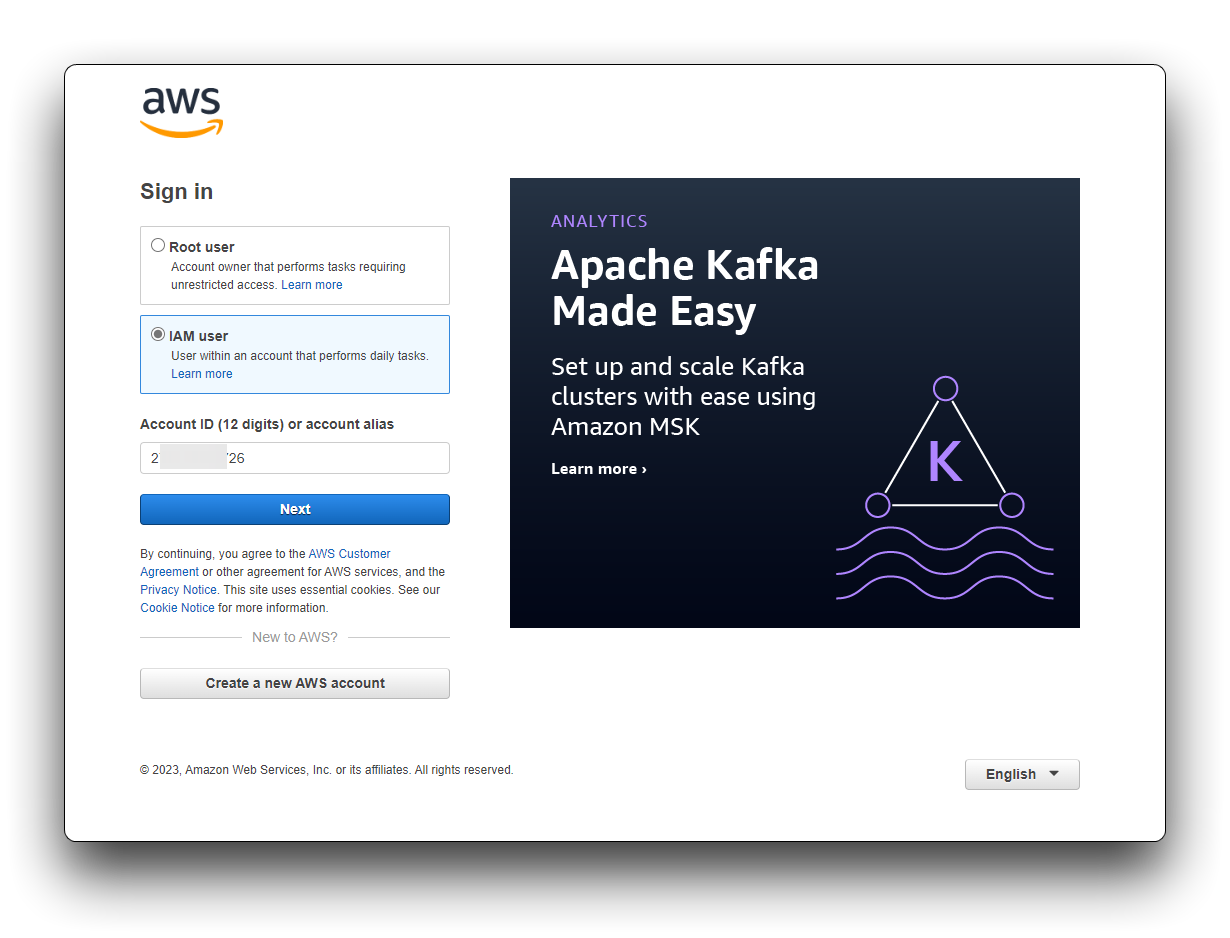
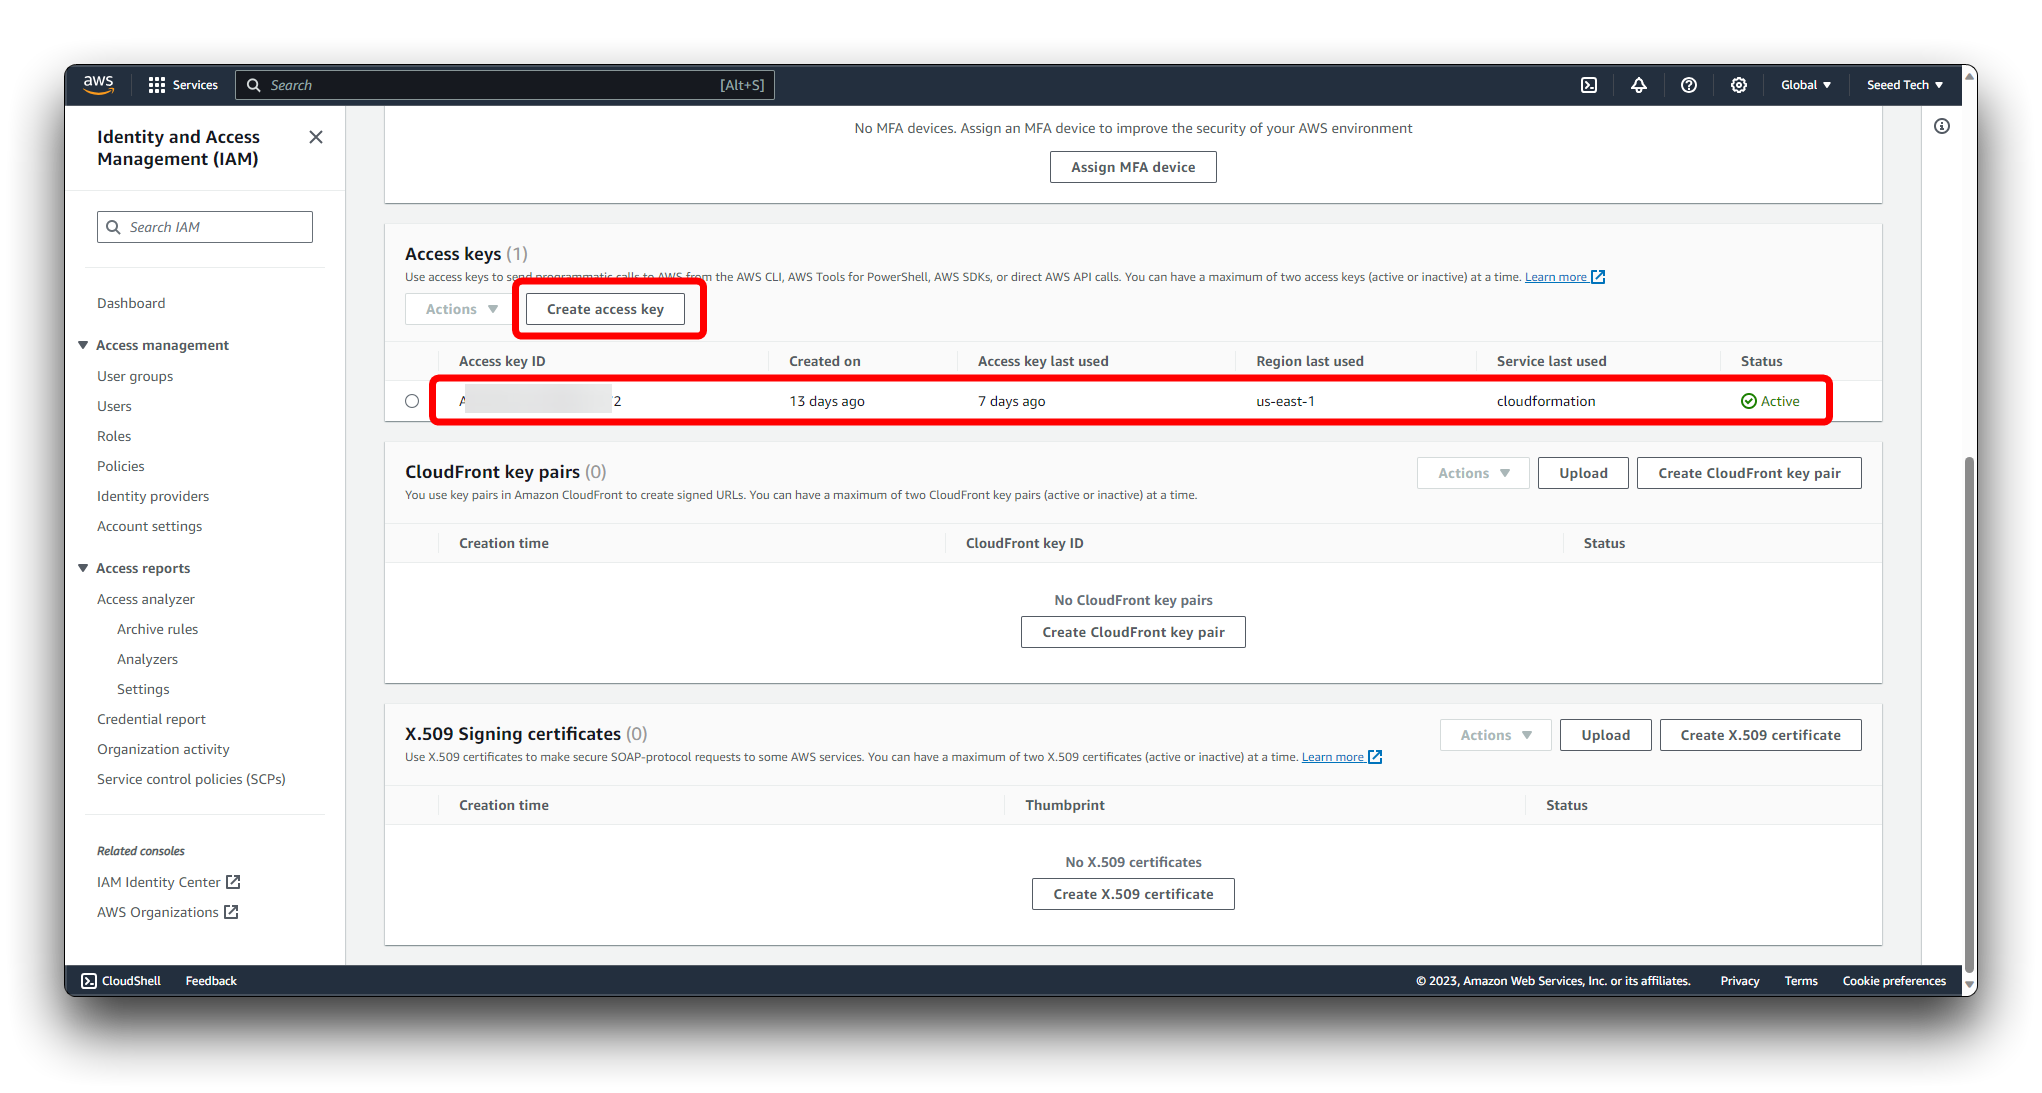
Step 3. Get the account key.
Once logged in, in the upper right corner of the console, click on your username and select Security credentials.
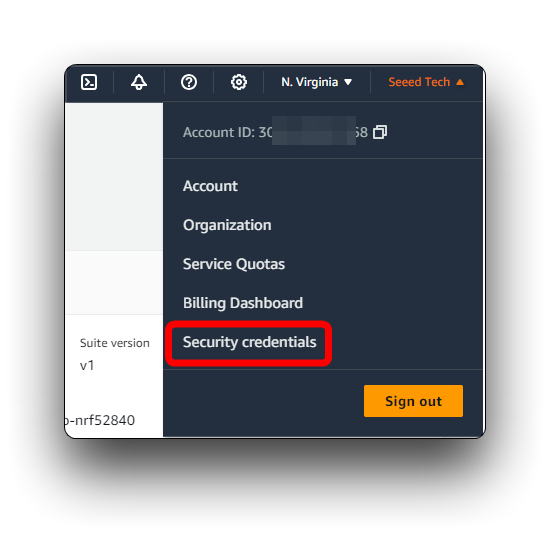
Then please create a new credential and save your Access Key ID and Secret Access Key. we will use them in later steps.
Step 4. Configure credentials file on your local machine.
If you haven't already installed the AWS CLI, then you may need to install it.
If you have the AWS CLI installed, then you can use the aws configure command to configure your credentials file. If you are using a Windows system, you will need to execute the command in a CMD window with administrator privileges.
aws configure
The window will then ask you to enter your keys, please enter them separately and enter to confirm.
aws_access_key_id = YOUR_ACCESS_KEY
aws_secret_access_key = YOUR_SECRET_KEY
This is followed by the choice of country and region, here we need to select us-east-1.
region=us-east-1
For the rest, we simply enter and leave the default.

Step 5. Add user permissions to create resources.
If your user has Admin permissions, prerequisite is already satisfied, you can skip this point.
This tutorial uses an administrator rights account by default, if you are using an IAM account, please contact your administrator to enable specific permissions for your account.
- Run
python aws-iot-core-for-amazon-sidewalk-sample-app/ApplicationServerDeployment/policies/generate_policy.pyscript, which will generate personalized policy documents in ApplicationServerDeployment/policies/ directory - go to the IAM console, create the policy using DeployStackPolicy.json content
- assign created policy to your user Refer to the IAM tutorial: Create and attach your first customer managed policy for further guidance.
Make sure Simplicity Commander (for SiLabs) are present in your system PATH environment variable.
Try calling commander --version in the terminal to make sure the Simplicity Commander is available.
Run Amazon Sidewalk's BLE example
The original tutorial for the Template Bluetooth LE can be read here.
Provisioning generation
Step 1. Go to AWS IoT Core for Amazon Sidewalk tools.
Open the folder aws-iot-core-for-amazon-sidewalk-sample-app that we cloned down earlier.
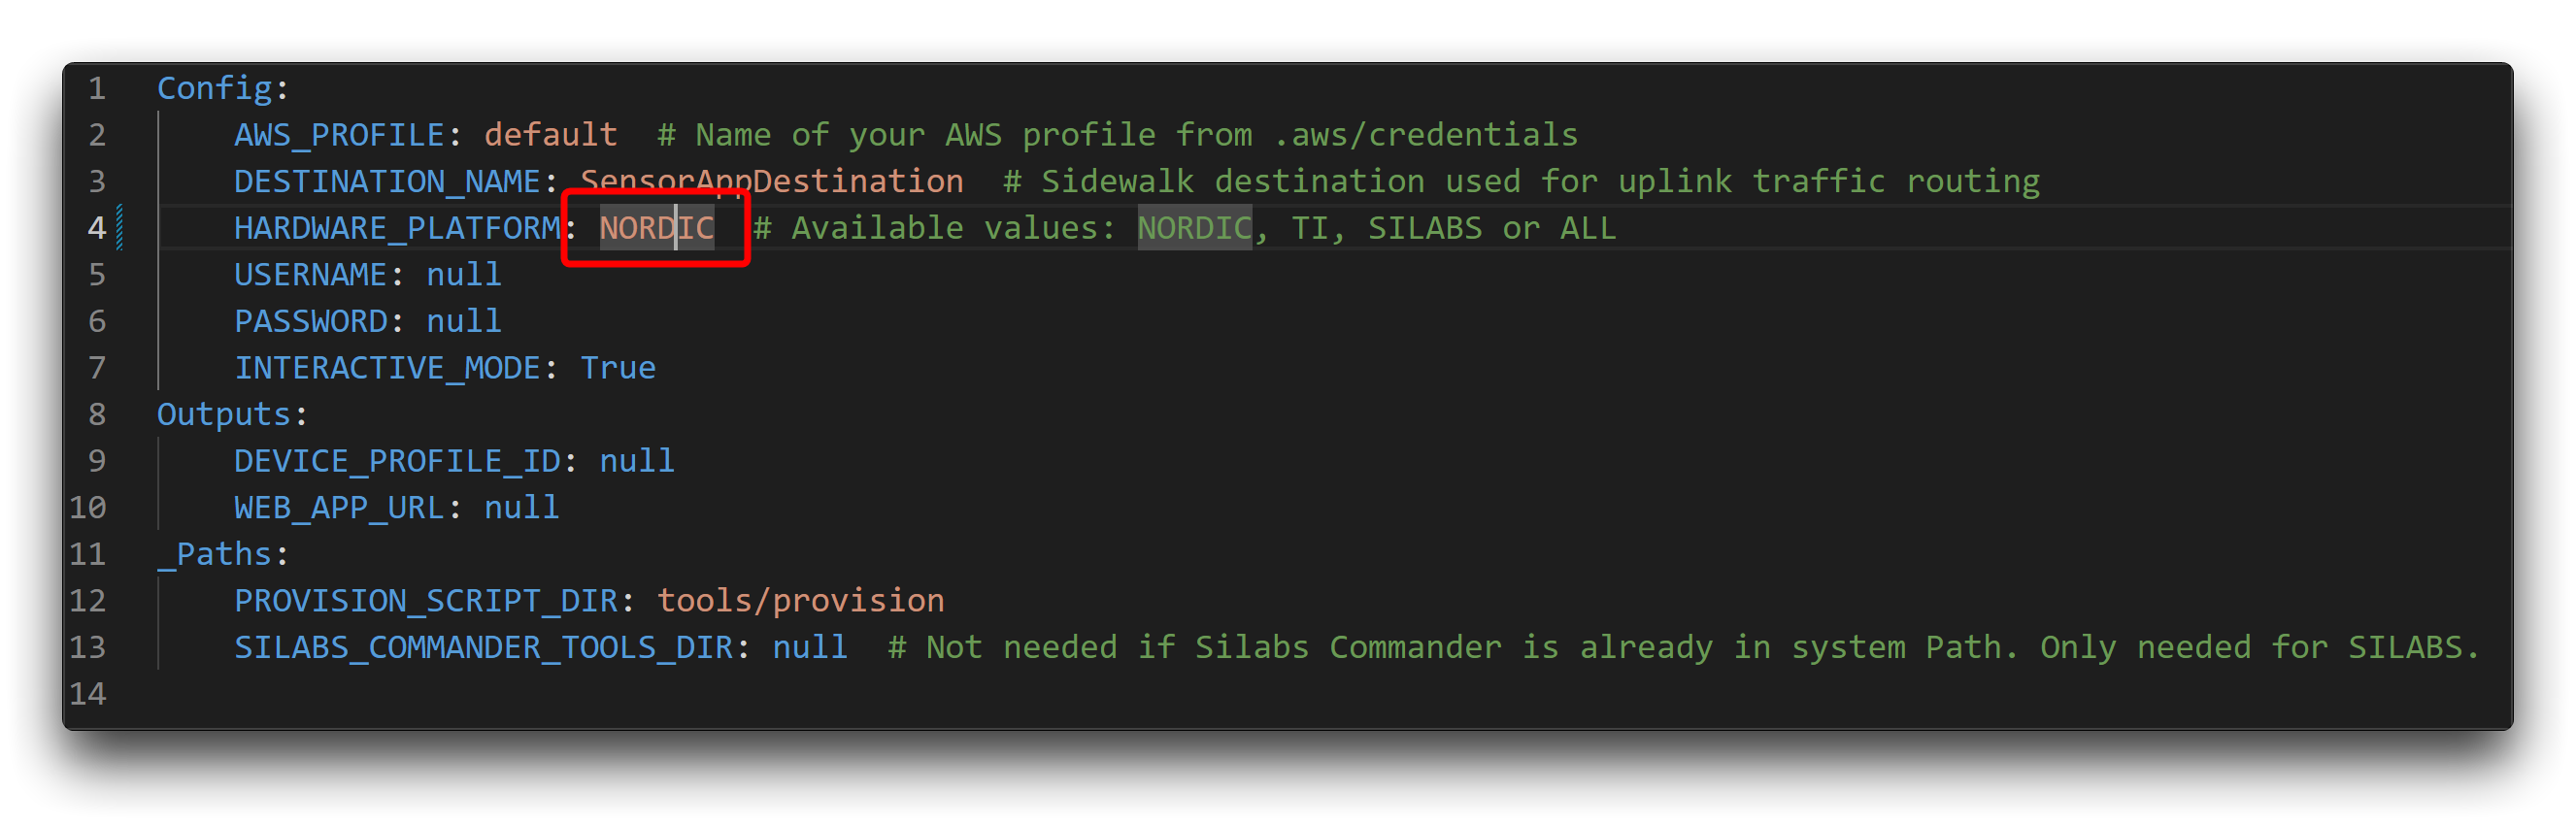
Step 2. Populate the config.yaml configuration file. Set NORDIC hardware platform.
Open the file named config.yaml in the folder (use a suitable editor, e.g. VS Code). Paste the following and keep it.
Config:
AWS_PROFILE: default  # Name of your AWS profile from .aws/credentials
DESTINATION_NAME: SensorAppDestination  # Sidewalk destination used for uplink traffic routing
HARDWARE_PLATFORM: NORDIC  # Available values: NORDIC, TI, SILABS or ALL
USERNAME: null
PASSWORD: null
INTERACTIVE_MODE: True
Outputs:
    DEVICE_PROFILE_ID: null
    WEB_APP_URL: null
_Paths:
    PROVISION_SCRIPT_DIR: tools/provision
    SILABS_COMMANDER_TOOLS_DIR: null  # Not needed if Silabs Commander is already in system Path. Only needed for SILABS.
Step 3. Set up Python virtual environment for the provisioning tools:
cd aws-iot-core-for-amazon-sidewalk-sample-app
python -m pip install --user virtualenv
python -m venv sample-app-env
sample-app-env\Scripts\activate.bat
pip install pip==22.3.1
python -m pip install -r requirements.txt
python -m pip install pyjwt -t .\ApplicationServerDeployment\lambda\authLibs
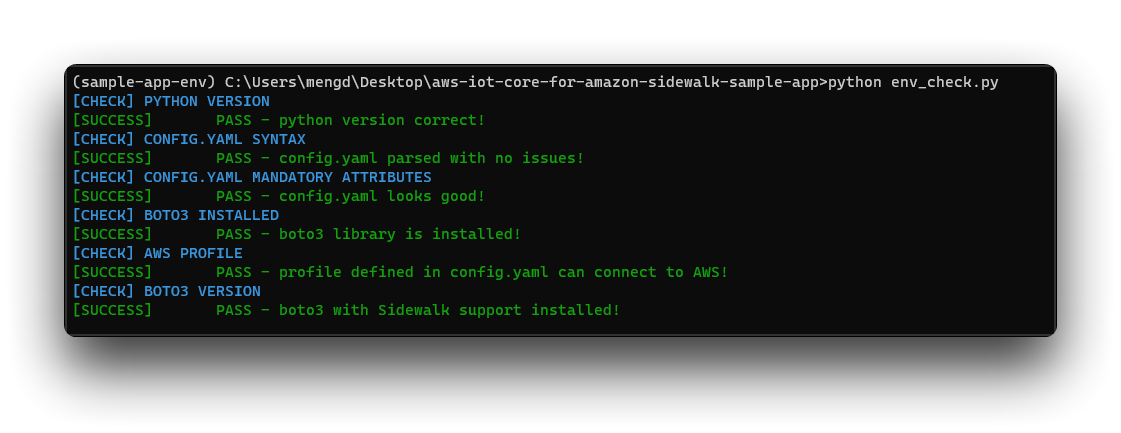
Step 4. At this point you may want to run a helper env_check.py script to sanity check your environment against the most common errors.
python env_check.py
If the message appears as shown, then your environment installation has gone well.
Step 5. Run the device provisioning scripts:
python EdgeDeviceProvisioning/provision_sidewalk_end_device.py
You should see the following output:
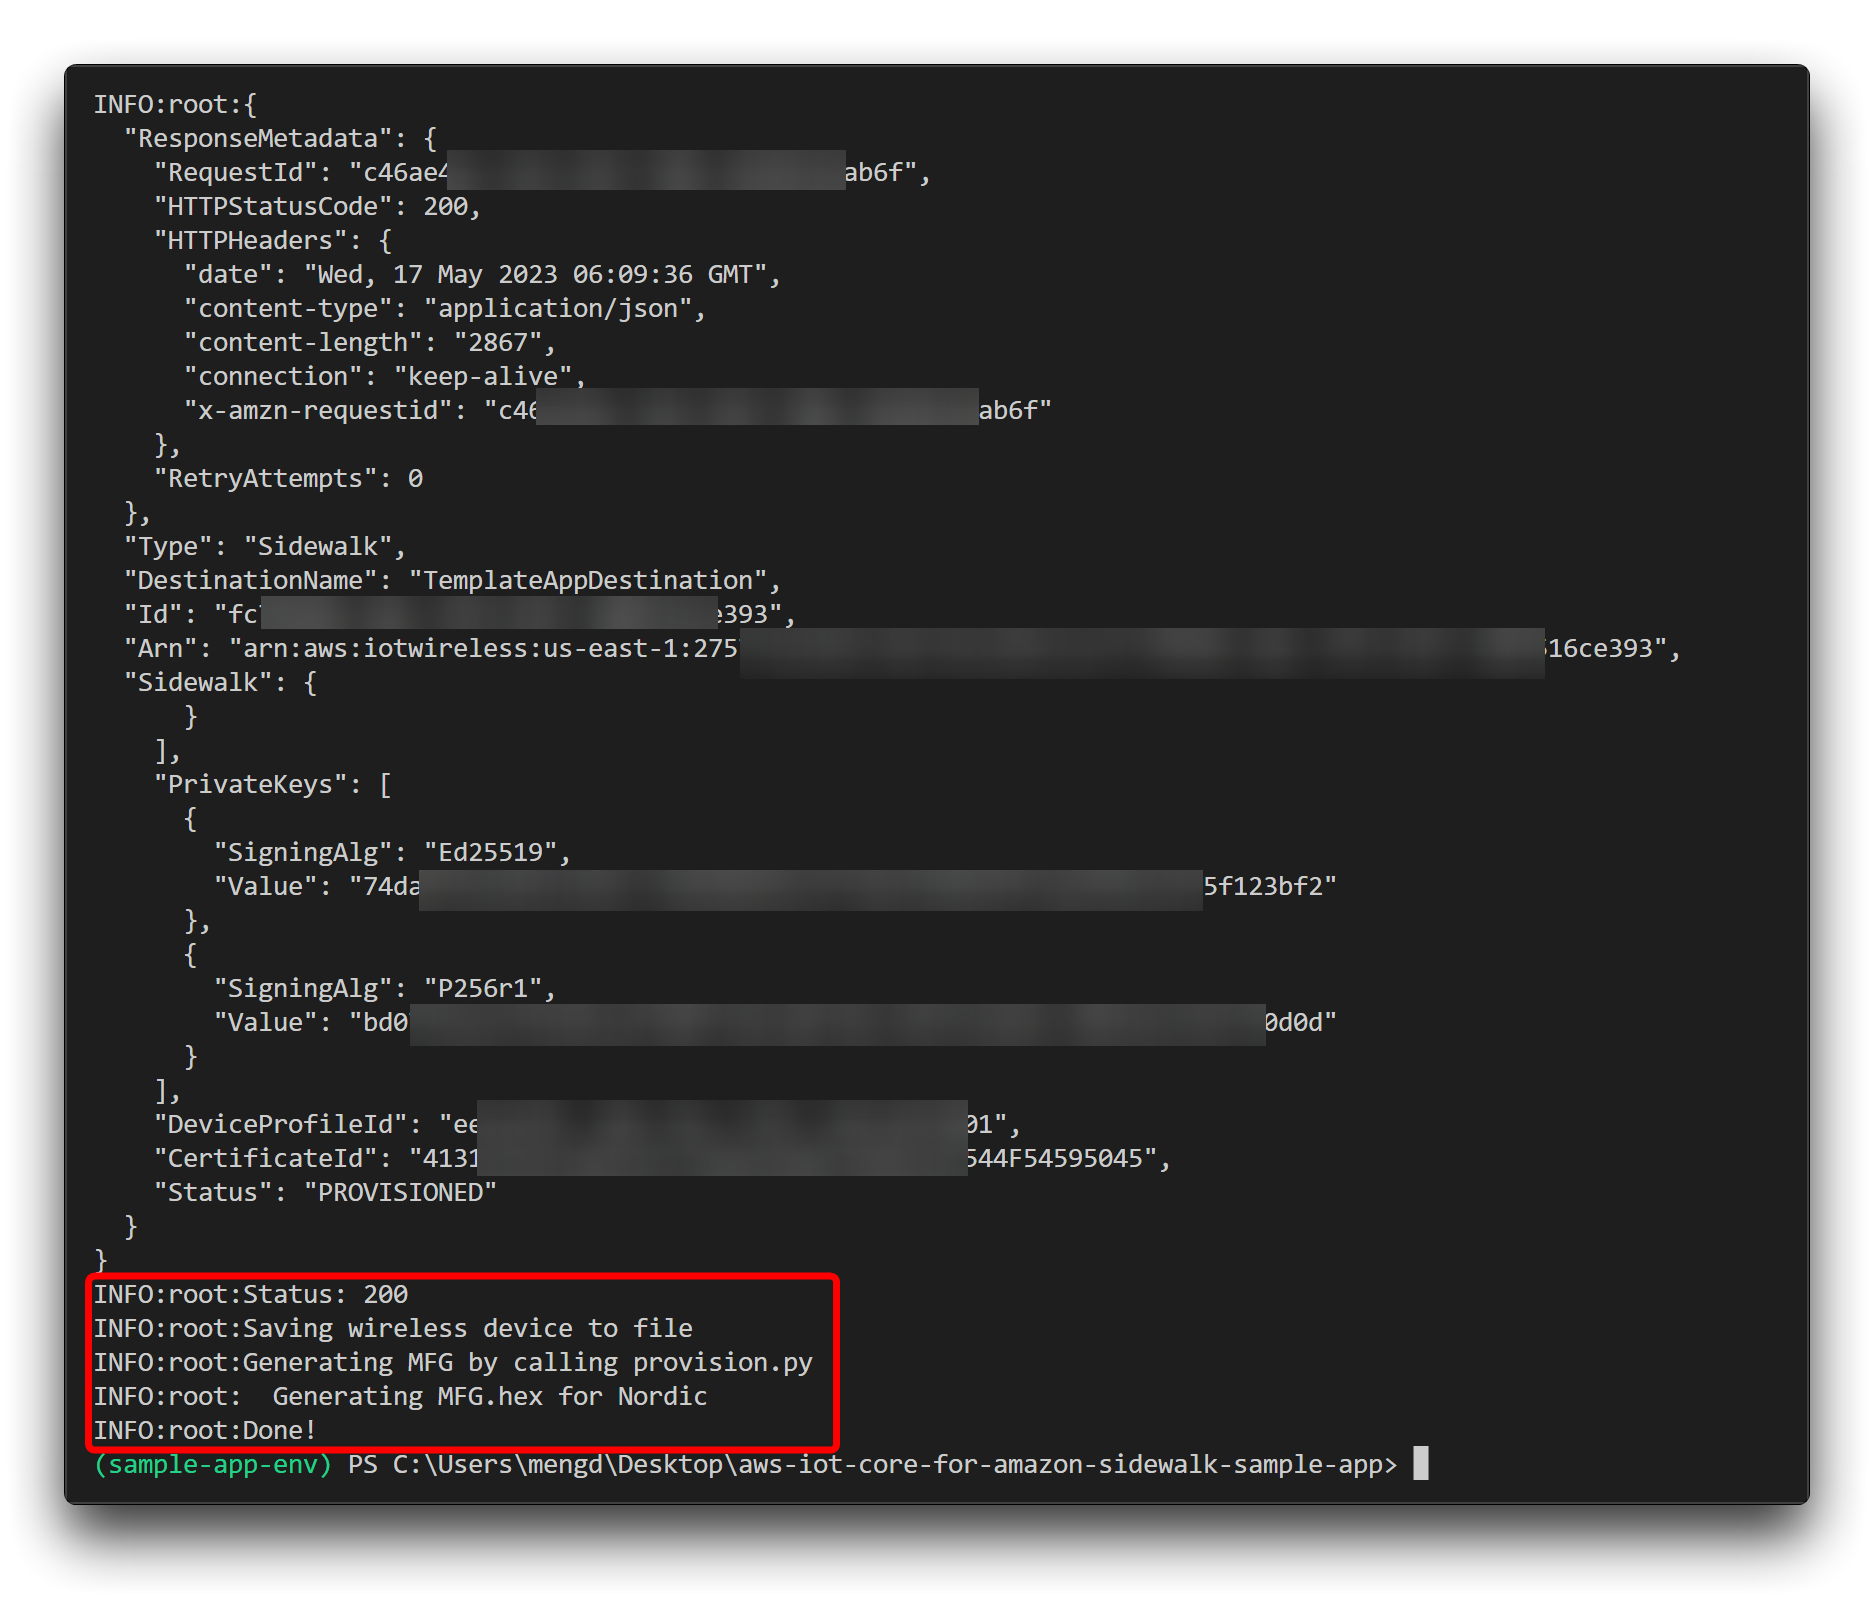
We need the Nordic_MFG.hex file that has been generated here, which will eventually be flashed into the XIAO nRF52840.
Nordic_MFG.hex is the only credential for a device to establish a communication link with your Amazon IoT Core, which is different for each device or account.
Your provisioning file is located in the EdgeDeviceProvisioning directory. Devices are grouped in the device profile’s subdirectory as shown in the structure below:
EdgeDeviceProvisioning \
- DeviceProfile_<profile-id> \
- DeviceProfile.json
- WirelessDevice_<device-id>\
    --  Nordic_MFG.bin
    --  Nordic_MFG.hex
    --  WirelessDevice.json
Please copy Nordic_MFG.hex files and save it in a place where you can easily find it.
Step 6. Exit the Python virtual environment:
deactivate
Add MQTT to destination
For this part of the tutorial you can read the official tutorials provided by Sidewalk.
Samples overview
The sample demonstrates a template for Amazon Sidewalk End Node application. It is optimized for Bluetooth LE.
The sample supports the following development kits:
| Hardware platforms | PCA | Board name | Build target |
|---|---|---|---|
| nRF52840 DK | PCA10056 | nrf52840dk_nrf52840 | nrf52840dk_nrf52840 |
As Amazon Sidewalk has not yet merged our PR submission, we will currently support the XIAO nRF52840 by modifying the supported nRF52840 DK platform.
| Hardware platforms | Board name | Build target |
|---|---|---|
| Seeed Studio XIAO nRF52840 | nrf52840dk_nrf52840 | nrf52840dk_nrf52840 |
The sample shows implementation of the Amazon Sidewalk API for the Bluetooth LE transport protocol. It is a memory-optimized example of Amazon Sidewalk configuration where only Bluetooth LE transport protocol is supported. Because of the smaller footprint, both bootloader partitions for the application are placed in the internal flash memory of the supported SoC (nRF52840).
User Interface
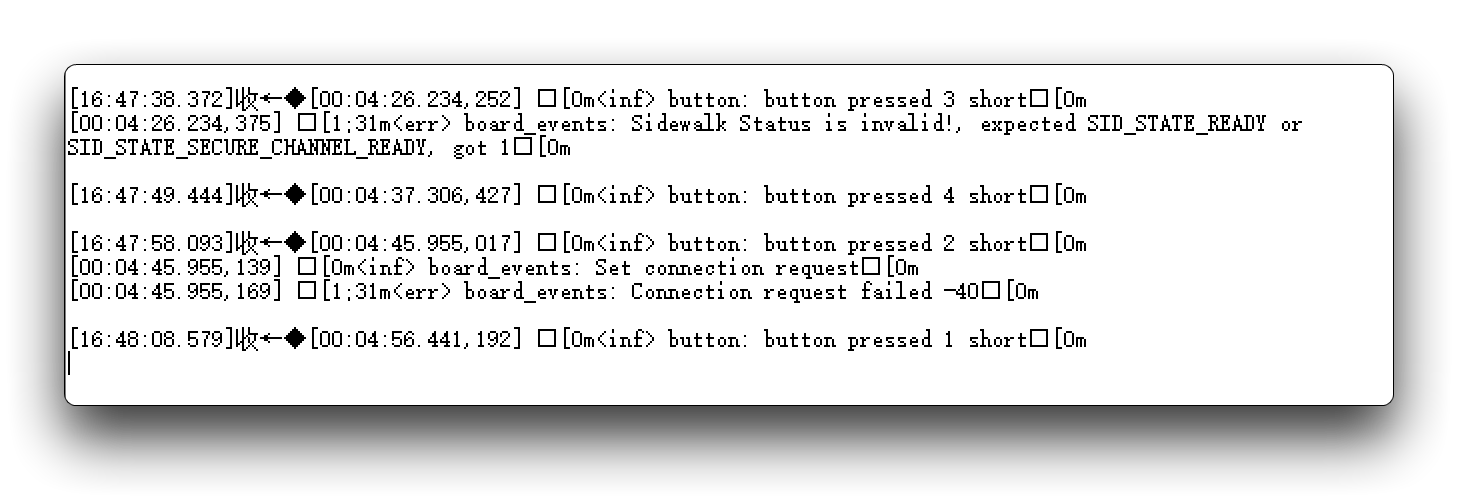
A button action is triggered when you release the button. To use a long press action, hold a button for 2 seconds or longer, and release it.
The button assignment is as follows:
Button 1 (long press) -- D1:
Factory Reset - The application informs the Amazon Sidewalk stack about the factory reset event. The Amazon Sidewalk library clears its configuration from the non-volatile storage. After a successful reset, the device needs to be registered with the cloud services again.
Button 2 -- D3:
Toggle Connection Request - The device requests the Amazon Sidewalk Gateway to initiate a connection while the device is advertising through Bluetooth LE. After the connection is dropped, the user has to set the beacon state again. Gateways may not always be able to process this request, as it depends on the number of devices connected to it.
Button 3 -- D4:
Send Hello - This action will queue a message to the cloud. If Amazon Sidewalk is not ready, it will simply show an error without sending the message. The queue will be processed eventually, and all the queued messages will be sent.
Button 4 (short press) -- D9:
Set fake battery level - The action sets a simulated battery level.
Button 4 (long press) -- D9: Enter DFU state - This action disables the Amazon Sidewalk stack and starts the Bluetooth LE SMP Server. You can update the firmware image using nRF Connect for mobile application. To exit DFU state, perform a power cycle on your device.
LEDs represent the current state of the application (Not yet achieved):
LED 1 -- D0:
Application Connected successfully.
LED 2 -- D2:
Application Registered successfully.
LED 3 -- D5:
Application time sync successful.
LED 4 -- D8:
Application link is up.
Preparing sample firmware
This example uses the BLE example program provided by Amazon Sidewalk, the firmware of the hardware driver is common to all XIAO nRF52840, if you don't want to go through the steps in this section, you can also directly download the merged.hex file provided by us.
Here are the exact steps to follow.
Step 1. Download the program written for the XIAO nRF52840 from Github.
Step 2. Once downloaded, please unzip the folder into the ncs directory. The default path is as follows:
C:\ncs\v2.3.0\zephyr\boards\arm\nrf52840dk_nrf52840
The file directory originally held the development files for the nRF52840 DK. For simplicity, we have overwritten the development board by renaming the XIAO nRF52840 program.
So all you need to do is to overwrite all the files in the original file nrf52840dk_nrf52840 with all the files in the zip archive.
Step 3. Let's go back to the Bash window of the nRF Connect SDK. Enter the following command to perform the firmware generation.
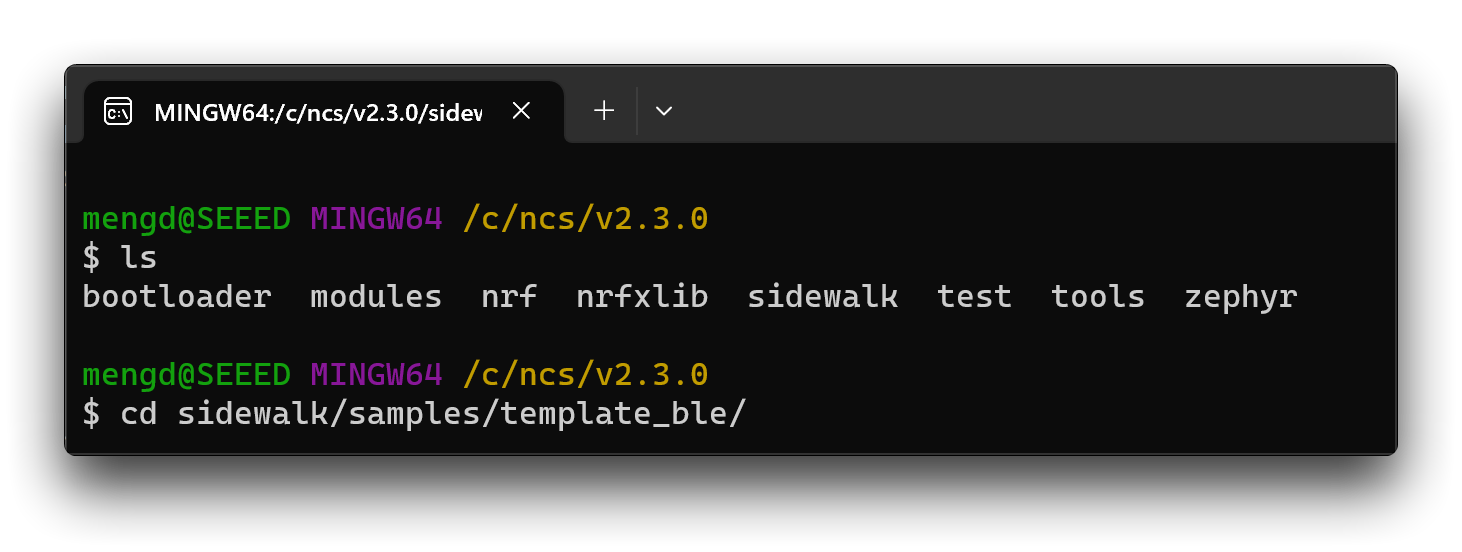
cd sidewalk/samples/template_ble/
west build -b nrf52840dk_nrf52840
If the execution goes well, you will see the following output.
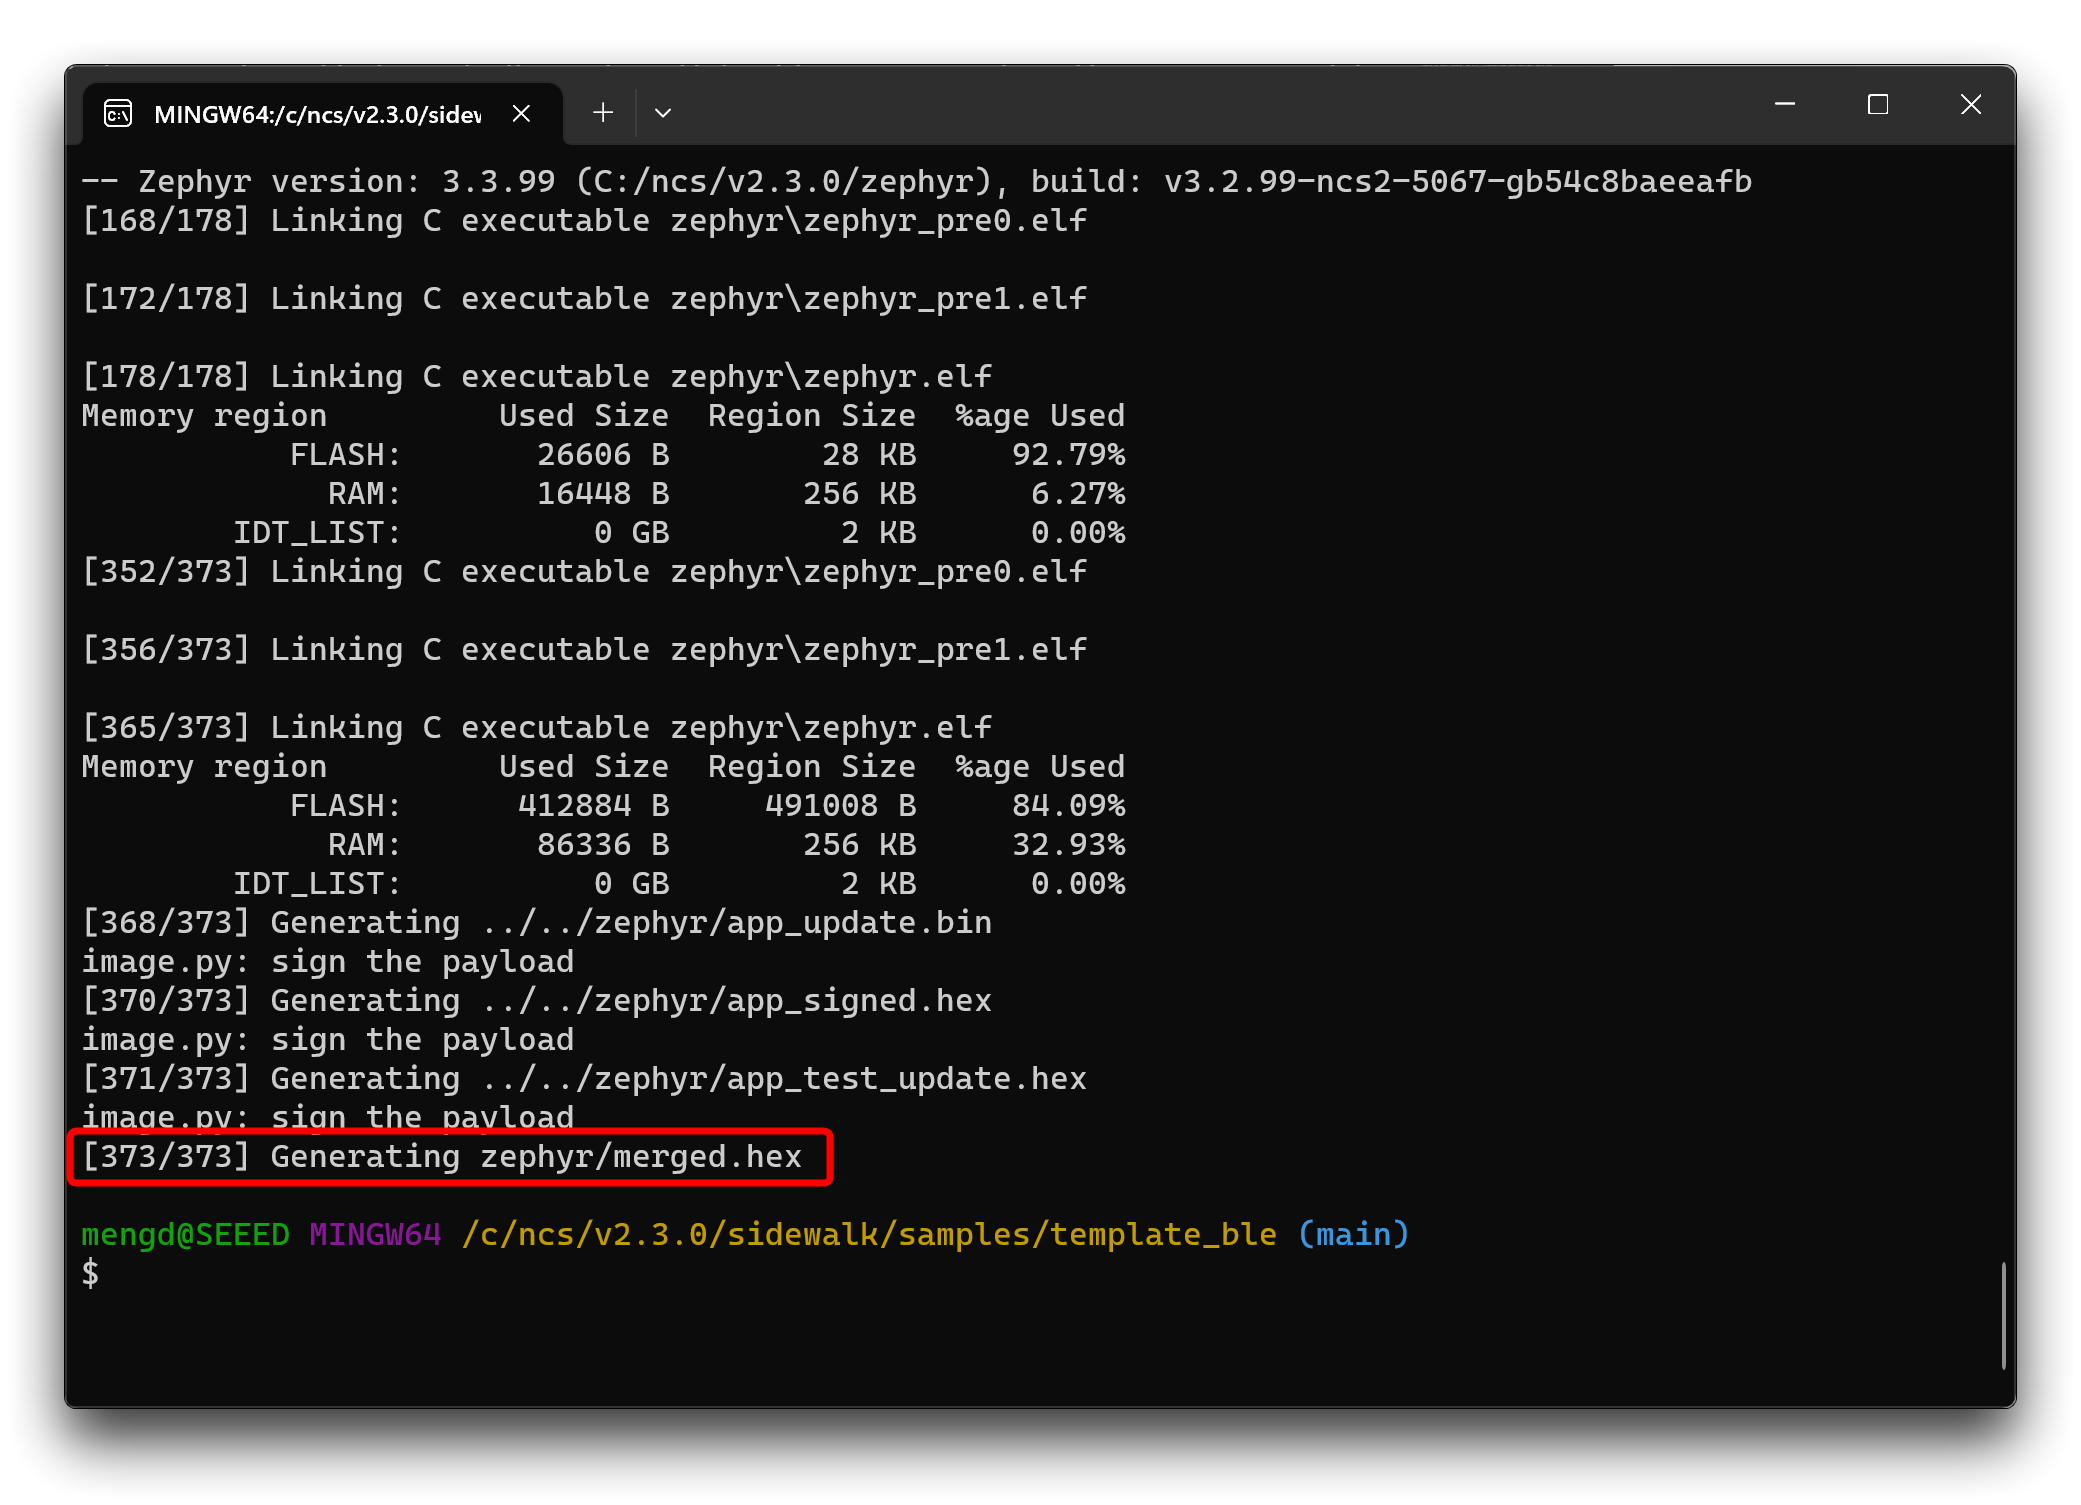
At this point we've got the sample firmware, which is named: merged.hex and stored in the default location of:
C:\ncs\v2.3.0\sidewalk\samples\template_ble\build\zephyr
You can start by putting this file together with the Nordic_MFG.hex file we prepared earlier and we will use them together later.
Flash firmware for XIAO nRF52840
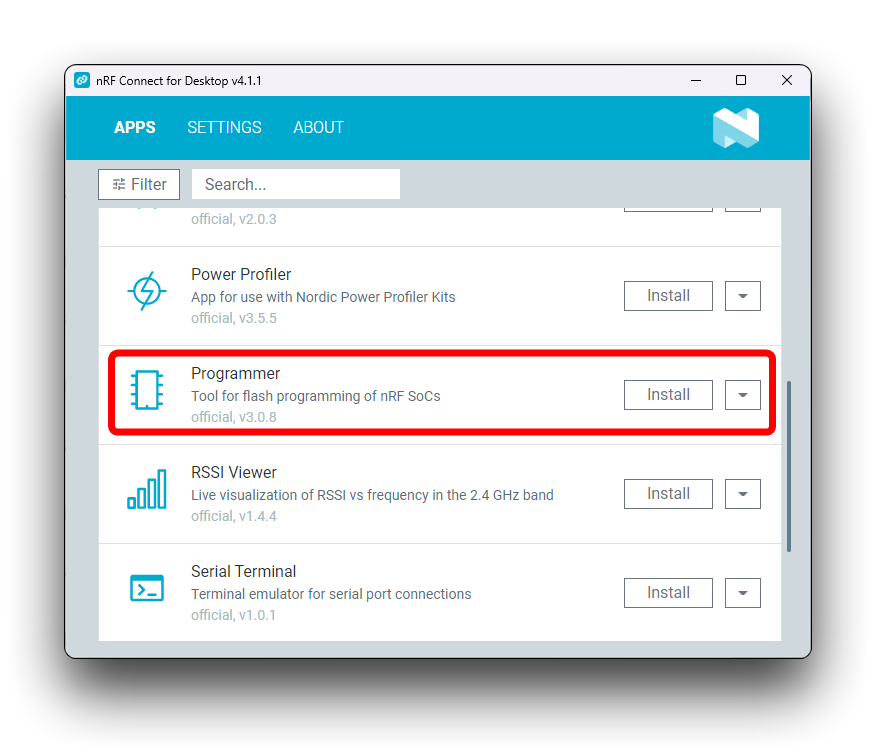
Step 1. Open nRF Connect for Desktop, find Programmer in the APPS and install it.
Step 2. Connect the XIAO nRF52840 via JLink.
Please connect the XIAO nRF52840 to the JLink via the SWD interface.
| Seeed Studio XIAO nRF52840 | JLink (Non-educational version) |
|---|---|
| 3V3 | Vterf |
| GND | GND |
| SWDIO | SWIO |
| SWCLK | SWCK |
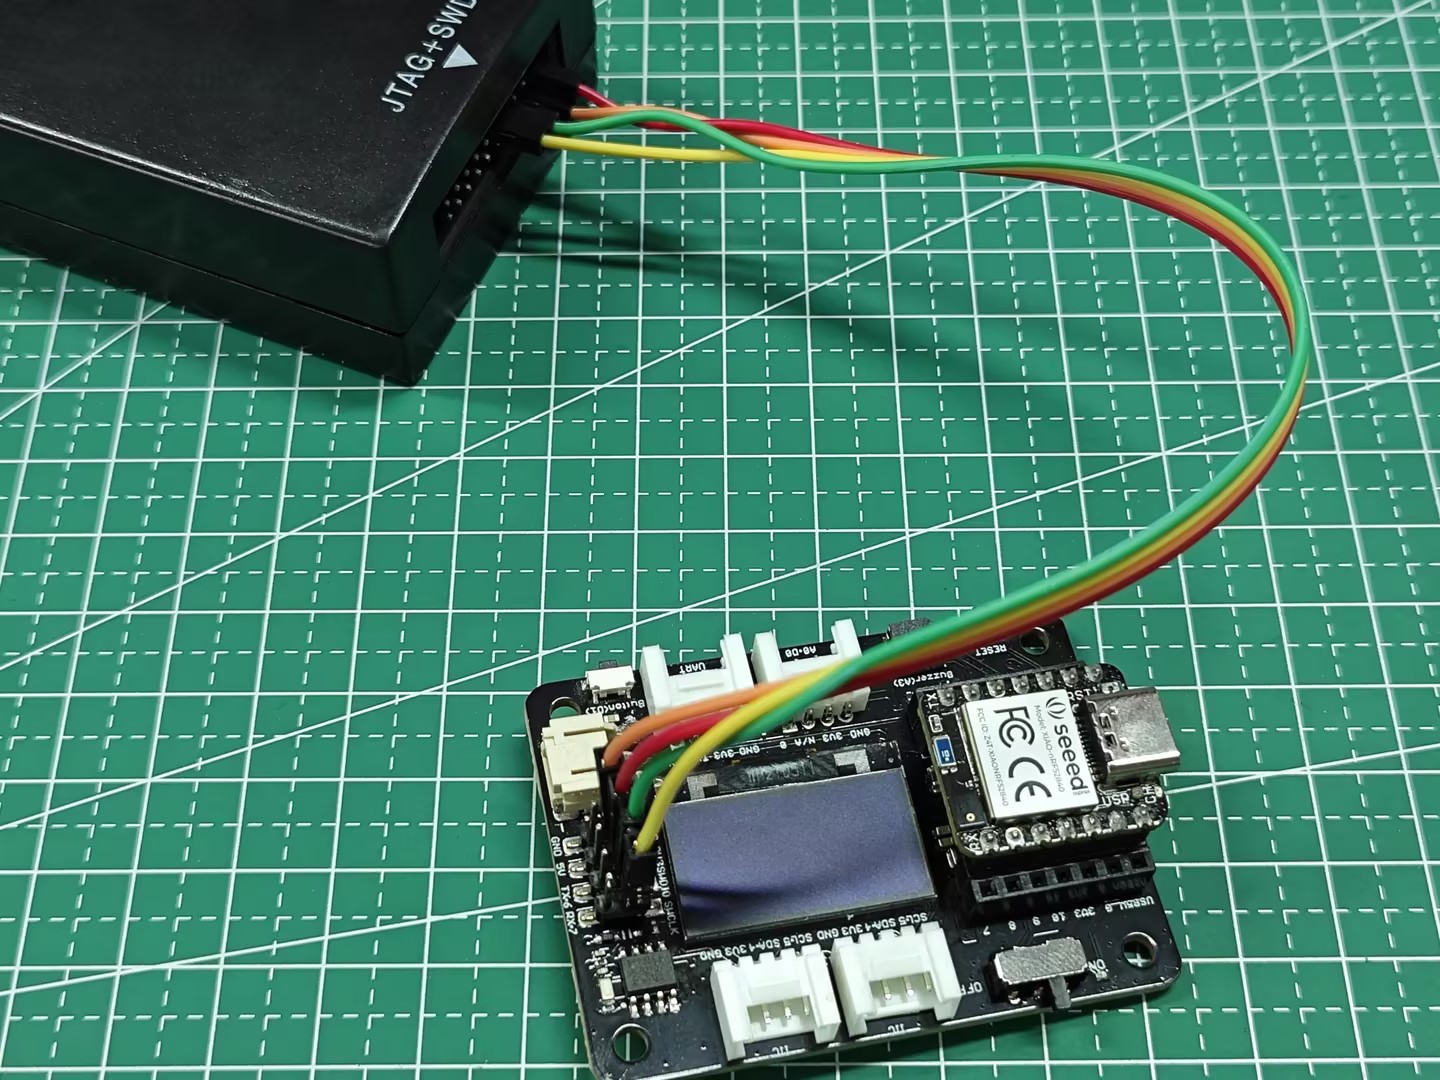
If you do not intend to use the XIAO expansion board, then you can refer to the XIAO nRF52840 Wiki on the use of the SWD interface to additionally solder duplex wire to the JLink.
Step 3. Open Programmer and burn both firmware to the XIAO nRF52840.
Click the Add file button in the top left corner of the software and add the merged.hex file and Nordic_MFG.hex prepared in this article respectively.
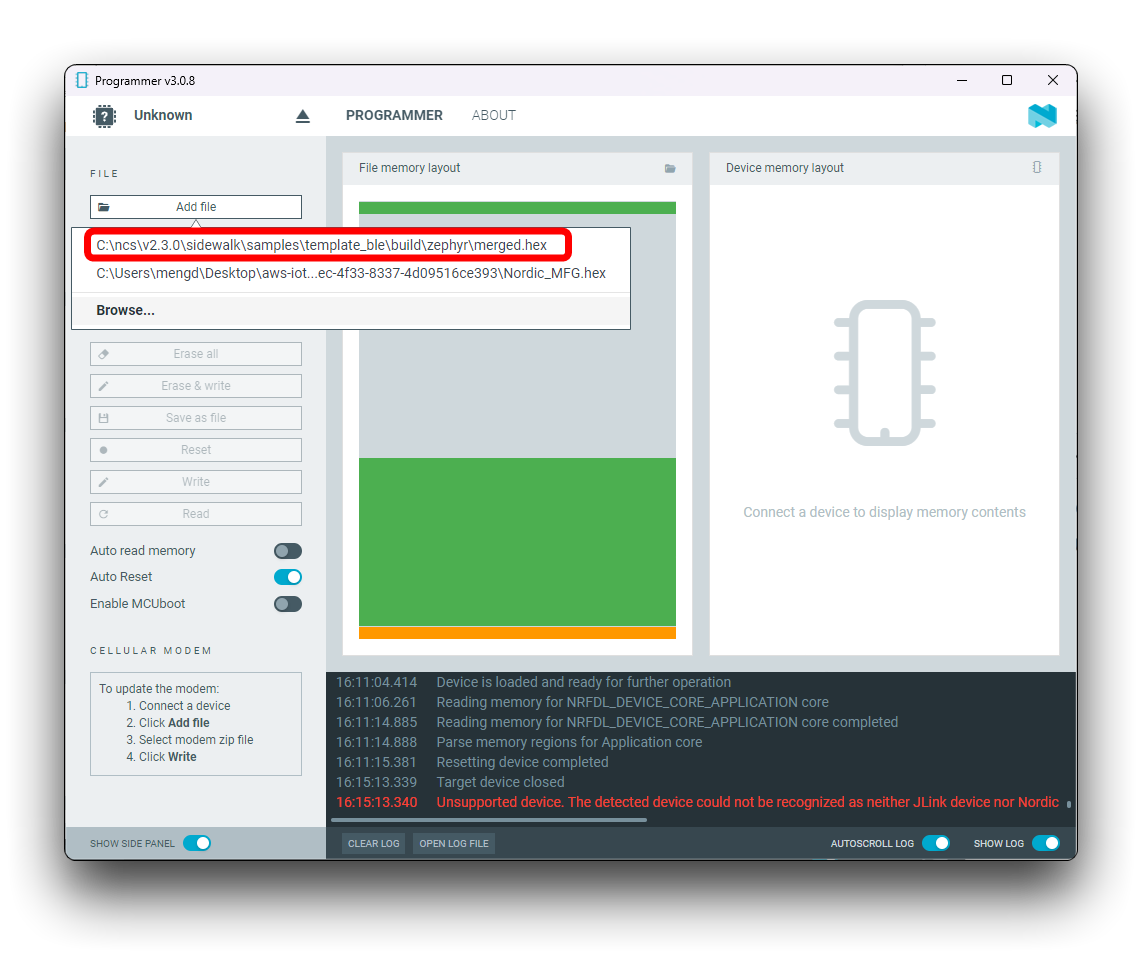
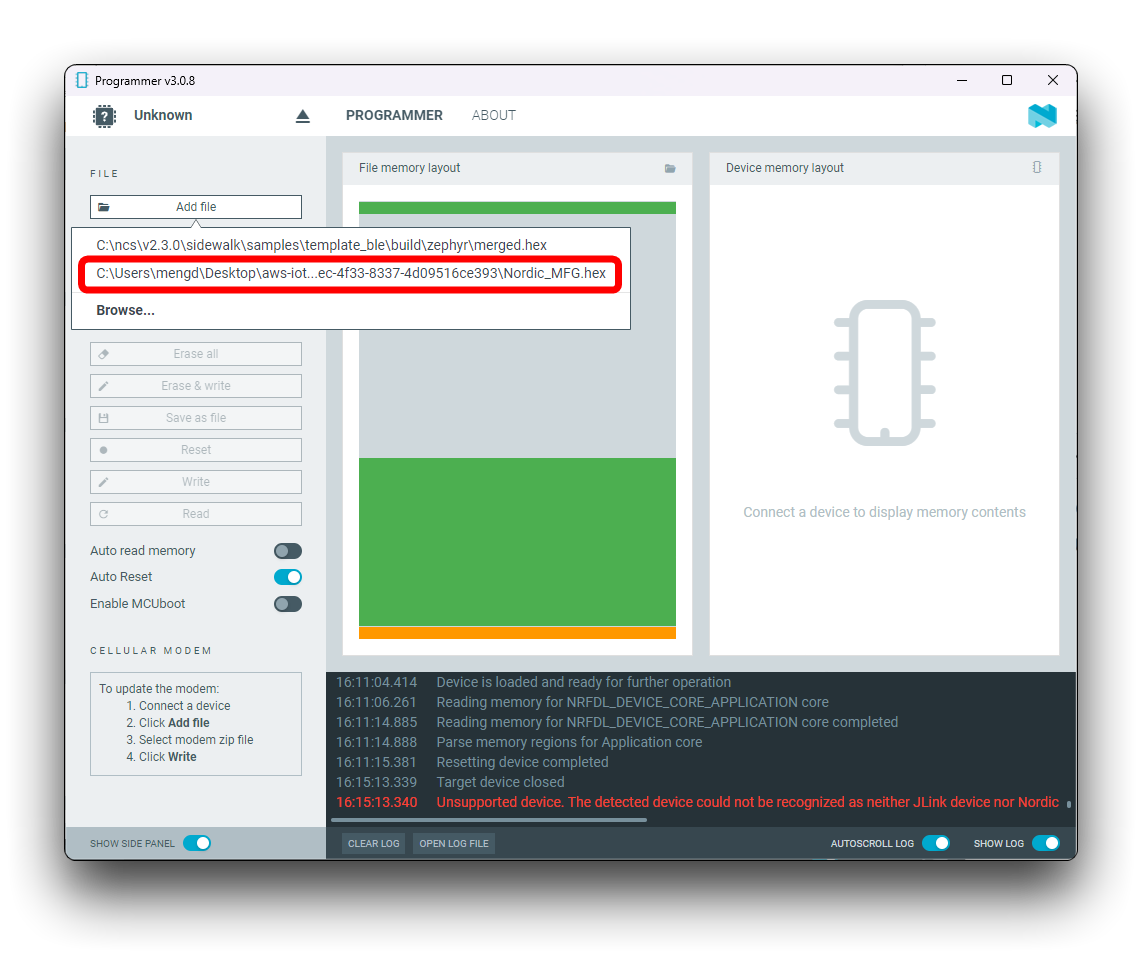
Then connect the JLink to your computer and click on the top left corner to select your device.
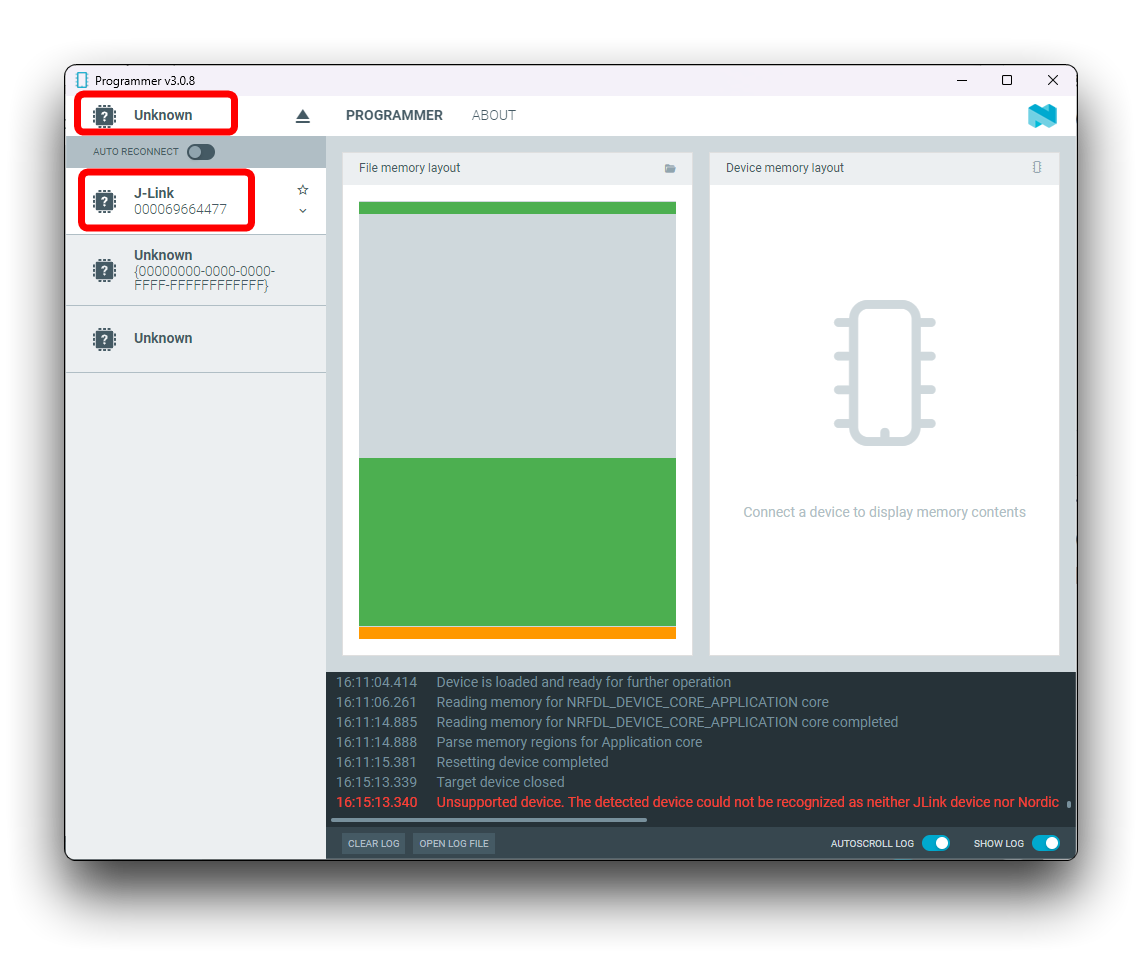
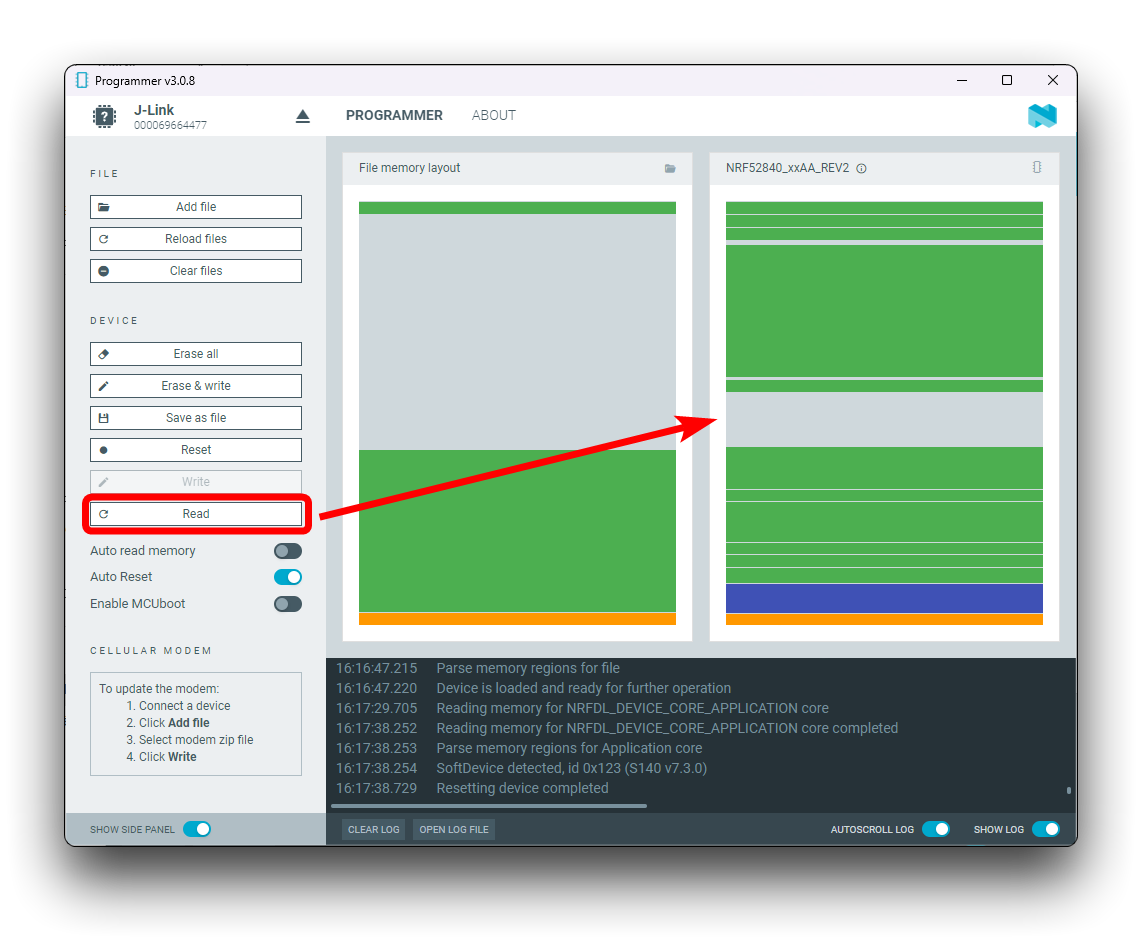
Once connected, click the Read button on the left to get the memory partition of the XIAO.
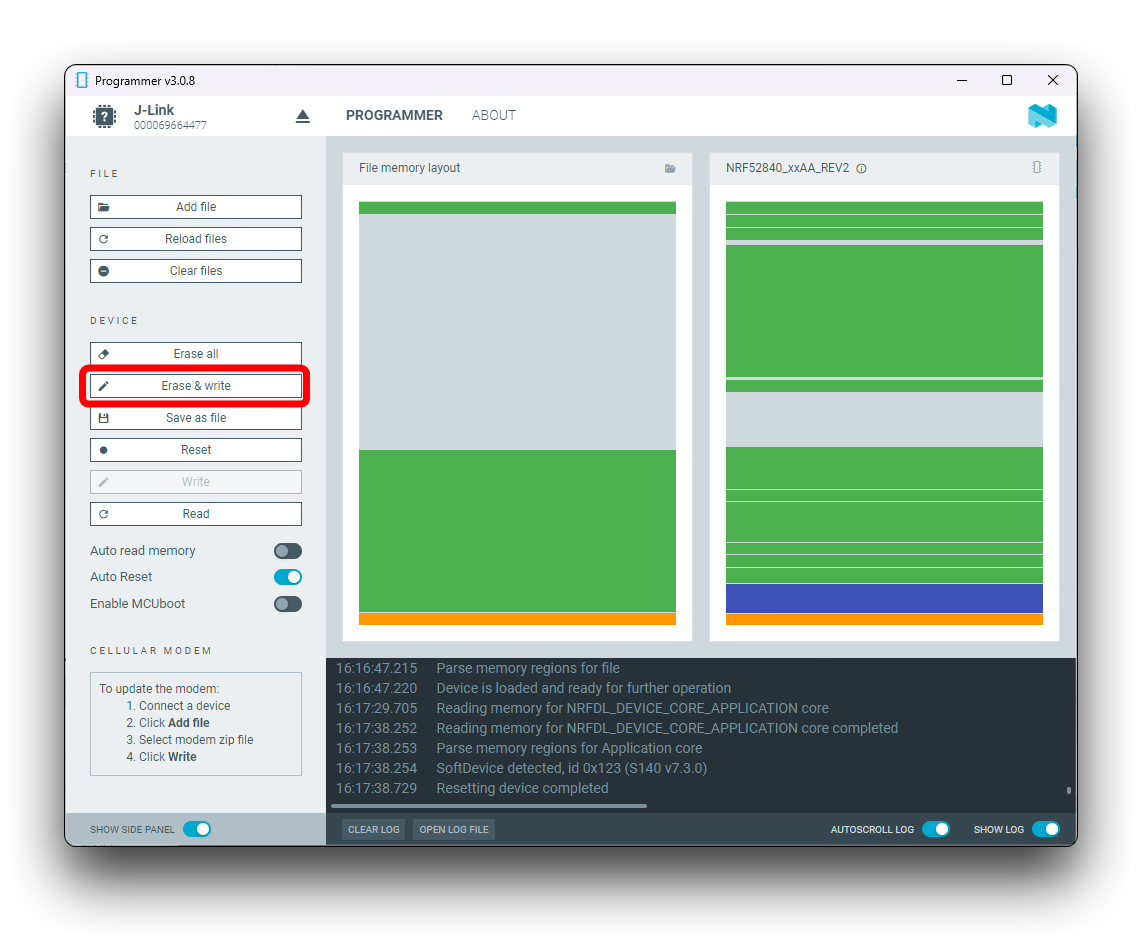
Next click on Erase & write to flash the firmware into XIAO.
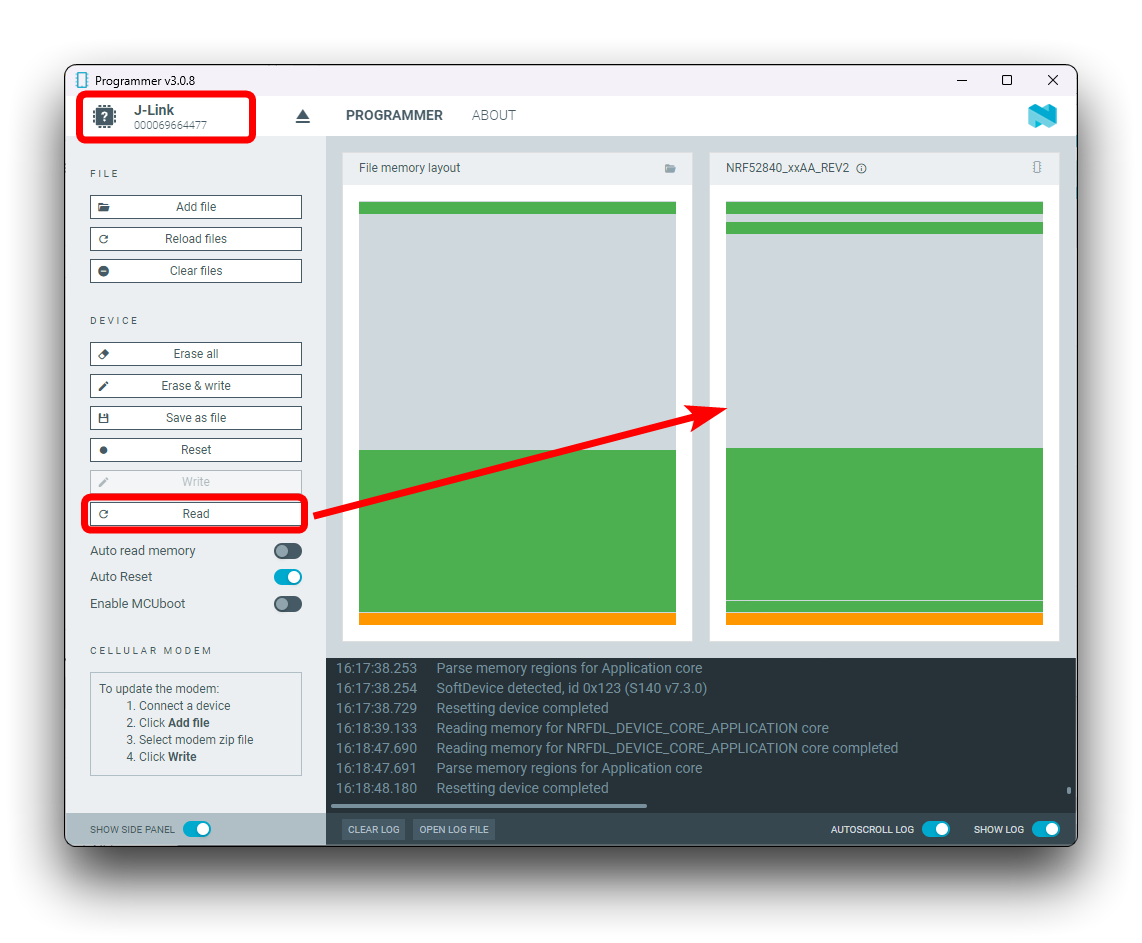
When you have finished you can click on Read to see if the shape of the memory is approximate, this allows you to check if the flash memory was successful.
Step 4. Assemble the Amazon Sidewalk device and make it work.
In the preview of the example we have marked the pin positions to which the LEDs and Button are connected. Next we will need to use the four Grove LED Buttons, which not only allow us to control the work of the XIAO, but also show the different working states by means of the LEDs on the buttons.
| Seeed Studio XIAO nRF52840 | LED | Button | USB to UART |
|---|---|---|---|
| D0 | LED1 | ||
| D1 | Button1 | ||
| D2 | LED2 | ||
| D3 | Button2 | ||
| D4 | LED3 | ||
| D5 | Button3 | ||
| D8 | LED4 | ||
| D9 | Button4 | ||
| RX (D7) | TX | ||
| TX (D6) | RX |
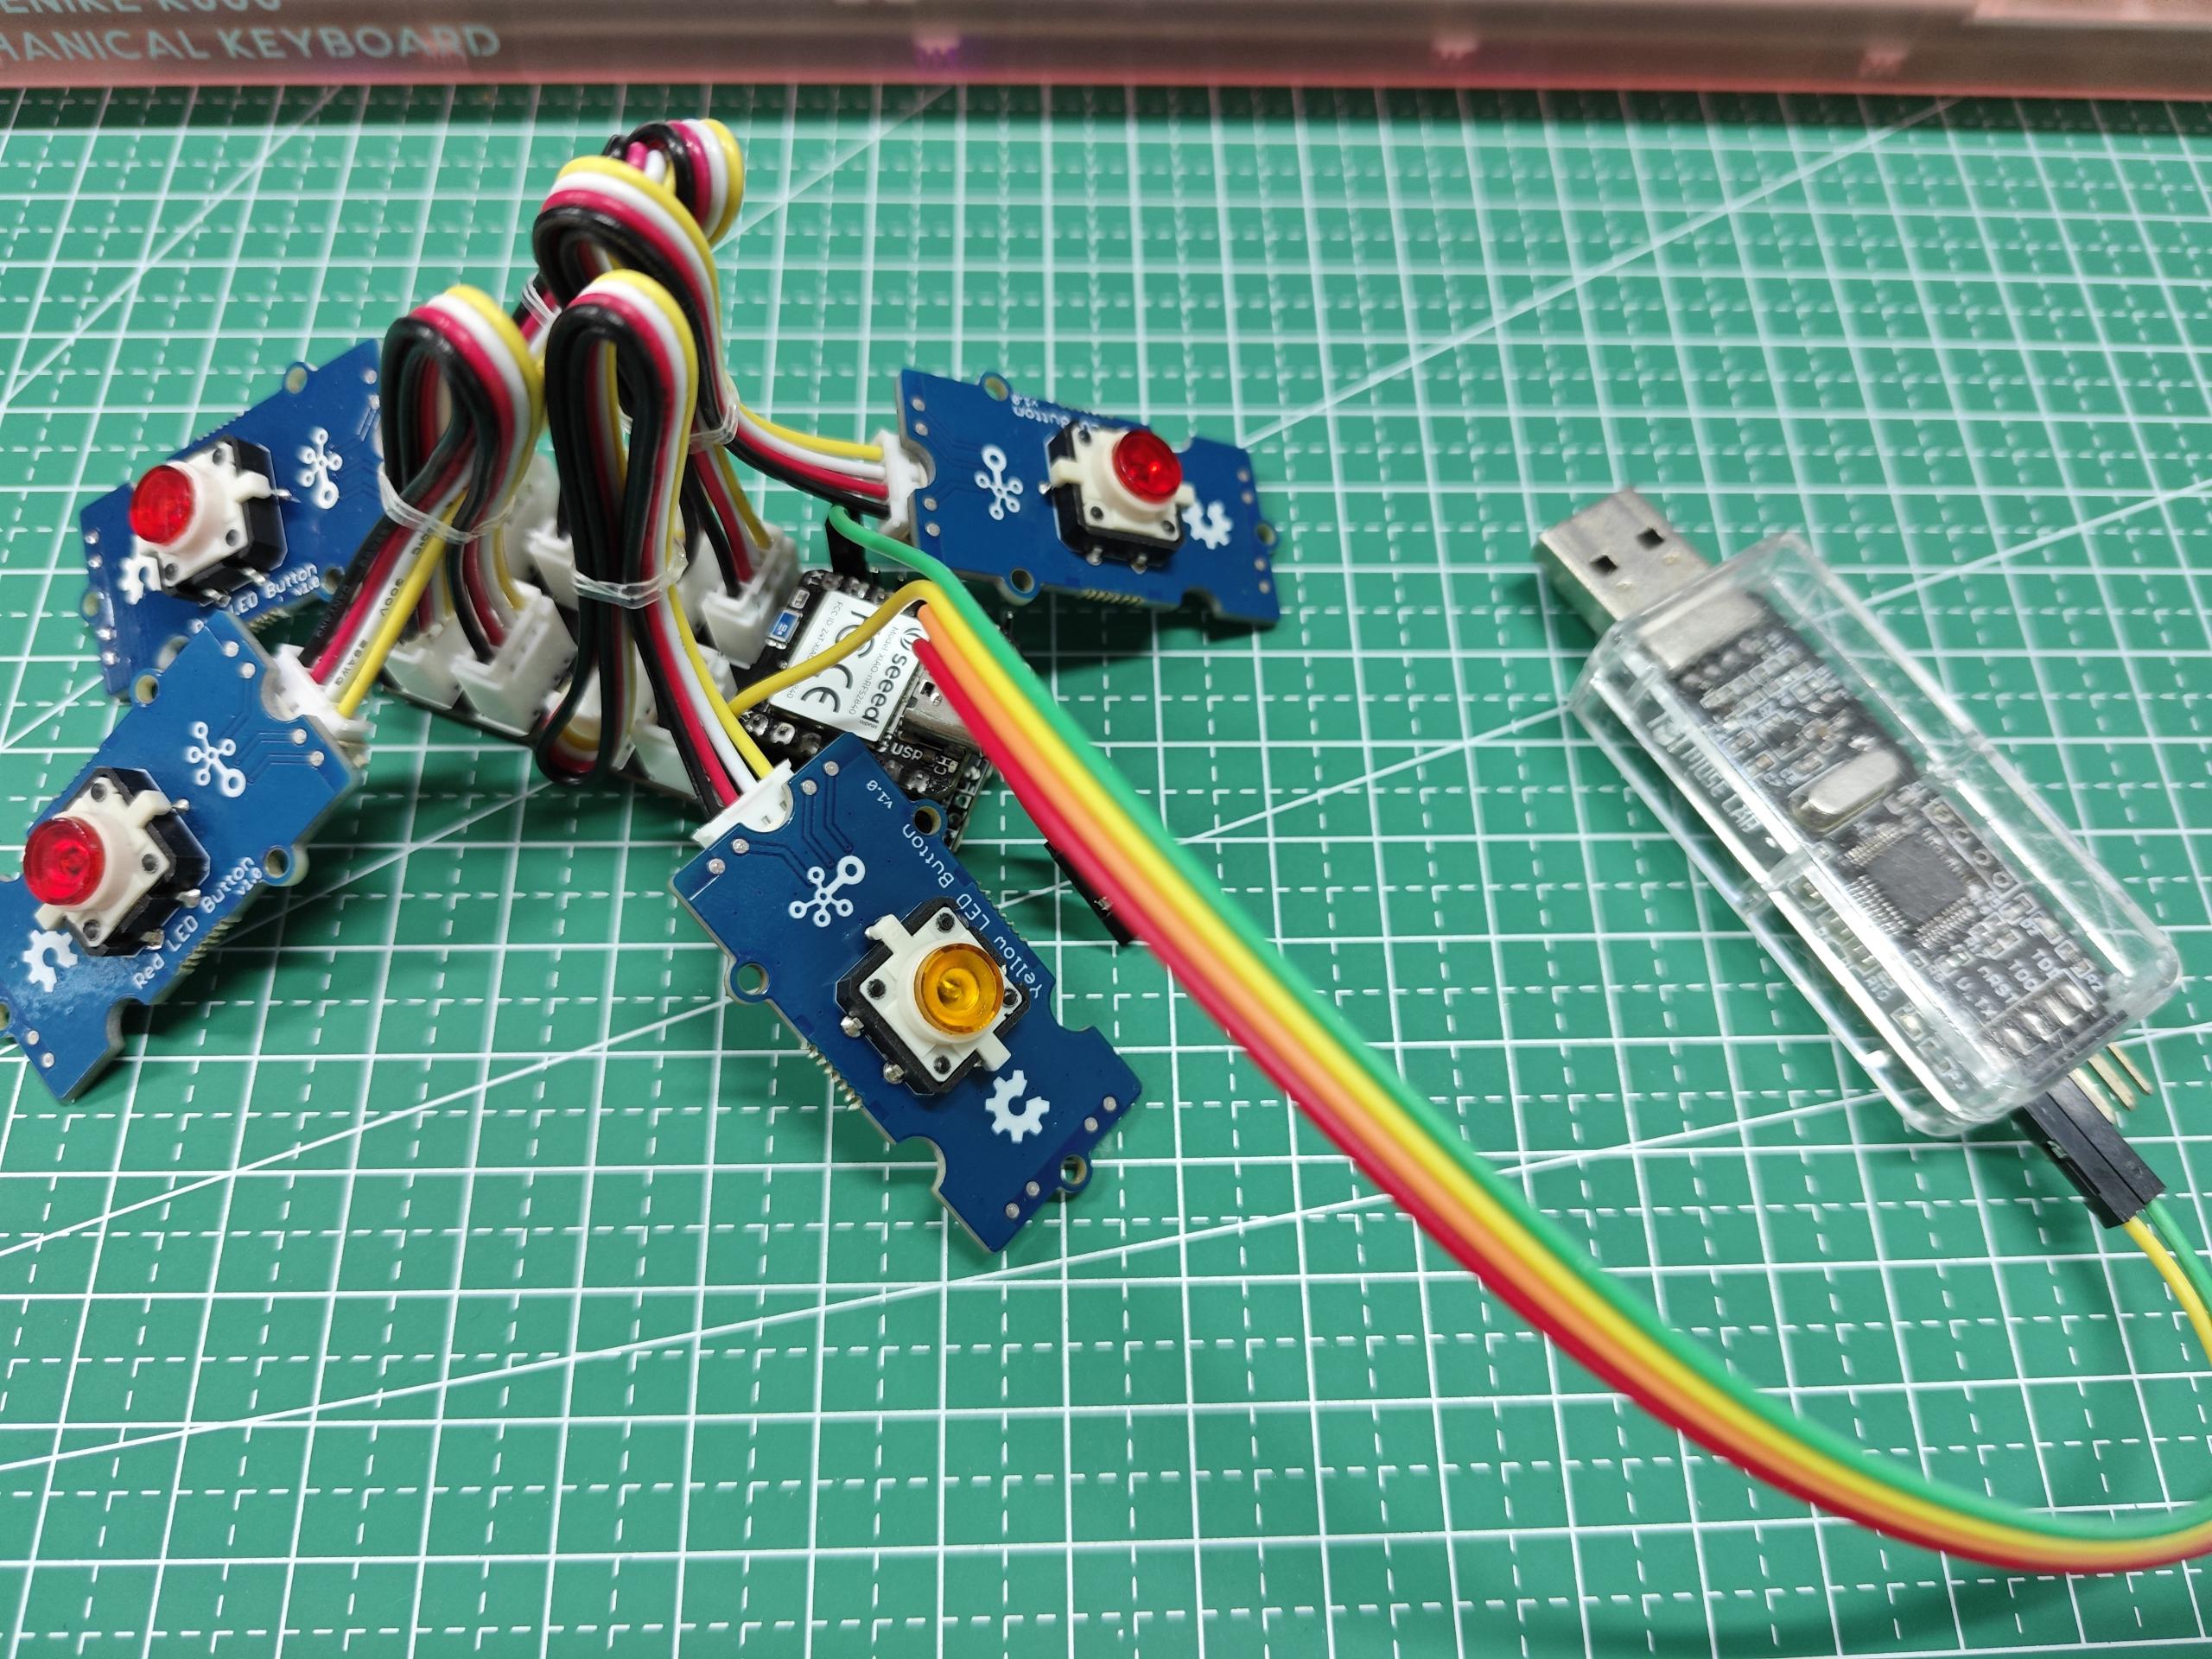
The XIAO is powered via USB and then the XIAO nRF52840 is controlled using pushbuttons and the XIAO operation log is available via UART.
Resources
Tech Support & Product Discussion
Thank you for choosing our products! We are here to provide you with different support to ensure that your experience with our products is as smooth as possible. We offer several communication channels to cater to different preferences and needs.