Grove - Temperature&Humidity Sensor Pro(DHT22)

This is a powerful sister version of our Grove - Temperature&Humidity Sensor Pro. It has more complete and accurate performance than the basic version. The detecting range of this sensor is 5% RH - 99% RH, and -40°C - 80°C. And its accuracy reaches up to 2% RH and 0.5°C. A professional choice for applications that have relatively strict requirements.

Upgradable to Industrial Sensors
With the SenseCAP S2110 controller and S2100 data logger, you can easily turn the Grove into a LoRaWAN® sensor. Seeed not only helps you with prototyping but also offers you the possibility to expand your project with the SenseCAP series of robust industrial sensors.
SenseCAP S210x series industrial sensors provide an out-of-box experience for environmental sensing. Please refer to the S2101 Wireless Temperature and Humidity Sensor with higher performance and robustness for air quality monitoring. The series includes sensors for soil moisture, air temperature and humidity, light intensity, CO2, EC, and an 8-in-1 weather station. Try the latest SenseCAP S210x for your next successful industrial project.
| SenseCAP Industrial Sensor |
 |
| S2101 Air Temp & Humidity |
Specification
| Item | Min | Norm | Max | Unit |
|---|---|---|---|---|
| Input voltage (VCC) | 3.3 | - | 6 | V |
| I/O Logic Level | - | based on VCC | - | V |
| Measuring Current Supply | 1 | - | 1.5 | mA |
| Standby Current Supply | 40 | - | 50 | uA |
| Measuring range (Humidity) | 5% | - | 99% | RH |
| Measuring range (Temperature) | -40 | - | 80 | °C |
| Accuracy (Humidity) | - | - | ±2% | RH |
| Accuracy (Temperature) | - | - | ±0.5 | °C |
| Resolution (Humidity) | - | - | 0.1% | RH |
| Resolution (Temperature) | - | - | 0.1 | °C |
| Repeatability (Humidity) | - | - | ±0.3% | RH |
| Repeatability (Temperature) | - | - | ±0.2 | °C |
| Long-term Stability | - | - | ±0.5% | RH/year |
| Signal Collecting Period | - | 2 | - | S |
| Respond Time 1/e(63%) | 6 | - | 20 | S |
| Signal pin mode | - | Digital | - | - |
More details about Grove modules please refer to Grove System
Platforms Supported
| Arduino | Raspberry Pi | |||
|---|---|---|---|---|
The platforms mentioned above as supported is/are an indication of the module's software or theoritical compatibility. We only provide software library or code examples for Arduino platform in most cases. It is not possible to provide software library / demo code for all possible MCU platforms. Hence, users have to write their own software library.
Getting Started
If this is the first time you work with Arduino, we strongly recommend you to see Getting Started with Arduino before the start.
Play With Arduino
Hardware
Materials required
| Seeeduino V4.2 | Base Shield | Temperature&Humidity Sensor Pro |
|---|---|---|
 |  |  |
| Get One Now | Get One Now | Get One Now |
1 Please plug the USB cable gently, otherwise you may damage the port. Please use the USB cable with 4 wires inside, the 2 wires cable can't transfer data. If you are not sure about the wire you have, you can click here to buy
2 Each Grove module comes with a Grove cable when you buy. In case you lose the Grove cable, you can click here to buy
-
Step 1. Connect Grove - Temperature&Humidity Sensor Pro to port D2 of Grove-Base Shield.
-
Step 2. Plug Grove - Base Shield into Seeeduino.
-
Step 3. Connect Seeeduino to PC via a USB cable.

If we don't have Grove Base Shield, We also can directly connect Grove - Temperature and Humidity Sensor Pro to Seeeduino as below.
| Seeeduino | Temperature&Humidity Sensor Pro |
|---|---|
| 5V | Red |
| GND | Black |
| Not Conencted | White |
| D2 | Yellow |
Software
-
Step 1. Download the Seeed DHT library from Github.
-
Step 2. Refer to How to install library to install library for Arduino.
-
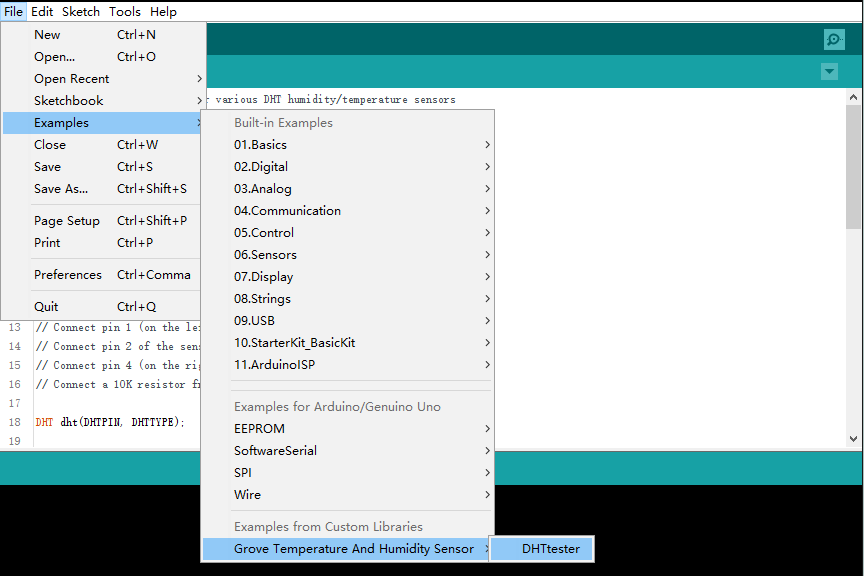
Step 3. Restart the Arduino IDE. Open “ DHTtester” example via the path: File --> Examples --> Grove_Humidity_Temperature_Sensor-master --> DHTtester. Through this demo, we can read the temperature and relative humidity information of the environment.
This Grove - Temperature&Humidity Sensor Pro and our another product Grove-Temperature and Humidity Sensor are sharing this library. No matter which product you are using, make sure that you have made the definition line of the sensor of your board into effect and commented out the definition lines of other specs. For example, the sensor we used on Grove - Temperature and Humidity Sensor Pro is DHT 22. So the definition part of the sensor spec should be:
//#define DHTTYPE DHT11   // DHT 11
#define DHTTYPE DHT22   // DHT 22  (AM2302)
//#define DHTTYPE DHT21   // DHT 21 (AM2301)
-
Step 4. Upload the demo. If you do not know how to upload the code, please check How to upload code.
-
Step 5. Open the Serial Monitor of Arduino IDE by click Tool-> Serial Monitor. Or tap the ++ctrl+shift+m++ key at the same time. if every thing goes well, you will get the result.
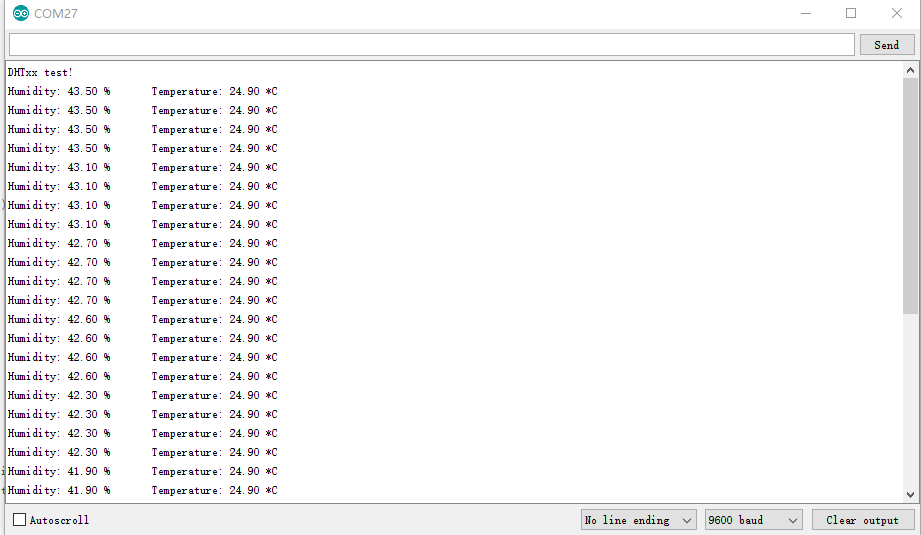
The result should be like:
Play With Raspberry Pi (With Grove Base Hat for Raspberry Pi)
Hardware
- Step 1. Things used in this project:
| Raspberry pi | Grove Base Hat for RasPi | Grove - Temp & Hum Sensor Pro |
|---|---|---|
 |  | |
| Get ONE Now | Get ONE Now | Get ONE Now |
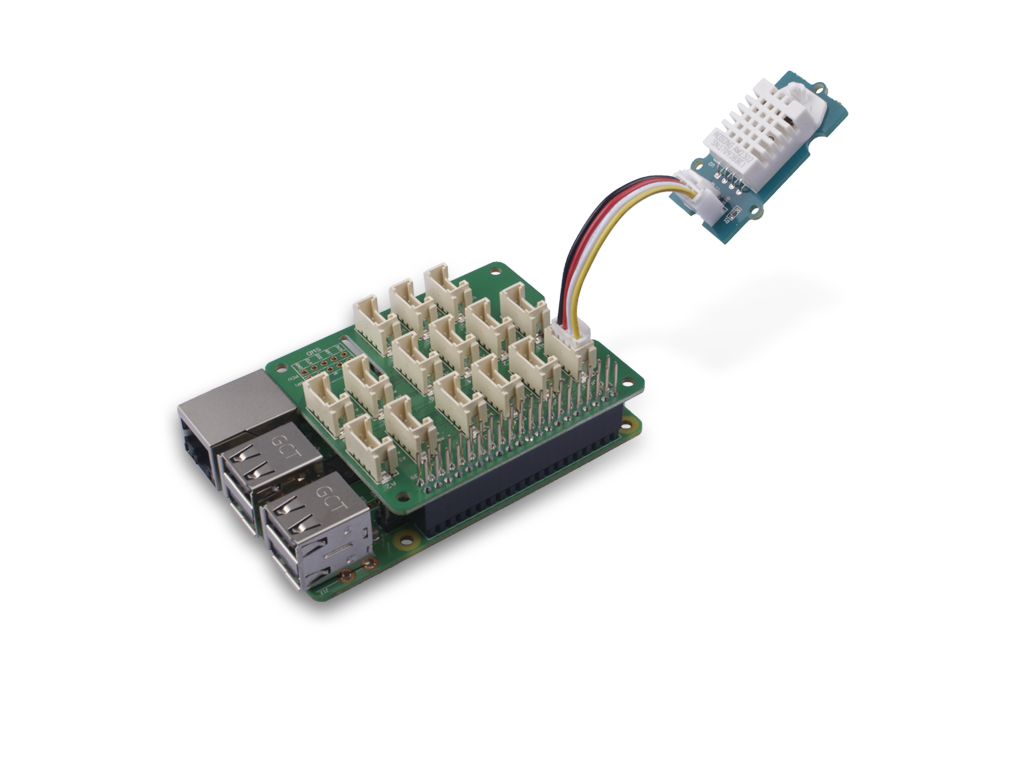
- Step 2. Plug the Grove Base Hat into Raspberry.
- Step 3. Connect the temperature and humidity sensor pro to port 12 of the Base Hat.
- Step 4. Connect the Raspberry Pi to PC through USB cable.
For step 3 you are able to connect the temperature and humidity sensor pro to any GPIO Port but make sure you change the command with the corresponding port number.
Software
If you are using Raspberry Pi with Raspberrypi OS >= Bullseye, you have to use this command line only with Python3.
- Step 1. Follow Setting Software to configure the development environment.
One of the steps is to add the necessary DHT library, please make sure it is installed.
- Step 2. Enter the relevant virtual environment.
source ~/grove_env/env/bin/activate
cd ~/grove_env/grove.py/grove
- Step 3. Excute below commands to run the code.
nano ~/grove_env/dht22_demo.py
Copy the following code
import time
import seeed_dht

# for DHT11/DHT22
    sensor = seeed_dht.DHT("22", 12)
    # for DHT10
    # sensor = seeed_dht.DHT("10")
print("DHT11 reading every second, Ctrl+C to quit")
try:
    while True:
        humi, temp = sensor.read()
        print(f"DHT11  Humidity {humi:.1f}%  Temperature {temp:.1f}°C")
        time.sleep(1)
except KeyboardInterrupt:
    print("\nBye")
Save and exit: Ctrl+O → Enter → Ctrl+X
If everything goes well, you will be able to see the following result
pi@raspberrypi:~/Seeed_Python_DHT/examples $ python ~/grove_env/dht22_demo.py
DHT22, humidity 39.2%, temperature 29.1*
DHT22, humidity 39.2%, temperature 29.1*
DHT22, humidity 39.2%, temperature 29.1*
DHT22, humidity 39.1%, temperature 29.1*
DHT22, humidity 40.0%, temperature 29.1*
DHT22, humidity 39.9%, temperature 29.1*
DHT22, humidity 40.3%, temperature 29.1*
DHT22, humidity 42.0%, temperature 29.1*
You can quit this program by simply press ++ctrl+c++.
Play With Raspberry Pi (with GrovePi_Plus)
Hardware
Materials required
| Raspberry pi | GrovePi_Plus | Temperature&Humidity Sensor Pro |
|---|---|---|
 |  | |
| Get One Now | Get One Now | Get One Now |
-
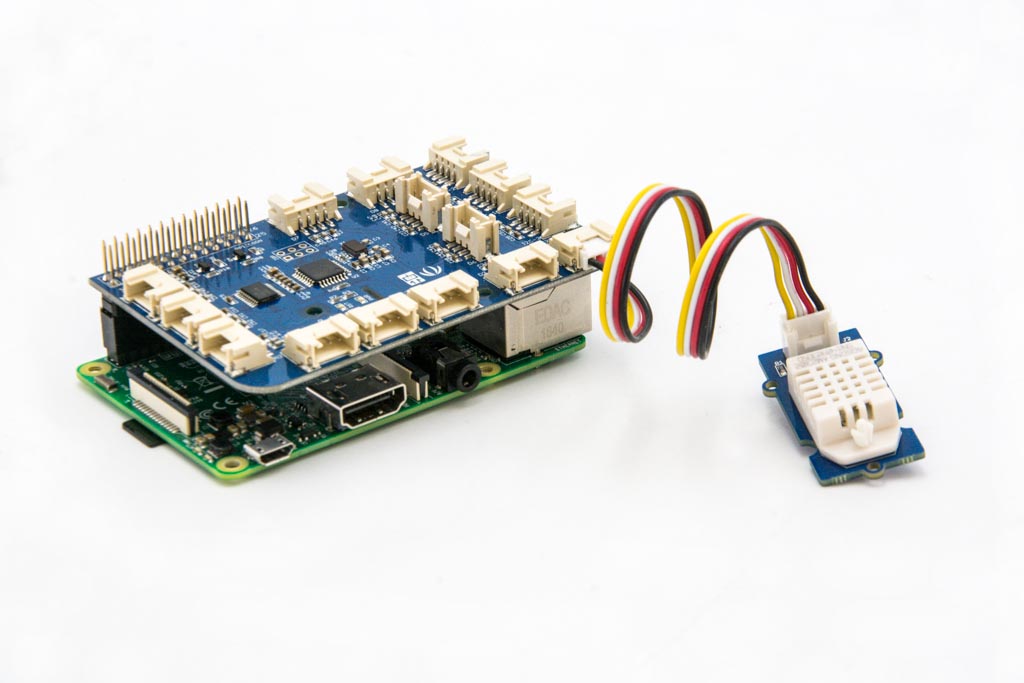
Step 1. Plug the GrovePi_Plus into Raspberry.
-
Step 2. Connect Grove - Temperature&Humidity Sensor Pro to D4 port of GrovePi_Plus.
-
Step 3. Connect the Raspberry to PC via USB cable.
Software
If this is the first time you use GrovePi, please do this part step by step. If you are an old friend with GrovePi, you can skip Step1 and Step2.
- Step 1. Setting Up The Software. In the command line, type the following commands:
If you are using Raspberry Pi with Raspberrypi OS >= Bullseye, you cannot use this command line.
sudo curl -kL dexterindustries.com/update_grovepi | bash
sudo reboot
cd /home/pi/Desktop
git clone https://github.com/DexterInd/GrovePi.git
For more detail about this part, please refer to Setting Software.
- Step 2. Follow Updating the Firmware to update the newest firmware of GrovePi.
We firmly suggest you to update the firmware, or for some sensors you may get errors.
- Step 3. Configure the parameter
If you are using Raspberry Pi with Raspberrypi OS >= Bullseye, you have to use this command line only with Python3.
cd /home/pi/Desktop/GrovePi/Software/Python/
sudo nano grove_dht_pro.py
The Grove - Temperature&Humidity Sensor and the Grove - Temperature&Humidity Sensor pro share the same python code which named
grove_dht_pro.py. The only difference is that for the sentence [temp,humidity] = grovepi.dht(sensor,blue). We use the parameterblue for Grove - Temperature&Humidity Sensor while we use white for the Grove - Temperature&Humidity Sensor pro. The default value is blue, so for this sensor you need to change the code.
Change the default parameter [temp,humidity] = grovepi.dht(sensor,blue) into [temp,humidity] = grovepi.dht(sensor,white). Then the code should be like:
import grovepi
import math
# Connect the Grove Temperature & Humidity Sensor Pro to digital port D4
# This example uses the blue colored sensor.
# SIG,NC,VCC,GND
sensor = 4  # The Sensor goes on digital port 4.

# temp_humidity_sensor_type
# Grove Base Kit comes with the blue sensor.
blue = 0    # The Blue colored sensor.
white = 1   # The White colored sensor.

while True:
    try:
        # This example uses the blue colored sensor.
        # The first parameter is the port, the second parameter is the type of sensor.
        [temp,humidity] = grovepi.dht(sensor,white)
        if math.isnan(temp) == False and math.isnan(humidity) == False:
            print("temp = %.02f C humidity =%.02f%%"%(temp, humidity))

    except IOError:
        print ("Error")
Then tap ++ctrl+x++ to quit nano. Tap ++y++ to save the change.
- Step 4. Run the following command to get the result.
sudo python3 grove_dht_pro.py
The result should be like:
pi@raspberrypi:~/GrovePi/Software/Python $ sudo python3 grove_dht_pro.py
temp = 22.90 C humidity =42.30%
temp = 22.90 C humidity =42.30%
temp = 22.90 C humidity =42.30%
temp = 22.90 C humidity =42.30%
temp = 22.90 C humidity =42.30%
temp = 22.90 C humidity =42.30%
temp = 22.90 C humidity =42.30%
temp = 22.90 C humidity =42.30%
temp = 22.90 C humidity =42.30%
temp = 22.90 C humidity =42.30%
temp = 22.90 C humidity =42.30%
temp = 22.90 C humidity =42.30%
Schematic Online Viewer
Resources
- [Zip] Temperature&Humidity Sensor Pro in eagle format
- [PDF] Temperature&Humidity Sensor Pro PCB in PDF format
- [PDF] Temperature&Humidity Sensor Pro Schematic in PDF format
- [Library] Temperature&Humidity Sensor Pro library
- [Datasheet] AM2302-CN.pdf
- [Datasheet] AM2302-EN.pdf
Projects
Temperature Humidity Data Logger: This project helps to monitor temperature and humidity values of a particular location along with device battery level.
LinkIt ONE IoT Demo: An IoT demo made by LinkIt ONE.
Automated Snake Enclosure with Camera: Interactive snake enclosure that is temperature and humidity controlled and uses lat-long to mimic natural light cycles, with an online cam.
Foton - The connected lightsaber: Foton is a special lightsaber, which can monitor temperature and humidity of a room, detect movements, and send those data to a smartphone.
Tech Support & Product Discussion
Thank you for choosing our products! We are here to provide you with different support to ensure that your experience with our products is as smooth as possible. We offer several communication channels to cater to different preferences and needs.