Adding Accessories to ODYSSEY - X86J41x5
This wiki introduces how to add different accessories to ODYSSEY - X86J41x5 to boost up the performance to fit your needs. For instance, you might be using ODYSSEY-X86J41x5 for a more graphics required scenario, hence the need of adding an external GPU for high performance. Or in some cases such as NAS, you would prefer two HDD hard drive instead of using SSD for stability reasons.
1. Adding Additional Storage via PCIe to SATA III (HDD Hard Drives)
On ODYSSEY-X86J41x5, there is 1 M.2 SATA SSD, 1 M.2 PCIe SSD and 1 SATA III connectors with 3 SATA III power connectors. For standard use, these connectors are enough. However, for more of a industrial usage would prefer using HDD instead of SSD. This demonstrates how to attach more than 1 HDD to ODYSSEY-X86J41x5.
Materials Required
M.2 PCIe to SATA Adapter
HDD Hard Drives (Maximum 3 HDD supported on ODYSSEY-X86J41x5)
To attach more HDD to ODYSSEY-X86J41x5, we need an extra component, a M.2 PCIe to SATA adapter which can convert the M.2 PCIe slot into SATA data connector. This adapter can be purchased commonly on the electronics market.
Hardware Instructions
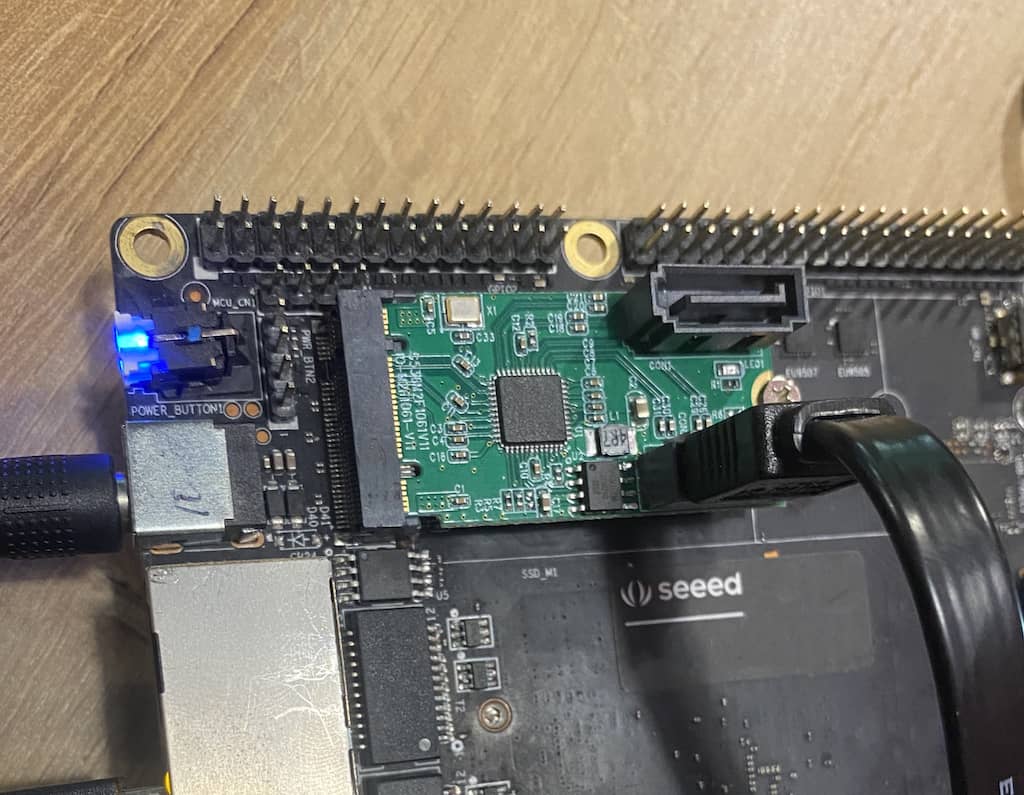
- Attach the M.2 PCIe to SATA adapter to the PCIe slot of the ODYSSEY-X86J41x5 and plug the HDD data cable into it as shown below. Connect the HDD power cable to one of the three SATA III power connectors.
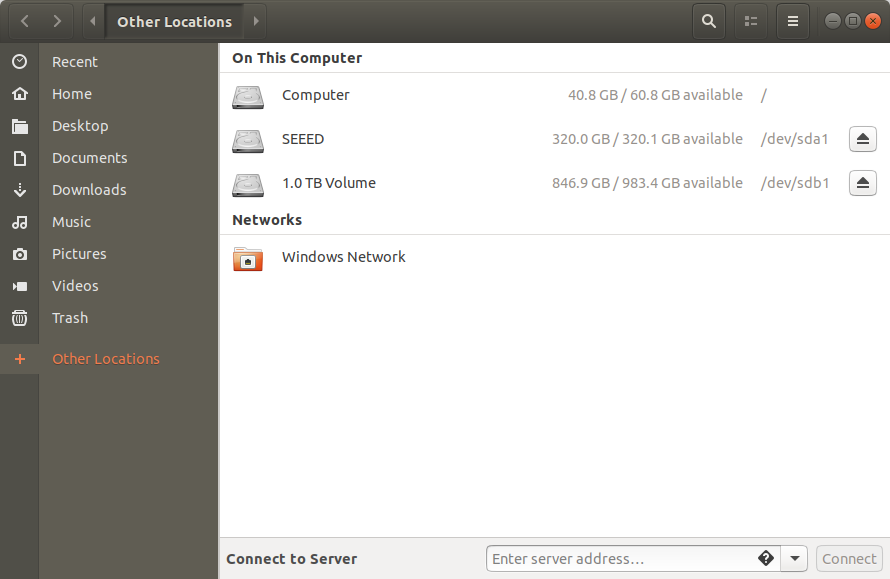
- You can have maximum of 3 HDD hard drives connected to the ODYSSEY-X86J41x5. Boot up the devices and check if the hard drives shown up in the operating system.
Result
Once booted in the OS, you should be able to see the hard drives.
Now you don't have to worry about the storage issue no more!
2. Adding an External GPU to the ODYSSEY-X86J41x5
To add external GPU to the ODYSSEY-X86J41x5 to boost up performance, you will also need an extra component.
Materials Required
M.2 PCIe x4 to PCIe x16 Adapter
DC power for GPU
The components are not yet available to sell from Seeed, so please be patient for now or get it from the electronics market. Make sure that the Adapter is suitable for GPU usage.
Initial BIOS Setup
Some configurations in the BIOS are needed for enabling GPU:
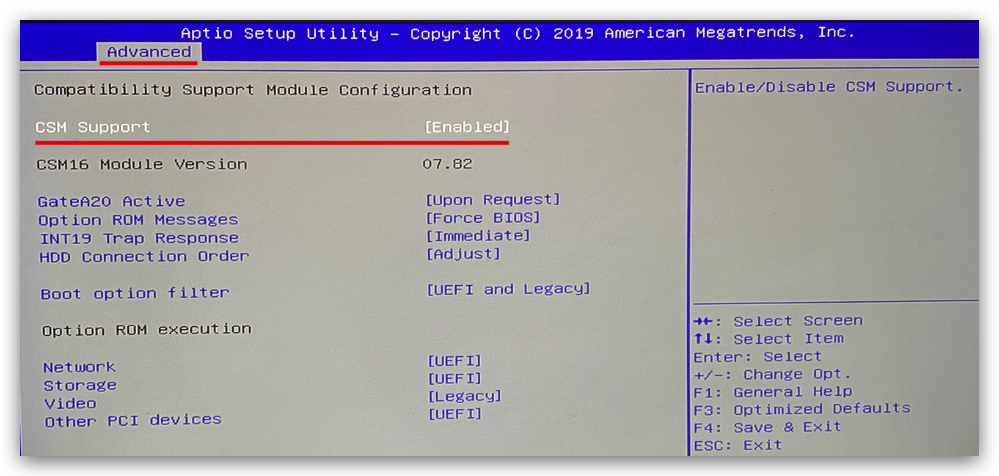
1.Enter BIOS menu by keeping DEL key when booting up.
2.Navigate to Advanced -> CSM Support and press Enter to enable it.
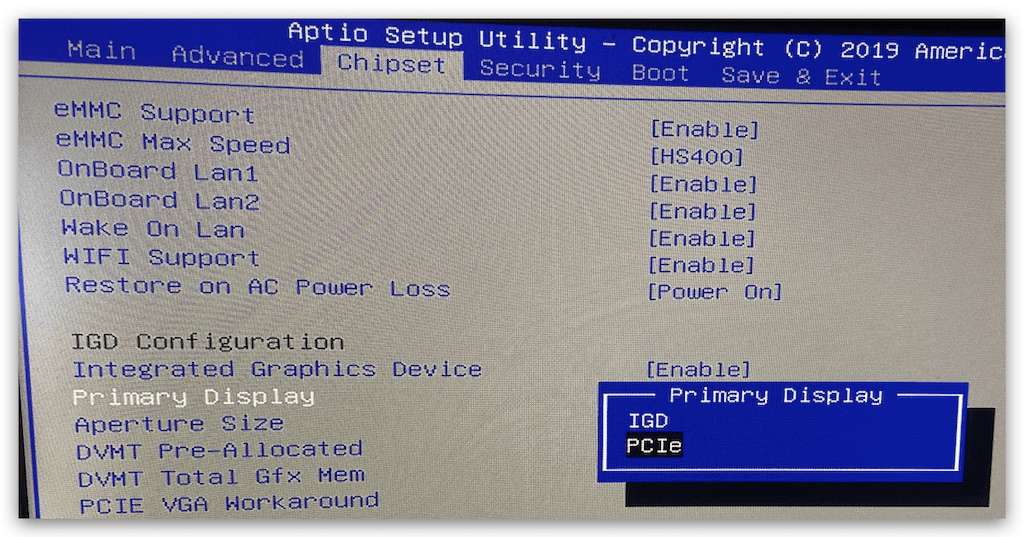
3.Navigate to Chipset -> Primary Display and select PCIe and press Enter.
Save the BIOS settings and power off the device.
Hardware Instructions
Insert your GPU into the PCIe x16 end of the adapter.
Insert the Adapter to M.2 PCIe slot of the ODYSSEY-X86J41x5,
The GPU also needs an external power, here I used a DIY 4-pin to DC jack to supply the 12V power (Only do this if know what you are doing). There is also 4-pin to DC jack on the market out there that you can buy.
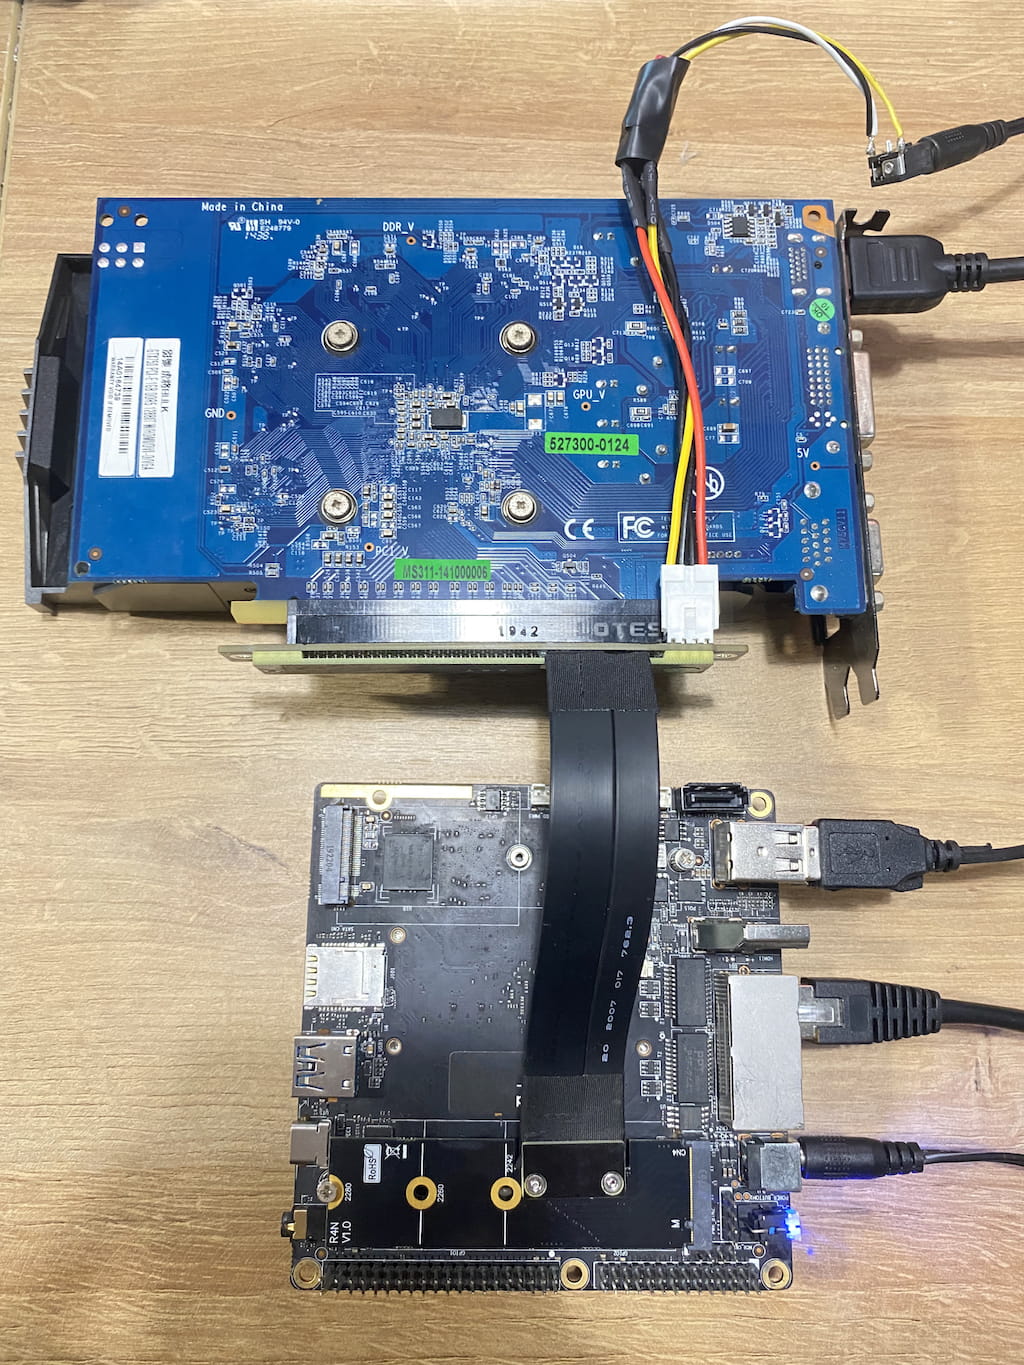
- Connect the HDMI to the GPU instead of the ODYSSEY-X86J41x5.
Please be careful during the hardware connection. Make sure everything is connected correctly before turning on power or you may in danger of damaging components.
Installing GPU's Driver
If everything goes well, the device should boot up properly and enters into the OS. But also need to install the GPU drivers to the OS. If you are a Windows user this will be very easy. Here I will demonstrate installing GPU(Nvidia) drivers on Ubuntu(Linux) for reference.
1.Open terminal and type the following command to check the GPU:
lspci | grep -i vga
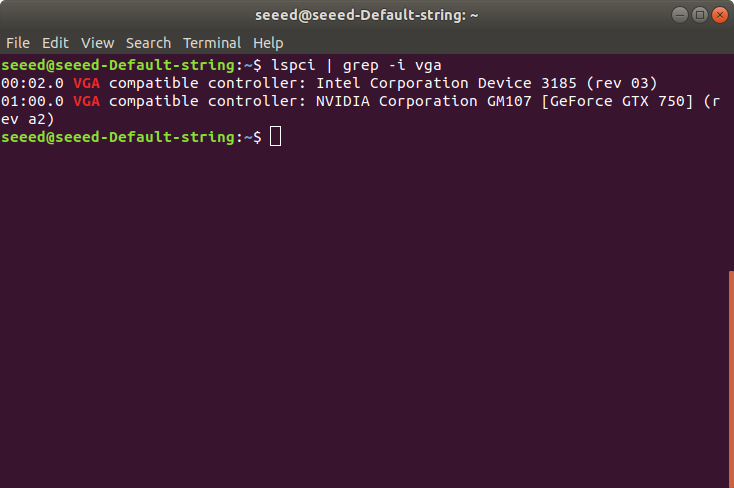
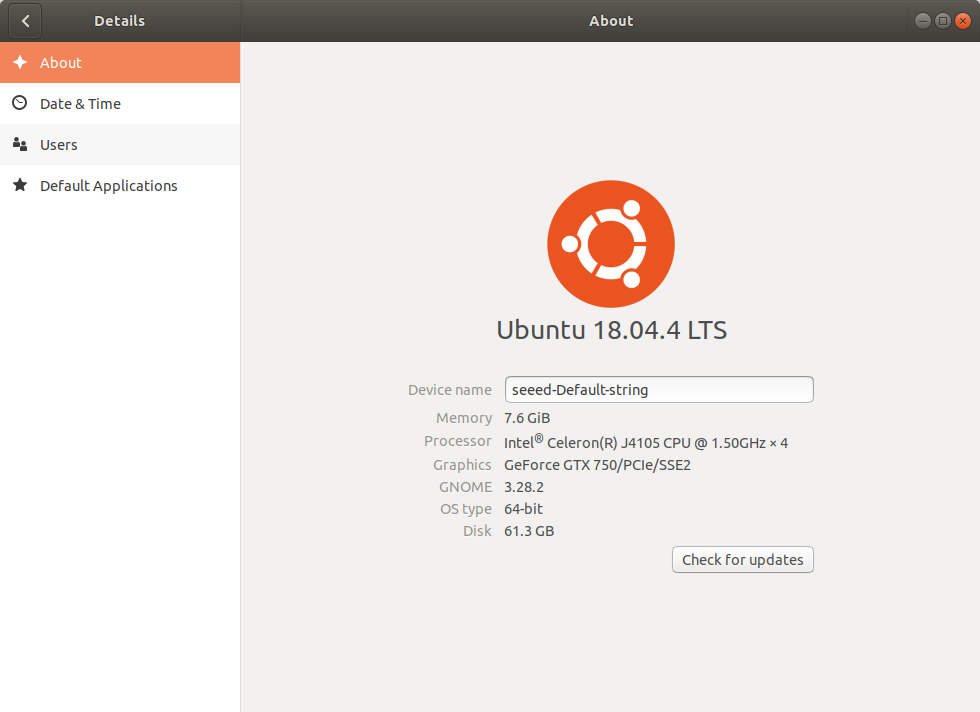
Here we can see two GPUs, one is the on-board GPU and the other is the external GPU(GTX 750).
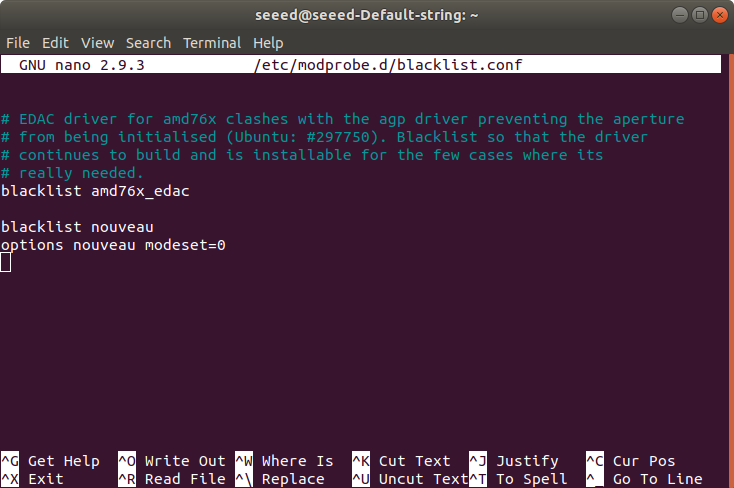
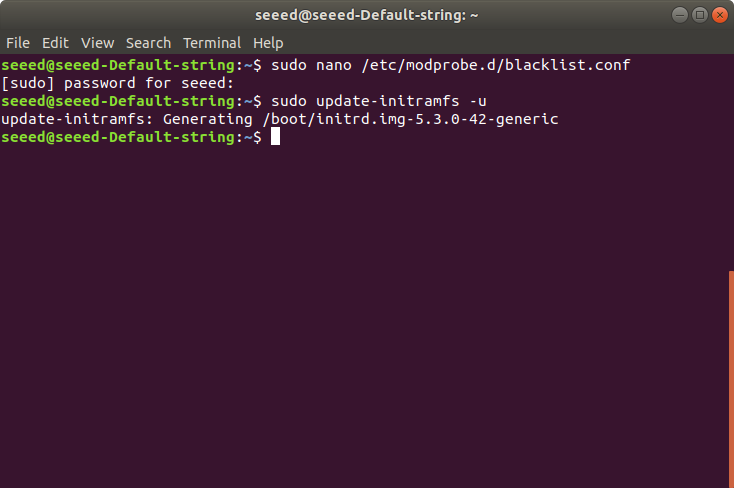
2.First, we need to disable the nouveau services on Ubuntu. In Terminal, use nano or vim to open the /etc/modprobe.d/blacklist.conf.
sudo nano /etc/modprobe.d/blacklist.conf

3.Add the following code at the end and save the changes.
blacklist nouveau
options nouveau modeset=0
4.Run the following command to update:
sudo update-initramfs -u
5.Reboot the device to take on changes and can run the following command, if nothing appears then the service is disabled.
lsmod | grep nouveau
6.Now we can use the ubuntu built-in command to check the drivers needed for the external GPU:
ubuntu-drivers devices
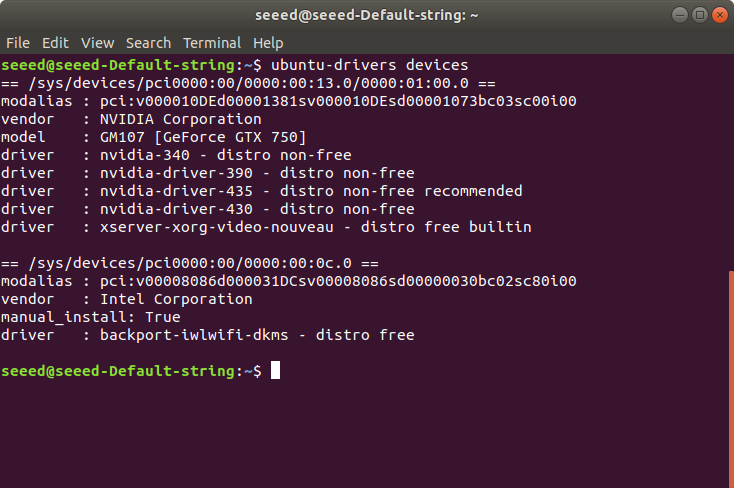
This will determine the GPU model and recommend the drivers for it. Here recommended the nvidia-driver-435 for the external GPU.
7.Auto install the driver using the following command, and reboot the device to take on the effect.
sudo ubuntu-drivers autoinstall
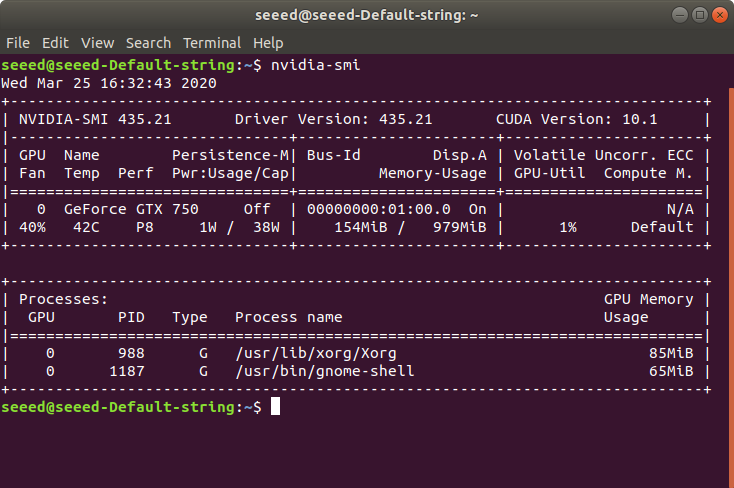
By now, the driver should be installed on the ODYSSEY-X86J4105! You can check the status of GPU by running the following command in the Terminal.
nvidia-smi
Or simply go to the settings:
Now enjoy the boosted up ODYSSEY-X86J41x5 and all set to dive in the field of AI where it requires a lot of GPU power!
Tech Support & Product Discussion
Thank you for choosing our products! We are here to provide you with different support to ensure that your experience with our products is as smooth as possible. We offer several communication channels to cater to different preferences and needs.