Seamless Asset Tracking with Amazon Sidewalk and LoRaWAN Networks
Introduction
Experience seamless network integration with this dual-device demo. The setup features the versatile Seeed Studio Wio Tracker Dev Board and the robust Seeed Studio SenseCAP T1000-S Tracker device, both showcasing seamless transitions between LoRaWAN and Sidewalk networks for optimal coverage.
- Dual Network Support: With a single button press, switch between LoRaWAN and Sidewalk to maintain persistent connectivity.
- Cloud-Connected: Witness data transfer in real-time to AWS IoT Core, visualized through an AWS web app on a laptop display/monitor.
- Battery-Powered Efficiency: The devices ensure consistent operation, untethered by wires for a truly mobile experience.
The process is divided into these main steps:
- SDK Installation and Setup
- Firmware Flashing
- AWS IoT Core Configuration
- Amazon Location Configuration
- Web App Configuration
Prerequisites
Installing the nRF Connect SDK
There are different ways to install the nRF Connect SDK, depending on your preferred development environment and the toolchain management tool:
-
Using Visual Studio Code and the nRF Connect for VS Code extension (recommended)
-
Using command line and nRF Util
Step 1: Update operating system
Before you start setting up the toolchain, install available updates for your operating system. See Requirements for information on the supported operating systems.
Step 2: Install prerequisites
- Visual Studio Code
- Command Line
-
The latest version of the nRF Command Line Tools package. Download it from the nRF Command Line Tools page.
-
The latest version of Visual Studio Code for your operating system from the Visual Studio Code download page.
-
In Visual Studio Code, the latest version of the nRF Connect for VS Code Extension Pack.
- The latest version of nRF Util development tool,a unified command line utility for Nordic products.
Note:
After downloading the nRF Util executable, move it to a directory that is in the system PATH. On macOS and Linux, the downloaded file also needs to be given execute permission by typing chmod +x nrfutil or by checking the checkbox in the file properties.
- The latest version of nRF Command Line Tools package,Download it from the nRF Command Line Tools page.
Note:
After downloading and installing the tools, add nrfjprog to the system PATH in the environment variables.
Step 3: Install the nRF Connect SDK toolchain
- nRF Connect for Visual Studio Code
- Command Line
- Open the nRF Connect extension in Visual Studio Code by clicking its icon in the
Activity Bar. - In the extension’s
Welcome View, click onInstall Toolchain. - Select the toolchain version to install. The toolchain version should match the nRF Connect SDK version you are going to work with. We use the
V2.5.0(recommended).
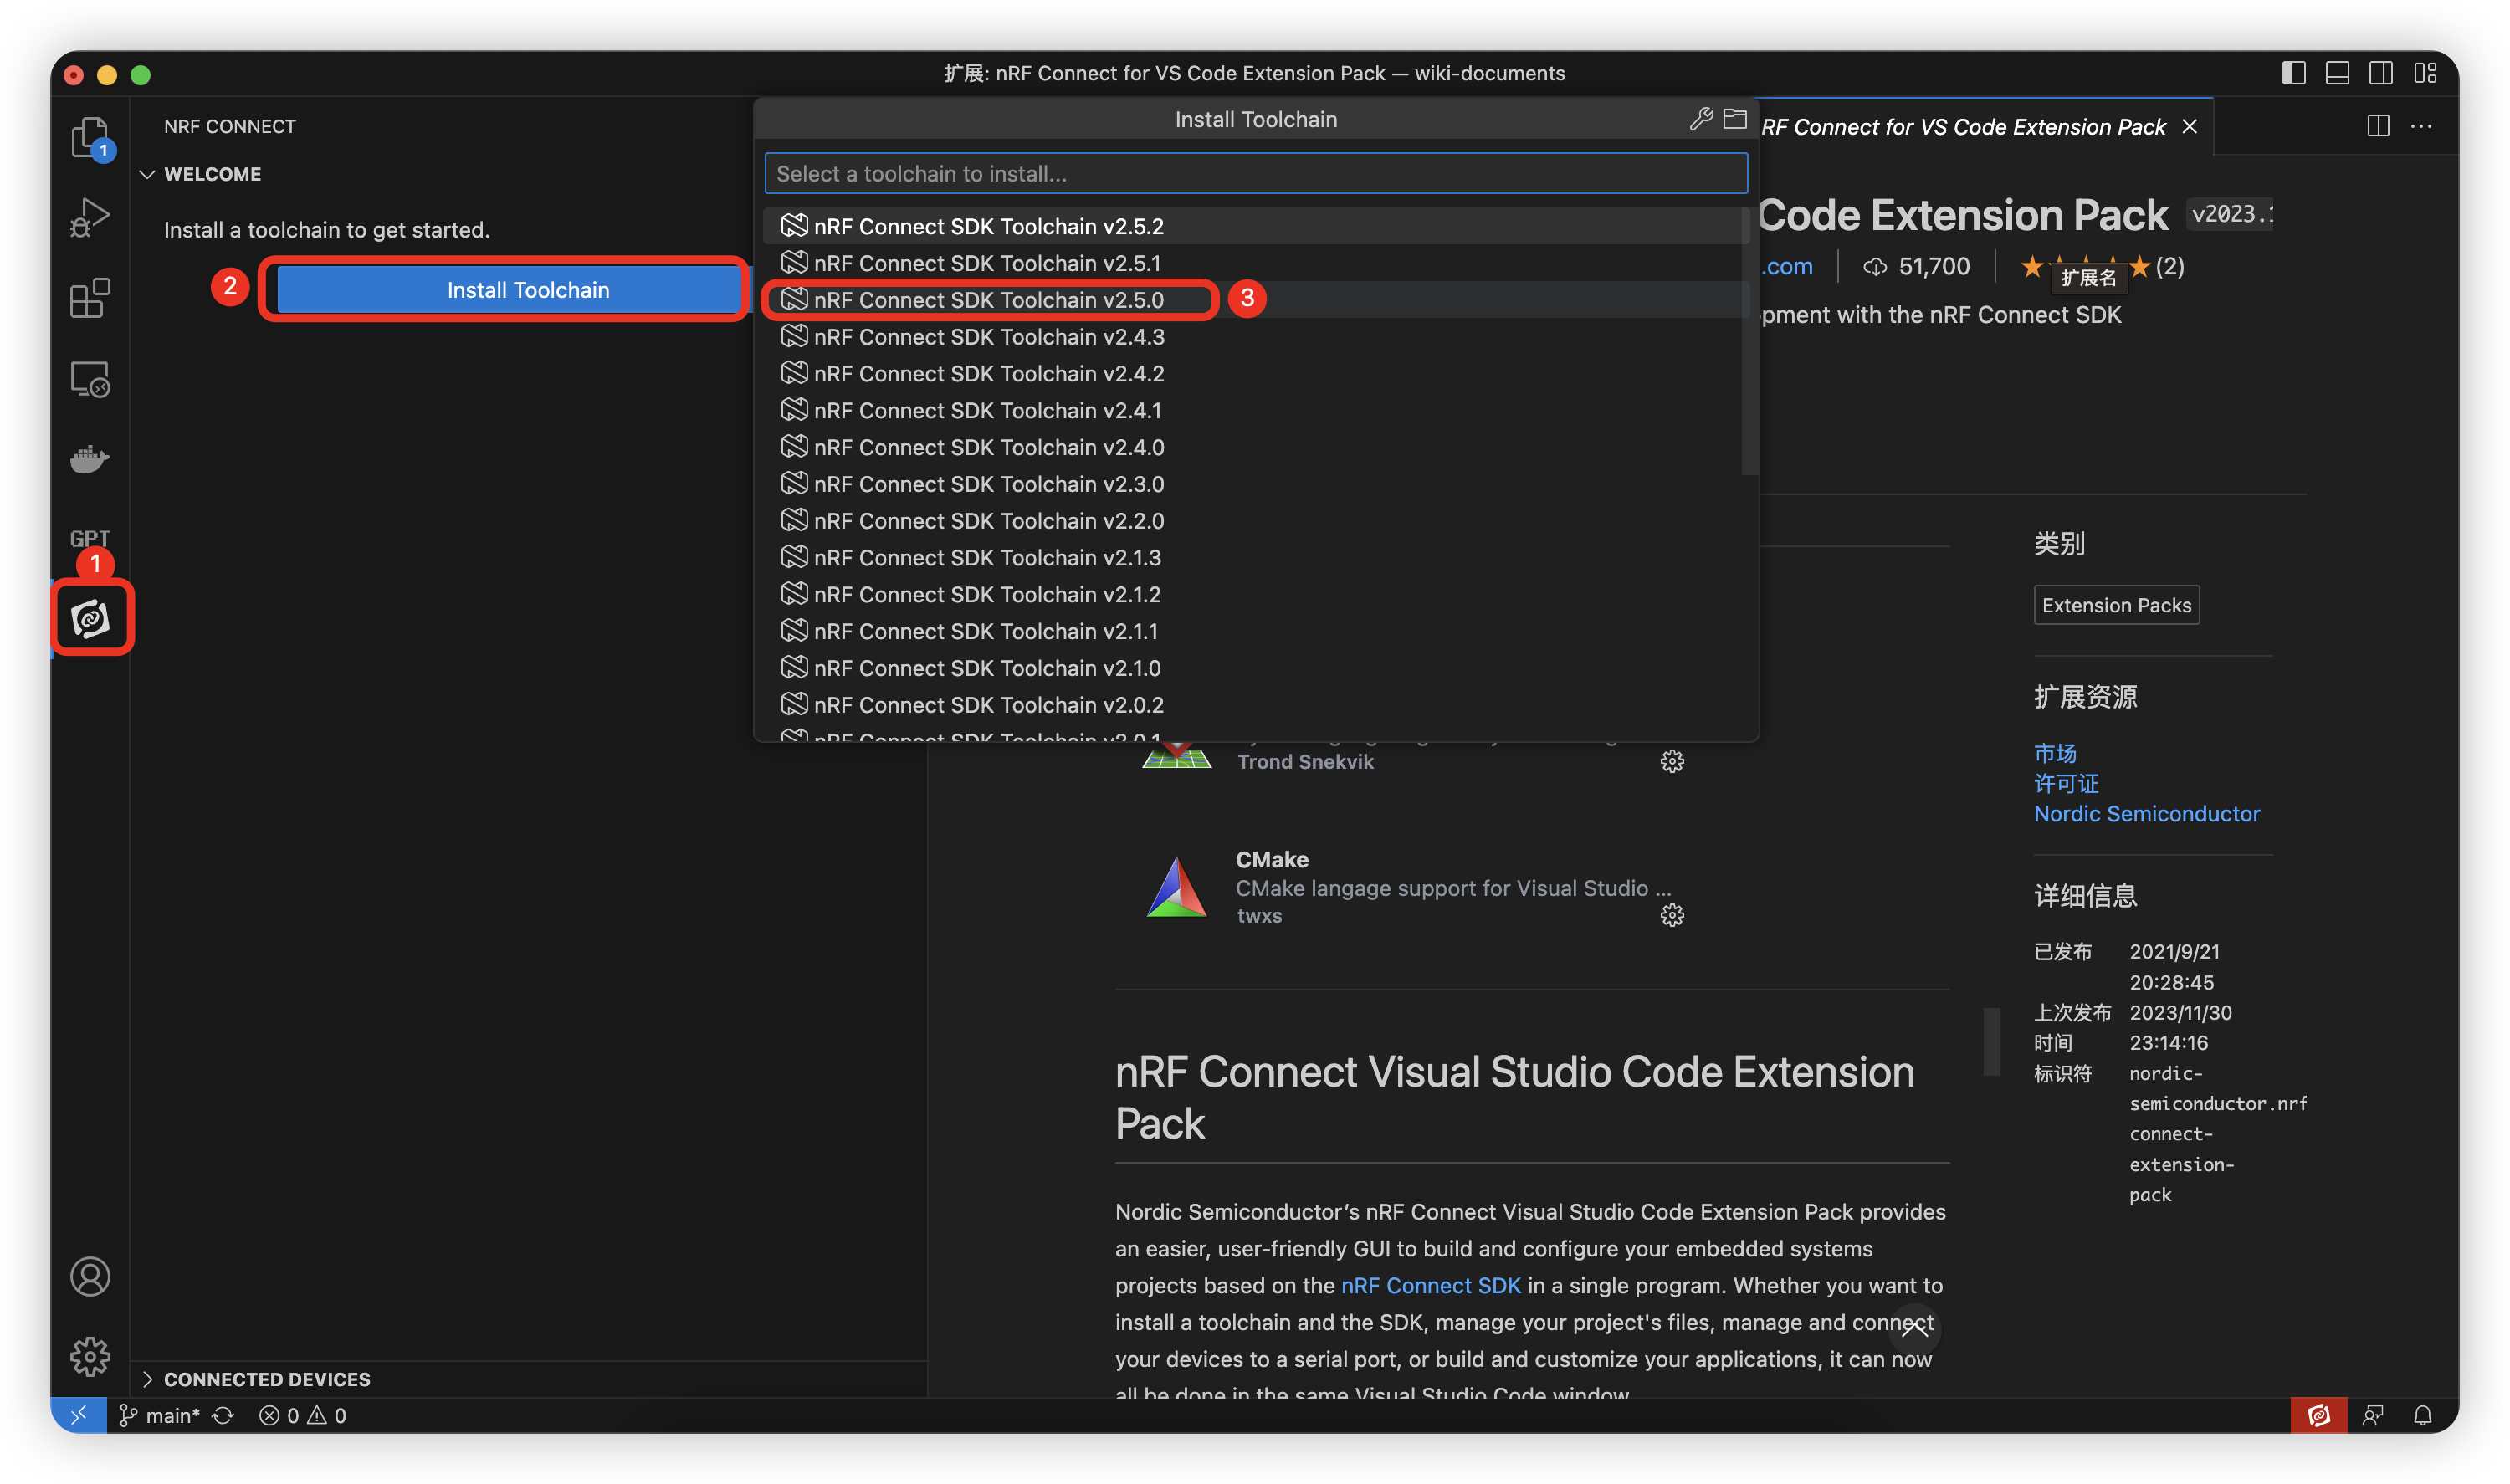
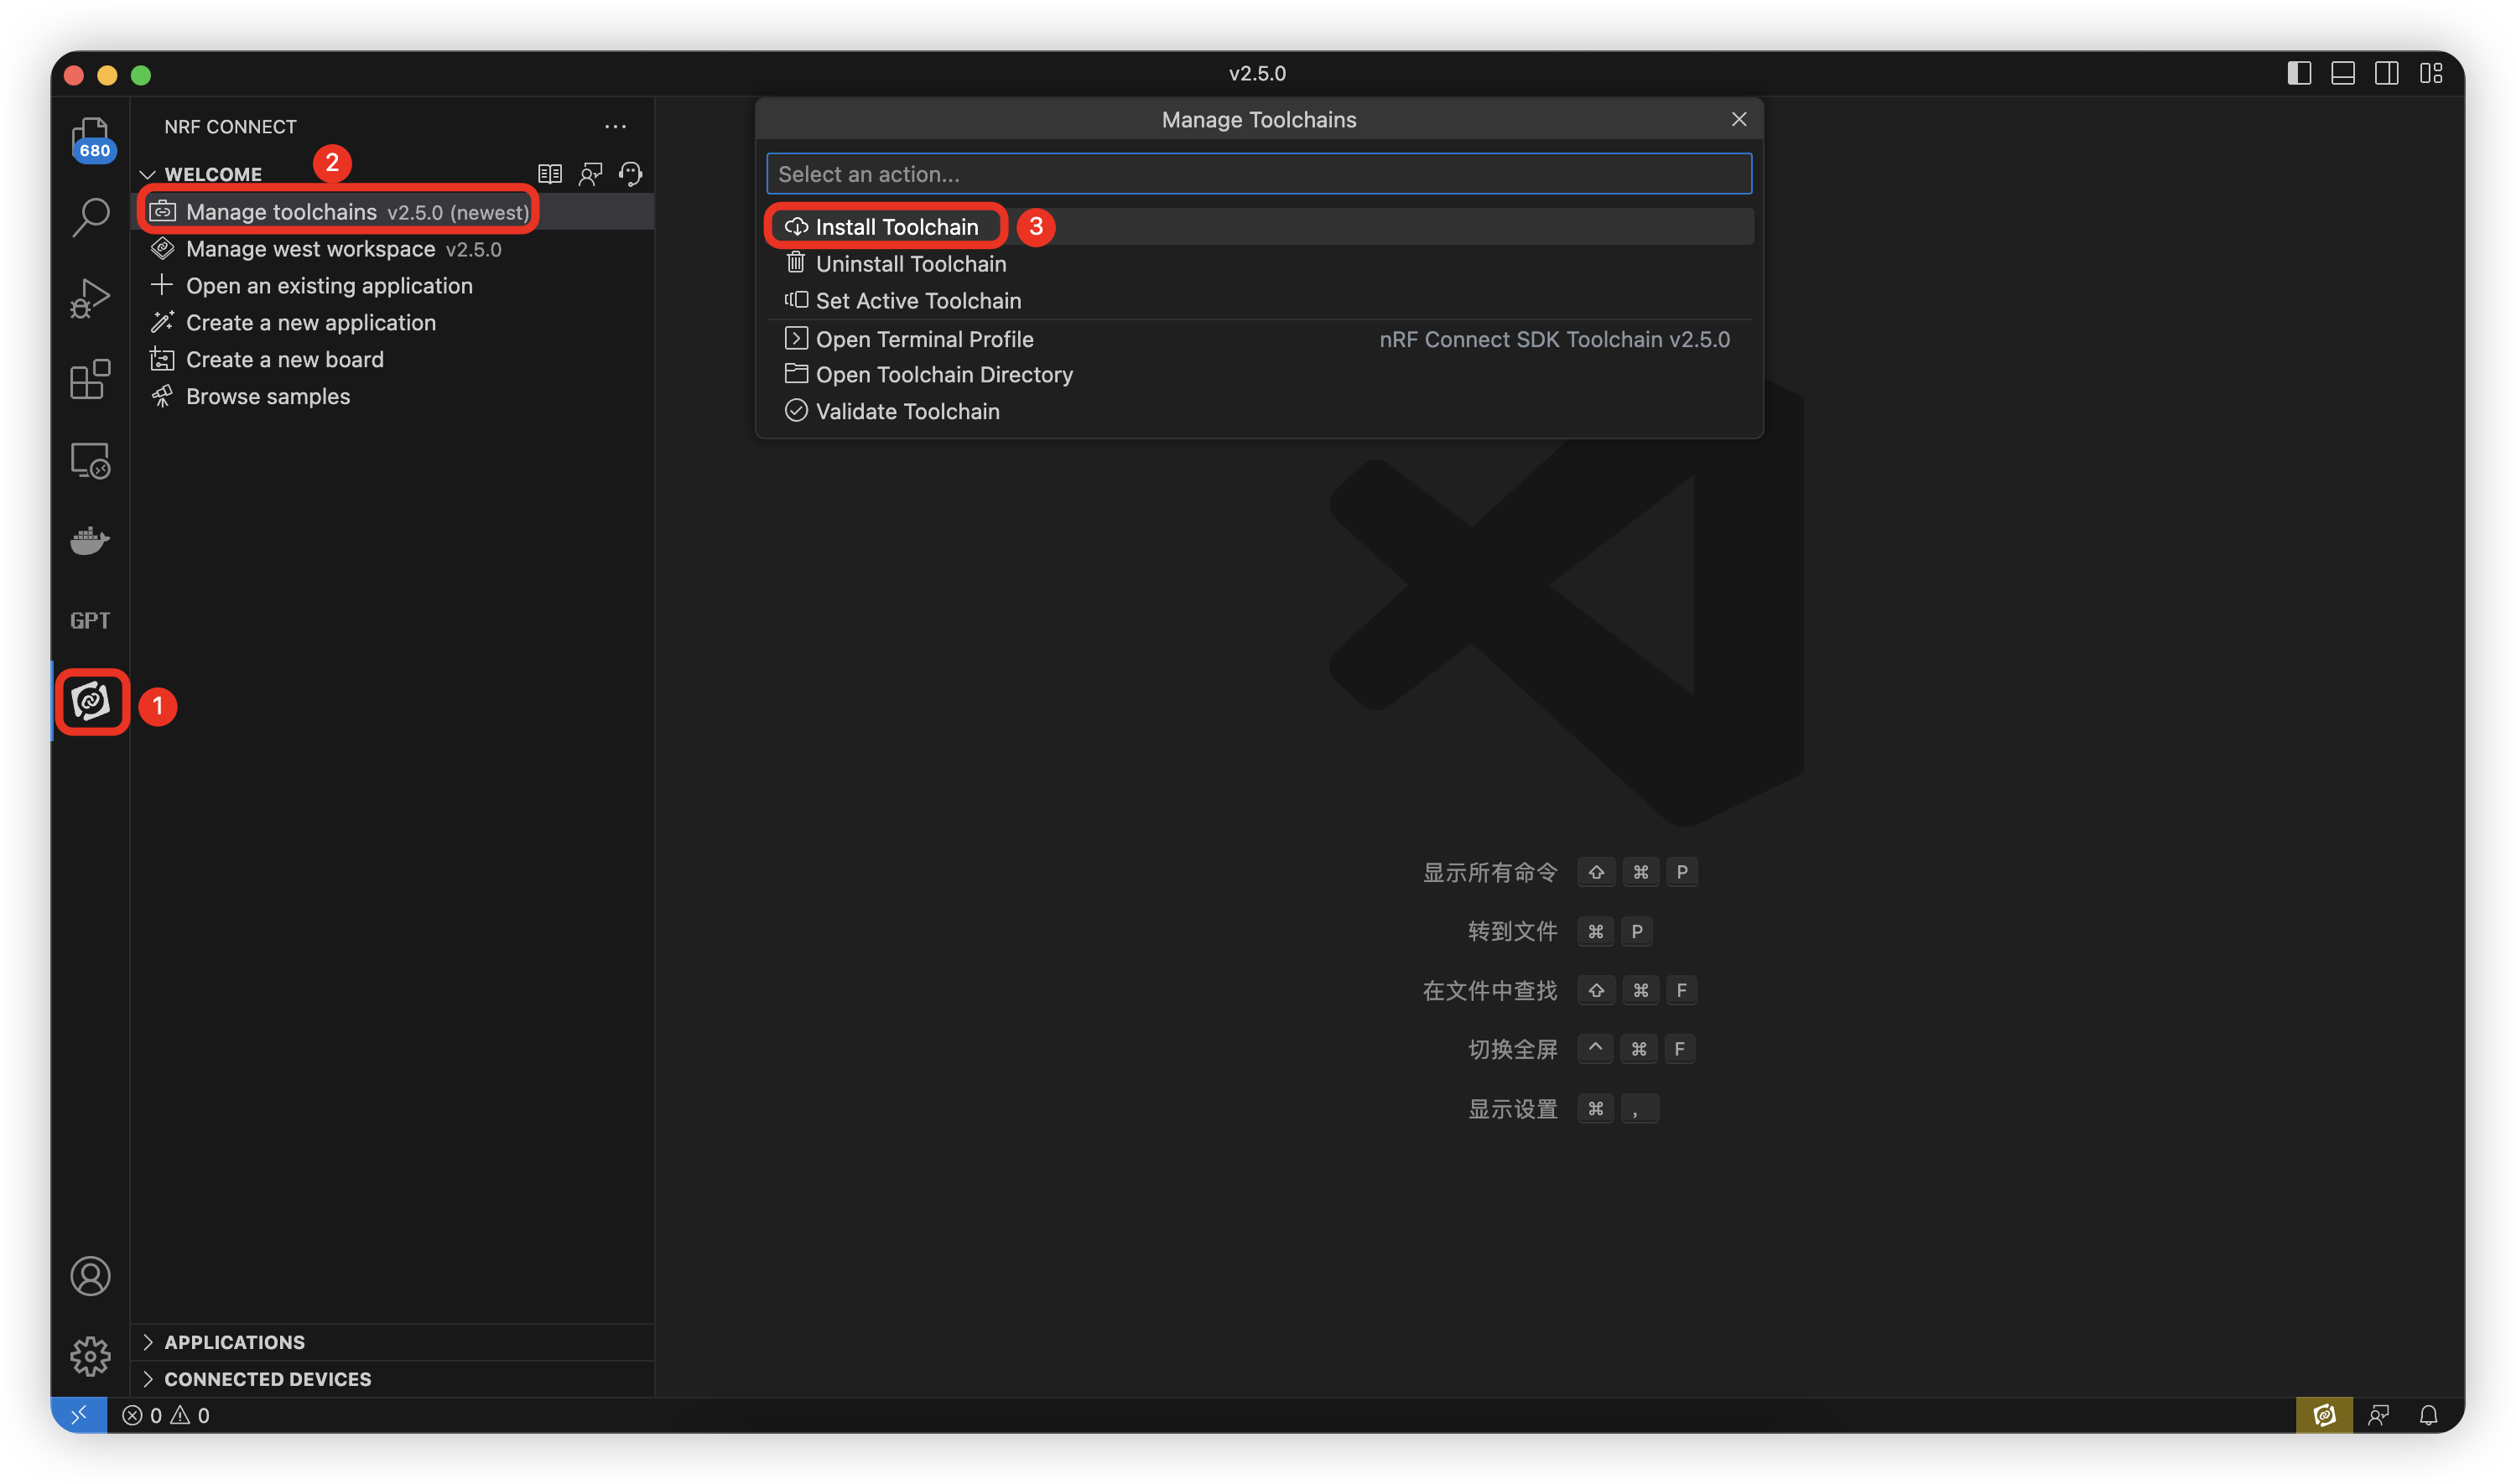
After installing the toolchain, you can access the Install Toolchain option by clicking on Manage toolchains.
-
Open a terminal window.
-
Run the following command to install the nRF Util toolchain-manager command:
nrfutil install toolchain-manager
- Run the following command to list the available installations:
nrfutil toolchain-manager search
The versions from this list correspond to the nRF Connect SDK versions and will be version in the following step.
- Run the following command to install the toolchain version for the SDK version of your choice:
nrfutil toolchain-manager install --ncs-version version
For example:
nrfutil toolchain-manager install --ncs-version v2.5.0
This example command installs the toolchain required for the nRF Connect SDK v2.5.0(recommended).
The toolchain is installed by default at C:/ncs/toolchains on Windows, ~/ncs/toolchains on Linux, and /opt/nordic/ncs/toolchains on macOS.
To check the current configuration setting, use the nrfutil toolchain-manager config --show command.
To read more about these commands, use the nrfutil toolchain-manager --help command.
Step 4: Get the nRF Connect SDK code
- nRF Connect for Visual Studio Code
- Command Line
To clone the nRF Connect SDK code, complete the following steps:
-
Open the nRF Connect extension in Visual Studio Code by clicking its icon in the
Activity Bar. -
In the extension’s
Welcome View, click onManage SDKs. The list of actions appears in the Visual Studio Code’s quick pick. -
Click
Install SDK. The list of available SDK versions appears in the Visual Studio Code’s quick pick. -
Select the SDK version to install, we use
V2.5.0.
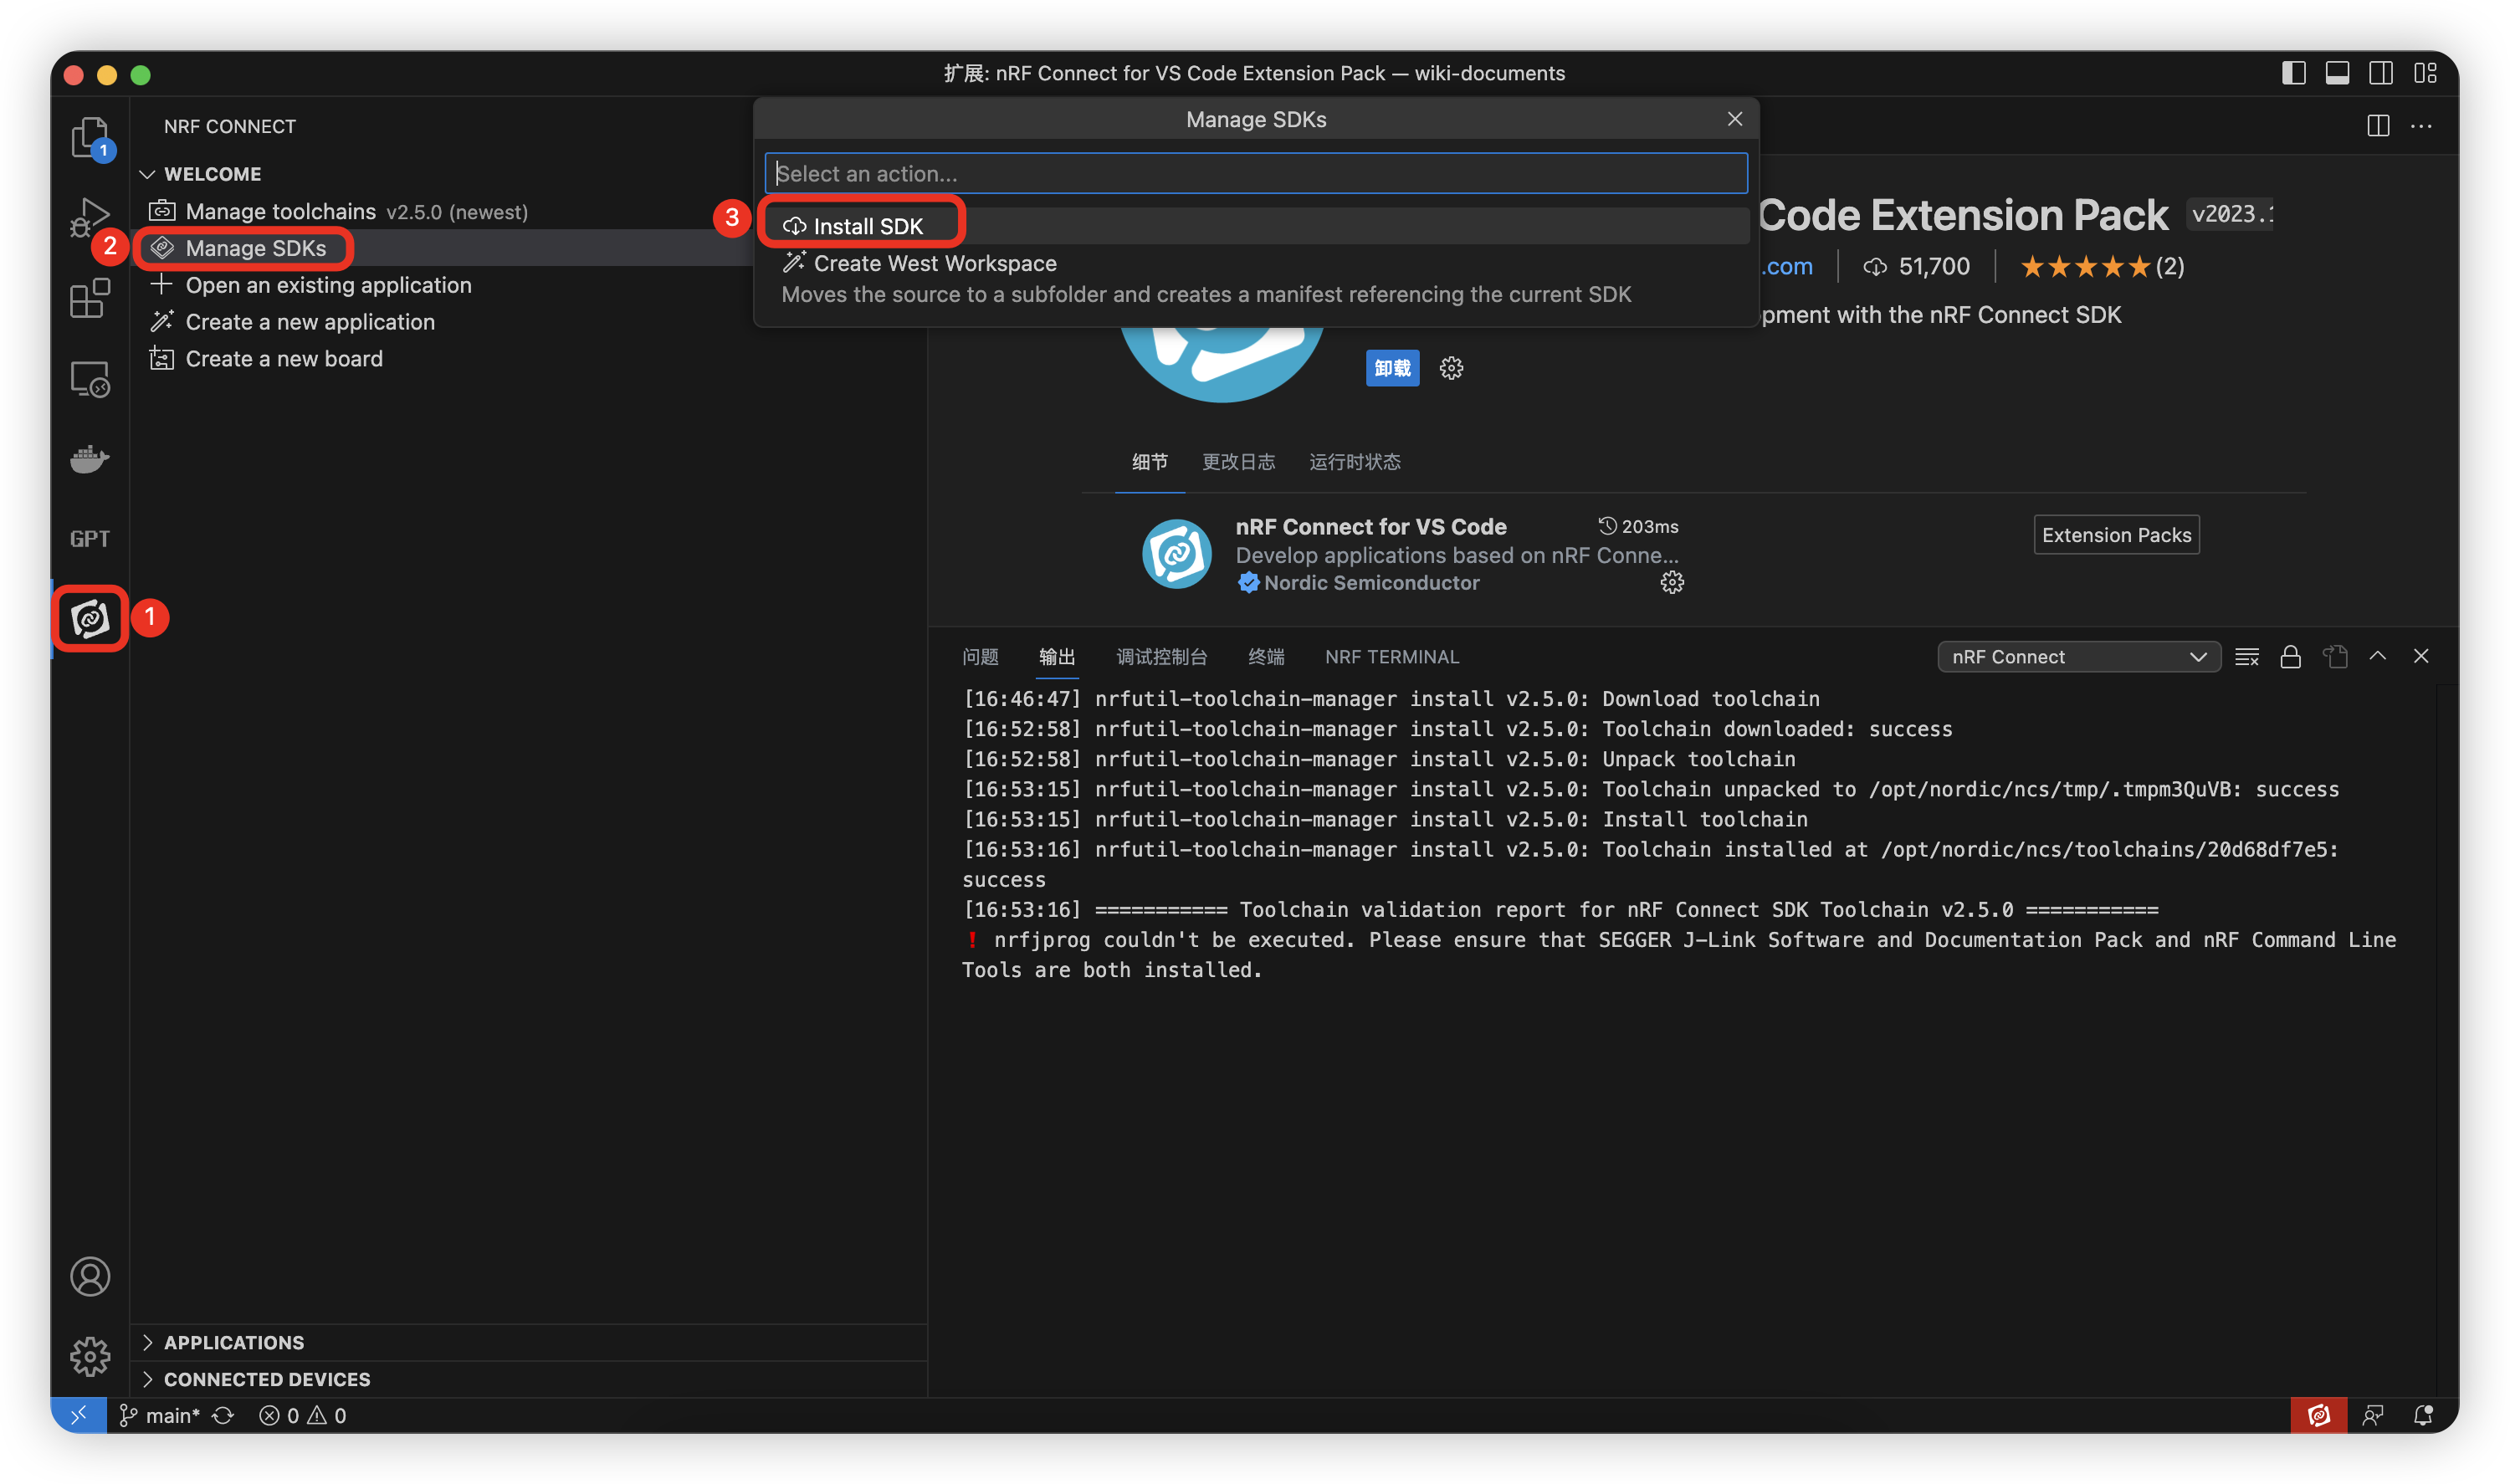
The SDK installation starts and it can take several minutes.
To clone the repositories, complete the following steps:
-
On the command line, open the directory
ncs. By default, this is one level up from the location where you installed the toolchain. This directory will hold all nRF Connect SDK repositories. -
Start the toolchain environment for your operating system using the following command:
Windows
nrfutil toolchain-manager launch --terminalLinux/macOS
nrfutil toolchain-manager launch --shell -
Determine the identifier of the revision of the nRF Connect SDK you want to work with. See the table above for more information. When you first install the nRF Connect SDK, it is recommended to install the latest released versions of the SDK and the toolchain.
-
Initialize west with the revision of the nRF Connect SDK that you want to check out, replacing nRFConnectSDK_revision with the identifier:
west init -m https://github.com/nrfconnect/sdk-nrf --mr nRFConnectSDK_revision
For example:
Specific release: To check out the v2.5.0 release, enter the following command:
west init -m https://github.com/nrfconnect/sdk-nrf --mr v2.5.0
Development tag: To check out the v1.9.2-dev1 tag, enter the following command:
west init -m https://github.com/nrfconnect/sdk-nrf --mr v1.9.2-dev1
Branch: To check out the main branch that includes the latest state of development, enter the following command:
west init -m https://github.com/nrfconnect/sdk-nrf --mr main
This will clone the manifest repository sdk-nrf into nrf.
Initializing west with a specific revision of the manifest file does not lock your repositories to this version. Checking out a different branch or tag in the sdk-nrf repository and running west update changes the version of the nRF Connect SDK that you work with.
Note:
If you get an error message when running west, update west to the latest version. See Troubleshooting West in the Zephyr documentation for more information.
-
Enter the following command to clone the project repositories:
west update
Depending on your connection, this might take some time.
-
Export a Zephyr CMake package. This allows CMake to automatically load the boilerplate code required for building nRF Connect SDK applications:
west zephyr-export
Check Installing the nRF Connect SDK for more details.
Setting up the Sidewalk environment
Follow these steps to download the Sidewalk application for the nRF Connect SDK:
- Open a terminal window. Your directory structure should look as follows:
.
|___ .west
|___ bootloader
|___ modules
|___ nrf
|___ nrfxlib
|___ zephyr
|___ ...
- Make sure the manifest path points to west.yml inside the nrf directory:
west manifest --path
/path-to-ncs-folder/nrf/west.yml
In case your manifest path points to a different file, use the following command:
west config manifest.path nrf
- Enable the Sidewalk group filter for west.
west config manifest.group-filter "+sidewalk"
Check for Sidewalk presence in west:
west list sidewalk
sidewalk     sidewalk                     <sidewalk_revision> https://github.com/nrfconnect/sdk-sidewalk
- Update all repositories:
west update
Depending on your connection, the update might take some time.
- Install Python requirements for Sidewalk.
pip install -r sidewalk/requirements.txt
Add LR11xx to nRF Connect SDK Sidewalk Extension
This repository contains the software driver that enables the LR11xx family of silicon to support the Sidewalk protocol when paired with the Nordic nRF52840 MCU and nRF Connect SDK. The driver is offered in binary form, as a static library which implements the "Platform Abstraction Layer" interfaces necessary to support LoRa or FSK connectivity. The static library contains within it a complete implementation of Semtech's SWDR001 (LR11xx Driver), which can be used to access other features of the LR11xx silicon, such as WIFI and GNSS scanning and ranging.
-
Download the SWDM016
-
With your working directory in cloned nordic repo, at top level directory, i.e.
~/ncs/<version>/sidewalk:
patch -p1 < ../nRF52840_LR11xx_driver_v010000.diff
parent directory path .. assumes you put the diff file there, otherwise you can specify the full path to its location.
-
Copy radio driver libraries
lib*.ainto sidewalk project to~/ncs/<version>/sidewalk/lib/lora_fsk/
There are two libraries provided, one withLOG_RUNTIME_FILTERINGenabled and other without. -
Copy
~/template_lbm_wio_tracker/boards/arm/wio_tracker_1110folder to~/ncs/v2.5.0/zephyr/boards/arm.
·
├─── .west/
├─── modules/
├─── nrf/
├─── ...
└─── zephyr/
     └─── Boards/
          └─── arm/
               └─── wio_tracker_1110/
Create Resources
Step 1: Deploy Cloud9 Environment
In this section you will create all the resources that we need before getting started. As a first step you will create a Cloud9 Workspace that you'll use to build and deploy other resources. Then you will deploy a CDK Stack that contains all the backend resources for the Asset Tracker app. Finally, you will install all the frontend dependencies and configure the app.
- Open the AWS Cloud9 Console, click
Create Environment
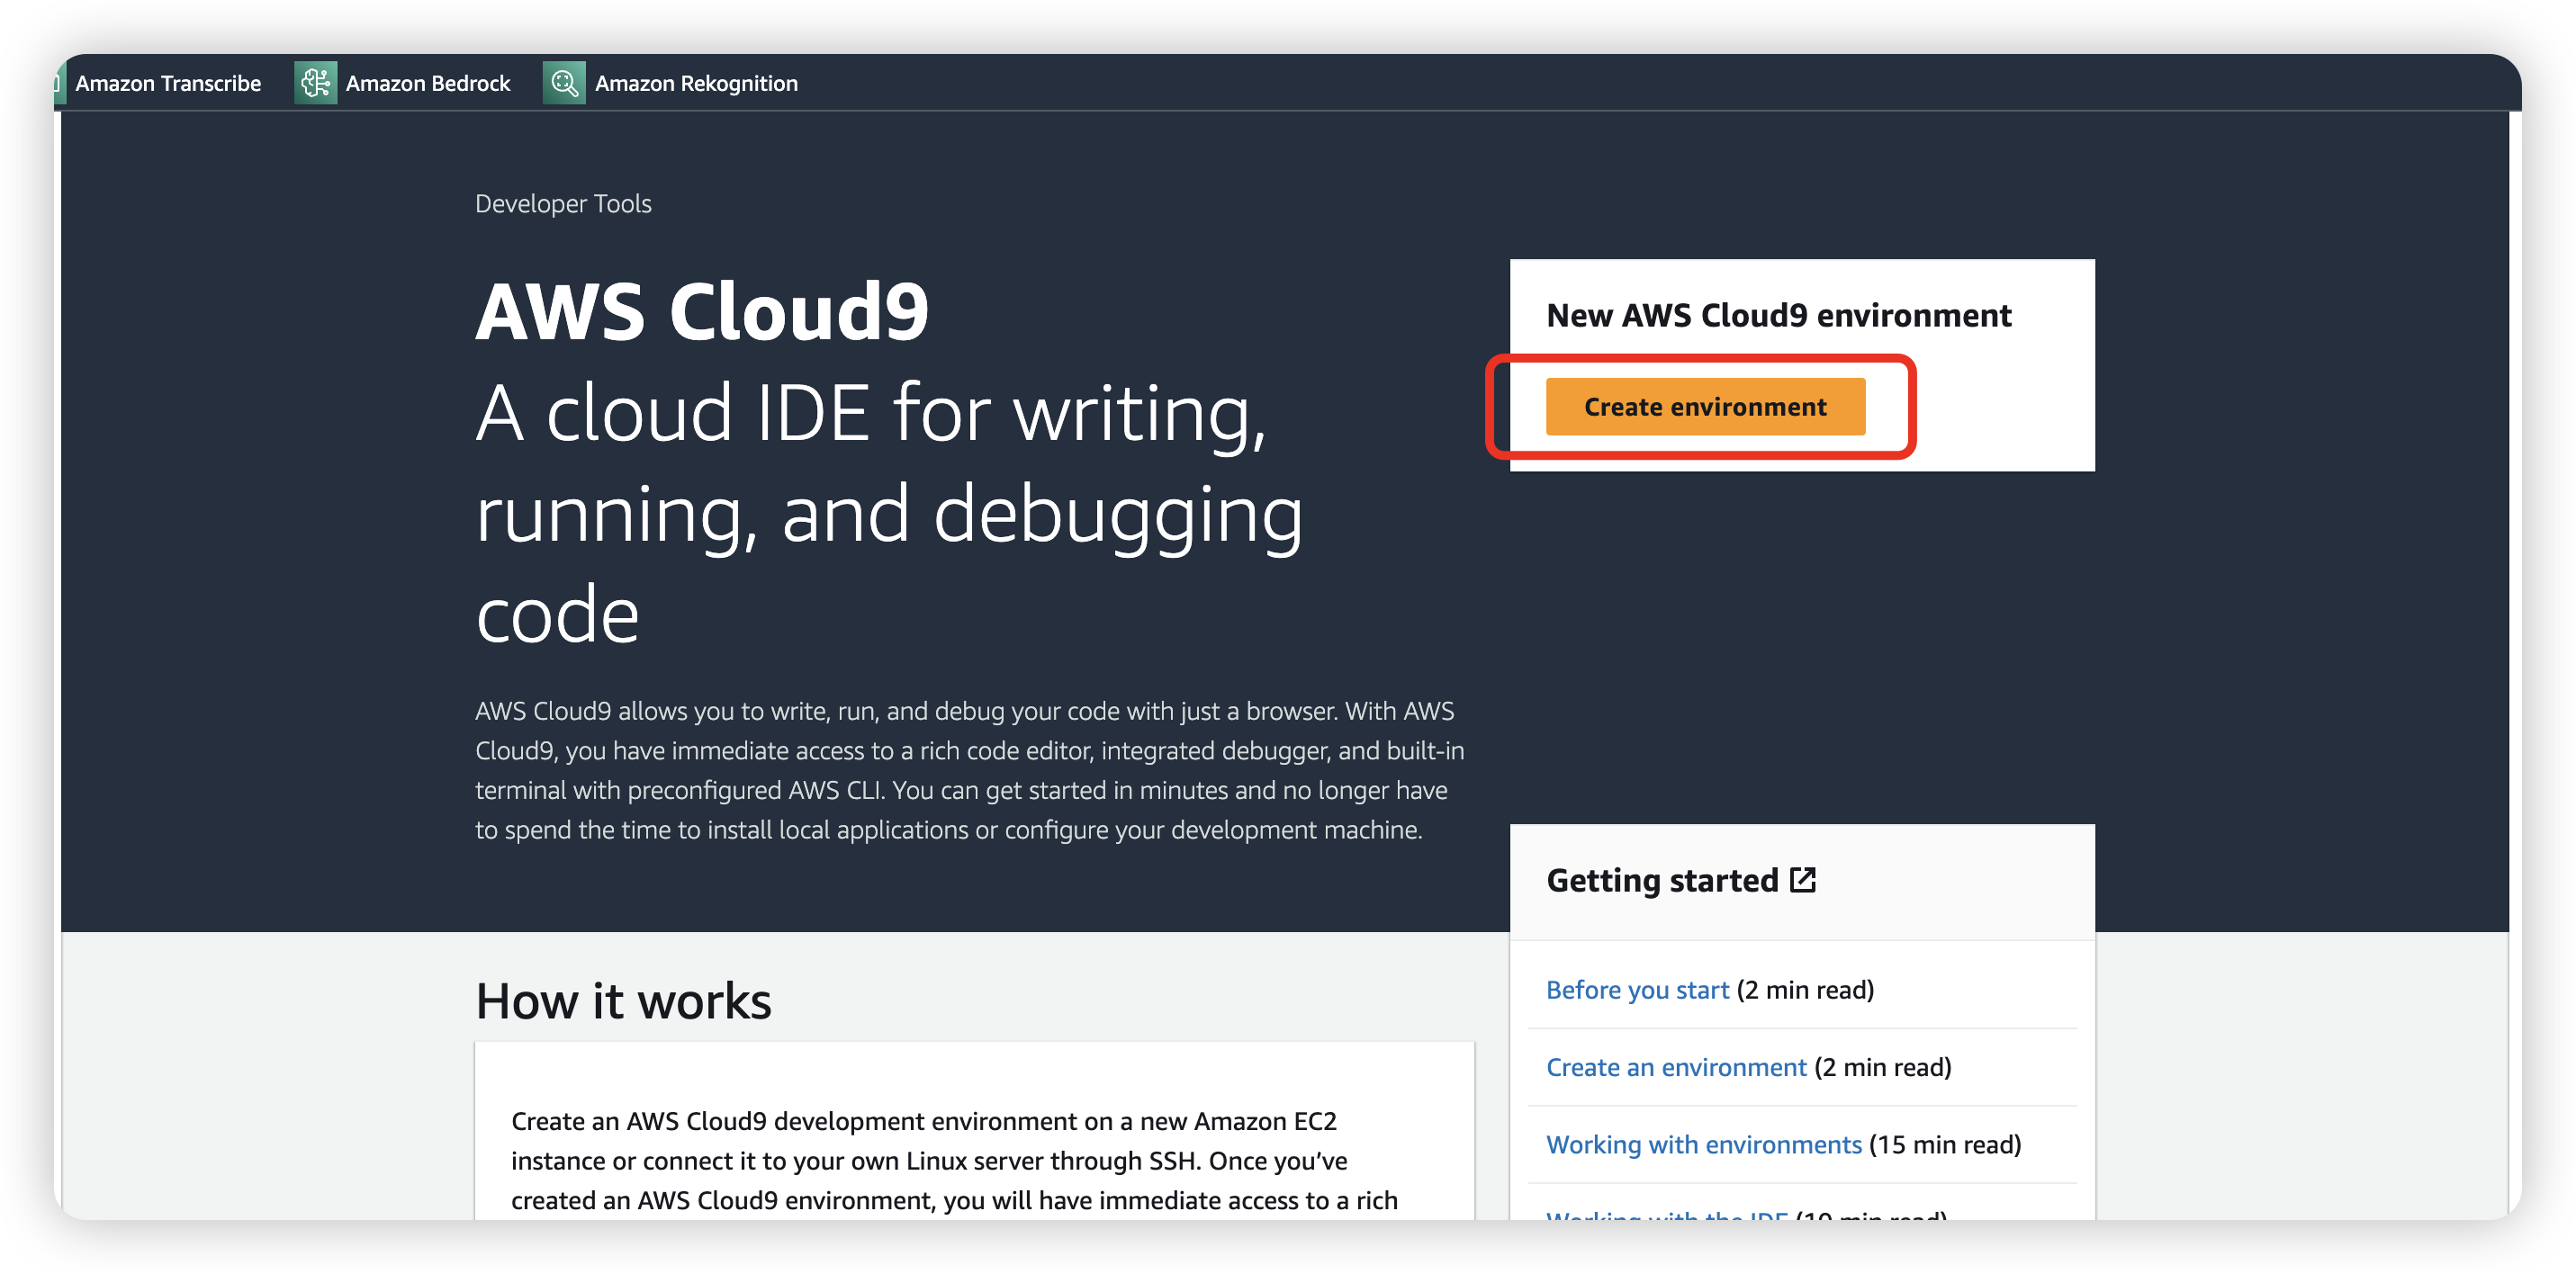
- Leave all other settings as default except the Instance type. Select
m5.large.

Step 2: Configure Prerequisites
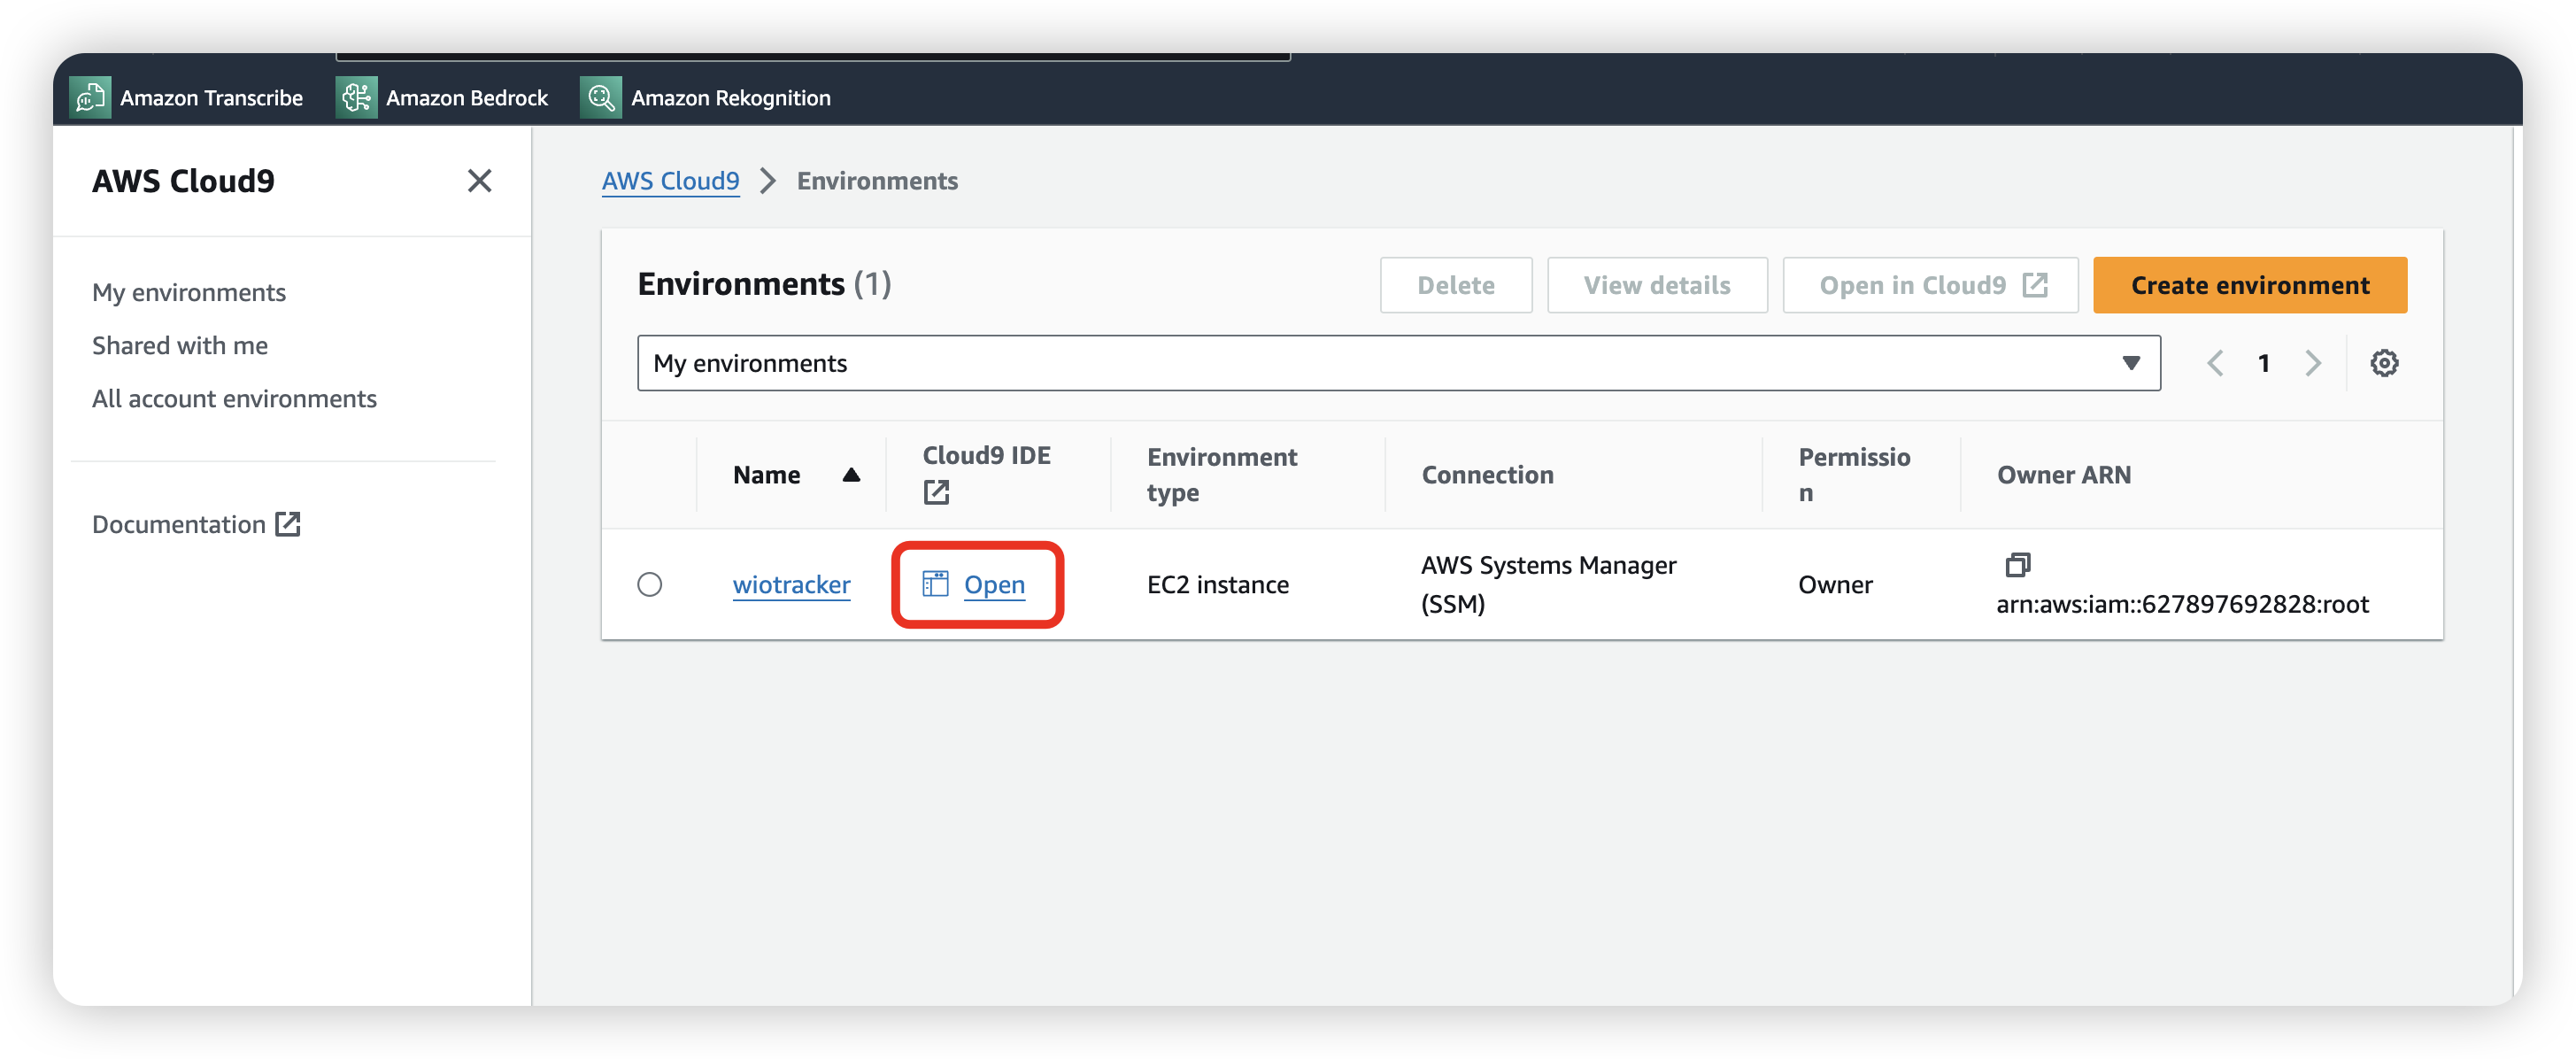
- Open the Cloud9 IDE.
- Clone the github repo in your Cloud9 environment terminal by entering the following command:
git clone --recurse-submodules https://github.com/aws-samples/aws-iot-asset-tracker-demo.git /home/ec2-user/environment/asset-tracking-workshop

- Navigate to the sample app directory:
cd ~/environment/asset-tracking-workshop
- Resize the EBS Volume of the underlying EC2 instance.
npm run utils:resizeC9EBS
- Install the project's dependencies:
npm ci
- Deploy the backend infrastructure:
# Prepare the AWS account for CDK
npm run infra:bootstrap
# Deploy the backend resources
npm run infra:deploy
- Create a config file:
npm run utils:createConfig
LoRaWAN Configuration
Add LoRaWAN Gateway on AWS
Check this Get Started to add the SenseCAP M2 Multi-Platform gateway to AWS IoT Core.
Add LoRaWAN Device on AWS
Step 1: Define the keys
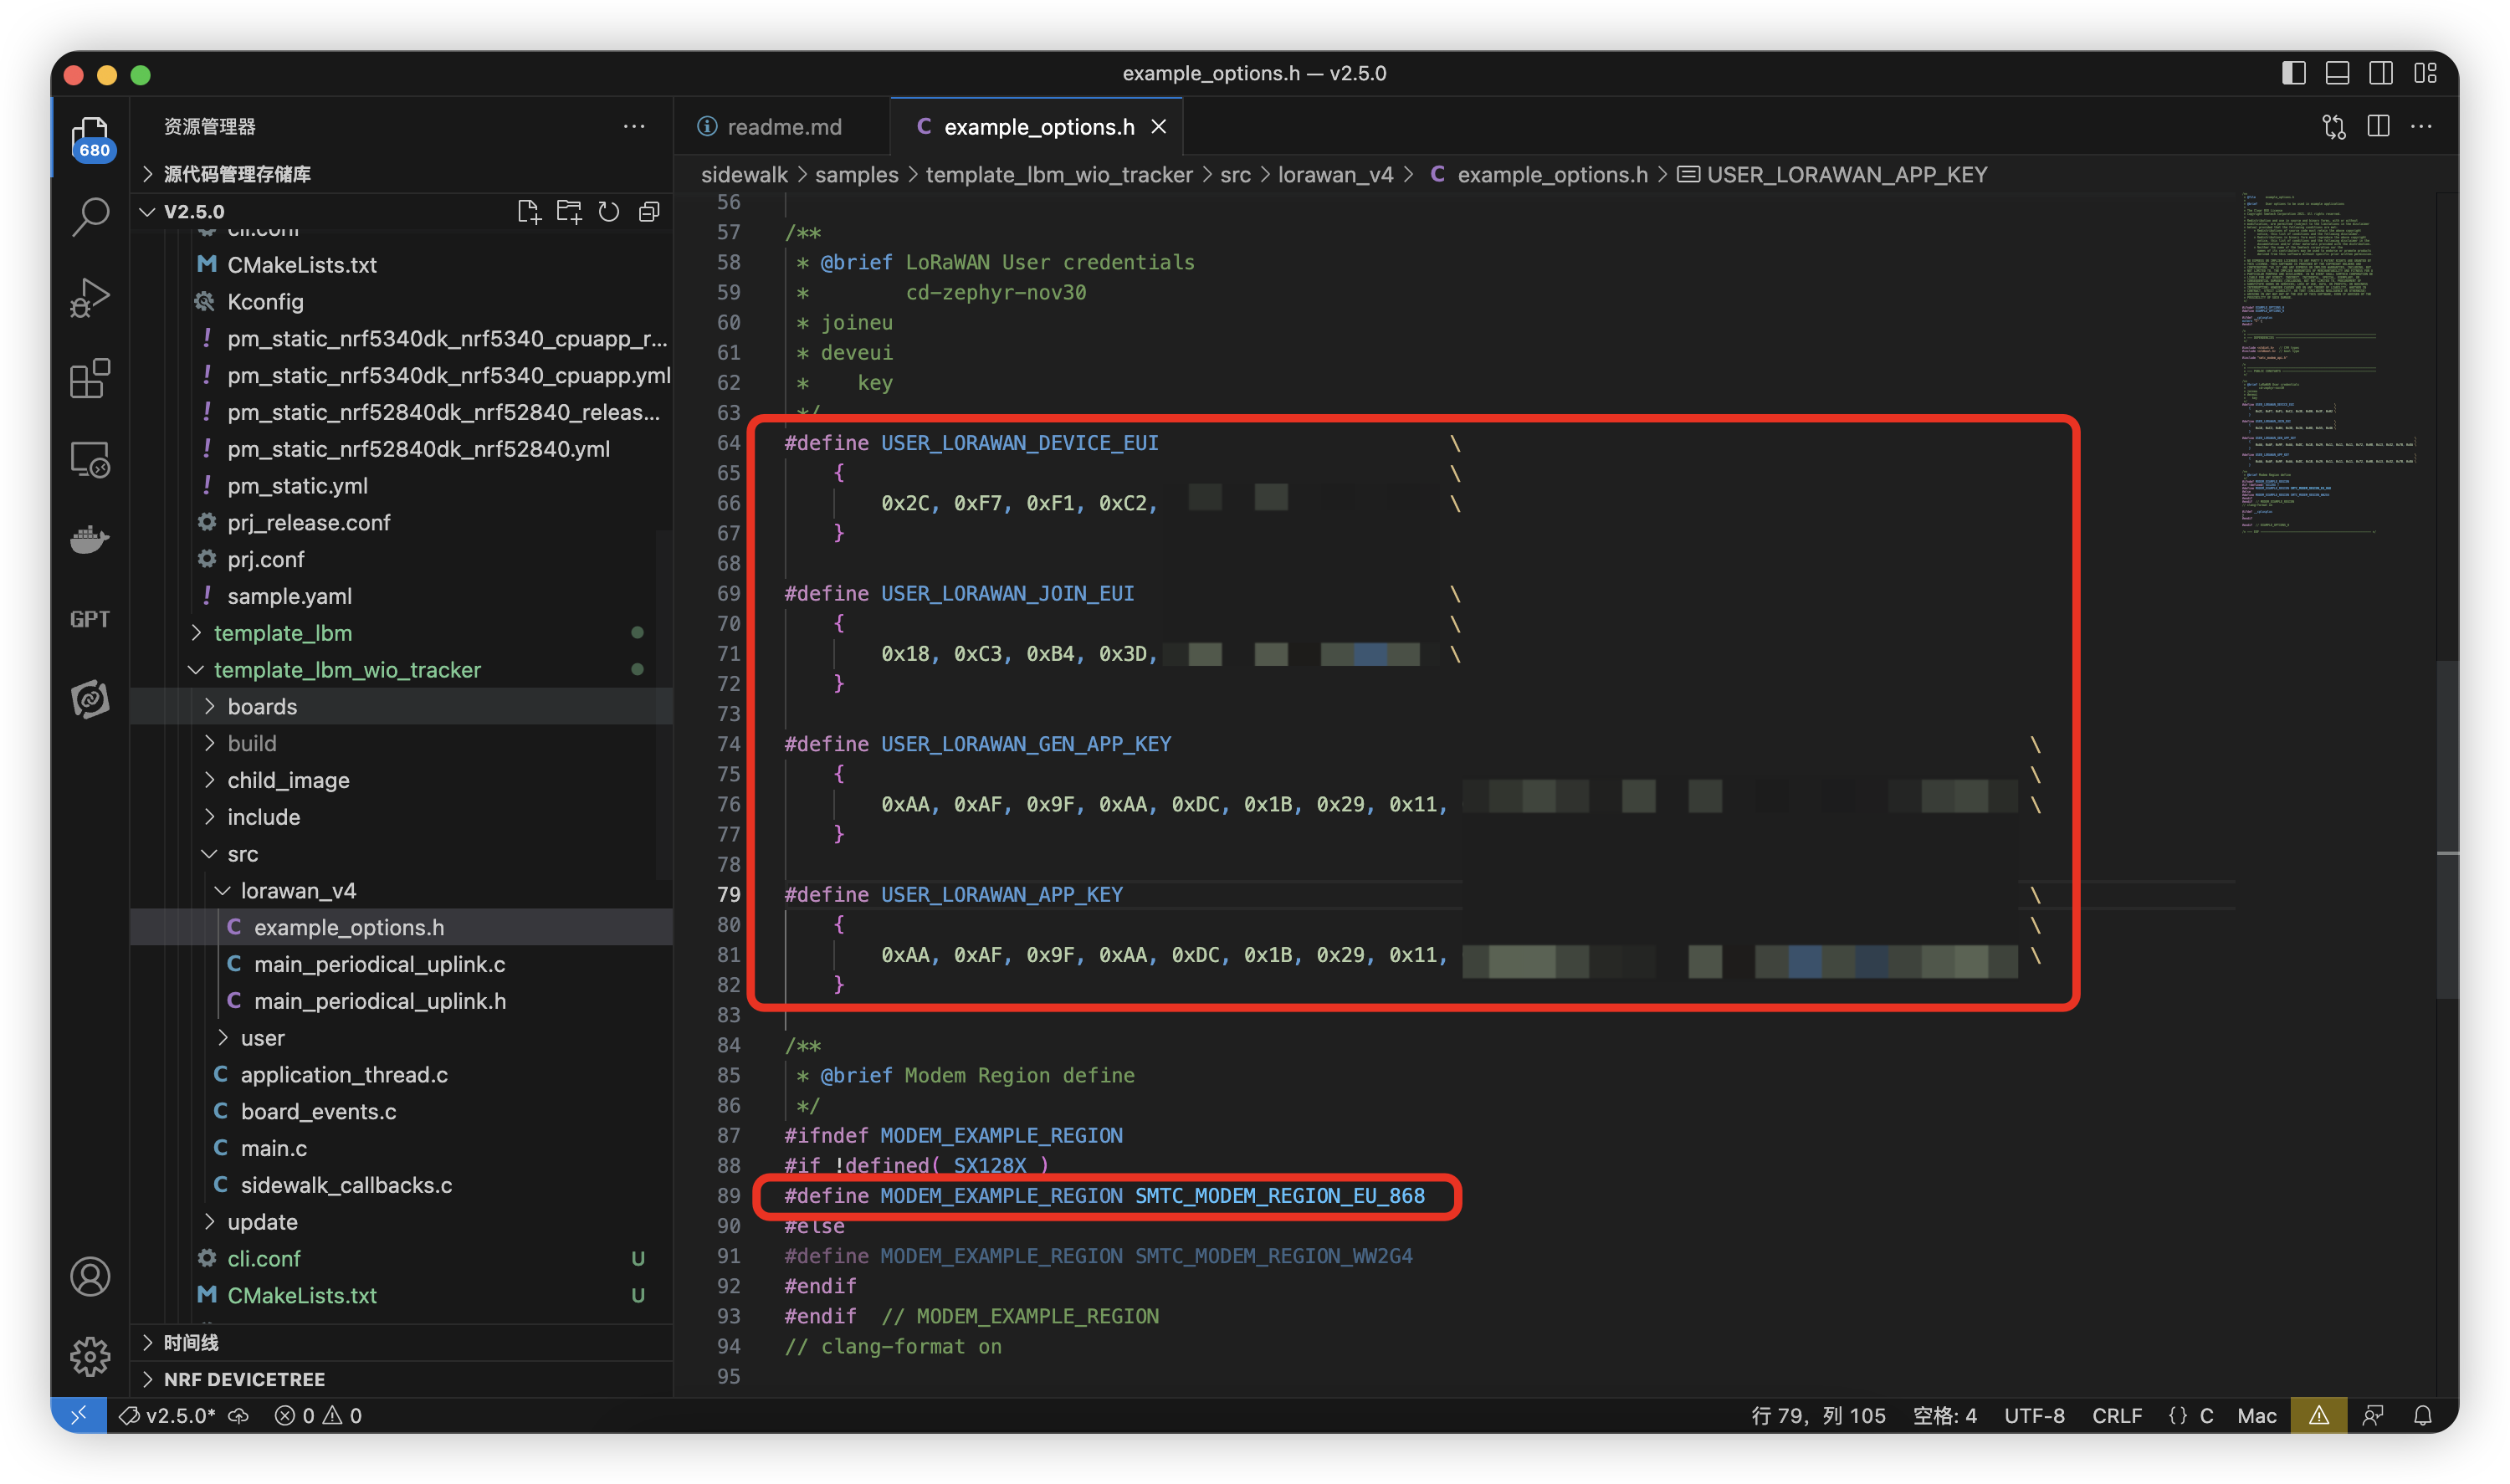
Define the DevEUI/JoinEUI/APPkey and the REGION in src/lorawan_v4/example_options.h.
JoinEUI also known as AppEUI
Step 2: Create profiles
Login to AWS IoT Console, navigate to Devices, click Profiles.
- Device profile
Device profiles define the device capabilities and boot parameters that the network server uses to set the LoRaWAN radio access service. It includes selection of parameters such as LoRa frequency band, LoRa regional parameters version, and MAC version of the device.
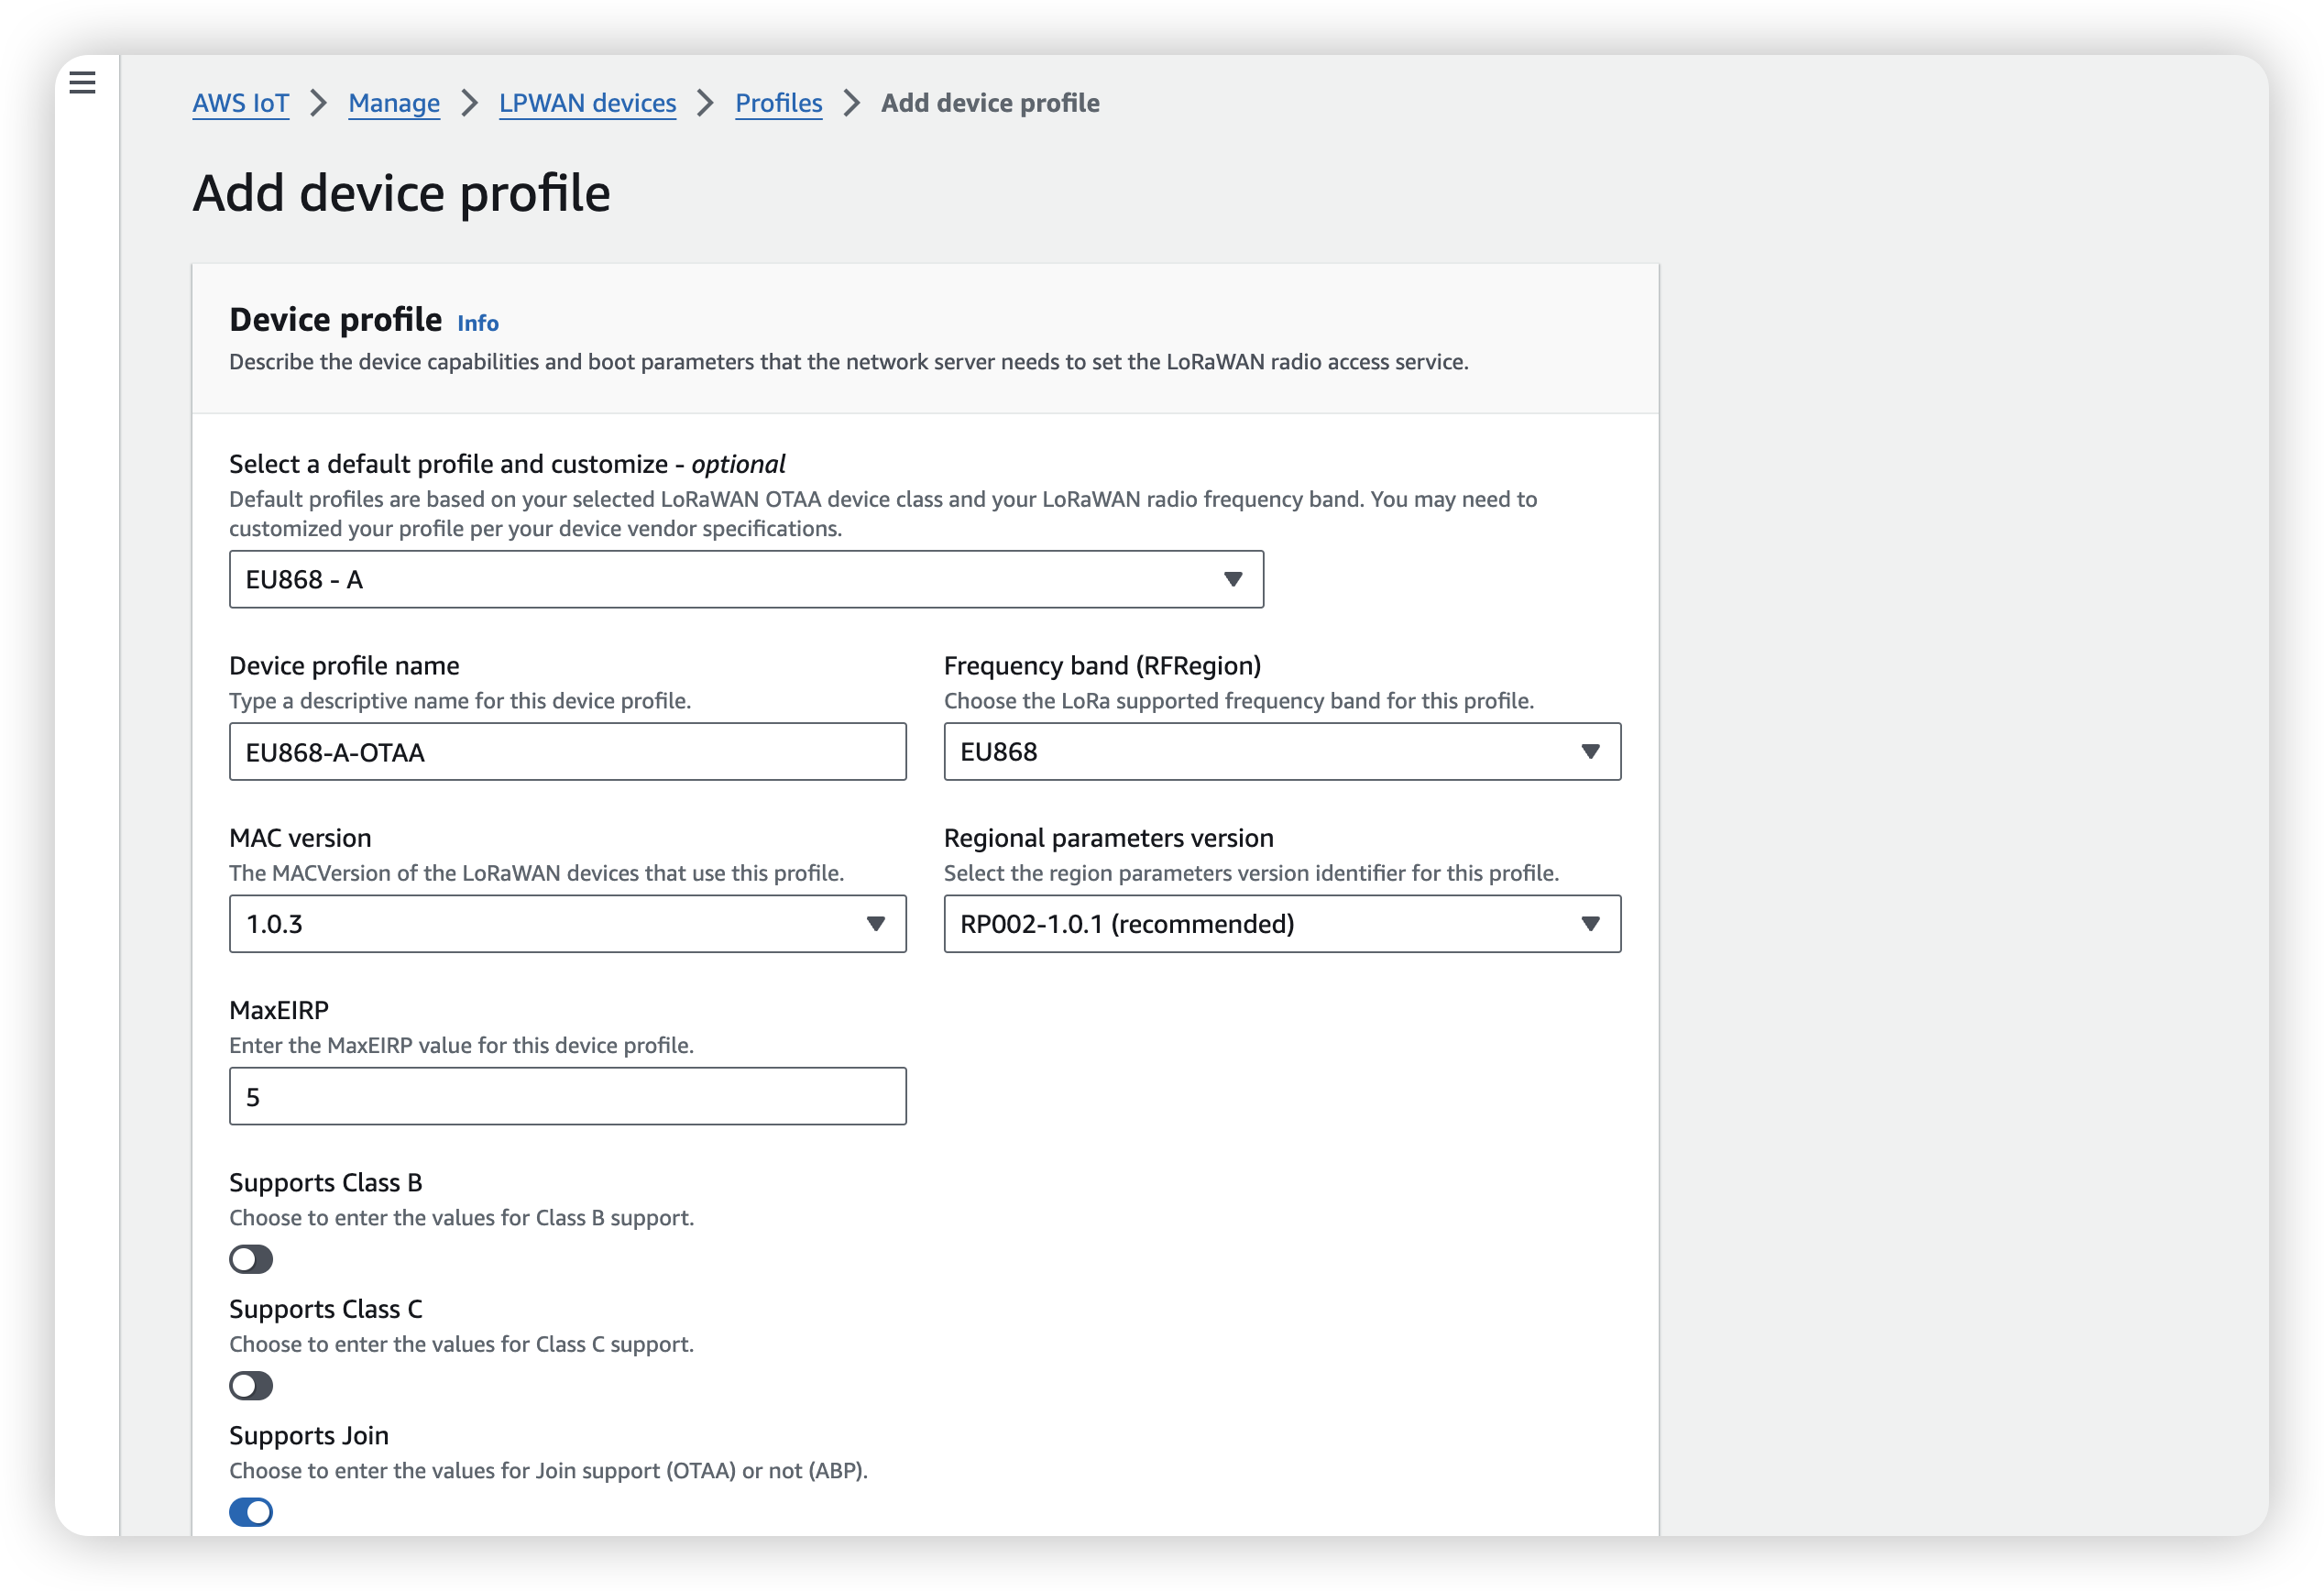
To learn about the different frequency bands, see Consider selection of LoRa frequency bands for your gateways and device connection.
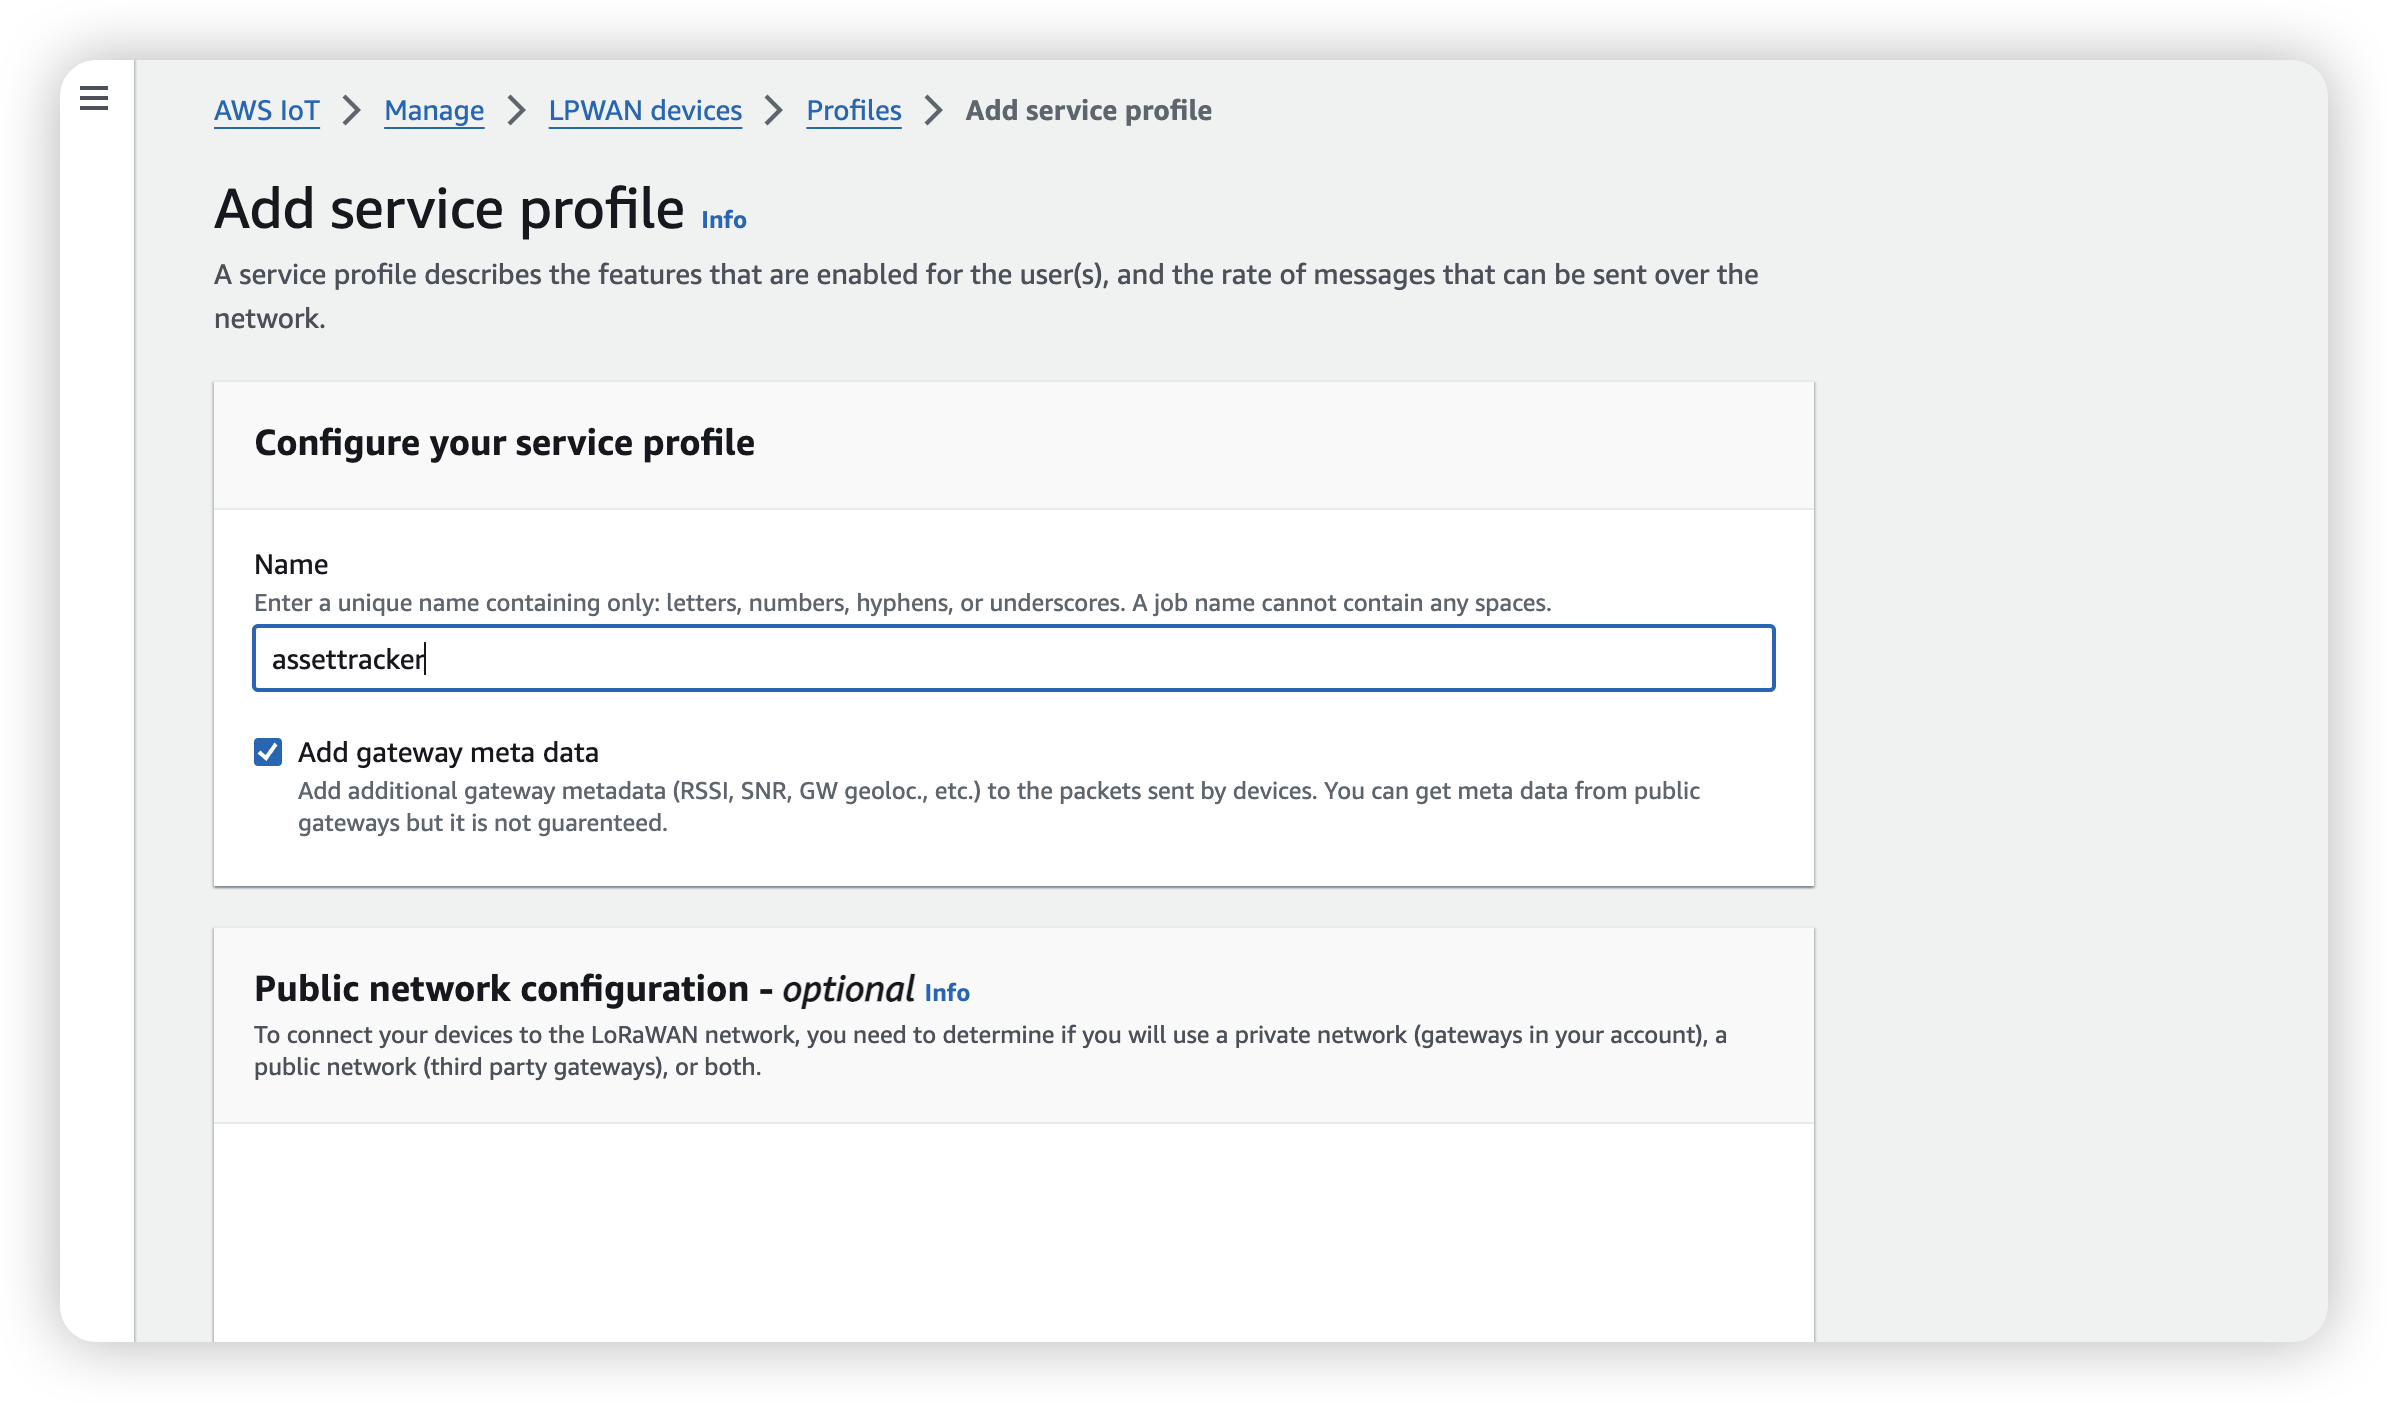
- Service profile
We recommend that you leave the setting AddGWMetaData enabled so that you'll receive additional gateway metadata for each payload, such as RSSI and SNR for the data transmission.
Step 3: Add device
Navigate to LPWAN devices > Devices, click Add wireless device.
Wireless device specification: OTAAv1.0x

Select the device profile and destination you created in the previous step.

Navigate to the Devices page and choose the device you added before.
Sidewalk Configuration
Setting up a Sidewalk gateway (Optional)
You can set up a Sidewalk gateway, configure it, and associate your gateway with your Amazon account. Your Sidewalk endpoint will connect to and communicate with the Sidewalk gateway after it’s registered with Amazon Sidewalk.
Check Setting up a Sidewalk gateway for more details.
Setting up your Sidewalk device
Add your Sidewalk device
Step 1: Add your device profile and Sidewalk end device
Before creating a wireless device, first create a device profile.
Navigat to the Sidewalk tab of the Devices hub, choose Provision device, and then perform the following steps.
Step 2: Obtain device JSON file
To obtain the JSON file for provisioning your Sidewalk device:
-
Go to the Sidewalk devices hub.
-
Choose the device that you added to AWS IoT Core for Amazon Sidewalk to view its details.
-
Obtain the JSON file by choosing
Download device JSON filein the details page of the device that you added.
A certificate.json file will be downloaded that contains the required information for provisioning your end device.

Step 3: Provision your Sidewalk endpoint
Generate binary image
- Install the requirements file
Go to the Sidewalk SDK folder $[Amazon Sidewalk repository]/tools/scripts/public/provision/, and then run the following command to install the requirements file.
pip3 install -r requirements.txt
- Generate the manufacturing binary image
Run the provision.py script to generate the manufacturing binary image file that will be used to provision the development board that you are using as a Sidewalk endpoint.
- If you’re using the combined device JSON file that you obtained from the AWS IoT console, use the certificate_json parameter to specify this file as input when running the provisioning script.
python3 provision.py aws --output_bin mfg.bin --certificate_json certificate.json \
   --config config/[device_vendor]/[device]_dk/config.yaml
If you’re using the separate device JSON files that you obtained as responses from the GetDeviceProfile and GetWirelessDevice API operations, use the wireless_device_json and device_profile_json parameters to specify these files as input when running the provisioning script.
python3 provision.py aws --output_bin mfg.bin \
   --wireless_device_json wireless_device.json \
   --device_profile_json device_profile.json \
   --config config/[device_vendor]/[device]_dk/config.yaml
You should see the following output:

- Flash the mfg.hex file
Your provisioning file will be typically located in the EdgeDeviceProvisioning directory.
To flash the binary image, use the address 0xFD000 for loading the binary image on the Nordic Semiconductor HDK. For information about flashing the binary image, see the Nordic Semiconductor documentation.
Step 4: Build and flash the demo
-
Open a terminal window.
-
Go to the
template_lbm_wio_trackerdirectory.
For example:
cd /opt/nordic/ncs/v2.5.0/sidewalk/samples/template_lbm_wio_tracker
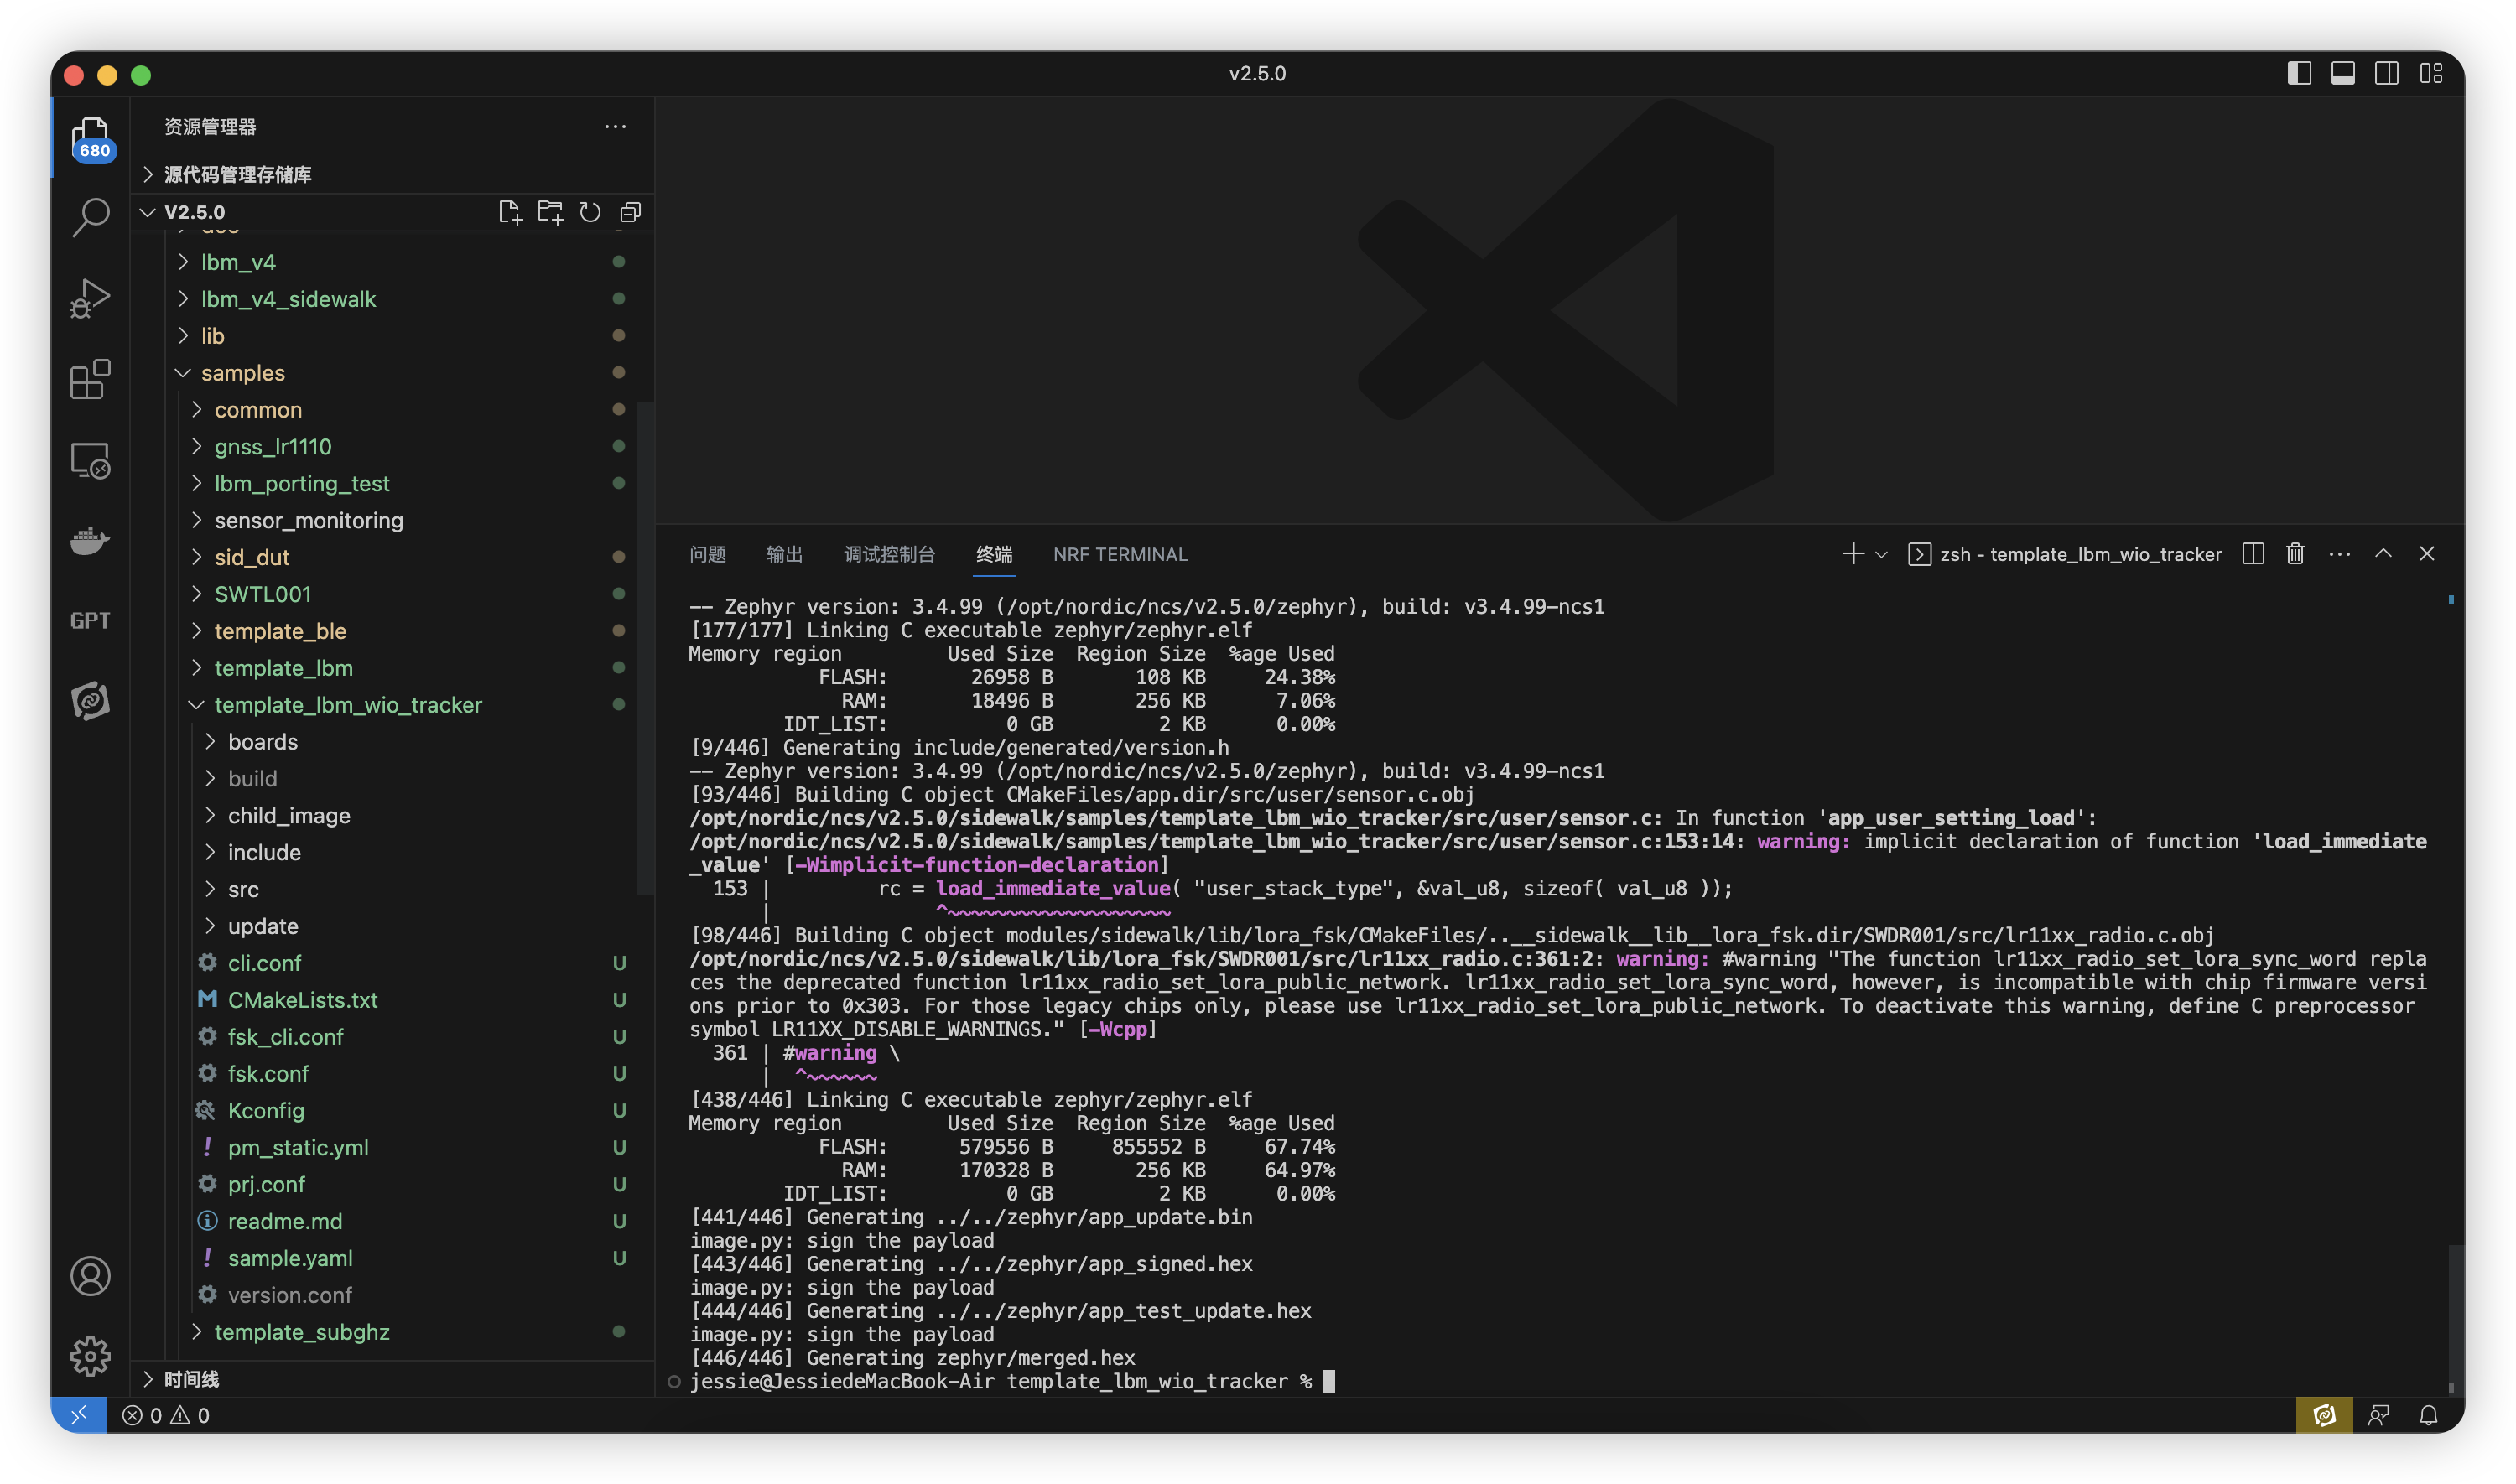
- Build the application by using the following west command:
west build --board wio_tracker_1110 -- -DRADIO=LR1110_SRC
or with pre-compiled radio driver library:
west build --board wio_tracker_1110 -- -DRADIO=LR1110
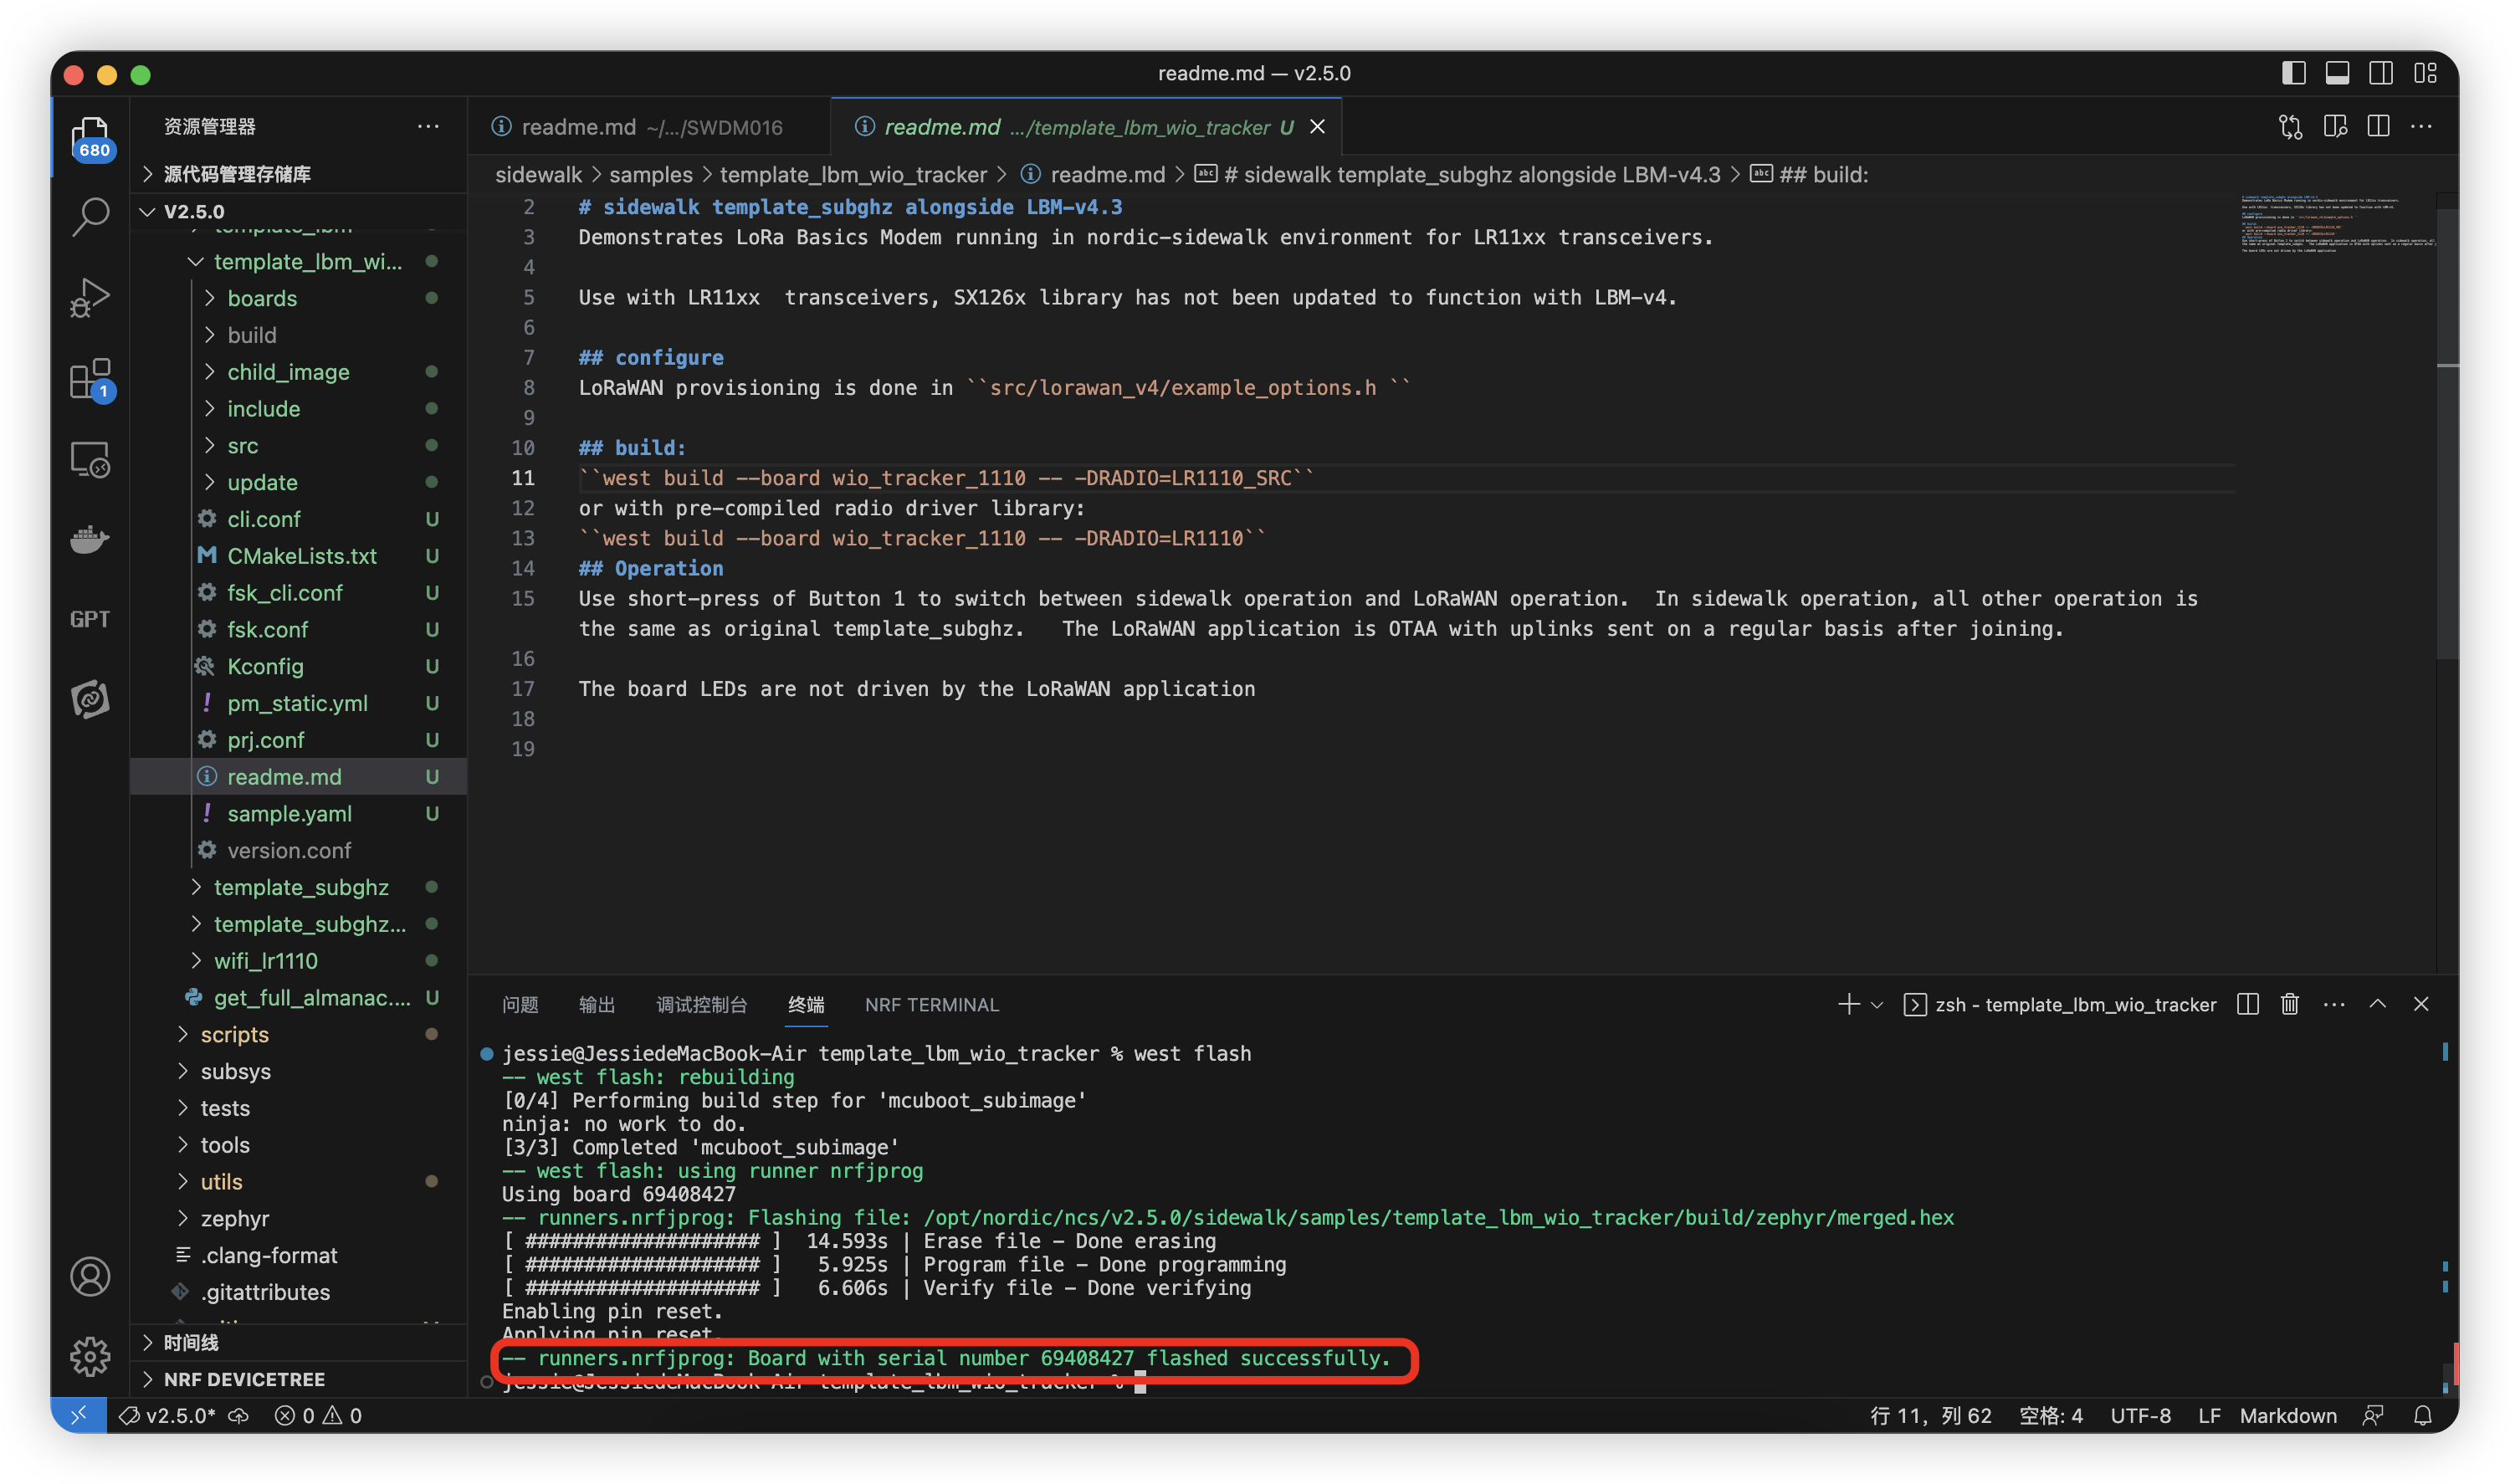
- Flash the application by using the following west command:
west flash
Sidewalk Register
After you’ve provisioned the Sidewalk endpoint, the endpoint must be registered so that it can communicate over the Sidewalk network.
To register your Sidewalk endpoint, either use automatic touchless registration with Sidewalk Frustration Free Networking (FFN), or manually register your device using a Mac or native Ubuntu machine that runs the registration script.
| Criteria Automatic | registration (using Sidewalk FFN) | Manual registration |
|---|---|---|
| User and endpoint association | This registration method doesn’t require any association between the Sidewalk endpoint and a user. The endpoint can join the Sidewalk network without being associated with any user. | This registration method requires an association between the Sidewalk endpoint and a user’s Amazon account. |
| LWA (Login with Amazon) | LWA is not required. | LWA is required to link the user’s Amazon account and the AWS account that’s used by the Sidewalk endpoint developer. |
To perform registration using Sidewalk FFN:
- Your Sidewalk gateway and endpoint must be powered on.
- Your gateway must be opted into Sidewalk, and in close range to your endpoint. We recommend that you keep the devices within 10 meters of each other.
For Manual Sidewalk registration and other details please check here.
Network Switch
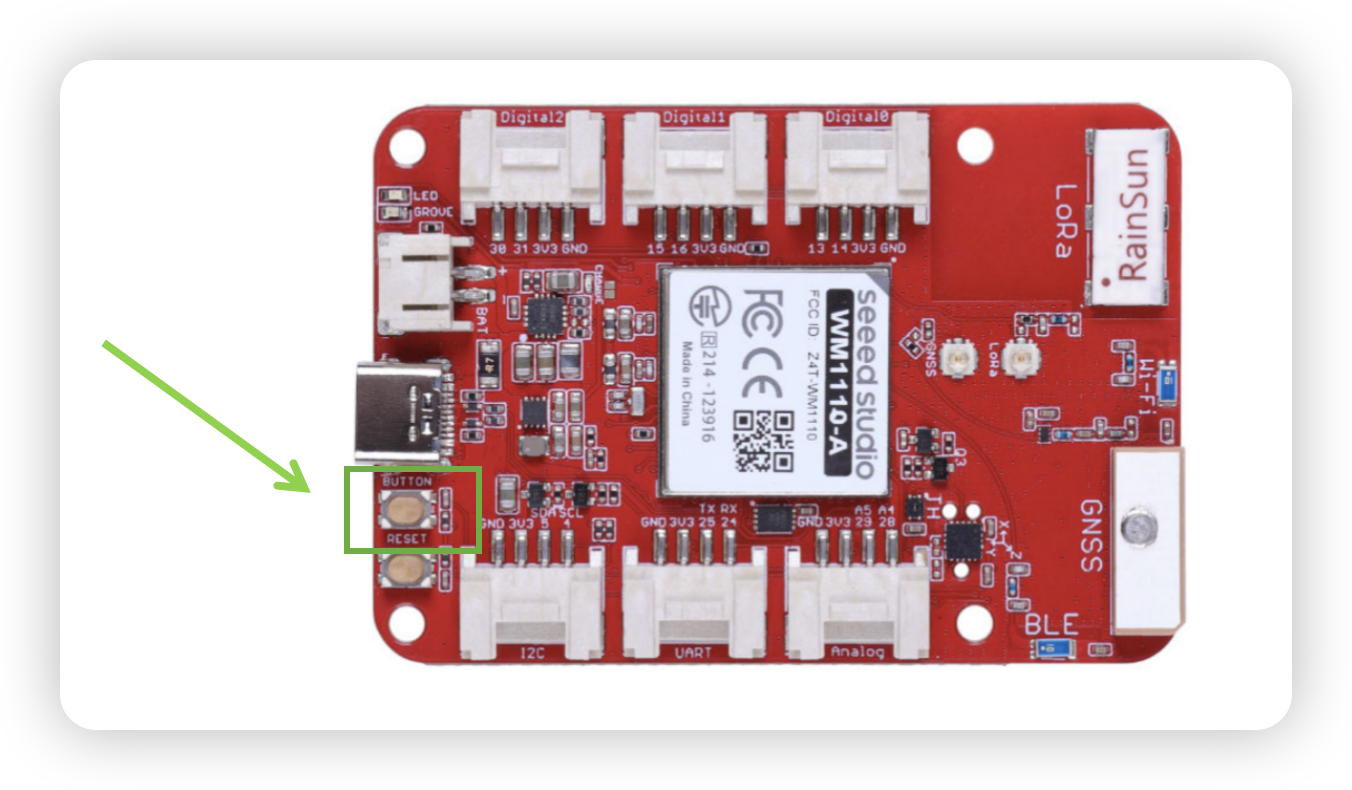
The default is LoRaWAN network, click the User Button to switch network.
View Message
Add Destination
In the IoT Core console, select LPWAN devices from the left menu and then Destinations.
Select Edit and select Publish to AWS IoT Core message broker. In the topic text box, enter assets as the MQTT Topic.
Under Permissions select Create a new service role and leave the Role name blank.
- ExpressionType:
MqttTopic - Expression:
EmbeddedWorldTrackerDemo
Add Decoder Rule
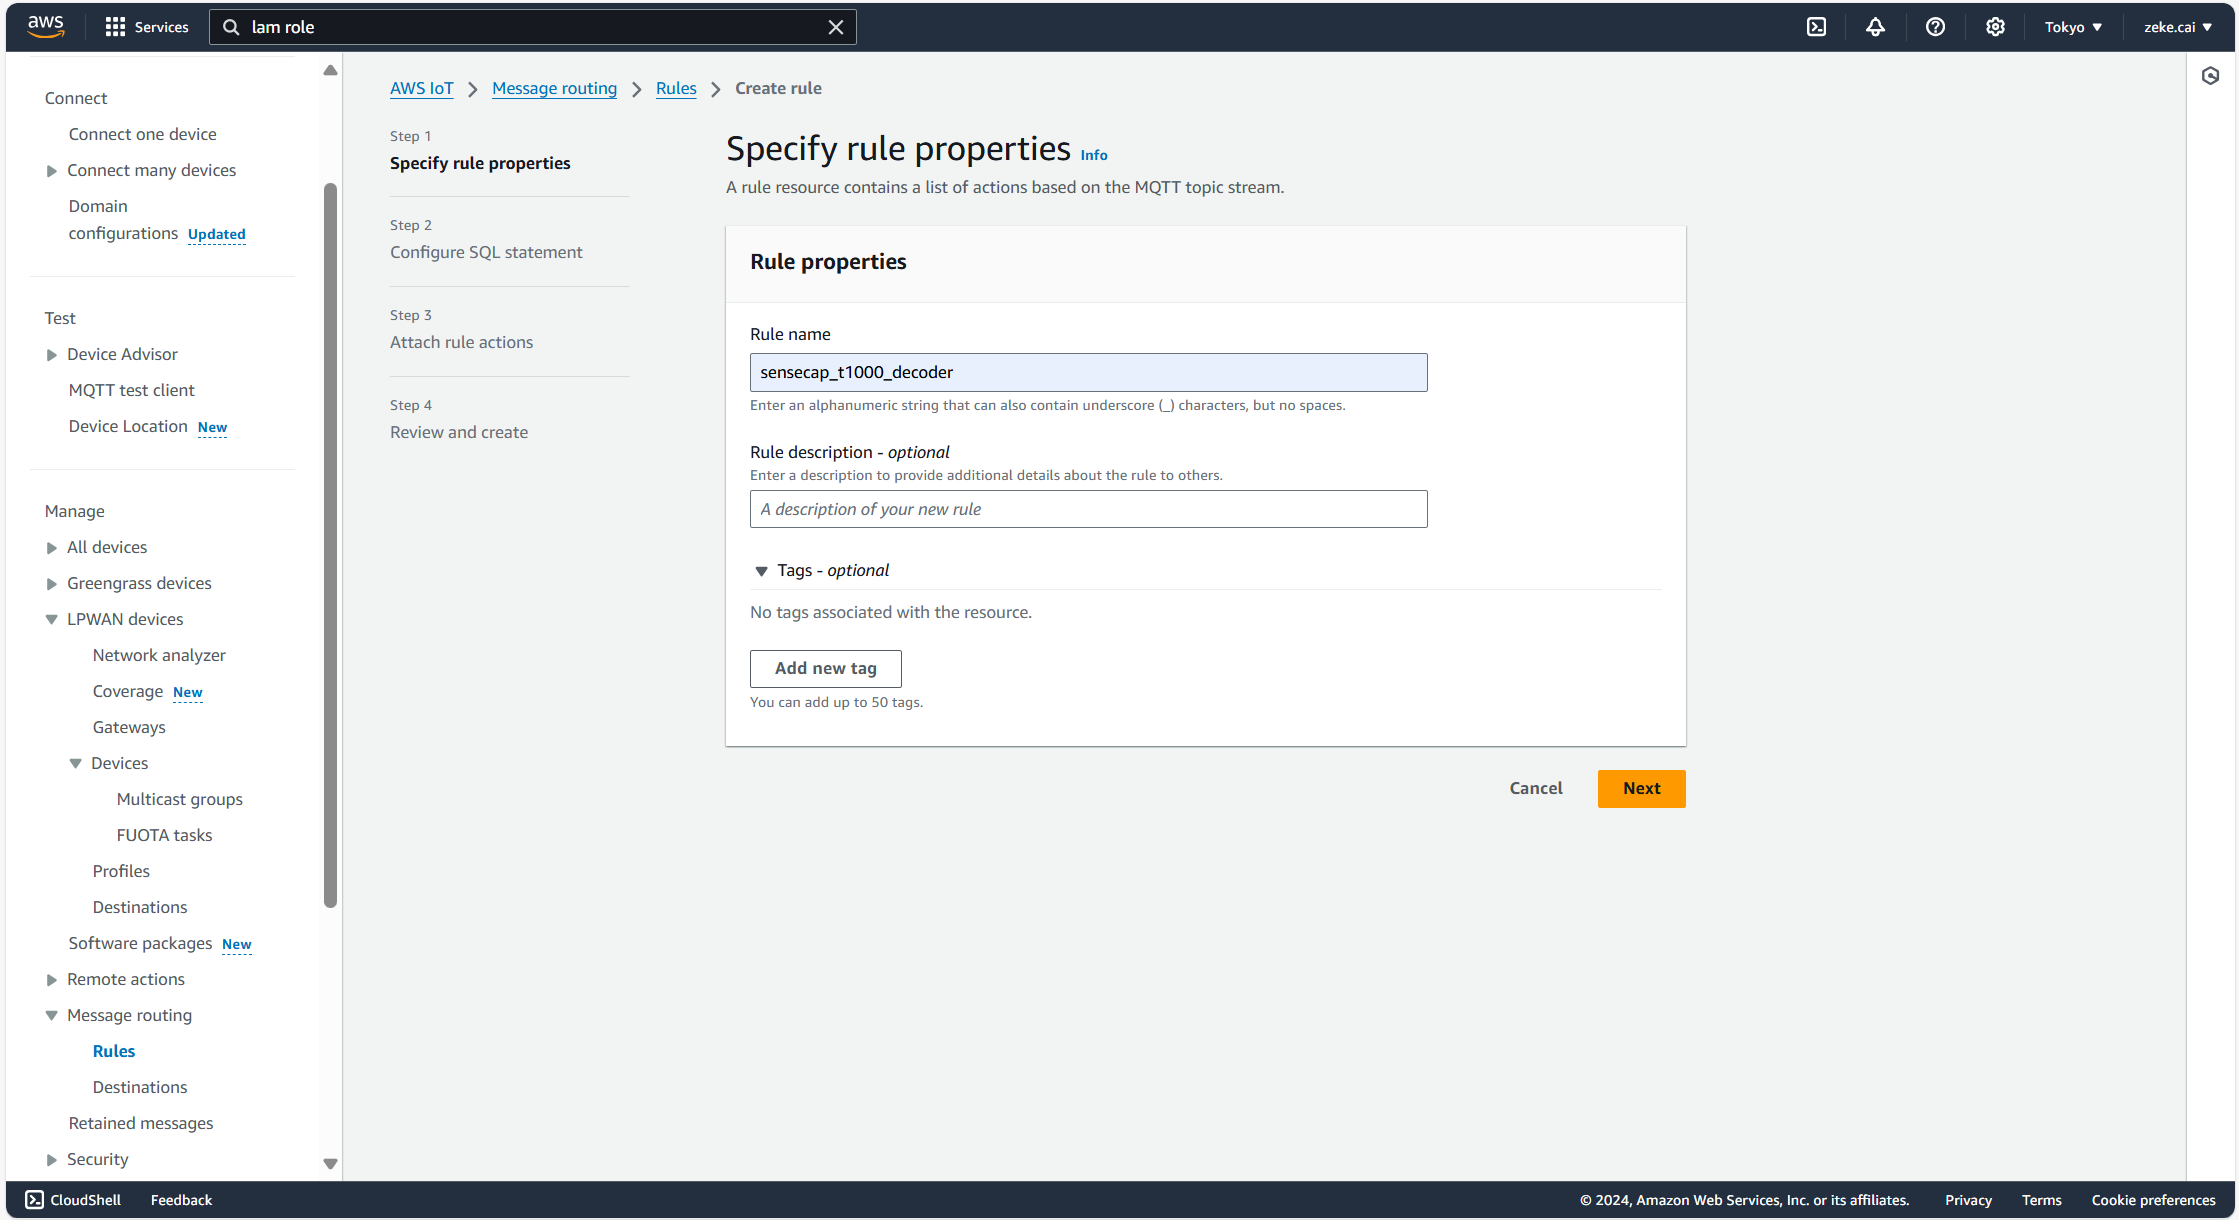
Navigate to Message routing tab → Rules, and click Create Rule button.
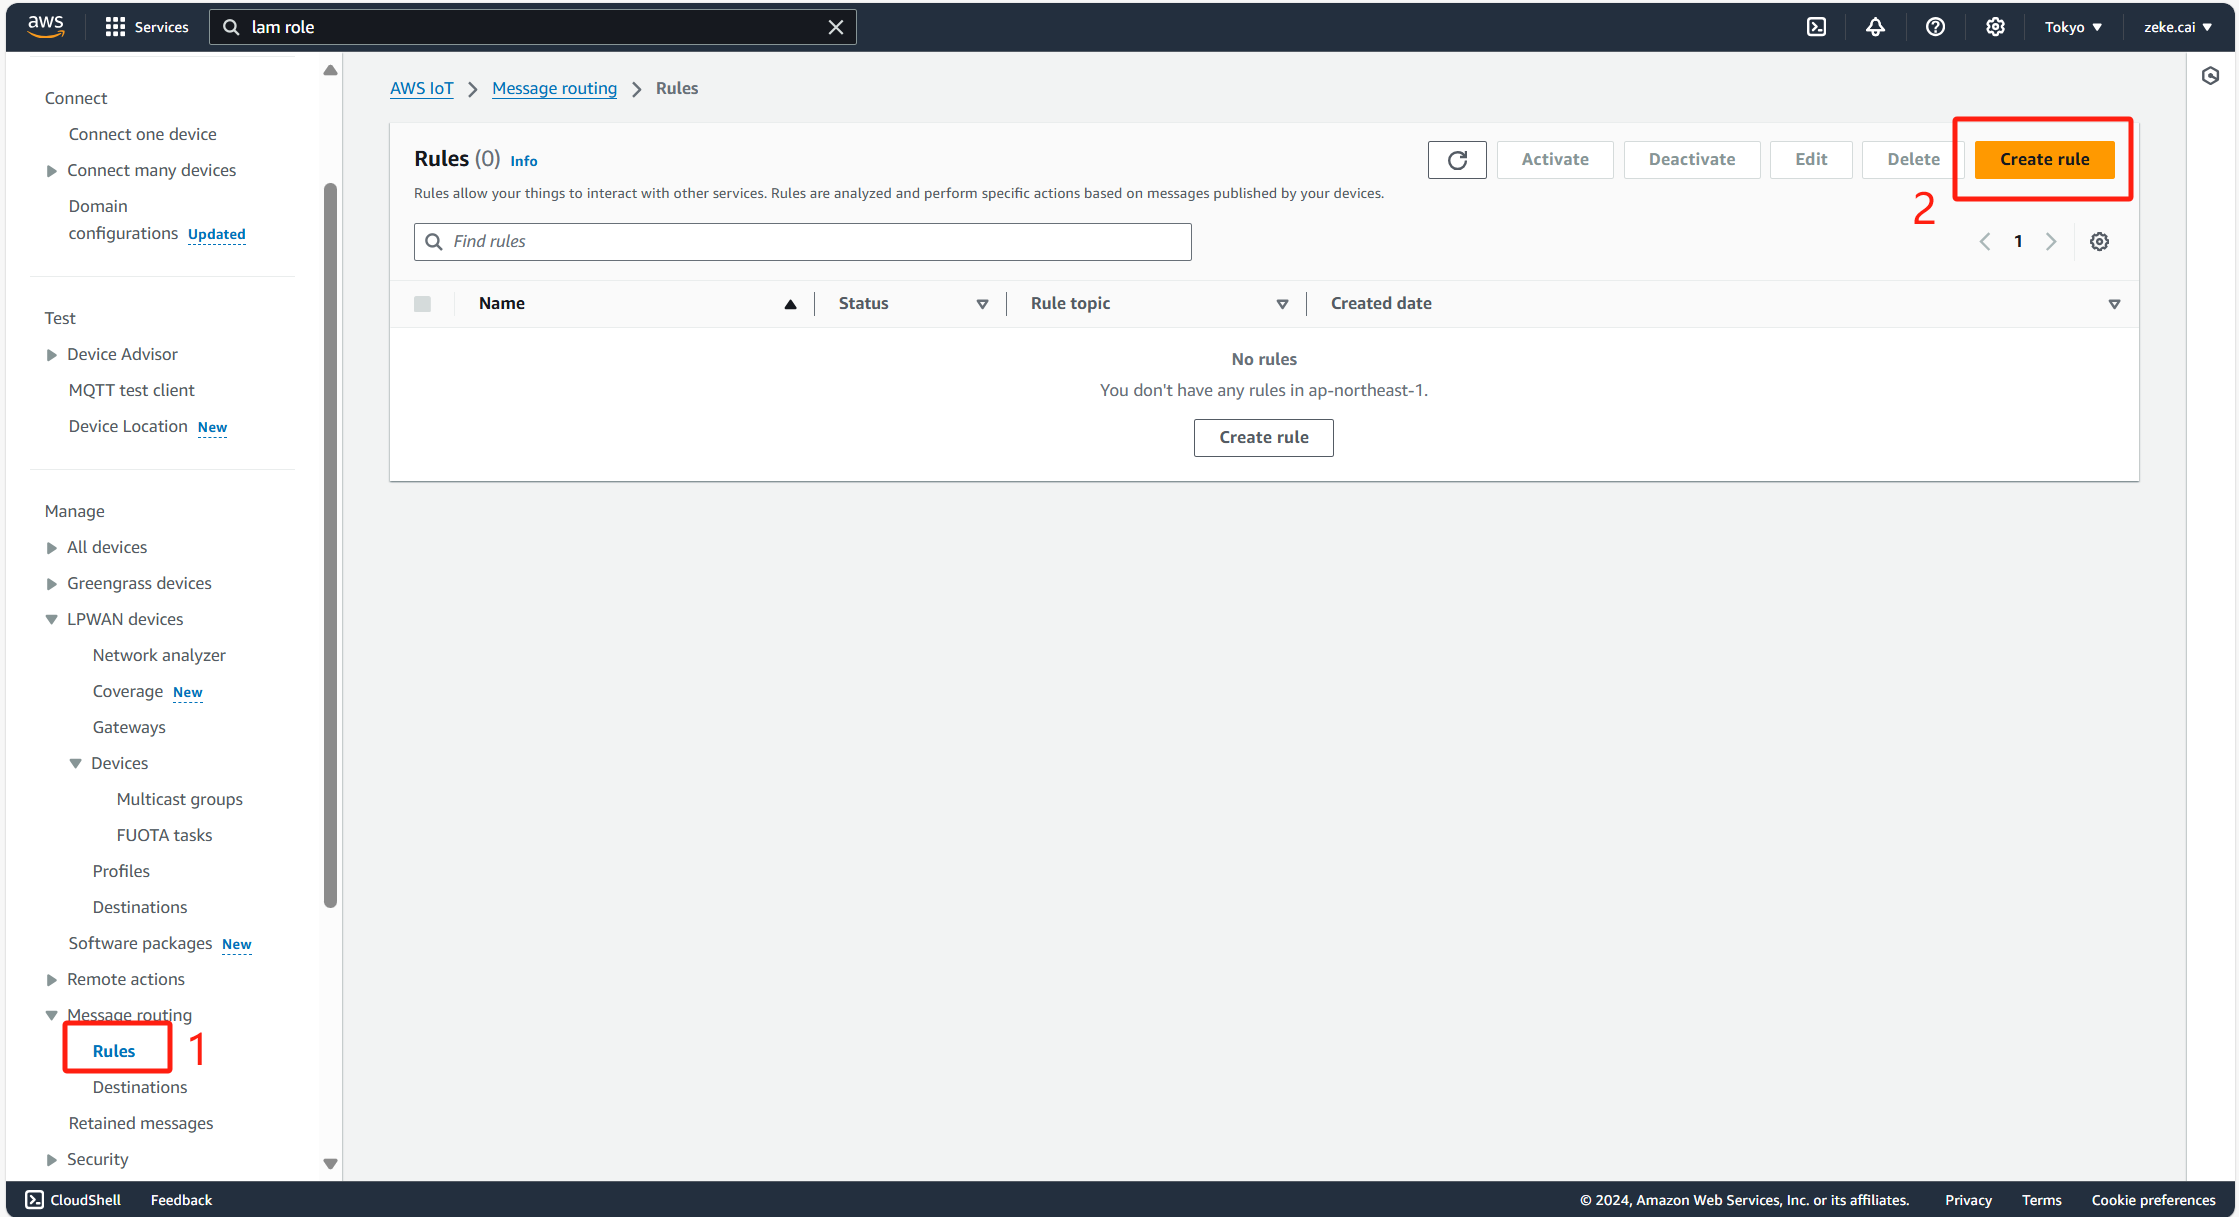
Name your rule and submit it.
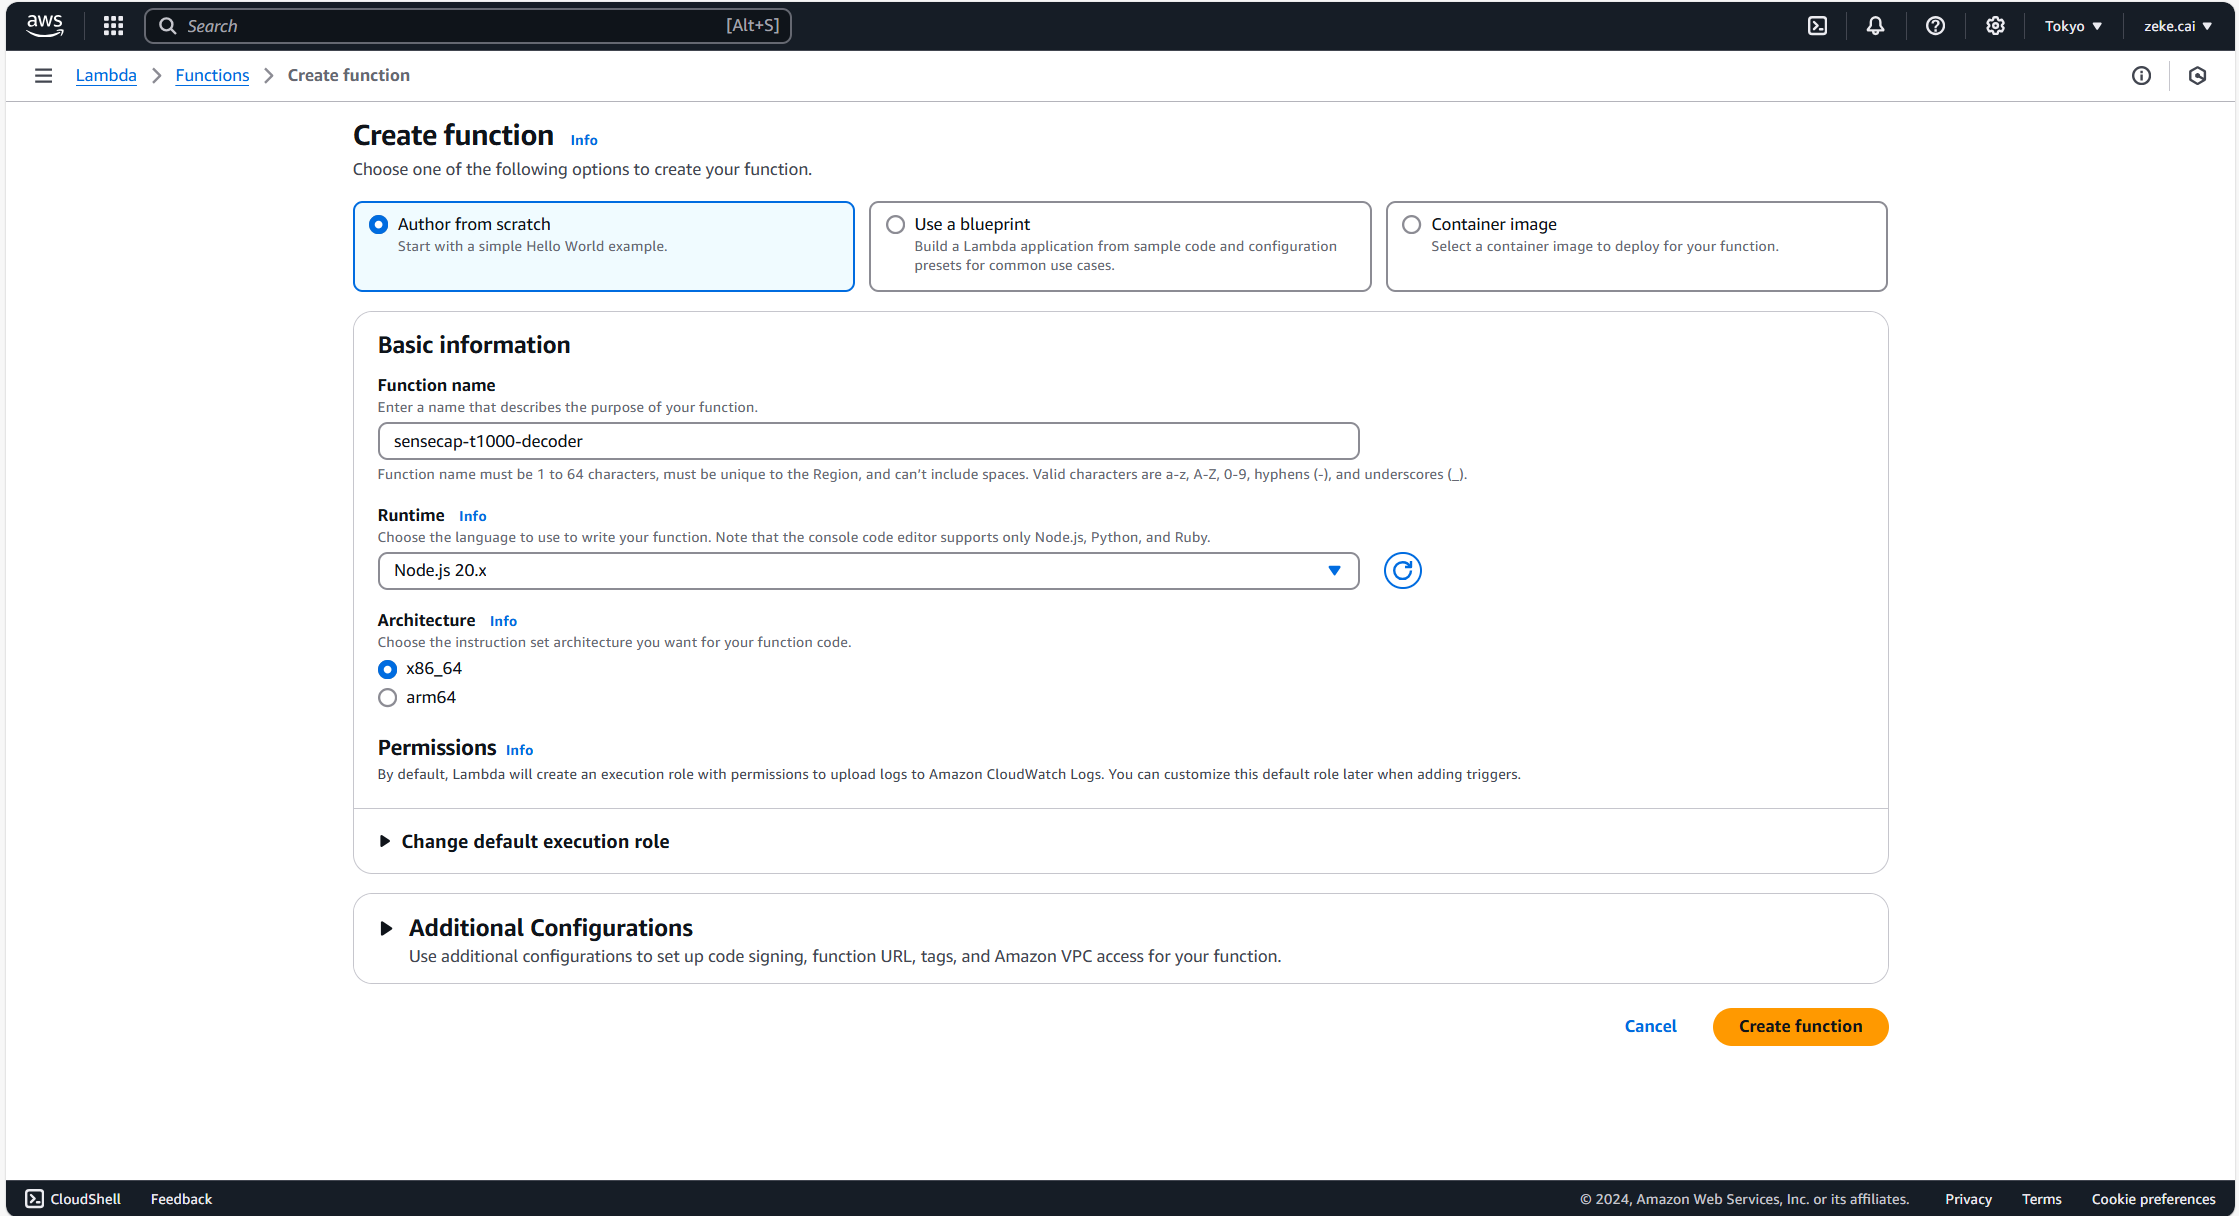
From the IoT Core Rule, select the Lambda Function. then click Create a Lambda function.
Author from scratch
Function name: Name your function.
Runtime: Node.js 14.x
Architexture: x86_64
Click Create function button to create a new function
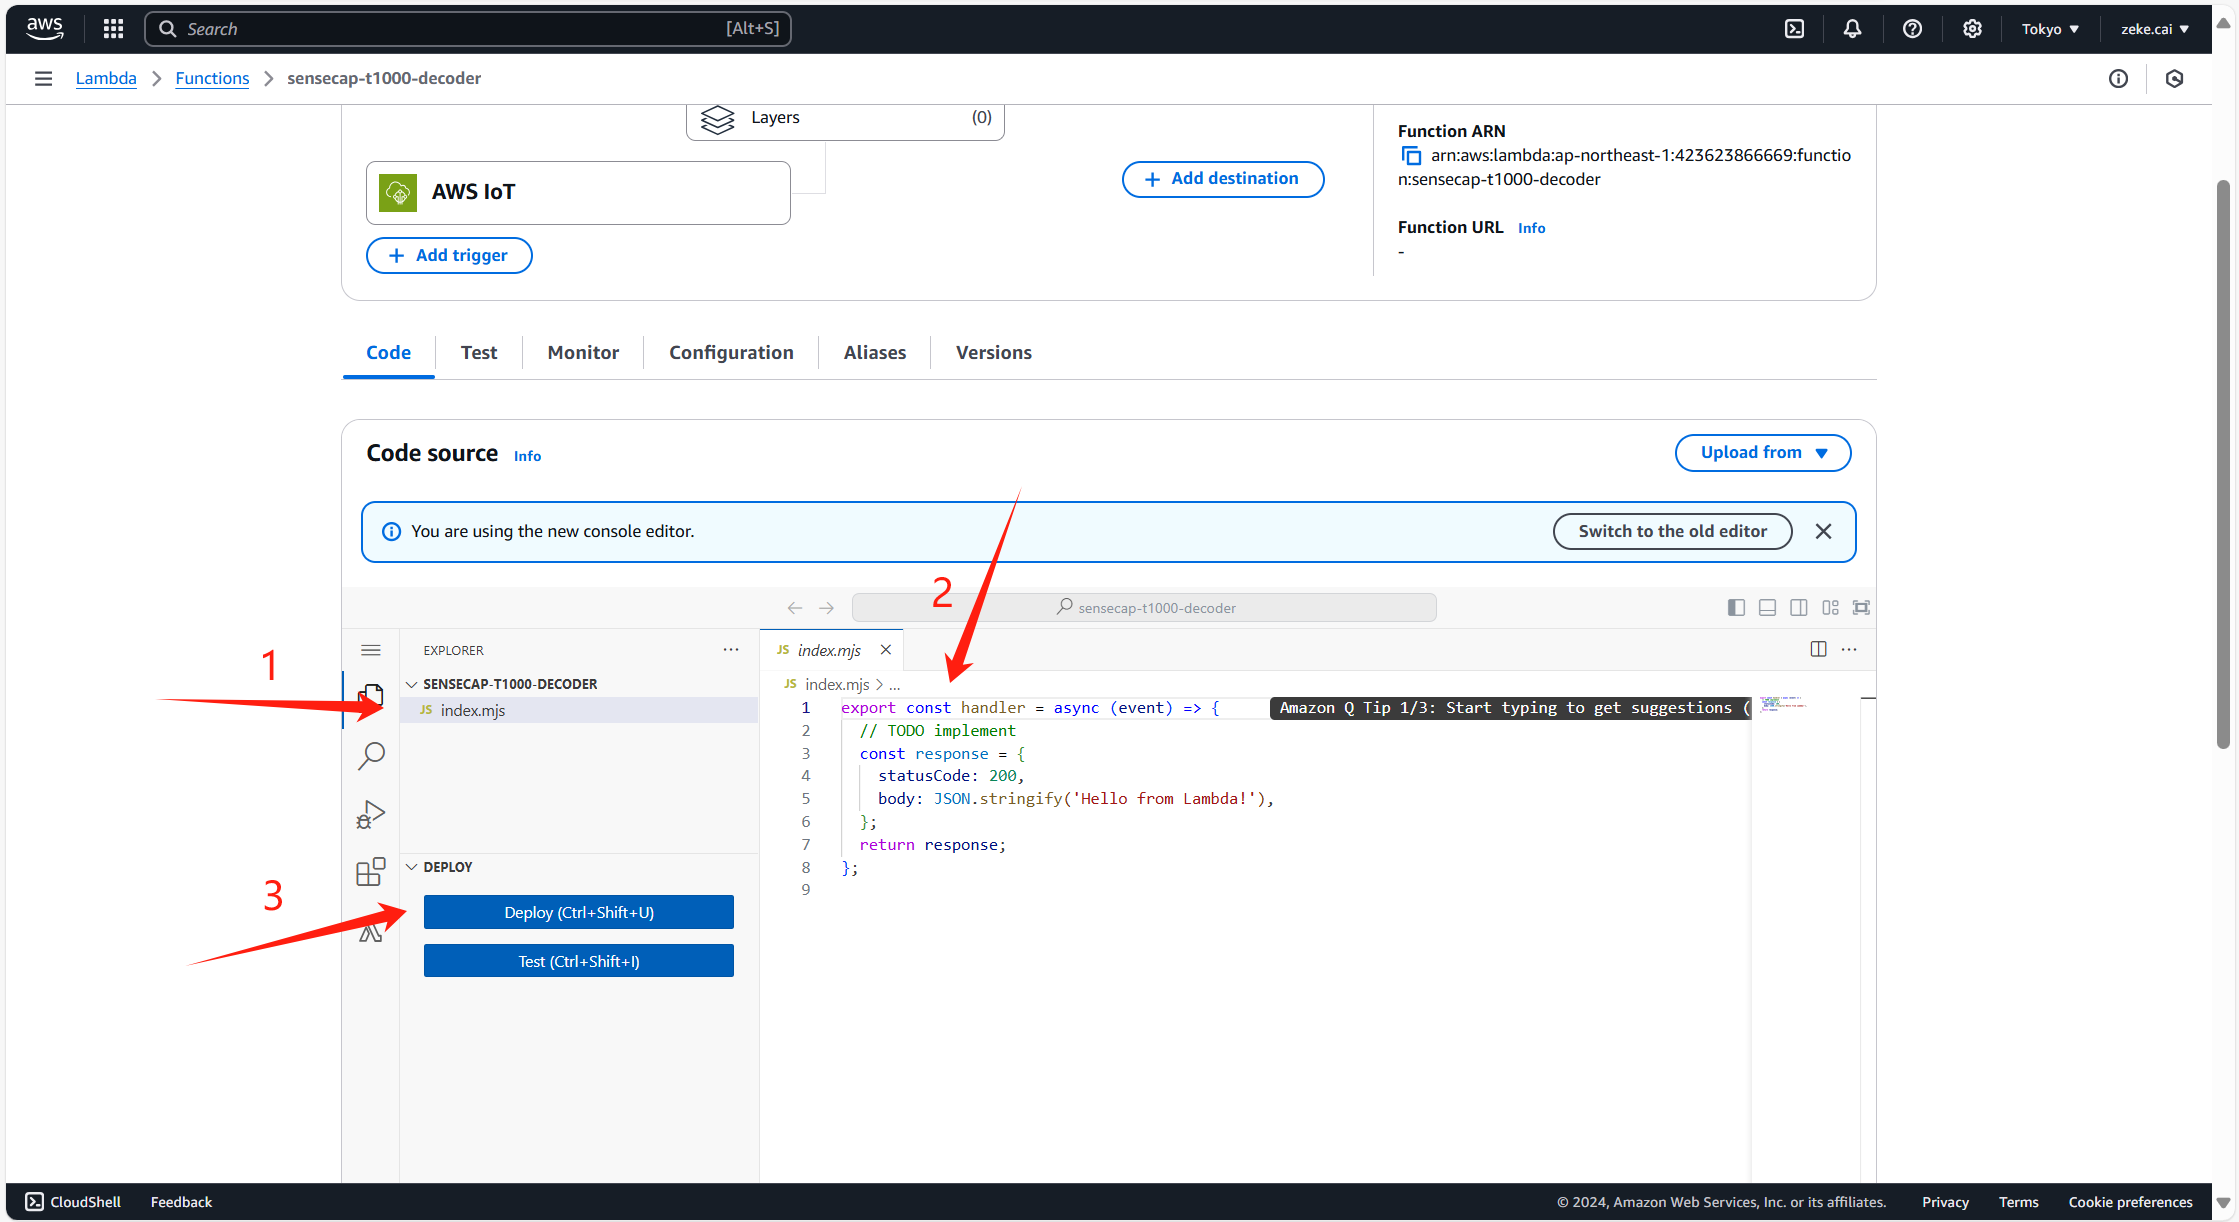
On the following funcition config page, remove all the code and replace it with the following script, then click Deploy button.
Lambda Code
const {IoTDataPlaneClient, PublishCommand} = require("@aws-sdk/client-iot-data-plane");
const {IoTWirelessClient, GetWirelessDeviceCommand} = require("@aws-sdk/client-iot-wireless");
const client = new IoTDataPlaneClient({
    "region": "us-east-1"
});
const wireless_client = new IoTWirelessClient({
    "region": "us-east-1"
});

function decodeUplink(input) {
    const originMessage = input.toLocaleUpperCase()
    const decoded = {
        valid: true,
        err: 0,
        payload: input,
        messages: []
    }
    let measurement = messageAnalyzed(originMessage)
    if (measurement.length === 0) {
        decoded.valid = false
        return {data: decoded}
    }

    for (let message of measurement) {
        if (message.length === 0) {
            continue
        }
        let elements = []
        for (let element of message) {
            if (element.errorCode) {
                decoded.err = element.errorCode
                decoded.errMessage = element.error
            } else {
                elements.push(element)
            }
        }
        if (elements.length > 0) {
            decoded.messages.push(elements)
        }
    }
    return {data: decoded}
}

function messageAnalyzed(messageValue) {
    try {
        let frames = unpack(messageValue)
        let measurementResultArray = []
        for (let i = 0; i < frames.length; i++) {
            let item = frames[i]
            let dataId = item.dataId
            let dataValue = item.dataValue
            let measurementArray = deserialize(dataId, dataValue)
            measurementResultArray.push(measurementArray)
        }
        return measurementResultArray
    } catch (e) {
        return e.toString()
    }
}

function unpack(messageValue) {
    return [{dataId: 0, dataValue: messageValue}]
}

function deserialize(dataId, dataValue) {
    let measurementArray = null
    measurementArray = [
        {
            measurementId: '4198',
            type: 'Latitude',
            measurementValue: parseFloat(getSensorValue(dataValue.substring(0, 8), 1000000))
        },
        {
            measurementId: '4197',
            type: 'Longitude',
            measurementValue: parseFloat(getSensorValue(dataValue.substring(8, 16), 1000000))
        },
        {
            measurementId: '4097',
            type: 'Air Temperature',
            measurementValue: getSensorValue(dataValue.substring(16, 20), 10)
        },
        {
            measurementId: '4098',
            type: 'Air Humidity',
            measurementValue: getSensorValue(dataValue.substring(20, 22))
        }
    ]
    return measurementArray
}

function getSensorValue(str, dig) {
    if (str === '8000') {
        return null
    } else {
        return loraWANV2DataFormat(str, dig)
    }
}

function bytes2HexString(arrBytes) {
    var str = ''
    for (var i = 0; i < arrBytes.length; i++) {
        var tmp
        var num = arrBytes[i]
        if (num < 0) {
            tmp = (255 + num + 1).toString(16)
        } else {
            tmp = num.toString(16)
        }
        if (tmp.length === 1) {
            tmp = '0' + tmp
        }
        str += tmp
    }
    return str
}

function loraWANV2DataFormat(str, divisor = 1) {
    let strReverse = bigEndianTransform(str)
    let str2 = toBinary(strReverse)
    if (str2.substring(0, 1) === '1') {
        let arr = str2.split('')
        let reverseArr = arr.map((item) => {
            if (parseInt(item) === 1) {
                return 0
            } else {
                return 1
            }
        })
        str2 = parseInt(reverseArr.join(''), 2) + 1
        return '-' + str2 / divisor
    }
    return parseInt(str2, 2) / divisor
}

function bigEndianTransform(data) {
    let dataArray = []
    for (let i = 0; i < data.length; i += 2) {
        dataArray.push(data.substring(i, i + 2))
    }
    return dataArray
}

function toBinary(arr) {
    let binaryData = arr.map((item) => {
        let data = parseInt(item, 16)
            .toString(2)
        let dataLength = data.length
        if (data.length !== 8) {
            for (let i = 0; i < 8 - dataLength; i++) {
                data = `0` + data
            }
        }
        return data
    })
    return binaryData.toString().replace(/,/g, '')
}

exports.handler = async (event) => {
    try {
        let device_id = event['WirelessDeviceId'];
        let lorawan_info = null;
        let sidewalk_info = null;
        let payload = null
        let timestamp = null

        let queryDeviceRequest = {
            Identifier: device_id,
            IdentifierType: "WirelessDeviceId"
        }
        let deviceInfo = await wireless_client.send(new GetWirelessDeviceCommand(queryDeviceRequest))
        console.log("device_info:" + JSON.stringify(deviceInfo))
        if (!deviceInfo || deviceInfo.name) {
            return {
                statusCode: 500,
                body: 'can not find this wirelessDeviceId: ' + device_id
            };
        }
        let device_name = deviceInfo.Name

        if (event["WirelessMetadata"]["LoRaWAN"]) {
            lorawan_info = event["WirelessMetadata"]["LoRaWAN"]
            timestamp = lorawan_info["Timestamp"]
            let bytes = Buffer.from(event["PayloadData"], 'base64');
            payload = bytes2HexString(bytes)
        } else if (event["WirelessMetadata"]["Sidewalk"]) {
            timestamp = new Date().getTime()
            let origin = new Buffer(event["PayloadData"], 'base64')
            payload = origin.toString('utf8')
        }

        console.log(`event.PayloadData: ${payload}`)
        const resolved_data = decodeUplink(payload);

        // publish all measurement data
        const input = { // PublishRequest
            topic: `tracker/EmbeddedWorldTrackerDemo/sensor/${device_id}`,
            qos: 0,
            retain: false,
            payload: JSON.stringify({
                DeviceName: "assettracker",
                timestamp: timestamp,
                data: resolved_data.data,
                WirelessDeviceId: device_id,
                PayloadData: event['PayloadData'],
                WirelessMetadata: event["WirelessMetadata"]
            })
        };

        const command = new PublishCommand(input);
        const response = await client.send(command);
        console.log("response: " + JSON.stringify(response));
        return {
            statusCode: 200,
            body: 'Message published successfully' + JSON.stringify(event)
        };
    } catch (error) {
        console.error('Error publishing message:', error);

        return {
            statusCode: 500,
            body: 'Error publishing message'
        };
    }
};

Now go back to the Device Destination, select Enter a rule name and enter the name we just create.
Navigate to the AWS IoT Core Console and select MQTT Test Client and subscribe to the topic.
Add Tracker Rule
Repeat the above steps to create a new rule, and copy the following Lambda code:
Lambda Code
const {IoTDataPlaneClient, PublishCommand} = require("@aws-sdk/client-iot-data-plane");

const {LocationClient, BatchUpdateDevicePositionCommand} = require("@aws-sdk/client-location")

const {IoTWirelessClient, UpdateResourcePositionCommand } = require("@aws-sdk/client-iot-wireless");
const client = new IoTDataPlaneClient({
    "region": "us-east-1"
});
const wireless_client = new IoTWirelessClient({
    "region": "us-east-1"
});

exports.handler = async (event) => {
    console.log(`message received: ${JSON.stringify(event)}`)
    let device_id = event['WirelessDeviceId']
    let device_name = event['DeviceName']
    let measurements = event['data']['messages']
    let resolver_time = event['timestamp']
    let network = 1; // 1: lorawan 2: sidewalk
    if (event["WirelessMetadata"] && event["WirelessMetadata"]["Sidewalk"]) {
        network = 2
    }

    let longitude;
    let latitude;
    let gps_data = null
    let sensor_map = {}
    if (measurements && measurements.length > 0) {
        for (let i = 0; i < measurements.length; i++) {
            for (let j = 0; j < measurements[i].length; j++) {
                if (measurements[i][j].measurementId === "4097") {
                    sensor_map["Temperature"] = measurements[i][j].measurementValue;
                }
                if (measurements[i][j].measurementId === "4098") {
                    sensor_map["Humidity"] = measurements[i][j].measurementValue;
                }
                if (measurements[i][j].measurementId === "4197") {
                    longitude = measurements[i][j]["measurementValue"];
                }
                if (measurements[i][j].measurementId === "4198") {
                    latitude = measurements[i][j]["measurementValue"];
                }

                if (latitude && longitude) {
                    try {
                        gps_data = {
                            "type": "Point",
                            "coordinates": [longitude, latitude]
                            // "coordinates": [33.3318, -22.2155, 13.123]
                        }
                    } catch (e) {
                        console.log(`===>error`, e)
                    }
                }
            }
        }
    }

    if (gps_data) {
        console.log(`update device location : ${JSON.stringify(gps_data)}`)
        await updateDevicePosition(gps_data, device_id);
        const input = { // PublishRequest
            topic: `tracker/EmbeddedWorldTrackerDemo/location/${device_id}`,
            qos: 0,
            retain: false,
            payload: JSON.stringify({
                timestamp: resolver_time,
                deviceId: device_id,
                deviceName: device_name,
                latitude: gps_data.coordinates[1],
                longitude: gps_data.coordinates[0],
                positionProperties: {'batteryLevel': 90, "sensor:": 60}
            })
        };
        const command = new PublishCommand(input);
        const response = await client.send(command);
        console.log("mqtt push response: " + JSON.stringify(response));

        let locationClient = new LocationClient()
        let location_info = {
            TrackerName: 'AssetTracker',
            Updates: [
                {
                    DeviceId: 'assettracker',
                    SampleTime: new Date(resolver_time),
                    Position: [
                        gps_data.coordinates[0], gps_data.coordinates[1]
                    ],
                    Accuracy: {
                        Horizontal: 1,
                    },
                    PositionProperties: {
                        "context": JSON.stringify({net: network}),
                        "sensor": JSON.stringify(sensor_map)
                    }
                }
            ]
        }
        let loc_response = await locationClient.send(new BatchUpdateDevicePositionCommand(location_info))
        console.log("loc update response: " + JSON.stringify(loc_response));

    }
}

async function updateDevicePosition(gps_data, device_id) {
    const input = { // UpdateResourcePositionRequest
        ResourceIdentifier: device_id, // required
        ResourceType: "WirelessDevice", // required
        GeoJsonPayload: JSON.stringify(gps_data),
    };
    const command = new UpdateResourcePositionCommand(input);
    const wireless_response = await wireless_client.send(command);
    console.log(wireless_response)
}
Building Web App
We will deploy the necessary Amazon Location Service resources required to display our device on a map.
Creating Map
As a first step you will need to create a new Amazon Location Service Map resource. You will be doing so using the AWS Console.
-
Open the Amazon Location Service Console.
-
Then expand the navigation bar on the left side of the screen, and select Maps.
-
In this screen, create a new map:
-
Input the name of the map and select the
HERE Exploremap style, then click onCreate map.

Creating Router Calculator
-
Open the Amazon Location Service Console.
-
Then expand the navigation bar on the left side of the screen, and select
Route calculators.
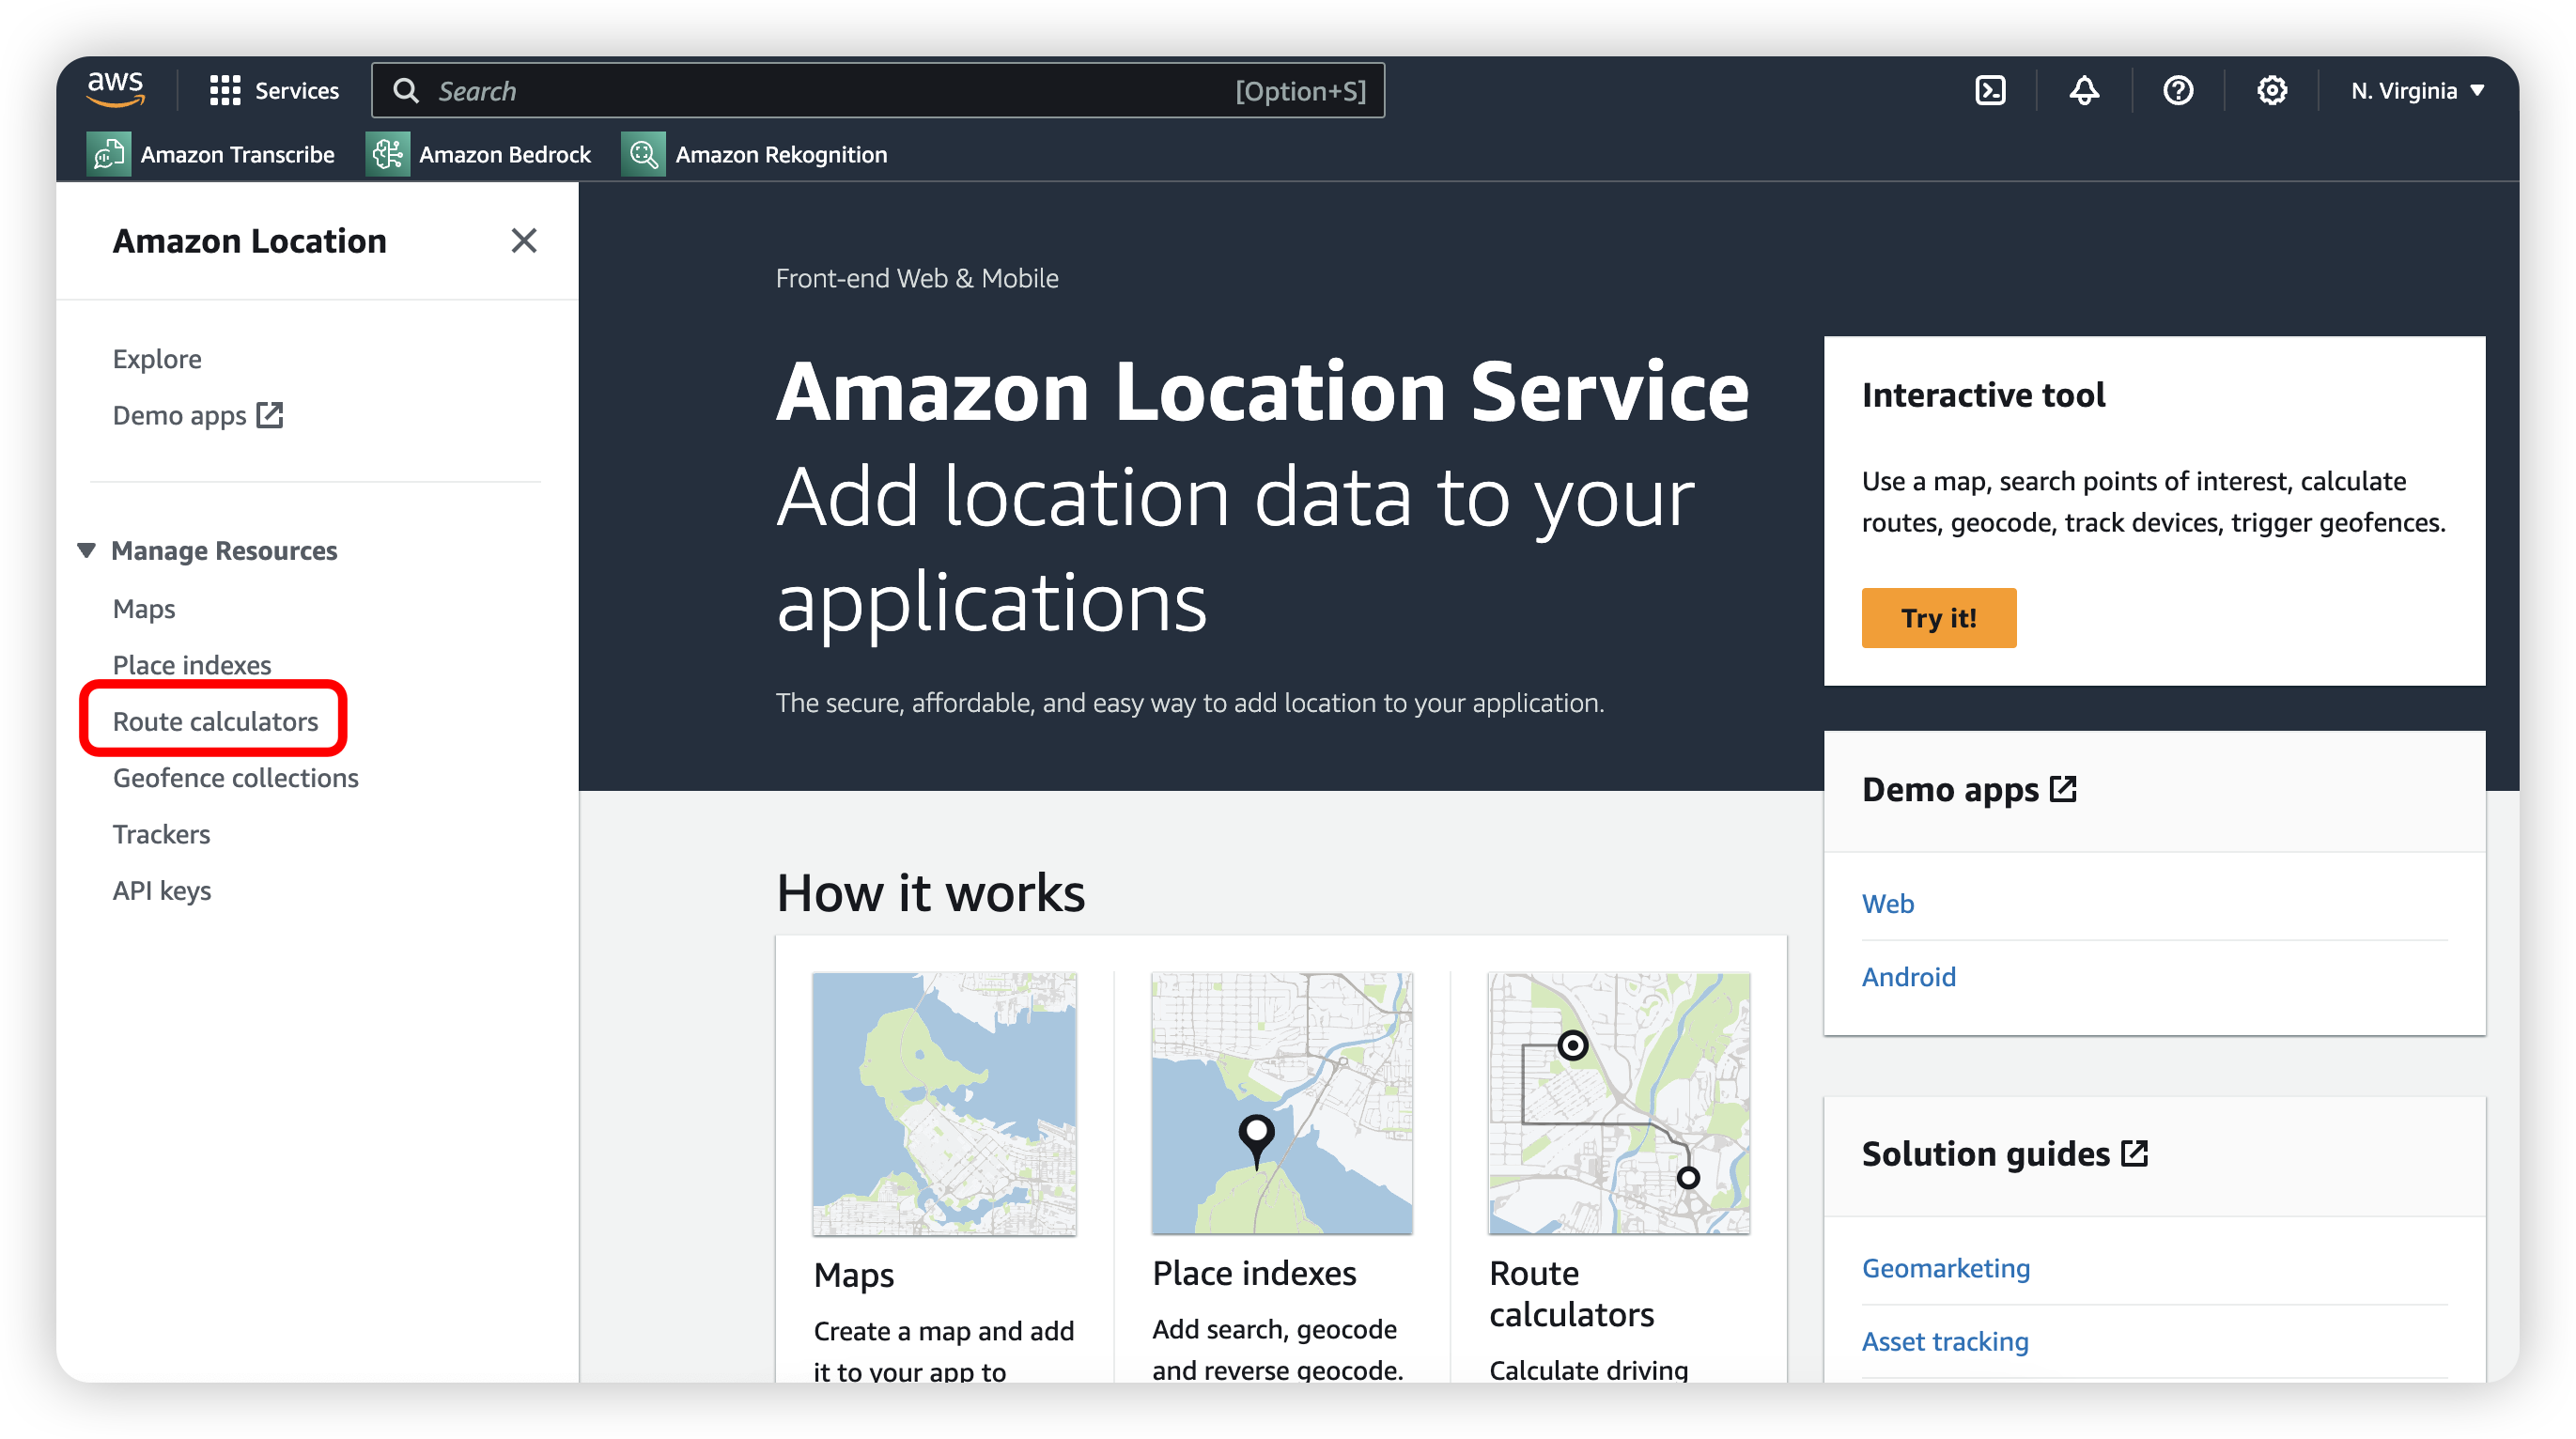
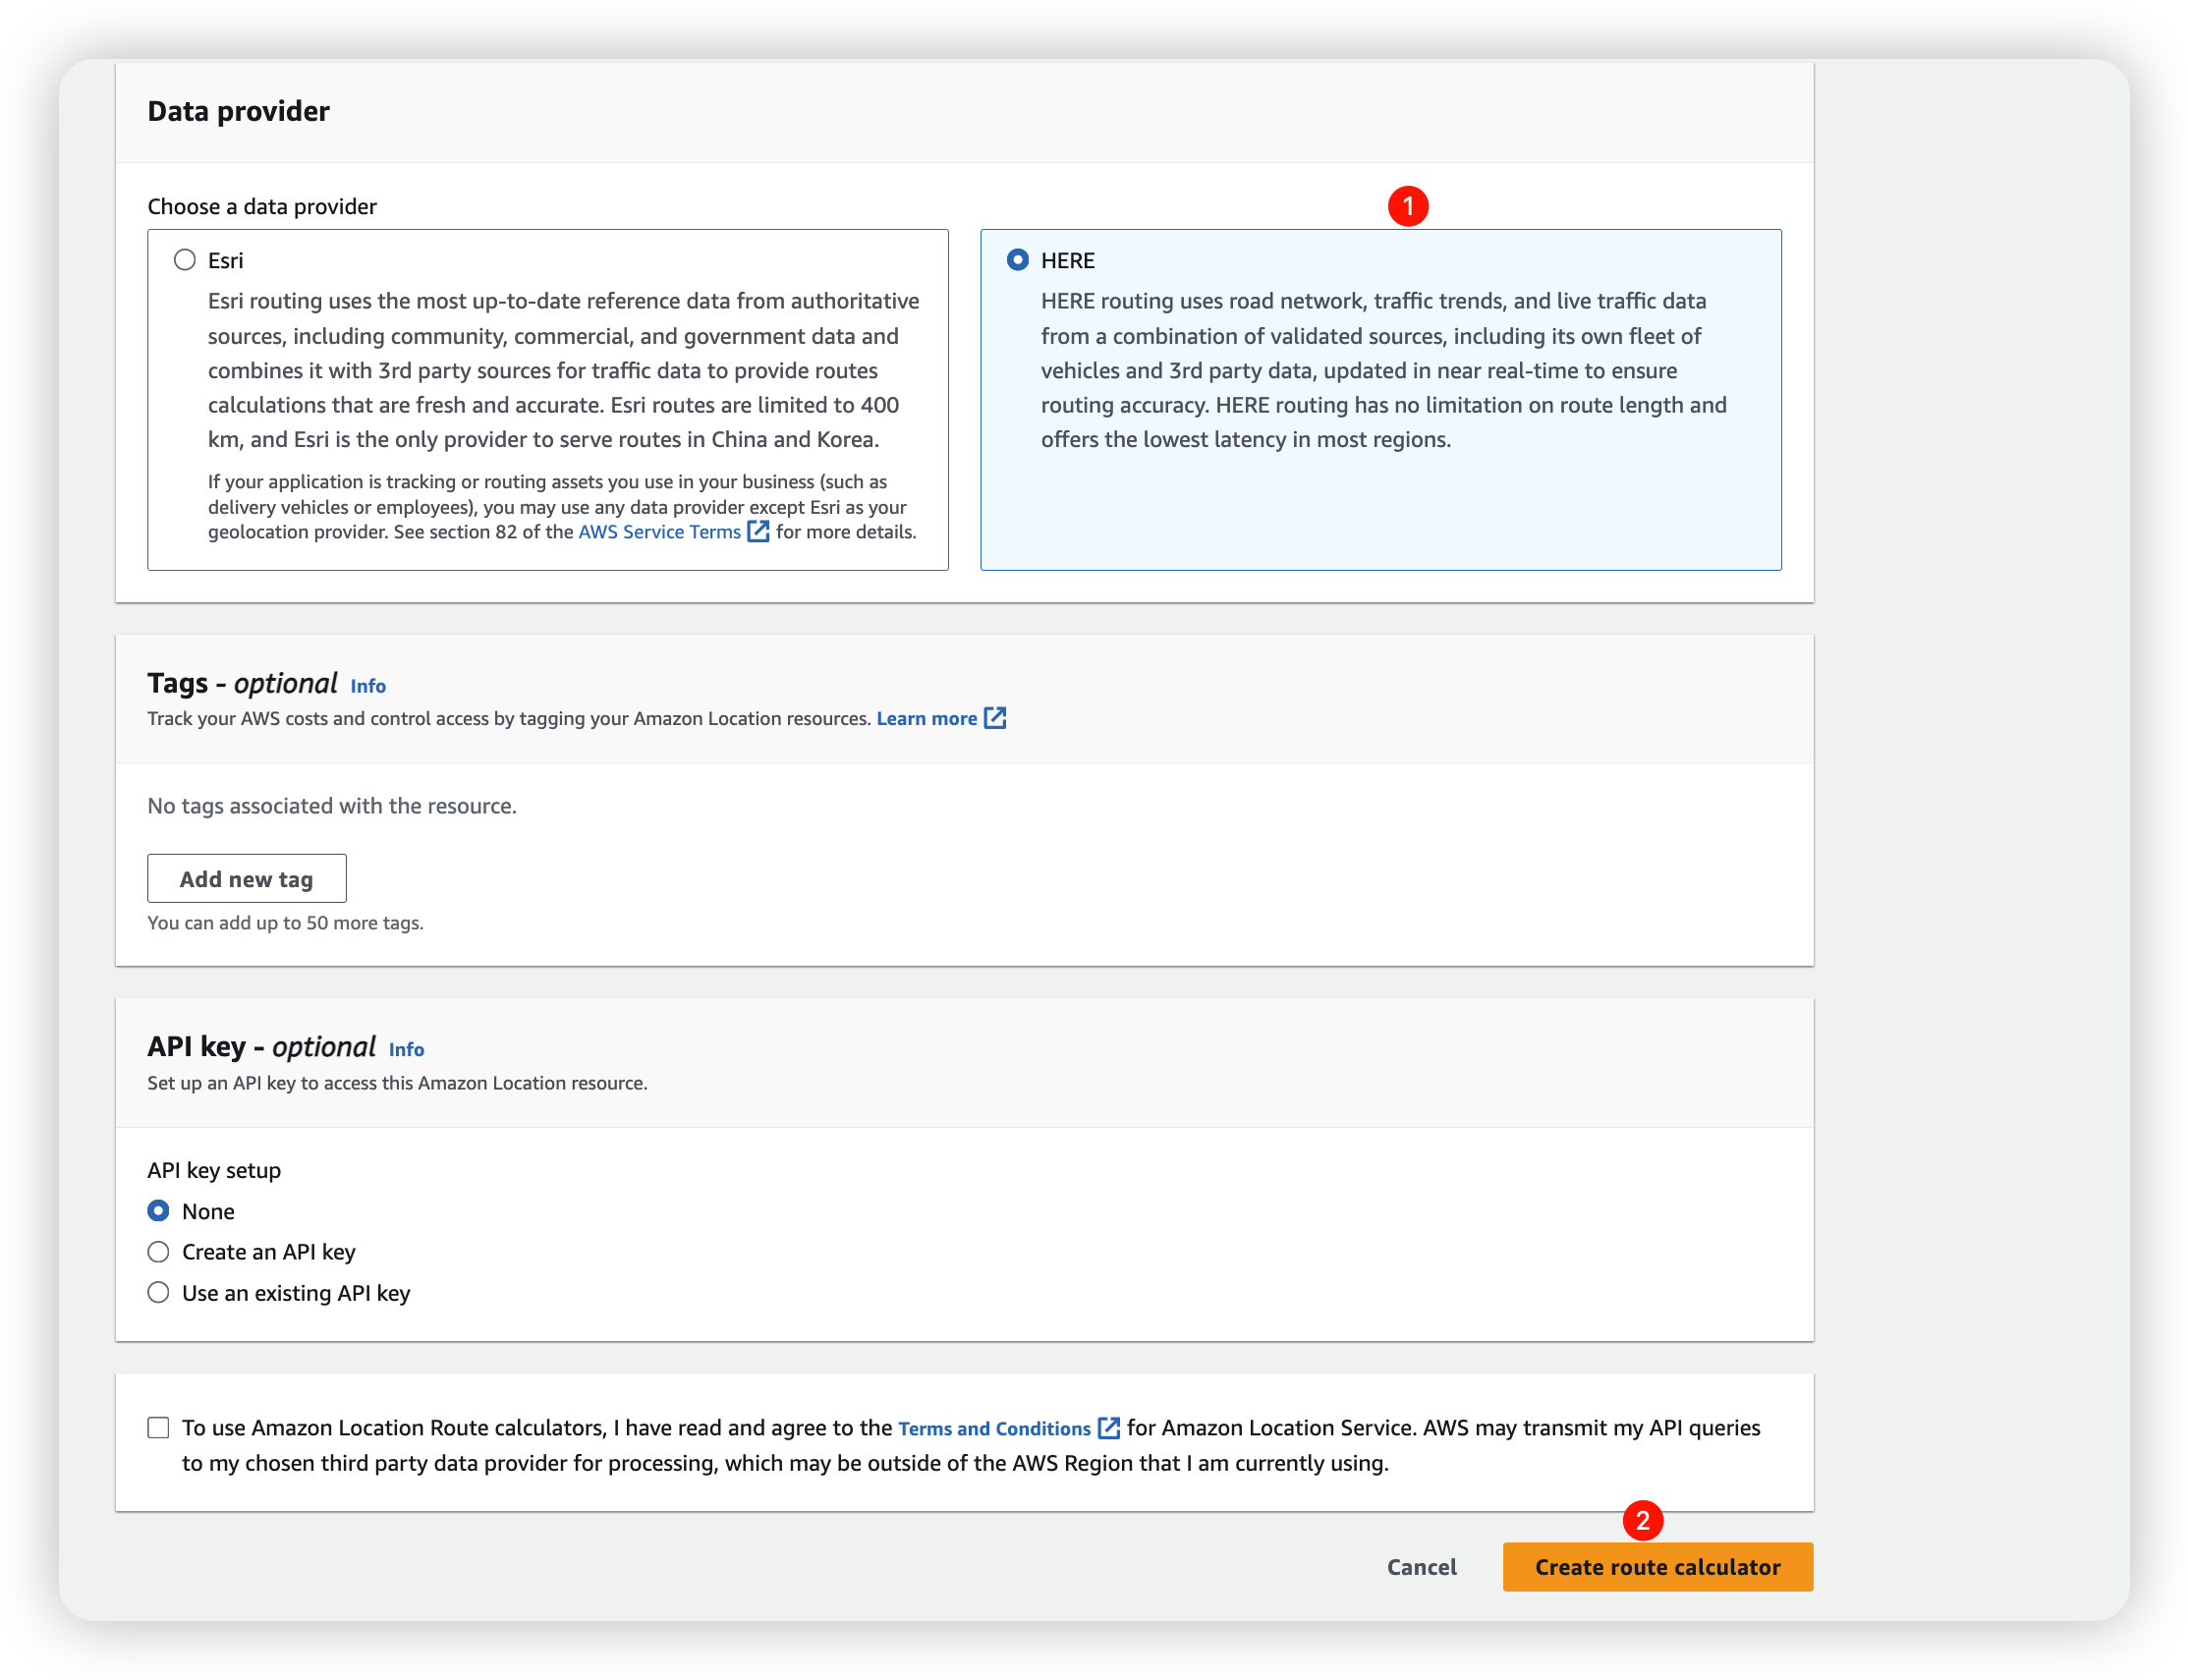
Continue by selecting HERE as Data Provider, click on the Create route calculator button.
Creating Tracker
Navigate to Trackers -> Create tracker:
Input the name of the tracker and select Time-based filtering under position filtering.

Then scroll down and mark the Enable EventBridge events setting under EventBridge configuration, then click Create tracker.

Creating Geofence Collection
Navigate to Geofence collections, and click create geofence collection.

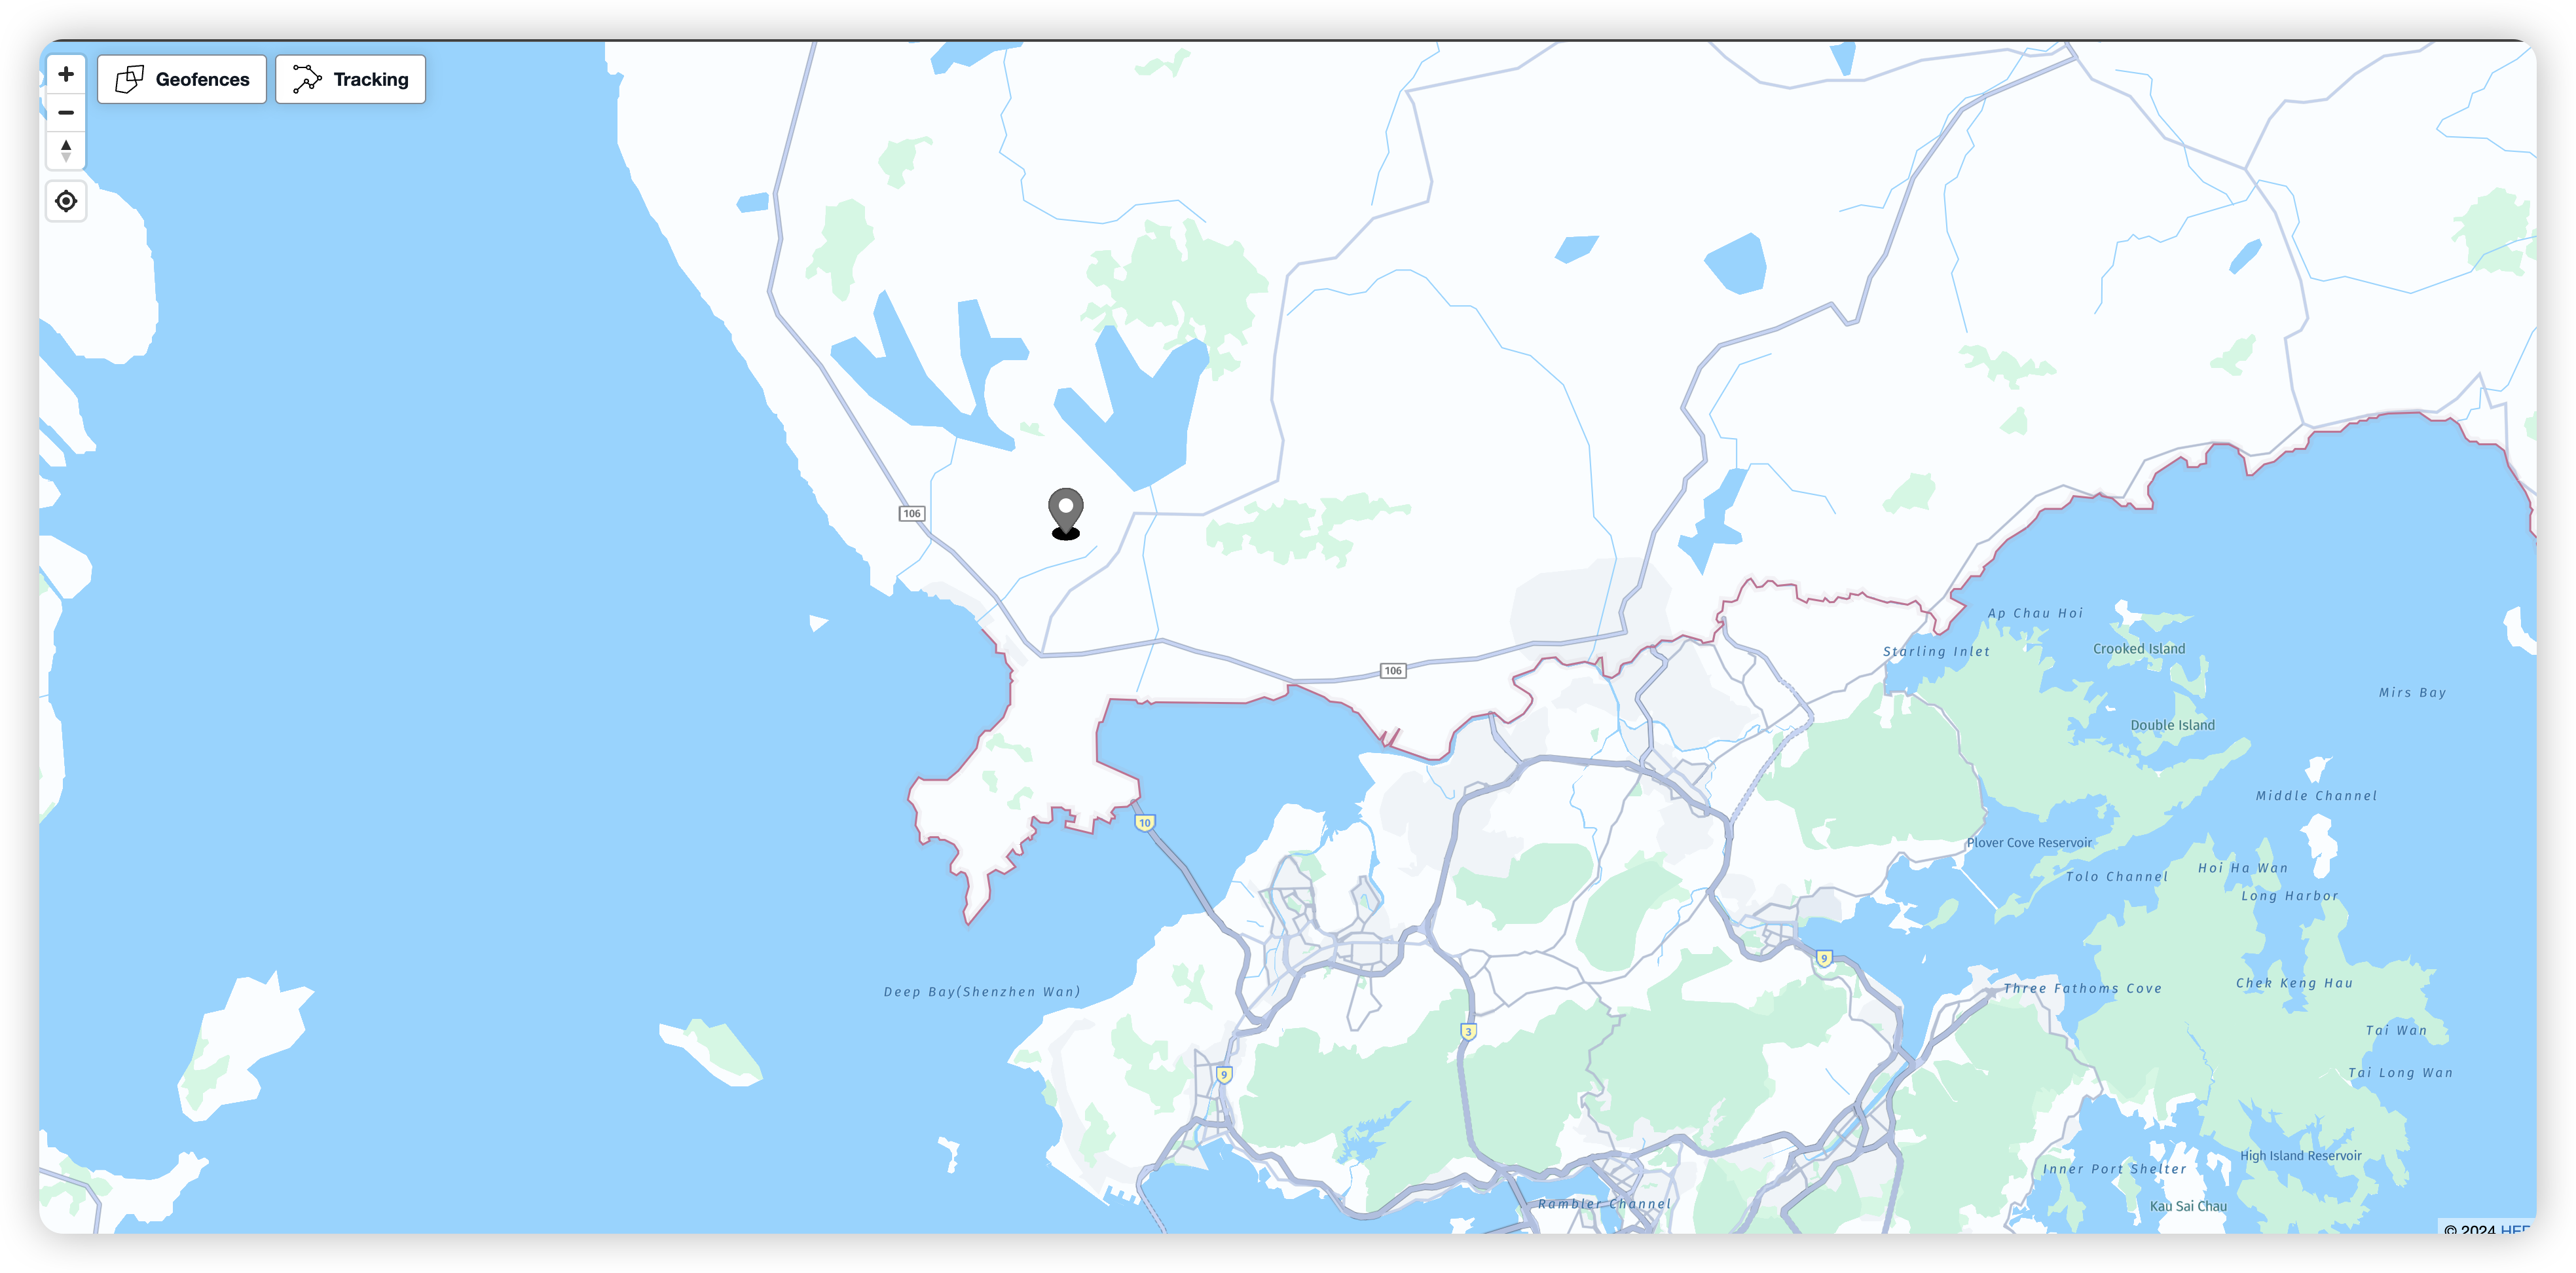
Display Web App
Deploy App to Cloudfront
- In your Cloud9 Terminal, navigate to
/home/ec2-user/environment/asset-tracking-workshop:
cd /home/ec2-user/environment/asset-tracking-workshop
- Run the following command:
npm run frontend:publish
- Once it's completed, you will receive the website URL.
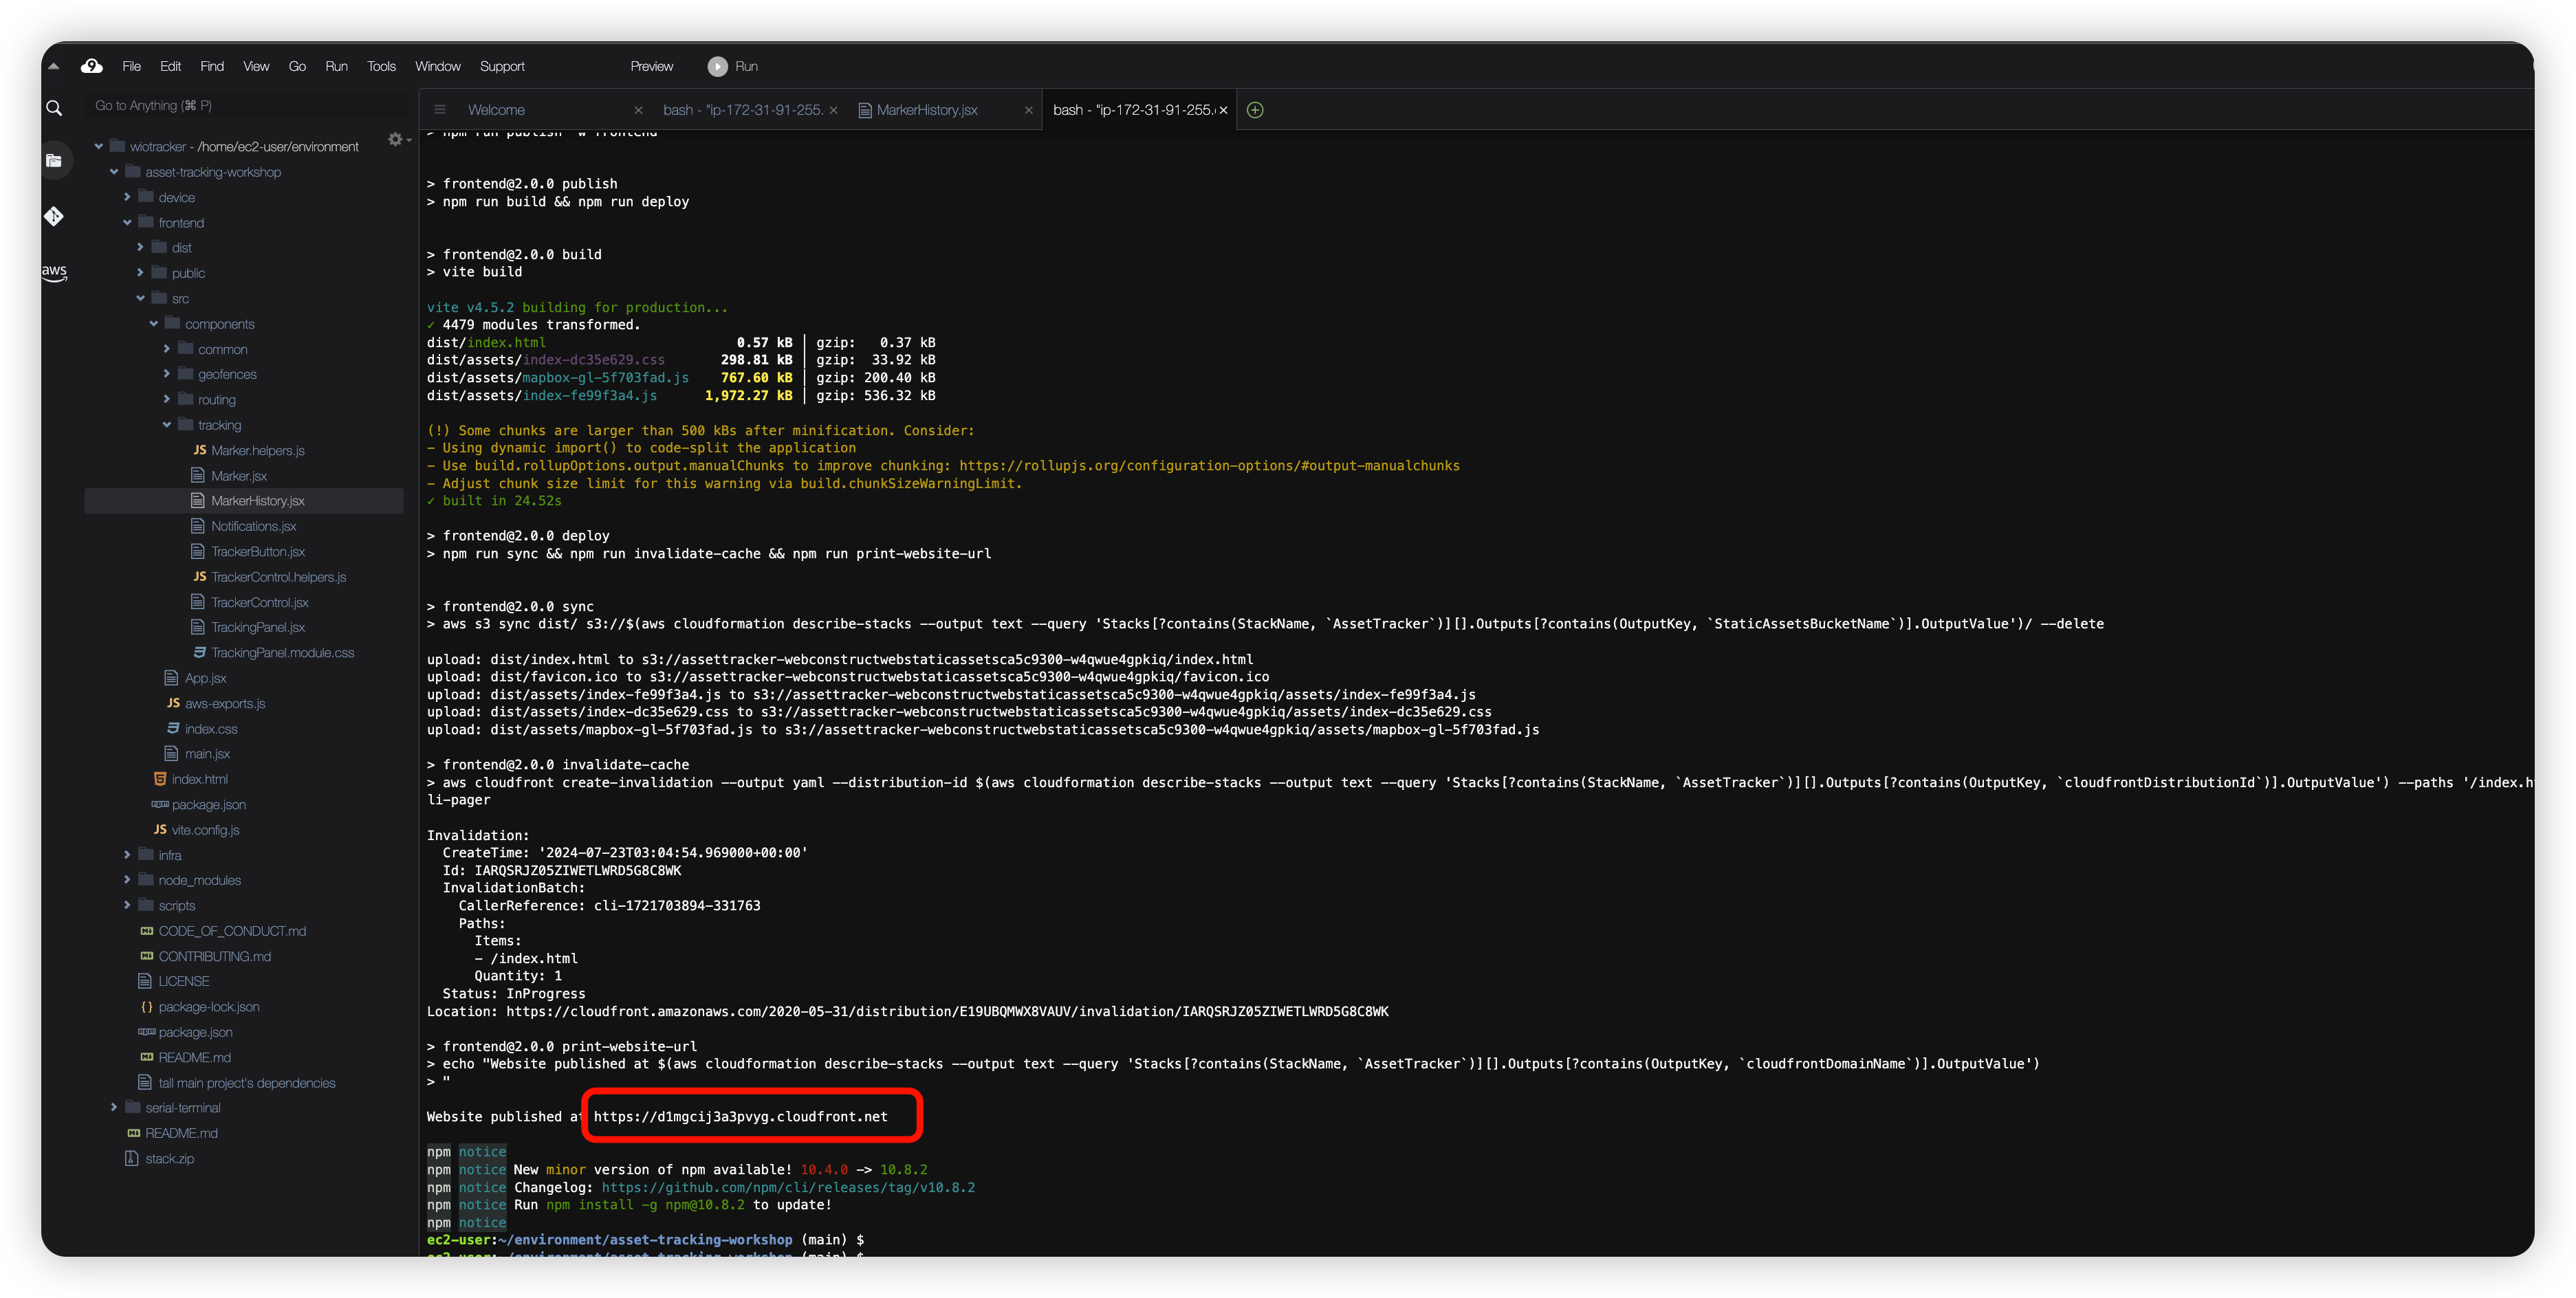
- Navigate to this URL in your browser to view your tracking application.