Grove - GSR Sensor
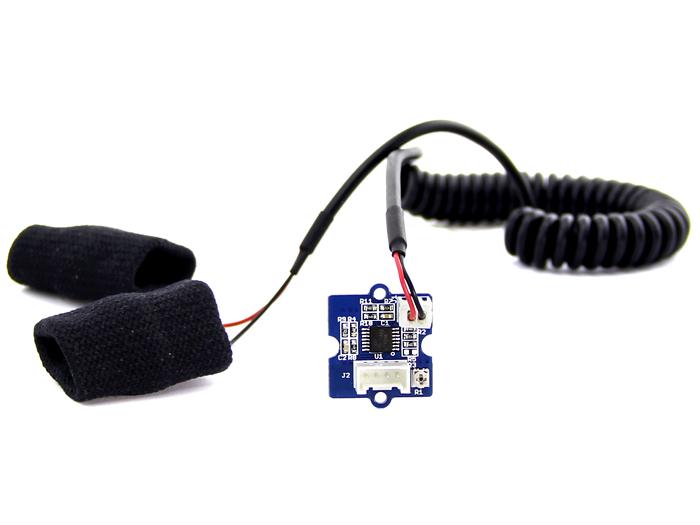
GSR stands for galvanic skin response, is a method of measuring the electrical conductance of the skin. Strong emotion can cause stimulus to your sympathetic nervous system, resulting more sweat being secreted by the sweat glands. Grove - GSR allows you to spot such strong emotions by simple attaching two electrodes to two fingers on one hand. It is an interesting to create emotion related projects like sleep quality monitor.
Grove-GSR Sensor measures the resistance of the people, NOT Conductivity!

Version
| Product Version | Changes | Released Date |
|---|---|---|
| Grove - GSR_Sensor V1.0 | Initial | June 19, 2013 |
| Grove - GSR_Sensor V1.2 | Add C3 100nf between M324PW-TSSOP14 and GND | July 31, 2014 |
Specification
| Parameter | Value/Range |
|---|---|
| Operating voltage | 3.3V/5V |
| Sensitivity | Adjustable via a potentiometer |
| Input Signal | Resistance, NOT Conductivity |
| Output Signal | Voltage, analog reading |
| Finger contact material | Nickel |
More details about Grove modules please refer to Grove System
Platforms Supported
| Arduino | Raspberry Pi | |||
|---|---|---|---|---|
The platforms mentioned above as supported is/are an indication of the module's software or theoritical compatibility. We only provide software library or code examples for Arduino platform in most cases. It is not possible to provide software library / demo code for all possible MCU platforms. Hence, users have to write their own software library.
Getting Started
Play With Arduino
Hardware
- Step 1. We need to prepare the below stuffs:
| Seeeduino V4.2 | Base Shield | Grove - GSR |
|---|---|---|
 |  |  |
| Get ONE Now | Get ONE Now | Get ONE Now |
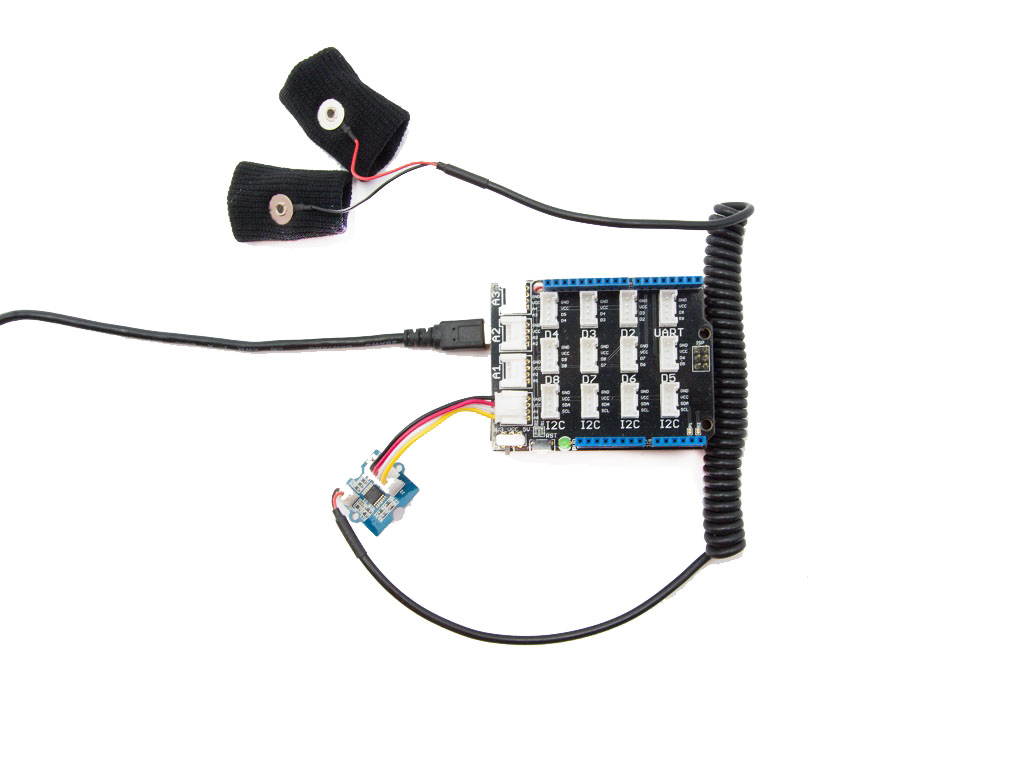
- Step 2. Connect the Grove-GSR to A0 on Base Shield.
- Step 3. Plug the base Shield into Seeeduino-V4.2.
- Step 4. Connect Seeeduino-V4.2 to PC by using a USB cable.
If we don't have a Base Shield, don't worry, the sensor can be connected to your Arduino directly. Please follow below tables to connect with Arduino.
| Seeeduino | Grove-GSR Sensor |
|---|---|
| GND | Black |
| 5V | Red |
| NC | White |
| A0 | Yellow |
Software
- Step 1. Copy the code into Arduino IDE and upload.
const int GSR=A0;
int sensorValue=0;
int gsr_average=0;

void setup(){
  Serial.begin(9600);
}

void loop(){
  long sum=0;
  for(int i=0;i<10;i++)           //Average the 10 measurements to remove the glitch
      {
      sensorValue=analogRead(GSR);
      sum += sensorValue;
      delay(5);
      }
   gsr_average = sum/10;
   Serial.println(gsr_average);
}
- Step 2. Do not Wear the GSR sensor.
- Step 3. Click the Tools-> Serial Plotter from Arduino IDE
- Step 4. Use the screw driver to adjust resistor until the serial output is minimized. The serial port data at this point is noted as Serial_calibration.
- Step 5. Wear the GSR sensor.
- Step 6. We will see the below graph. Please deep breath and see the trends.
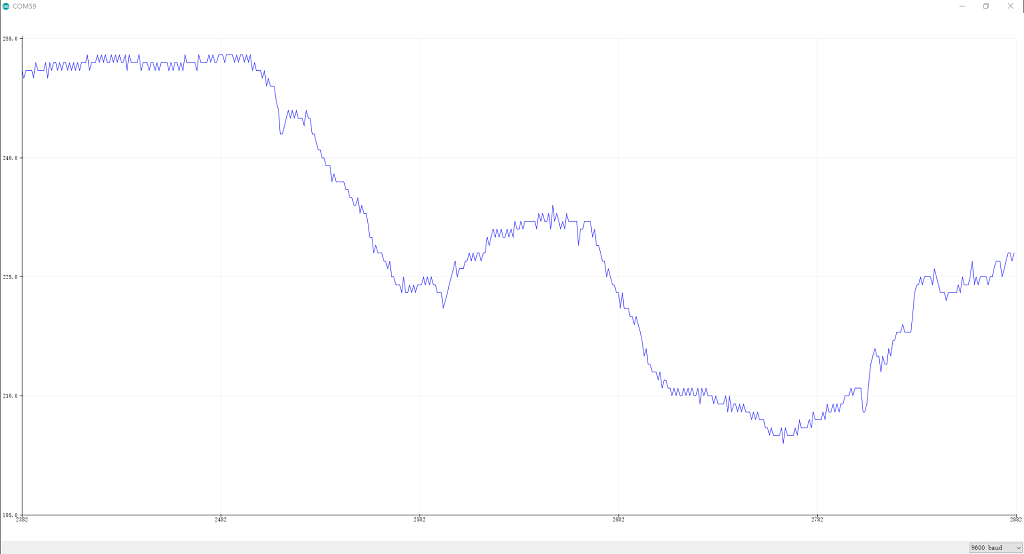
Human Resistance = ((1024 + 2 x Serial_Port_Reading) x 10000)/(Serial_calibration - Serial_Port_Reading)
- Unit is ohm;
- Serial_Port_Reading is the value display on Serial Port(between 0~1023);
- Serial_calibration is from Step 4 (Use the screw driver to adjust resistor until the serial output is minimized. The serial port data at this point is noted as the Serial_calibration).
Play With Raspberry Pi (With Grove Base Hat for Raspberry Pi)
Hardware
- Step 1. Things used in this project:
| Raspberry pi | Grove Base Hat for RasPi | Grove - GSR Sensor |
|---|---|---|
 |  | |
| Get ONE Now | Get ONE Now | Get ONE Now |
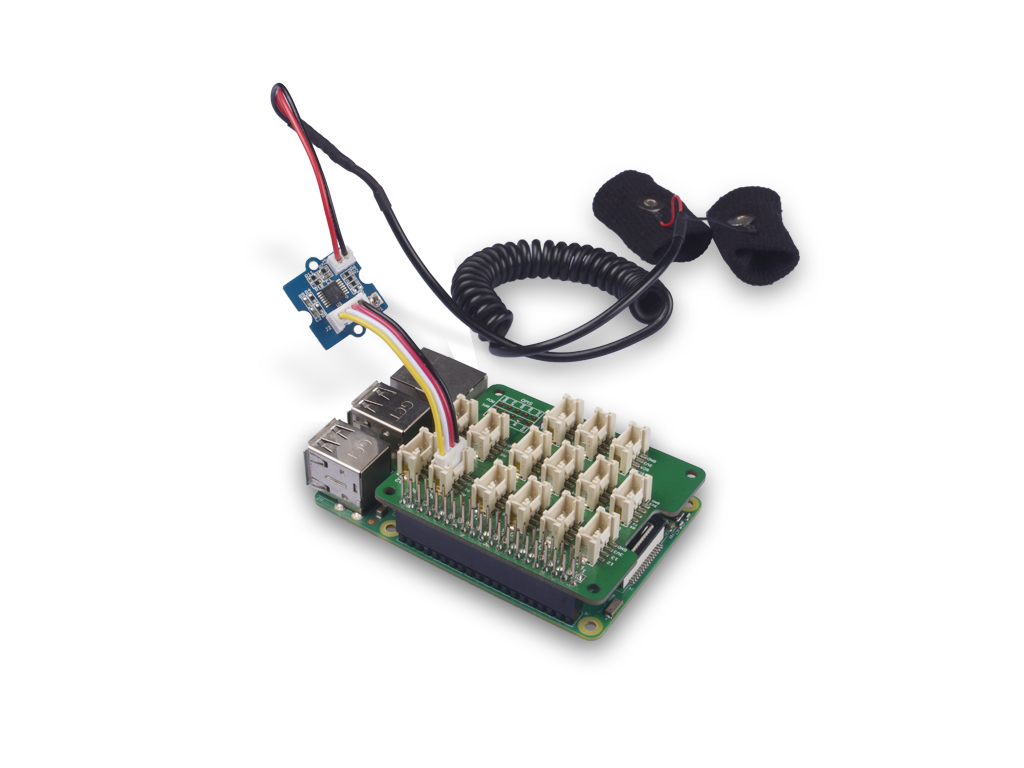
- Step 2. Plug the Grove Base Hat into Raspberry Pi.
- Step 3. Connect the Grove - GSR Sensor to to the A0 port of the Base Hat.
- Step 4. Connect the Raspberry Pi to PC through USB cable.
For step 3 you are able to connect the Grove - GSR sensor to any Analog Port but make sure you change the command with the corresponding port number.
Software
- Step 1. Follow Setting Software to configure the development environment.
- Step 2. Download the source file by cloning the grove.py library.
cd ~
git clone https://github.com/Seeed-Studio/grove.py
- Step 3. Excute below commands to run the code.
cd grove.py/grove
nano grove_gsr_sensor.py
Then you should copy following code in this file and hit ++ctrl+x++ to quit and save.
import math
import sys
import time
from grove.adc import ADC


class GroveGSRSensor:

    def __init__(self, channel):
        self.channel = channel
        self.adc = ADC()

    @property
    def GSR(self):
        value = self.adc.read(self.channel)
        return value

Grove = GroveGSRSensor


def main():
    if len(sys.argv) < 2:
        print('Usage: {} adc_channel'.format(sys.argv[0]))
        sys.exit(1)

    sensor = GroveGSRSensor(int(sys.argv[1]))

    print('Detecting...')
    while True:
        print('GSR value: {0}'.format(sensor.GSR))
        time.sleep(.3)

if __name__ == '__main__':
    main()
- Step 4. Excute below command to run the code
python grove_gsr_sensor.py 0
If everything goes well, you will be able to see the following result
pi@raspberrypi:~/grove.py/grove $ python grove_gsr_sensor.py 0
Detecting...
GSR value: 503
GSR value: 503
GSR value: 503
GSR value: 503
GSR value: 503
GSR value: 383
GSR value: 256
GSR value: 314
GSR value: 348
GSR value: 361
GSR value: 368
GSR value: 371
^CTraceback (most recent call last):
  File "grove_gsr_sensor.py", line 69, in <module>
    main()
  File "grove_gsr_sensor.py", line 66, in main
    time.sleep(.3)
KeyboardInterrupt
You can quit this program by simply press ctrl+c.
You may have noticed that for the analog port, the silkscreen pin number is something like A1, A0, however in the command we use parameter 0 and 1, just the same as digital port. So please make sure you plug the module into the correct port, otherwise there may be pin conflicts.
FAQ
Q1: What is the unit of output?
A1: We measure the signal by voltage and print to COM port as (0~1023).
Grove - GSR v1.0
Grove - GSR v1.2
Resources
- [PDF] Download Wiki PDF
- [Eagle] Grove - GSR v1.0 Eagle File
- [Eagle] Grove - GSR v1.2 Eagle File
- [Datasheet] LM324 datasheet
Projects
eMotion - Towards a Better Future: We believe we can use biometric sensors, the security of the Helium platform and strength of Google Cloud to surface possible anxiety states.
Tech Support & Product Discussion
Thank you for choosing our products! We are here to provide you with different support to ensure that your experience with our products is as smooth as possible. We offer several communication channels to cater to different preferences and needs.