MT3620 Ethernet Shield v1.0

Azure Sphere MT3620 Development kit comes with four 2.54mm headers for hardware resources extension from MT3620. MT3620 Ethernet Shield is an add-on breakout board designed for MT3620 development kit. The Azure Sphere ethernet shield enables support for private LAN connection only. Please see here for more details.
Microsoft Azure Sphere is a solution for creating highly-secured, connected, MCU-powered devices. Azure Sphere brings together the best of Microsoft’s expertise in cloud, software and silicon—resulting in a unique approach to security that starts in the silicon and extends to the cloud. Together, Azure Sphere certified MCUs, the Azure Sphere OS, and the Azure Sphere Security Service provide you with the confidence and the power to reimagine your business and create the future.

External Wi-Fi is required for internet access and Azure Sphere services. Azure Sphere does not support routing or bridging between the private LAN and Wi-Fi interface.
Features
- Processor: Microchip, ENC28J60
- IEEE 802.3TM Compatible Ethernet Controller
- Fully Compatible with 10/100/1000Base-T Networks
- Integrated MAC and 10Base-T PHY
- Supports One 10Base-T Port with Automatic Polarity Detection and Correction
- Supports Full and Half-Duplex modes
- SPI Interface with Clock Speeds up to 20 MHz
- Operating Temperature(℃): 0 ~ +70℃
If you need it work under -40 ~ +85℃, please contact [email protected] for customization.
Hardware Overview

- ① J1: RJ45 interface, It is connected to ENC28J60.

- ② LED1: 3.3V Power Red LED, when you power the board, the led will be turned on.

- ③ U1: ENC28J60, Stand-Alone Ethernet Controller with SPI Interface, which converts SPI to Ethernet interface.

- ④ H4: Azure Sphere(MT3620 Development Board) , Extention Header , H4

- ⑤ H3: Azure Sphere(MT3620 Development Board) , Extention Header , H3

- ⑥ H2: Azure Sphere(MT3620 Development Board) , Extention Header , H2

- ⑦ H1: Azure Sphere(MT3620 Development Board) , Extention Header , H1

- ⑧ J2: UART3 Pin Header, It is connected to MT3620 GPIO66~GPIO69.

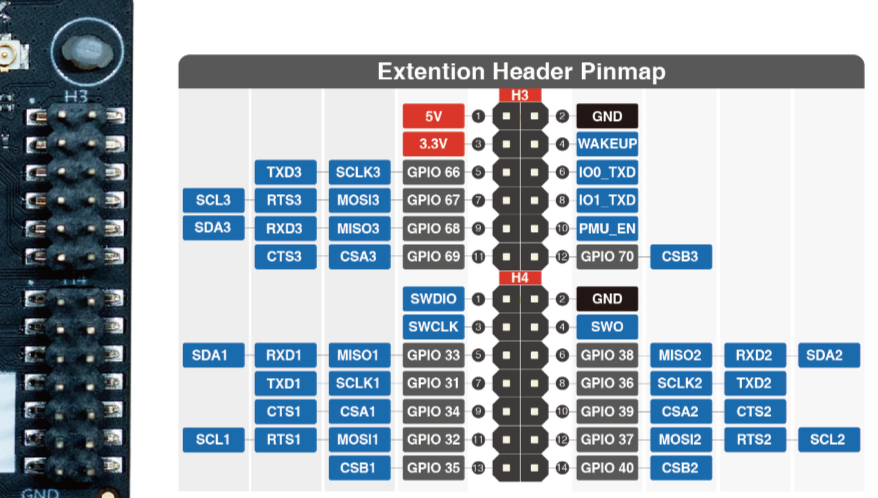
Pin Out
- The H1/H2/H3/H4 are the same as Azure Sphere board pin out.

Dimensions


Application Ideas
- Home/Building/Facilities
- Automation
- Security
- Equipment Management
- Utilities
- Public Safety
To understand how Azure Sphere works in a real-world setting, consider Contoso, Ltds cenario.
Getting Started
Prerequisites
Install Azure Sphere
If you have an Azure Sphere development kit that has not yet been used, complete these steps first to get up and running.
MT3620 Ethernet Shield Library
This sample C application demonstrates how you can connect an Azure Sphere device to a private Ethernet network. It configures the Azure Sphere device to run a DHCP server and an SNTP server, and it also implements a basic TCP server. The steps below show how to verify this functionality by connecting your computer to this private network.
The DHCP and SNTP servers are managed by the Azure Sphere OS, according to the configuration provided by the application. These servers will start only after the application requests they do so, but they will continue to run even if the application stops.
The TCP server runs in the application process itself and will stop when the application stops. Note that this sample TCP server implementation is basic, for illustration only, and it does not authenticate or encrypt connections: you should replace it with your own production logic.
The sample uses the following Azure Sphere libraries and includes beta APIs.
| Library | Purpose |
|---|---|
| log | Displays messages in the Visual Studio Device Output window during debugging |
| networking | Gets and sets network interface configuration |
Current the MT3620 Ethernet Shield does not support the internet connection due to Microsoft software is not ready. It supports connect to PC only.
Hardware Connection
| MT3620 development kits | MT3620 Ethernet Shield |
|---|---|
 |  |
| Get One Now | Get One Now |
- Step 1. Connect MT3620 Ethernet Shield to Azure Sphere MT3620 Development board.
- Step 2. Plug the USB cable to Azure Sphere MT3620 Development board and PC.
- Step 3. Connect the network cable between MT3620 Ethernet board and PC.

To build and run the sample
Set up your Azure Sphere device and development environment as described in the Azure Sphere documentation.
Even if you've performed this set up previously, ensure you have Azure Sphere SDK version 19.02 or above. In an Azure Sphere Developer Command Prompt, run azsphere show-version to check. Download and install the latest SDK as needed.
Connect your Azure Sphere device to your PC by USB.
Enable application development, if you have not already done so:
azsphere device prep-debugPackage and deploy the board configuration image for the Microchip ENC286J60 Ethernet chip:
azsphere image package-board-config --preset lan-enc28j60-isu0-int5 --output enc28j60-isu0-int5.imagepackageazsphere device sideload deploy --imagepackage enc28j60-isu0-int5.imagepackageClone the Azure Sphere samples repo and find the PrivateEthernet sample.
In Visual Studio, open PrivateEthernet.sln and press F5 to compile and build the solution and load it onto the device for debugging.
Leave the app running while you perform the following steps.
Troubleshooting
If you see numerous errors in the Visual Studio Error List relating to missing headers and undefined identifiers, or if when building the app, you see the following error in the Visual Studio Build Output:
error MSB6004: The specified task executable location "C:\Program Files (x86)\Microsoft Azure Sphere SDK\\SysRoot\tools\gcc\arm-poky-linux-musleabi-gcc.exe" is invalid.
Then it is likely you have an older version of the Azure Sphere SDK installed; ensure you have version 19.02 or newer.
Configure the Ethernet connection on your computer
- Open Settings and then click Network and Internet > Change adapter options.
- Right-click on your Ethernet adapter and select Properties.
- In the Ethernet Properties window, disable all items except for Internet Protocol Version 4 (TCP/IPv4).
- Select Internet Protocol Version 4 (TCP/IPv4), and then click the Properties button to launch the Internet Protocol Version 4 (TCP/IPv4) Properties window.
- Check that "Obtain IP address automatically" is selected. (Previous versions of this sample required configuration of a static IP address at this point. That is no longer necessary because the application now provides a DHCP server.)
- Click OK to close the IPv4 properties window, then close the Ethernet Properties window.
- Attach an Ethernet cable from the ENC286J60-H to the Ethernet connection on your computer.
If your computer is managed by policies that prevent it from being connected to multiple network interfaces at once, you may need to disable other network interfaces while using this sample.
The samples uses the IP address range 192.168.100.xxx. If you have another network adapter using the same range, then you will need to either modify the sample or disable the other network adapter temporarily.
Test the device's DHCP server
Open a command prompt on your computer and type ipconfig. You should see that the DHCP server has issued the IP address 192.168.100.11 to your PC for its Ethernet connection:
Ethernet adapter <name>:

   Connection-specific DNS Suffix  . :
   Link-local IPv6 Address . . . . . : fe80::8c67:be24:4d9a:d4bb%9
   IPv4 Address. . . . . . . . . . . : 192.168.100.11
   Subnet Mask . . . . . . . . . . . : 255.255.255.0
   Default Gateway . . . . . . . . . :
You could also find, download and use a DHCP client test tool on your PC to inspect the DHCP server response in more detail - e.g. to look at the NTP server address(es) returned.
Test the device's SNTP server
Ensure the device is connected to Wi-Fi, so it can obtain time from a public NTP server. The device's own SNTP server won't respond until it knows the current time.
Open a command prompt on your computer and type w32tm /stripchart /computer:192.168.100.10 /dataonly /samples:1. This invokes the Windows Time tool to query the device's SNTP server and to display the calculated difference between your computer's time and the device's time:
Tracking 192.168.100.10 [192.168.100.10:123].
Collecting 1 samples.
The current time is 06/02/2019 14:18:09.
14:18:09, +00.0349344s
If the SNTP server isn't running or doesn't respond, then you may see the following output. Check that app is running and that Wi-Fi is configured.
Tracking 192.168.100.10 [192.168.100.10:123].
Collecting 1 samples.
The current time is 06/02/2019 14:16:50.
14:16:50, error: 0x800705B4
Test the application's TCP server
Ensure the sample app is still running on your Azure Sphere device. Then, on your computer, use a terminal application to open a raw TCP connection to the Azure Sphere application's TCP server at 192.168.100.10 port 11000. You can open this connection with a third-party terminal application such as PuTTY (using a "raw" connection type), or with the built-in Telnet client for Windows.
To use the built-in Telnet client for Windows:
- Open Control Panel and click Programs and Features > Turn Windows features on or off to launch the Windows Features window.
- Ensure Telnet Client is selected and click OK.
- Open a command prompt and type telnet 192.168.100.10 11000.
The characters that you type will render in the debug console in Visual Studio–either immediately or when you enter a newline–showing they have been received by the example TCP server on the MT3620. Furthermore, when you enter a newline, the MT3620 will send a string back to the terminal, which says:
Received "<last-received-line>"
Note that this sample server has a simple 16 character input buffer. If you send more than this, then the Output window in Visual Studio may show: "Input data overflow. Discarding 16 characters."
Troubleshooting
- If you run the sample without the ENC28J60 attached (or improperly attached), then the sample app will exit immediately. The debug output will show an error such as "ERROR: Networking_SetStaticIp: 5 (I/O error)" just before it exits. If you subsequently attach or fix the connection to the ENC28J60, then you must also reset the MT3620.
- If you run the sample without the board configuration being loaded onto the device, then the sample app will exit immediately. The debug output will show an error such as "ERROR: Networking_SetStaticIp: 2 (No such file or directory)" just before it exits.
Removing the Ethernet board configuration
If you no longer require Ethernet, for example because you wish to use your board for a different project, you must manually remove the Ethernet board configuration image:
Find the installed image with type 'Board config', and note its component ID:
azsphere device image list-installedDelete this image:
azsphere device sideload delete --componentid <component ID>Press the reset button on the MT3620 dev board.
Note: This sample uses ISU0 (I2C/SPI/UART port 0) on the MT3620, which is also used by other samples. Other samples can be adapted to use a different ISU port. For now, it’s not possible to adapt this Private Ethernet sample to use another ISU port.
Schematic Online Viewer
Resource
- [PDF] MT3620 Ethernet Shield v1.0
- [Eagle] MT3620 Ethernet Shield v1.0
- [Mechanical Drawing] MT3620 Ethernet Shield Mechanical Drawing
- [DataSheet] ENC28J60 Datasheet
- [FAQ Web] Azure Sphere Forum
- [FAQ Web] Azure Sphere Github issues
Tech Support & Product Discussion
Thank you for choosing our products! We are here to provide you with different support to ensure that your experience with our products is as smooth as possible. We offer several communication channels to cater to different preferences and needs.