Codesys for Edge Box RPi 200
Edgebox-RPI-200

EdgeBox-RPi-200 series are all-in-one Raspberry Pi-based industrial edge computing controllers, combining multiple industrial purposes. Designed as high-scalability and rugged industrial hardware, mounted with rich IO resources and supported by the great Raspberry Pi industrial software ecosystem, it is an ideal choice for smart automation and Industrial Internet of Things(IIoT) solutions.
Feature
-
All-in-one Industry Controller:
- More than just a PLC, PAC, more can it implement functions of the IIoT Gateway, OPC UA Server and Industry PC.
-
Powerful and Flexible Processors:
- Powered by Raspberry Pi Compute Module 4 (CM4), equipped up to 4GB RAM and 16GB eMMC, performing real-time operation and multi-process.
-
Rich IO resources and Industrial Interfaces Mounted:
- Support a wide range of industrial bus protocols and standards
-
Multiple Communication Capabilities:
- Carry full-featured wireless interconnectivity and a RJ45 Gigabit Ethernet, supported by multiple cloud services
-
Rugged Industrial-grade Hardware Design:
- Integrated thermal management with full Aluminum heatsink enclosure, supporting 35mm DIN and wall mount
-
Great Raspberry Pi Industrial Software Ecosystem:
- Support a variety of industrial software and platforms, including Codesys, Node Red, MQTT, OPC UA, Ignition and etc.
What is Codesys?
Codesys is an intergrated industrial standard IEC 61131-3 software development environment for programming the industrial controller and automations.
In this wiki we have used the Codesys Development System V3 software as IDE to config and program software to run on the Edgebox-RPI-200 which is a Raspberry Pi Computer Module 4 based PLC contoller, therefore the CODESYS Control for Raspberry Pi MC runtime will be installed and configured with the Edgebox-RPI-200.
Prerequisites
- 1 x Windows PC Host computer
- 1 x Edgebox-RPI-200
- CODESYS Development System V3 Software
- CODESYS Control for Raspberry Pi MC SL License and Installer
Please visit the CODESYS Development System V3 download page to download the CODESYS Development System V3 installer according to your Windows PC Host computer setup, and follow the installation wizard to install the program.
Please visit the CODESYS Control for Raspberry Pi MC SL to purchase the License, or purchase CODESYS Control for Raspberry Pi SL for your own preferences, and Download the Raspberry Pi CODESYS installer package.
Getting started
Project Preparation
Please make sure you have the CODESYS Development System V3 software install and opened on your host computer.
-
STEP 1: Install CODESYS Control for Raspberry PI package on CODESYS Development System
-
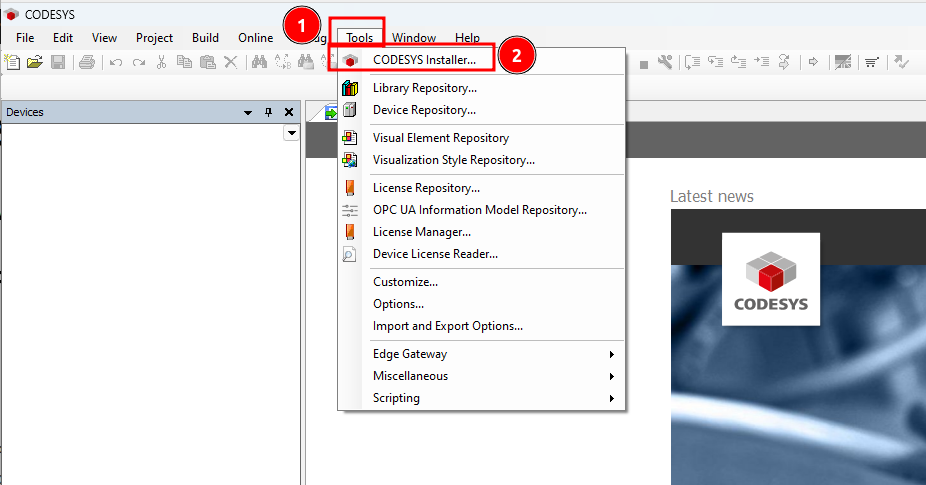
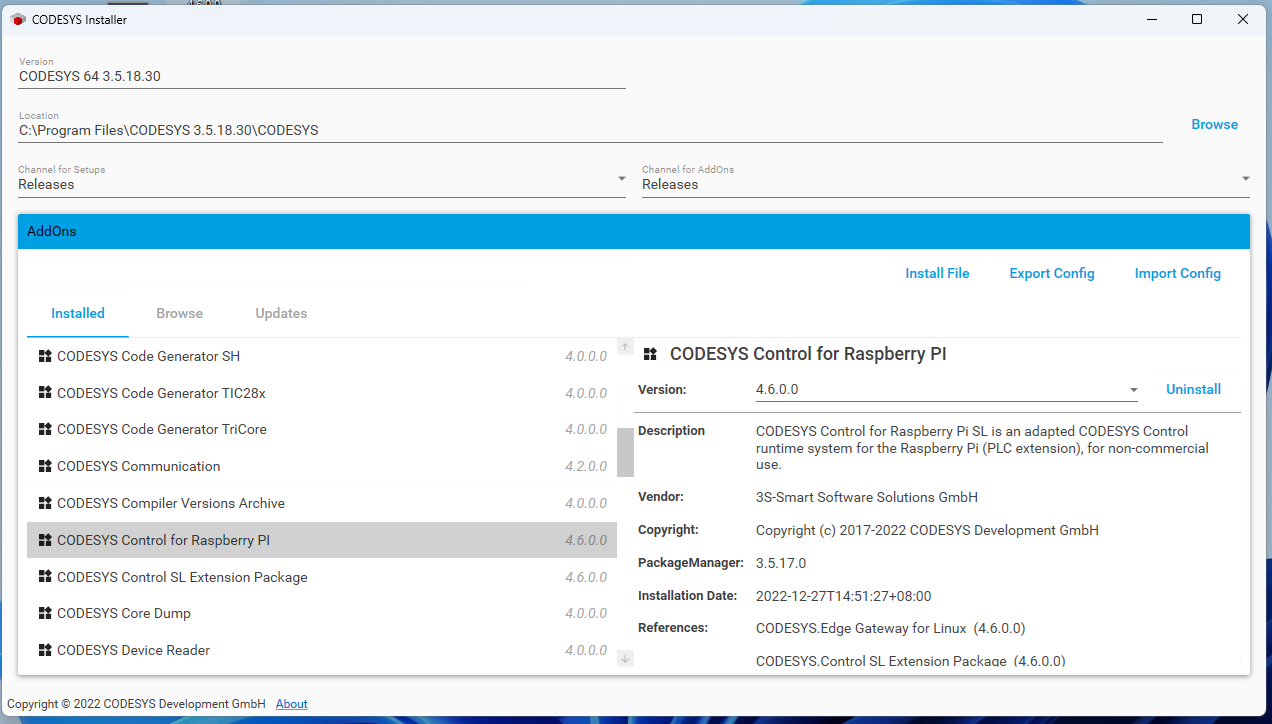
STEP 1-1: Please Open the Codesys Installer by click on ""TOOLS> CODESYS Installer""
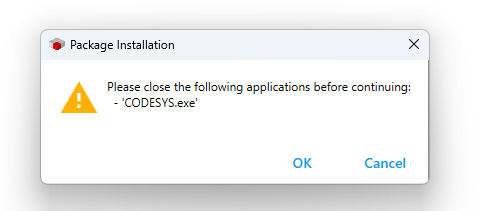
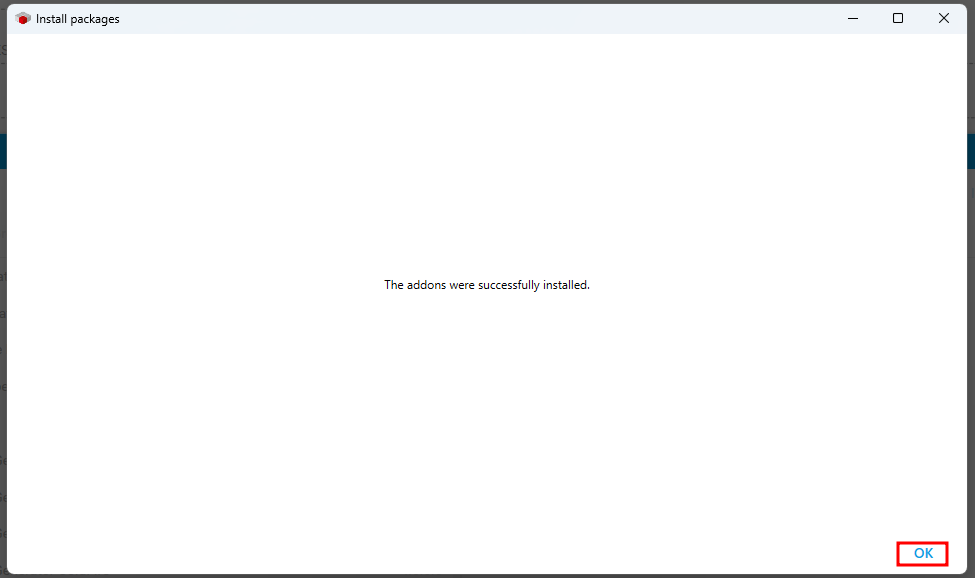
- STEP 1-2: Please close CODESYS Development System V3 software as required during package installation, otherwise you will get warning as below:
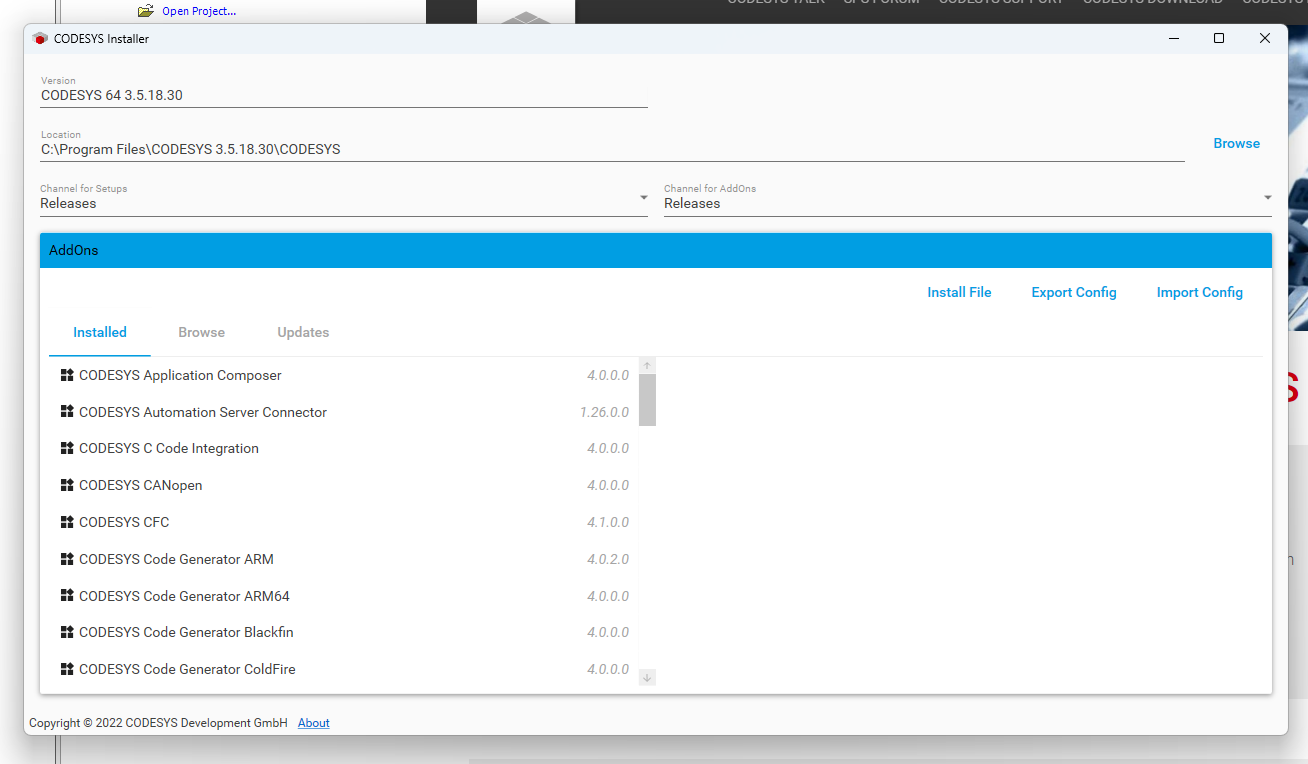
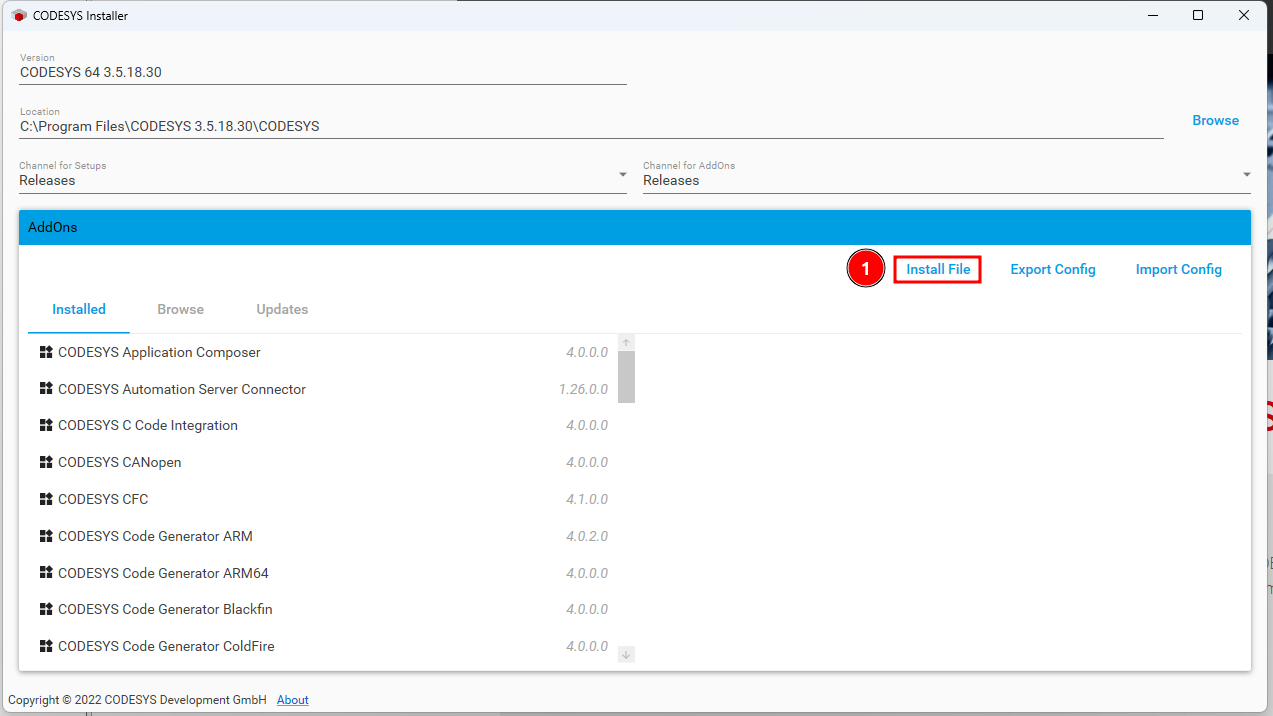
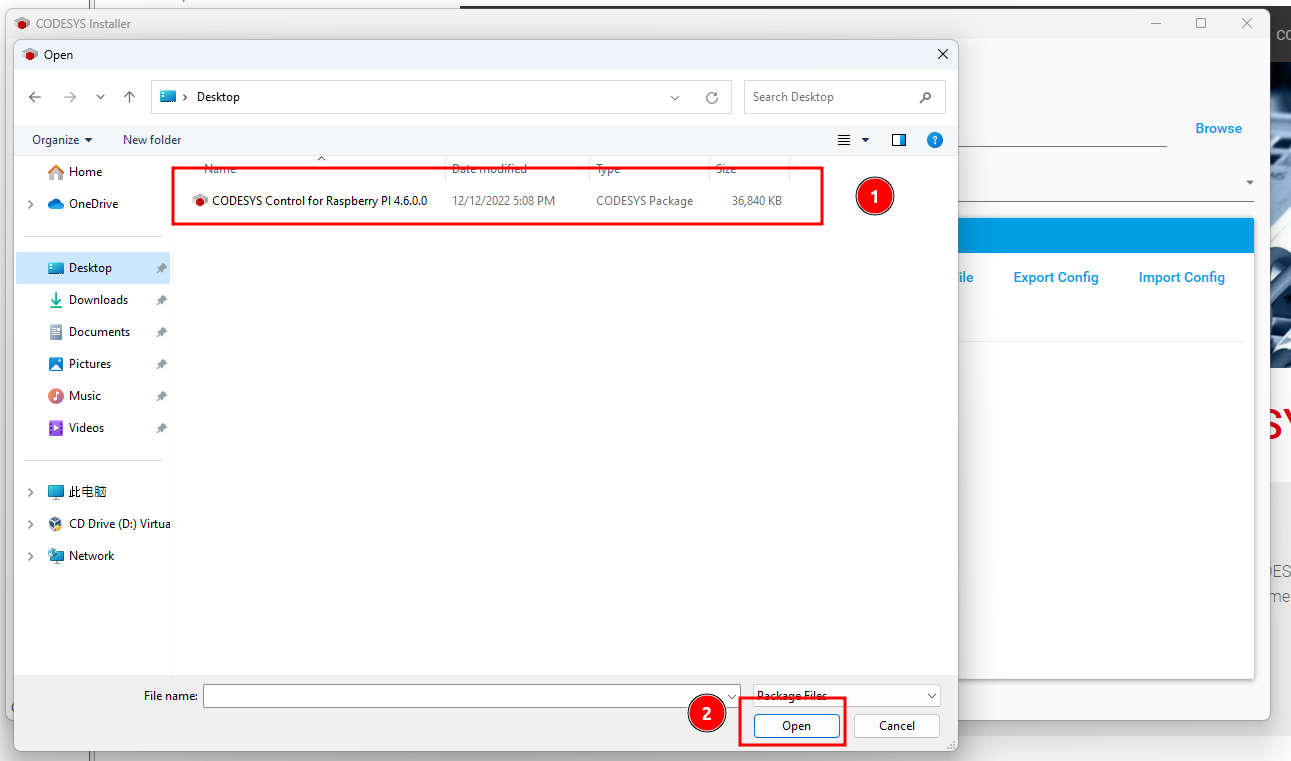
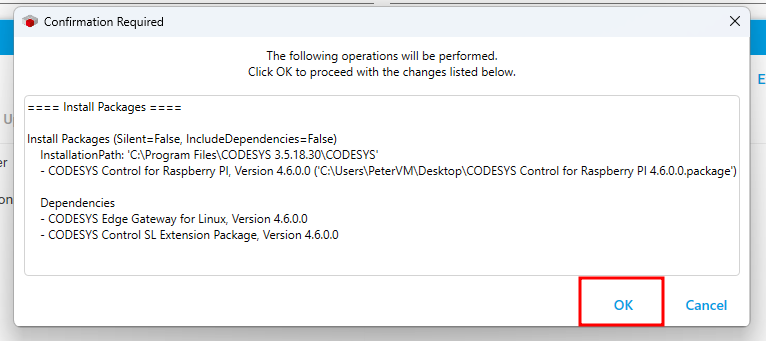
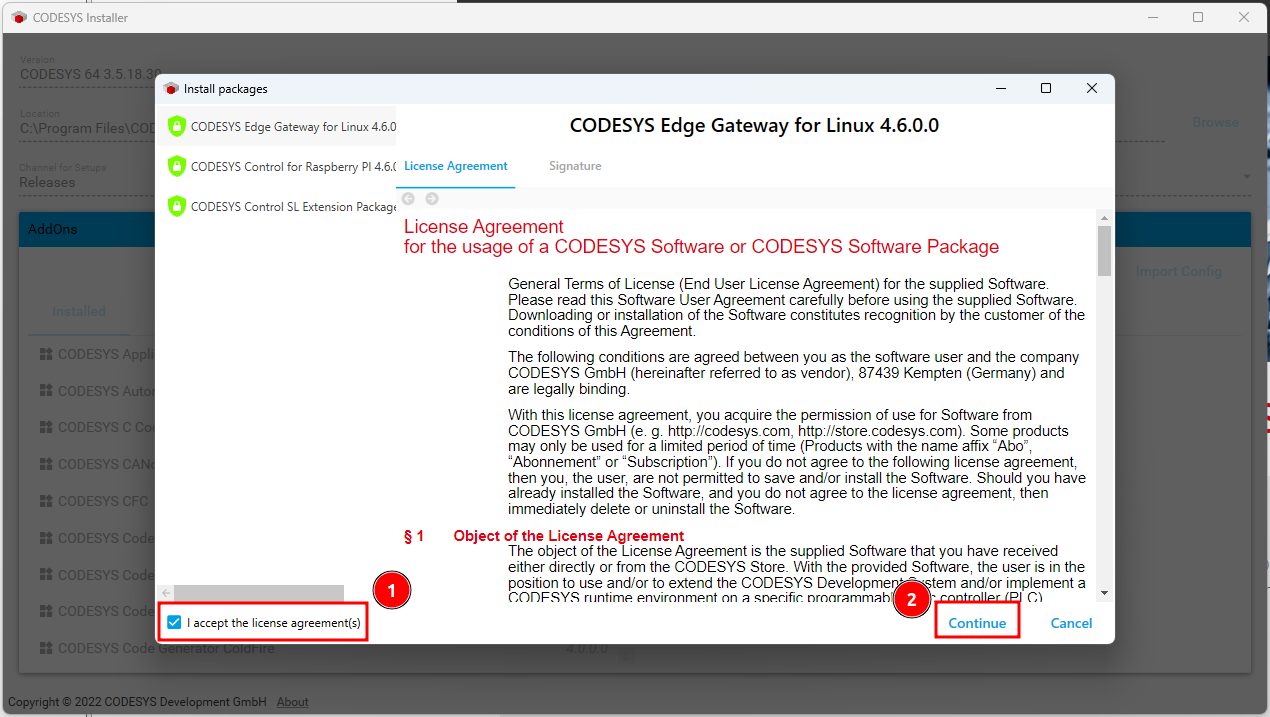
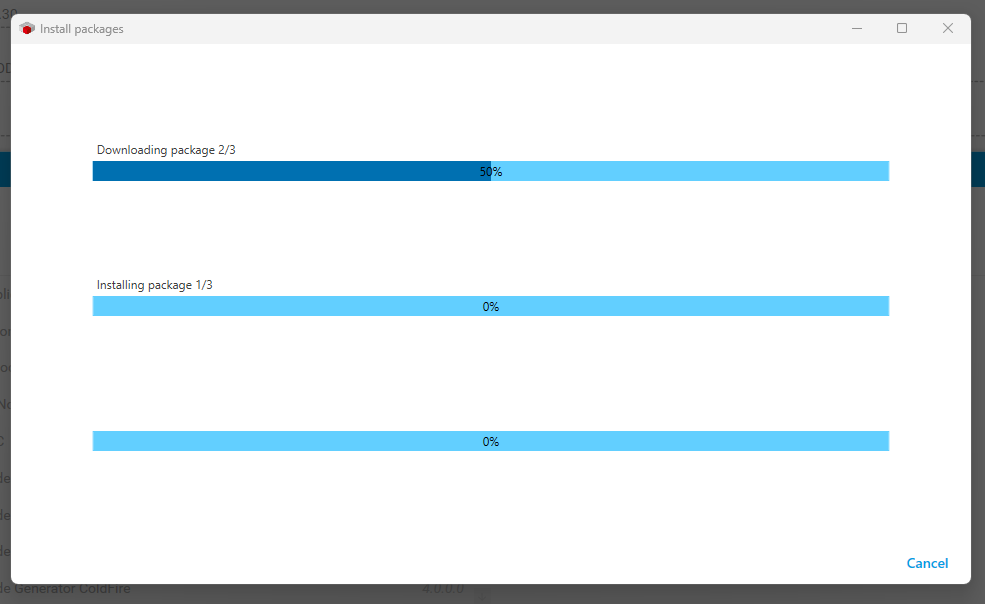
- STEP 1-3: Please click "browse" and select "CODESYS Control for Raspberry Pi MC SL package" and "install"
Toggle USER LED project with Edgebox-RPI-200
Make sure the Edgebox-RPI-200 is powered up and connected to the same network as you host computer, you will need to get the ip address for Edgebox-RPI-200 from the DHCP leases table of the router you have connected.
- STEP 1: Project Setup
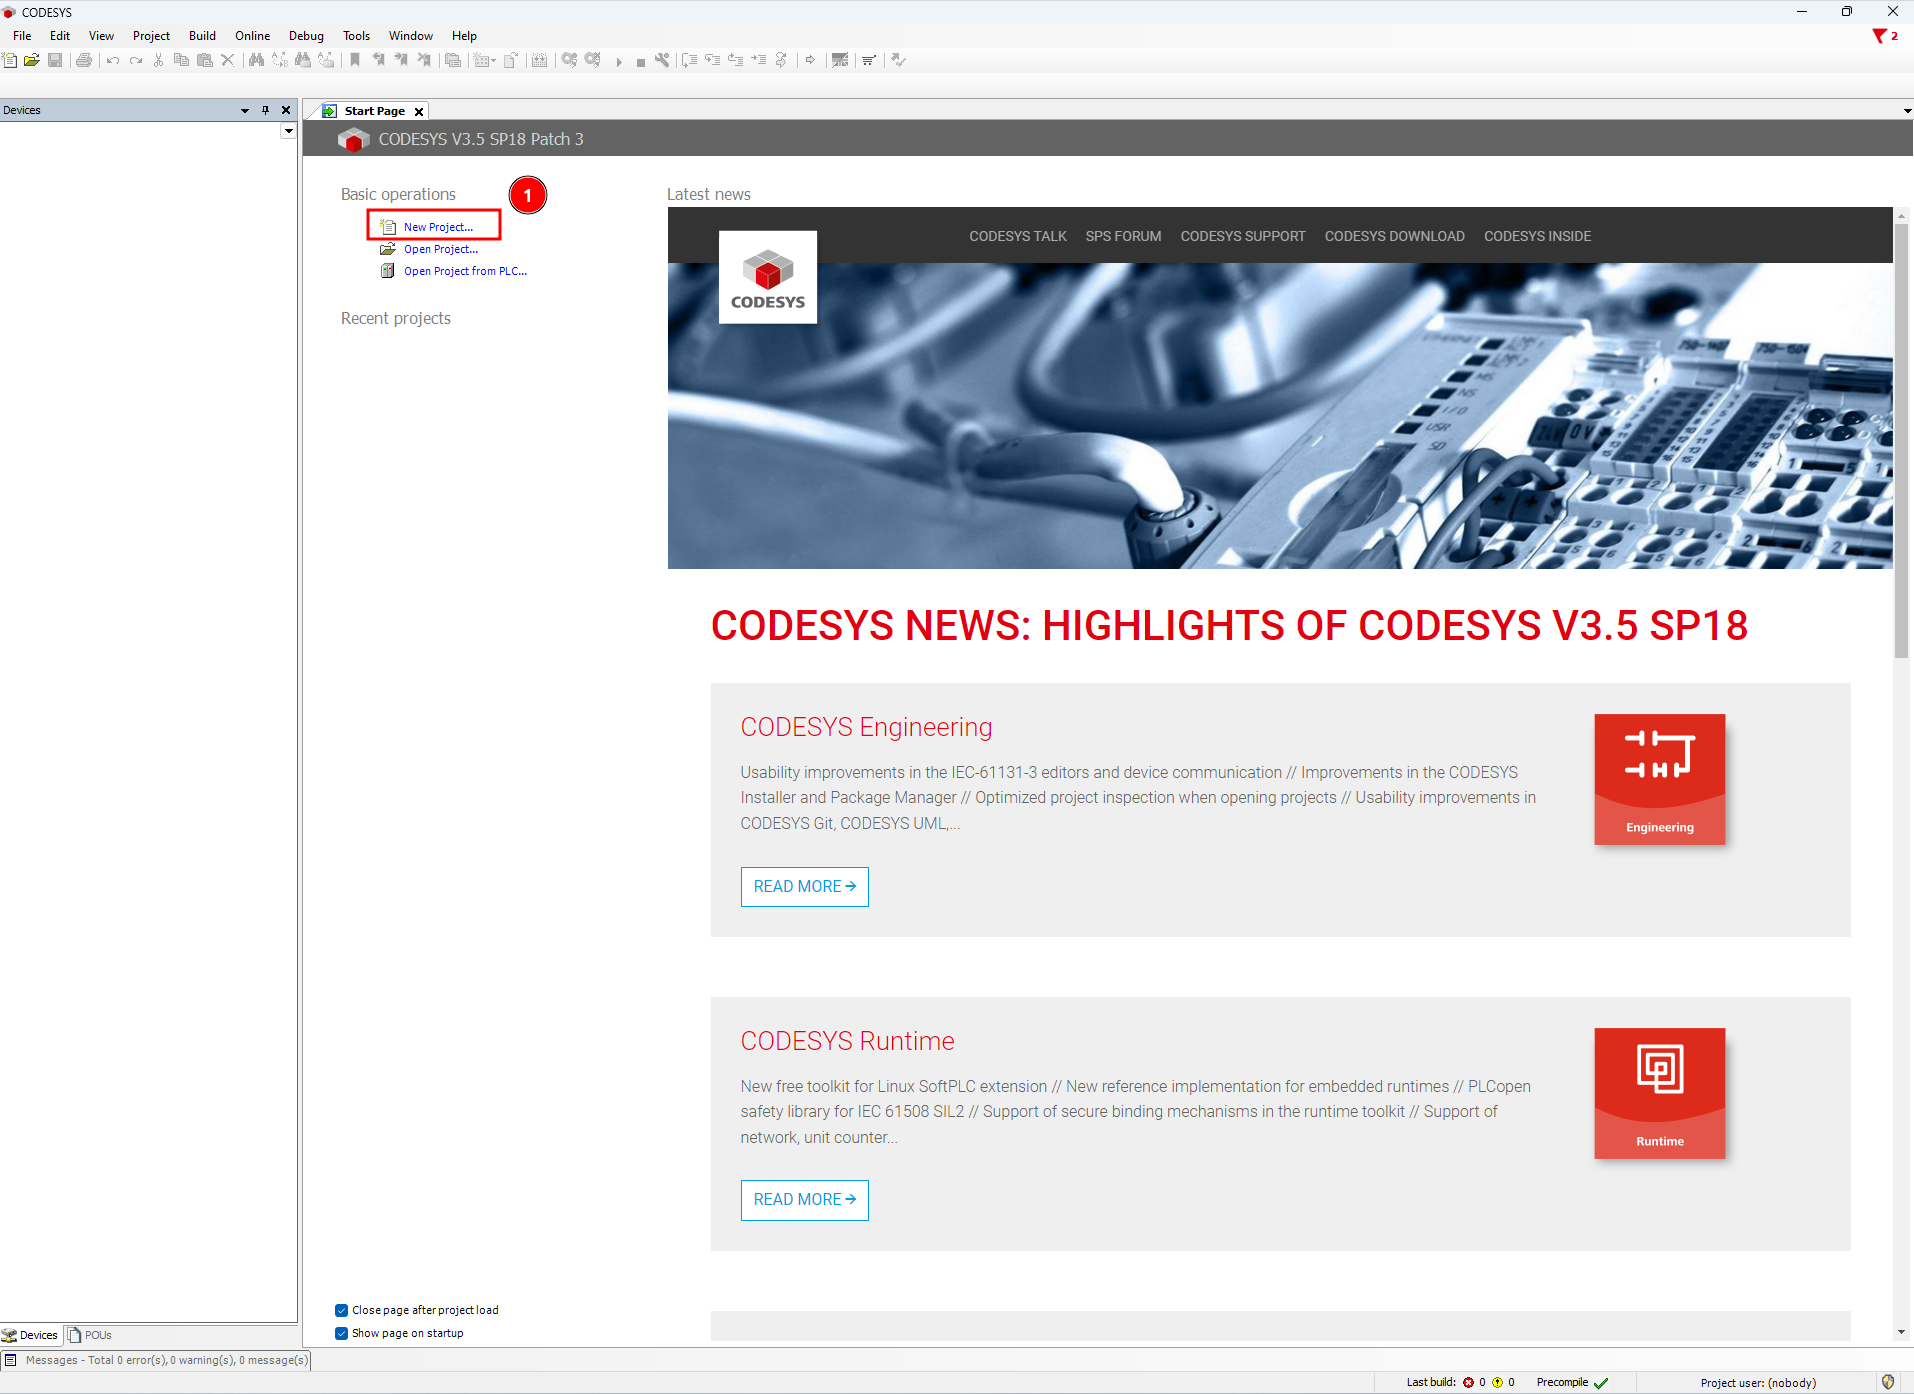
- STEP 1-1: Open the CODESYS Development System V3 software and select "File>New Project..."
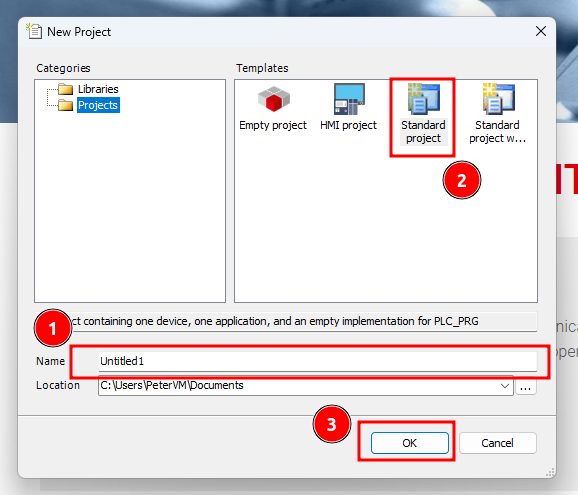
- STEP 1-2: At the "New Project" window, under "Categories" window select "projects", under "Templates" select "Standard project", enter your project name, and then click "OK".
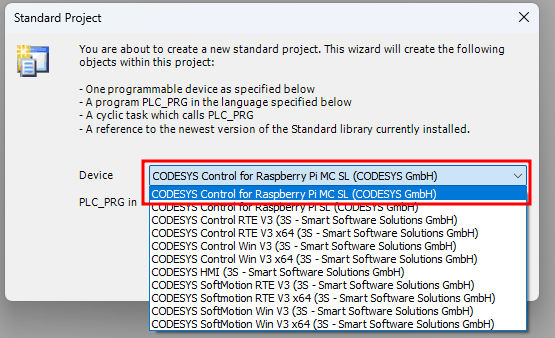
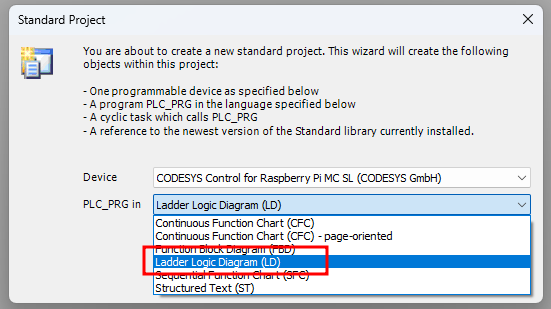
- STEP 1-3: At the Standard Project Window, select "CODESYS Control for Raspberry Pi MC SL (CODESYS GmBH)" for device, and for PLC_PRG in select "Ladder Logic Diagram (LD)", then click "OK".
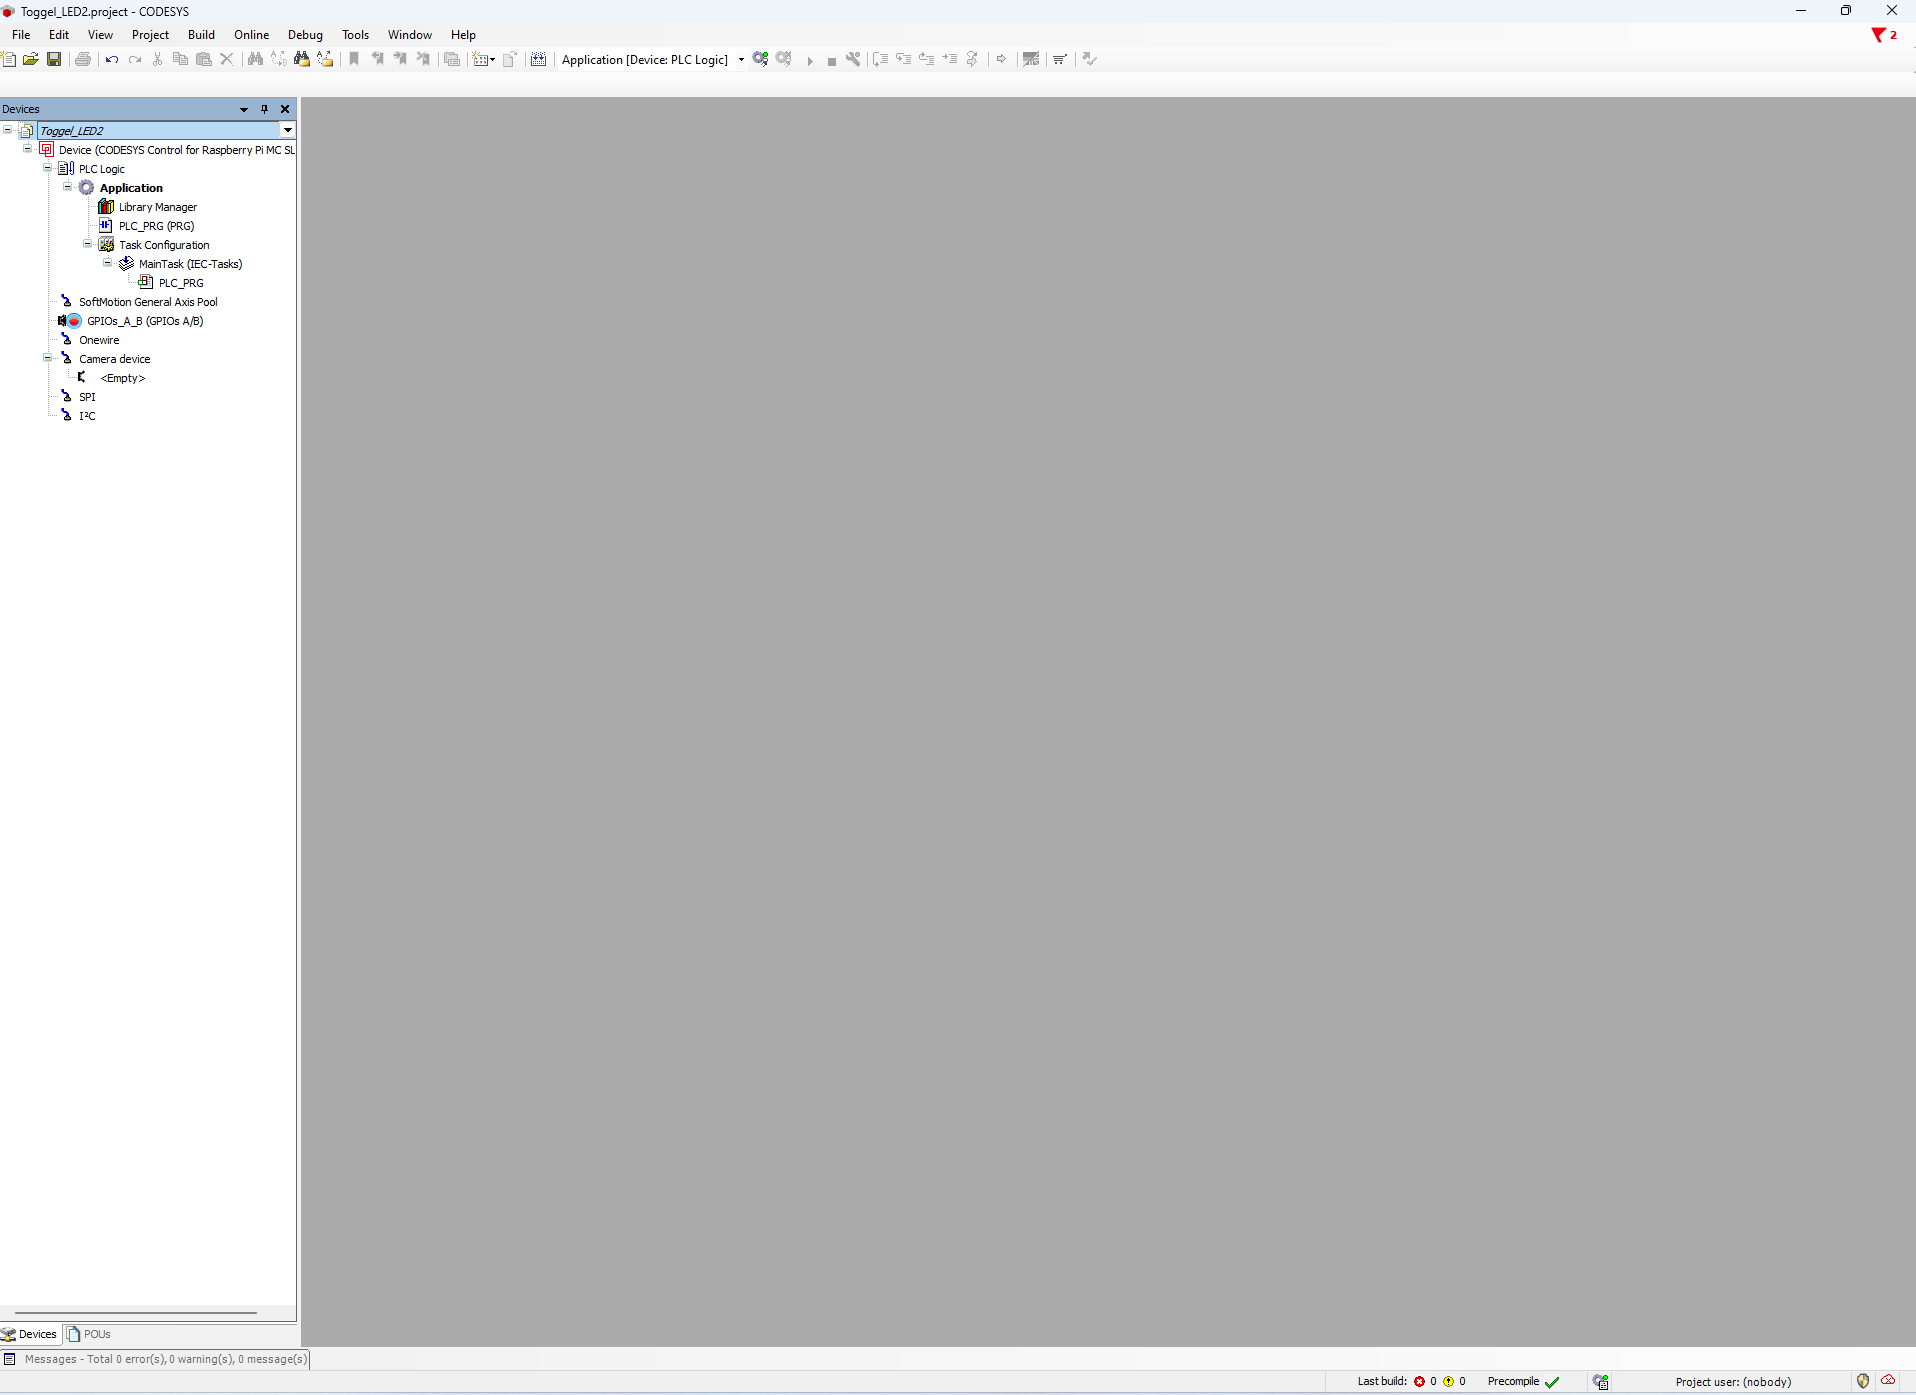
You should see similar sceen after you have setup a new project for Raspberry Pi:
-
STEP 2: Config Edgebox-RPI-200
-
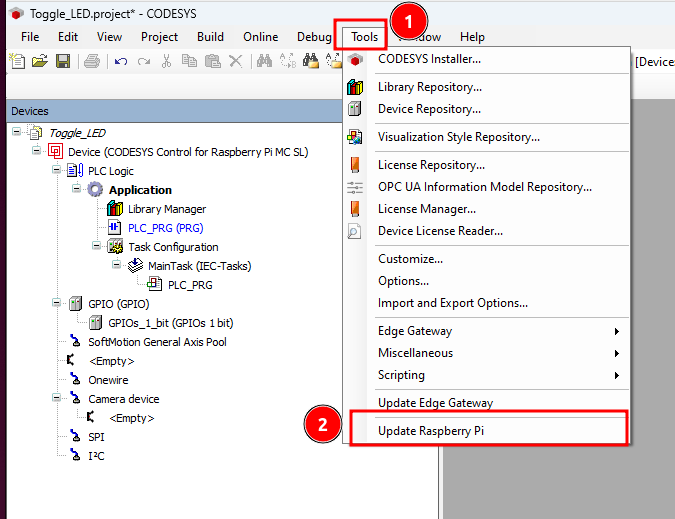
STEP 2-1: Select "Tools>Update Raspberry Pi"
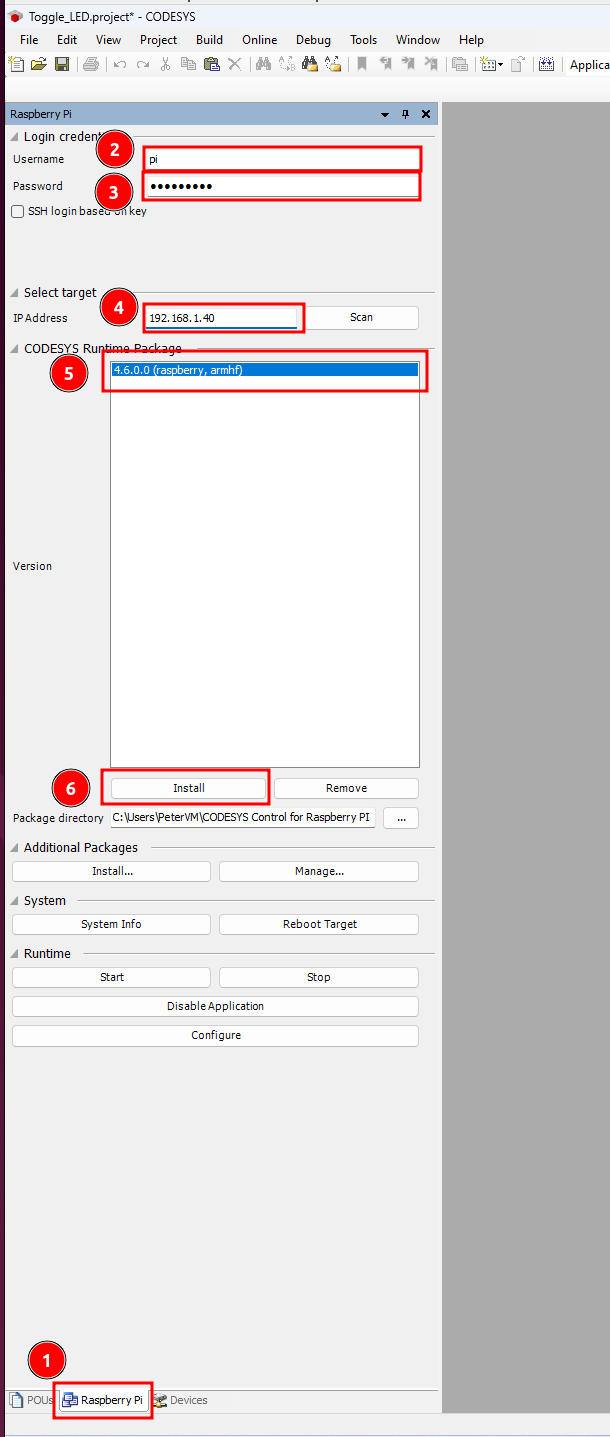
- STEP 2-2: At the Raspberry Pi side panel fill-in the following infomation, followed by click the "Install" button to install the "CODESYS Control for Raspberry Pi MC runtime" into Edgebox-RPI-200.
-
Login credentials
- Username: pi
- Password: raspberry
-
Select Target:
- IP Address: 192.168.1.40
-
CODESYS Runtime Package
- Version: 4.6.0.0(raspberry, armhf)
-
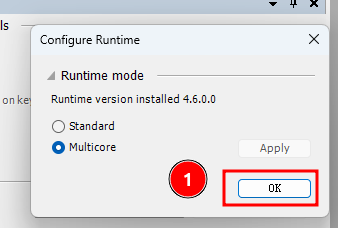
STEP 2-3: At the "Configure Runtime" pop up window select the "runtime mode" according to your preferences, in this case we choose the default "Multicore" and click "OK"
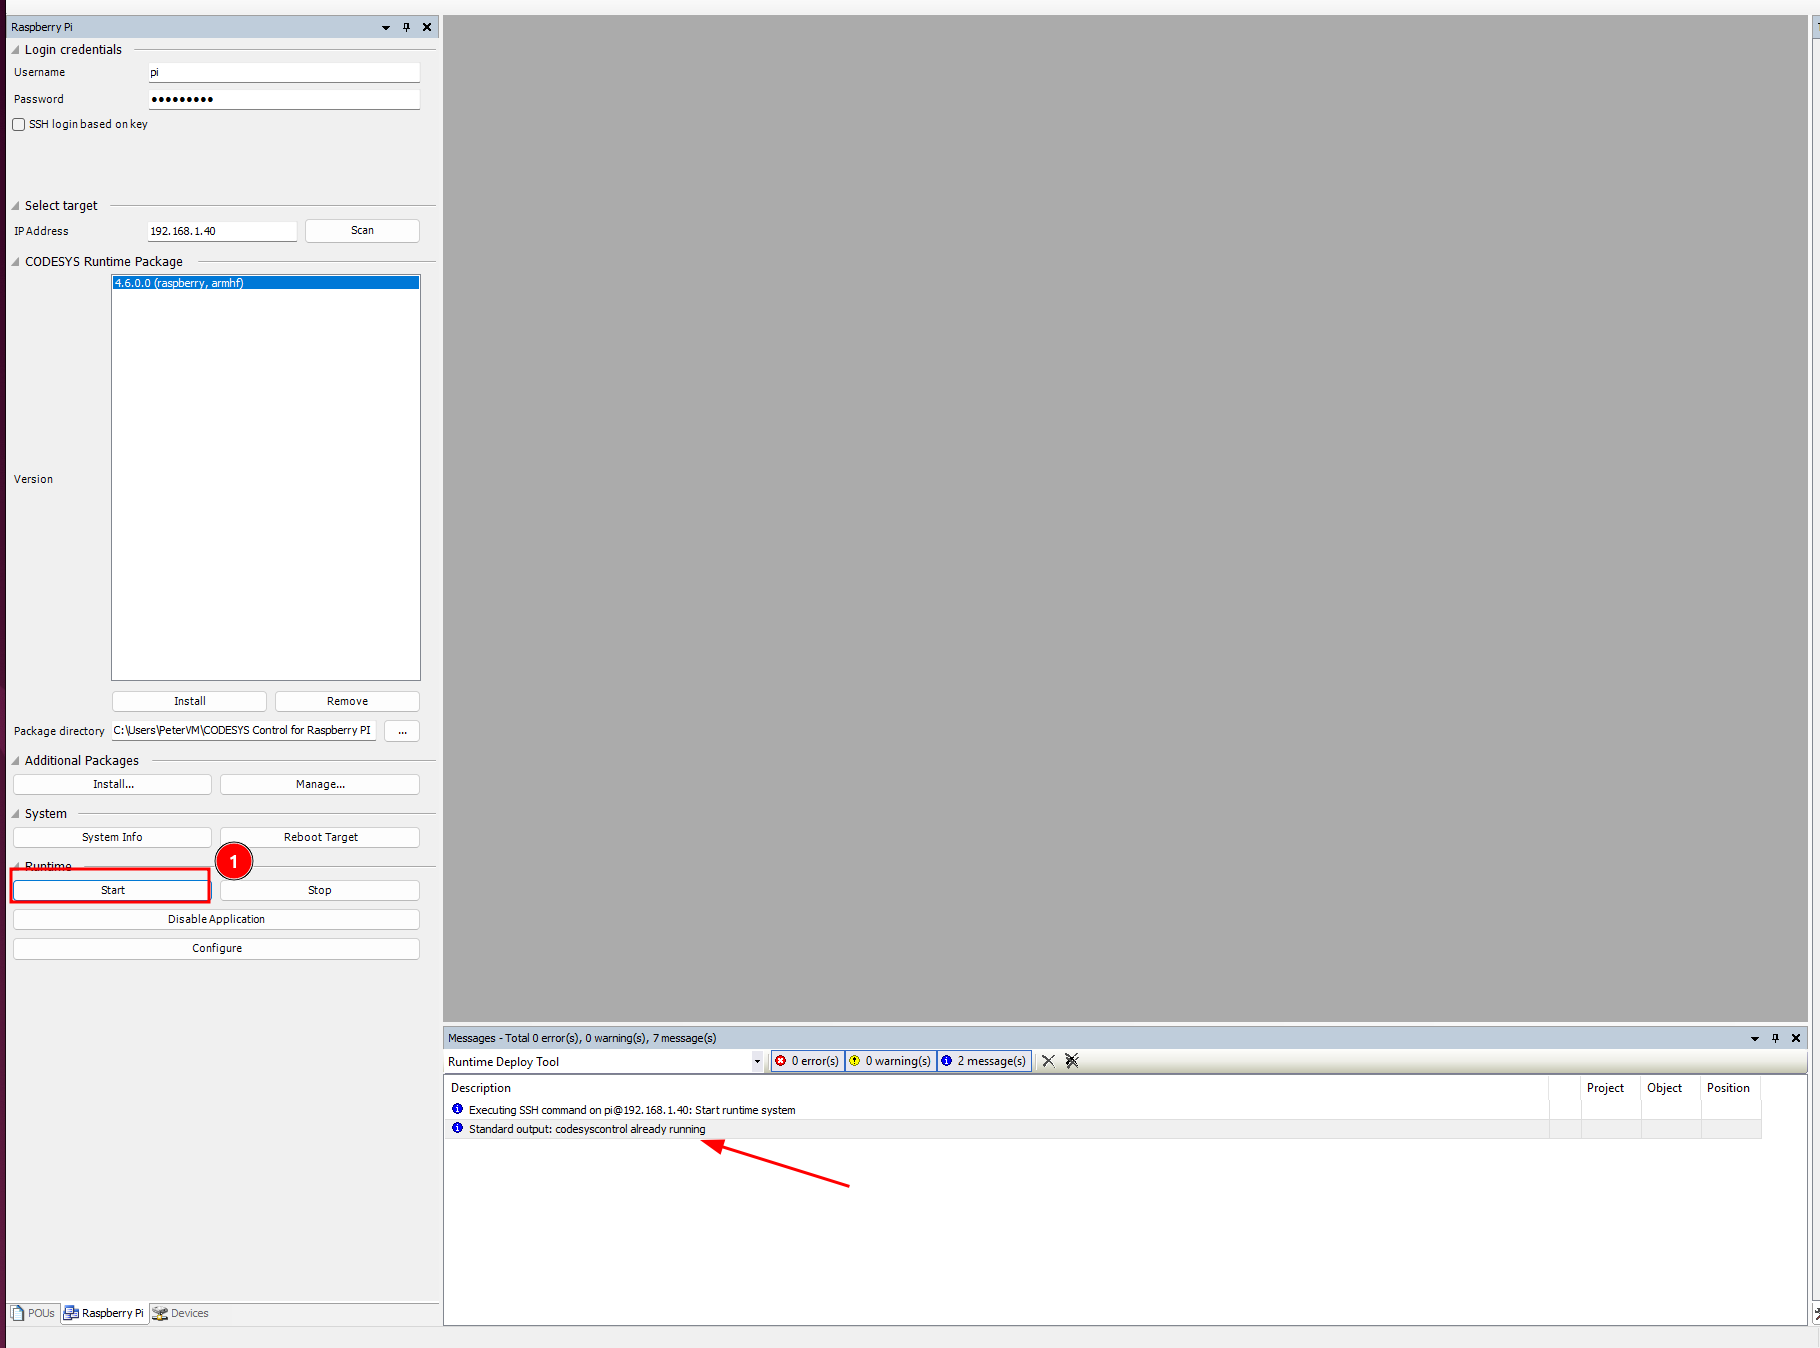
- STEP 2-4: Too confirm the "CODESYS Control for Raspberry Pi MC runtime" is running on "Edgebox-RPI-200", please click "Start" at the "Runtime" section, and then check the "Messages" windows state that "Standard output: codesyscontrol already running"
-
STEP 3: Config GPIO Device:
-
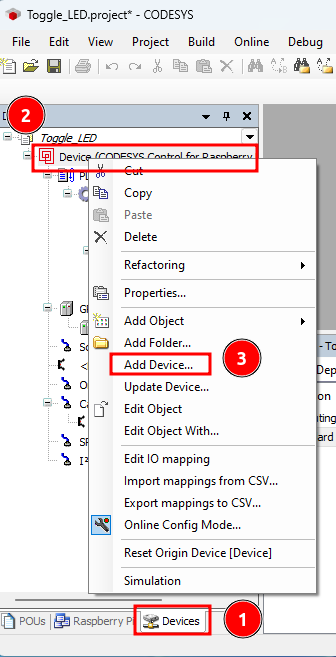
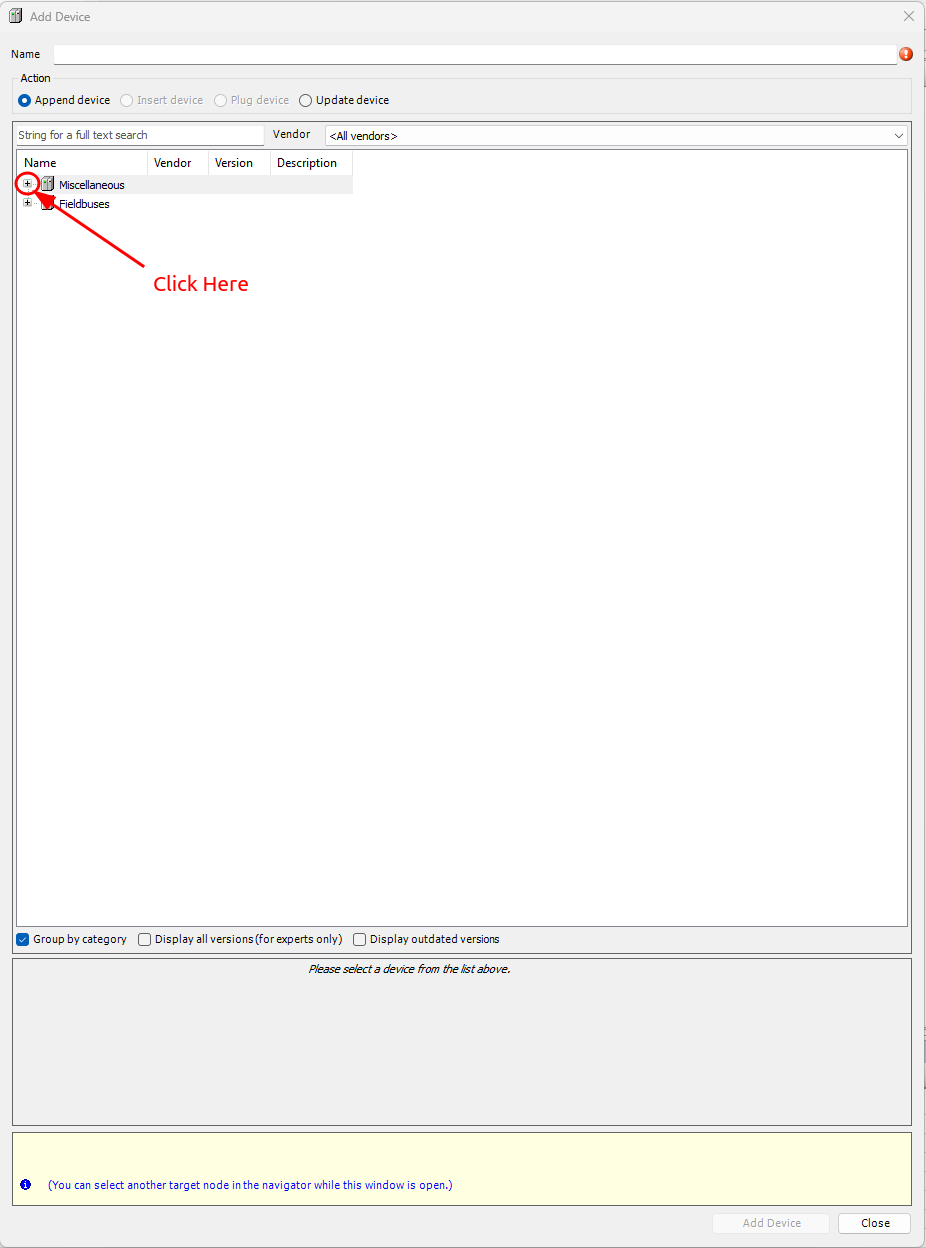
STEP 3-1: Add GPIO at Devices tab, first select "Devices" tab at the left hand side bar, then "right click" the Device select "Add Device" from the dropdown list
- STEP 3-2: At the "Add Device" window, click "+" at the Miscellaneous, and then select the "GPIO" option and then click "Add Device" to confirm.
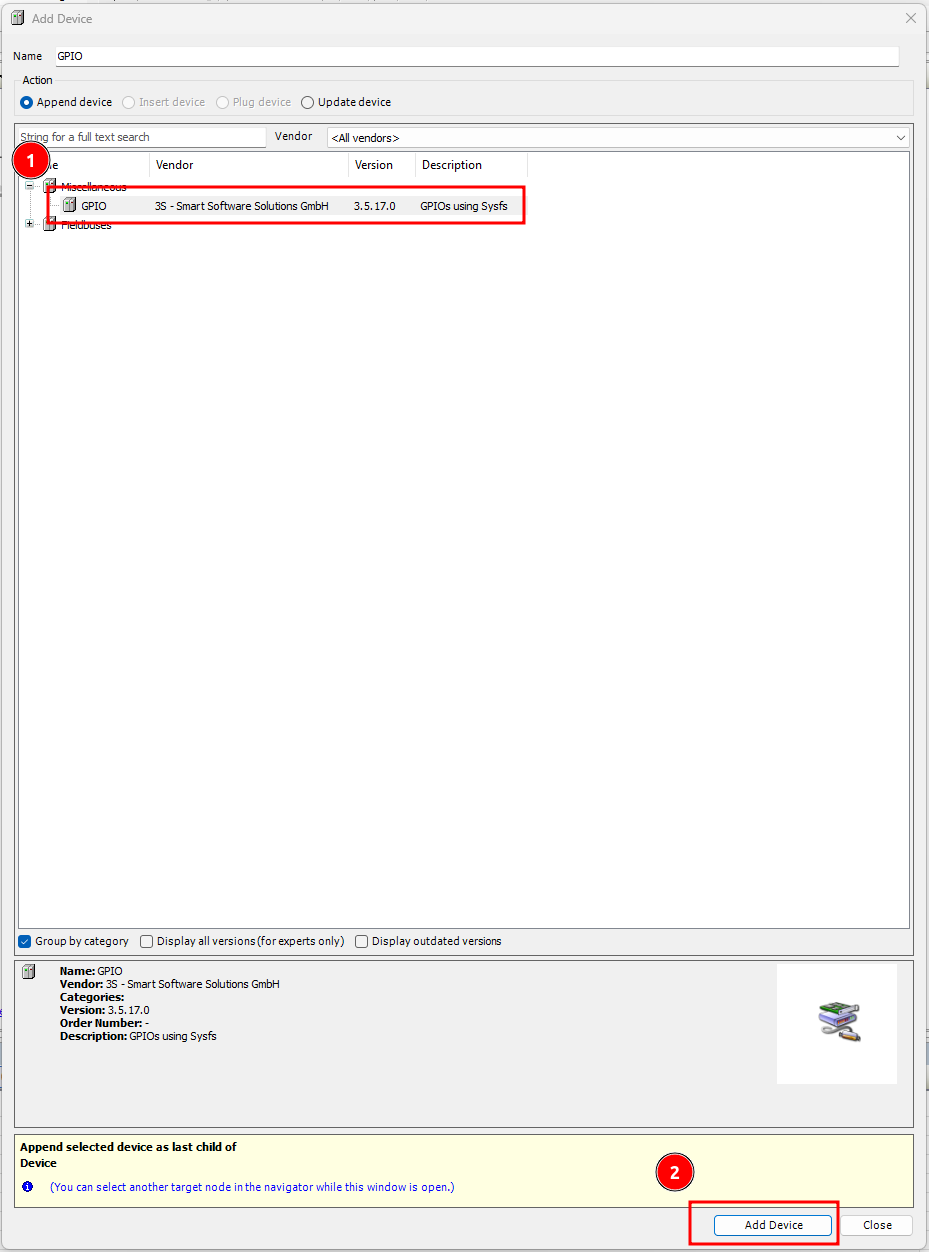
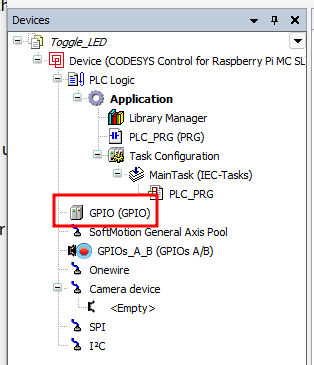
Now you should see a new GPIO device listed in the device tab.
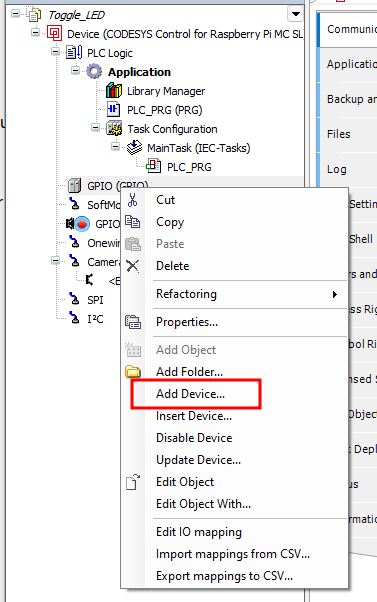
- STEP 3-3: Add 1 bit GPIO device, Right click at the new added "GPIO" device from above step, and then select "Add Device..." at the dropdown list.
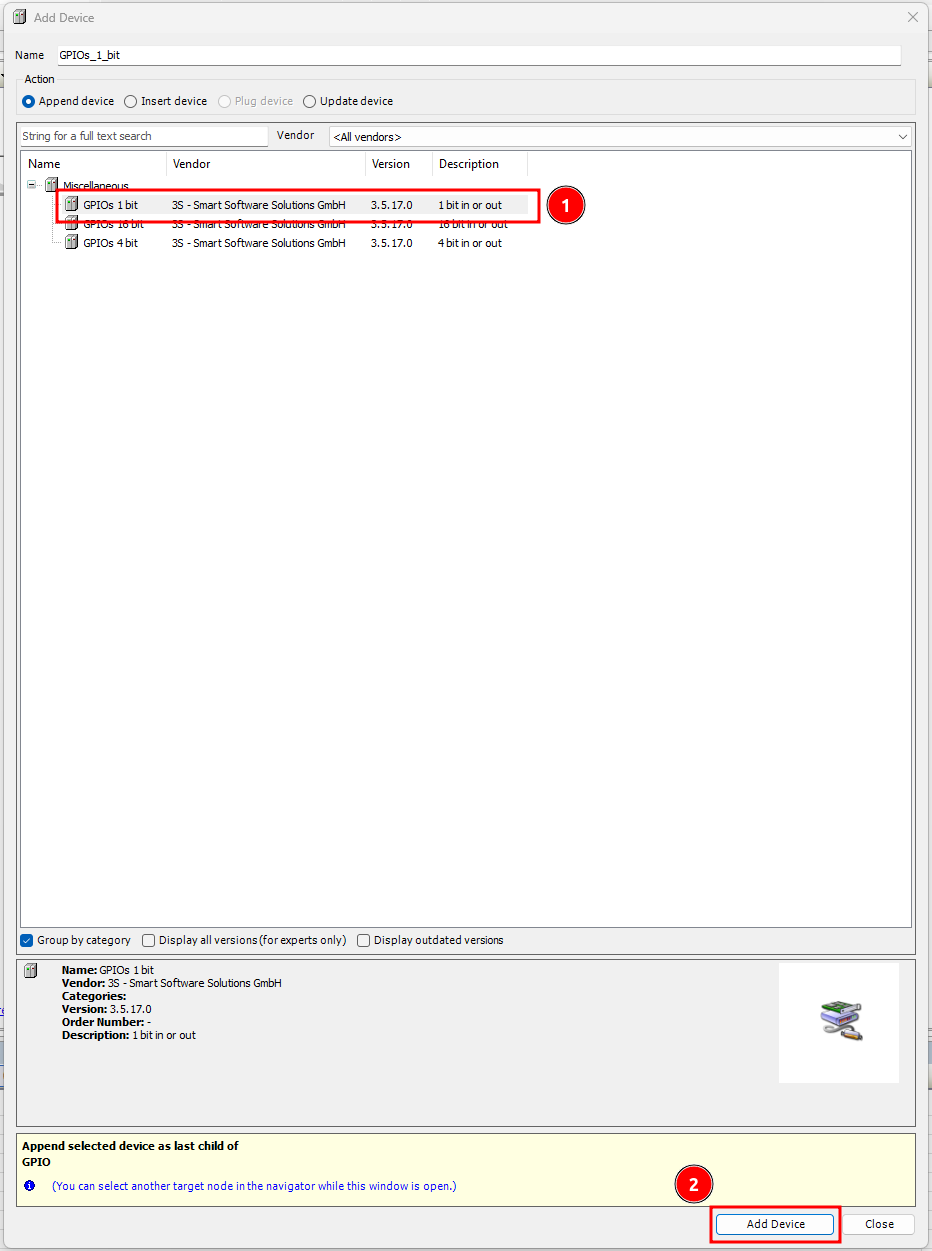
- STEP 3-4: At the "Add Device" window, select "GPIOS 1 bit" option and then click "Add Device" to confirm.
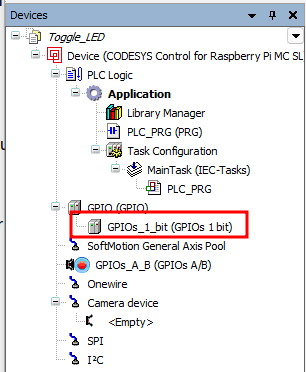
- STEP 3-5: To config the GPIO, double click the new added device from the above step "GPIOS_1_bit(GPIOs 1 bit)" to bring up the main configuration window.
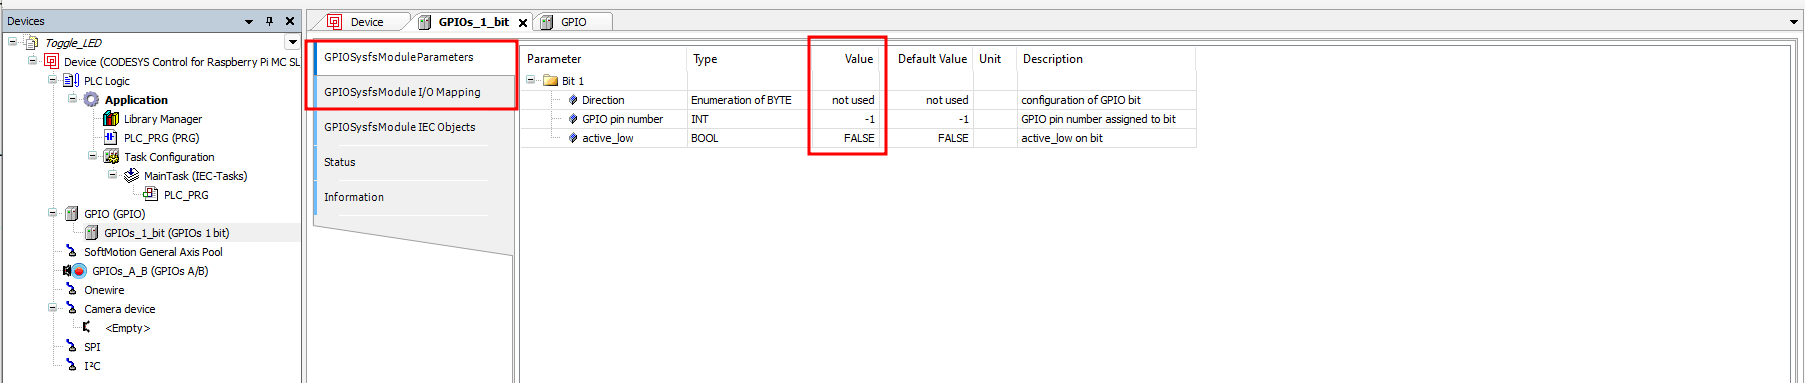
- STEP 3-6: At the "GPIOs_1_bit" Main configuration window, select the first tab "GPIOSysfsModuleParameters" to config and assign the GPIO Direction, Pin Number and current PIN state. In this case we are going to toggle the LED2 on the Edgebox-RPI-200 which is the GPIO Pin 21 according to the datasheet. So the Pin configuration should be the same as below.


- STEP 3-7: Mapping the GPIO I/O, select the second tab "GPIOSysfsModule I/O Mapping", and then assign a variable name to the GPIO, in this case I call it "LED_in" for "GPIO 21 input", and "LED_out" for "GPIO 21 Output".

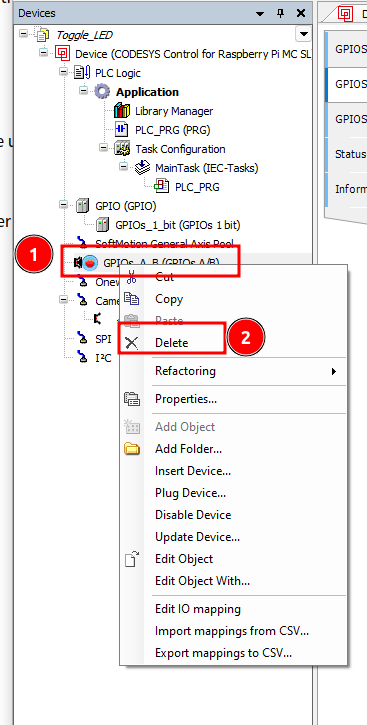
Please Delete the default "GPIOs_A_B(GPIOs A/B)" device otherwise it will interfere with the new added GPIO Device.
-
STEP 4: Connect to Edgebox-RPI-200 in Online Config Mode to test and toggle the LED2 on Edgebox-RPI-200
-
STEP 4-1: First we need to setup the Deivce by double click the "Deivce (CODESYS Control for Raspberry Pi MC SL)", this will bring up the device configuration window.
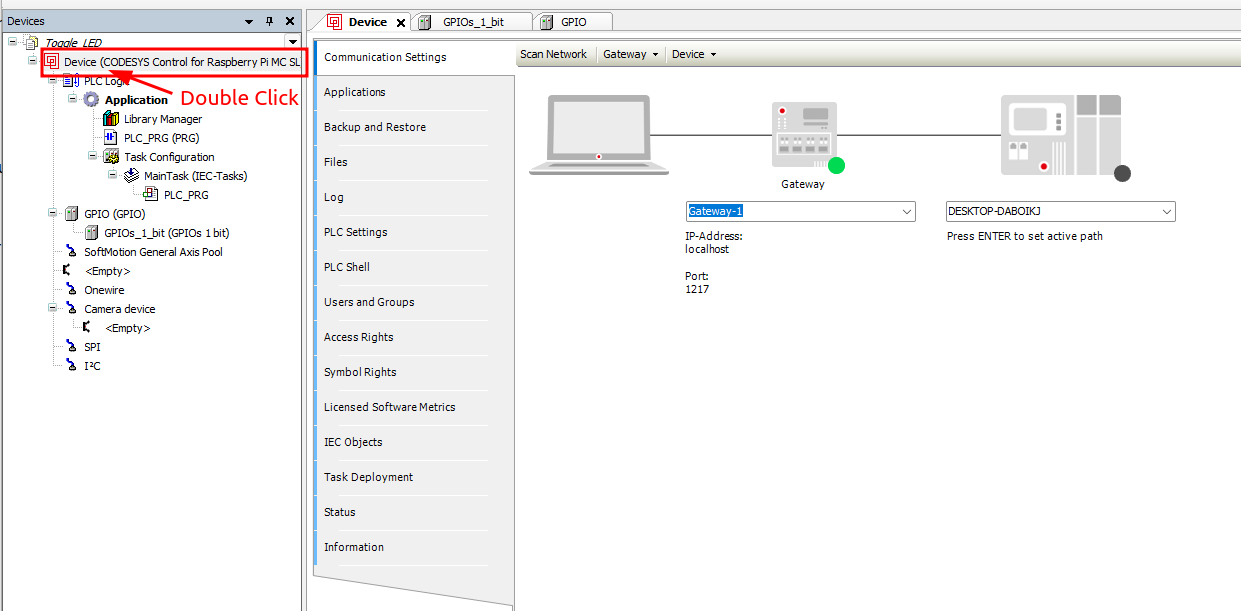
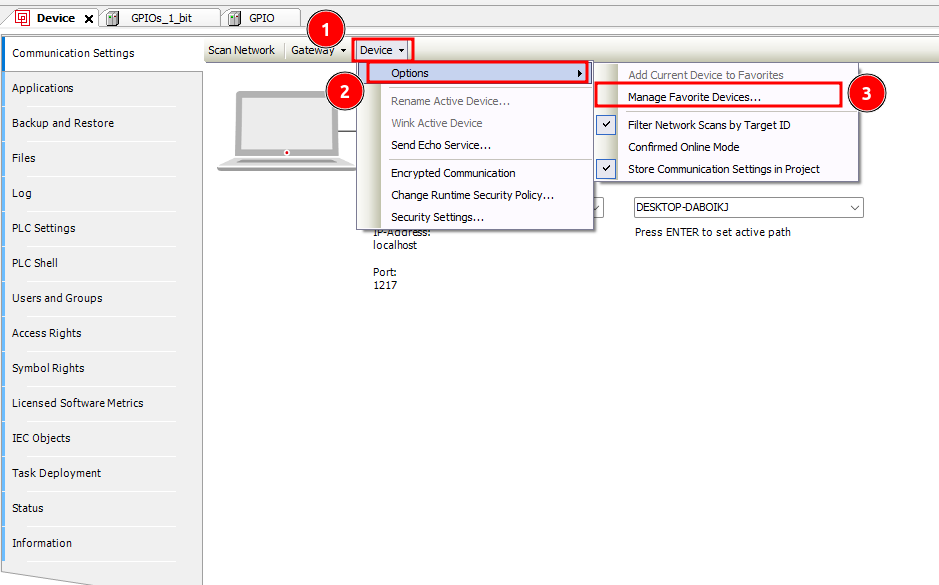
- STEP 4-2: At the "Communication" settings tab of the "device configuration" window, click the "Device" dropdown list and then select "Options>Manage Favorite Devices..."
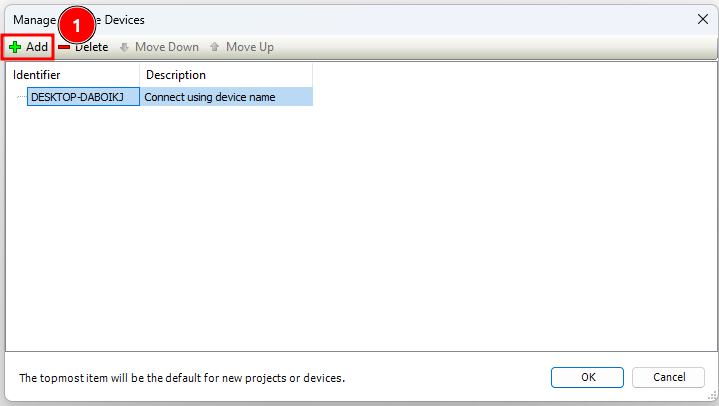
- STEP 4-3: At the "Manage Favorite Devices" window, click "+ Add", at the "Add favorite" window
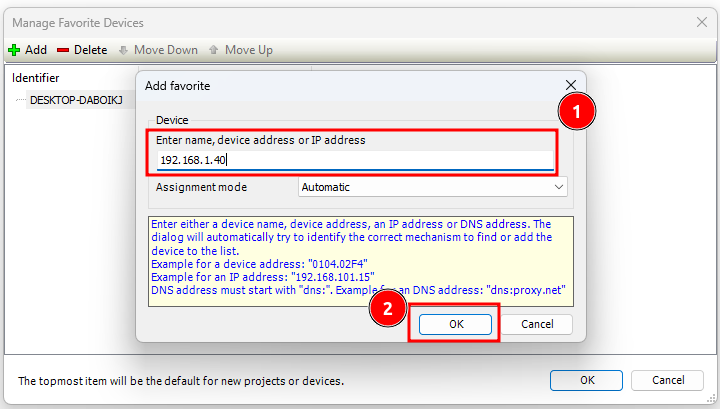
- STEP 4-4: please enter the IP Address of the Edgebox-RPI-200 in the "Enter name, device address or IP address" box.
In my case the IP address of the Edgebox-RPI-200 is "192.168.1.40", and the click "OK" to confirm.
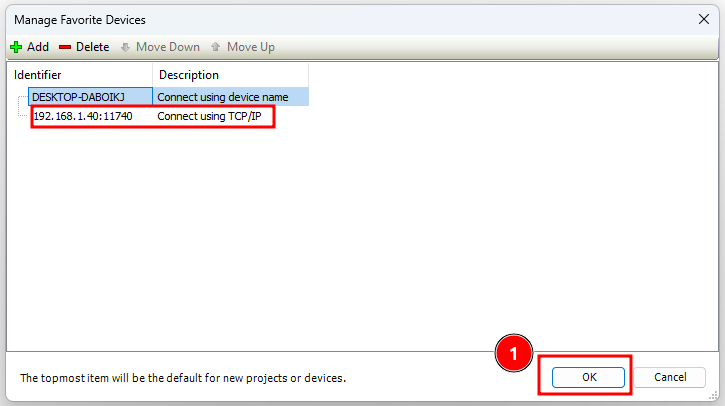
- STEP 4-5: At the "Manage Favorite Devices" window, select the new added IP address device for the Identifier field and then click "OK" to confirm.
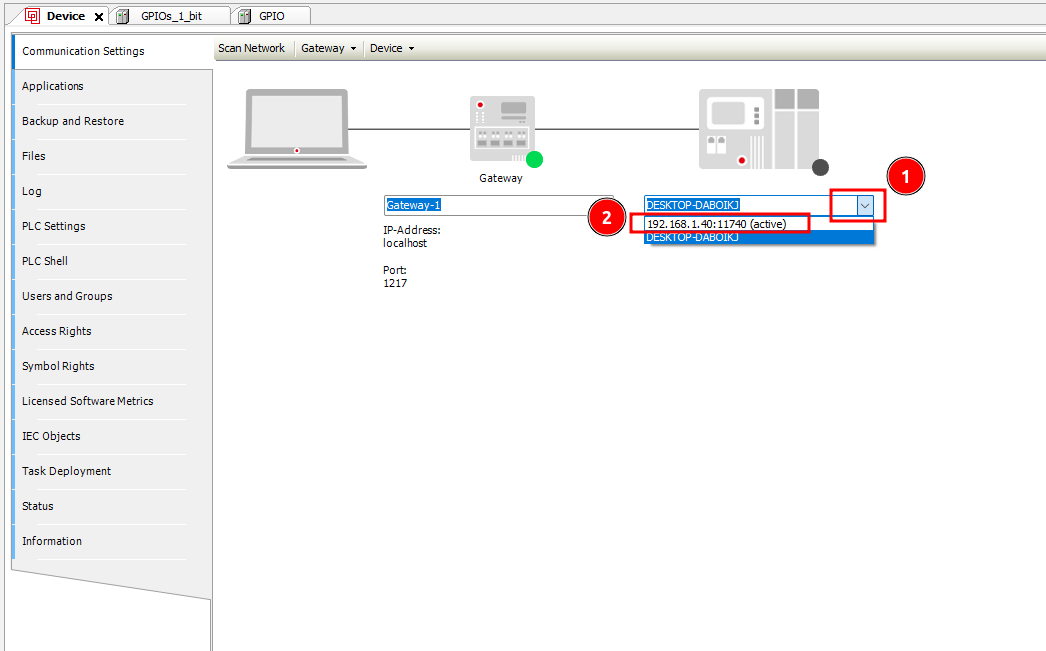
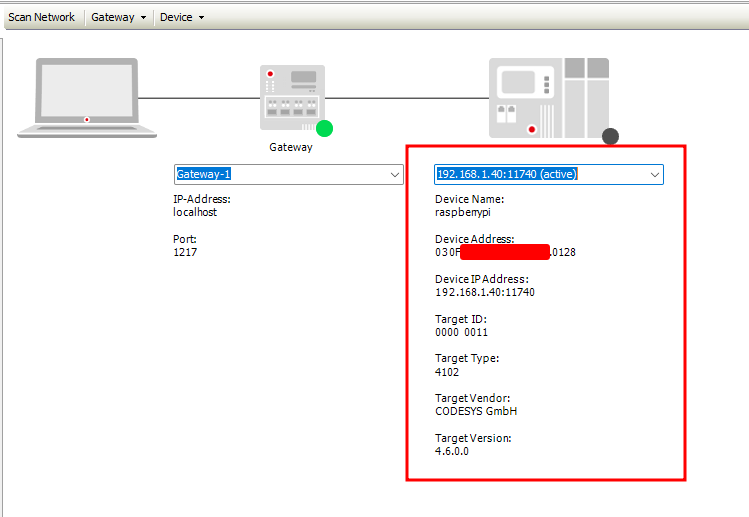
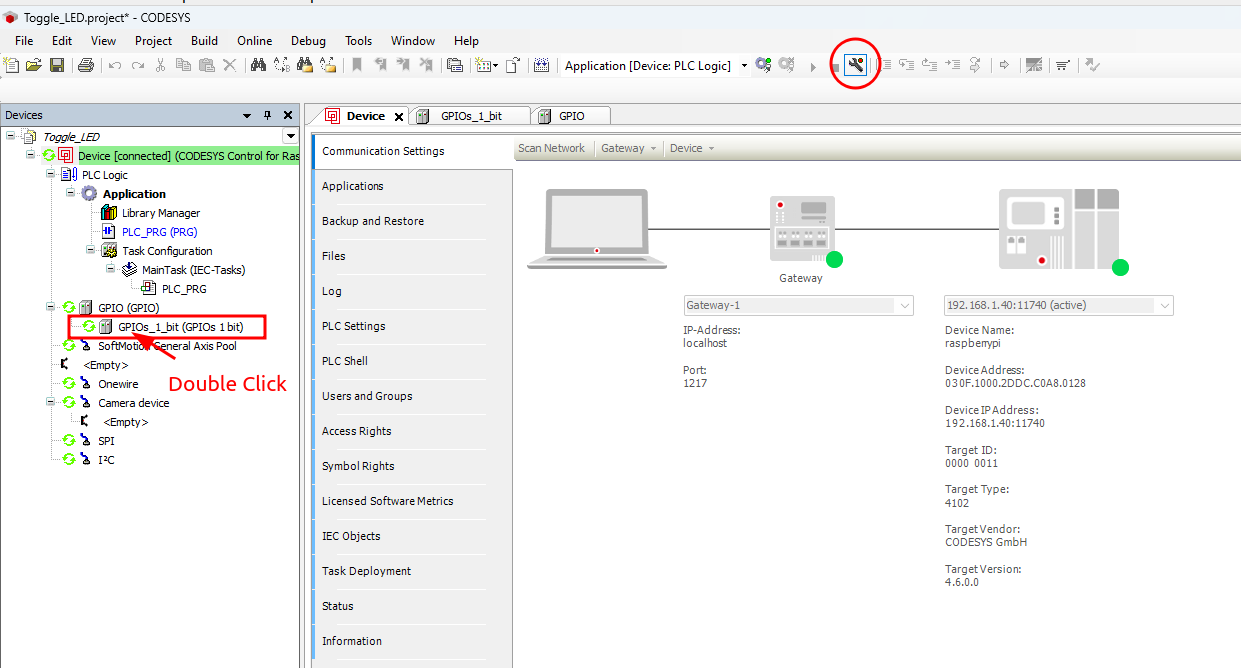
- STEP 4-6: At the "Communication" settings tab of the "device configuration" window, please "click" the dropdown list and select the new added device "IP Address", you should see some information about the connected device below.
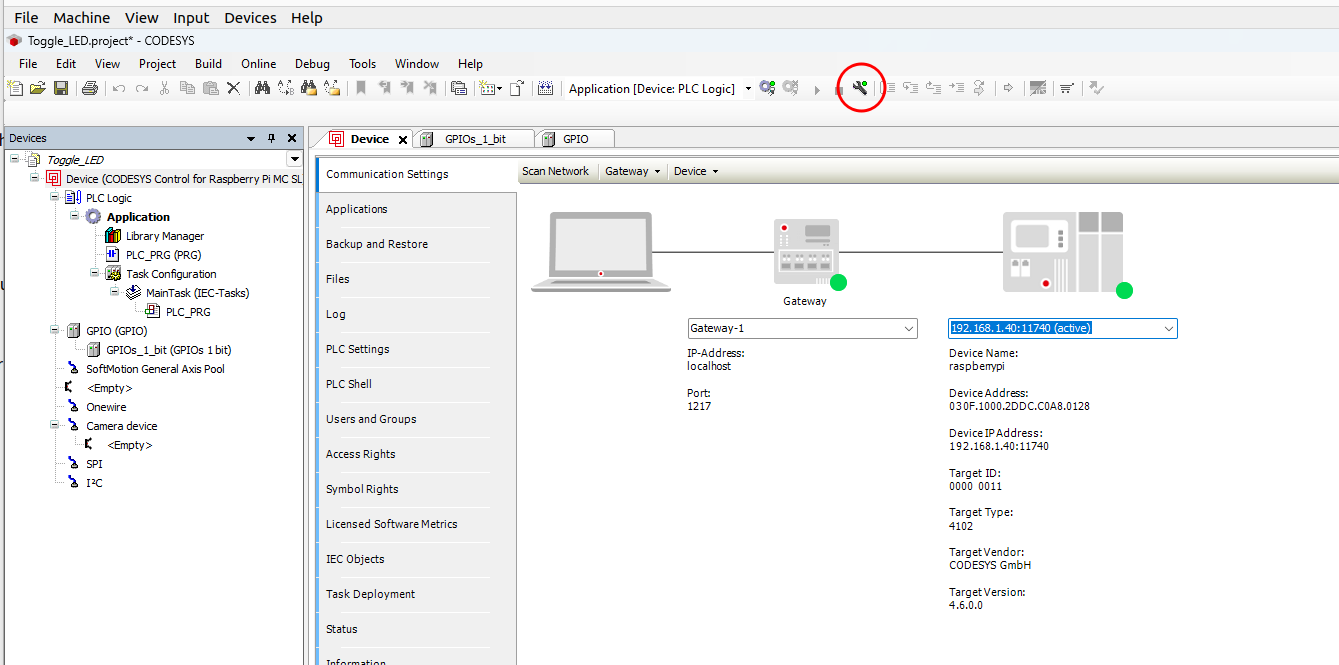
- STEP 4-7: Click the "Online Config Mode..." button from the "toolbar", the icon of the "Online Config Mode..." should turn from green to red, which means the CODESYS Development System V3 IDE is connected to the Edgebox-RPI-200 and you could directly test and interface from IDE with the connected hardware device.
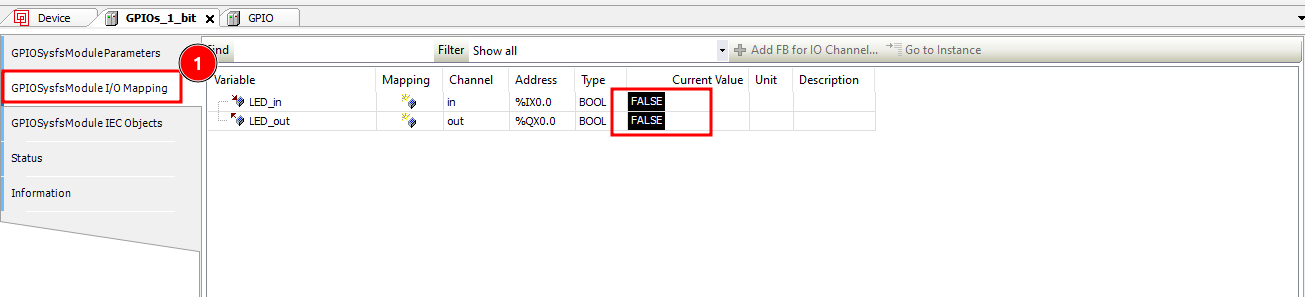
- STEP 4-8: Now Double click the "GPIOs_1_bit(GPIOs 1 bit)" from the device sidebar to open the config window.
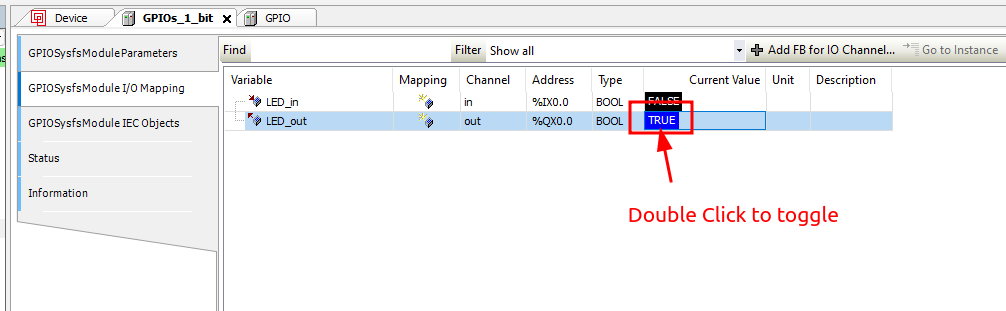
- STEP 4-9: Select the second tab "GPIOSysfsModule I/O Mapping" in the main config window, you should see the "Current Value" should be "False" for both LED_in and LED_out, you can now toggle the LED2 on Edgebox-RPI-200 by double click the "False" at the "Current Value" section to toggle "True/False" for "LED_out", where the LED2 should be turn on/off according to the True/False Value.
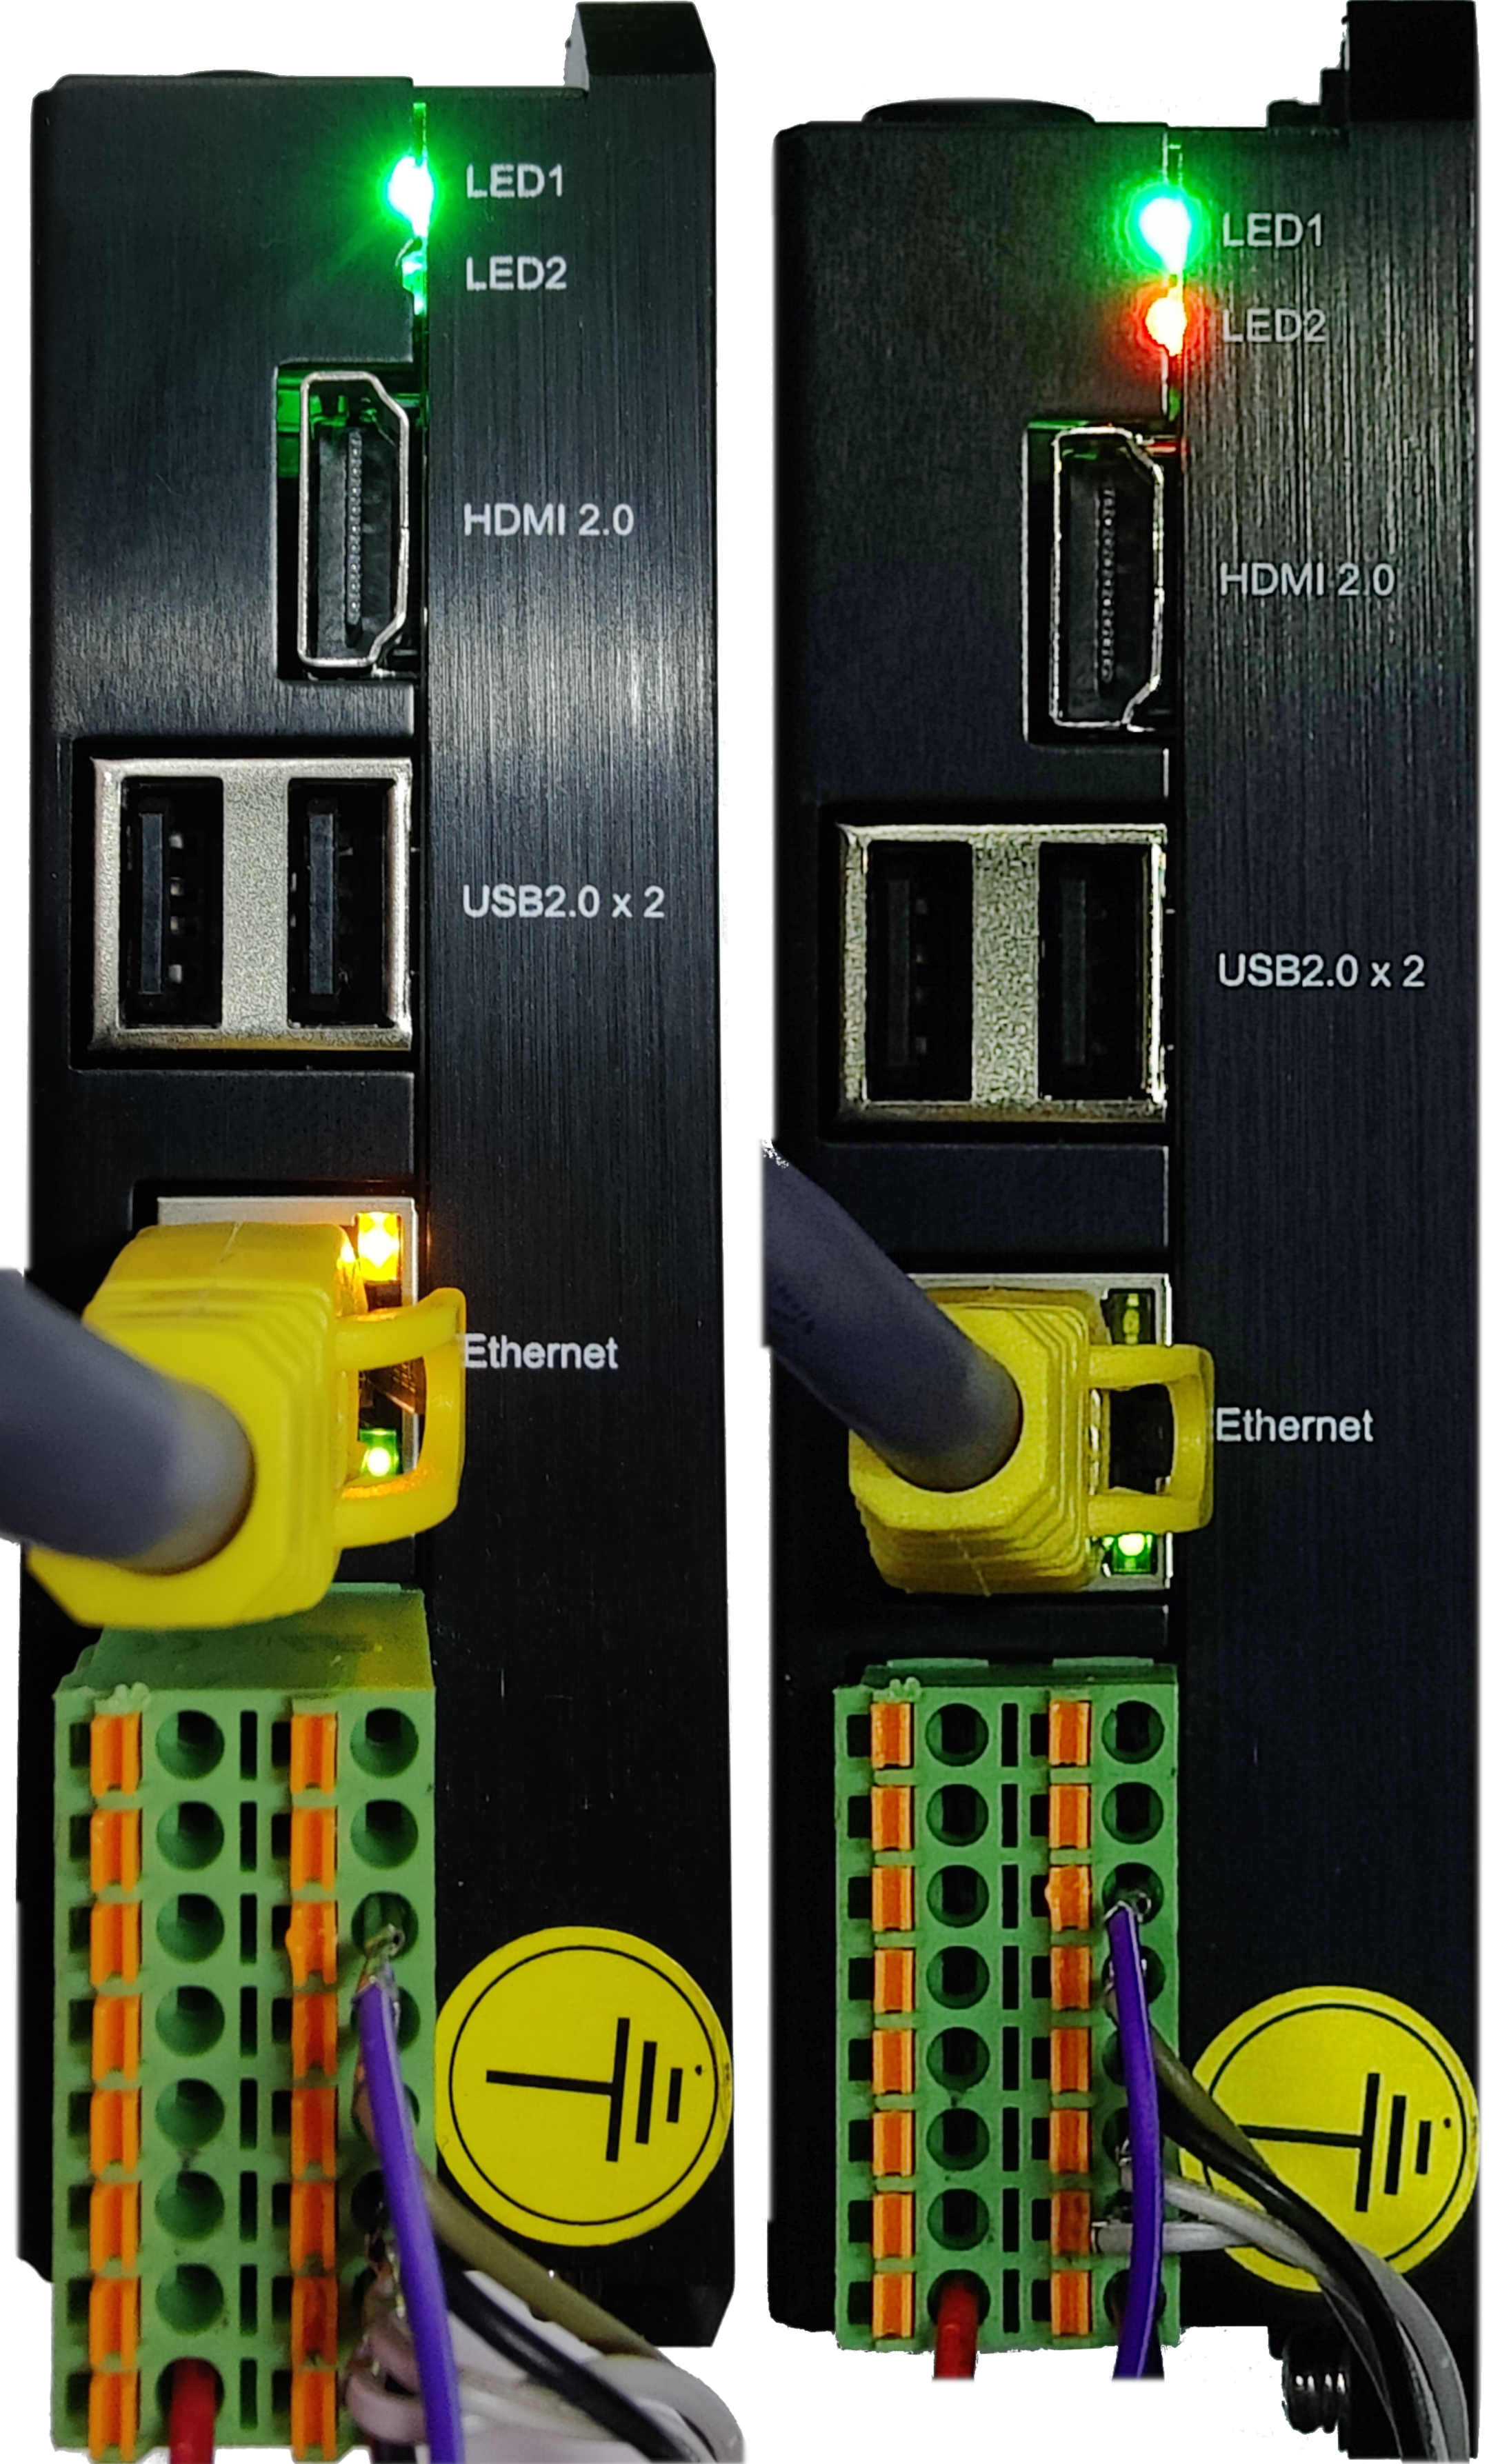
You can check the LED2 on your Edgebox-RPI-200, it should respond to the toggled value:
Tech Support & Product Discussion
Thank you for choosing our products! We are here to provide you with different support to ensure that your experience with our products is as smooth as possible. We offer several communication channels to cater to different preferences and needs.