Tricycle Bot

The Tricycle Bot is a easy-to-assemble and Grove_Compatible DIY Robot platform for education. It includes the eletronic materials and structure materials which could be assembled easily via the guideline. The Tricycle Bot has three floors and five shores between the 2nd and 3th floor, the 3th floor can be fixed many modules via screws and nuts.
Further more, you can fix the Arduino board and breadboard as the heart of the robot in the 2nd floor and each shore can be fixed 1-2 plug-n-play Grove modules as the wings of the robot to strengthen the functions accordingly, such as RGB LEd and ultrasonic Grove module. The supply voltage of Tricycle Bot is provided by a 12V battery holder.

This kit **DOES NOT** include a controller and motor driver.
##Features
- Multi-platform supportted
- Grove Compatible Shores
- Easy-to-assemble
- RF/BLE/Wi-Fi Control Choices
##Part List

| Parts name | Specification | Quantity |
|---|---|---|
| Wheel | Ф64mm*W30mm | 2 |
| Deceleration DC Motor | / | 2 |
| Universal Wheel | 49*32*22mm | 1 |
| Battery Holder | 62*58*30mm | 1 |
| Binding Ties | 20.5*31.8mm | 1 |
| Btm Plate(1st floor) | 220*155*3.8mm | 1 |
| Mid Board(2nd floor) | 220*155*3.8mm | 1 |
| Top Plate(3rd floor) | 160*158*3.8mm | 1 |
| Front Shore | 62*56*3.8mm | 1 |
| Side Shore | 62*31*3.8mm | 4 |
| Rivet_1 | R3090 | 4 |
| Standoffs_2 | M3*22 | 6 |
| Standoffs_3 | M3*55+6 | 4 |
| Screw_4 | PM3*8 | 14 |
| Screw_5 | PM3*25 | 4 |
| Nut_6 | M3*2.3 | 6 |
| Rivet_7 | R2064 | 15 |
| Screw_8 | KM2*10 | 15 |
| Nut_9 | M2*1.5 | 15 |
| Wrench | / | 2 |
| ScrewDriver | / | 1 |
This kit does not include the Arduino/Genuino 101 and breadboard.
##Assembly Introdutions


You could fix any boards you like on Tricycle Bot to drive this Robot Platform, such as Arduino, Raspberry Pi and BeagleBone. And to drive the DC motors and Grove modules, motor cape and Grove cape are good helper for you.
As there are so many boards to choose, here we will make a introduction of how to choose the suitable board for you between Arduino, Raspberry and BeagleBone.
##Work with Arduino
Arduino is the most famous open-source prototyping platform as its easy-to-use hardware and software. We believe that you could DIY a funny and creative robot car with Arduino easily. And as we have so much Grove modules for Arduino, it is convenient to expand function for your robot car, such as LED effect, obstacle detection or remote control(RF/Bluetooth/Wi-Fi).
###Seeeduino V4.2 Seeeduino v4 is an Open Source, Arduino-compatible ATmega328 MCU development board. We think Seeeduino v4 is one of the best Arduino derivatives/compatibles available. Seeeduino v4 is feature rich, much more stable, easy-to-use and even good looking.

###Motor Shield V2.0 The Motor Shield is a driver module for motors that allows you to use Arduino to control the working speed and direction of the motor.

As an expansion board, Base Shield v2 has many Grove connectors, making it convenient for you to use Grove module together. And It is compatible with a series of Arduino products.

###Recommendation Grove Modules
| W2812B LED Strip | Ultrasonic Sensor | Line Finder |
|---|---|---|
 |  |  |
| GET ONE NOW! | GET ONE NOW! | GET ONE NOW! |
| Buzzer | Serial RF | Serial Bluetooth |
|---|---|---|
 |  |  |
| GET ONE NOW! | GET ONE NOW! | GET ONE NOW! |
Click on [Grove System](https://wiki.seeedstudio.com/Grove_System/) to get more available modules.
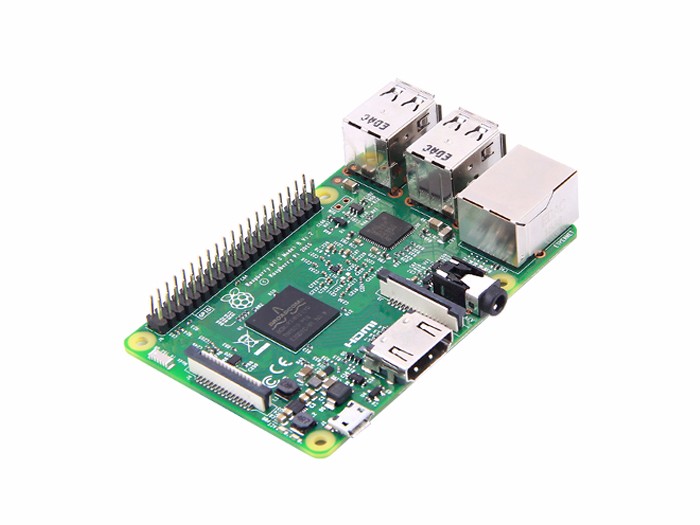
##Work with Raspberry Pi
The Raspberry Pi is one of the most popular single-board computer now, it has much more powerful computing performance than Arduino. As Raspberry Pi is so popular, you can easily find many tutorials of funny projects.
The Raspberry Pi 3 has included integrated 802.11 b/g/n wireless LAN, Bluetooth Classical and LE. You didn’t need additional peripherals to make it wireless. It is 10x the performance of Raspberry Pi 1.
###Raspberry Pi Motor Board v1.0
Raspberry Pi Motor Board lets you drive two DC motors with your Raspberry Pi, controlling the speed and direction of each one independently.

###GrovePi+
GrovePi+ is a system that brings Grove Modules to the Raspberry Pi. It adds support for the newly RaspberryPi Model B+ and Model A+.

###Recommendation Modules
| USB Webcam | OLED Dispaly | GPS Module |
|---|---|---|
 |  |  |
| GET ONE NOW! | GET ONE NOW! | GET ONE NOW! |
Click on [Grove System](https://wiki.seeedstudio.com/Grove_System/) to get more available modules.
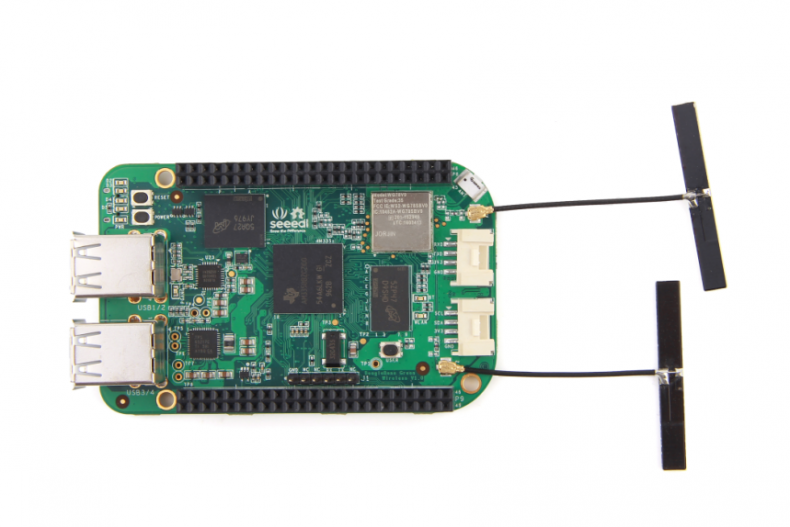
##Work with BeagleBone Board
BeagleBone is also one of the most popular linux single-board computer. Compared with Raspberry, BeagleBone has an advantage on programming Grove module, as its Mraa and UPM library.
###BeagleBone Green Wireless SeeedStudio BeagleBone Green Wireless is based on the open-source hardware design of BeagleBone Black, but it has a high-performance flexible WiFi/Bluetooth interface, making it easier to develop remote controlled, such as BBGW Wi-Fi Car.
###Motor Bridge Cape v1.0 The Motor Bridge Cape can control two stepper motors or four brushed DC motors with 6~15V DC power and about 1A current draw per motor. It also has six servo control interfaces and six expand I\O, which means that you could expand one more robot arm on your robot car.

###Grove Base Cape for BeagleBone v2 Grove Base Cape for BeagleBone v2 is a Grove system expansion board for BeagleBone platform. This cape makes it convenient to connect many transducers (sensors and actuators) available as Grove modules with BeagleBone platform.

###Recommendation Grove Modules
| USB WEBCAM | W2812B LED STRIP | IMU 9DOF |
|---|---|---|
 |  |  |
| GET ONE NOW! | GET ONE NOW! | GET ONE NOW! |
| OLED DISPLAY | DIGITAL LIGHT SENSOR | GPS MODULE |
|---|---|---|
 |  |  |
| GET ONE NOW! | GET ONE NOW! | GET ONE NOW! |
Click on [Grove System](https://wiki.seeedstudio.com/Grove_System/) to get more available modules.
##Simple Example
Here is a simple example of making a Tricycle Bot with Arduino UNO.
###Things we need

- Arduino UNO *1
- Motor Shield V2.0 *1
- Base Shield V2 *1
- Digital RGB LED Flexi-Strip *1
- Grove - Ultrasonic Ranger *1
- Grove - Buzzer *1
###Assemble

- Assemble the Tricycle Bot.
- Fix the Grove modules on the shores and top plate.
- Connect Grove Buzzer to D4, Grove Ultrasonic Ranger to D5 and LED strip to D6 of the Base Shield.
- Finish it!

###Show
This is the video of this simple example.
- This demo Tricycle Bot car is able to detect the obstacle before it, and make a turn when their distances are less than 35CM.
- When the car goes straight, the LED strip will flash in blue,while the car is making a turn, the LED strip will flash in red and the Grove Buzzer will make a noise to warn.
###Coding
- Download the Arduino Library of Motor Shield V2, Grove - Ultrasonic Ranger and LED Strip.
 /*
 * TricycleBotDemo.ino
 *
 * Simple code for Tricycle Bot
 *
 * Copyright (c) 2016 Seeed Technology Limited.
 * MIT license
 *
 */

#include "MotorDriver.h"
#include "Adafruit_NeoPixel.h"
#include "Ultrasonic.h"

#define BEE           4
#define LEDPIN        6
#define LEDNUM        10
#define PIXELS_SPACE  128
#define BRIGHTNESS    150
#define DistanceCM    35

Adafruit_NeoPixel strip = Adafruit_NeoPixel(LEDNUM, LEDPIN, NEO_GRB + NEO_KHZ800);
MotorDriver motor;
Ultrasonic ultrasonic(5);

void setup() {
    // put your setup code here, to run once:
    pinMode(BEE, OUTPUT);
    strip.setBrightness(BRIGHTNESS);
    strip.begin();
    strip.show();
    motor.begin();
    pixelStart();
}

void loop() {

    // put your main code here, to run repeatedly:
    long RangeInCentimeters;
    RangeInCentimeters = ultrasonic.MeasureInCentimeters();

    if (RangeInCentimeters < DistanceCM) {
        turnRight();
        beep();
        pixelState2();
    }
    else {
        goStraight();
        pixelState1();
    }
    delay(100);
}

void goStraight() {
    motor.speed(0, 100);
    motor.speed(1, 100);
}

void turnRight() {
    motor.speed(0, -100);
    motor.speed(1, 100);
}

//go straight
void pixelState1() {
    for (uint32_t t = 0; t < (PIXELS_SPACE * LEDNUM); ++t) {
        for (int i = 0; i < (LEDNUM / 2); i++) {
            strip.setPixelColor(((LEDNUM / 2) - i -1) , triangular_color((t + i * PIXELS_SPACE) % (PIXELS_SPACE * LEDNUM)));
            strip.setPixelColor(i + 5, triangular_color((t + i * PIXELS_SPACE) % (PIXELS_SPACE * LEDNUM)));
        }
        strip.show();
    }
}

//turn right
void pixelState2() {
    for (int i = 0; i < 3; i++) {
        for (int j = 0; j < LEDNUM; j++) {
            strip.setPixelColor(j, 250, 0, 0);
            strip.show();
        }
        delay(50);
        for (int j = 0; j < LEDNUM; j++) {
            strip.setPixelColor(j, 0, 0, 0);
            strip.show();
        }
        delay(50);
    }
}

void pixelStart() {
    for (int i = 0; i < LEDNUM; i++) {
        for (int j = 0; j< 255; j++) {
            strip.setPixelColor(i, 0, j, 0);
            strip.show();
        }
        delay(50);
    }
}

uint32_t triangular_color(uint32_t t) {
    uint32_t c = 0;

    if (t < 256) {
        c = strip.Color(0, 0, t);
    } else if (t < 512) {
        c = strip.Color(0, 0, 511 - t);
    }

    return c;
}

void beep() {
    digitalWrite(BEE, HIGH);
    delay(100);
    digitalWrite(BEE, LOW);
}
##Attachments
Tech Support & Product Discussion
Thank you for choosing our products! We are here to provide you with different support to ensure that your experience with our products is as smooth as possible. We offer several communication channels to cater to different preferences and needs.