How to Write an ArduPy Library
![]()
In this wiki, we will introduce how to write an ArduPy library from scratch and used an example to fully walk through the workflow. By the end of this, you will have a understanding of how to write an ArduPy library and implement into your ArduPy projects! You can convert your favorite Arduino library into MicroPython form factor and use it under ArduPy!
This would require some software programming knowledge, but it should be simple to follow through some key points.
Hardware Required
Get Started
Let's walk you through an example and get you better understanding!
1. Arduino Libraries
First thing first, to write an ArduPy library, you will need to find the library that is already written in Arduino library form. This should be very easy as most our modules will support Arduino and will have an Arduino library on our github. Simply search the module on the github and find the repository.
In this wiki, I will take the Grove - Temp&Humi&Barometer Sensor (BME280) as an example and here is the Grove-BME280 Arduino Library.
!!!Note The first thing to do is better to check that the library is working on the Arduino, so that it won't be a program later on. Simply upload one of the example to see if there is any errors.
2. ArduPy Library Structure
Let's first walk through an ArduPy library structure so we know what is needed!
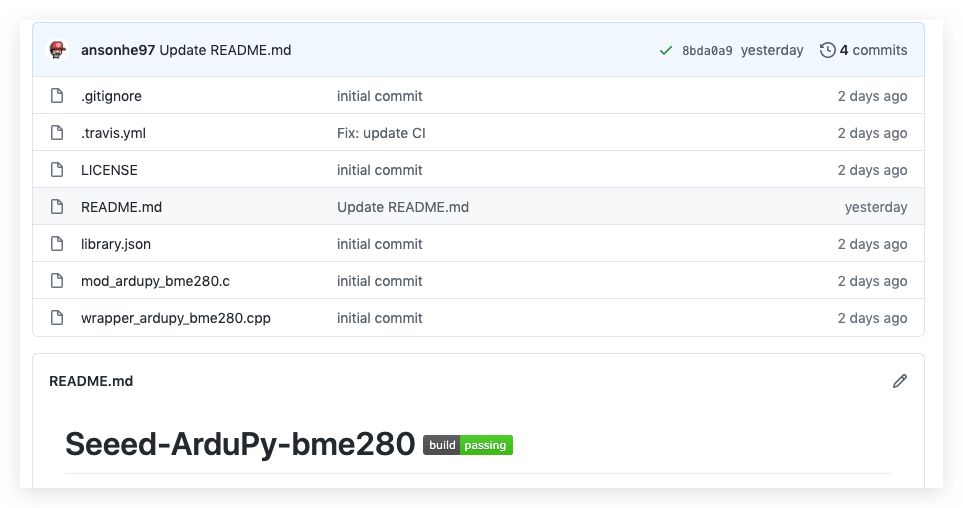
This is the ArduPy library for Grove-BME280 and this is what a ArduPy library consist of:
-
.gitigore- specifies intentionally untracked files to ignore for git -
.travis.yml- our CI test files which can be ignored -
LICENSE- the license of the library -
README.md- README doc -
library.json- ArduPy json file for the library -
mod_ardupy_bme280.c- core code that converts c to micropython -
wrapper_ardupy_bme280.cpp- A wrapper for code
Therefore the important files are only library.json, mod_ardupy_bme280.c and wrapper_ardupy_bme280.cpp where others are not needed if you're writing for you own ArduPy library.
!!!Note Although it is not necessary, it is also better to contain all the files list above (LICENSE and README makes it user-friendly)
3. Writing the library.json
Let's get it started by writing the library.json first. This is the json files to locate the dependent libraries. For the Grove-BME280 it looks like this:
{
    "name": "Seeed ArduPy BME280 ",
    "version": "1.0.0",
    "repository": {
        "type": "git",
        "url": "https://github.com/Seeed-Studio/seeed-ardupy-bme280.git"
    },
    "dependencies": [{
        "name": "Seeed_Arduino_BME280",
        "url": "https://github.com/Seeed-Studio/Grove_BME280.git"
    }]
}
where name is the name of the ArduPy library and the url under repository is url of the library. This url is used ArduPy-aip to search. You replace to your own github repo.
Under dependencies, this is the dependent library (Arduino library):
nameis the name of the Arduino library for later usage, you may also use the formatSeeed_Arduino_MODULE-NAME.urlis the url for the dependent Arduino library.
4. Writing the wrapper_ardupy_MODULE.cpp
This is the wrapper for the converting c to MicroPython code. Let's check wrapper_ardupy_bme280.cpp for example.
First, need to include the dependent library, something like this:
#include "Seeed_Arduino_BME280/Seeed_BME280.h"
!!!Note Make sure that the name matches.
Include the share bindings:
extern "C"{
#include "py/mphal.h"
#include "py/nlr.h"
#include "py/objtype.h"
#include "py/runtime.h"
#include "shared-bindings/util.h"
}
Initializing the module with format as followed:
#define bme280 (*(BME280*)self->module)
void * operator new(size_t, void *);
where bme280 and BME280 will be replaced to your module name.
Next up gets a bit tricky. Follow the same format as follow to map functions from the Grove-BME280.
extern "C" {
    void common_hal_bme280_construct(abstract_module_t *self){
        self->module = new (m_new_obj(BME280)) BME280();
        bme280.init();
    }
    void common_hal_bme280_deinit(abstract_module_t *self){
        bme280.~BME280();
    }
    float common_hal_bme280_get_temperature(abstract_module_t *self){
        return bme280.getTemperature();
    }
    uint32_t common_hal_bme280_get_pressure(abstract_module_t *self){
        return bme280.getPressure();
    }
    uint32_t common_hal_bme280_get_humidity(abstract_module_t *self){
        return bme280.getHumidity();
    }
}
where common_hal_bme280_construct is the initializing function to create an object and it has a format of:
self->module = new (m_new_obj(BME280)) BME280();
bme280.init()
Replace BME280 to your module. Initialize the module using bme280.init() of which comes from here.
For functions, it simply called from the Arduino side which looks like this:
float common_hal_bme280_get_temperature(abstract_module_t *self){
    return bme280.getTemperature();
}
getTemperature() comes from here.
You should be able to see the pattern here where you simply map the functions from Grove-BME280 following the above format.
Functions that takes Parameters
- If your module have functions that take parameters, please read through here.
Let's take an example here in the Seeed_Arduino_LIS3DHTR where it takes one parameter. This function would convert to this in the seeed-ardupy-lis3dhtr.
From this:
void setHighSolution(bool enable);
converts to:
void common_hal_lis3dhtr_setHighSolution(abstract_module_t *self, bool enable)
{
    lis.setHighSolution(enable);
}
You should be able to see the pattern here. Here provides an example that take 2 parameters.
5. Writing the mod_ardupy_MODULE.c
Once the wrapper is done, let's get work on the core, will take mod_ardupy_bme280.c as example.
First, also include the shared bindings:
#include "py/mphal.h"
#include "py/nlr.h"
#include "py/objtype.h"
#include "py/runtime.h"
#include "py/obj.h"
#include "shared-bindings/util.h"
State the previously defined functions from the wrapper:
void common_hal_bme280_construct(abstract_module_t *self);
void common_hal_bme280_deinit(abstract_module_t *self);
float common_hal_bme280_get_temperature(abstract_module_t *self);
uint32_t common_hal_bme280_get_pressure(abstract_module_t *self);
uint32_t common_hal_bme280_get_humidity(abstract_module_t *self);
extern const mp_obj_type_t grove_bme280_type;
Initialize the module:
m_generic_make(bme280) {
    abstract_module_t * self = new_abstruct_module(type);
    mp_arg_check_num(n_args, n_kw, 0, 0, false);
    common_hal_bme280_construct(self);
    return self;
}
where you could follow the same format and replace to you functions and module names.
Next up it's the object attributes, you should also write in the following format:
void bme280_obj_attr(mp_obj_t self_in, qstr attr, mp_obj_t *dest){
    abstract_module_t *self = (abstract_module_t *)self_in;
    uint32_t value;
    float number;
    if (dest[0] == MP_OBJ_NULL) {
        if (attr == MP_QSTR_temperature) {
            number = common_hal_bme280_get_temperature(self); // Call previously defined unction
            dest[0] = mp_obj_new_float(number); // This the MicroPython float type, should match with the data type
            return;
        }
        else if (attr == MP_QSTR_pressure) {
            value = common_hal_bme280_get_pressure(self); // Call previously defined unction
            dest[0] = mp_obj_new_int(value); // This the MicroPython int type, should match with the data type
            return;
        }
        else if (attr == MP_QSTR_humidity) {
            value = common_hal_bme280_get_humidity(self); // Call previously defined unction
            dest[0] = mp_obj_new_int(value);
            return;
        }
    }
    generic_method_lookup(self_in, attr, dest);
}
You can see that it simply return the functions by doing as followed:
if (attr == MP_QSTR_temperature) {
    number = common_hal_bme280_get_temperature(self); // Call previously defined unction
    dest[0] = mp_obj_new_float(number); // This the MicroPython float type, should match with the data type
    return;
}
This basically converts to .temperature method in usage (i.e. MP_QSTR_[Function-name]). You should also be able to see pattern here.
!!!Note
dest[0] data type should match here. There are mp_obj_new_float, mp_obj_new_int, mp_obj_new_bool, mp_obj_new_str and etc.
Define a look-up table:
const mp_rom_map_elem_t bme280_locals_dict_table[] = {
    // instance methods
    { MP_ROM_QSTR(MP_QSTR_deinit),    MP_ROM_PTR(&bme280_deinit_obj) },
    { MP_ROM_QSTR(MP_QSTR___enter__), MP_ROM_PTR(&default___enter___obj) },
    { MP_ROM_QSTR(MP_QSTR___exit__),  MP_ROM_PTR(&bme280_obj___exit___obj) },
};

MP_DEFINE_CONST_DICT(bme280_locals_dict, bme280_locals_dict_table);
Define the initial module type:
const mp_obj_type_t grove_bme280_type = {
    {&mp_type_type},
    .name = MP_QSTR_grove_bme280,
    .make_new = bme280_make_new,
    .locals_dict = (mp_obj_t)&bme280_locals_dict,
    .attr = bme280_obj_attr,
};
This may seem tricky at first, but it's actually replacing module names and very little programming.
Functions that takes Parameters
- If your module have functions that take parameters, please read through here.
Let's also take the same example as before to demonstrate. This is the code to implement the function in mod_ardupy_[MODULE].c. Follow the same format as below to map functions:
- For function that takes 1 parameter:
mp_obj_t lis3dhtr_setHighSolution(size_t n_args, const mp_obj_t *pos_args, mp_map_t *kw_args)
{
    abstract_module_t *self = (abstract_module_t *)pos_args[0];
    bool enable = mp_obj_is_true(pos_args[1]);
    common_hal_lis3dhtr_setHighSolution(self, enable);
    return mp_const_none;
}
MP_DEFINE_CONST_FUN_OBJ_KW(lis3dhtr_setHighSolution_obj, 1, lis3dhtr_setHighSolution);
- For function that takes 2 parameters (this is not the code for lis3dhtr, just to demonstrate):
mp_obj_t led_bar_set_brightness(size_t n_args, const mp_obj_t *pos_args, mp_map_t *kw_args){
    abstract_module_t * self = (abstract_module_t *)(pos_args[0]);
    uint32_t led_no = mp_obj_get_int(pos_args[1]);
    float value = mp_obj_get_float(pos_args[2]);
    common_hal_led_bar_set_brightness(self, led_no, value);
    return mp_const_none;
}

MP_DEFINE_CONST_FUN_OBJ_KW(led_bar_set_brightness_obj, 2, led_bar_set_brightness);
!!!Note
Same here, the data types should match, there are mp_obj_is_true, mp_obj_get_int, mp_obj_get_float, mp_obj_get_str and etc.
Remember to add the function to the look-up table, which looks like this:
const mp_rom_map_elem_t lis3dhtr_locals_dict_table[] = {
    // instance methods
    {MP_ROM_QSTR(MP_QSTR_deinit), MP_ROM_PTR(&lis3dhtr_deinit_obj)},
    {MP_ROM_QSTR(MP_QSTR___enter__), MP_ROM_PTR(&default___enter___obj)},
    {MP_ROM_QSTR(MP_QSTR___exit__), MP_ROM_PTR(&lis3dhtr_obj___exit___obj)},
    {MP_ROM_QSTR(MP_QSTR_available), MP_ROM_PTR(&lis3dhtr_available_obj)},
    {MP_ROM_QSTR(MP_QSTR_setPowerMode), MP_ROM_PTR(&lis3dhtr_setPowerMode_obj)},
    {MP_ROM_QSTR(MP_QSTR_setFullScaleRange), MP_ROM_PTR(&lis3dhtr_setFullScaleRange_obj)},
    {MP_ROM_QSTR(MP_QSTR_setOutputDataRate), MP_ROM_PTR(&lis3dhtr_setOutputDataRate_obj)},
    {MP_ROM_QSTR(MP_QSTR_setHighSolution), MP_ROM_PTR(&lis3dhtr_setHighSolution_obj)},
    {MP_ROM_QSTR(MP_QSTR_openTemp), MP_ROM_PTR(&lis3dhtr_openTemp_obj)},
    {MP_ROM_QSTR(MP_QSTR_closeTemp), MP_ROM_PTR(&lis3dhtr_closeTemp_obj)},
};
6. Building the Firmware
Now once you have written the ArduPy library, you will need to build it and of course debug if there are any errors while building it! You can now upload the entire project sketch to your github repository, for example: https://github.com/Seeed-Studio/seeed-ardupy-bme280.
- Download and Install
ardupy-aipthe tool set to build ArduPy library following this tutorial.
Once you have ardupy-aip installed, you can run the following to build your ArduPy firmware:
aip install [Your ArduPy library url]
# For example: aip install https://github.com/Seeed-Studio/seeed-ardupy-bme280
Build the ArduPy library with the firmware:
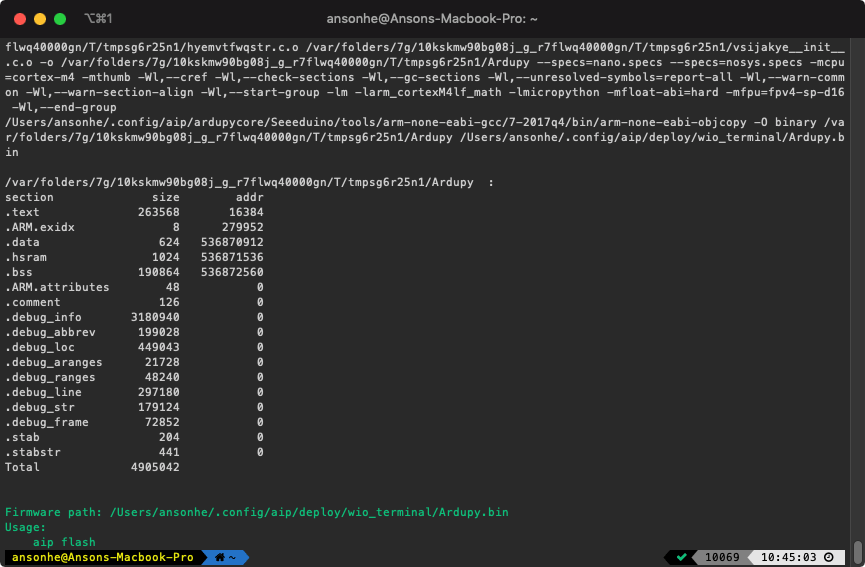
aip build
If everything goes well, you should be see a screen as follow, meaning that there is no error in the ArduPy library!
Testing the Libraries
Once your build was successful, you can use the following command to flash the firmware to your device and test the library:
aip flash
Note: Make sure that your device is connected to your PC beforehand.
Once flashed you can use the shell function to enter repl mode:
aip shell -c "repl"
- Import the written module using the following format:
from arduino import grove_bme280
where grove_bme280 will be replaced with your library module name.
- Initialize the library and call the function as follow:
bme280 = grove_bme280()
print ("Temperature: ", bme280.temperature, "C")
print ("Humidity: ", bme280.humidity, "%")
print ("Pressure: ", bme280.pressure, "Pa")
If you have gone this far, you have written a ArduPy library successfully! This allows you to convert any Arduino library into ArduPy library.
!!!Note If your library stuck at any point or not getting results back, there might be some bugs in the code. Please check carefully.
Resources
There are numbers of ArduPy libraries already available, you can install and build your ArduPy firmware with these easily. You may also use these as templates to write you own ArduPy libraries!
Tech Support & Product Discussion
Thank you for choosing our products! We are here to provide you with different support to ensure that your experience with our products is as smooth as possible. We offer several communication channels to cater to different preferences and needs.