ArduPy Get Started
To get started with ArduPy, first need to install aip - ArduPy Integrated Platform is a utility to develop ArduPy and interact with ArduPy board. It enables users to quickly get started with ardupy. aip is meant to be a simple command line tool. You can customize your own ardupy firmware through it, without needing to know more details about ArduPy.
Supported Boards
Quick Start with ArduPy
The following method is used to experience the ArduPy software in the simplest way. Follow the procedures to get started now!
- STEP.1 Entering bootloader mode
Connect your device to your PC via USB connection. Enter the bootloader mode by resetting the device quickly.
There should a USB drive named Arduino appeared in your PC. Go into the Arduino USB drive location.
- STEP.2 Download ArduPy UF2 Firmware
Download the ArduPy firmware in the form of UF2 files.
- For Wio Terminal
- For Seeeduino XIAO
and save it in your drive.
- STEP.3 Flashing ArduPy Firmware to the Device
Once downloaded the firmware for your device. Drag the .UF2 files to the ARDUINO USB drive. Now, your board will disappear from PC. Reset the board and it has loaded ArduPy firmware into it!
- STEP.4 Blinking the device
Now, there will be a USB drive named ARDUPY appeared in your PC. Open the ARDUPY and you will see a main.py python file. Open the main.py with your favorite editor such as Microsoft Visual Studio Code, Atom, Sublime Text and etc. Copy the following code and save the main.py.
from machine import Pin, Map
import time

LED = Pin(Map.LED_BUILTIN, Pin.OUT)

while True:
    LED.on()
    time.sleep(1)
    LED.off()
    time.sleep(1)
Now you should see your device's built-in LED starts to blink! Check the below sections to find out more about ArduPy! You will learn about ArduPy-aip tool and how to use aip to build and flash your own firmware to devices!
Install aip with macOS
For macOS user, you can simply run the following in Terminal to install ArduPy-aip:
pip3 install ardupy-aip
Note: please make sure that you have installed Python 3 on macOS. To install Python 3, you can use Homebrew which is a software package manager for macOS. Once installed Homebrew, run the following to install python 3: brew install python3. You can also download and install Python 3 from the official Python website.
Install aip with Windows
You can download the latest versions of ArduPy for windows in the below session. Once downloaded, extract the binary aip into a directory that is in your PATH.
Or if you have Python 3 environment, you can also install using pip3:
pip3 install ardupy-aip
Install aip with Linux
For Linux user, you can simply run the following in Terminal to install ArduPy-aip:
pip3 install ardupy-aip
Note: please make sure you have Python 3 installed and pip3 is up to date.
ArduPy-aip CLI
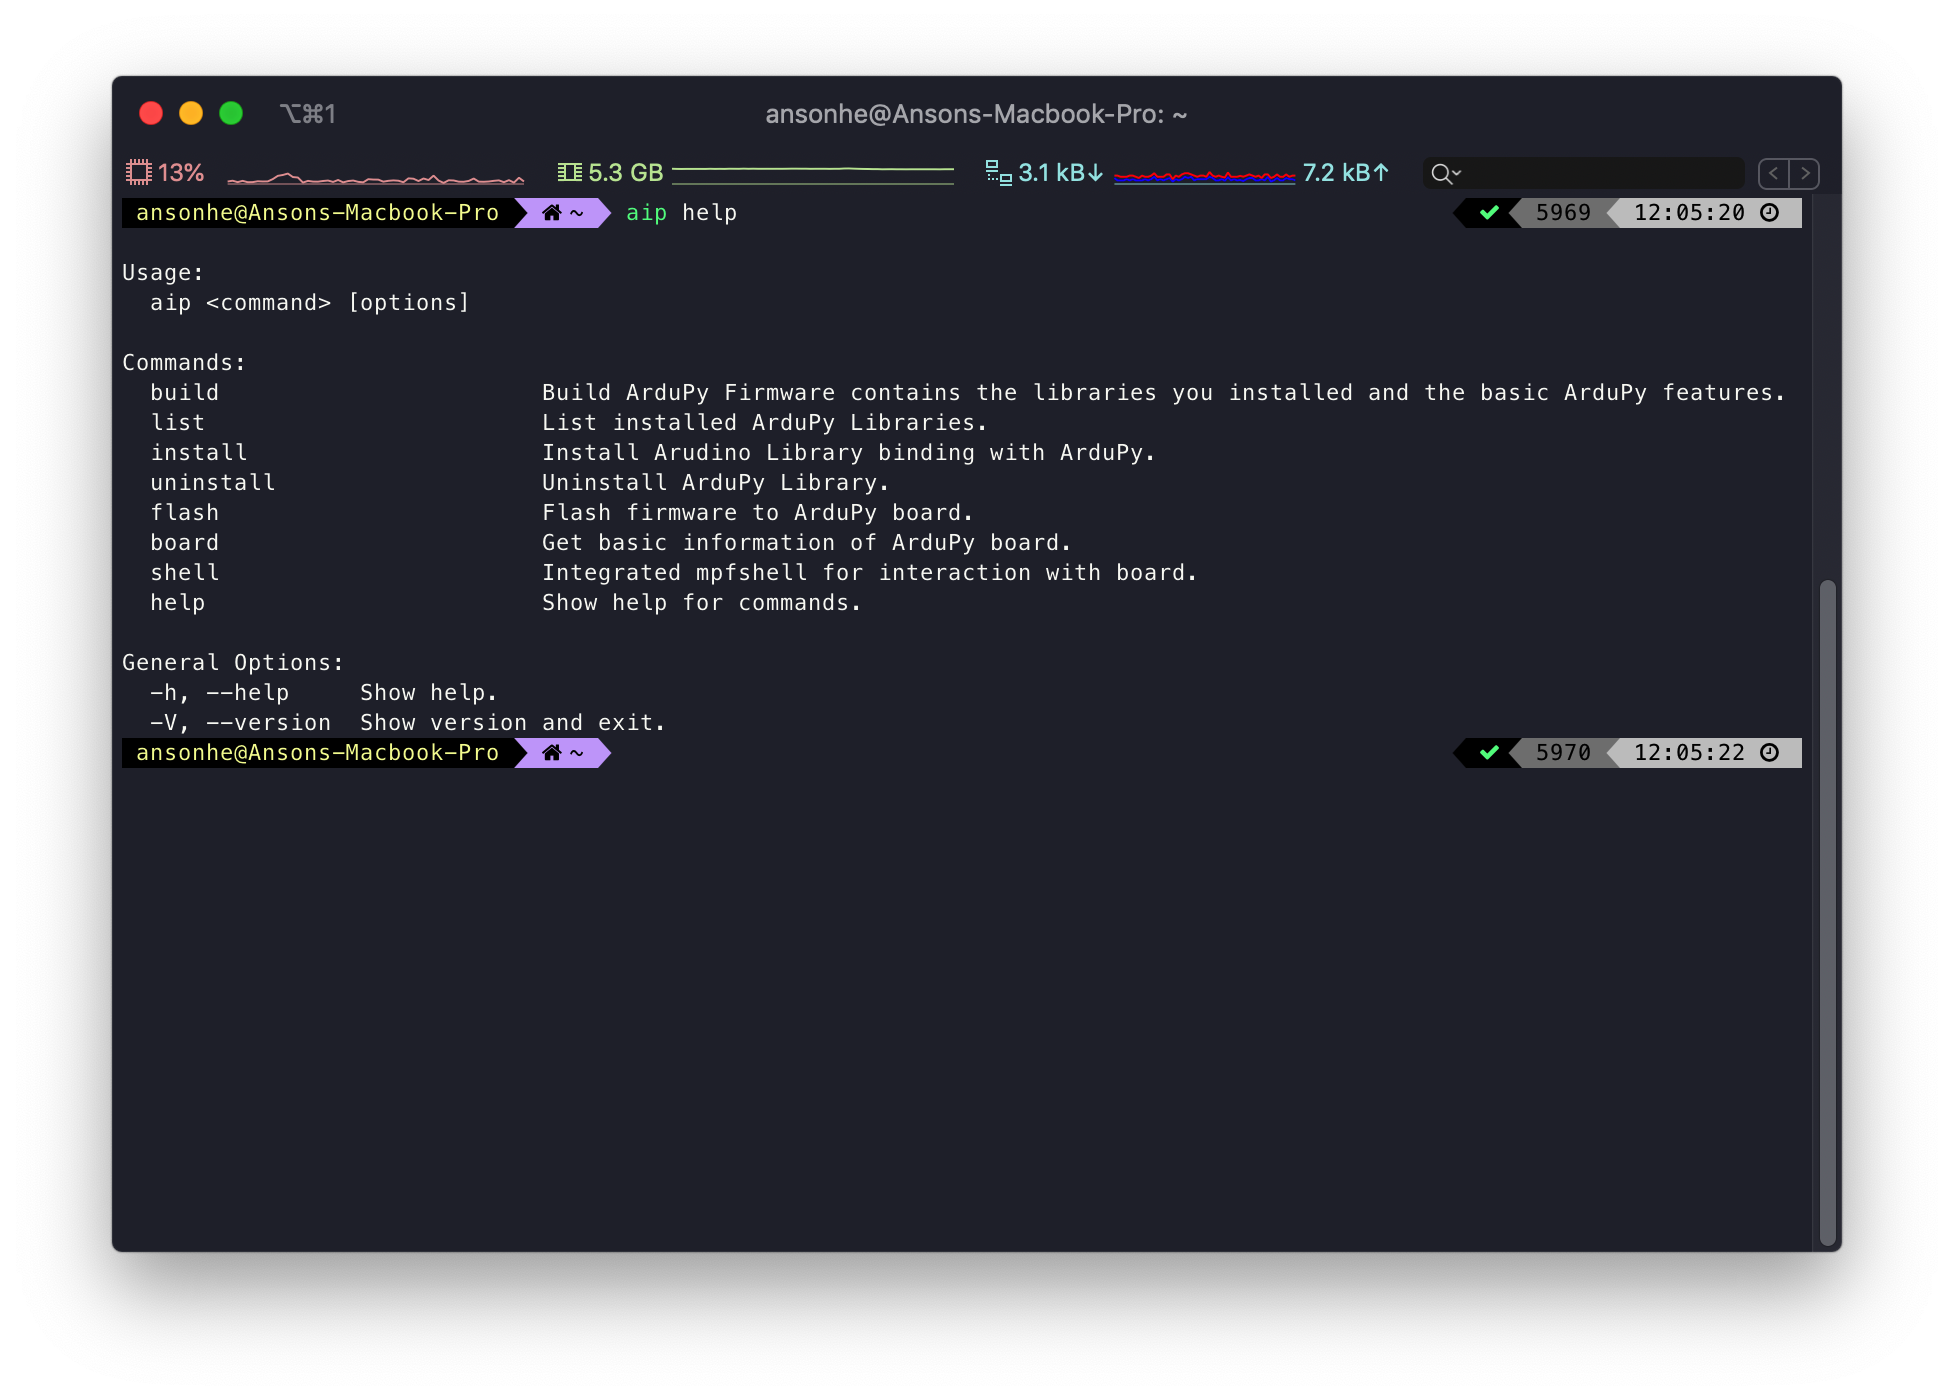
aip is a command-line interface for ArduPy, you can use aip to install ArduPy libraries, build and flash ArduPy firmware to hardware with ease. Simply use help to get more information:
aip help
- To get board information (firmware info.):
aip board
- To install Arduino libraries binding with ArduPy:
Please check here for the available ArduPy libraries.
aip install <ArduPy Library Path>
# Example Usage:
# aip install Seeed-Studio/seeed-ardupy-ultrasonic-sensor
- To uninstall ArduPy libraries:
aip uninstall <ArduPy Library Path>
# Example Usage:
# aip uninstall Seeed-Studio/seeed-ardupy-ultrasonic-sensor
- To list installed ArduPy Libraries
aip list
- To build ArduPy Firmware contains the libraries you installed and the basic ArduPy features. Note that, you can now choose to build for Seeeduino XIAO or Wio Terminal now!
aip build --board=<board>
# For Seeeduino XIAO:
# aip build --board=xiao
# For Wio Terminal:
# aip build --board=wio_terminal
- To flash ArduPy Firmware into hardware:
aip flash
!!!Note
After commands, you use -h flags to see more usage for that command. For example, aip flash -h.
- To interact with the board (shell-based file explorer):
aip shell
Note: Once entered the ardupy-mpfshell, you can use help for more information and commands.
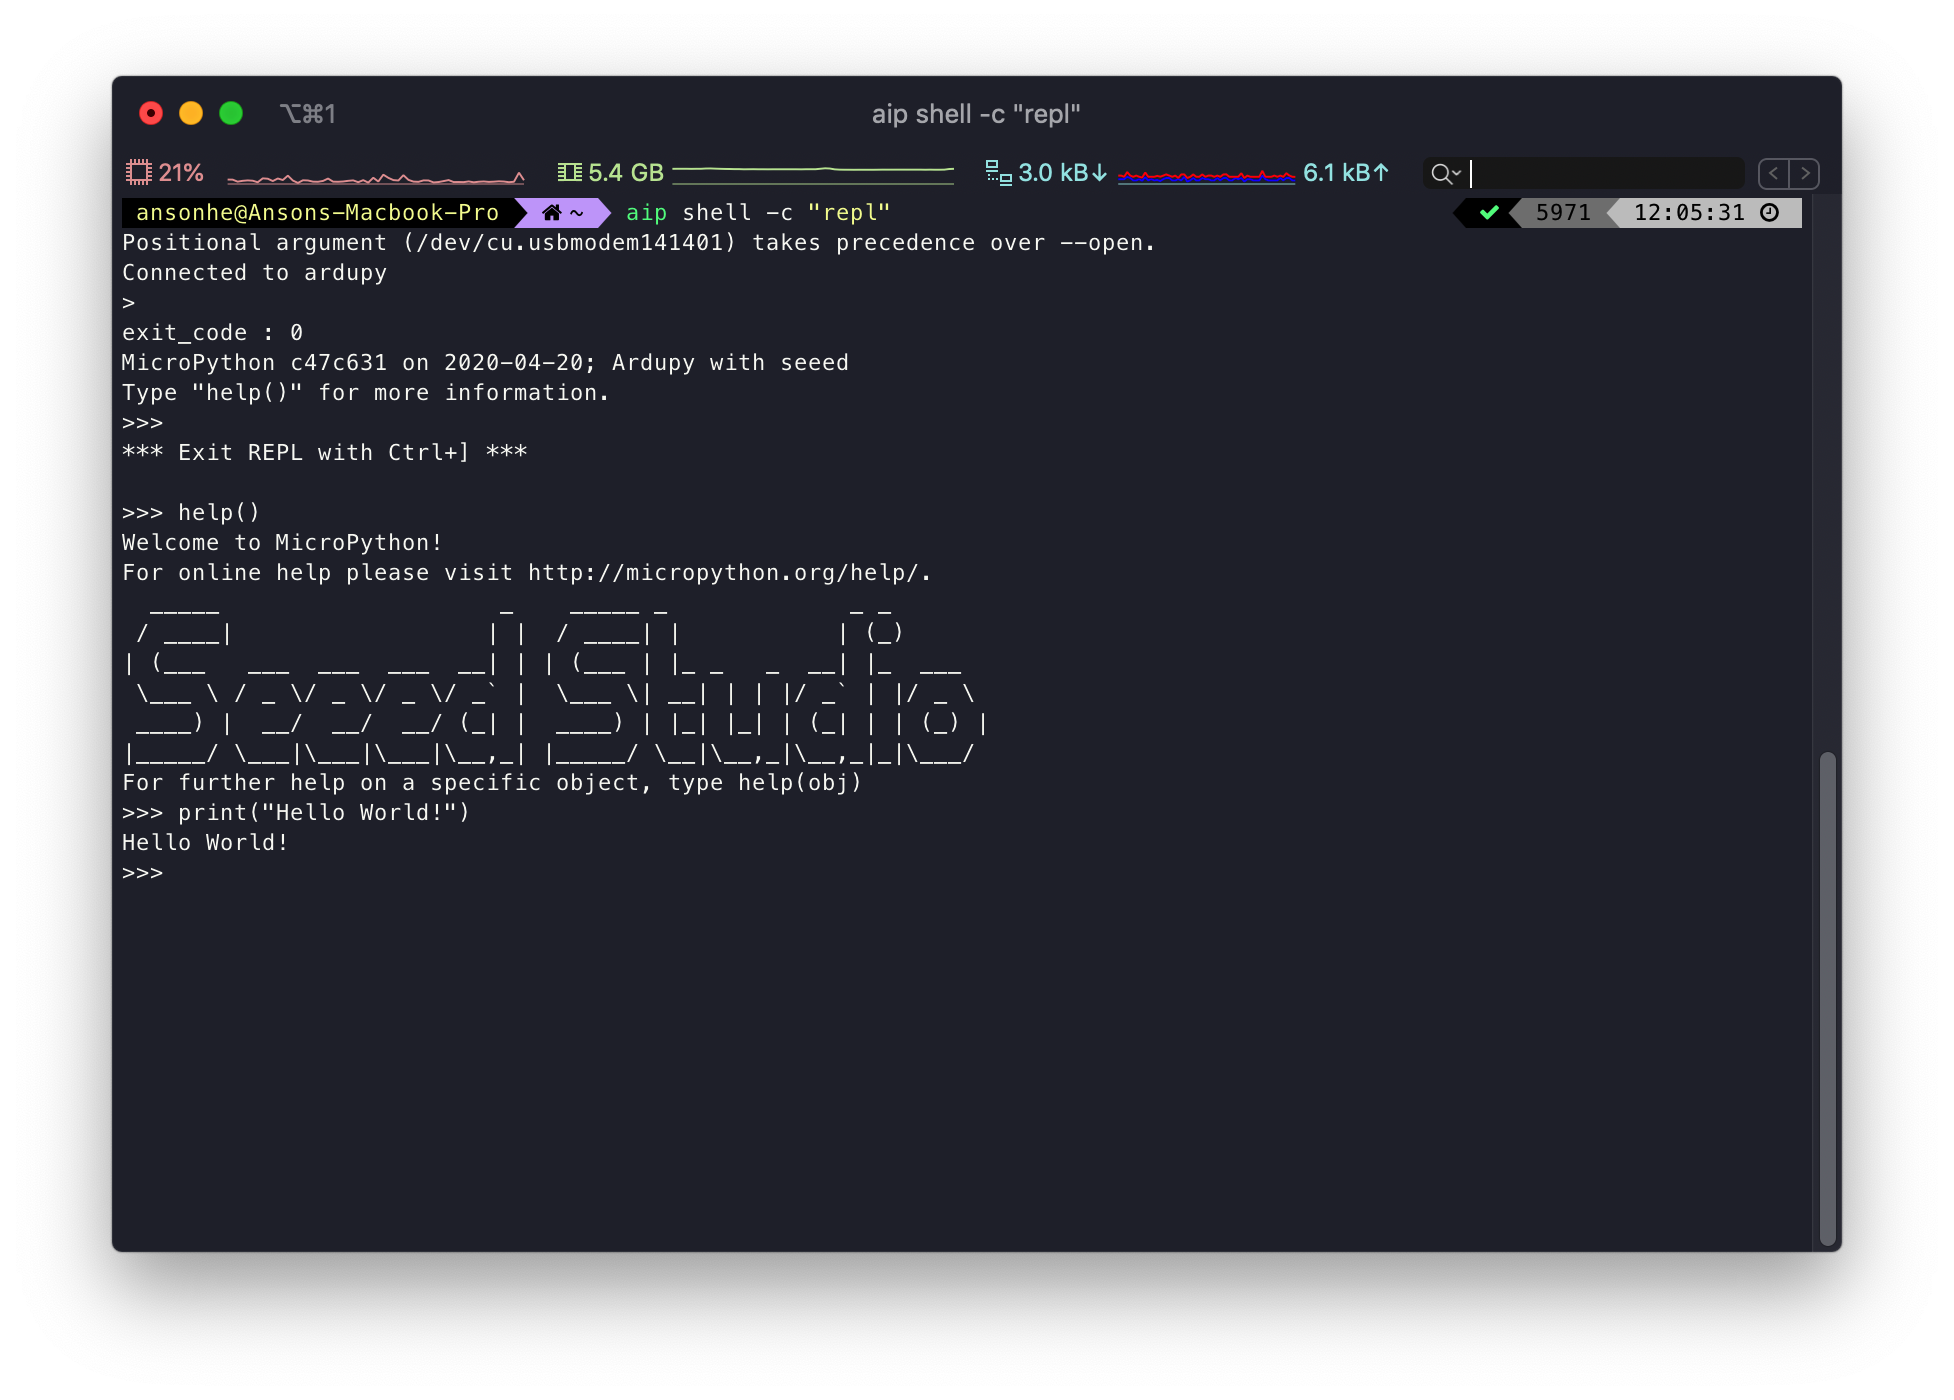
- Entering REPL mode:
aip shell -c "repl"
- To run Python file:
aip shell -n -c "runfile <YourPythonFilePath> [Path]"
# Example Usage:
# aip shell -n -c "runfile /Users/ansonhe/Desktop/ur.py"
- To load files into the board using shell:
aip shell -n -c "put <YourPythonFilePath> [Path]"
# Example Usage:
# aip shell -n -c "put /Users/ansonhe/Desktop/ur.py"
Running your First Script
Once flashed the ArduPy firmware, there should be a USB drive named ARDUPY appear in your PC. You can create the following Python files to get started.
boot.py
To run a MicroPython script from boot up, simply name your project boot.py in the root location of the board. This script is executed when the device boots up.
main.py
This is the default python script, but this does not run on boot up. The main.py runs when main.py has changes saved to it. i.e. it can auto reload.
Usage under ardupy-mpfshell
Once entered ardupy-mpfshell, use help to check commands usage. Here listed some useful commands:
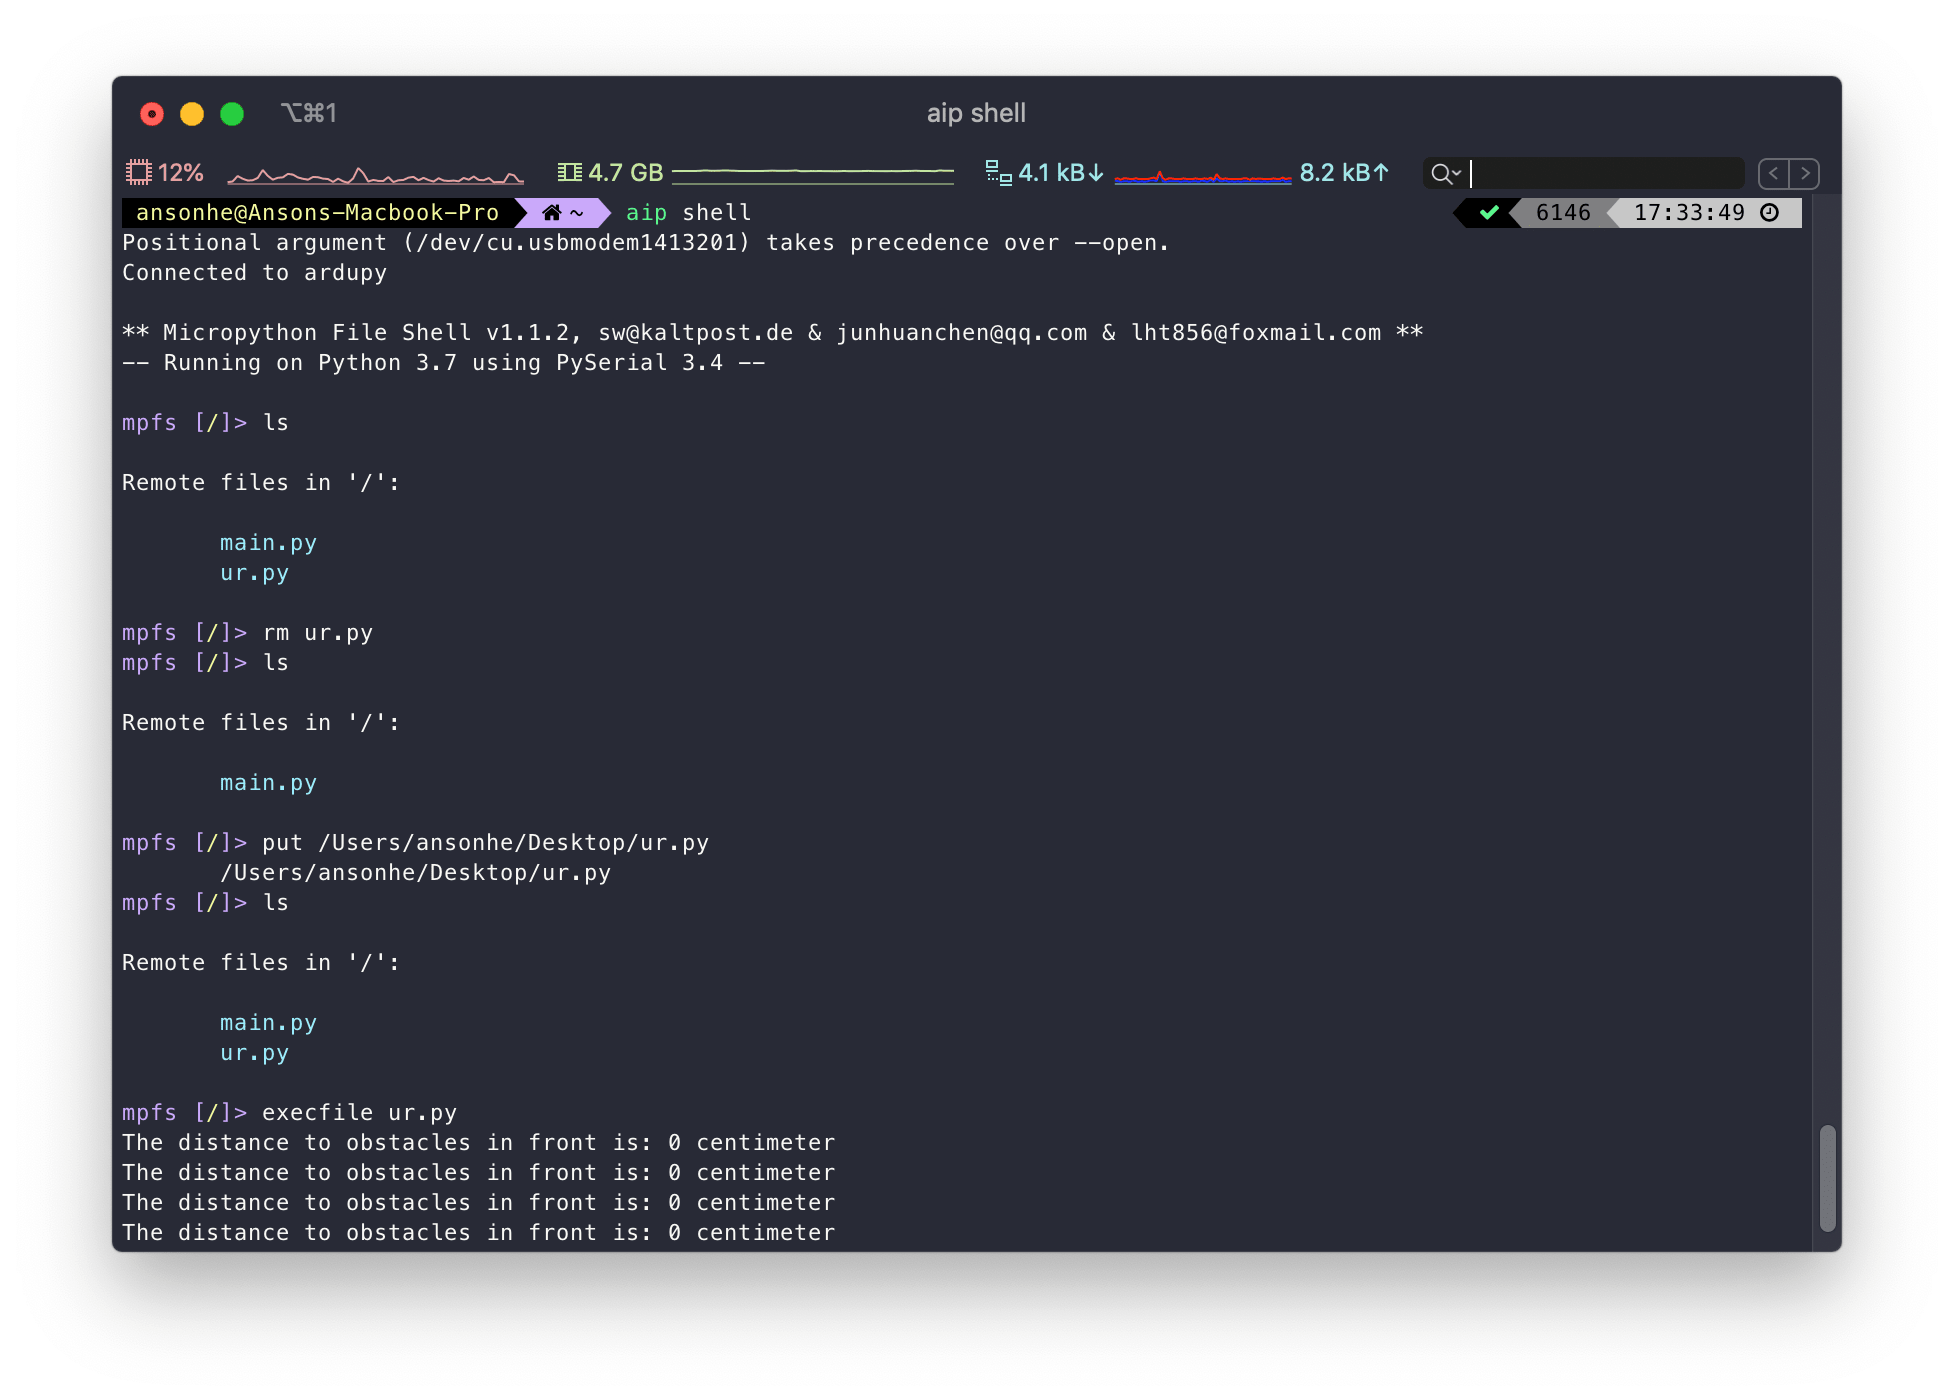
- To list files on the deivces:
ls
- To remove a file (or a directory) on the device:
rm <File/Directory>
- To upload e.g. the local file
boot.pyto the device:
put <YourPythonFilePath> [Path]
- To execute the files i.e.
test.pyon the device:
execfile test.py
Using aip to include Other ArduPy Libraries Example
aip is one of the key feature of ArduPy, which can be used to convert Arduino Libraries to Python Interface to be used for ArduPy. Here we provide an example, how to include the ArduPy library into ArduPy Firmware using Wio Terminal:
1.Open Terminal/Powershell, run the following to install ardupy libraries.
aip install Seeed-Studio/seeed-ardupy-ultrasonic-sensor
2.Build the firmware:
aip build --board=wio_terminal
Note: Usage of flashing firmware will appeared at the bottom of build.
3.Flash the "NEW" firmware into the board by copying the usage from end of build. Here aip will automatically look for the board connected to the PC and upload the firmware. If board is not connected, an error will appear.
aip flash
Library Example Usage
Once the library is included within the ArduPy firmware and flashed into the device, you can import and use the module as follow:
aip shell -n -c "put /Users/ansonhe/Desktop/ur.py"
Replace
/Users/ansonhe/Desktopto your path.
where the ur.py is:
from arduino import grove_ultra_ranger
import time

ur = grove_ultra_ranger(0)

while True:
    print ("The distance to obstacles in front is:", ur.cm, 'centimeter')
    time.sleep(1)
For more reference, please check the seeed-ardupy-ultrasonic-sensor.
FAQ
For more aip reference, please visit ardupy-aip to find out more.
Time and Delay
- Importing time module and delaying:
import time

time.sleep(1)           # Delay for 1 second
time.sleep_ms(500)      # Delay for 500 milliseconds
time.sleep_us(500)      # Delay for 500 microseconds
- Using time counter:
import time

time.ticks_ms()          # milliseconds counter
start = time.ticks_us()  # microseconds counter
time.ticks_diff(time.tick_us(), start) # Measure the difference between counters
Note: You can use the TAB key to auto-suggest and see all the functions available.For example, after typing time., press TAB to sell all the functions in time.
For more reference, please visit MicroPython time related functions.
Pin and GPIO
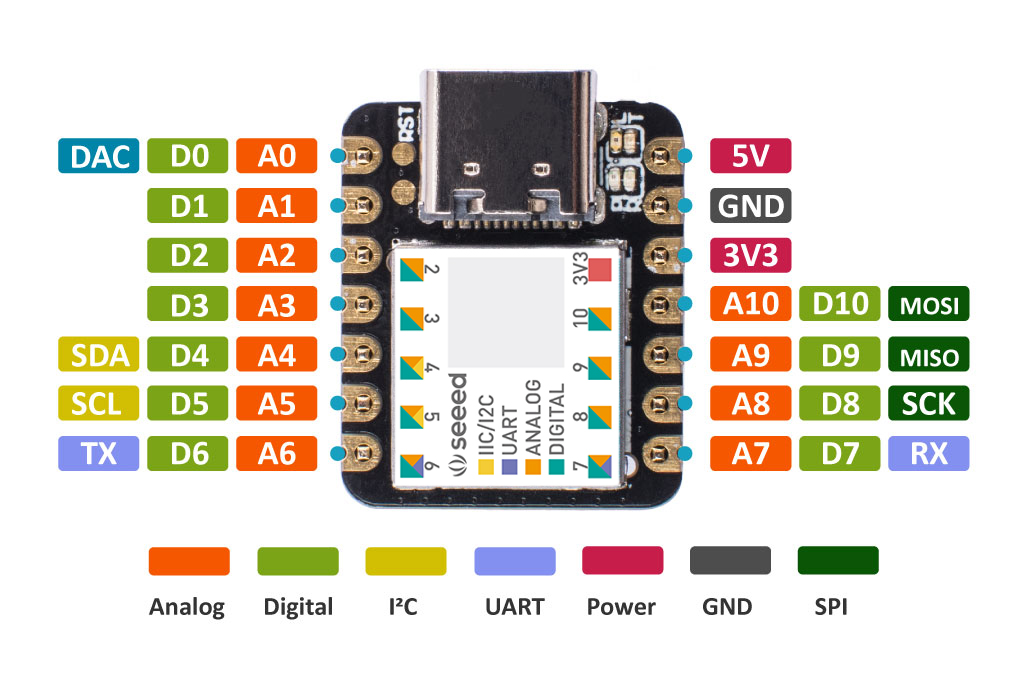
Pinout Diagram for Seeeduino XIAO
Pinout Diagram for Wio Terminal
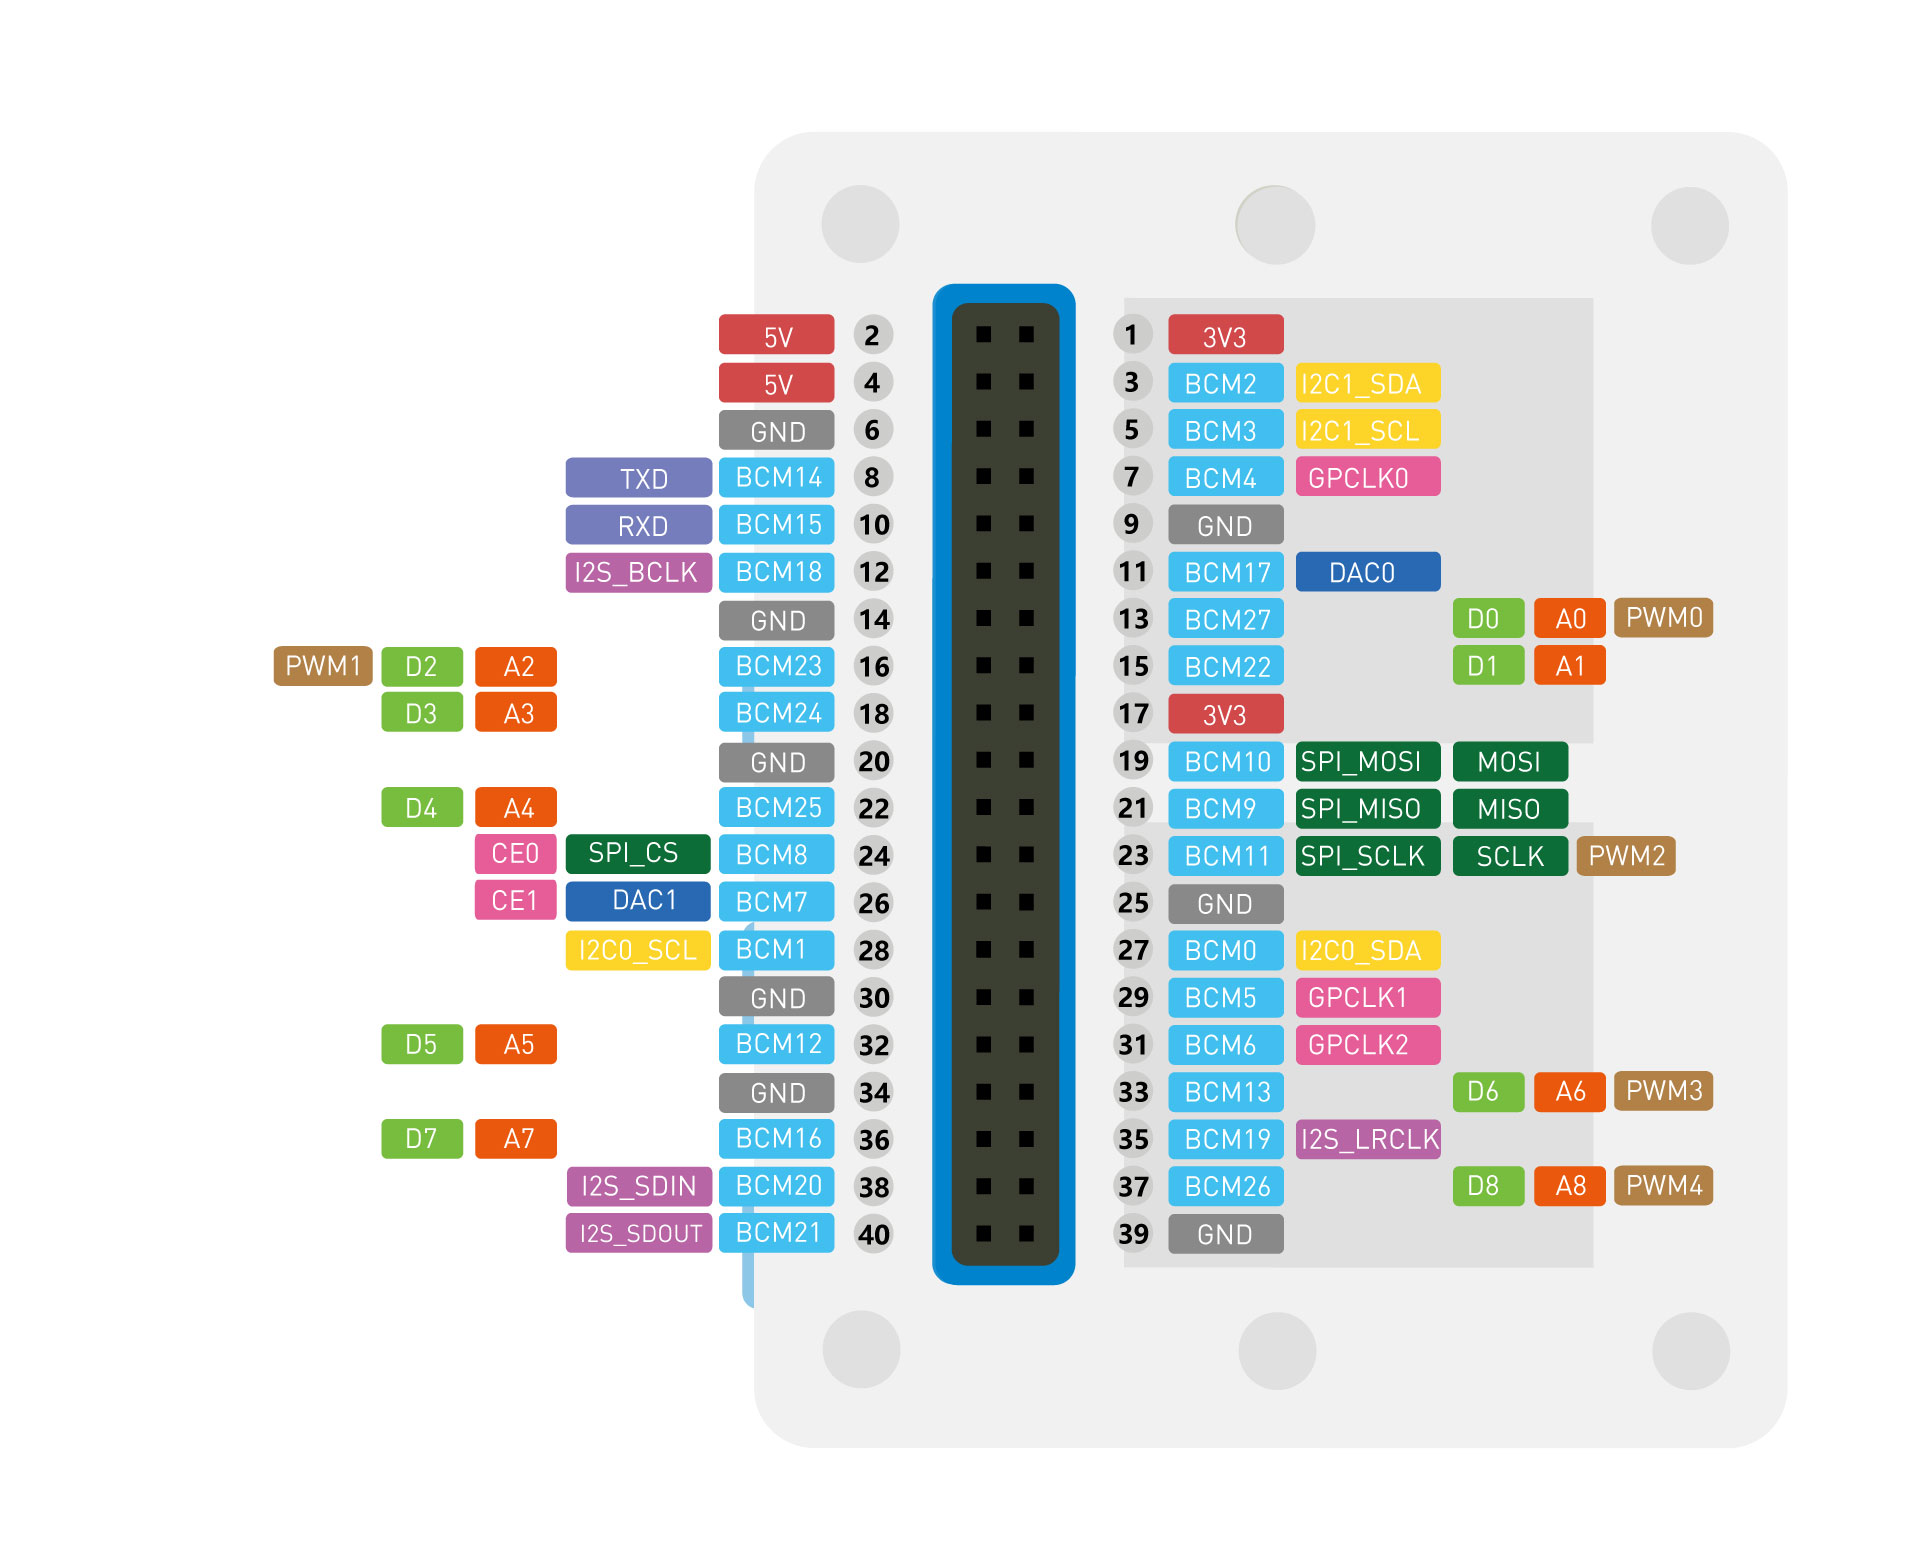
To reference GPIO in ArduPy, simply use the physical pin map of the device that you are using. For example, for Wio Terminal, Pin 1 is 3.3V and Pin 2 is 5V.
- Importing Pin and configuring GPIO:
from machine import Pin
p3 = Pin(3, Pin.OUT)    # Setting Pin 3 as a output pin
p3.on()                 # Setting Pin 3 to HIGH
p3.off()                # Setting Pin 3 to LOW

p3.value(1)             # Setting Pin 3 to HIGH using value method


p5 = Pin(5, Pin.IN)     # Setting Pin 5 as input pin
p5.value()              # Prints the value of the input pin

p3 = Pin(3, Pin.OUT, value=1) # Setting Pin 3 as output pin and HIGH in one line
p5 = Pin(5, Pin.IN, Pin.PULL_UP) # Setting Pin 5 as input with pull-up resistors
Map
To make it easier access to the Boards peripherals,ArduPy has mapped the same calling methods from Arduino:
from machine import Pin, Map
import time

LED = Pin(Map.LED_BUILTIN, Pin.OUT) # Setting builtin LED as output

while True:
    LED.on()
    time.sleep(1)
    LED.on()
    time.sleep(1)
PWM (Pulse Width Modulation)
To use PWM, you must use the PWM channels on the device. Please refer this back to the device pin map, and indicate where the PWM channels are.
- Using PWM:
from machine import Pin, PWM

pwm0 = PWM(Pin(13))     # Creating PWM Channel on Pin 13
pwm0.freq()             # Current frequency
pwm0.freq(1000)         # Sets the frequency to 1000Hz
pwm0.duty()             # Current duty cycle
pwm0.duty(200)          # Sets the duty cycle to 200
pwm0.deinit()           # Switch off PWM on the pin

pwm1 = PWM(Pin(16), freq=1000, duty=200) # PWM in one line
ADC
To use ADC on the device, you must use the analog pins. For example, Pin 13(A0) on Wio Terminal.
Note: ADC channel on Wio Terminal is 10 bit(0-1023).
- Using ADC
from machine import ADC, Pin

adc = ADC(Pin(13))      # Crating ADC on Pin 13
adc.read()              # reading ADC value, 0 ~ 1023
DAC
To use DAC on the device, you must use the DAC pins or PWM pins on the board. For example, Pin 11(DAC0) on Wio Terminal.
Note: DAC channel on Wio Terminal is 12 bit(0-4095).
- Using DAC:
from machine import DAC, Pin

dac0 = DAC(Pin(11))      # Creating DAC on Pin 11
dac0.write(512)          # Writing value to DAC, 512/4096*3.3 = 0.4125 V

dac1 = DAC(Pin(26), resolution=10)  # Creating DAC on Pin 26 and using 10 bit resolution
dac1.write(1023)                    # Writing max output to DAC, 3.3V
Note: When using DAC on PWM pins, the resolution on the channel will be only 8-bit.
# Using DAC om PWM Pins
from machine import DAC, Pin

dac2 = DAC(Pin(16))     # Creating DAC on Pin 16
dac2.write(128)         # Writing value to DAC, 128/255*3.3 = 1.65V
LCD
For Wio Terminal, the TFT LCD display can be used as followed. For more LCD reference, please visit ArduPy LCD API Reference.
- Using the LCD module:
from machine import LCD

lcd = LCD()                            # Initialize LCD and turn the backlight
lcd.fillScreen(lcd.color.BLACK)        # Fill the LCD screen with color black
lcd.setTextSize(2)                     # Setting font size to 2
lcd.setTextColor(lcd.color.GREEN)      # Setting test color to Green
lcd.drawString("Hello World!", 0, 0)   # Printing Hello World at (0, 0)
Note: Use tab to see the available functions.
IDE Getting Started
As mentioned before, you can use your preferred editor to write your Python program. To run and test program easily, you can simply edit the main.py file in the ARDUPY USB location (auto re-load feature). Here will demonstrate another quick example using Wio Terminal:
Make sure you have followed the above procedures before the next session.
1.Open main.py in ARDUPY USB location.
2.Copy the following code to main.py and save the file.
from machine import LCD
import time, math

DEG2RAD = 0.0174532925
lcd = LCD()
lcd.fillScreen(lcd.color.BLACK)

# DRAW CIRCLE SEGMENTS
# x,y == coords of centre of circle
# start_angle = 0 - 359
# sub_angle   = 0 - 360 = subtended angle
# r = radius
# colour = 16 bit colour value

def fillSegment(x, y, startAngle, subAngle, r, color):
    # Calculate first pair of coordinates for segment start
    sx = math.cos((startAngle - 90) * DEG2RAD)
    sy = math.sin((startAngle - 90) * DEG2RAD)
    x1 = sx * r + x
    y1 = sy * r + y

    # Draw colour blocks every inc degrees
    for i in range(startAngle, startAngle+subAngle, 1):
        # Calculate pair of coordinates for segment end
        x2 = math.cos((i + 1 - 90) * DEG2RAD) * r + x
        y2 = math.sin((i + 1 - 90) * DEG2RAD) * r + y

        lcd.fillTriangle(int(x1), int(y1), int(x2), int(y2), x, y, color)

        # Copy segment end to segment start for next segment
        x1 = x2
        y1 = y2

def main():
    # Draw 4 pie chart segments
    fillSegment(160, 120, 0, 60, 100, lcd.color.RED)
    fillSegment(160, 120, 60, 30, 100, lcd.color.GREEN)
    fillSegment(160, 120, 60 + 30, 120, 100, lcd.color.BLUE)
    fillSegment(160, 120, 60 + 30 + 120, 150, 100, lcd.color.YELLOW)
    time.sleep(1)
    fillSegment(160, 120, 0, 360, 100, lcd.color.BLACK)

if __name__ == "__main__":
    while True:
        main()
3.You should see the Wio Terminal starts drawing pie chart on the screen instantly!
The auto re-load can be very useful when testing on small programs.
Tech Support
Please submit any technical issue into our forum