XIAO ESP32S3 Sense & Edge Impulse关键词识别

本教程将指导您使用XIAO ESP32S3 Sense微控制器板上的TinyML实现关键词识别(KWS)系统,并借助Edge Impulse进行数据收集和模型训练。KWS对语音识别系统至关重要,借助TinyML的强大功能,可以在更小、更低功耗的设备上实现。让我们使用Edge Impulse和XIAO ESP32S3 Sense构建自己的KWS系统!
入门指南
在开始这个项目之前,请按照以下准备步骤准备此项目所需的软件和硬件。
硬件
要成功完成此项目,您需要准备以下硬件。
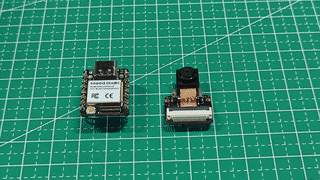
- XIAO ESP32S3 Sense
- microSD卡(不超过32GB)
- microSD读卡器
- USB-C数据线
通过为XIAO ESP32S3 Sense安装扩展板,您可以使用扩展板上的麦克风。
安装扩展板非常简单,您只需将扩展板上的连接器与XIAO ESP32S3上的B2B连接器对齐,用力按压并听到"咔嗒"声,安装即完成。
XIAO ESP32S3 Sense支持最大32GB的microSD卡,因此如果您准备为XIAO购买microSD卡,请参考此规格。在使用microSD卡之前,请将microSD卡格式化为FAT32格式。
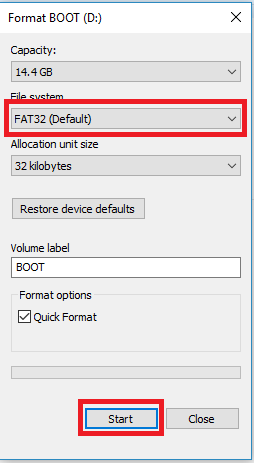
格式化后,您可以将microSD卡插入microSD卡槽。请注意插入方向,金手指一面应朝内。

软件
如果这是您第一次使用XIAO ESP32S3 Sense,那么在开始之前,我们建议您阅读以下两个Wiki来学习如何使用它。
捕获(离线)音频数据
步骤1. 将录制的声音样本保存为.wav音频文件到microSD卡
让我们使用板载SD卡读卡器来保存.wav音频文件,我们需要首先启用XIAO PSRAM。
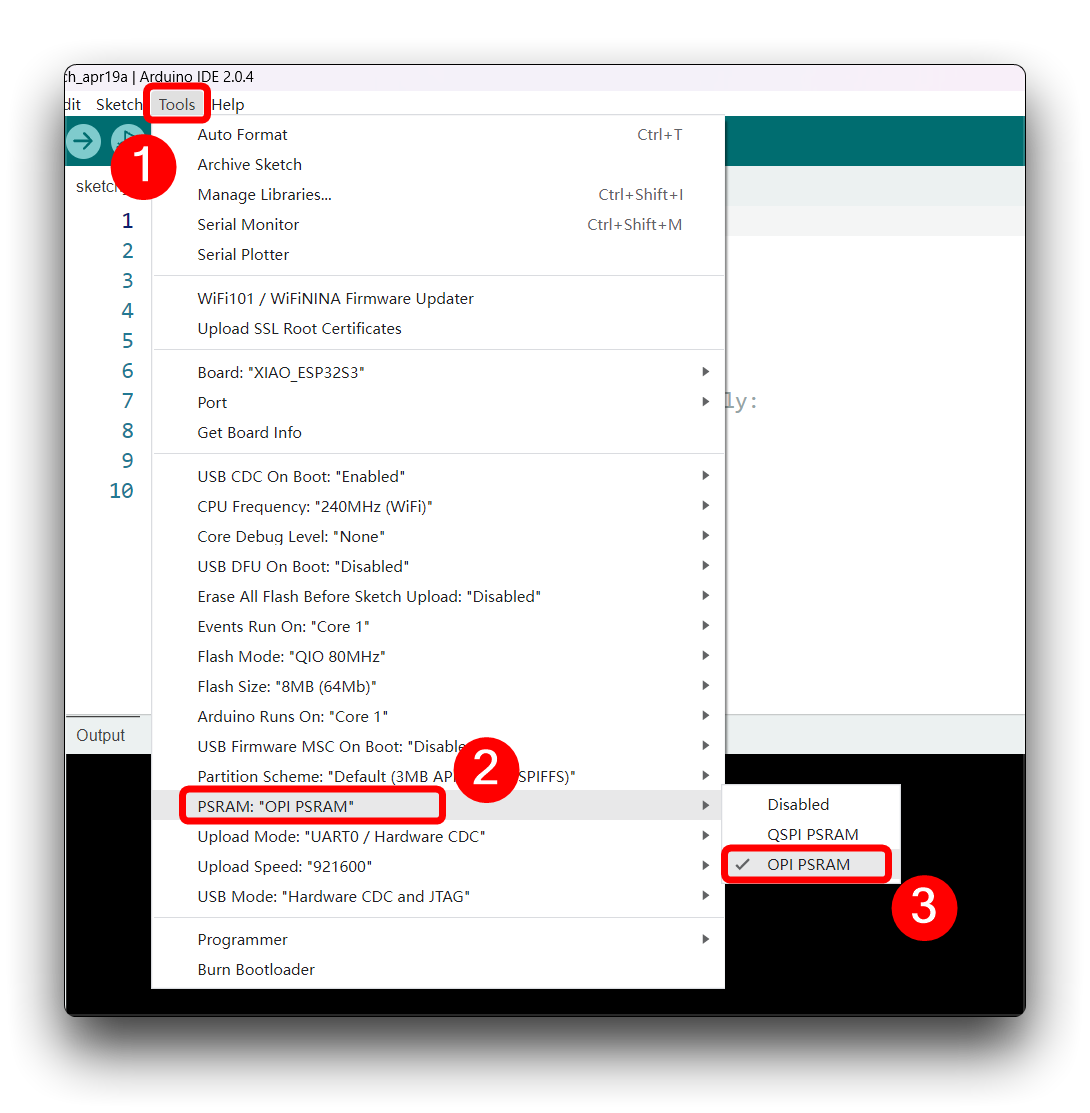
然后编译并上传以下程序到XIAO ESP32S3。
此代码使用Seeed XIAO ESP32S3 Sense板的I2S接口录制音频,将录音保存为SD卡上的.wav文件,并允许通过从串行监视器发送的命令控制录音过程。音频文件的名称是可自定义的(应该是用于训练的类标签),可以进行多次录音,每次都保存在新文件中。代码还包括增加录音音量的功能。
如果您的ESP32版本是2.0.x。点击此处预览完整程序
/*
 * WAV Recorder for Seeed XIAO ESP32S3 Sense
 *
 * NOTE: To execute this code, we will need to use the PSRAM
 * function of the ESP-32 chip, so please turn it on before uploading.
 * Tools>PSRAM: "OPI PSRAM"
 *
 * Adapted by M.Rovai @May23 from original Seeed code
*/

#include <I2S.h>
#include "FS.h"
#include "SD.h"
#include "SPI.h"

// make changes as needed
#define RECORD_TIME   10  // seconds, The maximum value is 240
#define WAV_FILE_NAME "data"

// do not change for best
#define SAMPLE_RATE 16000U
#define SAMPLE_BITS 16
#define WAV_HEADER_SIZE 44
#define VOLUME_GAIN 2

int fileNumber = 1;
String baseFileName;
bool isRecording = false;

void setup() {
  Serial.begin(115200);
  while (!Serial) ;

  I2S.setAllPins(-1, 42, 41, -1, -1);
  if (!I2S.begin(PDM_MONO_MODE, SAMPLE_RATE, SAMPLE_BITS)) {
    Serial.println("Failed to initialize I2S!");
    while (1) ;
  }
  if(!SD.begin(21)){
    Serial.println("Failed to mount SD Card!");
    while (1) ;
  }
  Serial.printf("Enter with the label name\n");
  //record_wav();
}

void loop() {
  if (Serial.available() > 0) {
    String command = Serial.readStringUntil('\n');
    command.trim();
    if (command == "rec") {
      isRecording = true;
    } else {
      baseFileName = command;
      fileNumber = 1; // reset file number each time a new base file name is set
      Serial.printf("Send rec for starting recording label \n");
    }
  }
  if (isRecording && baseFileName != "") {
    String fileName = "/" + baseFileName + "." + String(fileNumber) + ".wav";
    fileNumber++;
    record_wav(fileName);
    delay(1000); // delay to avoid recording multiple files at once
    isRecording = false;
  }
}

void record_wav(String fileName)
{
  uint32_t sample_size = 0;
  uint32_t record_size = (SAMPLE_RATE * SAMPLE_BITS / 8) * RECORD_TIME;
  uint8_t *rec_buffer = NULL;
  Serial.printf("Start recording ...\n");

  File file = SD.open(fileName.c_str(), FILE_WRITE);
  // Write the header to the WAV file
  uint8_t wav_header[WAV_HEADER_SIZE];
  generate_wav_header(wav_header, record_size, SAMPLE_RATE);
  file.write(wav_header, WAV_HEADER_SIZE);

  // PSRAM malloc for recording
  rec_buffer = (uint8_t *)ps_malloc(record_size);
  if (rec_buffer == NULL) {
    Serial.printf("malloc failed!\n");
    while(1) ;
  }
  Serial.printf("Buffer: %d bytes\n", ESP.getPsramSize() - ESP.getFreePsram());

  // Start recording
  esp_i2s::i2s_read(esp_i2s::I2S_NUM_0, rec_buffer, record_size, &sample_size, portMAX_DELAY);
  if (sample_size == 0) {
    Serial.printf("Record Failed!\n");
  } else {
    Serial.printf("Record %d bytes\n", sample_size);
  }

  // Increase volume
  for (uint32_t i = 0; i < sample_size; i += SAMPLE_BITS/8) {
    (*(uint16_t *)(rec_buffer+i)) <<= VOLUME_GAIN;
  }

  // Write data to the WAV file
  Serial.printf("Writing to the file ...\n");
  if (file.write(rec_buffer, record_size) != record_size)
    Serial.printf("Write file Failed!\n");

  free(rec_buffer);
  file.close();
  Serial.printf("Recording complete: \n");
  Serial.printf("Send rec for a new sample or enter a new label\n\n");
}

void generate_wav_header(uint8_t *wav_header, uint32_t wav_size, uint32_t sample_rate)
{
  // See this for reference: http://soundfile.sapp.org/doc/WaveFormat/
  uint32_t file_size = wav_size + WAV_HEADER_SIZE - 8;
  uint32_t byte_rate = SAMPLE_RATE * SAMPLE_BITS / 8;
  const uint8_t set_wav_header[] = {
    'R', 'I', 'F', 'F', // ChunkID
    file_size, file_size >> 8, file_size >> 16, file_size >> 24, // ChunkSize
    'W', 'A', 'V', 'E', // Format
    'f', 'm', 't', ' ', // Subchunk1ID
    0x10, 0x00, 0x00, 0x00, // Subchunk1Size (16 for PCM)
    0x01, 0x00, // AudioFormat (1 for PCM)
    0x01, 0x00, // NumChannels (1 channel)
    sample_rate, sample_rate >> 8, sample_rate >> 16, sample_rate >> 24, // SampleRate
    byte_rate, byte_rate >> 8, byte_rate >> 16, byte_rate >> 24, // ByteRate
    0x02, 0x00, // BlockAlign
    0x10, 0x00, // BitsPerSample (16 bits)
    'd', 'a', 't', 'a', // Subchunk2ID
    wav_size, wav_size >> 8, wav_size >> 16, wav_size >> 24, // Subchunk2Size
  };
  memcpy(wav_header, set_wav_header, sizeof(set_wav_header));
}
如果你的 ESP32 版本是 3.0.x。点击此处预览完整程序
/*
 * WAV Recorder for Seeed XIAO ESP32S3 Sense
 *
 * NOTE: To execute this code, we will need to use the PSRAM
 * function of the ESP-32 chip, so please turn it on before uploading.
 * Tools>PSRAM: "OPI PSRAM"
 *
 * Adapted by M.Rovai @May23 from original Seeed code
*/

#include <ESP_I2S.h>
#include "FS.h"
#include "SD.h"
#include "SPI.h"

// make changes as needed
#define RECORD_TIME   10  // seconds, The maximum value is 240
#define WAV_FILE_NAME "data"

// do not change for best
#define SAMPLE_RATE 16000U
#define SAMPLE_BITS 16
#define WAV_HEADER_SIZE 44
#define VOLUME_GAIN 2

I2SClass I2S;
String baseFileName;

int fileNumber = 1;
bool isRecording = false;

void setup() {
  Serial.begin(115200);
  while (!Serial) ;

  // setup 42 PDM clock and 41 PDM data pins
  I2S.setPinsPdmRx(42, 41);
  if (!I2S.begin(I2S_MODE_PDM_RX, 16000, I2S_DATA_BIT_WIDTH_16BIT, I2S_SLOT_MODE_MONO)) {
    Serial.println("Failed to initialize I2S!");
    while (1) ;
  }
  if(!SD.begin(21)){
    Serial.println("Failed to mount SD Card!");
    while (1) ;
  }
  Serial.printf("Enter with the label name\n");
  //record_wav();
}

void loop() {
  if (Serial.available() > 0) {
    String command = Serial.readStringUntil('\n');
    command.trim();
    if (command == "rec") {
      isRecording = true;
    } else {
      baseFileName = command;
      fileNumber = 1; // reset file number each time a new base file name is set
      Serial.printf("Send rec for starting recording label \n");
    }
  }
  if (isRecording && baseFileName != "") {
    String fileName = "/" + baseFileName + "." + String(fileNumber) + ".wav";
    fileNumber++;
    record_wav(fileName);
    delay(1000); // delay to avoid recording multiple files at once
    isRecording = false;
  }
}

void record_wav(String fileName)
{
  uint32_t sample_size = 0;
  uint32_t record_size = (SAMPLE_RATE * SAMPLE_BITS / 8) * RECORD_TIME;
  uint8_t *rec_buffer = NULL;
  Serial.printf("Start recording ...\n");

  File file = SD.open(fileName.c_str(), FILE_WRITE);
  // Write the header to the WAV file
  uint8_t wav_header[WAV_HEADER_SIZE];
  generate_wav_header(wav_header, record_size, SAMPLE_RATE);
  file.write(wav_header, WAV_HEADER_SIZE);

  // PSRAM malloc for recording
  rec_buffer = (uint8_t *)ps_malloc(record_size);
  if (rec_buffer == NULL) {
    Serial.printf("malloc failed!\n");
    while(1) ;
  }
  Serial.printf("Buffer: %d bytes\n", ESP.getPsramSize() - ESP.getFreePsram());

  // Start recording
  esp_i2s::i2s_read(esp_i2s::I2S_NUM_0, rec_buffer, record_size, &sample_size, portMAX_DELAY);
  if (sample_size == 0) {
    Serial.printf("Record Failed!\n");
  } else {
    Serial.printf("Record %d bytes\n", sample_size);
  }

  // Increase volume
  for (uint32_t i = 0; i < sample_size; i += SAMPLE_BITS/8) {
    (*(uint16_t *)(rec_buffer+i)) <<= VOLUME_GAIN;
  }

  // Write data to the WAV file
  Serial.printf("Writing to the file ...\n");
  if (file.write(rec_buffer, record_size) != record_size)
    Serial.printf("Write file Failed!\n");

  free(rec_buffer);
  file.close();
  Serial.printf("Recording complete: \n");
  Serial.printf("Send rec for a new sample or enter a new label\n\n");
}

void generate_wav_header(uint8_t *wav_header, uint32_t wav_size, uint32_t sample_rate)
{
  // See this for reference: http://soundfile.sapp.org/doc/WaveFormat/
  uint32_t file_size = wav_size + WAV_HEADER_SIZE - 8;
  uint32_t byte_rate = SAMPLE_RATE * SAMPLE_BITS / 8;
  const uint8_t set_wav_header[] = {
    'R', 'I', 'F', 'F', // ChunkID
    file_size, file_size >> 8, file_size >> 16, file_size >> 24, // ChunkSize
    'W', 'A', 'V', 'E', // Format
    'f', 'm', 't', ' ', // Subchunk1ID
    0x10, 0x00, 0x00, 0x00, // Subchunk1Size (16 for PCM)
    0x01, 0x00, // AudioFormat (1 for PCM)
    0x01, 0x00, // NumChannels (1 channel)
    sample_rate, sample_rate >> 8, sample_rate >> 16, sample_rate >> 24, // SampleRate
    byte_rate, byte_rate >> 8, byte_rate >> 16, byte_rate >> 24, // ByteRate
    0x02, 0x00, // BlockAlign
    0x10, 0x00, // BitsPerSample (16 bits)
    'd', 'a', 't', 'a', // Subchunk2ID
    wav_size, wav_size >> 8, wav_size >> 16, wav_size >> 24, // Subchunk2Size
  };
  memcpy(wav_header, set_wav_header, sizeof(set_wav_header));
}
现在,将代码上传到 XIAO 并从关键词(hello 和 stop)获取样本。您也可以捕获噪音和其他单词。串行监视器将提示您接收要录制的标签。
发送标签(例如,hello)。程序将等待另一个命令:rec。
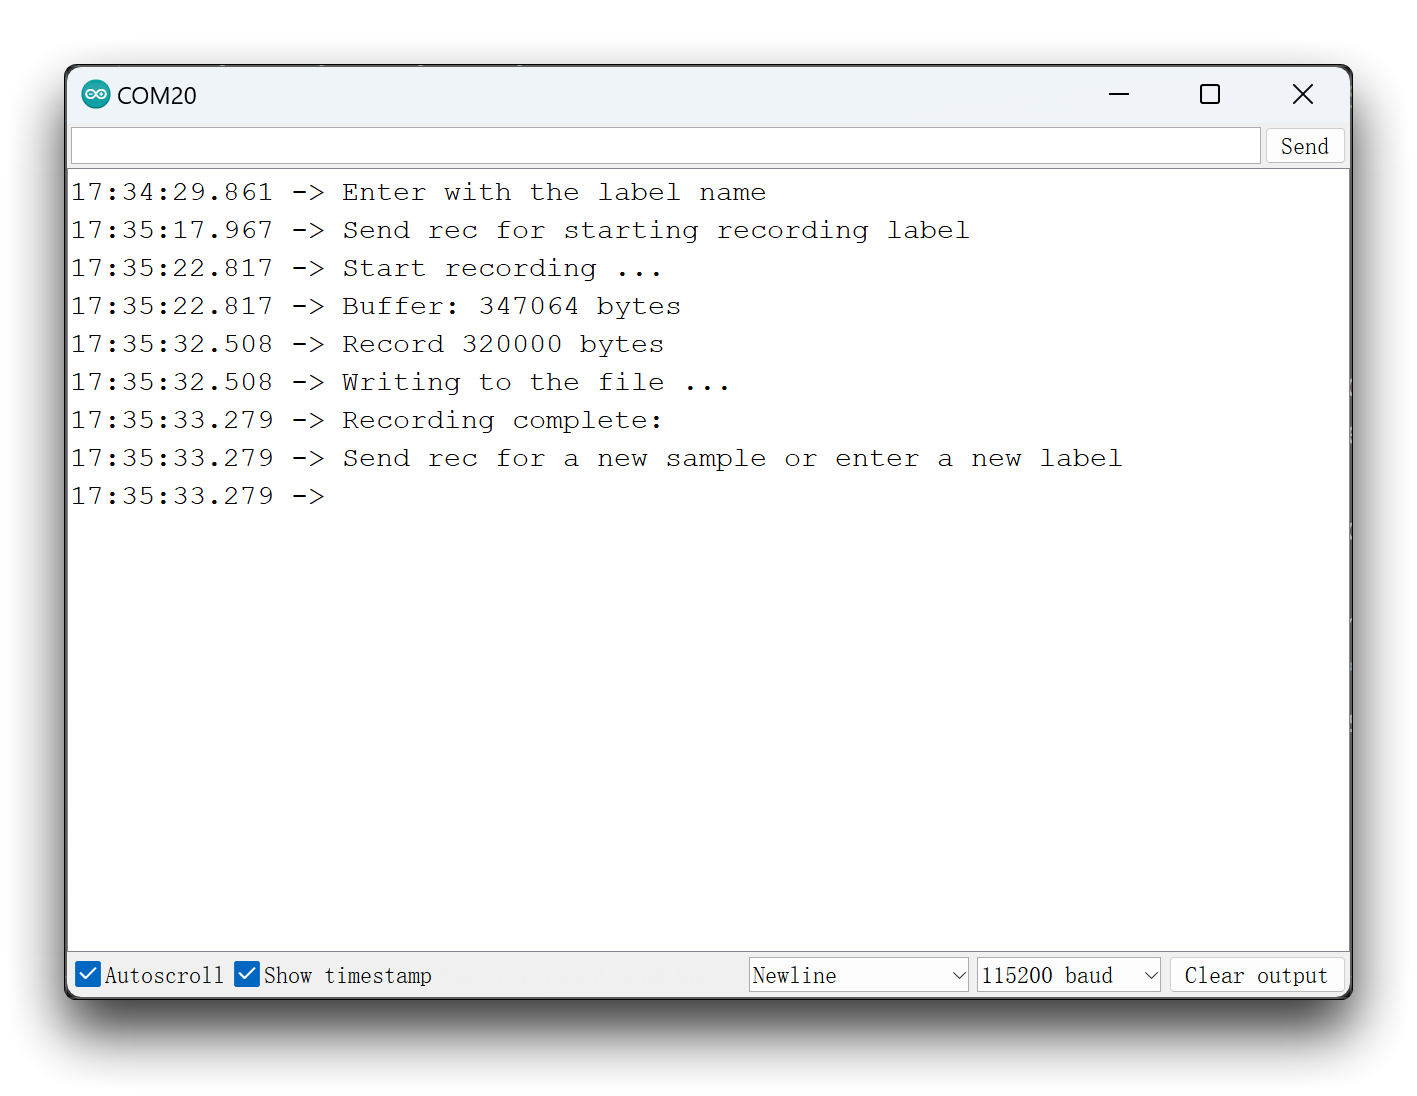
程序将在每次发送命令 rec 时开始录制新样本。文件将保存为 hello.1.wav、hello.2.wav、hello.3.wav 等,直到发送新标签(例如,stop)。在这种情况下,您应该为每个新样本发送命令 rec,这些样本将保存为 stop.1.wav、stop.2.wav、stop.3.wav 等。
最终,我们将在 SD 卡上获得保存的文件。
我们建议您为每个标签样本有足够的声音。您可以在每个十秒录制会话中多次重复您的关键词,我们将在后续步骤中分割样本。但关键词之间需要有一些间隔。
训练数据获取
步骤 2. 上传收集的声音数据
当原始数据集定义和收集完成后,我们应该在 Edge Impulse 启动一个新项目。创建项目后,在 Data Acquisition 部分选择 Upload Existing Data 工具。选择要上传的文件。
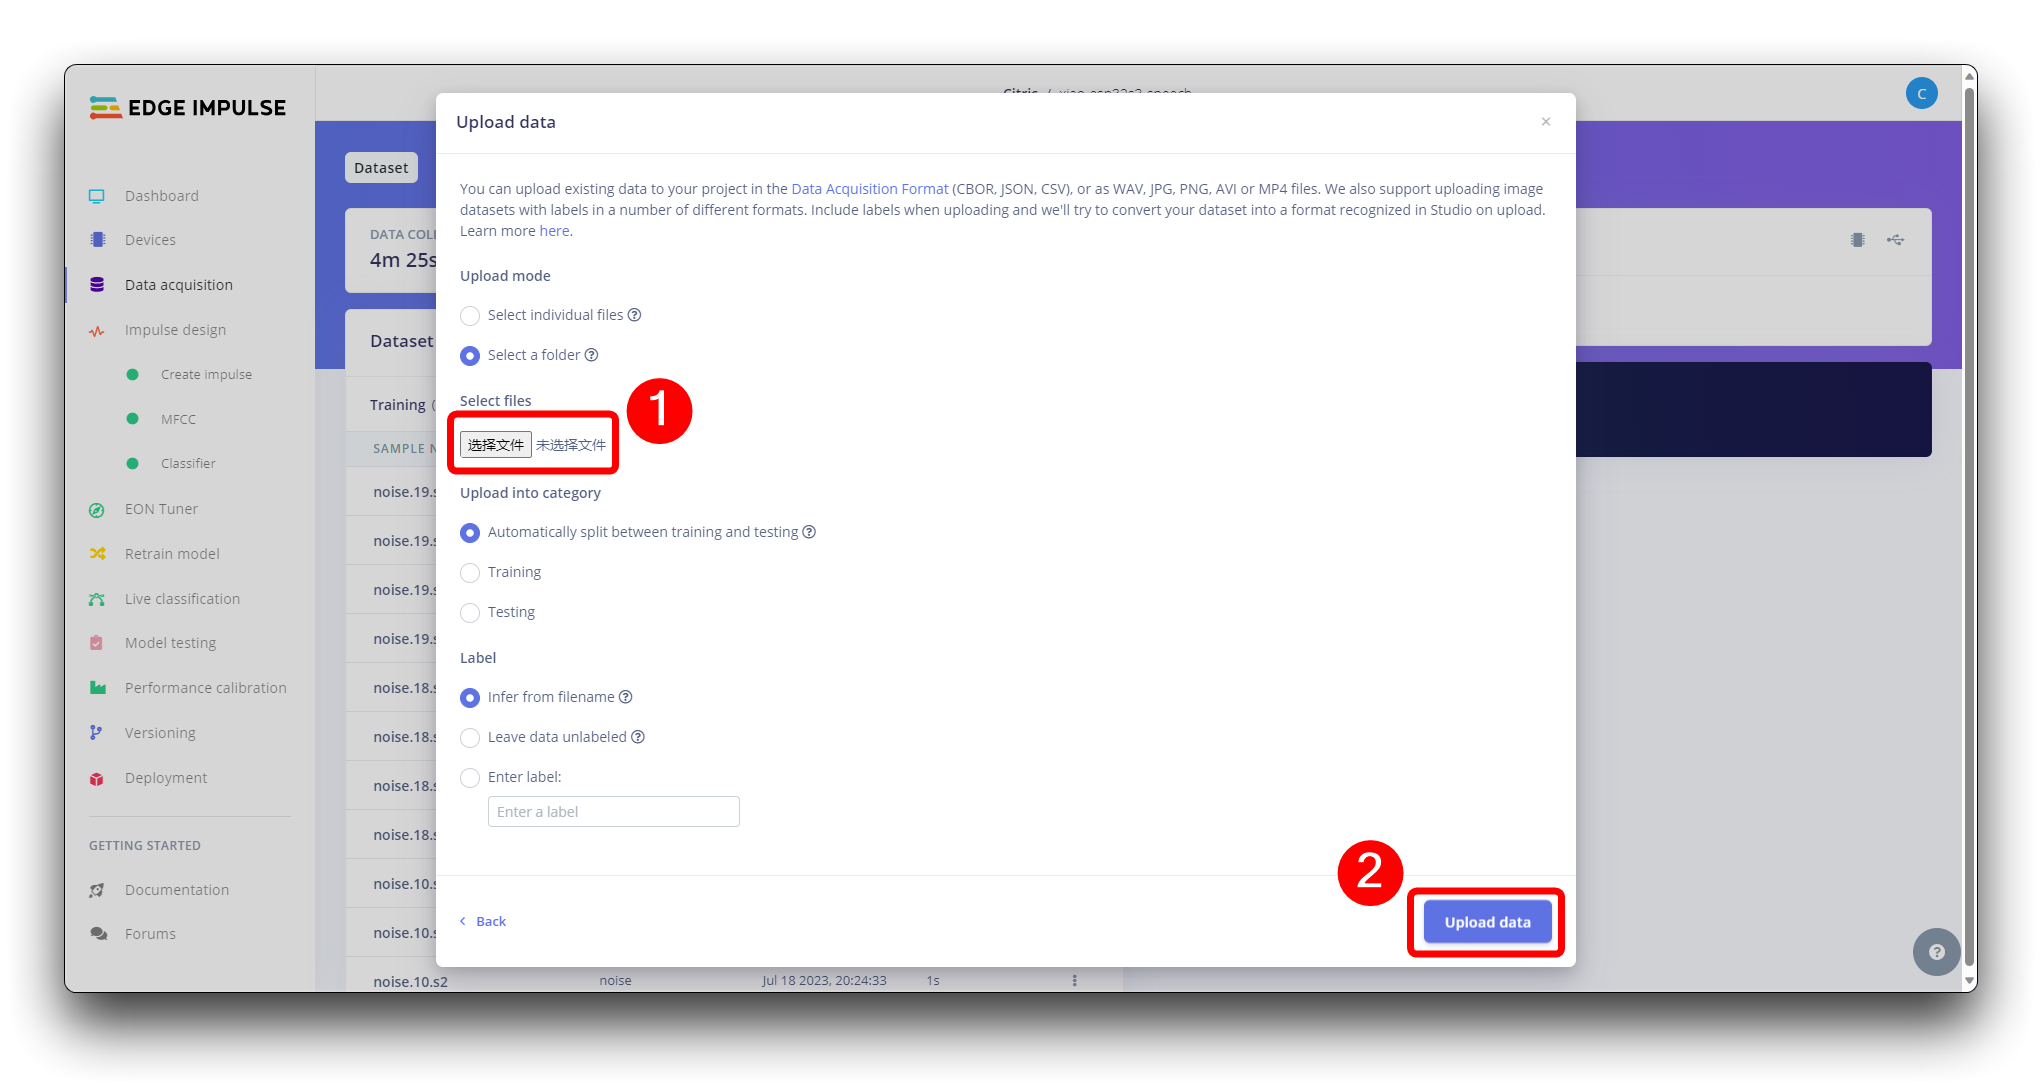
并将它们上传到 Studio(您可以自动将数据分割为训练/测试)。对所有类别和所有原始数据重复此操作。
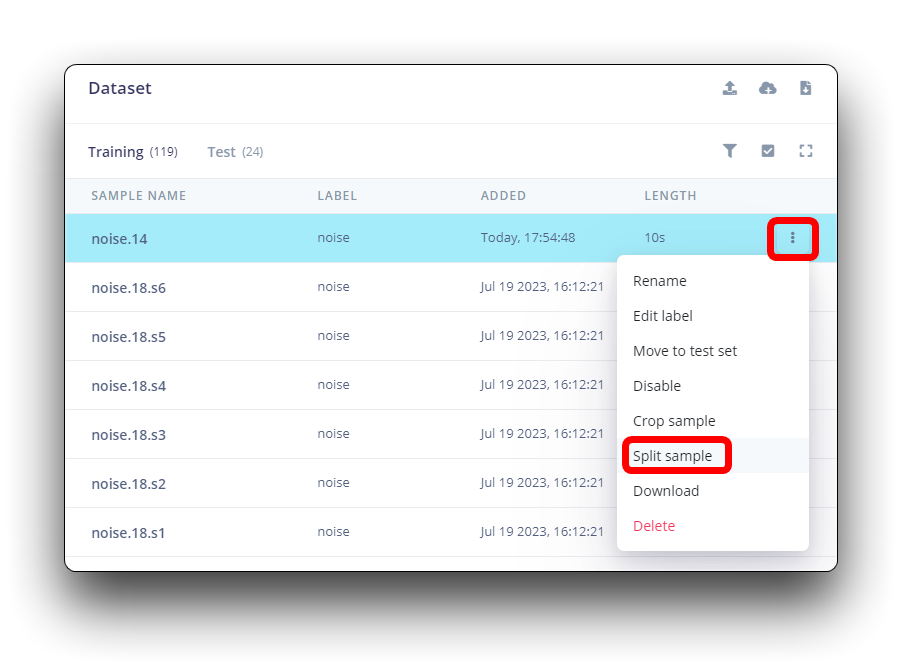
数据集中的所有数据长度为 1 秒,但在前面部分录制的样本长度为 10 秒,必须分割为 1 秒样本以保持兼容。点击样本名称后的三个点并选择 Split sample。
进入工具后,将数据分割为 1 秒记录。如有必要,添加或删除片段。
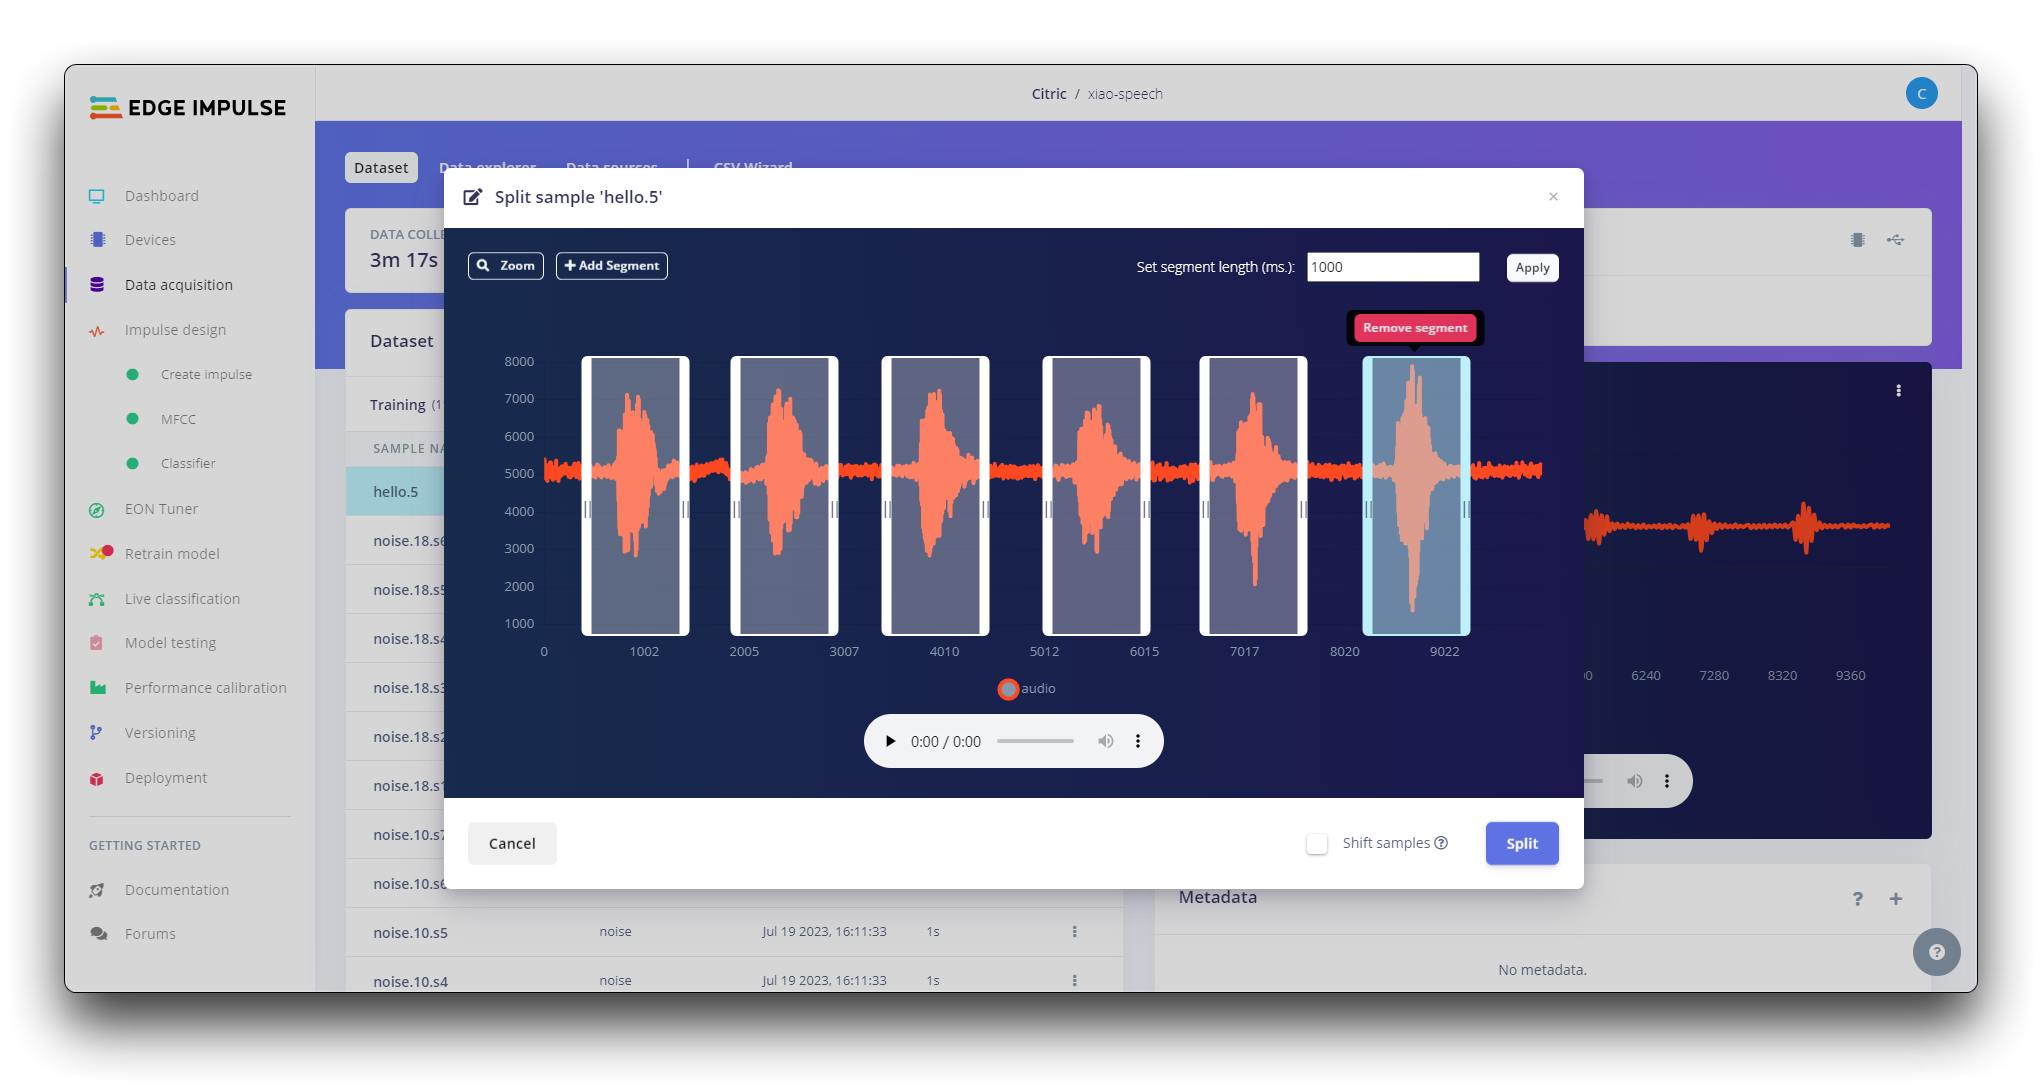
此过程应对所有样本重复。
步骤 3. 创建脉冲(预处理/模型定义)
脉冲获取原始数据,使用信号处理提取特征,然后使用学习块对新数据进行分类。
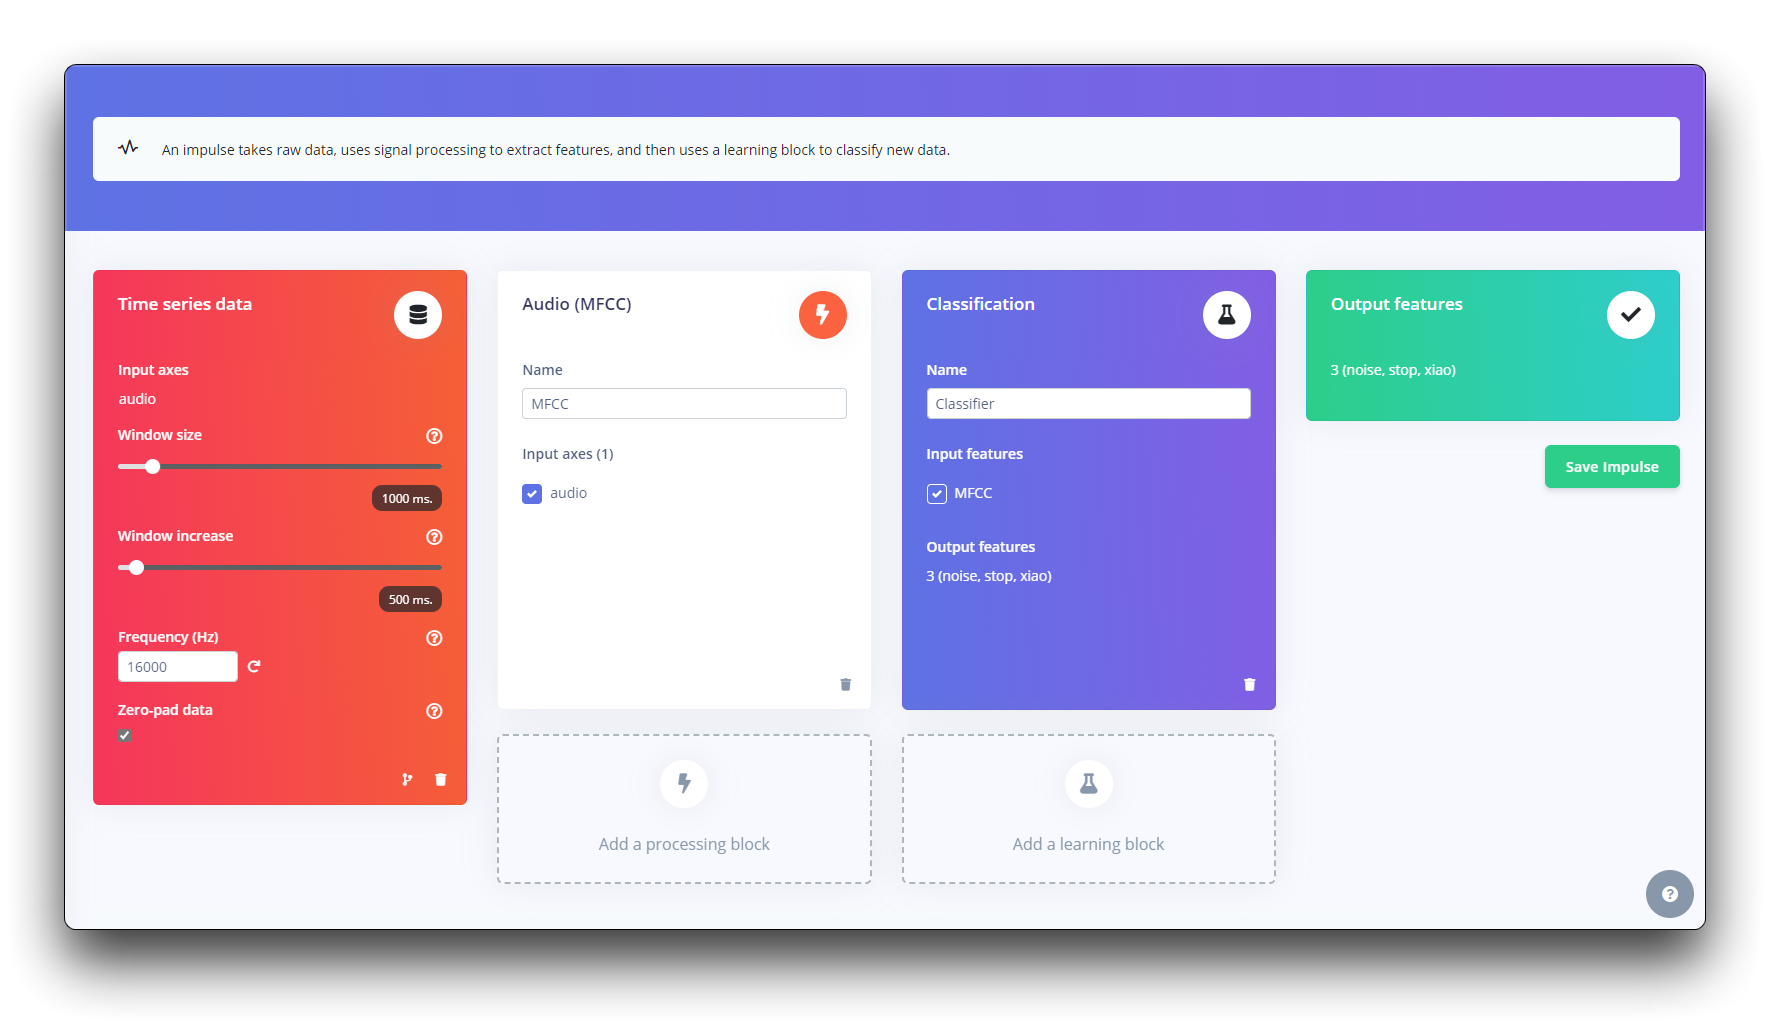
首先,我们将使用 1 秒窗口获取数据点,增强数据,每 500 毫秒滑动该窗口。注意 zero-pad data 选项已设置。这对于用零填充小于 1 秒的样本很重要(在某些情况下,我在 split tool 中减少了 1000 毫秒窗口以避免噪音和尖峰)。
每个 1 秒音频样本应该被预处理并转换为图像(例如,13 x 49 x 1)。我们将使用 MFCC,它使用梅尔频率倒谱系数从音频信号中提取特征,这对人声很有效。
接下来,我们选择 KERAS 进行分类,它通过使用卷积神经网络进行图像分类来从头构建我们的模型。
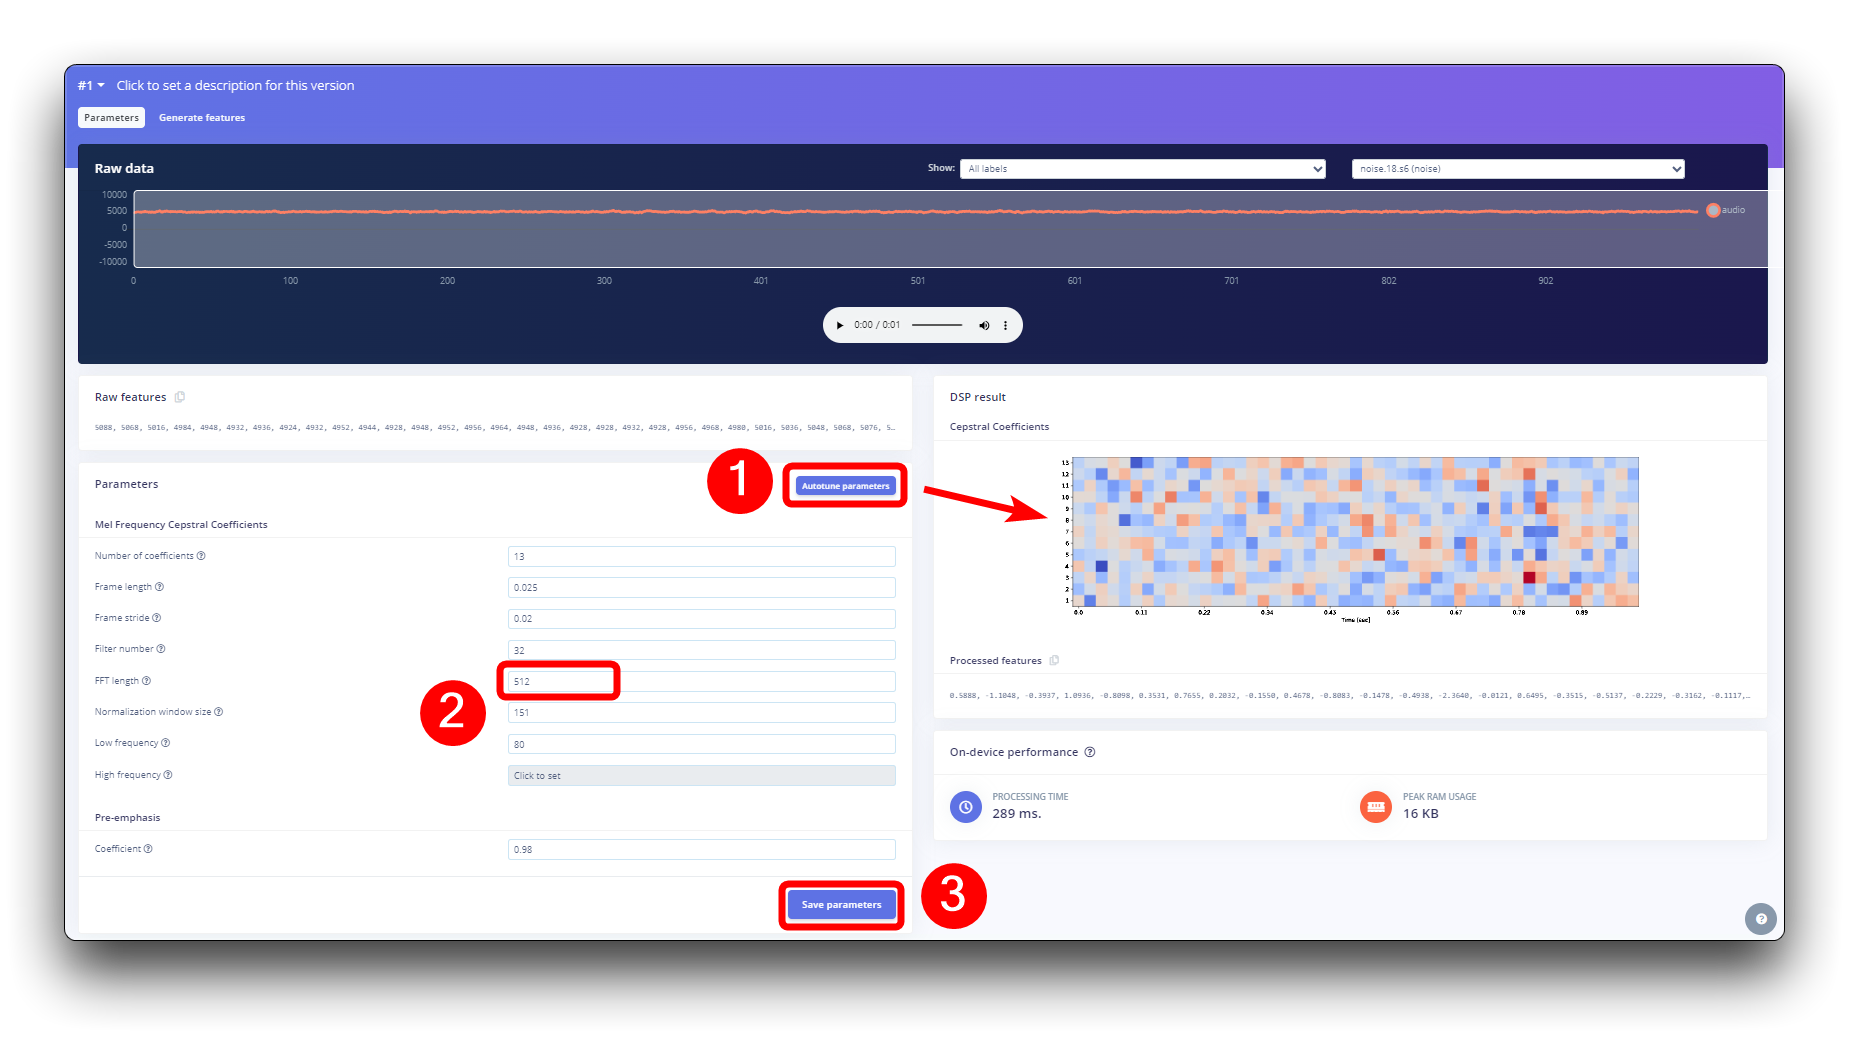
步骤 4. 预处理(MFCC)
下一步是创建要在下一阶段训练的图像。我们可以保持默认参数值或利用 DSP Autotuneparameters option,我们将这样做。
构建机器学习模型
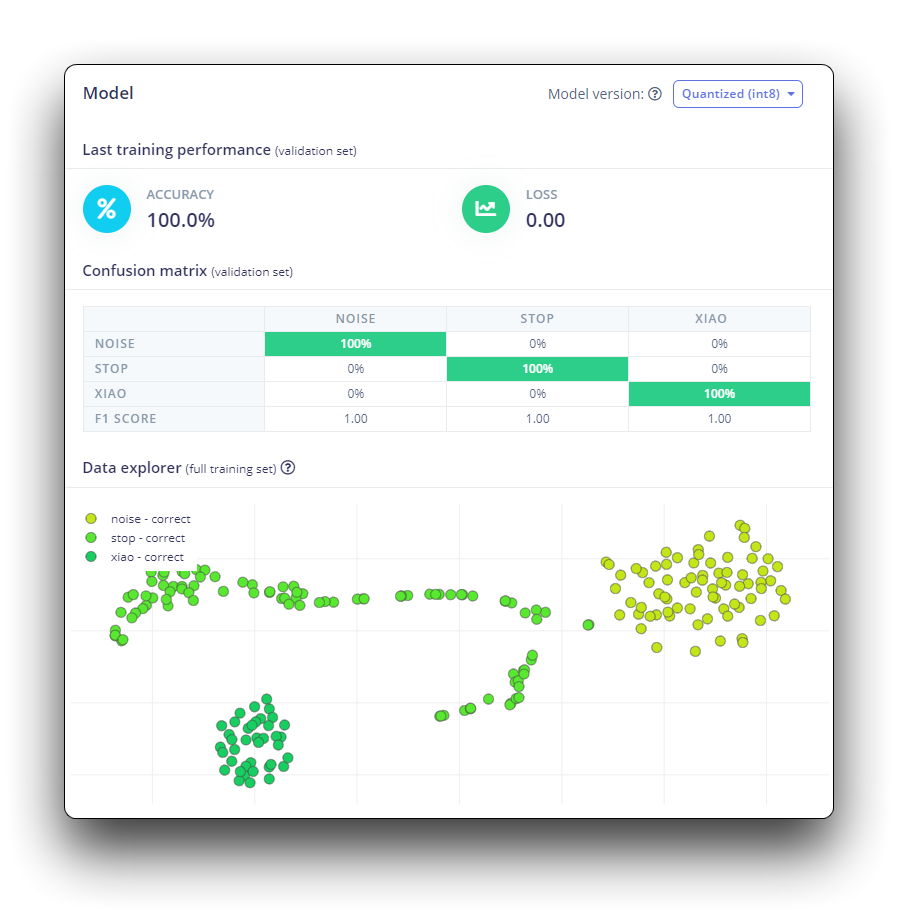
步骤 5. 模型设计和训练
我们将使用卷积神经网络(CNN)模型。基本架构定义为两个 Conv1D + MaxPooling 块(分别有 8 个和 16 个神经元)和 0.25 的 Dropout。在最后一层,经过 Flatten 后有四个神经元,每个类别一个。
作为超参数,我们将使用 0.005 的学习率和一个将训练 100 个 epoch 的模型。我们还将包括数据增强,如一些噪声。结果看起来不错。
部署到 XIAO ESP32S3 Sense
步骤 6. 部署到 XIAO ESP32S3 Sense
Edge Impulse 将打包所有需要的库、预处理函数和训练好的模型,并将它们下载到您的计算机。您应该选择 Arduino Library 选项,在底部选择 Quantized (Int8) 并按下 Build 按钮。
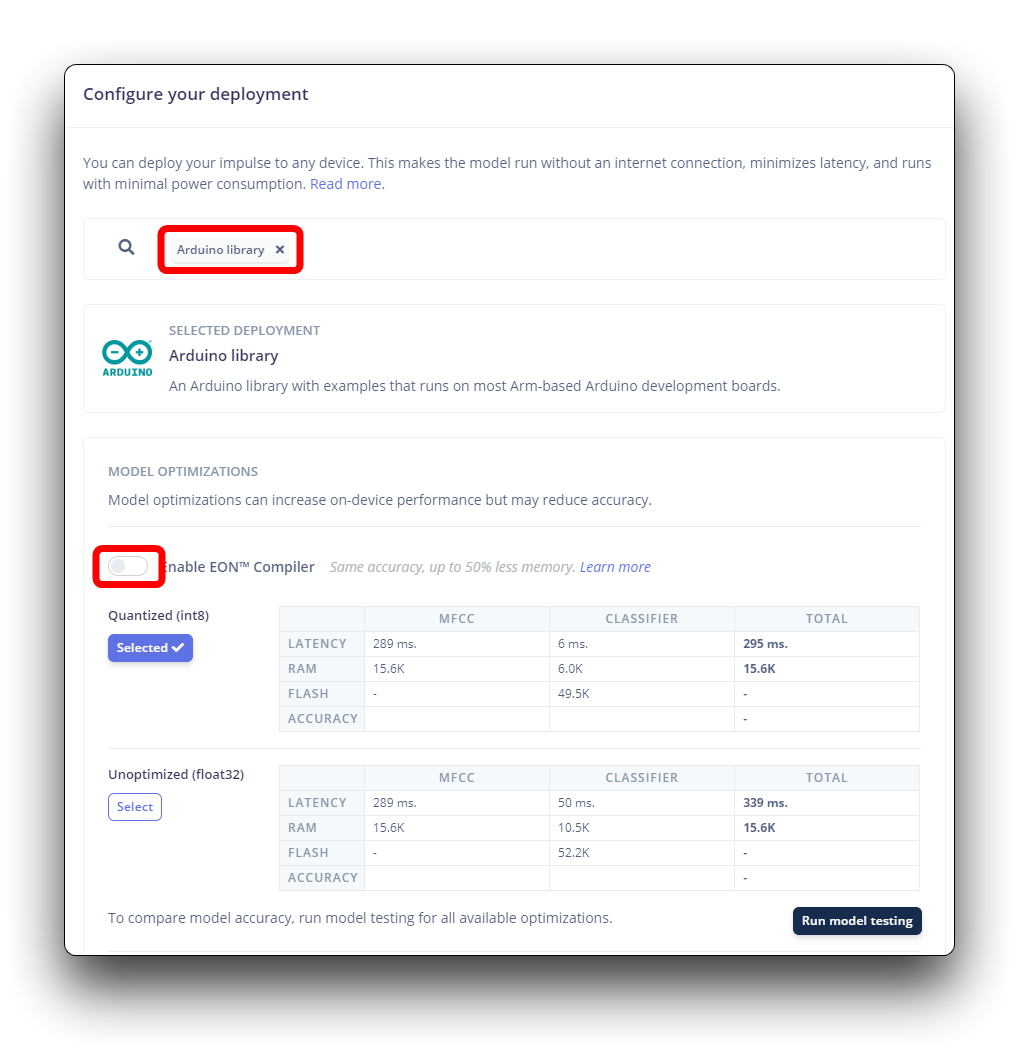
尽管 Edge Impulse 尚未发布使用 ESP NN 加速器的 ESP32S3 SDK,但感谢 Dmitry Maslov,我们可以为 ESP32-S3 恢复和修复其汇编优化。这个解决方案还不是官方的,EI 将在修复与其他开发板的冲突后将其包含在 EI SDK 中。
目前,这仅适用于非 EON 版本。因此,您还应该保持 Enable EON Compiler 选项未选中。
当选择 Build 按钮时,将创建一个 Zip 文件并下载到您的计算机。
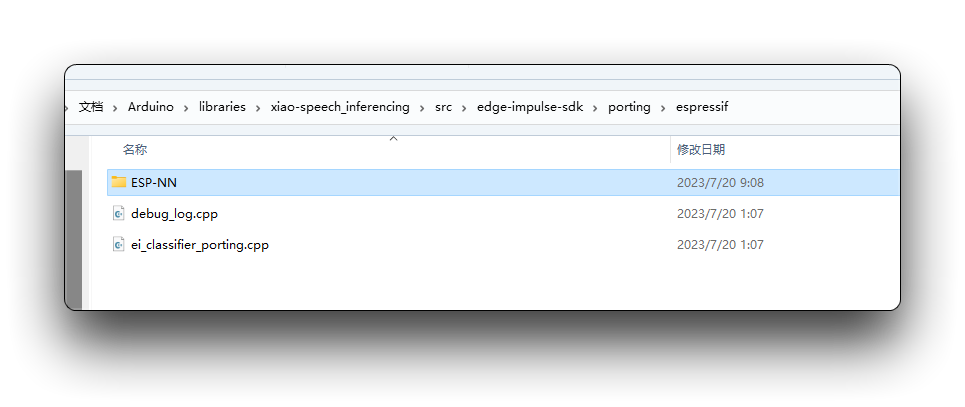
在我们使用下载的库之前,我们需要启用 ESP NN 加速器。为此,您可以从项目 GitHub 下载一个初步版本,解压缩它,并在您的 Arduino 库文件夹中用它替换 ESP NN 文件夹:src/edge-impulse-sdk/porting/espressif/ESP-NN。
在您的 Arduino IDE 中,转到 Sketch 选项卡并选择 Add .ZIP Library 选项,然后选择 Edge Impulse 下载的 .zip 文件。
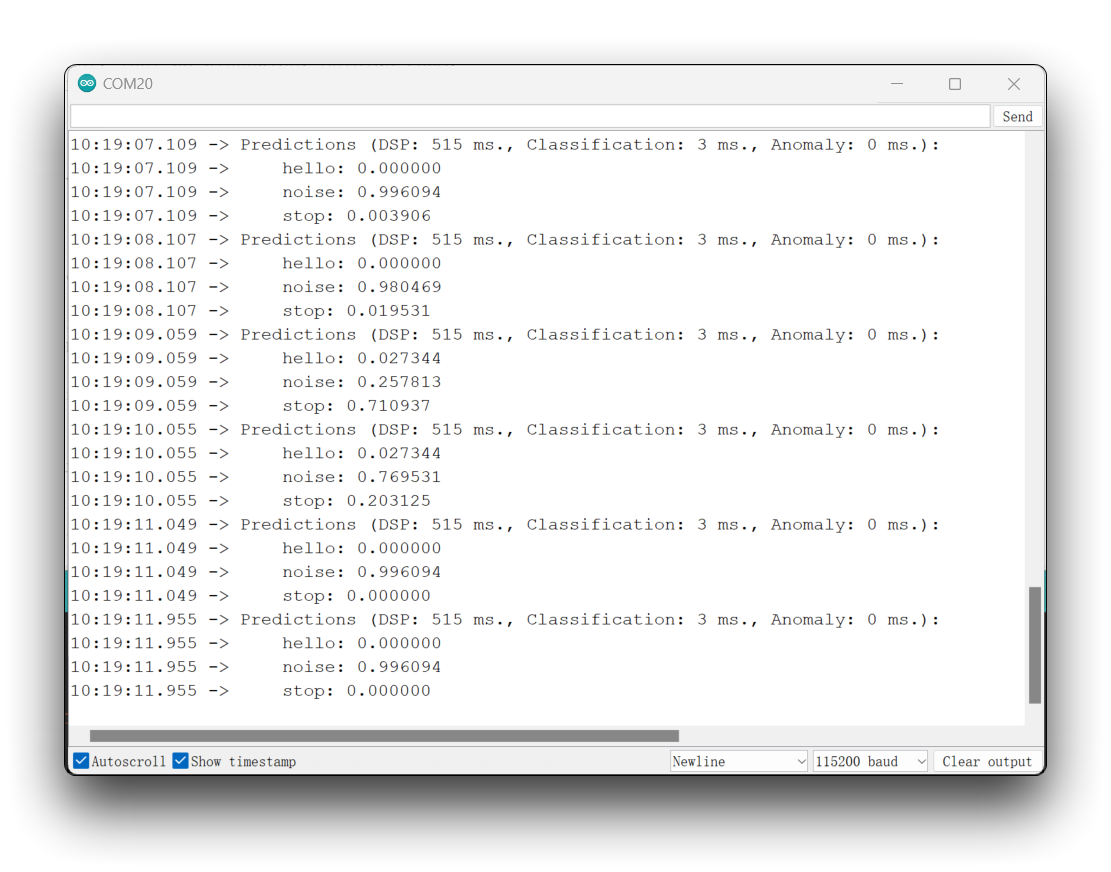
您可以在项目的 GitHub 上找到完整的代码。将草图上传到您的开发板并测试一些真实的推理。
代码中导入的库需要更新为您的库的名称。点亮的逻辑也需要根据您实际训练的标签顺序进行修改。
如果您的 ESP32 版本是 2.0.x。点击这里预览完整程序
/* Edge Impulse Arduino examples
* Copyright (c) 2022 EdgeImpulse Inc.
*
* Permission is hereby granted, free of charge, to any person obtaining a copy
* of this software and associated documentation files (the "Software"), to deal
* in the Software without restriction, including without limitation the rights
* to use, copy, modify, merge, publish, distribute, sublicense, and/or sell
* copies of the Software, and to permit persons to whom the Software is
* furnished to do so, subject to the following conditions:
*
* The above copyright notice and this permission notice shall be included in
* all copies or substantial portions of the Software.
*
* THE SOFTWARE IS PROVIDED "AS IS", WITHOUT WARRANTY OF ANY KIND, EXPRESS OR
* IMPLIED, INCLUDING BUT NOT LIMITED TO THE WARRANTIES OF MERCHANTABILITY,
* FITNESS FOR A PARTICULAR PURPOSE AND NONINFRINGEMENT. IN NO EVENT SHALL THE
* AUTHORS OR COPYRIGHT HOLDERS BE LIABLE FOR ANY CLAIM, DAMAGES OR OTHER
* LIABILITY, WHETHER IN AN ACTION OF CONTRACT, TORT OR OTHERWISE, ARISING FROM,
* OUT OF OR IN CONNECTION WITH THE SOFTWARE OR THE USE OR OTHER DEALINGS IN THE
* SOFTWARE.
*/
// If your target is limited in memory remove this macro to save 10K RAM
#define EIDSP_QUANTIZE_FILTERBANK 0
/*
** NOTE: If you run into TFLite arena allocation issue.
**
** This may be due to may dynamic memory fragmentation.
** Try defining "-DEI_CLASSIFIER_ALLOCATION_STATIC" in boards.local.txt (create
** if it doesn't exist) and copy this file to
** `<ARDUINO_CORE_INSTALL_PATH>/arduino/hardware/<mbed_core>/<core_version>/`.
**
** See
** (https://support.arduino.cc/hc/en-us/articles/360012076960-Where-are-the-installed-cores-located-)
** to find where Arduino installs cores on your machine.
**
** If the problem persists then there's not enough memory for this model and application.
*/
/* Includes ---------------------------------------------------------------- */
#include <XIAO-ESP32S3-KWS_inferencing.h>
#include <I2S.h>
#define SAMPLE_RATE 16000U
#define SAMPLE_BITS 16
#define LED_BUILT_IN 21
/** Audio buffers, pointers and selectors */
typedef struct {
int16_t *buffer;
uint8_t buf_ready;
uint32_t buf_count;
uint32_t n_samples;
} inference_t;
static inference_t inference;
static const uint32_t sample_buffer_size = 2048;
static signed short sampleBuffer[sample_buffer_size];
static bool debug_nn = false; // Set this to true to see e.g. features generated from the raw signal
static bool record_status = true;
/**
* @brief Arduino setup function
*/
void setup()
{
// put your setup code here, to run once:
Serial.begin(115200);
// comment out the below line to cancel the wait for USB connection (needed for native USB)
while (!Serial);
Serial.println("Edge Impulse Inferencing Demo");
pinMode(LED_BUILT_IN, OUTPUT); // Set the pin as output
digitalWrite(LED_BUILT_IN, HIGH); //Turn off
I2S.setAllPins(-1, 42, 41, -1, -1);
if (!I2S.begin(PDM_MONO_MODE, SAMPLE_RATE, SAMPLE_BITS)) {
Serial.println("Failed to initialize I2S!");
while (1) ;
}
// summary of inferencing settings (from model_metadata.h)
ei_printf("Inferencing settings:\n");
ei_printf("\tInterval: ");
ei_printf_float((float)EI_CLASSIFIER_INTERVAL_MS);
ei_printf(" ms.\n");
ei_printf("\tFrame size: %d\n", EI_CLASSIFIER_DSP_INPUT_FRAME_SIZE);
ei_printf("\tSample length: %d ms.\n", EI_CLASSIFIER_RAW_SAMPLE_COUNT / 16);
ei_printf("\tNo. of classes: %d\n", sizeof(ei_classifier_inferencing_categories) / sizeof(ei_classifier_inferencing_categories[0]));
ei_printf("\nStarting continious inference in 2 seconds...\n");
ei_sleep(2000);
if (microphone_inference_start(EI_CLASSIFIER_RAW_SAMPLE_COUNT) == false) {
ei_printf("ERR: Could not allocate audio buffer (size %d), this could be due to the window length of your model\r\n", EI_CLASSIFIER_RAW_SAMPLE_COUNT);
return;
}
ei_printf("Recording...\n");
}
/**
* @brief Arduino main function. Runs the inferencing loop.
*/
void loop()
{
bool m = microphone_inference_record();
if (!m) {
ei_printf("ERR: Failed to record audio...\n");
return;
}
signal_t signal;
signal.total_length = EI_CLASSIFIER_RAW_SAMPLE_COUNT;
signal.get_data = µphone_audio_signal_get_data;
ei_impulse_result_t result = { 0 };
EI_IMPULSE_ERROR r = run_classifier(&signal, &result, debug_nn);
if (r != EI_IMPULSE_OK) {
ei_printf("ERR: Failed to run classifier (%d)\n", r);
return;
}
int pred_index = 0; // Initialize pred_index
float pred_value = 0; // Initialize pred_value
// print the predictions
ei_printf("Predictions ");
ei_printf("(DSP: %d ms., Classification: %d ms., Anomaly: %d ms.)",
result.timing.dsp, result.timing.classification, result.timing.anomaly);
ei_printf(": \n");
for (size_t ix = 0; ix < EI_CLASSIFIER_LABEL_COUNT; ix++) {
ei_printf(" %s: ", result.classification[ix].label);
ei_printf_float(result.classification[ix].value);
ei_printf("\n");
if (result.classification[ix].value > pred_value){
pred_index = ix;
pred_value = result.classification[ix].value;
}
}
// Display inference result
if (pred_index == 3){
digitalWrite(LED_BUILT_IN, LOW); //Turn on
}
else{
digitalWrite(LED_BUILT_IN, HIGH); //Turn off
}
#if EI_CLASSIFIER_HAS_ANOMALY == 1
ei_printf(" anomaly score: ");
ei_printf_float(result.anomaly);
ei_printf("\n");
#endif
}
static void audio_inference_callback(uint32_t n_bytes)
{
for(int i = 0; i < n_bytes>>1; i++) {
inference.buffer[inference.buf_count++] = sampleBuffer[i];
if(inference.buf_count >= inference.n_samples) {
inference.buf_count = 0;
inference.buf_ready = 1;
}
}
}
static void capture_samples(void* arg) {
const int32_t i2s_bytes_to_read = (uint32_t)arg;
size_t bytes_read = i2s_bytes_to_read;
while (record_status) {
/* read data at once from i2s - Modified for XIAO ESP2S3 Sense and I2S.h library */
// i2s_read((i2s_port_t)1, (void*)sampleBuffer, i2s_bytes_to_read, &bytes_read, 100);
esp_i2s::i2s_read(esp_i2s::I2S_NUM_0, (void*)sampleBuffer, i2s_bytes_to_read, &bytes_read, 100);
if (bytes_read <= 0) {
ei_printf("Error in I2S read : %d", bytes_read);
}
else {
if (bytes_read < i2s_bytes_to_read) {
ei_printf("Partial I2S read");
}
// scale the data (otherwise the sound is too quiet)
for (int x = 0; x < i2s_bytes_to_read/2; x++) {
sampleBuffer[x] = (int16_t)(sampleBuffer[x]) * 8;
}
if (record_status) {
audio_inference_callback(i2s_bytes_to_read);
}
else {
break;
}
}
}
vTaskDelete(NULL);
}
/**
* @brief Init inferencing struct and setup/start PDM
*
* @param[in] n_samples The n samples
*
* @return { description_of_the_return_value }
*/
static bool microphone_inference_start(uint32_t n_samples)
{
inference.buffer = (int16_t *)malloc(n_samples * sizeof(int16_t));
if(inference.buffer == NULL) {
return false;
}
inference.buf_count = 0;
inference.n_samples = n_samples;
inference.buf_ready = 0;
// if (i2s_init(EI_CLASSIFIER_FREQUENCY)) {
// ei_printf("Failed to start I2S!");
// }
ei_sleep(100);
record_status = true;
xTaskCreate(capture_samples, "CaptureSamples", 1024 * 32, (void*)sample_buffer_size, 10, NULL);
return true;
}
/**
* @brief Wait on new data
*
* @return True when finished
*/
static bool microphone_inference_record(void)
{
bool ret = true;
while (inference.buf_ready == 0) {
delay(10);
}
inference.buf_ready = 0;
return ret;
}
/**
* Get raw audio signal data
*/
static int microphone_audio_signal_get_data(size_t offset, size_t length, float *out_ptr)
{
numpy::int16_to_float(&inference.buffer[offset], out_ptr, length);
return 0;
}
/**
* @brief Stop PDM and release buffers
*/
static void microphone_inference_end(void)
{
free(sampleBuffer);
ei_free(inference.buffer);
}
#if !defined(EI_CLASSIFIER_SENSOR) || EI_CLASSIFIER_SENSOR != EI_CLASSIFIER_SENSOR_MICROPHONE
#error "Invalid model for current sensor."
#endif
如果你的 ESP32 版本是 3.0.x。点击此处预览完整程序
/* Edge Impulse Arduino examples
* Copyright (c) 2022 EdgeImpulse Inc.
*
* Permission is hereby granted, free of charge, to any person obtaining a copy
* of this software and associated documentation files (the "Software"), to deal
* in the Software without restriction, including without limitation the rights
* to use, copy, modify, merge, publish, distribute, sublicense, and/or sell
* copies of the Software, and to permit persons to whom the Software is
* furnished to do so, subject to the following conditions:
*
* The above copyright notice and this permission notice shall be included in
* all copies or substantial portions of the Software.
*
* THE SOFTWARE IS PROVIDED "AS IS", WITHOUT WARRANTY OF ANY KIND, EXPRESS OR
* IMPLIED, INCLUDING BUT NOT LIMITED TO THE WARRANTIES OF MERCHANTABILITY,
* FITNESS FOR A PARTICULAR PURPOSE AND NONINFRINGEMENT. IN NO EVENT SHALL THE
* AUTHORS OR COPYRIGHT HOLDERS BE LIABLE FOR ANY CLAIM, DAMAGES OR OTHER
* LIABILITY, WHETHER IN AN ACTION OF CONTRACT, TORT OR OTHERWISE, ARISING FROM,
* OUT OF OR IN CONNECTION WITH THE SOFTWARE OR THE USE OR OTHER DEALINGS IN THE
* SOFTWARE.
*/
// If your target is limited in memory remove this macro to save 10K RAM
#define EIDSP_QUANTIZE_FILTERBANK 0
/*
** NOTE: If you run into TFLite arena allocation issue.
**
** This may be due to may dynamic memory fragmentation.
** Try defining "-DEI_CLASSIFIER_ALLOCATION_STATIC" in boards.local.txt (create
** if it doesn't exist) and copy this file to
** `<ARDUINO_CORE_INSTALL_PATH>/arduino/hardware/<mbed_core>/<core_version>/`.
**
** See
** (https://support.arduino.cc/hc/en-us/articles/360012076960-Where-are-the-installed-cores-located-)
** to find where Arduino installs cores on your machine.
**
** If the problem persists then there's not enough memory for this model and application.
*/
/* Includes ---------------------------------------------------------------- */
#include <XIAO-ESP32S3-KWS_inferencing.h>
#include <ESP_I2S.h>
I2SClass I2S;
#define SAMPLE_RATE 16000U
#define SAMPLE_BITS 16
#define LED_BUILT_IN 21
/** Audio buffers, pointers and selectors */
typedef struct {
int16_t *buffer;
uint8_t buf_ready;
uint32_t buf_count;
uint32_t n_samples;
} inference_t;
static inference_t inference;
static const uint32_t sample_buffer_size = 2048;
static signed short sampleBuffer[sample_buffer_size];
static bool debug_nn = false; // Set this to true to see e.g. features generated from the raw signal
static bool record_status = true;
/**
* @brief Arduino setup function
*/
void setup()
{
// put your setup code here, to run once:
Serial.begin(115200);
// comment out the below line to cancel the wait for USB connection (needed for native USB)
while (!Serial);
Serial.println("Edge Impulse Inferencing Demo");
pinMode(LED_BUILT_IN, OUTPUT); // Set the pin as output
digitalWrite(LED_BUILT_IN, HIGH); //Turn off
// setup 42 PDM clock and 41 PDM data pins
I2S.setPinsPdmRx(42, 41);
if (!I2S.begin(I2S_MODE_PDM_RX, 16000, I2S_DATA_BIT_WIDTH_16BIT, I2S_SLOT_MODE_MONO)) {
Serial.println("Failed to initialize I2S!");
while (1) ;
}
// summary of inferencing settings (from model_metadata.h)
ei_printf("Inferencing settings:\n");
ei_printf("\tInterval: ");
ei_printf_float((float)EI_CLASSIFIER_INTERVAL_MS);
ei_printf(" ms.\n");
ei_printf("\tFrame size: %d\n", EI_CLASSIFIER_DSP_INPUT_FRAME_SIZE);
ei_printf("\tSample length: %d ms.\n", EI_CLASSIFIER_RAW_SAMPLE_COUNT / 16);
ei_printf("\tNo. of classes: %d\n", sizeof(ei_classifier_inferencing_categories) / sizeof(ei_classifier_inferencing_categories[0]));
ei_printf("\nStarting continious inference in 2 seconds...\n");
ei_sleep(2000);
if (microphone_inference_start(EI_CLASSIFIER_RAW_SAMPLE_COUNT) == false) {
ei_printf("ERR: Could not allocate audio buffer (size %d), this could be due to the window length of your model\r\n", EI_CLASSIFIER_RAW_SAMPLE_COUNT);
return;
}
ei_printf("Recording...\n");
}
/**
* @brief Arduino main function. Runs the inferencing loop.
*/
void loop()
{
bool m = microphone_inference_record();
if (!m) {
ei_printf("ERR: Failed to record audio...\n");
return;
}
signal_t signal;
signal.total_length = EI_CLASSIFIER_RAW_SAMPLE_COUNT;
signal.get_data = µphone_audio_signal_get_data;
ei_impulse_result_t result = { 0 };
EI_IMPULSE_ERROR r = run_classifier(&signal, &result, debug_nn);
if (r != EI_IMPULSE_OK) {
ei_printf("ERR: Failed to run classifier (%d)\n", r);
return;
}
int pred_index = 0; // Initialize pred_index
float pred_value = 0; // Initialize pred_value
// print the predictions
ei_printf("Predictions ");
ei_printf("(DSP: %d ms., Classification: %d ms., Anomaly: %d ms.)",
result.timing.dsp, result.timing.classification, result.timing.anomaly);
ei_printf(": \n");
for (size_t ix = 0; ix < EI_CLASSIFIER_LABEL_COUNT; ix++) {
ei_printf(" %s: ", result.classification[ix].label);
ei_printf_float(result.classification[ix].value);
ei_printf("\n");
if (result.classification[ix].value > pred_value){
pred_index = ix;
pred_value = result.classification[ix].value;
}
}
// Display inference result
if (pred_index == 3){
digitalWrite(LED_BUILT_IN, LOW); //Turn on
}
else{
digitalWrite(LED_BUILT_IN, HIGH); //Turn off
}
#if EI_CLASSIFIER_HAS_ANOMALY == 1
ei_printf(" anomaly score: ");
ei_printf_float(result.anomaly);
ei_printf("\n");
#endif
}
static void audio_inference_callback(uint32_t n_bytes)
{
for(int i = 0; i < n_bytes>>1; i++) {
inference.buffer[inference.buf_count++] = sampleBuffer[i];
if(inference.buf_count >= inference.n_samples) {
inference.buf_count = 0;
inference.buf_ready = 1;
}
}
}
static void capture_samples(void* arg) {
const int32_t i2s_bytes_to_read = (uint32_t)arg;
size_t bytes_read = i2s_bytes_to_read;
while (record_status) {
/* read data at once from i2s - Modified for XIAO ESP2S3 Sense and I2S.h library */
// i2s_read((i2s_port_t)1, (void*)sampleBuffer, i2s_bytes_to_read, &bytes_read, 100);
esp_i2s::i2s_read(esp_i2s::I2S_NUM_0, (void*)sampleBuffer, i2s_bytes_to_read, &bytes_read, 100);
if (bytes_read <= 0) {
ei_printf("Error in I2S read : %d", bytes_read);
}
else {
if (bytes_read < i2s_bytes_to_read) {
ei_printf("Partial I2S read");
}
// scale the data (otherwise the sound is too quiet)
for (int x = 0; x < i2s_bytes_to_read/2; x++) {
sampleBuffer[x] = (int16_t)(sampleBuffer[x]) * 8;
}
if (record_status) {
audio_inference_callback(i2s_bytes_to_read);
}
else {
break;
}
}
}
vTaskDelete(NULL);
}
/**
* @brief Init inferencing struct and setup/start PDM
*
* @param[in] n_samples The n samples
*
* @return { description_of_the_return_value }
*/
static bool microphone_inference_start(uint32_t n_samples)
{
inference.buffer = (int16_t *)malloc(n_samples * sizeof(int16_t));
if(inference.buffer == NULL) {
return false;
}
inference.buf_count = 0;
inference.n_samples = n_samples;
inference.buf_ready = 0;
// if (i2s_init(EI_CLASSIFIER_FREQUENCY)) {
// ei_printf("Failed to start I2S!");
// }
ei_sleep(100);
record_status = true;
xTaskCreate(capture_samples, "CaptureSamples", 1024 * 32, (void*)sample_buffer_size, 10, NULL);
return true;
}
/**
* @brief Wait on new data
*
* @return True when finished
*/
static bool microphone_inference_record(void)
{
bool ret = true;
while (inference.buf_ready == 0) {
delay(10);
}
inference.buf_ready = 0;
return ret;
}
/**
* Get raw audio signal data
*/
static int microphone_audio_signal_get_data(size_t offset, size_t length, float *out_ptr)
{
numpy::int16_to_float(&inference.buffer[offset], out_ptr, length);
return 0;
}
/**
* @brief Stop PDM and release buffers
*/
static void microphone_inference_end(void)
{
free(sampleBuffer);
ei_free(inference.buffer);
}
#if !defined(EI_CLASSIFIER_SENSOR) || EI_CLASSIFIER_SENSOR != EI_CLASSIFIER_SENSOR_MICROPHONE
#error "Invalid model for current sensor."
#endif
这个想法是,每当检测到关键词 HELLO 时,LED 就会点亮。同样地,这可以不是点亮 LED,而是作为外部设备的"触发器",正如我们在介绍中看到的那样。
特别感谢
特别感谢 MJRoBot (Marcelo Rovai) 提供关于 XIAO ESP32S3 Sense 接入 Edge Impulse 的教程内容。原文非常详细,包含了大量关于机器学习的知识。
如果您想阅读本文的原始内容,可以直接跳转到下面的原文。
MJRoBot 还有很多关于 XIAO ESP32S3 的有趣项目。
资源
- [GITHUB] 项目 Github
- [EDGE-IMPULSE] edge impulse 演示
技术支持与产品讨论
感谢您选择我们的产品!我们在这里为您提供不同的支持,以确保您使用我们产品的体验尽可能顺畅。我们提供多种沟通渠道,以满足不同的偏好和需求。