Usage of Seeed Studio XIAO ESP32S3 microphone
In this tutorial, we will bring you how to use the microphone of XIAO ESP32S3 Sense expansion board. First is the very basic use of the I2S pin, we will get the loudness of the current environment by using I2S and the microphone, and display it in the serial waveform graph. Then we will explain how to record sound and save the recorded sound to the SD card.
| Seeed Studio XIAO ESP32S3 Sense |
|---|
 |
All contents of this tutorial are applicable to XIAO ESP32S3 Sense only.
Getting Started
Before starting the content of the tutorial, you may need to prepare the following hardware and software in advance.
Installation of expansion boards (for Sense)
Installing the expansion board is very simple, you just need to align the connector on the expansion board with the B2B connector on the XIAO ESP32S3, press it hard and hear a "click", the installation is complete.
Prepare the microSD card
You may need a MicroSD card when working on a project where recordings are saved.
XIAO ESP32S3 Sense supports microSD cards up to 32GB, so if you are ready to buy a microSD card for XIAO, please refer to this specification. And format the microSD card to FAT32 format before using the microSD card.
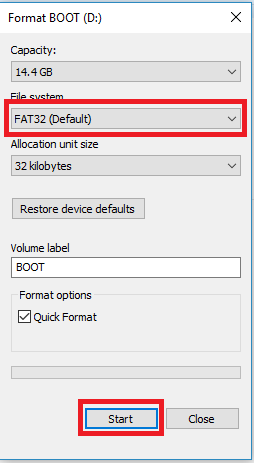
After formatting, you can insert the microSD card into the microSD card slot. Please note the direction of insertion, the side with the gold finger should face inward.

Understanding Pins
| Pin Number | Function Description |
|---|---|
| GPIO 41 | PDM Microphone DATA |
| GPIO 42 | PDM Microphone CLK |
Detection of sound loudness
For the first project case, let's detect the noise in the environment and show the ambient loudness detected by the microphone using the Arduino IDE's serial port waveform graph.
The following is the complete sample program.
Check and make sure which version of esp32 you are using, the following example is for 2.0.x the one below is for 3.0.x and later
#include <I2S.h>

void setup() {
  // Open serial communications and wait for port to open:
  // A baud rate of 115200 is used instead of 9600 for a faster data rate
  // on non-native USB ports
  Serial.begin(115200);
  while (!Serial) {
    ; // wait for serial port to connect. Needed for native USB port only
  }

  // start I2S at 16 kHz with 16-bits per sample
  I2S.setAllPins(-1, 42, 41, -1, -1);
  if (!I2S.begin(PDM_MONO_MODE, 16000, 16)) {
    Serial.println("Failed to initialize I2S!");
    while (1); // do nothing
  }
}

void loop() {
  // read a sample
  int sample = I2S.read();

  if (sample && sample != -1 && sample != 1) {
    Serial.println(sample);
  }
}
The example above is only compatible with 2.0.x of esp32, if you are on latest (e.g. 3.0.x) use the one below
#include <ESP_I2S.h>
I2SClass I2S;

void setup() {
  // Open serial communications and wait for port to open:
  // A baud rate of 115200 is used instead of 9600 for a faster data rate
  // on non-native USB ports
  Serial.begin(115200);
  while (!Serial) {
    ; // wait for serial port to connect. Needed for native USB port only
  }

  // setup 42 PDM clock and 41 PDM data pins
  I2S.setPinsPdmRx(42, 41);

  // start I2S at 16 kHz with 16-bits per sample
  if (!I2S.begin(I2S_MODE_PDM_RX, 16000, I2S_DATA_BIT_WIDTH_16BIT, I2S_SLOT_MODE_MONO)) {
    Serial.println("Failed to initialize I2S!");
    while (1); // do nothing
  }
}

void loop() {
  // read a sample
  int sample = I2S.read();

  if (sample && sample != -1 && sample != 1) {
    Serial.println(sample);
  }
}
Upload this program for XIAO ESP32S3 Sense and open Serial Plotter, you will see the loudness change curve of the sound.

Program annotation
At the beginning of the program, we need to first import the I2S library in order to use the microphone pins.
#include <I2S.h>
The setAllPins() function is called on the I2S object to configure the pins used for the I2S interface. The function takes five integer parameters that represent the GPIO pins connected to the I2S interface's bit clock, word select, data input, data output, and channel select lines, respectively.
I2S.setAllPins(-1, 42, 41, -1, -1);
In this specific code, the -1 values indicate that the corresponding pins are not used, while the 42 and 41 values represent the GPIO pins connected to the word select and data input lines, respectively. The data output and channel select lines are not used in this configuration and are set to -1.
if (!I2S.begin(PDM_MONO_MODE, 16000, 16)) {
    Serial.println("Failed to initialize I2S!");
    while (1); // do nothing
}
The begin() function is called on the I2S object to initialize the I2S interface with the specified parameters: PDM_MONO_MODE, 16000 Hz sample rate, and 16-bit resolution.
It should be noted that for the current ESP32-S3 chip, we can only use PDM_MONO_MODE and the sampling bit width can only be 16bit. only the sampling rate can be modified, but after testing, the sampling rate at 16kHz is relatively stable.
int sample = I2S.read();

if (sample && sample != -1 && sample != 1) {
    Serial.println(sample);
}
The read() function is called on the I2S object to read a single audio sample from the I2S interface. The if statement checks the value of the sample variable. If the sample value is not 0, -1, or 1, it is considered a valid audio sample, and the code inside the if block will be executed. In this case, the sample value is printed to the serial console using the Serial.println() function.
Save recorded sound to microSD card
In this next project, we will guide you how to combine the functions of the microSD card and save the recorded sound to the microSD card. Then for this project, please prepare the microSD card and format it to FAT32 format in advance.
If this is your first time using a microSD card on the XIAO ESP32S3, you can read the file system Wiki content to learn about microSD card installation and preparation.
The following is the Arduino program for this project.
Check and make sure which version of esp32 you are using, the following example is for 2.0.x the one below is for 3.0.x and later
/*
 * WAV Recorder for Seeed XIAO ESP32S3 Sense
*/

#include <I2S.h>
#include "FS.h"
#include "SD.h"
#include "SPI.h"

// make changes as needed
#define RECORD_TIME   20  // seconds, The maximum value is 240
#define WAV_FILE_NAME "arduino_rec"

// do not change for best
#define SAMPLE_RATE 16000U
#define SAMPLE_BITS 16
#define WAV_HEADER_SIZE 44
#define VOLUME_GAIN 2

void setup() {
  Serial.begin(115200);
  while (!Serial) ;
  I2S.setAllPins(-1, 42, 41, -1, -1);
  if (!I2S.begin(PDM_MONO_MODE, SAMPLE_RATE, SAMPLE_BITS)) {
    Serial.println("Failed to initialize I2S!");
    while (1) ;
  }
  if(!SD.begin(21)){
    Serial.println("Failed to mount SD Card!");
    while (1) ;
  }
  record_wav();
}

void loop() {
  delay(1000);
  Serial.printf(".");
}

void record_wav()
{
  uint32_t sample_size = 0;
  uint32_t record_size = (SAMPLE_RATE * SAMPLE_BITS / 8) * RECORD_TIME;
  uint8_t *rec_buffer = NULL;
  Serial.printf("Ready to start recording ...\n");

  File file = SD.open("/"WAV_FILE_NAME".wav", FILE_WRITE);
  // Write the header to the WAV file
  uint8_t wav_header[WAV_HEADER_SIZE];
  generate_wav_header(wav_header, record_size, SAMPLE_RATE);
  file.write(wav_header, WAV_HEADER_SIZE);

  // PSRAM malloc for recording
  rec_buffer = (uint8_t *)ps_malloc(record_size);
  if (rec_buffer == NULL) {
    Serial.printf("malloc failed!\n");
    while(1) ;
  }
  Serial.printf("Buffer: %d bytes\n", ESP.getPsramSize() - ESP.getFreePsram());

  // Start recording
  esp_i2s::i2s_read(esp_i2s::I2S_NUM_0, rec_buffer, record_size, &sample_size, portMAX_DELAY);
  if (sample_size == 0) {
    Serial.printf("Record Failed!\n");
  } else {
    Serial.printf("Record %d bytes\n", sample_size);
  }

  // Increase volume
  for (uint32_t i = 0; i < sample_size; i += SAMPLE_BITS/8) {
    (*(uint16_t *)(rec_buffer+i)) <<= VOLUME_GAIN;
  }

  // Write data to the WAV file
  Serial.printf("Writing to the file ...\n");
  if (file.write(rec_buffer, record_size) != record_size)
    Serial.printf("Write file Failed!\n");

  free(rec_buffer);
  file.close();
  Serial.printf("The recording is over.\n");
}

void generate_wav_header(uint8_t *wav_header, uint32_t wav_size, uint32_t sample_rate)
{
  // See this for reference: http://soundfile.sapp.org/doc/WaveFormat/
  uint32_t file_size = wav_size + WAV_HEADER_SIZE - 8;
  uint32_t byte_rate = SAMPLE_RATE * SAMPLE_BITS / 8;
  const uint8_t set_wav_header[] = {
    'R', 'I', 'F', 'F', // ChunkID
    file_size, file_size >> 8, file_size >> 16, file_size >> 24, // ChunkSize
    'W', 'A', 'V', 'E', // Format
    'f', 'm', 't', ' ', // Subchunk1ID
    0x10, 0x00, 0x00, 0x00, // Subchunk1Size (16 for PCM)
    0x01, 0x00, // AudioFormat (1 for PCM)
    0x01, 0x00, // NumChannels (1 channel)
    sample_rate, sample_rate >> 8, sample_rate >> 16, sample_rate >> 24, // SampleRate
    byte_rate, byte_rate >> 8, byte_rate >> 16, byte_rate >> 24, // ByteRate
    0x02, 0x00, // BlockAlign
    0x10, 0x00, // BitsPerSample (16 bits)
    'd', 'a', 't', 'a', // Subchunk2ID
    wav_size, wav_size >> 8, wav_size >> 16, wav_size >> 24, // Subchunk2Size
  };
  memcpy(wav_header, set_wav_header, sizeof(set_wav_header));
}
The example above is only compatible with 2.0.x of esp32, if you are on latest (e.g. 3.0.x) use the one below
#include "ESP_I2S.h"
#include "FS.h"
#include "SD.h"

void setup() {
  // Create an instance of the I2SClass
  I2SClass i2s;

  // Create variables to store the audio data
  uint8_t *wav_buffer;
  size_t wav_size;

  // Initialize the serial port
  Serial.begin(115200);
  while (!Serial) {
    delay(10);
  }

  Serial.println("Initializing I2S bus...");

  // Set up the pins used for audio input
  i2s.setPinsPdmRx(42, 41);

  // start I2S at 16 kHz with 16-bits per sample
  if (!i2s.begin(I2S_MODE_PDM_RX, 16000, I2S_DATA_BIT_WIDTH_16BIT, I2S_SLOT_MODE_MONO)) {
    Serial.println("Failed to initialize I2S!");
    while (1); // do nothing
  }

  Serial.println("I2S bus initialized.");
  Serial.println("Initializing SD card...");

  // Set up the pins used for SD card access
  if(!SD.begin(21)){
    Serial.println("Failed to mount SD Card!");
    while (1) ;
  }
  Serial.println("SD card initialized.");
  Serial.println("Recording 20 seconds of audio data...");

  // Record 20 seconds of audio data
  wav_buffer = i2s.recordWAV(20, &wav_size);

  // Create a file on the SD card
  File file = SD.open("/arduinor_rec.wav", FILE_WRITE);
  if (!file) {
    Serial.println("Failed to open file for writing!");
    return;
  }

  Serial.println("Writing audio data to file...");

  // Write the audio data to the file
  if (file.write(wav_buffer, wav_size) != wav_size) {
    Serial.println("Failed to write audio data to file!");
    return;
  }

  // Close the file
  file.close();

  Serial.println("Application complete.");
}

void loop() {
  delay(1000);
  Serial.printf(".");
}
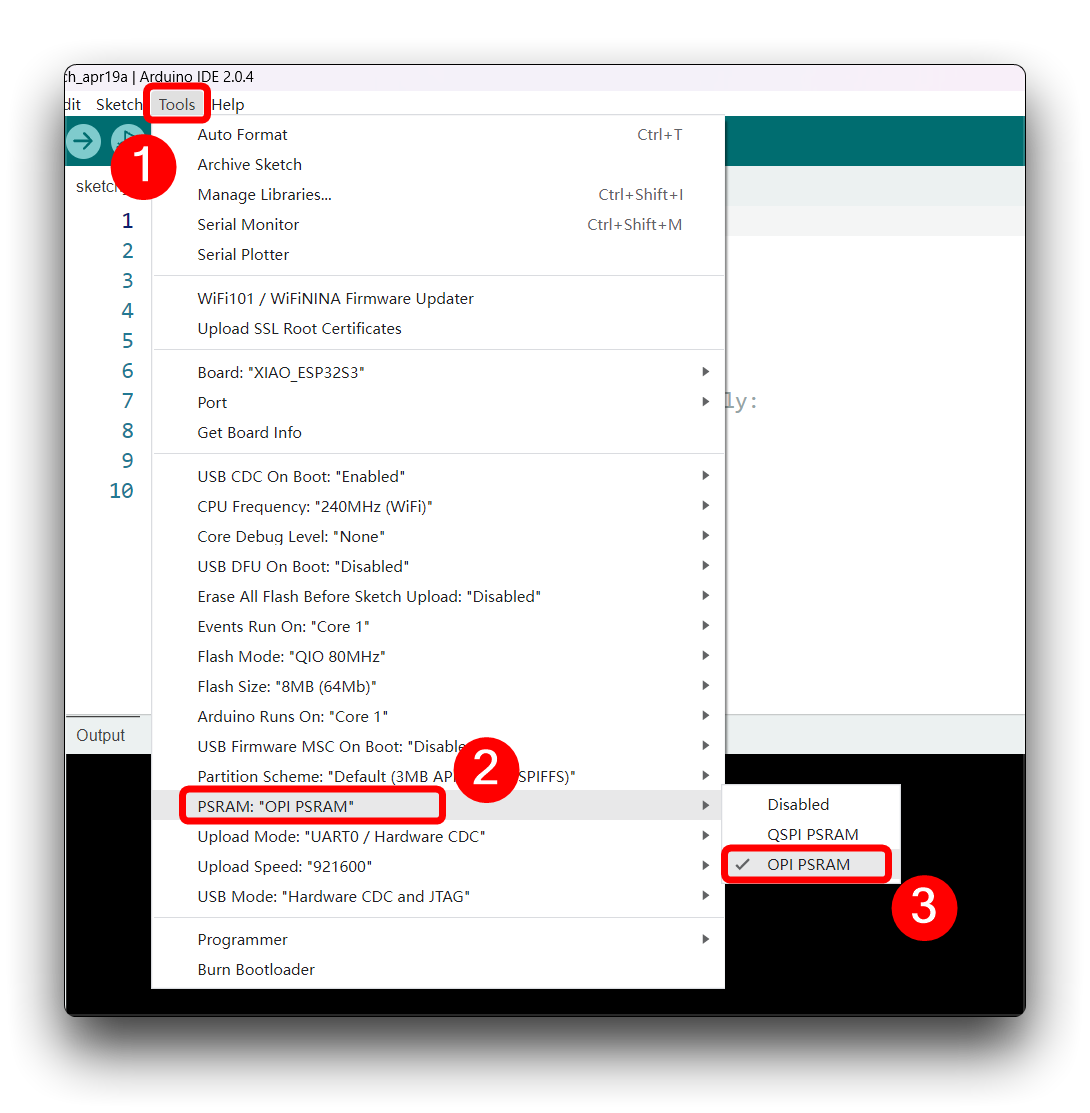
To execute this example, we will need to use the PSRAM function of the ESP-32 chip, so please turn it on before uploading.
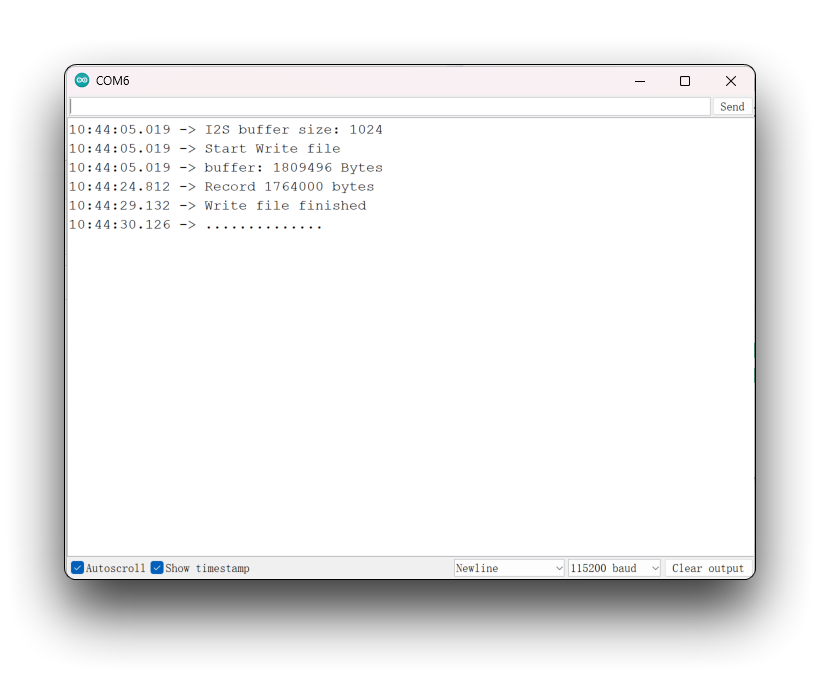
This program is executed only once after the user turns on the serial monitor, recording for 20 seconds and saving the recording file to microSD card as "arduino_rec.wav".
When the "." is output every 1 second in the serial monitor, the program execution is finished and you can play the recorded sound file with the help of a card reader.
To play the recorded audio from XIAO ESP32S3, you may need to use an audio player that supports WAV format.
Program annotation
In this program, we have written two functions for the recording function, one is record_wav() and the other is generate_wav_header().
-
record_wav(): Recording function. In this function, the program reads audio data from a microphone using the I2S interface, and stores it into an SD card as a WAV audio file.a. Initialize variables. The program defines a buffer
rec_bufferfor storing the recorded data, and sets the recording timeRECORD_TIME.b. Open the WAV file. The program uses the
SD.open()function to open a WAV audio file, and defines its filename asWAV_FILE_NAME.c. Write the WAV file header. The program generates the header information of the WAV audio file using the
generate_wav_header()function, and writes it into the opened WAV file.d. Allocate memory and start recording. The program uses the
ps_malloc()function to allocate a block of memory in the ESP32S3's PSRAM for storing the recorded data, and uses theesp_i2s::i2s_read()function to read audio data from the microphone. The read data is stored in the rec_buffer buffer.e. Increase volume. The program increases the volume of the recorded data using a gain value defined by the
VOLUME_GAINconstant.f. Write the recorded data into the WAV file. The program uses the
file.write()function to write the recorded data into the opened WAV file.g. Free the buffer memory and close the WAV file. The program uses the
free()function to free the memory of therec_bufferbuffer, and uses thefile.close()function to close the opened WAV file. -
generate_wav_header(uint8_t *wav_header, uint32_t wav_size, uint32_t sample_rate): Function for generating the header information of a WAV file. In this function, the program generates a byte array containing the header information of a WAV file based on the WAV file's specifications.a. Define the constants for the WAV file header information. The program defines a byte array
set_wav_headercontaining the header information of a WAV file, and defines the constants for the WAV file's specifications, includingNUM_CHANNELS,BITS_PER_SAMPLE,WAV_HEADER_SIZE, andSUB_CHUNK_SIZE.b. Set the WAV file header information. The program sets the WAV file header information using the constants defined in step a, and calculates the values of some fields based on the WAV file's specifications, including
AUDIO_FORMAT,BYTE_RATE,BLOCK_ALIGN,SAMPLES_PER_CHANNEL, andCHUNK_SIZE. The calculated values are stored in theset_wav_headerbyte array.c. Copy the WAV file header information. The program copies the header information stored in
set_wav_headerto the byte arraywav_header.
Troubleshooting
Why can't I play the recorded audio files?
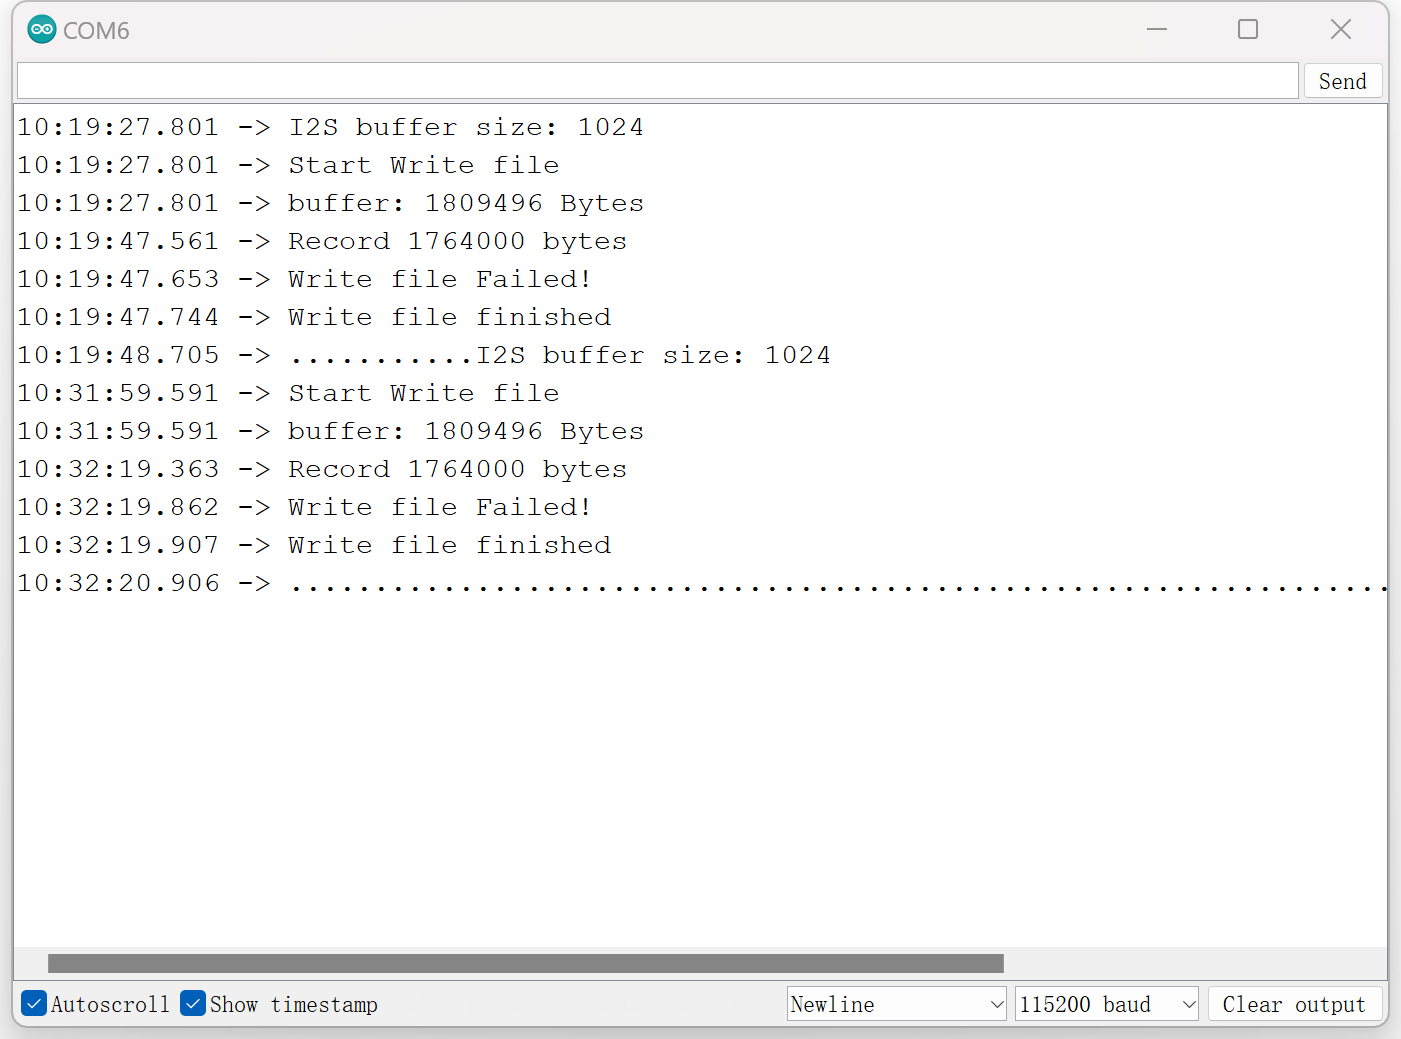
If you encounter a situation where you cannot play, please check the debug information printed by the serial monitor for error messages about reading and writing cards. If there is, please replace the microSD card or check if the card and expansion board connection is loose or unstable. If there is no problem with the card, then the audio file should be sized, if there is a problem with the recording, it may show up as a recorded audio file size of only 0KB.
For example, in the figure below, there is a problem with the card reading and writing.
If there are no problems with the card and the recording is quite successful. Then you need to check if the software supports audio playback in WAV format. We recommend using special music playing software to play audio, try not to use video player to play. After actual testing, there are many video players (although they support WAV format) that are unable to play it.
Tech Support & Product Discussion
Thank you for choosing our products! We are here to provide you with different support to ensure that your experience with our products is as smooth as possible. We offer several communication channels to cater to different preferences and needs.