XIAO ESP32S3 Sense & Edge Impulse Keywords Spotting

This tutorial will guide you through implementing a Keyword Spotting (KWS) system using TinyML on the XIAO ESP32S3 Sense microcontroller board, with the help of Edge Impulse for data collection and model training. KWS is essential for voice recognition systems, and with the power of TinyML, it's achievable on smaller, low-power devices. Let's build our own KWS system using Edge Impulse and XIAO ESP32S3 Sense!
Getting Started
Before starting this project, please follow the preparation steps below to prepare the software and hardware needed for this project.
Hardware
To carry out this project successfully, you need to prepare the following hardware.
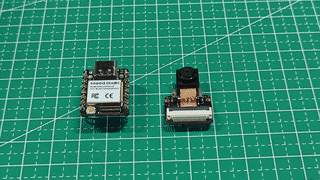
- XIAO ESP32S3 Sense
- microSD card (No larger than 32GB)
- microSD card reader
- USB-C data cable
By installing the expansion board with XIAO ESP32S3 Sense, you can use the microphone on the expansion board.
Installing the expansion board is very simple, you just need to align the connector on the expansion board with the B2B connector on the XIAO ESP32S3, press it hard and hear a "click", the installation is complete.
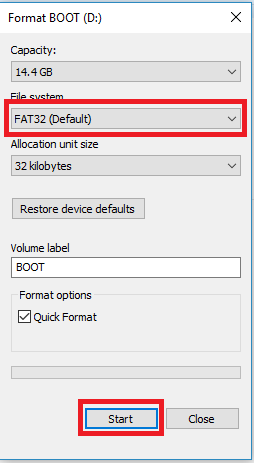
XIAO ESP32S3 Sense supports microSD cards up to 32GB, so if you are ready to buy a microSD card for XIAO, please refer to this specification. And format the microSD card to FAT32 format before using the microSD card.
After formatting, you can insert the microSD card into the microSD card slot. Please note the direction of insertion, the side with the gold finger should face inward.

Software
If this is your first time using XIAO ESP32S3 Sense, then before you start, we suggest you read the following two Wiki's to learn how to use it.
- Getting Started with Seeed Studio XIAO ESP32S3 (Sense)
- Usage of Seeed Studio XIAO ESP32S3 microphone
Capturing (offline) Audio Data
Step 1. Save recorded sound samples as .wav audio files to a microSD card
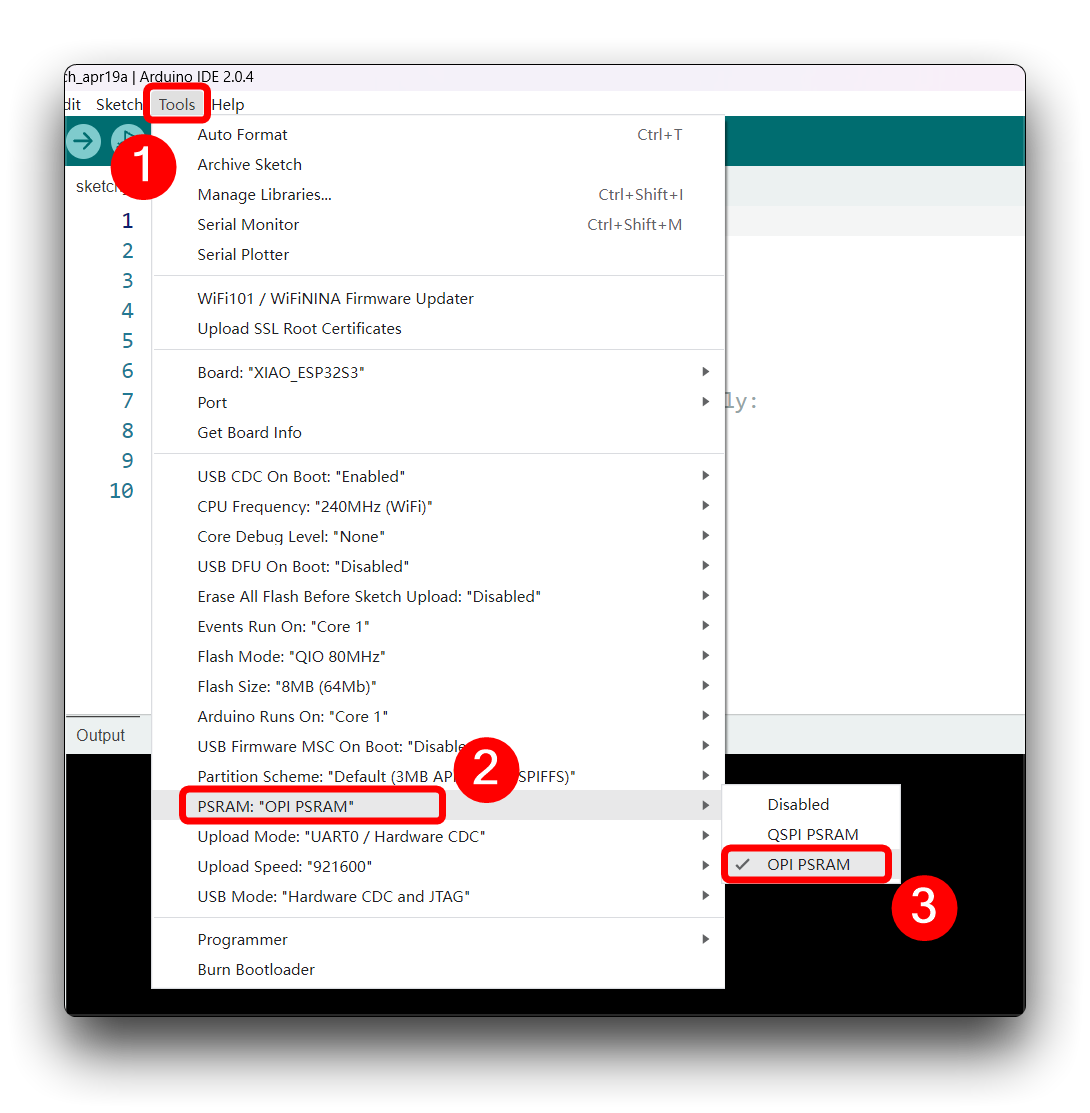
Let's use the onboard SD Card reader to save.wav audio files, we need to habilitate the XIAO PSRAM first.
Then compile and upload the following program to XIAO ESP32S3.
This code records audio using the I2S interface of the Seeed XIAO ESP32S3 Sense board, saves the recording as a.wav file on an SD card, and allows for control of the recording process through commands sent from the serial monitor. The name of the audio file is customizable (it should be the class labels to be used with the training), and multiple recordings can be made, each saved in a new file. The code also includes functionality to increase the volume of the recordings.
If your ESP32 version is 2.0.x. Click here to preview the full program
/*
 * WAV Recorder for Seeed XIAO ESP32S3 Sense
 *
 * NOTE: To execute this code, we will need to use the PSRAM
 * function of the ESP-32 chip, so please turn it on before uploading.
 * Tools>PSRAM: "OPI PSRAM"
 *
 * Adapted by M.Rovai @May23 from original Seeed code
*/

#include <I2S.h>
#include "FS.h"
#include "SD.h"
#include "SPI.h"

// make changes as needed
#define RECORD_TIME   10  // seconds, The maximum value is 240
#define WAV_FILE_NAME "data"

// do not change for best
#define SAMPLE_RATE 16000U
#define SAMPLE_BITS 16
#define WAV_HEADER_SIZE 44
#define VOLUME_GAIN 2

int fileNumber = 1;
String baseFileName;
bool isRecording = false;

void setup() {
  Serial.begin(115200);
  while (!Serial) ;

  I2S.setAllPins(-1, 42, 41, -1, -1);
  if (!I2S.begin(PDM_MONO_MODE, SAMPLE_RATE, SAMPLE_BITS)) {
    Serial.println("Failed to initialize I2S!");
    while (1) ;
  }
  if(!SD.begin(21)){
    Serial.println("Failed to mount SD Card!");
    while (1) ;
  }
  Serial.printf("Enter with the label name\n");
  //record_wav();
}

void loop() {
  if (Serial.available() > 0) {
    String command = Serial.readStringUntil('\n');
    command.trim();
    if (command == "rec") {
      isRecording = true;
    } else {
      baseFileName = command;
      fileNumber = 1; // reset file number each time a new base file name is set
      Serial.printf("Send rec for starting recording label \n");
    }
  }
  if (isRecording && baseFileName != "") {
    String fileName = "/" + baseFileName + "." + String(fileNumber) + ".wav";
    fileNumber++;
    record_wav(fileName);
    delay(1000); // delay to avoid recording multiple files at once
    isRecording = false;
  }
}

void record_wav(String fileName)
{
  uint32_t sample_size = 0;
  uint32_t record_size = (SAMPLE_RATE * SAMPLE_BITS / 8) * RECORD_TIME;
  uint8_t *rec_buffer = NULL;
  Serial.printf("Start recording ...\n");

  File file = SD.open(fileName.c_str(), FILE_WRITE);
  // Write the header to the WAV file
  uint8_t wav_header[WAV_HEADER_SIZE];
  generate_wav_header(wav_header, record_size, SAMPLE_RATE);
  file.write(wav_header, WAV_HEADER_SIZE);

  // PSRAM malloc for recording
  rec_buffer = (uint8_t *)ps_malloc(record_size);
  if (rec_buffer == NULL) {
    Serial.printf("malloc failed!\n");
    while(1) ;
  }
  Serial.printf("Buffer: %d bytes\n", ESP.getPsramSize() - ESP.getFreePsram());

  // Start recording
  esp_i2s::i2s_read(esp_i2s::I2S_NUM_0, rec_buffer, record_size, &sample_size, portMAX_DELAY);
  if (sample_size == 0) {
    Serial.printf("Record Failed!\n");
  } else {
    Serial.printf("Record %d bytes\n", sample_size);
  }

  // Increase volume
  for (uint32_t i = 0; i < sample_size; i += SAMPLE_BITS/8) {
    (*(uint16_t *)(rec_buffer+i)) <<= VOLUME_GAIN;
  }

  // Write data to the WAV file
  Serial.printf("Writing to the file ...\n");
  if (file.write(rec_buffer, record_size) != record_size)
    Serial.printf("Write file Failed!\n");

  free(rec_buffer);
  file.close();
  Serial.printf("Recording complete: \n");
  Serial.printf("Send rec for a new sample or enter a new label\n\n");
}

void generate_wav_header(uint8_t *wav_header, uint32_t wav_size, uint32_t sample_rate)
{
  // See this for reference: http://soundfile.sapp.org/doc/WaveFormat/
  uint32_t file_size = wav_size + WAV_HEADER_SIZE - 8;
  uint32_t byte_rate = SAMPLE_RATE * SAMPLE_BITS / 8;
  const uint8_t set_wav_header[] = {
    'R', 'I', 'F', 'F', // ChunkID
    file_size, file_size >> 8, file_size >> 16, file_size >> 24, // ChunkSize
    'W', 'A', 'V', 'E', // Format
    'f', 'm', 't', ' ', // Subchunk1ID
    0x10, 0x00, 0x00, 0x00, // Subchunk1Size (16 for PCM)
    0x01, 0x00, // AudioFormat (1 for PCM)
    0x01, 0x00, // NumChannels (1 channel)
    sample_rate, sample_rate >> 8, sample_rate >> 16, sample_rate >> 24, // SampleRate
    byte_rate, byte_rate >> 8, byte_rate >> 16, byte_rate >> 24, // ByteRate
    0x02, 0x00, // BlockAlign
    0x10, 0x00, // BitsPerSample (16 bits)
    'd', 'a', 't', 'a', // Subchunk2ID
    wav_size, wav_size >> 8, wav_size >> 16, wav_size >> 24, // Subchunk2Size
  };
  memcpy(wav_header, set_wav_header, sizeof(set_wav_header));
}
If your ESP32 version is 3.0.x. Click here to preview the full program
/*
 * WAV Recorder for Seeed XIAO ESP32S3 Sense
 *
 * NOTE: To execute this code, we will need to use the PSRAM
 * function of the ESP-32 chip, so please turn it on before uploading.
 * Tools>PSRAM: "OPI PSRAM"
 *
 * Adapted by M.Rovai @May23 from original Seeed code
*/

#include <ESP_I2S.h>
#include "FS.h"
#include "SD.h"
#include "SPI.h"

// make changes as needed
#define RECORD_TIME   10  // seconds, The maximum value is 240
#define WAV_FILE_NAME "data"

// do not change for best
#define SAMPLE_RATE 16000U
#define SAMPLE_BITS 16
#define WAV_HEADER_SIZE 44
#define VOLUME_GAIN 2

I2SClass I2S;
String baseFileName;

int fileNumber = 1;
bool isRecording = false;

void setup() {
  Serial.begin(115200);
  while (!Serial) ;

  // setup 42 PDM clock and 41 PDM data pins
  I2S.setPinsPdmRx(42, 41);
  if (!I2S.begin(I2S_MODE_PDM_RX, 16000, I2S_DATA_BIT_WIDTH_16BIT, I2S_SLOT_MODE_MONO)) {
    Serial.println("Failed to initialize I2S!");
    while (1) ;
  }
  if(!SD.begin(21)){
    Serial.println("Failed to mount SD Card!");
    while (1) ;
  }
  Serial.printf("Enter with the label name\n");
  //record_wav();
}

void loop() {
  if (Serial.available() > 0) {
    String command = Serial.readStringUntil('\n');
    command.trim();
    if (command == "rec") {
      isRecording = true;
    } else {
      baseFileName = command;
      fileNumber = 1; // reset file number each time a new base file name is set
      Serial.printf("Send rec for starting recording label \n");
    }
  }
  if (isRecording && baseFileName != "") {
    String fileName = "/" + baseFileName + "." + String(fileNumber) + ".wav";
    fileNumber++;
    record_wav(fileName);
    delay(1000); // delay to avoid recording multiple files at once
    isRecording = false;
  }
}

void record_wav(String fileName)
{
  uint32_t sample_size = 0;
  uint32_t record_size = (SAMPLE_RATE * SAMPLE_BITS / 8) * RECORD_TIME;
  uint8_t *rec_buffer = NULL;
  Serial.printf("Start recording ...\n");

  File file = SD.open(fileName.c_str(), FILE_WRITE);
  // Write the header to the WAV file
  uint8_t wav_header[WAV_HEADER_SIZE];
  generate_wav_header(wav_header, record_size, SAMPLE_RATE);
  file.write(wav_header, WAV_HEADER_SIZE);

  // PSRAM malloc for recording
  rec_buffer = (uint8_t *)ps_malloc(record_size);
  if (rec_buffer == NULL) {
    Serial.printf("malloc failed!\n");
    while(1) ;
  }
  Serial.printf("Buffer: %d bytes\n", ESP.getPsramSize() - ESP.getFreePsram());

  // Start recording
  esp_i2s::i2s_read(esp_i2s::I2S_NUM_0, rec_buffer, record_size, &sample_size, portMAX_DELAY);
  if (sample_size == 0) {
    Serial.printf("Record Failed!\n");
  } else {
    Serial.printf("Record %d bytes\n", sample_size);
  }

  // Increase volume
  for (uint32_t i = 0; i < sample_size; i += SAMPLE_BITS/8) {
    (*(uint16_t *)(rec_buffer+i)) <<= VOLUME_GAIN;
  }

  // Write data to the WAV file
  Serial.printf("Writing to the file ...\n");
  if (file.write(rec_buffer, record_size) != record_size)
    Serial.printf("Write file Failed!\n");

  free(rec_buffer);
  file.close();
  Serial.printf("Recording complete: \n");
  Serial.printf("Send rec for a new sample or enter a new label\n\n");
}

void generate_wav_header(uint8_t *wav_header, uint32_t wav_size, uint32_t sample_rate)
{
  // See this for reference: http://soundfile.sapp.org/doc/WaveFormat/
  uint32_t file_size = wav_size + WAV_HEADER_SIZE - 8;
  uint32_t byte_rate = SAMPLE_RATE * SAMPLE_BITS / 8;
  const uint8_t set_wav_header[] = {
    'R', 'I', 'F', 'F', // ChunkID
    file_size, file_size >> 8, file_size >> 16, file_size >> 24, // ChunkSize
    'W', 'A', 'V', 'E', // Format
    'f', 'm', 't', ' ', // Subchunk1ID
    0x10, 0x00, 0x00, 0x00, // Subchunk1Size (16 for PCM)
    0x01, 0x00, // AudioFormat (1 for PCM)
    0x01, 0x00, // NumChannels (1 channel)
    sample_rate, sample_rate >> 8, sample_rate >> 16, sample_rate >> 24, // SampleRate
    byte_rate, byte_rate >> 8, byte_rate >> 16, byte_rate >> 24, // ByteRate
    0x02, 0x00, // BlockAlign
    0x10, 0x00, // BitsPerSample (16 bits)
    'd', 'a', 't', 'a', // Subchunk2ID
    wav_size, wav_size >> 8, wav_size >> 16, wav_size >> 24, // Subchunk2Size
  };
  memcpy(wav_header, set_wav_header, sizeof(set_wav_header));
}
Now, upload the code to the XIAO and get samples from the keywords (hello and stop). You can also capture noise and other words. The Serial monitor will prompt you to receive the label to be recorded.
Send the label (for example, hello). The program will wait for another command: rec.
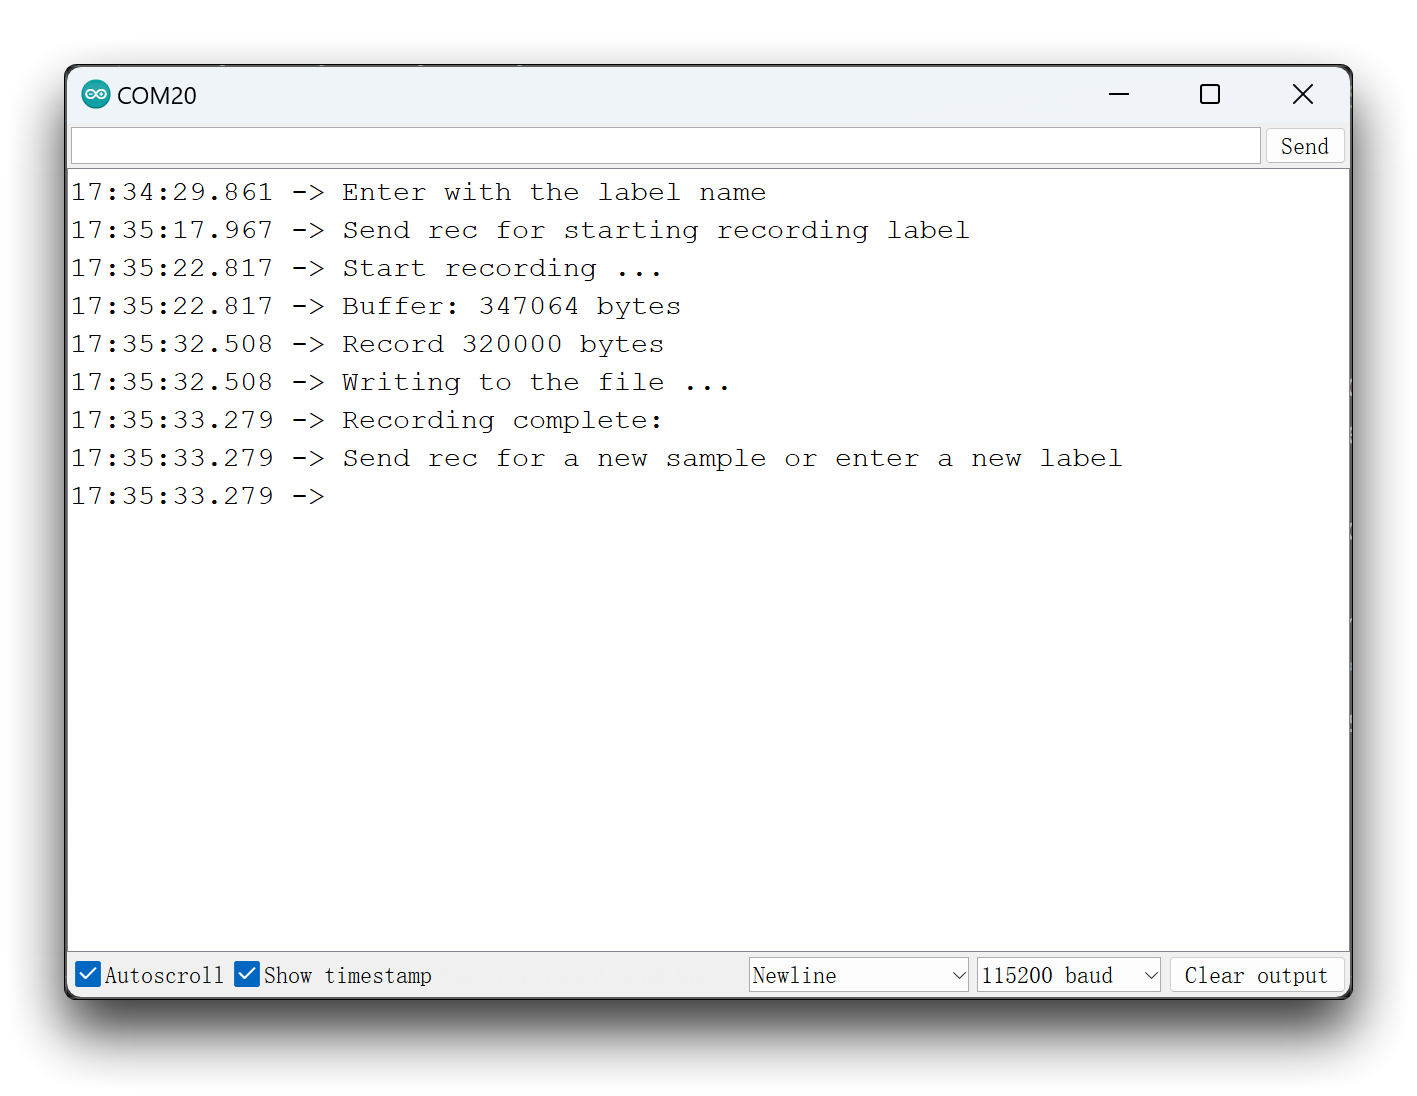
And the program will start recording new samples every time a command rec is sent. The files will be saved as hello.1.wav, hello.2.wav, hello.3.wav, etc. until a new label (for example, stop) is sent. In this case, you should send the command rec for each new sample, which will be saved as stop.1.wav, stop.2.wav, stop.3.wav, etc.
Ultimately, we will get the saved files on the SD card.
We recommend that you have enough sounds for each label sample. You can repeat your keywords several times during each ten-second recording session, and we will segment the samples in subsequent steps. But there needs to be some spacing between keywords.
Training data acquisition
Step 2. Uploading collected sound data
When the raw dataset is defined and collected, we should initiate a new project at Edge Impulse. Once the project is created, select the Upload Existing Data tool in the Data Acquisition section. Choose the files to be uploaded.
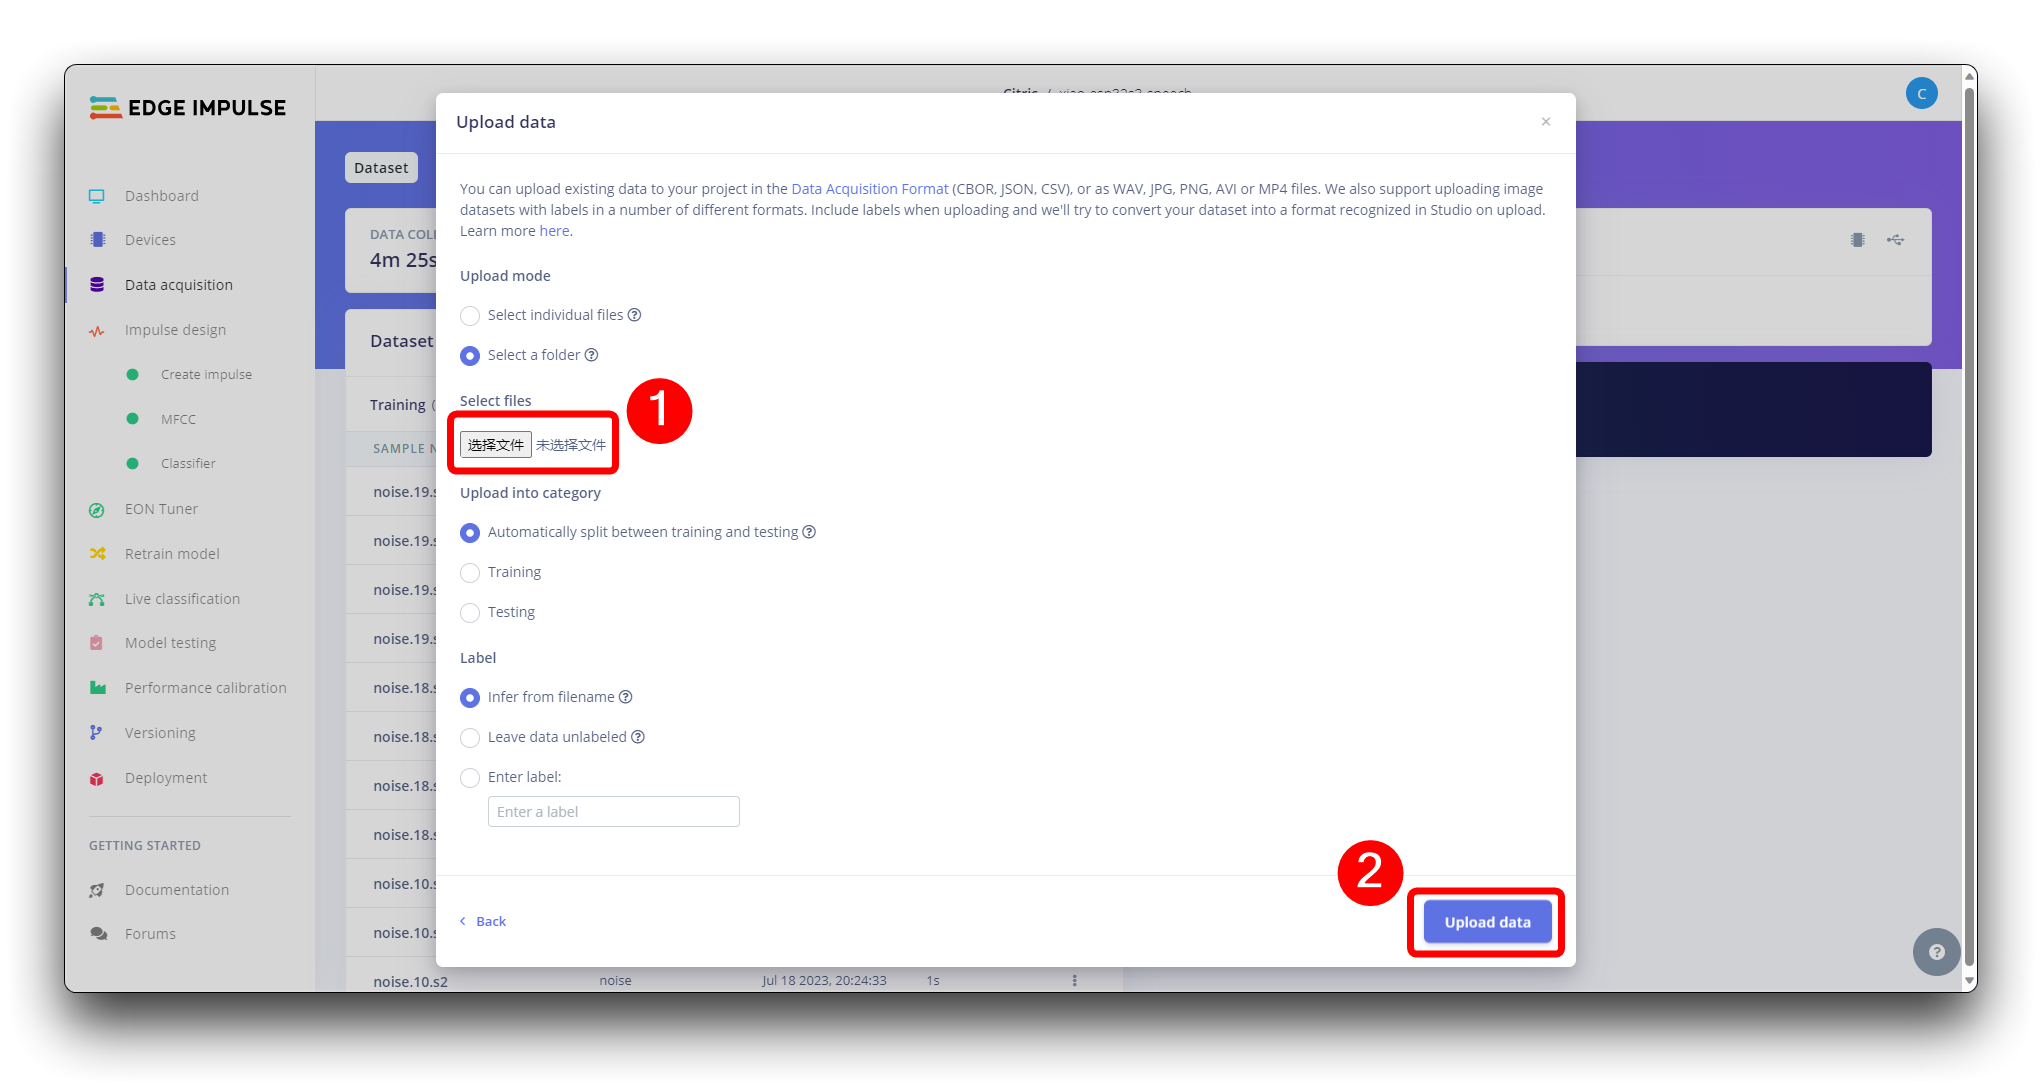
And upload them to the Studio (You can automatically split data in train/test). Repete to all classes and all raw data.
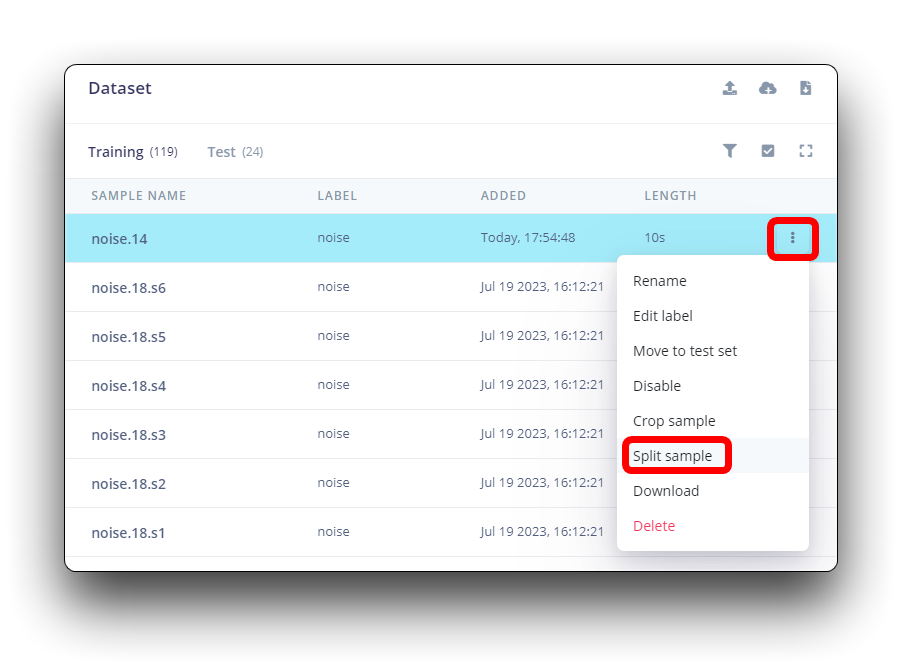
All data on dataset have a 1s length, but the samples recorded in the previous section have 10s and must be split into 1s samples to be compatible. Click on three dots after the sample name and select Split sample.
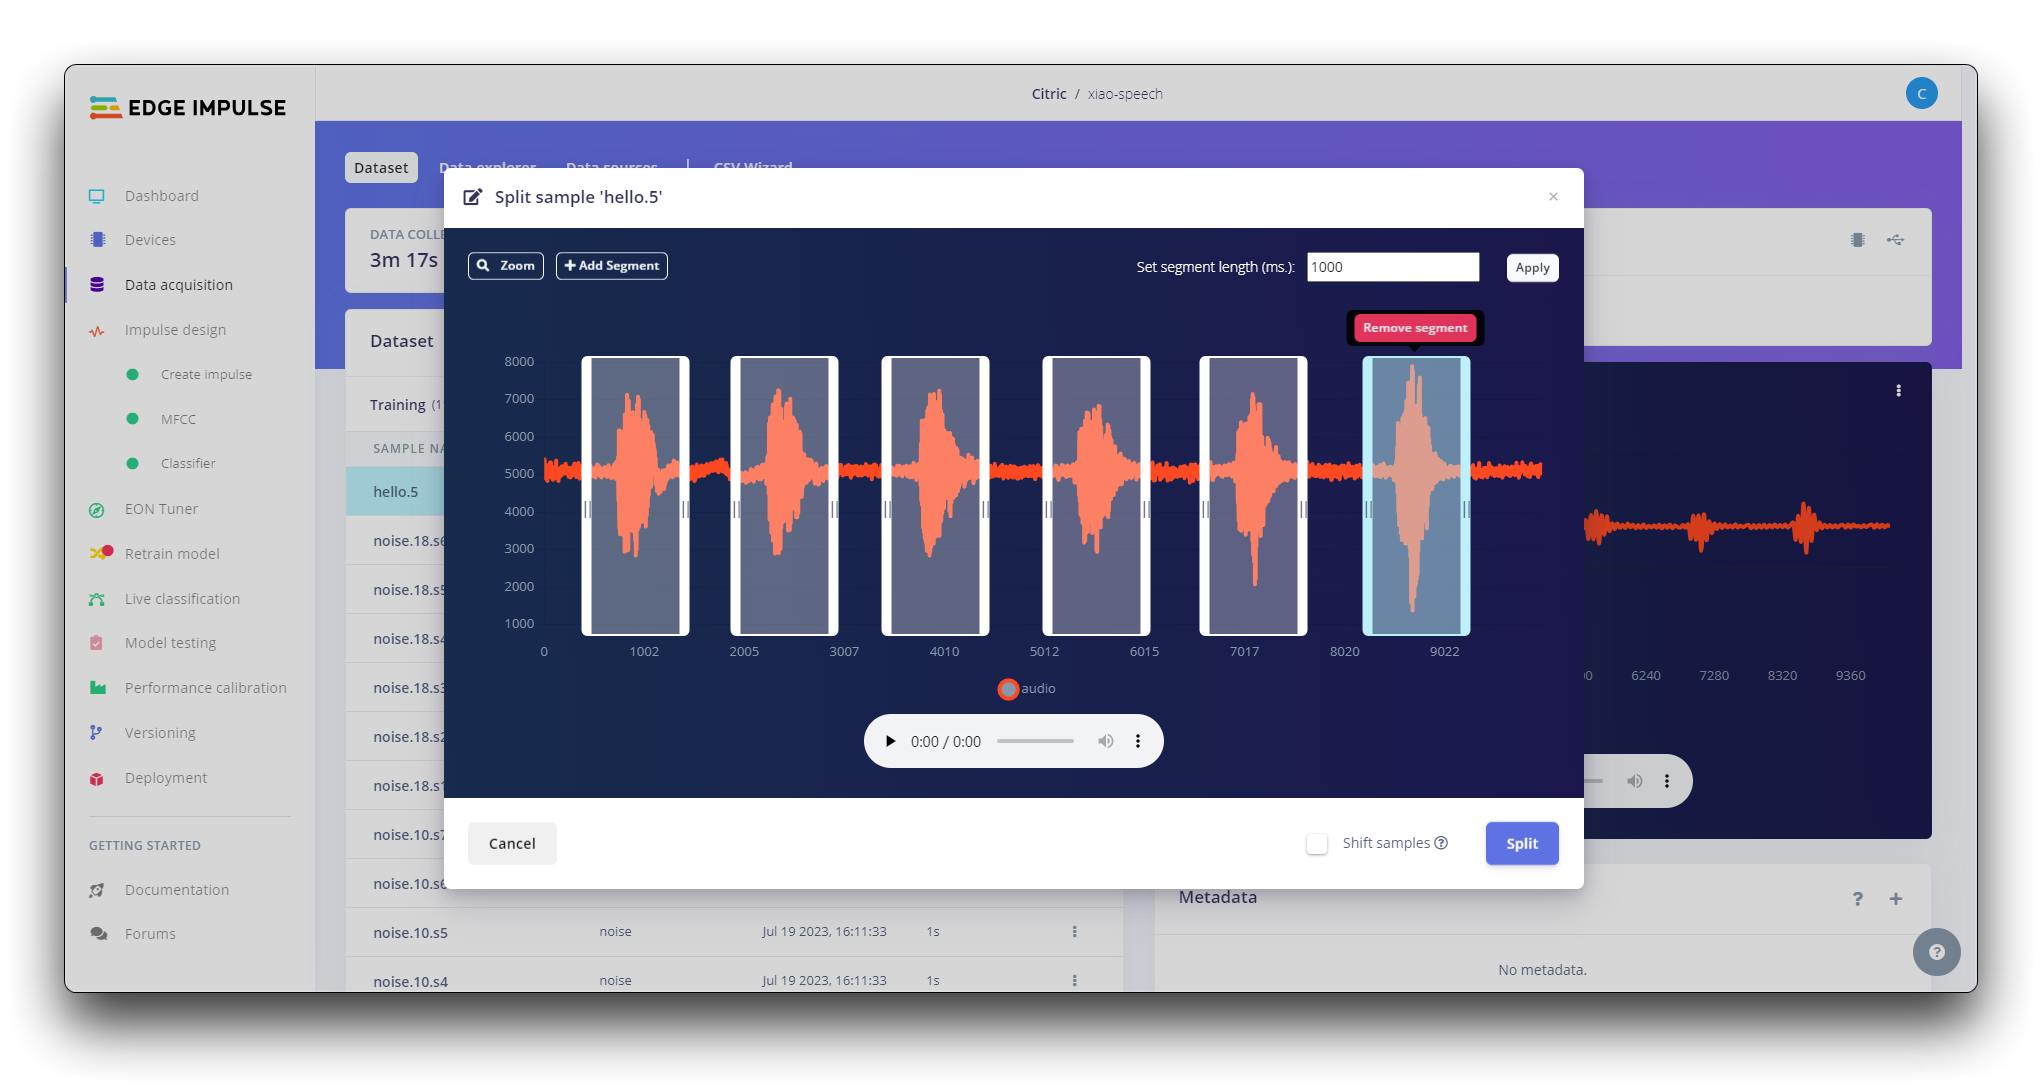
Once inside the tool, split the data into 1-second records. If necessary, add or remove segments.
This procedure should be repeated for all samples.
Step 3. Creating Impulse (Pre-Process / Model definition)
An impulse takes raw data, uses signal processing to extract features, and then uses a learning block to classify new data.
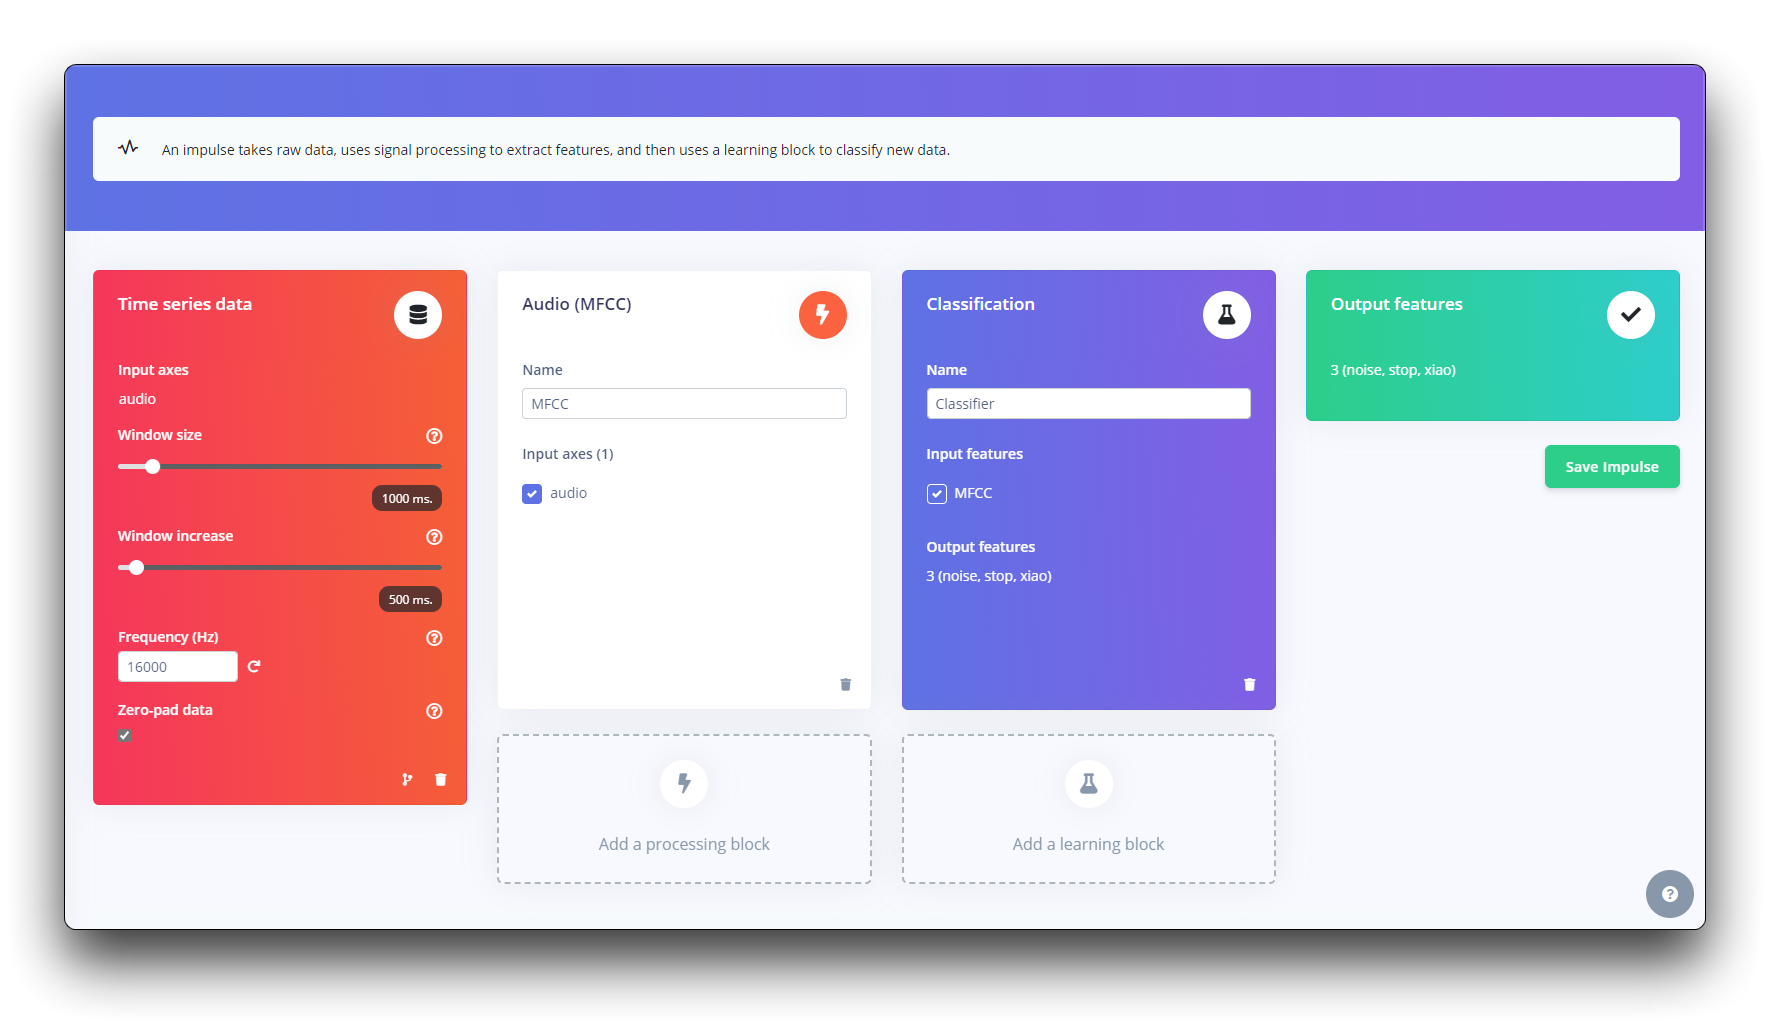
First, we will take the data points with a 1-second window, augmenting the data, sliding that window each 500ms. Note that the option zero-pad data is set. This is important to fill with zeros samples smaller than 1 second (in some cases, I reduced the 1000 ms window on the split tool to avoid noises and spikes).
Each 1-second audio sample should be pre-processed and converted to an image (for example, 13 x 49 x 1). We will use MFCC, which extracts features from audio signals using Mel Frequency Cepstral Coefficients, which are great for the human voice.
Next, we select KERAS for classification that builds our model from scratch by doing Image Classification using Convolution Neural Network.
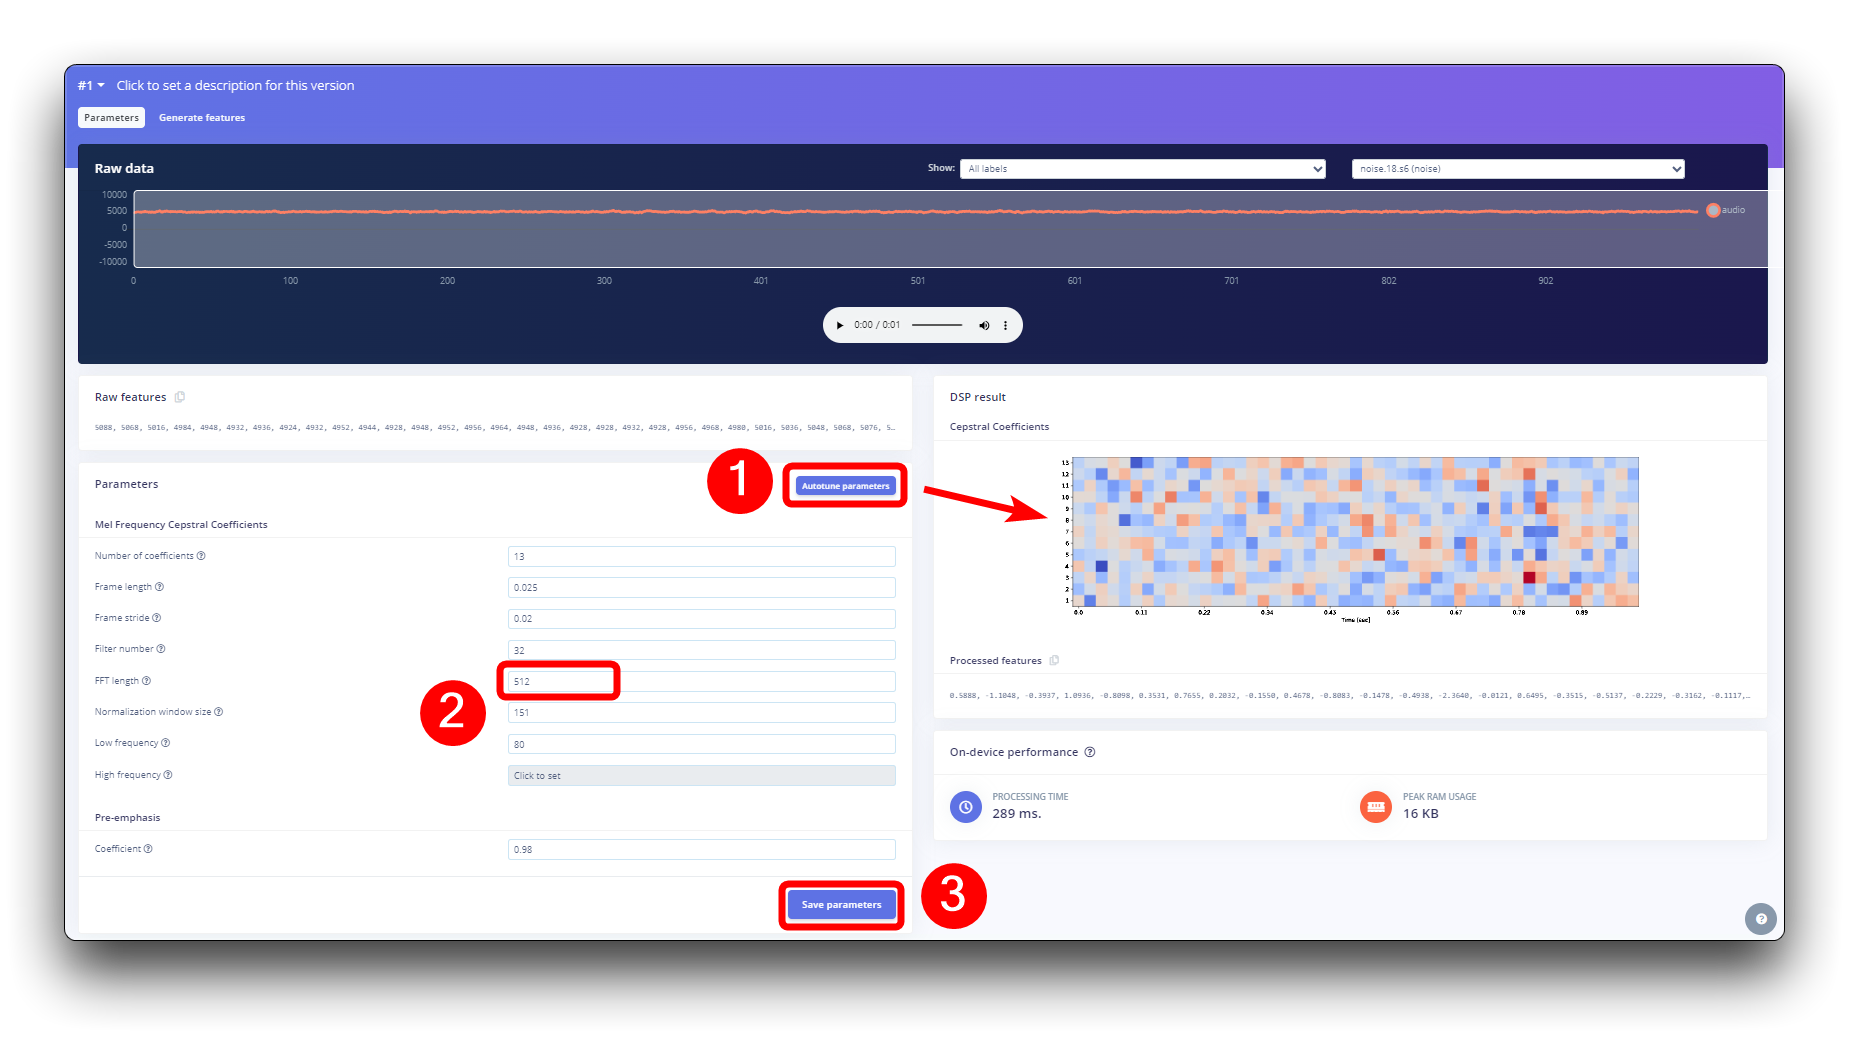
Step 4. Pre-Processing (MFCC)
The next step is to create the images to be trained in the next phase. We can keep the default parameter values or take advantage of the DSP Autotuneparameters option, which we will do.
Building a mechine learning model
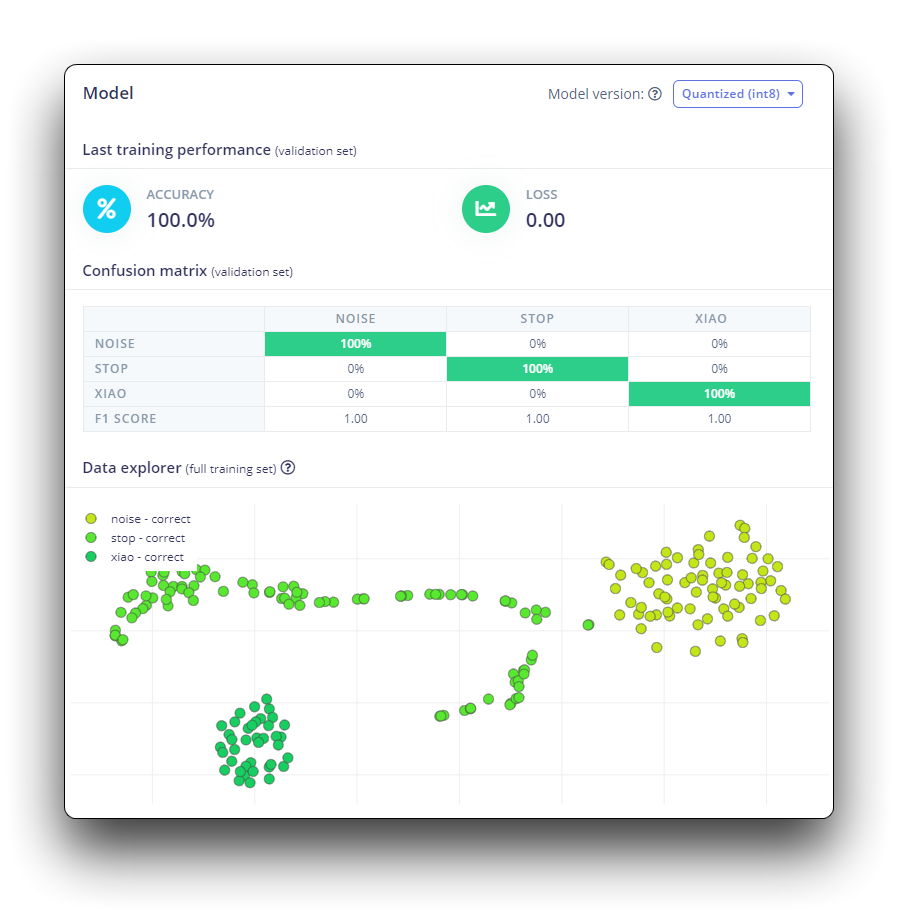
Step 5. Model Design and Training
We will use a Convolution Neural Network (CNN) model. The basic architecture is defined with two blocks of Conv1D + MaxPooling (with 8 and 16 neurons, respectively) and a 0.25 Dropout. And on the last layer, after Flattening four neurons, one for each class.
As hyper-parameters, we will have a Learning Rate of 0.005 and a model that will be trained by 100 epochs. We will also include data augmentation, as some noise. The result seems OK.
Deploying to XIAO ESP32S3 Sense
Step 6. Deploying to XIAO ESP32S3 Sense
Edge Impulse will package all the needed libraries, preprocessing functions, and trained models, downloading them to your computer. You should select the option Arduino Library and at the bottom, select Quantized (Int8) and press the button Build.
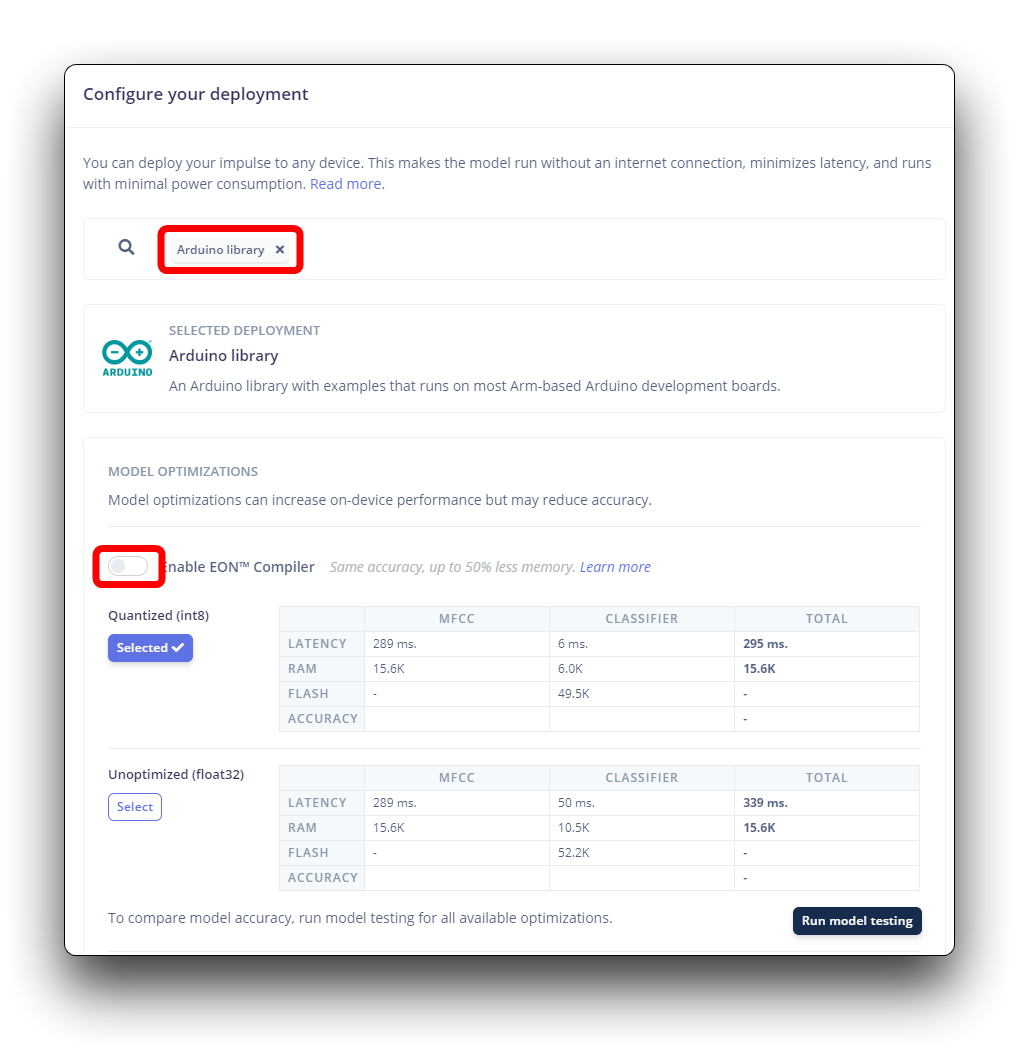
Even though Edge Impulse has not released its SDK for ESP32S3 using the ESP NN accelerator, thanks to Dmitry Maslov, we can have its assembly optimizations restored and fixed for ESP32-S3. This solution is not official yet, and EI will include it in EI SDK once they fix conflicts with other boards.
For now, this only works with the non-EON version. So, you should also keep the the option Enable EON Compiler not selected.
When the Build button is selected, a Zip file will be created and downloaded to your computer.
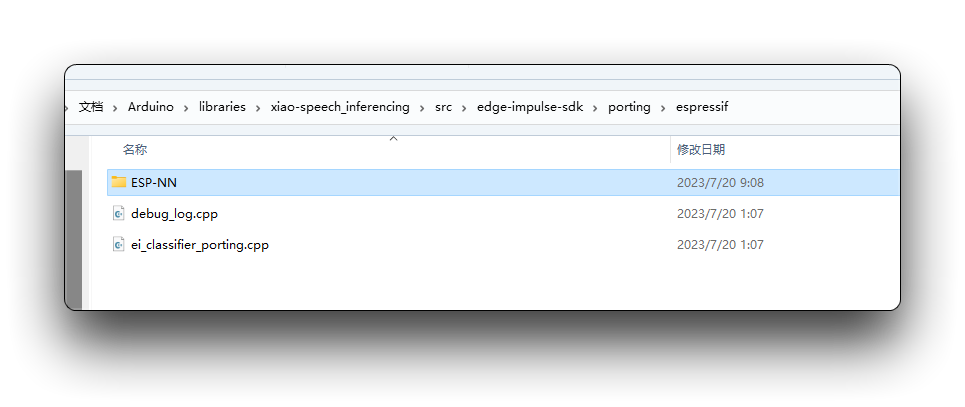
Before we use the downloaded library, we need to enable the ESP NN Accelerator. For that, you can download a preliminary version from the project GitHub, unzip it, and replace the ESP NN folder with it under:src/edge-impulse-sdk/porting/espressif/ESP-NN, in your Arduino library folder.
On your Arduino IDE, go to the Sketch tab and select the option Add .ZIP Library, and Choose the .zip file downloaded by the Edge Impulse.
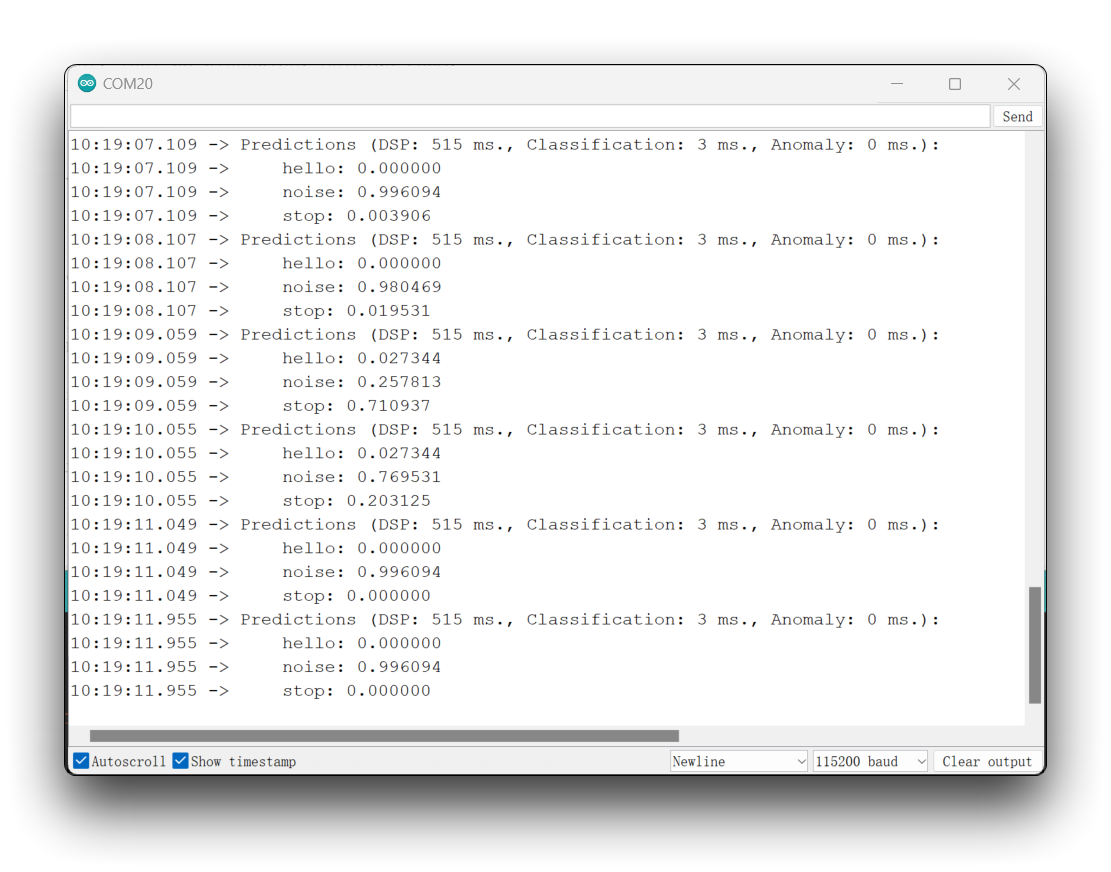
You can find the complete code on the project's GitHub. Upload the sketch to your board and test some real inferences.
The library imported in the code needs to be updated with the name of your library. The logic for lighting up also needs to be modified based on the order of the labels you actually trained on.
If your ESP32 version is 2.0.x. Click here to preview the full program
/* Edge Impulse Arduino examples
* Copyright (c) 2022 EdgeImpulse Inc.
*
* Permission is hereby granted, free of charge, to any person obtaining a copy
* of this software and associated documentation files (the "Software"), to deal
* in the Software without restriction, including without limitation the rights
* to use, copy, modify, merge, publish, distribute, sublicense, and/or sell
* copies of the Software, and to permit persons to whom the Software is
* furnished to do so, subject to the following conditions:
*
* The above copyright notice and this permission notice shall be included in
* all copies or substantial portions of the Software.
*
* THE SOFTWARE IS PROVIDED "AS IS", WITHOUT WARRANTY OF ANY KIND, EXPRESS OR
* IMPLIED, INCLUDING BUT NOT LIMITED TO THE WARRANTIES OF MERCHANTABILITY,
* FITNESS FOR A PARTICULAR PURPOSE AND NONINFRINGEMENT. IN NO EVENT SHALL THE
* AUTHORS OR COPYRIGHT HOLDERS BE LIABLE FOR ANY CLAIM, DAMAGES OR OTHER
* LIABILITY, WHETHER IN AN ACTION OF CONTRACT, TORT OR OTHERWISE, ARISING FROM,
* OUT OF OR IN CONNECTION WITH THE SOFTWARE OR THE USE OR OTHER DEALINGS IN THE
* SOFTWARE.
*/
// If your target is limited in memory remove this macro to save 10K RAM
#define EIDSP_QUANTIZE_FILTERBANK 0
/*
** NOTE: If you run into TFLite arena allocation issue.
**
** This may be due to may dynamic memory fragmentation.
** Try defining "-DEI_CLASSIFIER_ALLOCATION_STATIC" in boards.local.txt (create
** if it doesn't exist) and copy this file to
** `<ARDUINO_CORE_INSTALL_PATH>/arduino/hardware/<mbed_core>/<core_version>/`.
**
** See
** (https://support.arduino.cc/hc/en-us/articles/360012076960-Where-are-the-installed-cores-located-)
** to find where Arduino installs cores on your machine.
**
** If the problem persists then there's not enough memory for this model and application.
*/
/* Includes ---------------------------------------------------------------- */
#include <XIAO-ESP32S3-KWS_inferencing.h>
#include <I2S.h>
#define SAMPLE_RATE 16000U
#define SAMPLE_BITS 16
#define LED_BUILT_IN 21
/** Audio buffers, pointers and selectors */
typedef struct {
int16_t *buffer;
uint8_t buf_ready;
uint32_t buf_count;
uint32_t n_samples;
} inference_t;
static inference_t inference;
static const uint32_t sample_buffer_size = 2048;
static signed short sampleBuffer[sample_buffer_size];
static bool debug_nn = false; // Set this to true to see e.g. features generated from the raw signal
static bool record_status = true;
/**
* @brief Arduino setup function
*/
void setup()
{
// put your setup code here, to run once:
Serial.begin(115200);
// comment out the below line to cancel the wait for USB connection (needed for native USB)
while (!Serial);
Serial.println("Edge Impulse Inferencing Demo");
pinMode(LED_BUILT_IN, OUTPUT); // Set the pin as output
digitalWrite(LED_BUILT_IN, HIGH); //Turn off
I2S.setAllPins(-1, 42, 41, -1, -1);
if (!I2S.begin(PDM_MONO_MODE, SAMPLE_RATE, SAMPLE_BITS)) {
Serial.println("Failed to initialize I2S!");
while (1) ;
}
// summary of inferencing settings (from model_metadata.h)
ei_printf("Inferencing settings:\n");
ei_printf("\tInterval: ");
ei_printf_float((float)EI_CLASSIFIER_INTERVAL_MS);
ei_printf(" ms.\n");
ei_printf("\tFrame size: %d\n", EI_CLASSIFIER_DSP_INPUT_FRAME_SIZE);
ei_printf("\tSample length: %d ms.\n", EI_CLASSIFIER_RAW_SAMPLE_COUNT / 16);
ei_printf("\tNo. of classes: %d\n", sizeof(ei_classifier_inferencing_categories) / sizeof(ei_classifier_inferencing_categories[0]));
ei_printf("\nStarting continious inference in 2 seconds...\n");
ei_sleep(2000);
if (microphone_inference_start(EI_CLASSIFIER_RAW_SAMPLE_COUNT) == false) {
ei_printf("ERR: Could not allocate audio buffer (size %d), this could be due to the window length of your model\r\n", EI_CLASSIFIER_RAW_SAMPLE_COUNT);
return;
}
ei_printf("Recording...\n");
}
/**
* @brief Arduino main function. Runs the inferencing loop.
*/
void loop()
{
bool m = microphone_inference_record();
if (!m) {
ei_printf("ERR: Failed to record audio...\n");
return;
}
signal_t signal;
signal.total_length = EI_CLASSIFIER_RAW_SAMPLE_COUNT;
signal.get_data = µphone_audio_signal_get_data;
ei_impulse_result_t result = { 0 };
EI_IMPULSE_ERROR r = run_classifier(&signal, &result, debug_nn);
if (r != EI_IMPULSE_OK) {
ei_printf("ERR: Failed to run classifier (%d)\n", r);
return;
}
int pred_index = 0; // Initialize pred_index
float pred_value = 0; // Initialize pred_value
// print the predictions
ei_printf("Predictions ");
ei_printf("(DSP: %d ms., Classification: %d ms., Anomaly: %d ms.)",
result.timing.dsp, result.timing.classification, result.timing.anomaly);
ei_printf(": \n");
for (size_t ix = 0; ix < EI_CLASSIFIER_LABEL_COUNT; ix++) {
ei_printf(" %s: ", result.classification[ix].label);
ei_printf_float(result.classification[ix].value);
ei_printf("\n");
if (result.classification[ix].value > pred_value){
pred_index = ix;
pred_value = result.classification[ix].value;
}
}
// Display inference result
if (pred_index == 3){
digitalWrite(LED_BUILT_IN, LOW); //Turn on
}
else{
digitalWrite(LED_BUILT_IN, HIGH); //Turn off
}
#if EI_CLASSIFIER_HAS_ANOMALY == 1
ei_printf(" anomaly score: ");
ei_printf_float(result.anomaly);
ei_printf("\n");
#endif
}
static void audio_inference_callback(uint32_t n_bytes)
{
for(int i = 0; i < n_bytes>>1; i++) {
inference.buffer[inference.buf_count++] = sampleBuffer[i];
if(inference.buf_count >= inference.n_samples) {
inference.buf_count = 0;
inference.buf_ready = 1;
}
}
}
static void capture_samples(void* arg) {
const int32_t i2s_bytes_to_read = (uint32_t)arg;
size_t bytes_read = i2s_bytes_to_read;
while (record_status) {
/* read data at once from i2s - Modified for XIAO ESP2S3 Sense and I2S.h library */
// i2s_read((i2s_port_t)1, (void*)sampleBuffer, i2s_bytes_to_read, &bytes_read, 100);
esp_i2s::i2s_read(esp_i2s::I2S_NUM_0, (void*)sampleBuffer, i2s_bytes_to_read, &bytes_read, 100);
if (bytes_read <= 0) {
ei_printf("Error in I2S read : %d", bytes_read);
}
else {
if (bytes_read < i2s_bytes_to_read) {
ei_printf("Partial I2S read");
}
// scale the data (otherwise the sound is too quiet)
for (int x = 0; x < i2s_bytes_to_read/2; x++) {
sampleBuffer[x] = (int16_t)(sampleBuffer[x]) * 8;
}
if (record_status) {
audio_inference_callback(i2s_bytes_to_read);
}
else {
break;
}
}
}
vTaskDelete(NULL);
}
/**
* @brief Init inferencing struct and setup/start PDM
*
* @param[in] n_samples The n samples
*
* @return { description_of_the_return_value }
*/
static bool microphone_inference_start(uint32_t n_samples)
{
inference.buffer = (int16_t *)malloc(n_samples * sizeof(int16_t));
if(inference.buffer == NULL) {
return false;
}
inference.buf_count = 0;
inference.n_samples = n_samples;
inference.buf_ready = 0;
// if (i2s_init(EI_CLASSIFIER_FREQUENCY)) {
// ei_printf("Failed to start I2S!");
// }
ei_sleep(100);
record_status = true;
xTaskCreate(capture_samples, "CaptureSamples", 1024 * 32, (void*)sample_buffer_size, 10, NULL);
return true;
}
/**
* @brief Wait on new data
*
* @return True when finished
*/
static bool microphone_inference_record(void)
{
bool ret = true;
while (inference.buf_ready == 0) {
delay(10);
}
inference.buf_ready = 0;
return ret;
}
/**
* Get raw audio signal data
*/
static int microphone_audio_signal_get_data(size_t offset, size_t length, float *out_ptr)
{
numpy::int16_to_float(&inference.buffer[offset], out_ptr, length);
return 0;
}
/**
* @brief Stop PDM and release buffers
*/
static void microphone_inference_end(void)
{
free(sampleBuffer);
ei_free(inference.buffer);
}
#if !defined(EI_CLASSIFIER_SENSOR) || EI_CLASSIFIER_SENSOR != EI_CLASSIFIER_SENSOR_MICROPHONE
#error "Invalid model for current sensor."
#endif
If your ESP32 version is 3.0.x. Click here to preview the full program
/* Edge Impulse Arduino examples
* Copyright (c) 2022 EdgeImpulse Inc.
*
* Permission is hereby granted, free of charge, to any person obtaining a copy
* of this software and associated documentation files (the "Software"), to deal
* in the Software without restriction, including without limitation the rights
* to use, copy, modify, merge, publish, distribute, sublicense, and/or sell
* copies of the Software, and to permit persons to whom the Software is
* furnished to do so, subject to the following conditions:
*
* The above copyright notice and this permission notice shall be included in
* all copies or substantial portions of the Software.
*
* THE SOFTWARE IS PROVIDED "AS IS", WITHOUT WARRANTY OF ANY KIND, EXPRESS OR
* IMPLIED, INCLUDING BUT NOT LIMITED TO THE WARRANTIES OF MERCHANTABILITY,
* FITNESS FOR A PARTICULAR PURPOSE AND NONINFRINGEMENT. IN NO EVENT SHALL THE
* AUTHORS OR COPYRIGHT HOLDERS BE LIABLE FOR ANY CLAIM, DAMAGES OR OTHER
* LIABILITY, WHETHER IN AN ACTION OF CONTRACT, TORT OR OTHERWISE, ARISING FROM,
* OUT OF OR IN CONNECTION WITH THE SOFTWARE OR THE USE OR OTHER DEALINGS IN THE
* SOFTWARE.
*/
// If your target is limited in memory remove this macro to save 10K RAM
#define EIDSP_QUANTIZE_FILTERBANK 0
/*
** NOTE: If you run into TFLite arena allocation issue.
**
** This may be due to may dynamic memory fragmentation.
** Try defining "-DEI_CLASSIFIER_ALLOCATION_STATIC" in boards.local.txt (create
** if it doesn't exist) and copy this file to
** `<ARDUINO_CORE_INSTALL_PATH>/arduino/hardware/<mbed_core>/<core_version>/`.
**
** See
** (https://support.arduino.cc/hc/en-us/articles/360012076960-Where-are-the-installed-cores-located-)
** to find where Arduino installs cores on your machine.
**
** If the problem persists then there's not enough memory for this model and application.
*/
/* Includes ---------------------------------------------------------------- */
#include <XIAO-ESP32S3-KWS_inferencing.h>
#include <ESP_I2S.h>
I2SClass I2S;
#define SAMPLE_RATE 16000U
#define SAMPLE_BITS 16
#define LED_BUILT_IN 21
/** Audio buffers, pointers and selectors */
typedef struct {
int16_t *buffer;
uint8_t buf_ready;
uint32_t buf_count;
uint32_t n_samples;
} inference_t;
static inference_t inference;
static const uint32_t sample_buffer_size = 2048;
static signed short sampleBuffer[sample_buffer_size];
static bool debug_nn = false; // Set this to true to see e.g. features generated from the raw signal
static bool record_status = true;
/**
* @brief Arduino setup function
*/
void setup()
{
// put your setup code here, to run once:
Serial.begin(115200);
// comment out the below line to cancel the wait for USB connection (needed for native USB)
while (!Serial);
Serial.println("Edge Impulse Inferencing Demo");
pinMode(LED_BUILT_IN, OUTPUT); // Set the pin as output
digitalWrite(LED_BUILT_IN, HIGH); //Turn off
// setup 42 PDM clock and 41 PDM data pins
I2S.setPinsPdmRx(42, 41);
if (!I2S.begin(I2S_MODE_PDM_RX, 16000, I2S_DATA_BIT_WIDTH_16BIT, I2S_SLOT_MODE_MONO)) {
Serial.println("Failed to initialize I2S!");
while (1) ;
}
// summary of inferencing settings (from model_metadata.h)
ei_printf("Inferencing settings:\n");
ei_printf("\tInterval: ");
ei_printf_float((float)EI_CLASSIFIER_INTERVAL_MS);
ei_printf(" ms.\n");
ei_printf("\tFrame size: %d\n", EI_CLASSIFIER_DSP_INPUT_FRAME_SIZE);
ei_printf("\tSample length: %d ms.\n", EI_CLASSIFIER_RAW_SAMPLE_COUNT / 16);
ei_printf("\tNo. of classes: %d\n", sizeof(ei_classifier_inferencing_categories) / sizeof(ei_classifier_inferencing_categories[0]));
ei_printf("\nStarting continious inference in 2 seconds...\n");
ei_sleep(2000);
if (microphone_inference_start(EI_CLASSIFIER_RAW_SAMPLE_COUNT) == false) {
ei_printf("ERR: Could not allocate audio buffer (size %d), this could be due to the window length of your model\r\n", EI_CLASSIFIER_RAW_SAMPLE_COUNT);
return;
}
ei_printf("Recording...\n");
}
/**
* @brief Arduino main function. Runs the inferencing loop.
*/
void loop()
{
bool m = microphone_inference_record();
if (!m) {
ei_printf("ERR: Failed to record audio...\n");
return;
}
signal_t signal;
signal.total_length = EI_CLASSIFIER_RAW_SAMPLE_COUNT;
signal.get_data = µphone_audio_signal_get_data;
ei_impulse_result_t result = { 0 };
EI_IMPULSE_ERROR r = run_classifier(&signal, &result, debug_nn);
if (r != EI_IMPULSE_OK) {
ei_printf("ERR: Failed to run classifier (%d)\n", r);
return;
}
int pred_index = 0; // Initialize pred_index
float pred_value = 0; // Initialize pred_value
// print the predictions
ei_printf("Predictions ");
ei_printf("(DSP: %d ms., Classification: %d ms., Anomaly: %d ms.)",
result.timing.dsp, result.timing.classification, result.timing.anomaly);
ei_printf(": \n");
for (size_t ix = 0; ix < EI_CLASSIFIER_LABEL_COUNT; ix++) {
ei_printf(" %s: ", result.classification[ix].label);
ei_printf_float(result.classification[ix].value);
ei_printf("\n");
if (result.classification[ix].value > pred_value){
pred_index = ix;
pred_value = result.classification[ix].value;
}
}
// Display inference result
if (pred_index == 3){
digitalWrite(LED_BUILT_IN, LOW); //Turn on
}
else{
digitalWrite(LED_BUILT_IN, HIGH); //Turn off
}
#if EI_CLASSIFIER_HAS_ANOMALY == 1
ei_printf(" anomaly score: ");
ei_printf_float(result.anomaly);
ei_printf("\n");
#endif
}
static void audio_inference_callback(uint32_t n_bytes)
{
for(int i = 0; i < n_bytes>>1; i++) {
inference.buffer[inference.buf_count++] = sampleBuffer[i];
if(inference.buf_count >= inference.n_samples) {
inference.buf_count = 0;
inference.buf_ready = 1;
}
}
}
static void capture_samples(void* arg) {
const int32_t i2s_bytes_to_read = (uint32_t)arg;
size_t bytes_read = i2s_bytes_to_read;
while (record_status) {
/* read data at once from i2s - Modified for XIAO ESP2S3 Sense and I2S.h library */
// i2s_read((i2s_port_t)1, (void*)sampleBuffer, i2s_bytes_to_read, &bytes_read, 100);
esp_i2s::i2s_read(esp_i2s::I2S_NUM_0, (void*)sampleBuffer, i2s_bytes_to_read, &bytes_read, 100);
if (bytes_read <= 0) {
ei_printf("Error in I2S read : %d", bytes_read);
}
else {
if (bytes_read < i2s_bytes_to_read) {
ei_printf("Partial I2S read");
}
// scale the data (otherwise the sound is too quiet)
for (int x = 0; x < i2s_bytes_to_read/2; x++) {
sampleBuffer[x] = (int16_t)(sampleBuffer[x]) * 8;
}
if (record_status) {
audio_inference_callback(i2s_bytes_to_read);
}
else {
break;
}
}
}
vTaskDelete(NULL);
}
/**
* @brief Init inferencing struct and setup/start PDM
*
* @param[in] n_samples The n samples
*
* @return { description_of_the_return_value }
*/
static bool microphone_inference_start(uint32_t n_samples)
{
inference.buffer = (int16_t *)malloc(n_samples * sizeof(int16_t));
if(inference.buffer == NULL) {
return false;
}
inference.buf_count = 0;
inference.n_samples = n_samples;
inference.buf_ready = 0;
// if (i2s_init(EI_CLASSIFIER_FREQUENCY)) {
// ei_printf("Failed to start I2S!");
// }
ei_sleep(100);
record_status = true;
xTaskCreate(capture_samples, "CaptureSamples", 1024 * 32, (void*)sample_buffer_size, 10, NULL);
return true;
}
/**
* @brief Wait on new data
*
* @return True when finished
*/
static bool microphone_inference_record(void)
{
bool ret = true;
while (inference.buf_ready == 0) {
delay(10);
}
inference.buf_ready = 0;
return ret;
}
/**
* Get raw audio signal data
*/
static int microphone_audio_signal_get_data(size_t offset, size_t length, float *out_ptr)
{
numpy::int16_to_float(&inference.buffer[offset], out_ptr, length);
return 0;
}
/**
* @brief Stop PDM and release buffers
*/
static void microphone_inference_end(void)
{
free(sampleBuffer);
ei_free(inference.buffer);
}
#if !defined(EI_CLASSIFIER_SENSOR) || EI_CLASSIFIER_SENSOR != EI_CLASSIFIER_SENSOR_MICROPHONE
#error "Invalid model for current sensor."
#endif
The idea is that the LED will be ON whenever the keyword HELLO is detected. In the same way, instead of turn-on a LED, this could be a "trigger" for an external device, as we saw in the introduction.
Special Thanks
Special thanks to MJRoBot (Marcelo Rovai) for the tutorial content on XIAO ESP32S3 Sense access to Edge Impulse. The original article is very detailed and contains a lot of knowledge about machine learning.
If you would like to read the original content of this article, you can go straight to the original article by scrolling down.
MJRoBot also has very many interesting projects about the XIAO ESP32S3.
Resources
- [GITHUB] Project Github
- [EDGE-IMPULSE] edge impulse demo
Tech Support & Product Discussion
Thank you for choosing our products! We are here to provide you with different support to ensure that your experience with our products is as smooth as possible. We offer several communication channels to cater to different preferences and needs.