Grove - Temperature Sensor V1.2
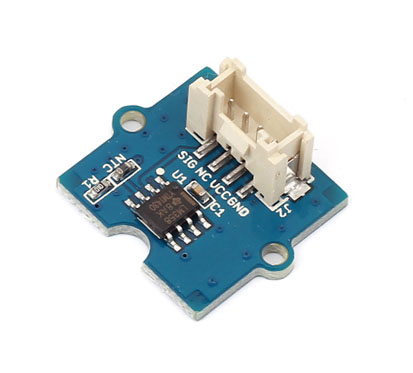
The Grove - Temperature Sensor uses a Thermistor to detect the ambient temperature. The resistance of a thermistor will increase when the ambient temperature decreases. It's this characteristic that we use to calculate the ambient temperature. The detectable range of this sensor is -40 - 125ºC, and the accuracy is ±1.5ºC
Note: This wiki works with Grove - Temperature sensor V1.1 as well, for V1.0 please refer to Grove - Temperature Sensor
![]()
Upgradable to Industrial Sensors
With the SenseCAP S2110 controller and S2100 data logger, you can easily turn the Grove into a LoRaWAN® sensor. Seeed not only helps you with prototyping but also offers you the possibility to expand your project with the SenseCAP series of robust industrial sensors.
SenseCAP S210x series industrial sensors provide an out-of-box experience for environmental sensing. Please refer to the S2101 Wireless Temperature and Humidity Sensor with higher performance and robustness for air quality monitoring. The series includes sensors for soil moisture, air temperature and humidity, light intensity, CO2, EC, and an 8-in-1 weather station. Try the latest SenseCAP S210x for your next successful industrial project.
| SenseCAP Industrial Sensor |
 |
| S2101 Air Temp & Humidity |
Specifications
- Voltage: 3.3 ~ 5V
- Zero power resistance: 100 KΩ
- Resistance Tolerance: ±1%
- Operating temperature range: -40 ~ +125 ℃
- Nominal B-Constant: 4250 ~ 4299K
More details about Grove modules please refer to Grove System
Platforms Supported
| Arduino | Raspberry | ArduPy |
|---|---|---|
The platforms mentioned above as supported is/are an indication of the module's software or theoritical compatibility. We only provide software library or code examples for Arduino platform in most cases. It is not possible to provide software library / demo code for all possible MCU platforms. Hence, users have to write their own software library.
Getting Started
After this section, you can make Grove - Temperature Sensor V1.1/1.2 run with only few steps.
If this is the first time you work with Arduino, we firmly recommend you to see Getting Started with Arduino before the start.
Play With Arduino
Hardware
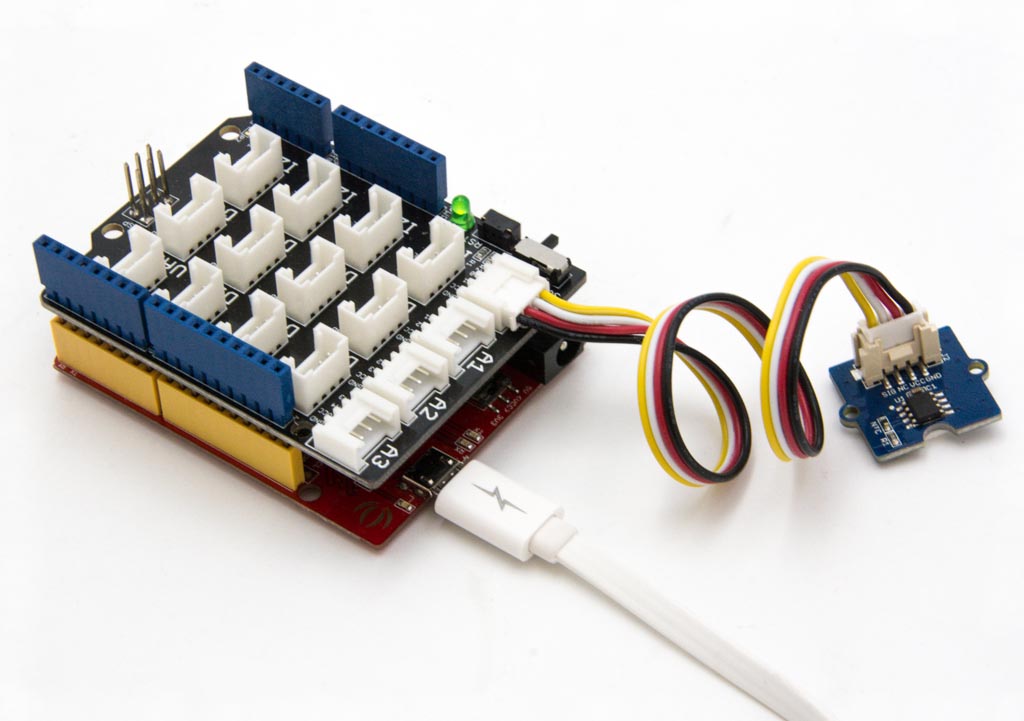
- Step 1. Prepare the below stuffs:
| Seeeduino V4.2 | Base Shield | Grove - Temperature Sensor |
|---|---|---|
 |  |  |
| Get One Now | Get One Now | Get One Now |
Step 2. Connect Grove - Temperature Sensor to port A0 of Grove-Base Shield.
Step 3. Plug Grove - Base Shield into Seeeduino.
Step 4. Connect Seeeduino to PC via a USB cable.
If we don't have Grove Base Shield, We also can directly connect Grove_Ultrasonic_Ranger to Seeeduino as below.
| Seeeduino | Grove - Temperature Sensor |
|---|---|
| 5V | Red |
| GND | Black |
| Not Conencted | White |
| A0 | Yellow |
Software
- Step 1. Launch Arduino IDE and click File>New to open a new page. Copy the following code into the new page and upload. If you do not know how to upload the code, please check How to upload code.
// Demo code for Grove - Temperature Sensor V1.1/1.2
// Loovee @ 2015-8-26

#include <math.h>

const int B = 4275;               // B value of the thermistor
const int R0 = 100000;            // R0 = 100k
const int pinTempSensor = A0;     // Grove - Temperature Sensor connect to A0

#if defined(ARDUINO_ARCH_AVR)
#define debug  Serial
#elif defined(ARDUINO_ARCH_SAMD) ||  defined(ARDUINO_ARCH_SAM)
#define debug  SerialUSB
#else
#define debug  Serial
#endif

void setup()
{
    Serial.begin(9600);
}

void loop()
{
    int a = analogRead(pinTempSensor);

    float R = 1023.0/a-1.0;
    R = R0*R;

    float temperature = 1.0/(log(R/R0)/B+1/298.15)-273.15; // convert to temperature via datasheet

    Serial.print("temperature = ");
    Serial.println(temperature);

    delay(100);
}
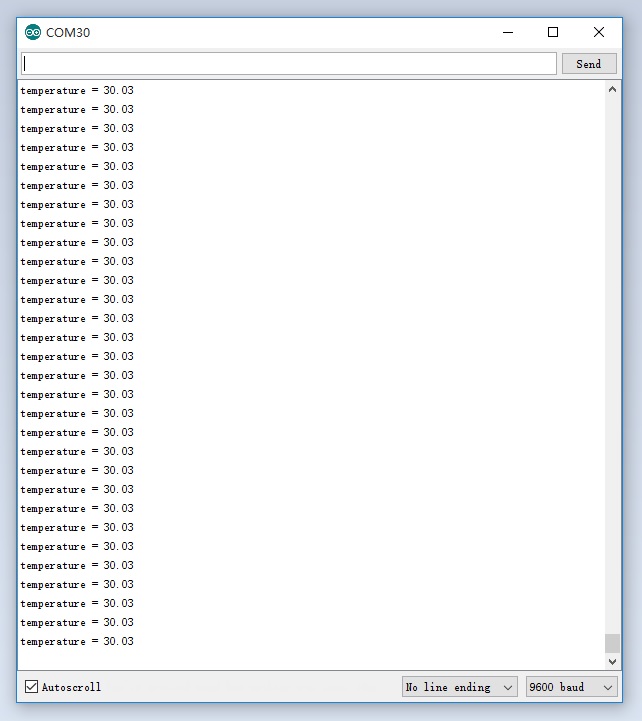
Step 2. Open the Serial Monitor of Arduino IDE by click Tool-> Serial Monitor. Or tap the ++ctrl+shift+m++ key at the same time. if every thing goes well, you will get the temperature.
The result should be like:
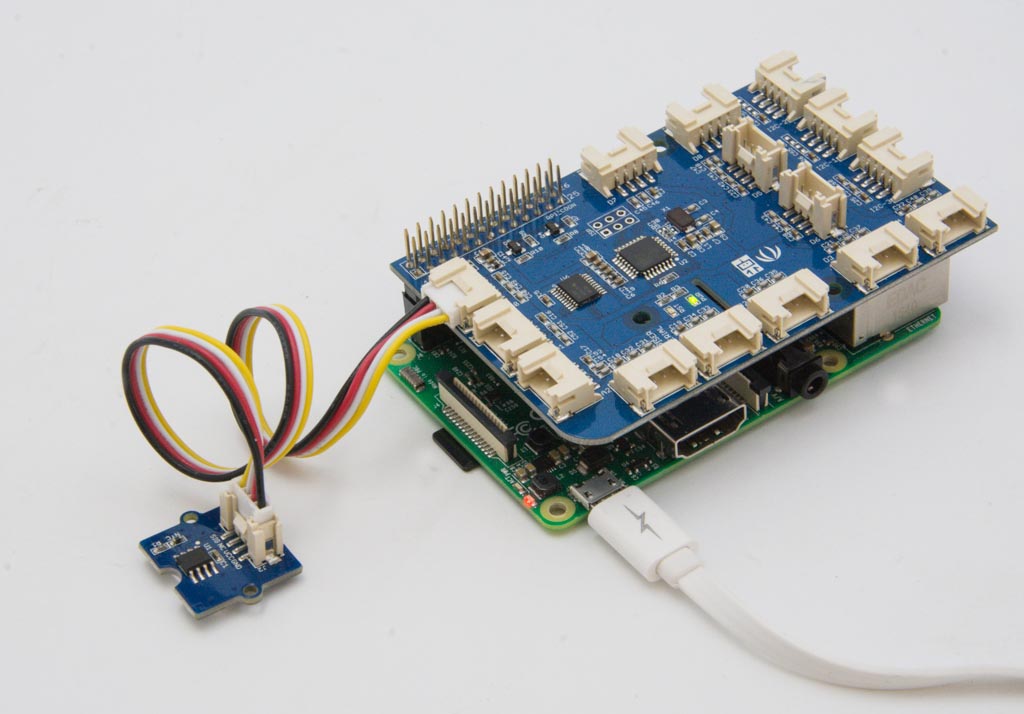
Play With Raspberry Pi (With Grove Base Hat for Raspberry Pi)
Hardware
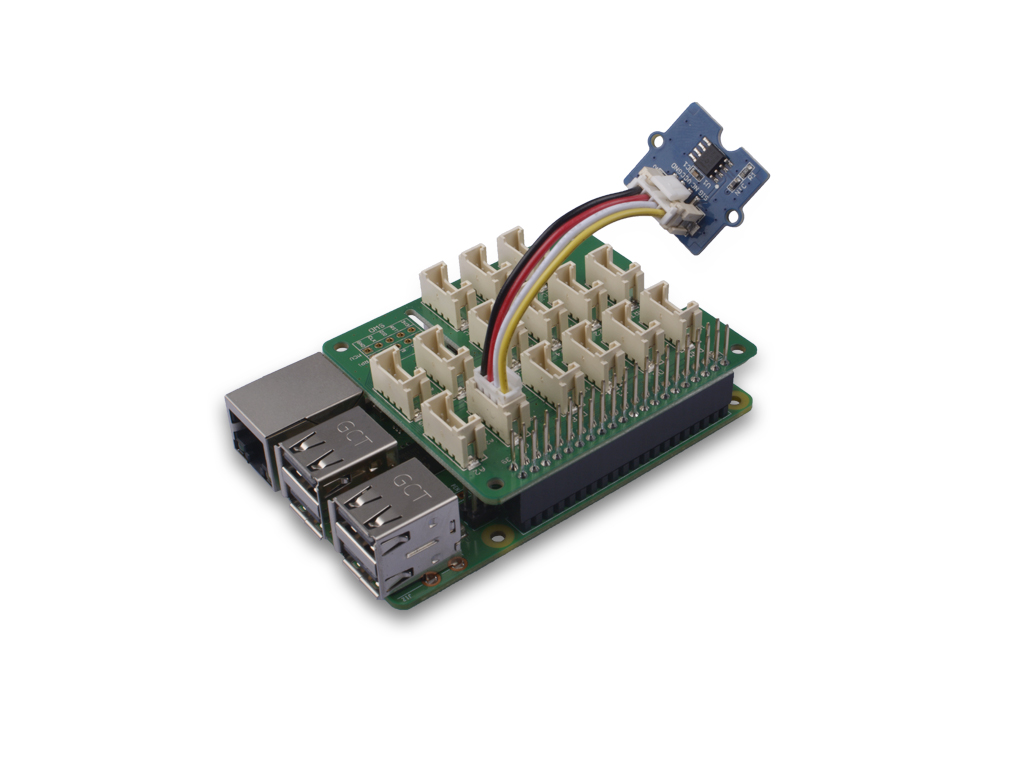
- Step 1. Things used in this project:
| Raspberry pi | Grove Base Hat for RasPi | Grove - Temperature Sensor |
|---|---|---|
 |  | |
| Get ONE Now | Get ONE Now | Get ONE Now |
- Step 2. Plug the Grove Base Hat into Raspberry.
- Step 3. Connect the temperature sensor to port A0 of the Base Hat.
- Step 4. Connect the Raspberry Pi to PC through USB cable.
For step 3 you are able to connect the temperature sensor to any analog Port but make sure you change the command with the corresponding port number.
Software
If you are using Raspberry Pi with Raspberrypi OS >= Bullseye, you have to use this command line only with Python3.
- Step 1. Follow Setting Software to configure the development environment.
- Step 2. Download the source file by cloning the grove.py library.
cd ~
git clone https://github.com/Seeed-Studio/grove.py
- Step 3. Excute below commands to run the code.
cd grove.py/grove
python3 grove_temperature_sensor.py 0
Following is the grove_temperature_sensor.py code.
import sys
import time
from grove.factory import Factory


def main():
    from grove.helper import SlotHelper
    sh = SlotHelper(SlotHelper.ADC)
    pin = sh.argv2pin()

    sensor = Factory.getTemper("NTC-ADC", pin)

    print('Detecting temperature...')
    while True:
        print('{} Celsius'.format(sensor.temperature))
        time.sleep(1)


if __name__ == '__main__':
    main()
If everything goes well, you will be able to see the following result
pi@raspberrypi:~/grove.py/grove $ python3 grove_temperature_sensor.py 0
Hat Name = 'Grove Base Hat RPi'
Detecting temperature...
24.7473402633 Celsius
24.7473402633 Celsius
24.7473402633 Celsius
24.7112751977 Celsius
24.7112751977 Celsius
^CTraceback (most recent call last):
  File "grove_temperature_sensor.py", line 53, in <module>
    main()
  File "grove_temperature_sensor.py", line 49, in main
    time.sleep(1)
KeyboardInterrupt
You can quit this program by simply press ++ctrl+c++.
You may have noticed that for the analog port, the silkscreen pin number is something like A1, A0, however in the command we use parameter 0 and 1, just the same as digital port. So please make sure you plug the module into the correct port, otherwise there may be pin conflicts.
Play With Raspberry Pi (with GrovePi_Plus)
Hardware
- Step 1. Prepare the below stuffs:
| Raspberry pi | GrovePi_Plus | Grove - Temperature Sensor |
|---|---|---|
 |  | |
| Get One Now | Get One Now | Get One Now |
Step 2. Plug the GrovePi_Plus into Raspberry.
Step 3. Connect Grove - Temperature Sensor ranger to A0 port of GrovePi_Plus.
Step 4. Connect the Raspberry to PC via USB cable.
Software
Step 1. Follow Setting Software to configure the development environment.
Step 2. Follow Updating the Firmware to update the newest firmware of GrovePi.
In this wiki we use the path ~/GrovePi/ instead of /home/pi/Desktop/GrovePi, you need to make sure Step 2 and Step 3 use the same path.
We firmly suggest you to update the firmware, or for some sensors you may get errors. :::
If you are using Raspberry Pi with Raspberrypi OS >= Bullseye, you have to use this command line only with Python3.
- Step 3. Git clone the Github repository.
cd ~
git clone https://github.com/DexterInd/GrovePi.git
- Step 4. Excute below commands to use the Grove - Temperature Sensor to meansure the temperature.
cd ~/GrovePi/Software/Python
sudo python3 grove_temperature_sensor.py
Here is the grove_temperature_sensor.py code.
# NOTE:
#  The sensor uses a thermistor to detect ambient temperature.
#  The resistance of a thermistor will increase when the ambient temperature decreases.
#
#  There are 3 revisions 1.0, 1.1 and 1.2, each using a different model thermistor.
#  Each thermistor datasheet specifies a unique Nominal B-Constant which is used in the calculation forumla.
#
#  The second argument in the grovepi.temp() method defines which board version you have connected.
#  Defaults to '1.0'. eg.
#   temp = grovepi.temp(sensor)        # B value = 3975
#   temp = grovepi.temp(sensor,'1.1')  # B value = 4250
#   temp = grovepi.temp(sensor,'1.2')  # B value = 4250

import time
import grovepi

# Connect the Grove Temperature Sensor to analog port A0
# SIG,NC,VCC,GND
sensor = 0

while True:
    try:
        temp = grovepi.temp(sensor,'1.2')
        print("temp =", temp)
        time.sleep(.5)

    except KeyboardInterrupt:
        break
    except IOError:
        print ("Error")
The result should be like:
pi@raspberrypi:~/GrovePi/Software/Python $ sudo python3 grove_temperature_sensor.py

('temp =', 25.28652137917777)
('temp =', 25.28652137917777)
('temp =', 25.28652137917777)
('temp =', 25.28652137917777)
('temp =', 25.368489566400115)
('temp =', 25.61468397498203)
('temp =', 27.43501590142614)
('temp =', 27.85285590636829)
('temp =', 27.18509952680688)
('temp =', 26.852756540240193)
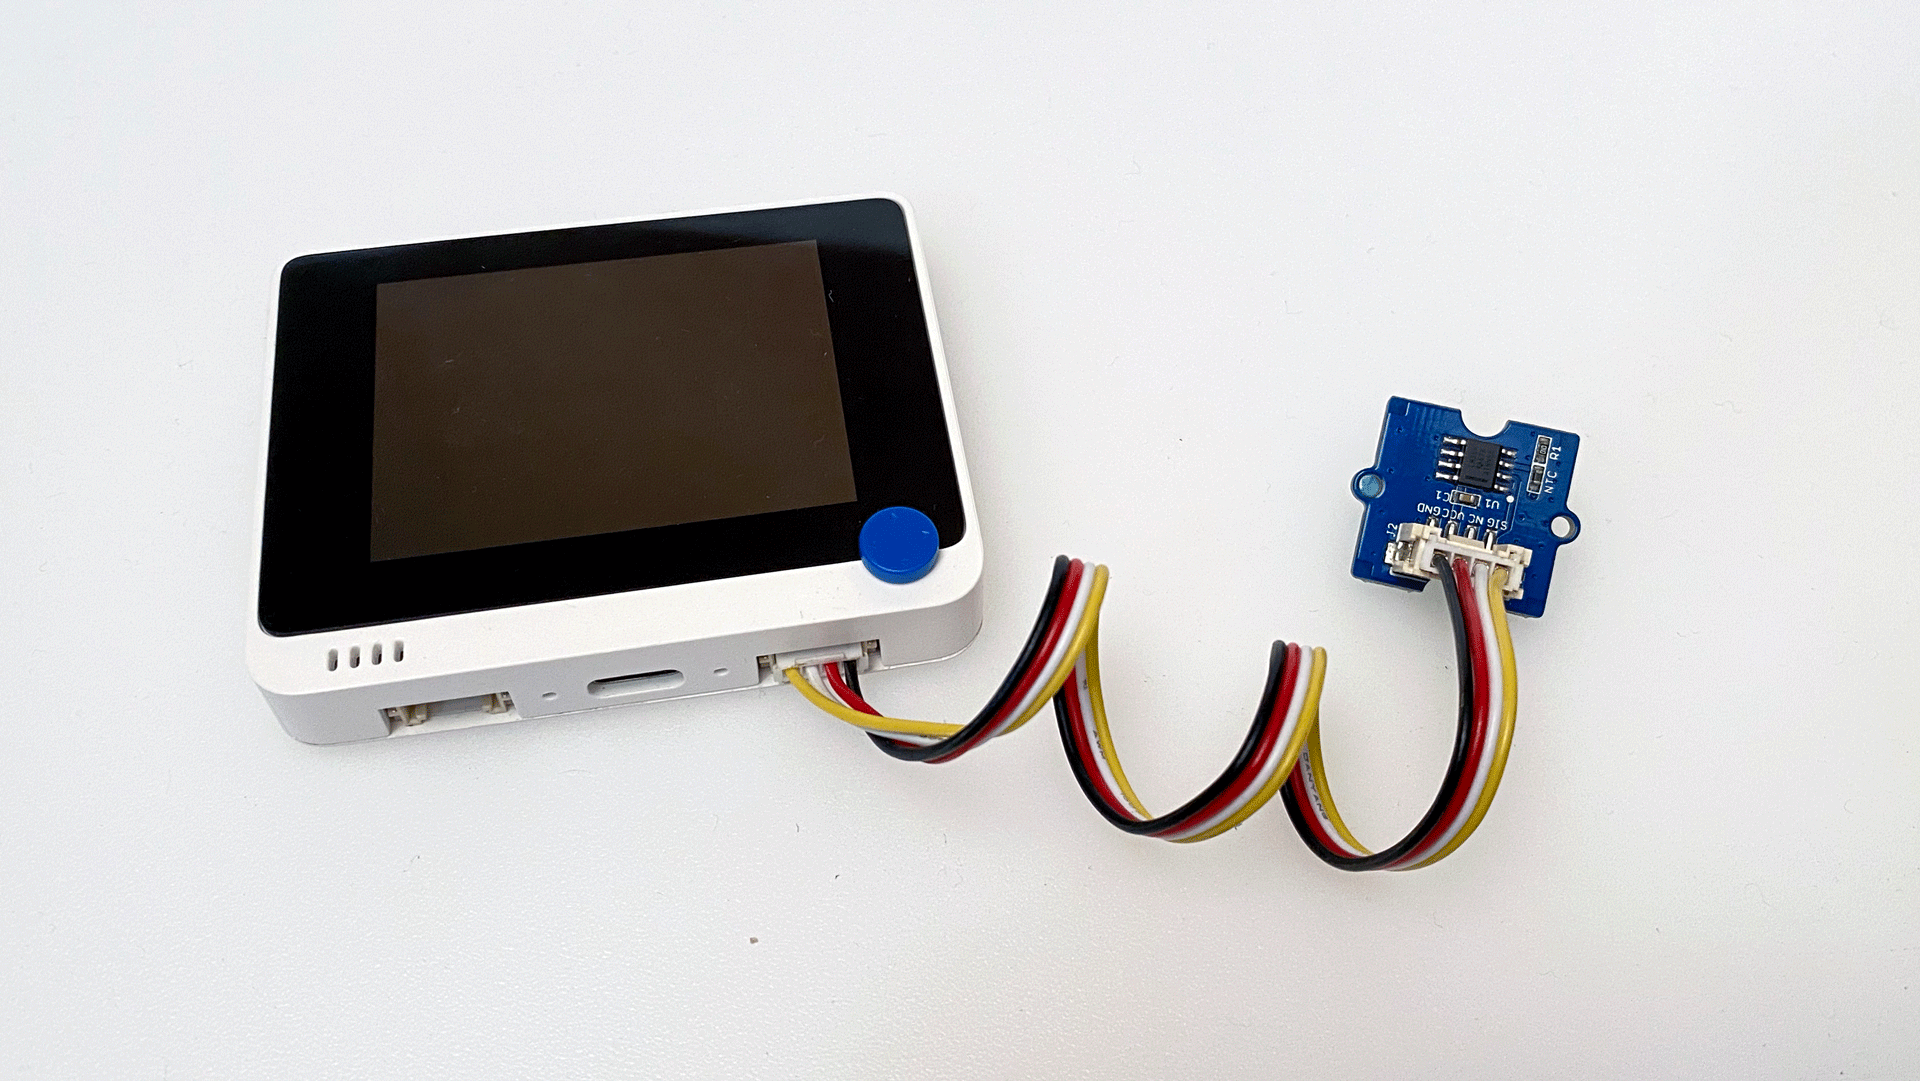
Play With Wio Terminal (ArduPy)
Hardware
- Step 1. Prepare the below stuffs:
| Wio Terminal | Grove - Temperature Sensor |
|---|---|
 | |
| Get One Now | Get One Now |
Step 2. Connect Grove - Temperature Sensor to A0 port of Wio Terminal.
Step 3. Connect the Wio Terminal to PC through USB Type-C cable.
Software
Step 1. Follow ArduPy Getting Started to configure the ArduPy development environment on Wio Terminal.
Step 2. Make sure that the ArduPy firmware is flashed into Wio Terminal. For more information, please follow here.
aip build
aip flash
- Step 3. Copy the following code and save it as
ArduPy-temp.py:
from machine import Pin, ADC
from machine import LCD
from machine import Sprite
import time, math

raw = ADC(Pin(13))
lcd = LCD()
spr = Sprite(lcd) # Create a buff
B = 4275 # B value of the thermistor
R0 = 100000 # R0 = 100k

def temp(reading):
    R = 1023.0 / reading - 1.0
    R = R0*R
    temperature = 1.0/(math.log(R/R0)/B+1/298.15)-273.15 # Convert to temperature via datasheet
    return temperature

def main():
    spr.createSprite(320, 240)
    while True:
        spr.setTextSize(2)
        spr.fillSprite(spr.color.BLACK)
        spr.setTextColor(lcd.color.ORANGE)
        spr.drawString("Temperature Reading", 45, 10)
        spr.drawFastHLine(40, 35, 240, lcd.color.DARKGREY)
        spr.setTextColor(lcd.color.WHITE)
        spr.drawString("- ", 20, 50)
        spr.drawFloat(temp(raw.read()), 3, 40,50)
        spr.drawString("C", 120, 50)
        spr.pushSprite(0,0)
        time.sleep_ms(500)

        print("Temperature: ", temp(raw.read()), "C")

if __name__ == "__main__":
    main()
- Step 4. Save the
ArduPy-temp.pyin a location that you know. Run the following command and replace<YourPythonFilePath>with yourArduPy-temp.pylocation.
aip shell -n -c "runfile <YourPythonFilePath>"
# Example:
# aip shell -n -c "runfile /Users/ansonhe/Desktop/ArduPy-temp.py"
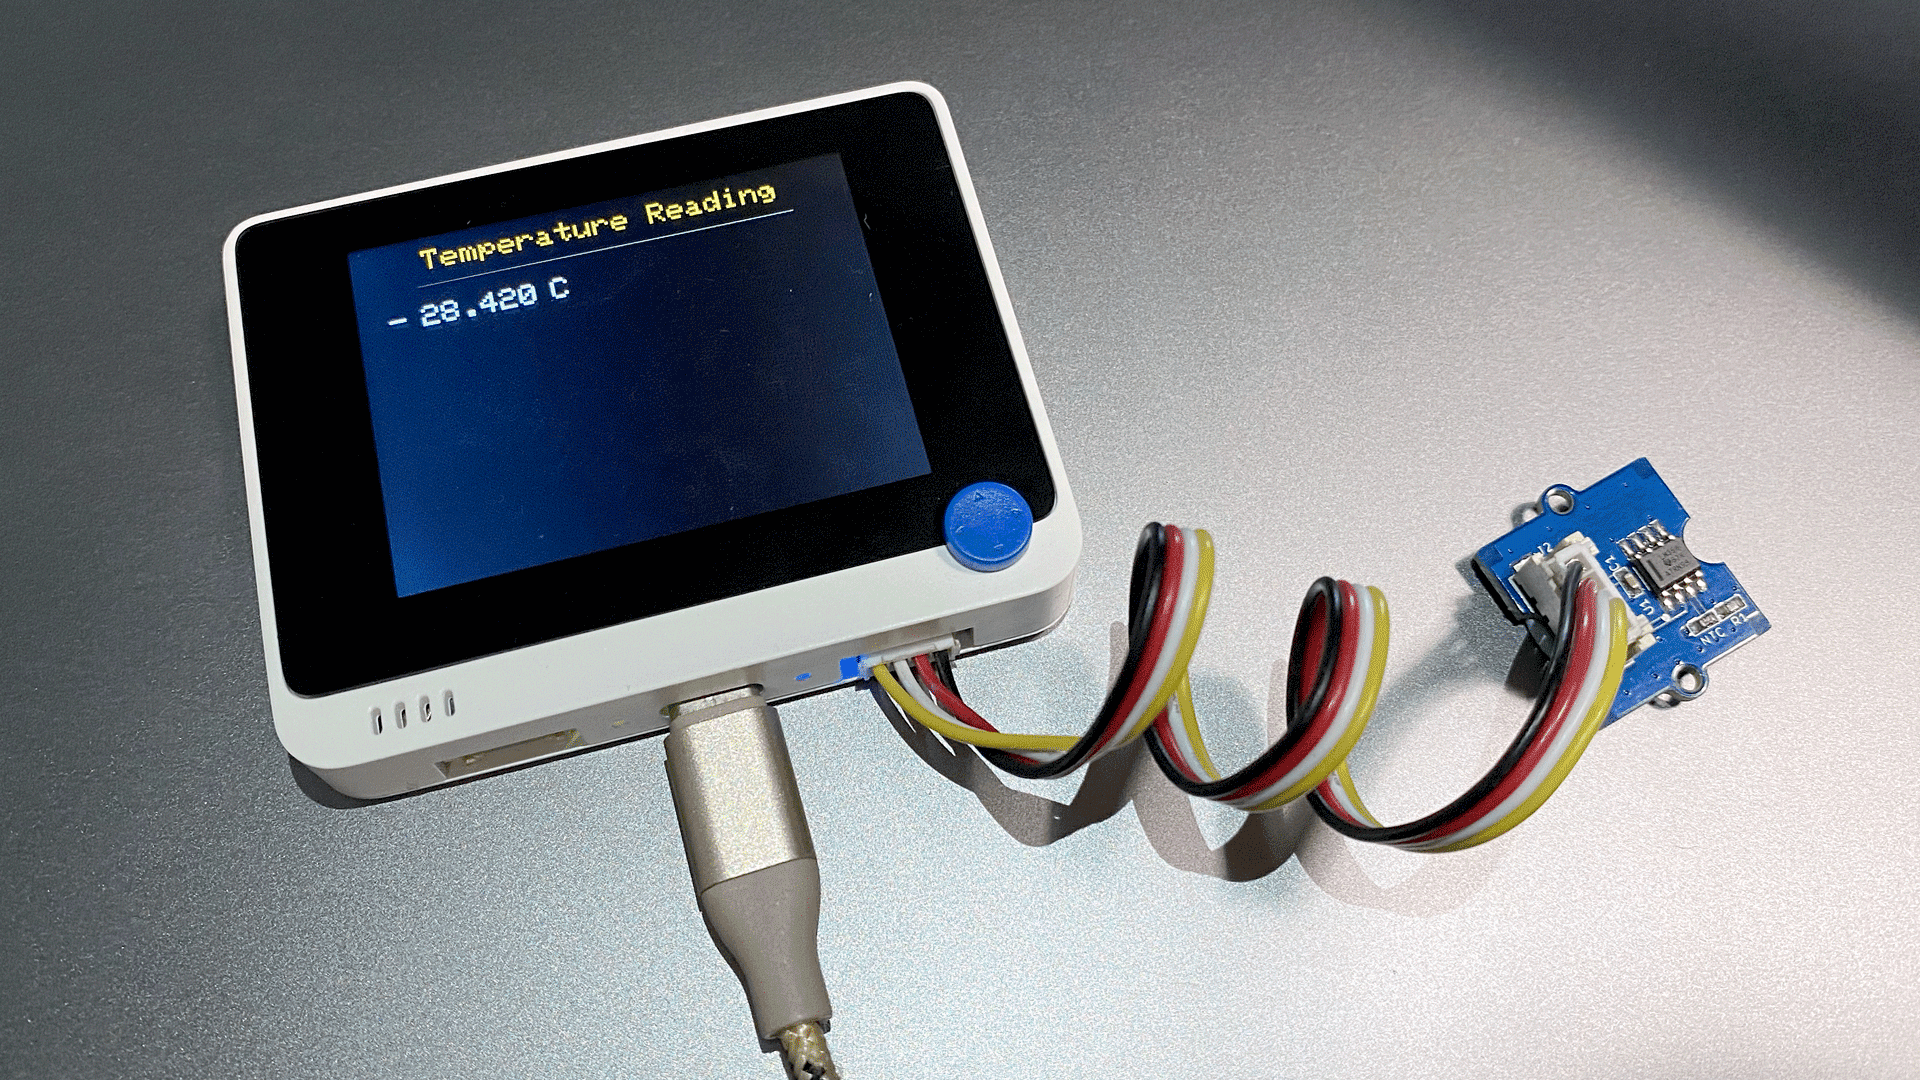
- Step 5. We will see the temperature value display on terminal as below, and displaying on the Wio Terminal LCD screen.
ansonhe@Ansons-Macbook-Pro ~:aip shell -n -c "runfile /Users/ansonhe/Desktop/ArduPy-temp.py"
Positional argument (/dev/cu.usbmodem141101) takes precedence over --open.
Connected to ardupy
Temperature:  28.08603 C
Temperature:  28.50415 C
Temperature:  28.16953 C
Temperature:  28.25308 C
Temperature:  28.08603 C
Temperature:  28.16953 C
Temperature:  28.08603 C
Temperature:  28.16953 C
Temperature:  28.33671 C
Temperature:  28.16953 C
Temperature:  28.25308 C
Reference
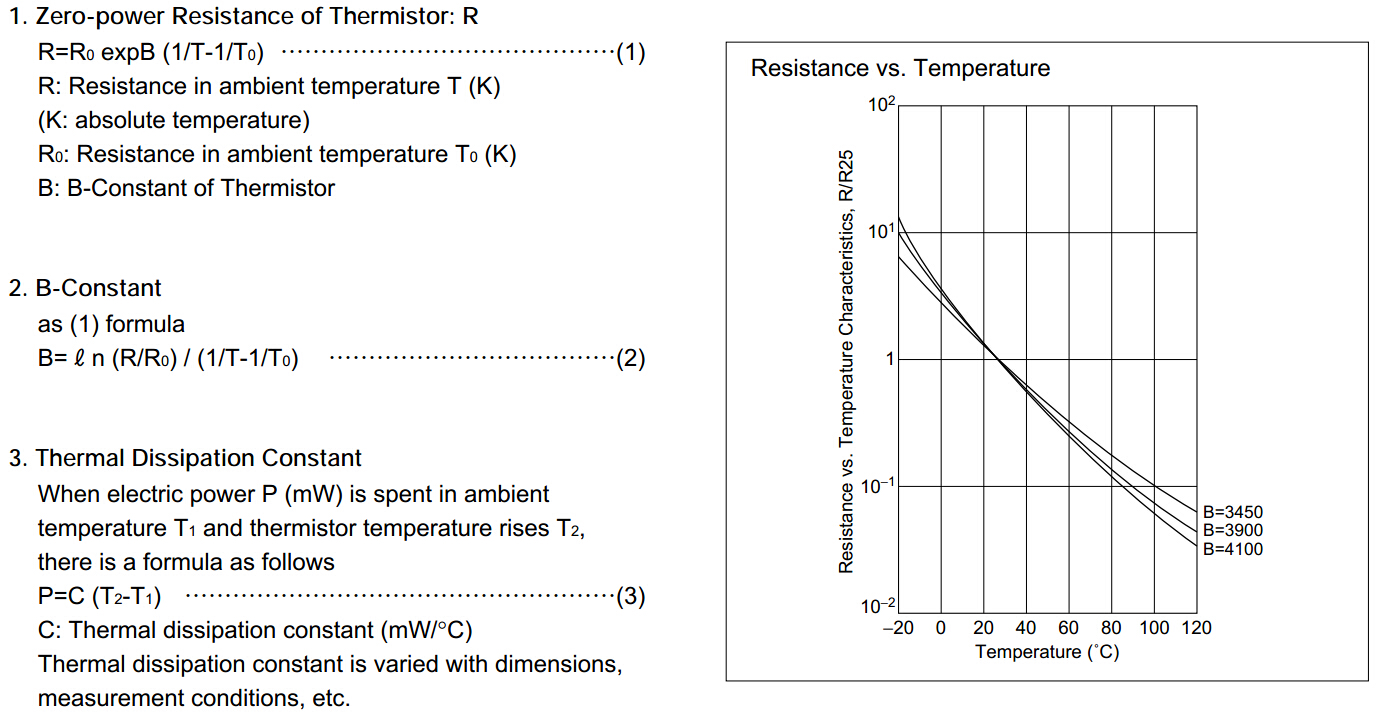
If you want to know how the algorithm of temperature coming, please refer to the below image:
Schematic Online Viewer
Resources
- [Zip] Grove - Temperature Sensor v1.1 Eagle File
- [PDF] Grove - Temperature Sensor v1.1.PDF
- [PDF] Temperature Sensor datasheet
Projects
Temperature sensor Grove module:
Tech Support & Product Discussion
Thank you for choosing our products! We are here to provide you with different support to ensure that your experience with our products is as smooth as possible. We offer several communication channels to cater to different preferences and needs.