SD Card Shield V3.0

The SD card v3.0 shield adds storage to your Arduino project. It supports SD, SDHC, or MicroSD TF cards. Use the on-board toggle switch to select the SD card type. The card supports use of one and only one format of SD card, either SD/SDHC, or MicroSD. Before using an SD or MicroSD card, please set the shields "SELECT" switch to the proper setting: toward the SD/SDHC slot, or the MicroSD slot.
The SD Card shield v3.0 uses only the the SPI ports of Arduino. The shield is also stackable, so additional shields can go on top. There are Grove compatible sockets for the I2C and UART ports on board.
The SD Card shield v3.0 makes use of pin 10 as a chip select. Please be sure other stacked shields do not make use of that same pin. See v4.0 of this shield for a version that uses pin 4.
These next lines were user added: This shield works fine for the Arduino Mega 2560, you just have to make the appropriate connections. 4or10 ->53, 11->51, 12 ->50, and 13 ->52. This arrangement works fine so long as you make sure not to assign anything else to those pins.
Model: INT106D1P
Features
Arduino/Seeeduino compatible( Do not compatible with Mega)
Grove compatible
SD card, Micro SD card and SDHC card supportable
3.3v and 5v logical voltage compatible
2.6~3.6v DC power supply
Specification
| Item | Min | Typical | Max | Unit |
|---|---|---|---|---|
| Voltage | 2.7 | 3.3 | 3.6 | V |
| Current | 0.159 | 40 | 200 | mA |
| Supported Card Type | SD card(<=2G); Micro SD card(<=2G); SDHC card(<=16G) | / | ||
| Dimension | 57.15x44.70x19.00 | mm | ||
| Net Weight | 16.6 | g | ||
Interface Function
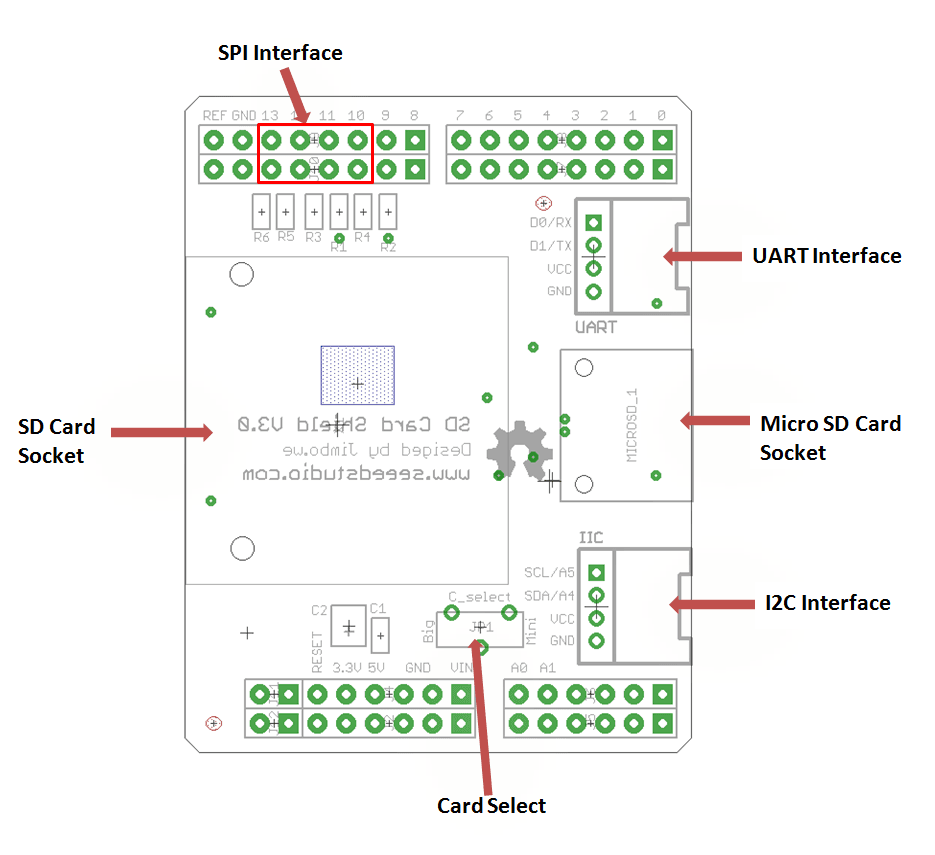 D10 – Used for CS of SPI
D11 – Used for MOSI of SPI
D12 – Used for MISO of SPI
D13 – Used for SCK of SPI
Grove connectors - One for Uart serial port, and the other one for I2C port.
D10 – Used for CS of SPI
D11 – Used for MOSI of SPI
D12 – Used for MISO of SPI
D13 – Used for SCK of SPI
Grove connectors - One for Uart serial port, and the other one for I2C port.
Usage
Hardware Installation
Plug the SD Card Shield onto the Arduino; Insert your SD card into the socket and make sure the card selector pointing to the right way (Standard card or micro).And then connect the Arduino to PC with USB cable.
Warning: Don't insert SD card and microSD card into the shield at the same time.

Software
First you have to get an SD card or micro SD card, and then format the SD card as FAT16 or FAT32 if it is necessary.
Format the SD card as the screenshots below:


Download the latest version of SdFat for Arduino.
Uncompress this package and put it in Arduino-1.0 program: ..\arduino-1.0\libraries.
Select the corresponding Arduino board, like Arduino UNO or Duemilanove or others, and the COM port you are using.
Upload the sketch Sdinfo.The following image is the result from the serial monitor. Of course you can upload other sketches.

If an error occurs, please recheck all the steps, and make sure the SD card is working. If none of that fixes the problem, try replacing the SD card. With that done, you can take a look at the other library examples for reading, writing, and sample logging with a GPS or real time clock. Enjoy!
FAQ
SD card can't be initialized .
Please reformat SD card to FAT/FTA32 .If it still can't work ,suggest to download the SD Formatter and reformat SD card by this software.
Version Tracker
| Revision | Descriptions | Release |
|---|---|---|
| v3.0 | V3.0 Release | 2012/3/29 |
| v3.1 | Voltage regulator upgraded to MIC5205 | 2012/5/10 |
SD Card Shield v3.1 Schematic Online Viewer
SD Card Shield v3.0 Schematic Online Viewer
Resources
[PDF]SD Card Shield pdf
[Eagle] Eagle file of SD Card Shield v3.0.
Tech Support & Product Discussion
Thank you for choosing our products! We are here to provide you with different support to ensure that your experience with our products is as smooth as possible. We offer several communication channels to cater to different preferences and needs.