Grove - I2C Motor Driver (TB6612FNG)

The Grove - I2C Motor Driver (TB6612FNG) can drive two DC motors up to 12V/1.2A or drive one stepper motor up to 12V/1.2A. With the on-board MCU, it can work with Arduino easily via the Grove I2C interface.
This diver board is based on TB6612FNG, which is a driver IC for DC motor and stepper motor with output transistor in LD MOS structure with low ON-resistor. Two input signals, IN1 and IN2, can choose one of four modes such as CW, CCW, short brake, and stop mode.

Version
| Product Version | Changes | Released Date |
|---|---|---|
| Grove - I2C Motor Driver (TB6612FNG) | Initial | Sep 2018 |
Features
- On board MCU
- CW/CCW/short brake/stop function modes
- Built-in thermal shutdown circuit and low voltage detecting circuit
- Standby (Power save) system
Specification
| Item | Value |
|---|---|
| MCU Operating Voltage | 3.3V / 5V |
| Motor Supply Voltage | 2.5 ~ 13.5 (5V Typical, 15V Max.) |
| Output Current | 1.2 A(ave)/3.2 A (peak) |
| Switching Frequency | 100kHz |
| Logic Interface | I2C |
| I2C Address | 0x14 (default) |
| I2C Address Range | 0x01 ~ 0x7f (Configurable) |
| Size | L: 60mm W: 40mm H: 12mm |
| Weight | 13g |
| Package size | L: 140mm W: 90mm H: 12mm |
| Gross Weight | 20g |
Typical applications
- DC motor control
- Stepper motor control
Hardware Overview
Pin Out


Hardware Detail
I2C Interface
This board uses the I2C interface to allow the on-board MCU to communicate with the host computer.
GND: connect this module to the system GND
VCC: you can use 5V or 3.3V for this module
SDA: I2C serial data
SCL: I2C serial clock

Power In
Provide DC power to the motors, input range 2.5V ~ 13.5V.
GND: Connect to the system GND, plug the power "-"
VM: Plug the power "+", supply power for the motor.

DC Motor Output
This board has two channel DC Motor Output, it can output 12V/1.2A per channel. You can use this driver board control two DC motors at the same time.
A1: Channel A output 1
A2: Channel A output 2
B1: Channel B output 1
B2: Channel B output 2

Steperp Motor Output
You can use this board to control the 4-wire stepper motor as well, it can output up to 12V/1.2A.
OUT1: Connected to one input of the stepper motor coil 1.
OUT2: Connected to the other input of the stepper motor coil 1.
OUT3: Connected to one input of the stepper motor coil 2.
OUT4: Connected to the other input of the stepper motor coil 2.
Actually the DC port and the stepper port are physically connected together. The connection diagram is as follows:
| DC Port | Stepper Port |
|---|---|
| A1 | OUT1 |
| A2 | OUT2 |
| B1 | OUT3 |
| B2 | OUT4 |
Platforms Supported
| Arduino | Raspberry Pi | |||
|---|---|---|---|---|
The platforms mentioned above as supported is/are an indication of the module's software or theoritical compatibility. We only provide software library or code examples for Arduino platform in most cases. It is not possible to provide software library / demo code for all possible MCU platforms. Hence, users have to write their own software library.
Getting Started
Play With Arduino
Hardware
Materials required
DC Motor Demo
| Seeeduino V4.2 | Base Shield | Grove - I2C Motor Driver (TB6612FNG) | DC Motor |
|---|---|---|---|
 |  |  |  |
| Get One Now | Get One Now | Get One Now | Get One Now |
1 Please plug the USB cable gently, otherwise you may damage the port. Please use the USB cable with 4 wires inside, the 2 wires cable can't transfer data. If you are not sure about the wire you have, you can click here to buy
2 Each Grove module comes with a Grove cable when you buy. In case you lose the Grove cable, you can click here to buy.
3 You also need prepare at least 2 jumpers, in case you do not have, you can click here to buy.
-
Step 1. Plu the DC motor into the DC Motor Output port of the driver board, plug the external DC power into the Power In port.
-
Step 2. Connect the Grove - I2C Motor Driver (TB6612FNG) to port I^2^C of Grove-Base Shield.
-
Step 3. Plug Grove - Base Shield into Seeeduino.
-
Step 4. Connect Seeeduino to PC via a USB cable.

Stepper Motor Demo
| Seeeduino V4.2 | Base Shield | Grove - I2C Motor Driver (TB6612FNG) | Stepper Motor |
|---|---|---|---|
| | |  |
| Get One Now | Get One Now | Get One Now | Get One Now |
- Step 1. Connect the stepper motor with Stepper Motor Output port of the driver board, plug the external DC power into the Power In port.
This driver board is suitable for 4-wire stepper motors. Depending on the stepper motor you use, the wiring color is different. We use the motor 24BYJ48 , the wiring is as shown in the table below:
| Pin Name | Wire of Stepper Motor | Wire color(24BYJ48) |
|---|---|---|
| OUT1 | one end of coil 1 | Orange |
| OUT2 | the other end of coil 1 | Blue |
| OUT3 | one end of coil 2 | Pink |
| OUT4 | the other end of coil 2 | Yellow |

-
Step 2. Connect the Grove - I2C Motor Driver (TB6612FNG) to port I^2^C of Grove-Base Shield.
-
Step 3. Plug Grove - Base Shield into Seeeduino.
-
Step 4. Connect Seeeduino to PC via a USB cable.

Since the DC port and the stepper port are physically connected together, you can also use the two DC port to control your stepper motor. The connection diagram is as follows:

If we don't have Grove Base Shield, We also can directly connect this module to Seeeduino as below.
| Seeeduino | Grove Cable | Grove - I2C Motor Driver (TB6612FNG) |
|---|---|---|
| GND | Black | GND |
| 5V or 3.3V | Red | VCC |
| SDA | White | SDA |
| SCL | Yellow | SCL |
Software
If this is the first time you work with Arduino, we strongly recommend you to see Getting Started with Arduino before the start.
-
Step 1. Download the Grove_Motor_Driver_TB6612FNG Library from Github.
-
Step 2. Refer to How to install library to install library for Arduino.
-
Step 3. Restart the Arduino IDE. Open the default example, we provide two examples for you
dc_motor: Demo for DC motor
stepper_motor_2phase: Demo for 4-wire, 2phase stepper motor.
You can open them in the following two ways(take the dc_motor for example):
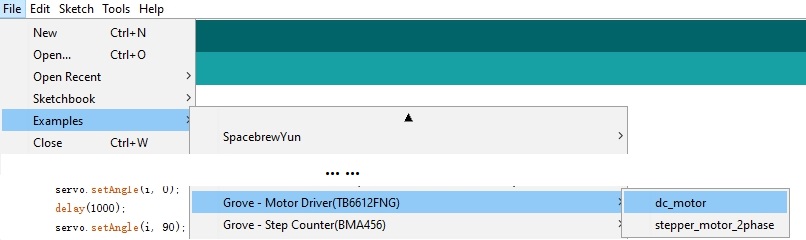
- Open it directly in the Arduino IDE via the path: File --> Examples --> Grove - Motor Driver(TB6612FNG) --> dc_motor.
- Open it in your computer by click the dc_motor.ino which you can find in the folder XXXX\Arduino\libraries\Grove_Motor_Driver_TB6612FNG-master\examples\dc_motor, XXXX is the location you installed the Arduino IDE.

- Step 4. Upload the demo. If you do not know how to upload the code, please check How to upload code.
If every thing goes well, when you power up the external power port, the motor will run.
Play With Raspberry Pi 4 Computer
Hardware
Materials required
DC Motor Demo
| Raspberry Pi 4 Computer | Grove Base Hat for Raspberry Pi | Grove - I2C Motor Driver (TB6612FNG) | DC Motor |
|---|---|---|---|
 |  | | |
| Get One Now | Get One Now | Get One Now | Get One Now |
1 Please plug the USB cable gently, otherwise you may damage the port. Please use the USB cable with 4 wires inside, the 2 wires cable can't transfer data. If you are not sure about the wire you have, you can click here to buy
2 Each Grove module comes with a Grove cable when you buy. In case you lose the Grove cable, you can click here to buy.
3 You also need prepare at least 2 jumpers, in case you do not have, you can click here to buy.
- Step 1. Plu the DC motor into the DC Motor Output port of the driver board, plug the external DC power into the Power In port.

-
Step 2. Connect the Grove - I2C Motor Driver (TB6612FNG) to port I^2^C of Grove Base Hat for Raspberry Pi.
-
Step 3. Plug Grove Base Hat for Raspberry Pi into Raspberry Pi 4 Computer.
-
Step 4. Connect Raspberry Pi 4 Computer to a display.

If this is your first time use Raspberry Pi, please refer to Getting started with Raspberry before the start.
Software
If you are using Raspberry Pi with Raspberrypi OS >= Bullseye, you have to use this command line only with Python3. Thanks MarkusBansky provide software library and learning resource for the Grove_Motor_Driver_TB6612FNG to Raspberry Pi 4 and python3. This is a port of Grove Arduino LIbrary for Grove I2C Motor Driver on TB6612FNG.
Requirements
- RaspberryPi linux image
- Python 3.6+
- smbus library
- time library
- math library
The library contains 6 easing functions for the smooth start of motors. Easing functions currently can only be used on a single motor at once. Containing IN and OUT functions.
How to use the library
If you are using Raspberry Pi with Raspberrypi OS >= Bullseye, you have to use this command line only with Python3.
First of all make sure you are running the latest released version of pip.This library requires you to add an additionalindex-url to pip.conf in order to install it. You can do this by editing your config file with sudo nano/etc/pip.conf and inserting this line just after the [global] section:
index-url=https://pypi.python.org/
Now you can install the package as usual, for python3 use something for example:
python3 -m pip install raspberry-i2c-tb6612fng
After you install the library successful, please enter the raspberry-i2c-tb6612fng file use below code.
cd raspberry-i2c-tb6612fng
The last step is to run the test code.
python3 test.py

If every thing goes well, when you type python3 test.py, the motor will run.
Schematic Online Viewer
Resources
-
[PDF] Datasheet TB6612FNG
Tech Support & Product Discussion
Thank you for choosing our products! We are here to provide you with different support to ensure that your experience with our products is as smooth as possible. We offer several communication channels to cater to different preferences and needs.