Grove - MP3 v4.0
Introduction
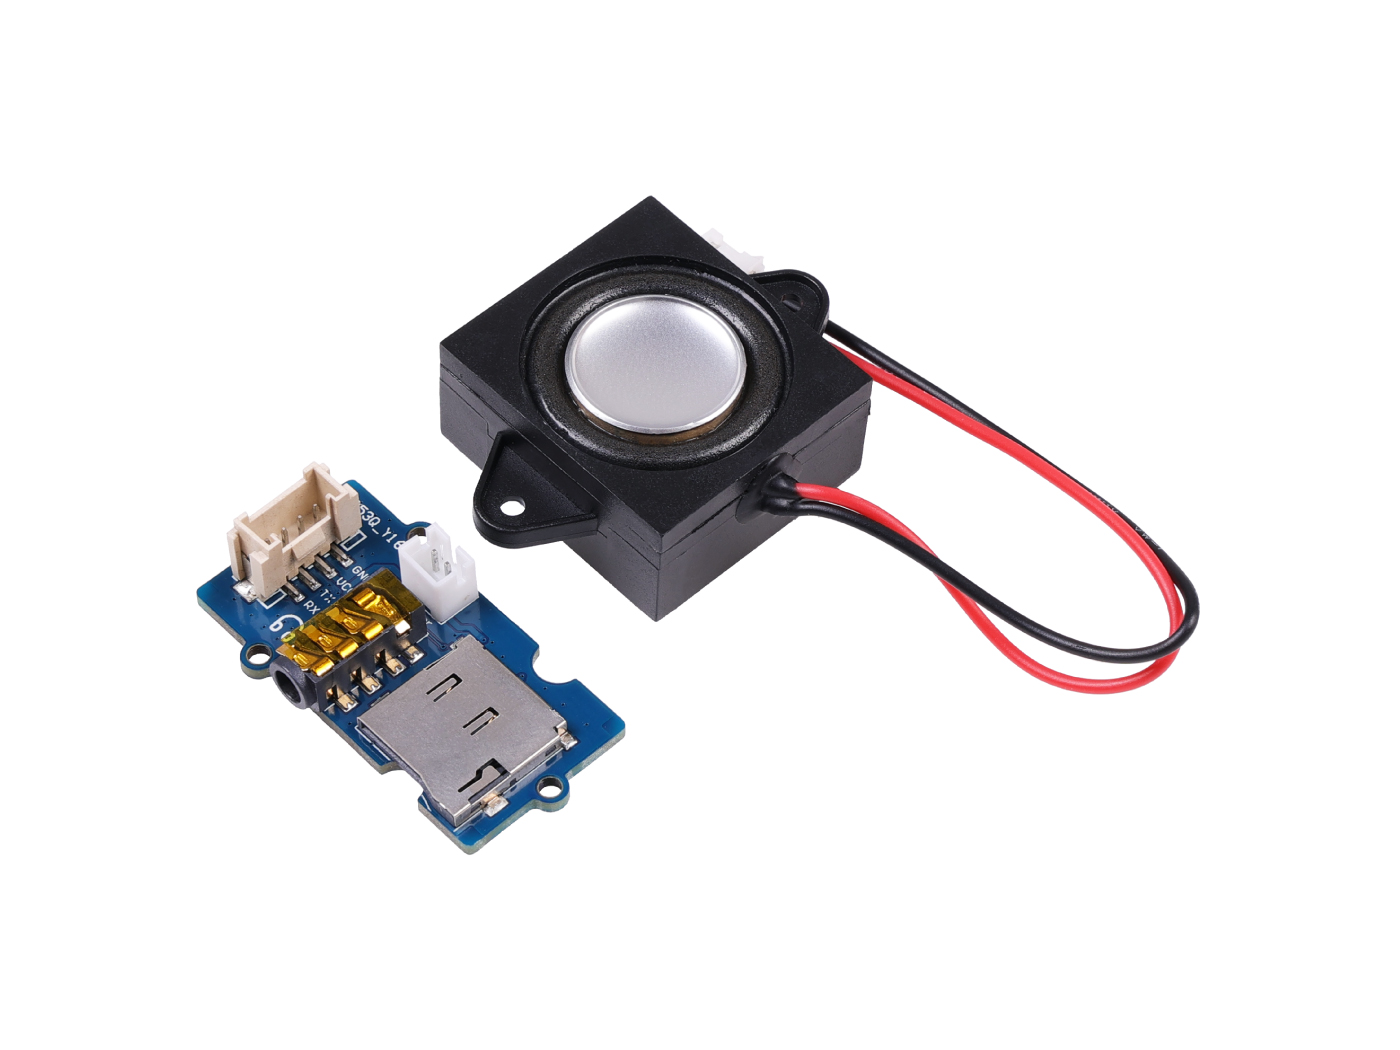
This MP3 module with an Arduino can be turned into your multi-format music player! It's a Music module based on WT2605CX high-quality audio chip, which has better performance then MP3 V3 and supports Grove interface, Speaker JST interface, 3.5mm audio jack and SD card, supporting SPI-Flash, TF card, and USB flash disk.

Feature
- Multiple Music Formats Supports: Support voice high-quality audio format, (8kbps~320kbps) with a beautiful sound, MP3, WAV format;
- Multiple Storage Format Support: Supports SPI-Flash, TF card, USB flash disk and support FAT, FAT32 file system;
- Control mode: Rich AT communication interface to meet your requirements;
- Rich Operation: supports randomized playback of commands, seamless loop playback function, and so on;
- Audio Output Mode: default DAC output for samples.
Specification
| Specification | Details |
|---|---|
| Input | 5V(DC) |
| Operating current (without signal output state) | less than 15 mA |
| Operating current (with signal output state) | less than 40 mA |
| Chip | KT403A |
| Chip LDO output voltage | 3.3 V |
| Chip output current | 100 mA(at Max.) |
| File formats supported | MP3, WAV, WMA |
| Maximum memory supported for SD card | 32 GB |
| Sampled rate | 8/11.025/12/16/22.05/24/32/44.1/48 (KHz) |
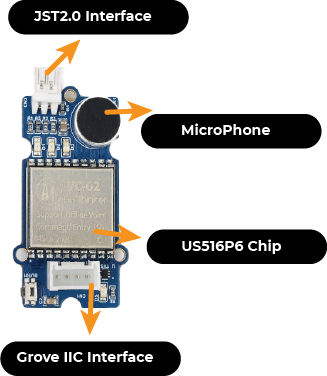
Hardware Overview
Getting Started
If you are using the Grove MP3 module for the first time, then you may first need to have a TF card with songs already stored on it, and an output device, either a 3.5mm audio cable headset or a speaker. The speakers are in the kit by default.

Arduino Library Overview
If this is your first time using Arduino, we highly recommend you to refer to Getting Started with Arduino.
Function
Before we get started developing a sketch, let's look at the available functions of the library.
void WT2605C<T>::init(T& serialPort)—— This function is responsible for configuring the serial port used by the MP3 module.Input Parameters:
- serialPort: The serial port.
uint8_t WT2605C<T>::playSPIFlashSong(uint16_t index)—— Specify the Flash root directory index to play. The files are indexed in the order in which they were copied into Flash.Input Parameters:
- index: Play the index of the song.
uint8_t WT2605C<T>::playSDRootSong(uint32_t index)—— Specify the TF card root directory index for playback. This command indexes the files in the TF card for playback, affected by the order in which the files are stored, and the files are sorted according to the indexing order. The order of file indexing is according to the time when the files are copied to the TF card.Input Parameters:
- index: Play the index of the song.
uint8_t WT2605C<T>::playSDSong(const char* fileName)—— Plays music with the specified file name. (File names must be no larger than 8 characters)Input Parameters:
- fileName: The name of the music file you want to play.
uint8_t WT2605C<T>::playSDDirectorySong(const char* dir, uint16_t index)—— Specify index playback in the TF card folder. This command can specify the folder in the root directory, and play the audio in the folder according to the folder index number (the folder name should not be larger than 8 characters) Folder name supports: Chinese, English, numbers, special symbols. If you use Chinese to send code, you need to use "UTF-16 encoding" format to transcode the code before sending it.Input Parameters:
- dir: The folder where the music you want to play is located.
- index: Index of music files.
uint8_t WT2605C<T>::playUDiskRootSong(uint32_t index)—— Specify the root directory index playback of the USB memory stick. This command indexes the files in the USB flash drive for playback, affected by the order in which the files are stored, the files are sorted according to the index order. The order of file indexing is according to the time when the files are copied to the USB flash drive.Input Parameters:
- index: Index of music files.
uint8_t WT2605C<T>::playUDiskSong(const char* fileName)—— Specify the USB memory stick file name for playback. This command allows you to specify a file name in the root directory for audio playback (the file name must not be larger than 8 characters). Supported audio formats:.mp3and.wav.Input Parameters:
- fileName: The name of the music file you want to play.
uint8_t WT2605C<T>::playUDiskDirectorySong(const char* dir, uint32_t index)—— Specify the file name to be played in the USB memory stick folder. This command specifies the name of a file in a folder in the root directory to be played. (File name must not be larger than 8 characters.) Audio formats supported:.mp3and.wav.Input Parameters:
- dir: The folder where the music you want to play is located.
- index: music files name.
uint8_t WT2605C<T>::pause_or_play()—— Pause Playback Command. In play state, send this command to pause the playback; in pause state, send this command to resume the playback from the pause. In stop play state, send this command to restart playback at current address.- Output Parameters: Returns 0 for successful execution and -1 for unsuccessful execution.
uint8_t WT2605C<T>::stop()—— Stop command. Send this command to stop playing the currently playing music.- Output Parameters: Returns 0 for successful execution and -1 for unsuccessful execution.
uint8_t WT2605C<T>::next()—— The next song order. This command triggers the playback of the next song in the current directory, and when the last song is played, sending this command triggers the playback of the first song.- Output Parameters: Returns 0 for successful execution and -1 for unsuccessful execution.
uint8_t WT2605C<T>::previous()—— Previous song order. This command triggers the playback of the next song in the current directory, and when the first song is playing, sending this command triggers the playback of the last song.- Output Parameters: Returns 0 for successful execution and -1 for unsuccessful execution.
uint8_t WT2605C<T>::volume(uint8_t vol)—— Volume Control Commands. There are 32 levels of volume, from 0 to 31, where 0 is mute and 31 is maximum volume.- Output Parameters: Returns 0 for successful execution and -1 for unsuccessful execution.
uint8_t WT2605C<T>::volumeDown()—— Volume plus control commands.- Output Parameters: Returns 0 for successful execution and -1 for unsuccessful execution.
uint8_t WT2605C<T>::volumeUp()—— Volume minus control command.- Output Parameters: Returns 0 for successful execution and -1 for unsuccessful execution.
uint8_t WT2605C<T>::playMode(PLAY_MODE mode)—— Specifies the playback mode. This command modifies the playback mode in case of normal communication and has a power-down memory function.Input Parameters:
mode:
- CYCLE: Loop mode for all tracks.
- SINGLE_CYCLE: Single song loop playback mode.
- DIR_CYCLE: Folder loop mode.
- RANDOM: Random playback mode.
- SINGLE_SHOT: Single song playback mode.
Output Parameters: Returns 0 for successful execution and -1 for unsuccessful execution.
uint8_t WT2003S<T>::cutInPlay(STORAGE device, uint32_t index)—— Insert command. This command can only be inserted in the play state, and is not valid in the stop state. When this command is sent, the track being played will be paused immediately, and then the playback track specified in this command will be executed, and then the original paused track will be played after the playback. When the playback is finished, the original paused track will be played.Input Parameters:
device:
- SPIFLASH: Specifies the index address within the interpolated FLASH;
- SD: Plugs the specified index address in the SD card;
- UDISK: Plug and play the specified index address in the USB memory stick.
index: Index of music files.
Output Parameters: Returns 0 for successful execution and -1 for unsuccessful execution.
Default Variables
#define AT_HEADER          "AT+"
#define AT_CMD_PLAY        "PLAY"
#define AT_CMD_LPLAY       "LPLAY"
#define AT_CMD_SPLAY       "SPLAY"
#define AT_CMD_FPLAY       "FPLAY"
#define AT_CMD_PP          "PP"
#define AT_CMD_STOP        "STOP"
#define AT_CMD_NEXT        "NEXT"
#define AT_CMD_PREV        "PREV"
#define AT_CMD_VOL         "VOL"
#define AT_CMD_VOLUP       "VOLUP"
#define AT_CMD_VOLDOWN     "VOLDOWN"
#define AT_CMD_REPEATMODE  "REPEATMODE"
#define AT_CMD_STEPINPLAY  "STEPINPLAY"
#define AT_CMD_TOTALTIME   "TOTALTIME"
#define AT_CMD_CURTIME     "CURTIME"
#define AT_CMD_CHANGE_DEV  "CHANGE_DEV"
#define AT_CMD_BUSY        "BUSY"
#define AT_CMD_VBATPCT     "VBATPCT"
#define AT_CMD_GVER        "GVER"
#define AT_CMD_GCFGVER     "GCFGVER"
#define AT_CMD_POWEROFF    "POWEROFF"
#define AT_CMD_OTA         "OTA"
#define AT_CMD_COPY        "COPY"
#define AT_CMD_BAUD        "BAUD"

#define WT2605C_TIMEOUT       1000
#define WT2605C_SEND_MAX_SIZE 64

#define STORAGE_SPIFLASH   "fat_nor"
#define STORAGE_SD         "sd0"
#define STORAGE_UDISK      "udisk0"

typedef enum {
    CYCLE        = 0x00,
    SINGLE_CYCLE = 0x01,
    DIR_CYCLE    = 0x02,
    RANDOM       = 0x03,
    SINGLE_SHOT  = 0x04,
} PLAY_MODE;

typedef enum {
    SPIFLASH = 0x00,
    SD       = 0x01,
    UDISK    = 0x02,
} STORAGE;
Installation
Since you have downloaded the zip Library, open your Arduino IDE, click on Sketch > Include Library > Add .ZIP Library. Choose the zip file you just downloaded,and if the library install correct, you will see Library added to your libraries in the notice window. Which means the library is installed successfully.

Seeeduino Example
Now that we have our library installed and we understand the basic functions, let's run some examples for our Seeeduino V4.3 to see how it behaves.
Step 1. Launch the Arduino application.
Step 2. Select your development board model and add it to the Arduino IDE.
If you want to use Seeed Studio XIAO SAMD21 for the later routines, please refer to this tutorial to finish adding.
If you want to use Seeed Studio XIAO RP2040 for the later routines, please refer to this tutorial to finish adding.
If you want to use Seeed Studio XIAO nRF52840 for the later routines, please refer to this tutorial to finish adding.
If you want to use Seeed Studio XIAO ESP32C3 for the later routines, please refer to this tutorial to finish adding.
If you want to use Seeed Studio XIAO ESP32S3 for the later routines, please refer to this tutorial to finish adding.
If you want to use Seeeduino V4.3 for the later routines, please refer to this tutorial to finish adding.
Step 3. Materials required
This tutorial will take Seeeduino V4.3 as an example to explain the use of Grove MP3 module. Then you may need to prepare the following materials.
| Seeeduino V4.3 | Grove - MP3 v4.0 |
|---|---|
 |  |
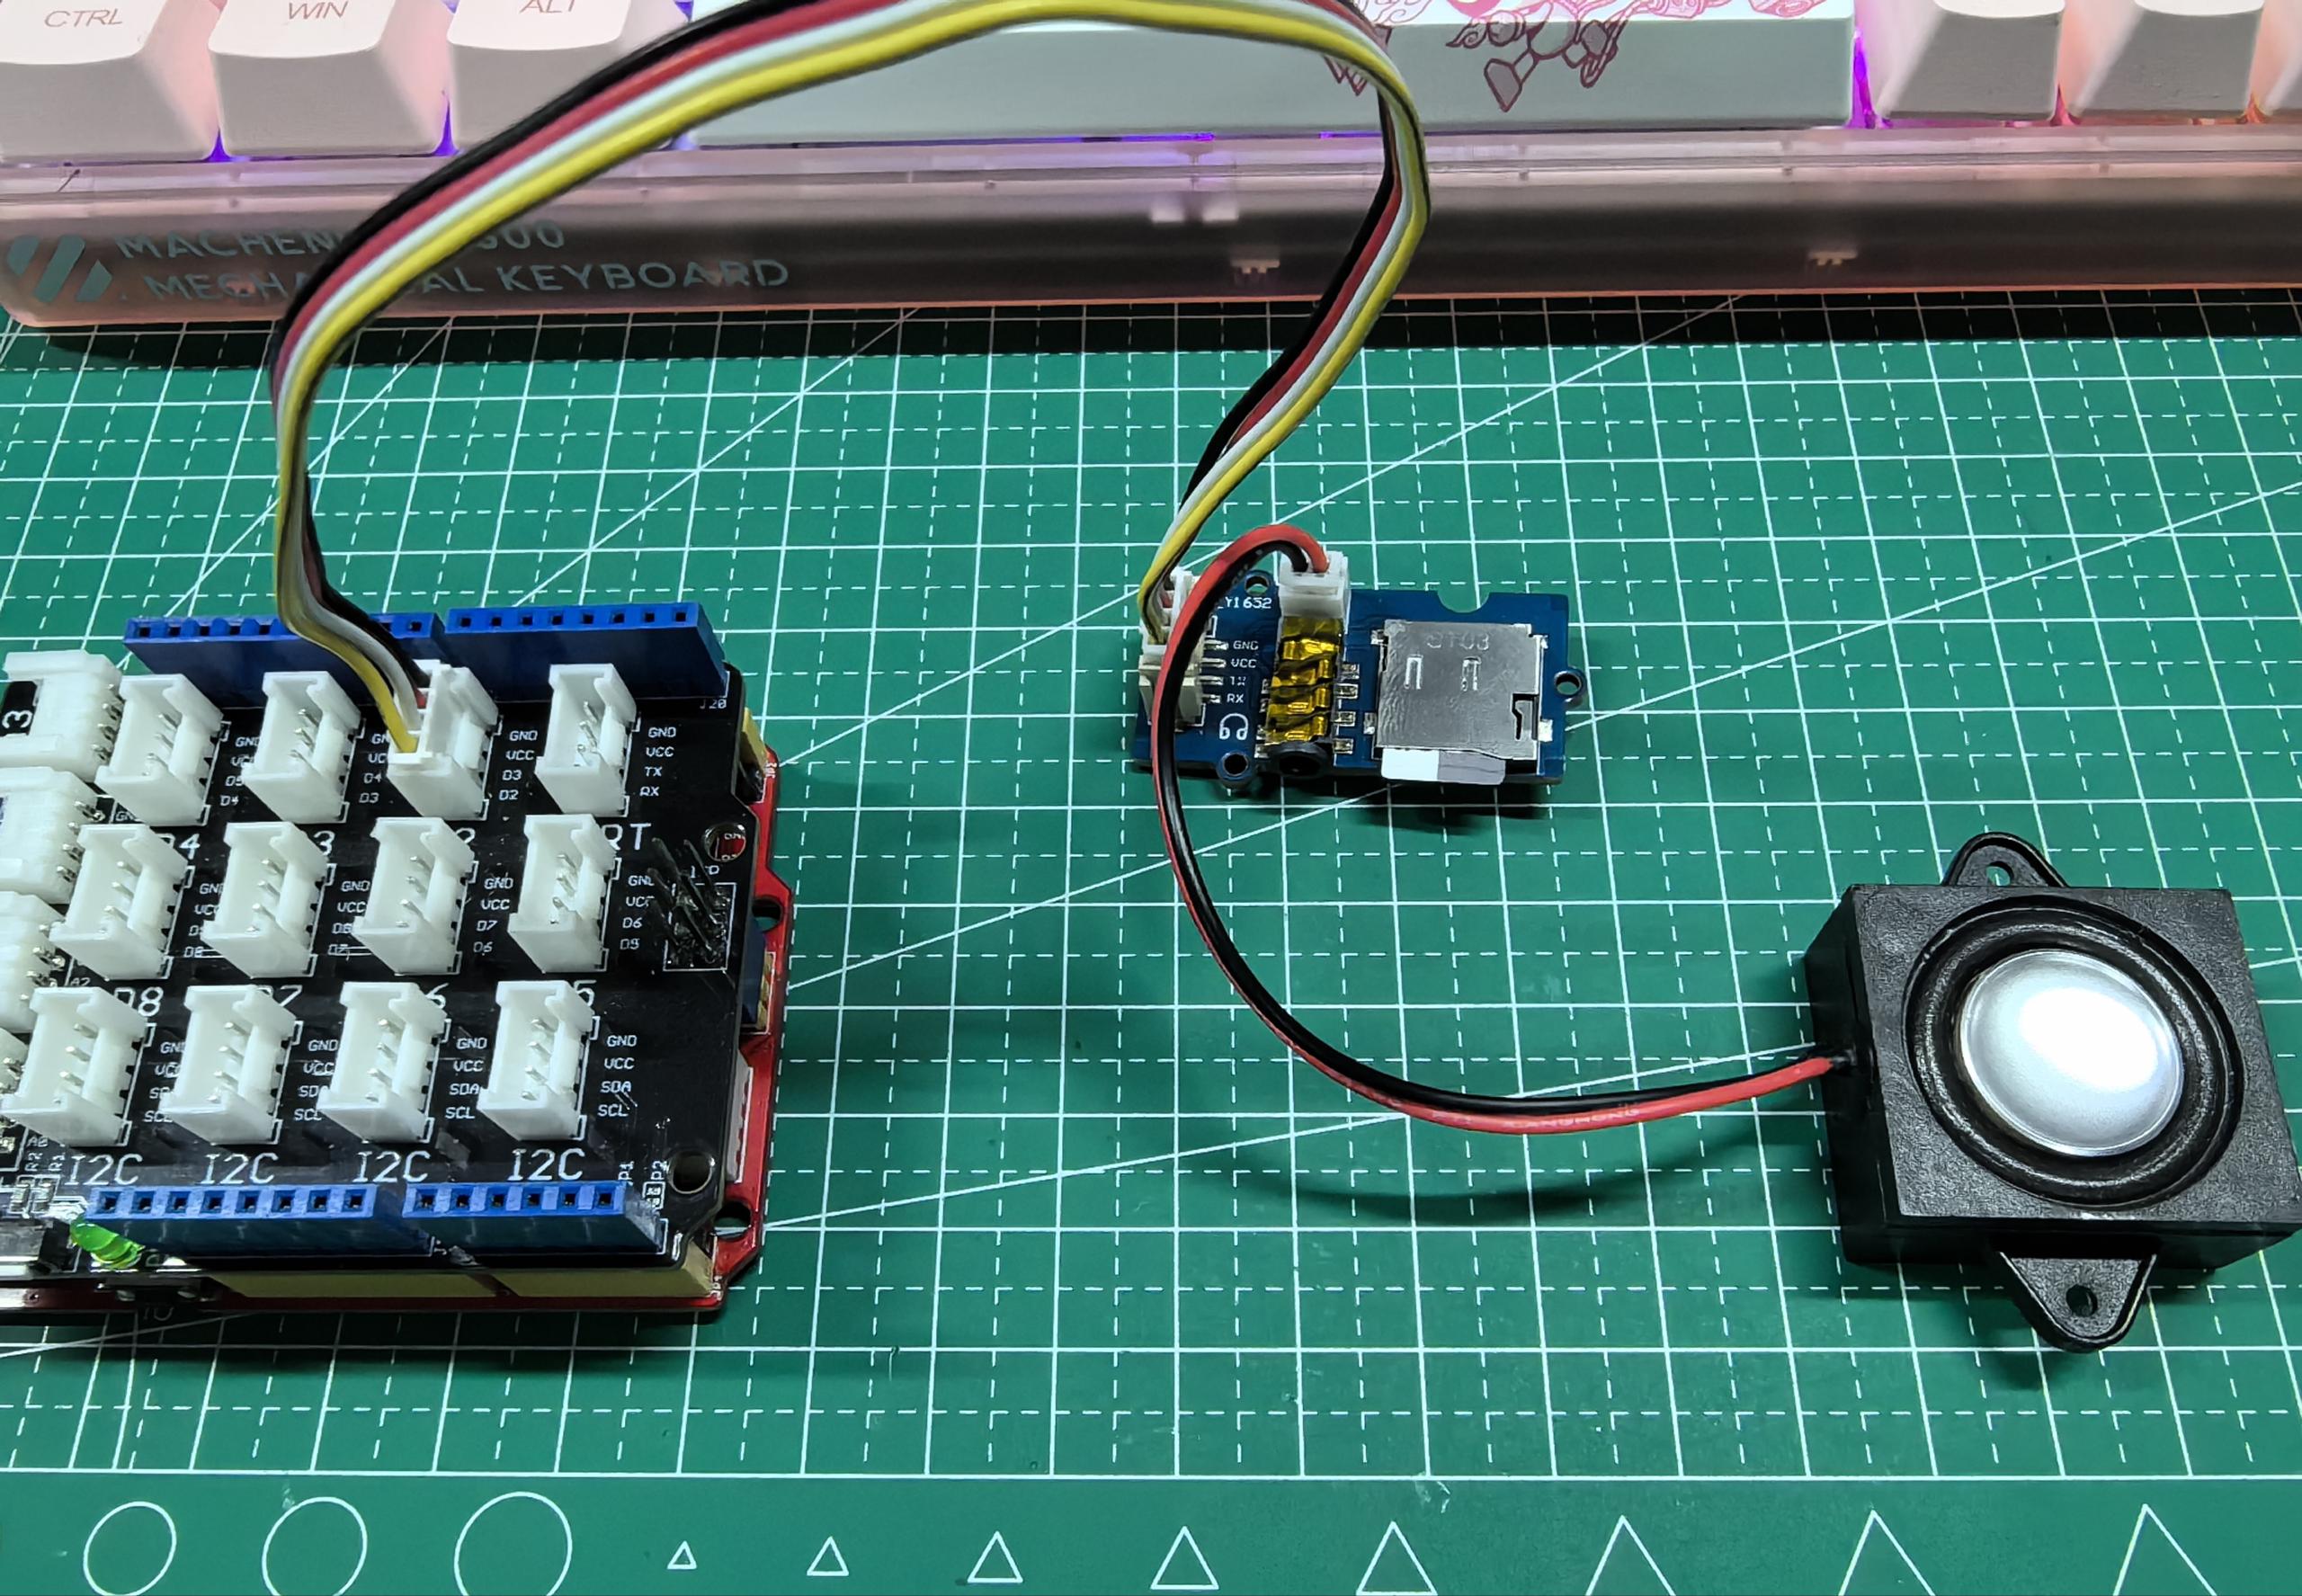
Step 4. Hardware Connection
Connect the Grove - MP3 V4.0 to the UART port of the Seeeduino V4.3. Then, Connect the Seeeduino to PC via a USB cable.
- Step 5. Open WT2605C_Terminal_player example via the path: File → Examples → Seeed_Serial_MP3_Player → WT2605C_Terminal_player. You can play
.mp3format music file using this moudle, and use 3.5mm Audio Jack, Speaker via JST2.0 speaker port or even output both in the same time.
The WT2605C_Terminal_player Example code is as follow:
#include "WT2605C_Player.h"

#ifdef __AVR__
  #include <SoftwareSerial.h>
  SoftwareSerial SSerial(2, 3); // RX, TX
  #define COMSerial SSerial
  #define ShowSerial Serial

  WT2605C<SoftwareSerial> Mp3Player;
#endif

#ifdef ARDUINO_SAMD_VARIANT_COMPLIANCE
  #define COMSerial Serial1
  #define ShowSerial SerialUSB

  WT2605C<Uart> Mp3Player;
#endif

#ifdef ARDUINO_ARCH_STM32F4
  #define COMSerial Serial
  #define ShowSerial SerialUSB

  WT2605C<HardwareSerial> Mp3Player;
#endif

void setup() {
  while (!ShowSerial);
  ShowSerial.begin(9600);
  COMSerial.begin(115200);
  ShowSerial.println("+++++++++++++++++++++++++++++++++++++++++++++++++++++");
  Mp3Player.init(COMSerial);

  ShowSerial.println("0...");
}


void loop() {
  if(ShowSerial.available()) {
    String input = Serial.readString();
    input.trim();

    if(input.startsWith("v")) {
      int vol = input.substring(1).toInt();
      int err = Mp3Player.volume(vol);
      ShowSerial.println(err);
      if(!err) ShowSerial.println("Volume set to: " + String(vol));
      else ShowSerial.println("ERROR");
    }

    else if(input.startsWith("m")) {
      if(input.substring(1) == "1"){
        ShowSerial.println("1");
        int err = Mp3Player.playMode(0x00);
        ShowSerial.println(err);
        if(!err) ShowSerial.println("The playback mode is set to Loop mode.");
        else ShowSerial.println("ERROR");
      }
      else if(input.substring(1) == "2"){
        ShowSerial.println("2");
        int err = Mp3Player.playMode(0x01);
        ShowSerial.println(err);
        if(!err) ShowSerial.println("The playback mode is set to Single song loop mode.");
        else ShowSerial.println("ERROR");
      }
      else if(input.substring(1) == "3"){
        ShowSerial.println("3");
        int err = Mp3Player.playMode(0x02);
        ShowSerial.println(err);
        if(!err) ShowSerial.println("The playback mode is set to Folder loop mode.");
        else ShowSerial.println("ERROR");
      }
      else if(input.substring(1) == "4"){
        ShowSerial.println("4");
        int err = Mp3Player.playMode(0x03);
        ShowSerial.println(err);
        if(!err) ShowSerial.println("The playback mode is set to Random mode.");
        else ShowSerial.println("ERROR");
      }
      else if(input.substring(1) == "5"){
        ShowSerial.println("5");
        int err = Mp3Player.playMode(0x04);
        ShowSerial.println(err);
        if(!err) ShowSerial.println("The playback mode is set to Single song mode.");
        else ShowSerial.println("ERROR");
      }
    }
    else if(input.startsWith("b")){
      int index = input.substring(1).toInt();
      Mp3Player.playSDRootSong(index);
      ShowSerial.println("Play music: " + String(index));
    }
    else if(input.startsWith("+")){
      int err = Mp3Player.volumeUp();
      if(!err) ShowSerial.println("Volume up");
      else ShowSerial.println("ERROR");
    }
    else if(input.startsWith("-")){
      int err = Mp3Player.volumeDown();
      if(!err) ShowSerial.println("Volume down");
      else ShowSerial.println("ERROR");
    }
    else if(input.startsWith("n")){
      Mp3Player.next();
      ShowSerial.println("Next song");
    }
    else if(input.startsWith("p")){
      Mp3Player.previous();
      ShowSerial.println("Previous song");
    }
  }
}
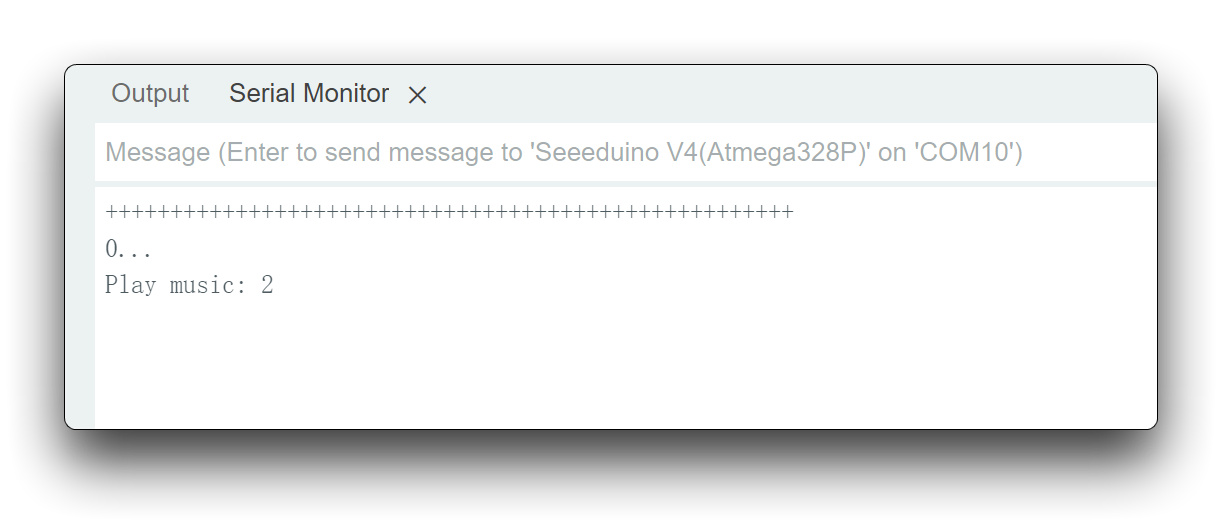
- Step 6. Upload the Demo. If you do not know how to upload the code, please check How to upload code. Open the Serial Monitor of Arduino IDE by click Tool-> Serial Monitor. Set the baud rate to 115200. The result should look like below.
You can enter a number of commands to control the MP3 module.
- Enter
v{num}to set the playback volume, e.g. v20 means set the playback volume to 20. - Enter
m{1~5}to set the playback mode. - Enter
b{num}to play the music at the specified index. - Enter
+, volume up. - Enter
-, volume down. - Enter
n, next song. - Enter
p, previous song.
You can be more creative and add more MP4 features.
FAQ
Q: TF card cannot be recognized?
A: Check the file system of the TF card, make sure it is FAT16 or FAT32 file system.
Resources
- [ZIP] Grove-MP3 V4 SCH&PCB
- [PDF] Grove-MP3 V4 SCH
- [PDF] Grove-MP3 V4 datasheet
Tech Support & Product Discussion
Thank you for choosing our products! We are here to provide you with different support to ensure that your experience with our products is as smooth as possible. We offer several communication channels to cater to different preferences and needs.