Get Started with Wio-WM1110 Dev Kit
Preparation
- Wio-WM1110 Dev Kit x 1
- Computer x 1
- USB Type-C Cable x 1
- J-Link Debug Programmer x 1
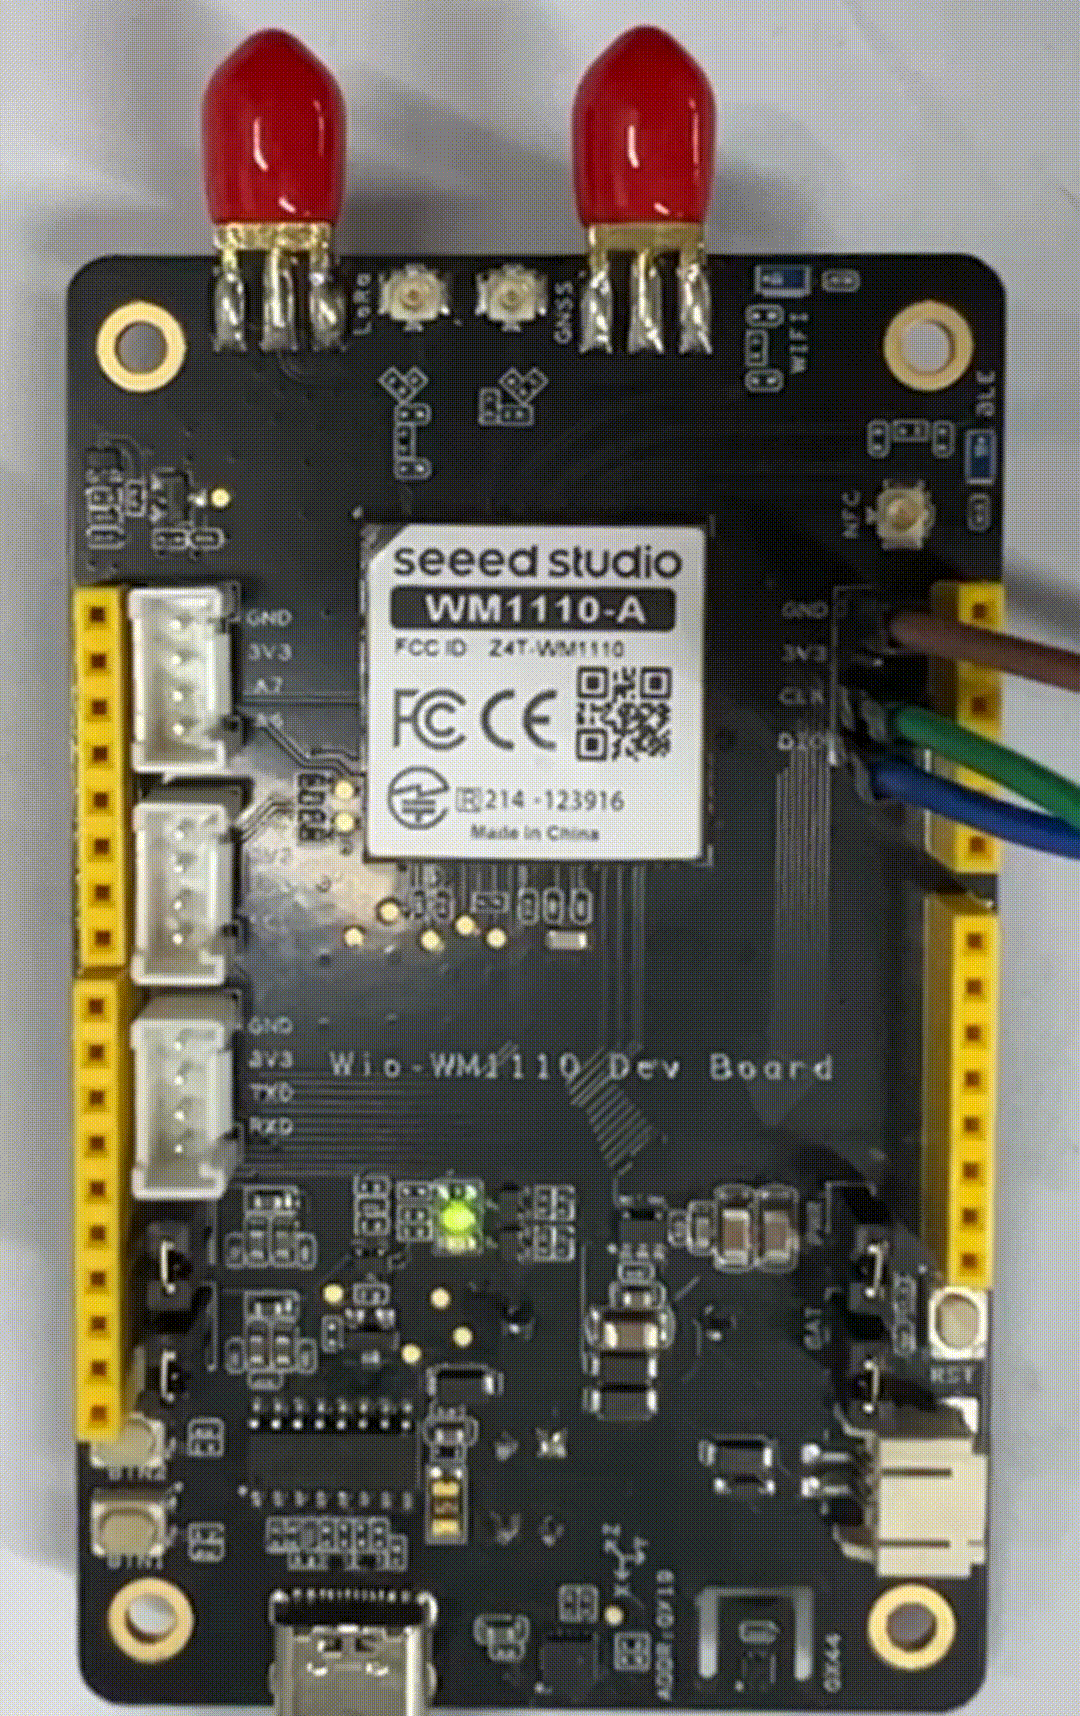
Device Connection
Connect the Wio-WM1110 Dev Board to the J-Link Debug Programmer as follows:

3V3 (Wio-WM1110 Dev Board) -> VTref (J-Link Debug Programmer Pin 1)
CLK (Wio-WM1110 Dev Board) -> SWCLK (J-Link Debug Programmer Pin 9)
DIO (Wio-WM1110 Dev Board) -> SWDIO (J-Link Debug Programmer Pin 7)
GND (Wio-WM1110 Dev Board) -> GND (J-Link Debug Programmer GND)
Set up your toolchain
Before you can start developing,the following tools are required for this Getting Started Guide.
SEGGER Embedded Studio (SES)
SES is an all-in-one solution for managing, building, testing and deploying embedded applications. This means smooth, efficient development operations thanks to its wide range of features. The powerful project manager enables the management of projects large and small. Version control features enable automatic application deployment.
SEGGER Embedded Studio (SES)-DownloadIt's recommended to use 5.68 version.

SEGGER J-Link Software and Documentation Pack
SEGGER J-Link Software and Documentation Pack-DownloadnRF5 SDK
The nRF5 SDK provides a rich developing environment for nRF5 Series devices by including a broad selection of drivers, libraries, examples for peripherals, SoftDevices, and proprietary radio protocols.
All code examples included in the SDK are tailored to compile for and run on Wio-WM1110 Dev Kit.
nRF5 SDK-Download
Seeed Example Package
Seeed provides an example project for developers to get started more quickly. This example includes LoRaWAN communication, positioning information acquisition, onboard sensor data acquisition, etc.
Seeed Example-Download
Running a First Test
Add Seeed Example file to nRF5 SDK
Copy the Seeed Example file to the following path of nRF5 SDK:
.../nRF5_SDK_17.1.0_ddde560/examples/peripheral/

Let's build the ses_blinky" project to check if your toolchain is set up correctly. Import the "ses_blinky" project.


Compiling the test application
Select "Build" > "Compile project_target".

Programming the test application
After compiling the application, you can program it to the Dev board.
Click "Target" -- "Connect J-Link"

Click "Build" -- "Build and Run" to build the blinky project.

You will see "Download successful" when it has completed.

Then the 2 LEDs on the board will blink as follows.
Get Started
This chapter will walk you through displaying current location information on Node-Red via TTN, and explains how to set up all required servers(Network Server(NS) and an Application Server(AS)).
Architecture & Data Flow

Setup the Keys
Before a device can communicate via the NS, we need to register it with the 3 keys.
Wio-WM1110 DK allows users to set the DevEUI, AppEUI, and AppKey, this is required on the next steps, so you can define our own parameters in the 'lorawan_key_config.h' file, then flash it onto the DK.
File located at:
.../nRF5_SDK_17.1.0_ddde560/examples/peripheral/Seeed_Wio_WM1110_Dev_Board/apps/common/lorawan_key_config.h

Or you can get the keys generated by TTN, then fill into the 'lorawan_key_config.h' file and run it on the DK.

LoRa Cloud™ Modem & Geolocation Services
The LoRa Cloud Modem & Geolocation Services provide a full set of lifecycle management features for LoRa® devices operating on a LoRaWAN network. These features include but are not limited to:
- Comprehensive device telemetry
- Device and application configuration
- Clock synchronization
- Advanced data transport services with robustness against packet loss and transparent data fragmentation (buffer streaming and file upload).
- Geolocation
To begin, go to the LoRa Cloud™ portal and register for an account.

Step 1: Create an Owner
To create a token, you first need to create an owner. Navigate to the DEVICE OWNERS page. Click CREATE NEW OWNER.


Step 2: Get a Token
A token is required for the application server to authenticate calls to the LoRa Cloud Modem & Geolocation Services server.

Step 3: API URL
The LoRa Cloud Modem & Geolocation Services URL depends on the region in which the device will be deployed. Click "Manage Tokens", then you can check the API URL:

When data is received from a device, it is automatically registered with the LoRa Cloud Modem & Geolocation Services server. This means that the device does not need to be registered beforehand.
LoRaWAN® Network Server(TTN)
Currently we use The Things Network V3
To begin, register for an account with The Things Industries or The Things Network.
Step 1: Create an application
Navigate to Applications page, click "+Create application".

Enter an Application ID, click Create Application to save your changes.

Step 2: Register the Device
Click "Register end device".

Set the following parameters:
Frequency Plan: Select the appropriate Frequency plan for the target region
LoRaWAN version:LoRaWAN Specification 1.0.3
Regional Parameters version: V1.0.3 REV A

JoinEUI/DevEUI/APPEUI: Which you defined in the 'lorawan_key_config.h' file in the previous setting.

Step 3: Create Credentials
The Things Network V3 network server requires that you generate a unique MQTT password. On the Application page of the console:
- Click Integrations and then MQTT.

- Select Generate new API Key.

- Copy the values from the following fields: Server Address, Username, and Password.

Application Server
The application server handles application data and device management frames. As there is no background connection between the LoRaWAN® network server and the LoRa Cloud™ Modem & Geolocation Services, all uplinks related to modem traffic must be forwarded by the application server to the Lora Cloud Modem & Geolocation Services.
We use Node-RED as the application server. Node-RED is a browser-based visual programming tool that allows for fast prototyping. Built on Node.js, Node-RED can be used to wire flows together using a wide array of nodes. These nodes can then be deployed to the Node-RED runtime with a single click.
Install Node.js®
To install Node-RED locally you will need a Supported Node Version
Download the latest 16.x LTS version of Node.js from the official Node.js. It will offer you the best version for your system.

When installing Node.js, if you are using a computer that has not had any programming environment installed, we would recommend that you check the box to install the necessary tools while installing Node.js, which will save you a lot of necessary trouble.
The easiest way to install Node-RED is, using Node's package management tool, npm. However, we do not recommend installing Node-RED with npm 1.x, but rather upgrading it to the latest npm 2.x version.
On Windows (Requires Windows 10 and above), use the Win+R shortcut and type cmd in the pop-up window to bring up the terminal and execute the following command.
If you are using MacOS or Linux, please execute the following command in the terminal and add sudo in front of the command for non-root users.
npm install -g npm@2.x
Once installed, open a command prompt and run the following command to ensure Node.js and npm are installed correctly.
node --version && npm --version
You should receive back output that looks similar to:
> v18.7.0
> 9.6.5

Install Node-RED
Installing Node-RED as a global module adds the command node-red to your system path. Execute the following at the command prompt:
npm install -g --unsafe-perm node-red
If Node-RED is installed as a global npm package, then execute the command node-red directly:
node-red
This will allow you to see the Node-RED editor on http://localhost:1880.

The user interface has three key areas:

- Palette: This is where you can select nodes; these are functional blocks that can be dragged-and-dropped, and then can be linked together to create a flow.
- Flow: This is the source code of the program. In this pane, you can link nodes together to create an application.
- Sidebar: The Sidebar displays any Help or debugging information available for the selected node.
Install libraries
To set up the demonstration, we will install 2 additional libraries:
-
node-red-contrib-loracloud-utils: Handles connections to LoRa Cloud™ servers
-
node-red-contrib-web-worldmap: World map web page for plotting "things" on
Click the menu in the top right corner and select "Manage palette".

Select Install on the Palette menu.

Search for "node-red-contrib-loracloud-utils" and install.

Repeat these steps to install the "node-red-contrib-web-worldmap" libraries.

Importing the Flow
The Seeed package includes useful samples to walk you through this example project,just need to import these 2 config file.
.../nRF5_SDK_17.1.0_ddde560/examples/peripheral/Seeed_Wio_WM1110_Dev_Board-master/apps/examples/geolocation_application_server/modem.json

.../nRF5_SDK_17.1.0_ddde560/examples/peripheral/Seeed_Wio_WM1110_Dev_Board-master/apps/examples/geolocation_application_server/geolocation.json


Then you will see the following flows:

Configure the Flow
Configuring the LoRaWAN Network Server (MQTT) All network server connectors are activated by default; however, the MQTT connection must be set up separately. Before you begin, get the required data:
- MQTT server address
- MQTT port
- MQTT username
- MQTT password
This data can be obtained in Step 3: Create Credentials
Doule click"TTN v3-Uplinks" node,and edit MQTT node.

You can find the Server, Port in the previous step.

Then add the username and password to "Security".

Click Add and then click Done.

Doule click"TTN joinReq" node,and select the MQTT server we added in the previous step.

Modem & Geolocation Service Configuration
To configure the server, the MGS URL and MGS TOKEN values from the previous step


Fill in the EUI of your device.

Click "Deploy" button to delpoy the flow.

Data View
Click "Debug", to view the data returned by the LoRa Cloud Modem & Geolocation Services:

Geolocation
To display the map, add /worldmap to the URL in your web browser.
For example: http://127.0.0.1:1880/worldmap

Resources
SEGGER J-Link Software and Documentation Pack
Tech Support
Need help with your Wio-WM1110 Dev Kit? We're here to assist you!