Quick Start to Using Blynk
In this tutorial, we will provide a quick guide on how to setup Grove Vision AI module with Wio Terminal to upload the detection data such as head counting and detection confidence value via Wifi, and then utilizing the dashboard from Blynk Mobile App to visualizes Grove Vision AI module detection output.
Materials Required
 | 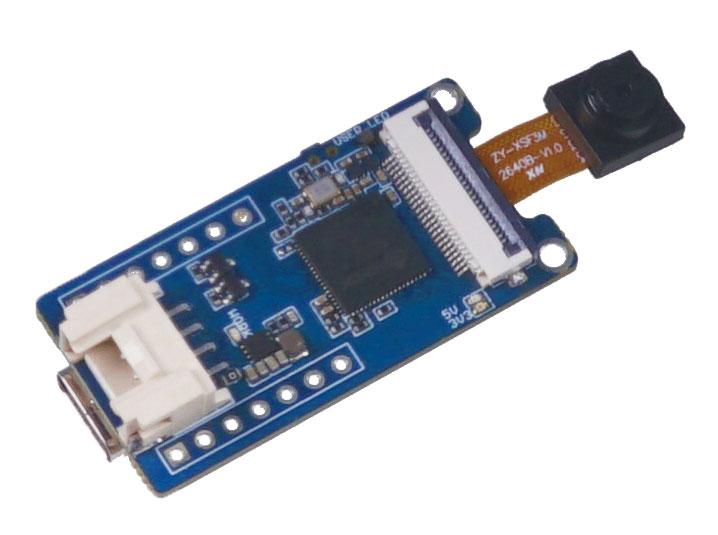 |
| Wio Terminal | Grove Vision AI module |
Preliminary Preparation
Connection
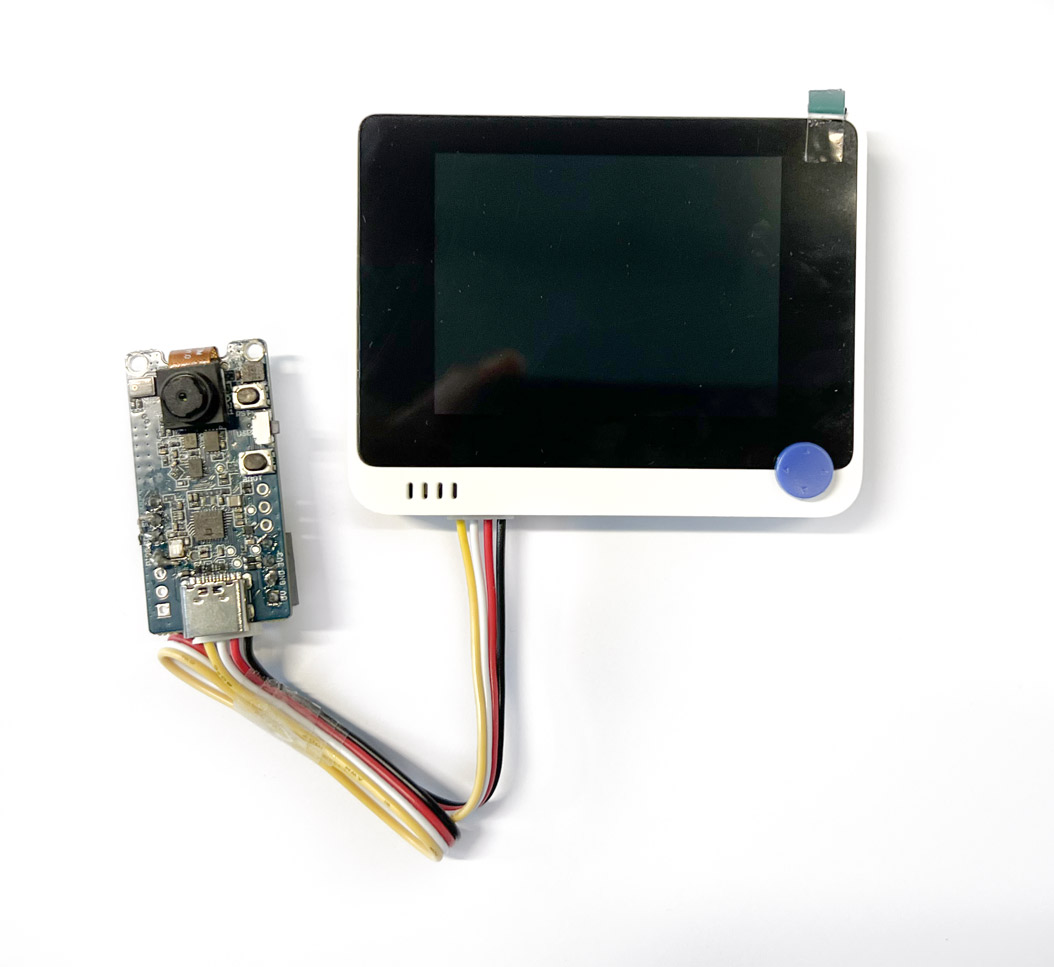
In this routine, we need to connect Vision AI Module on the left side according to the diagram below.
Software preparation
Step 1. You need to Install an Arduino Software.

Step 2. Launch the Arduino application.
Step 3. Add Wio Terminal to the Arduino IDE.
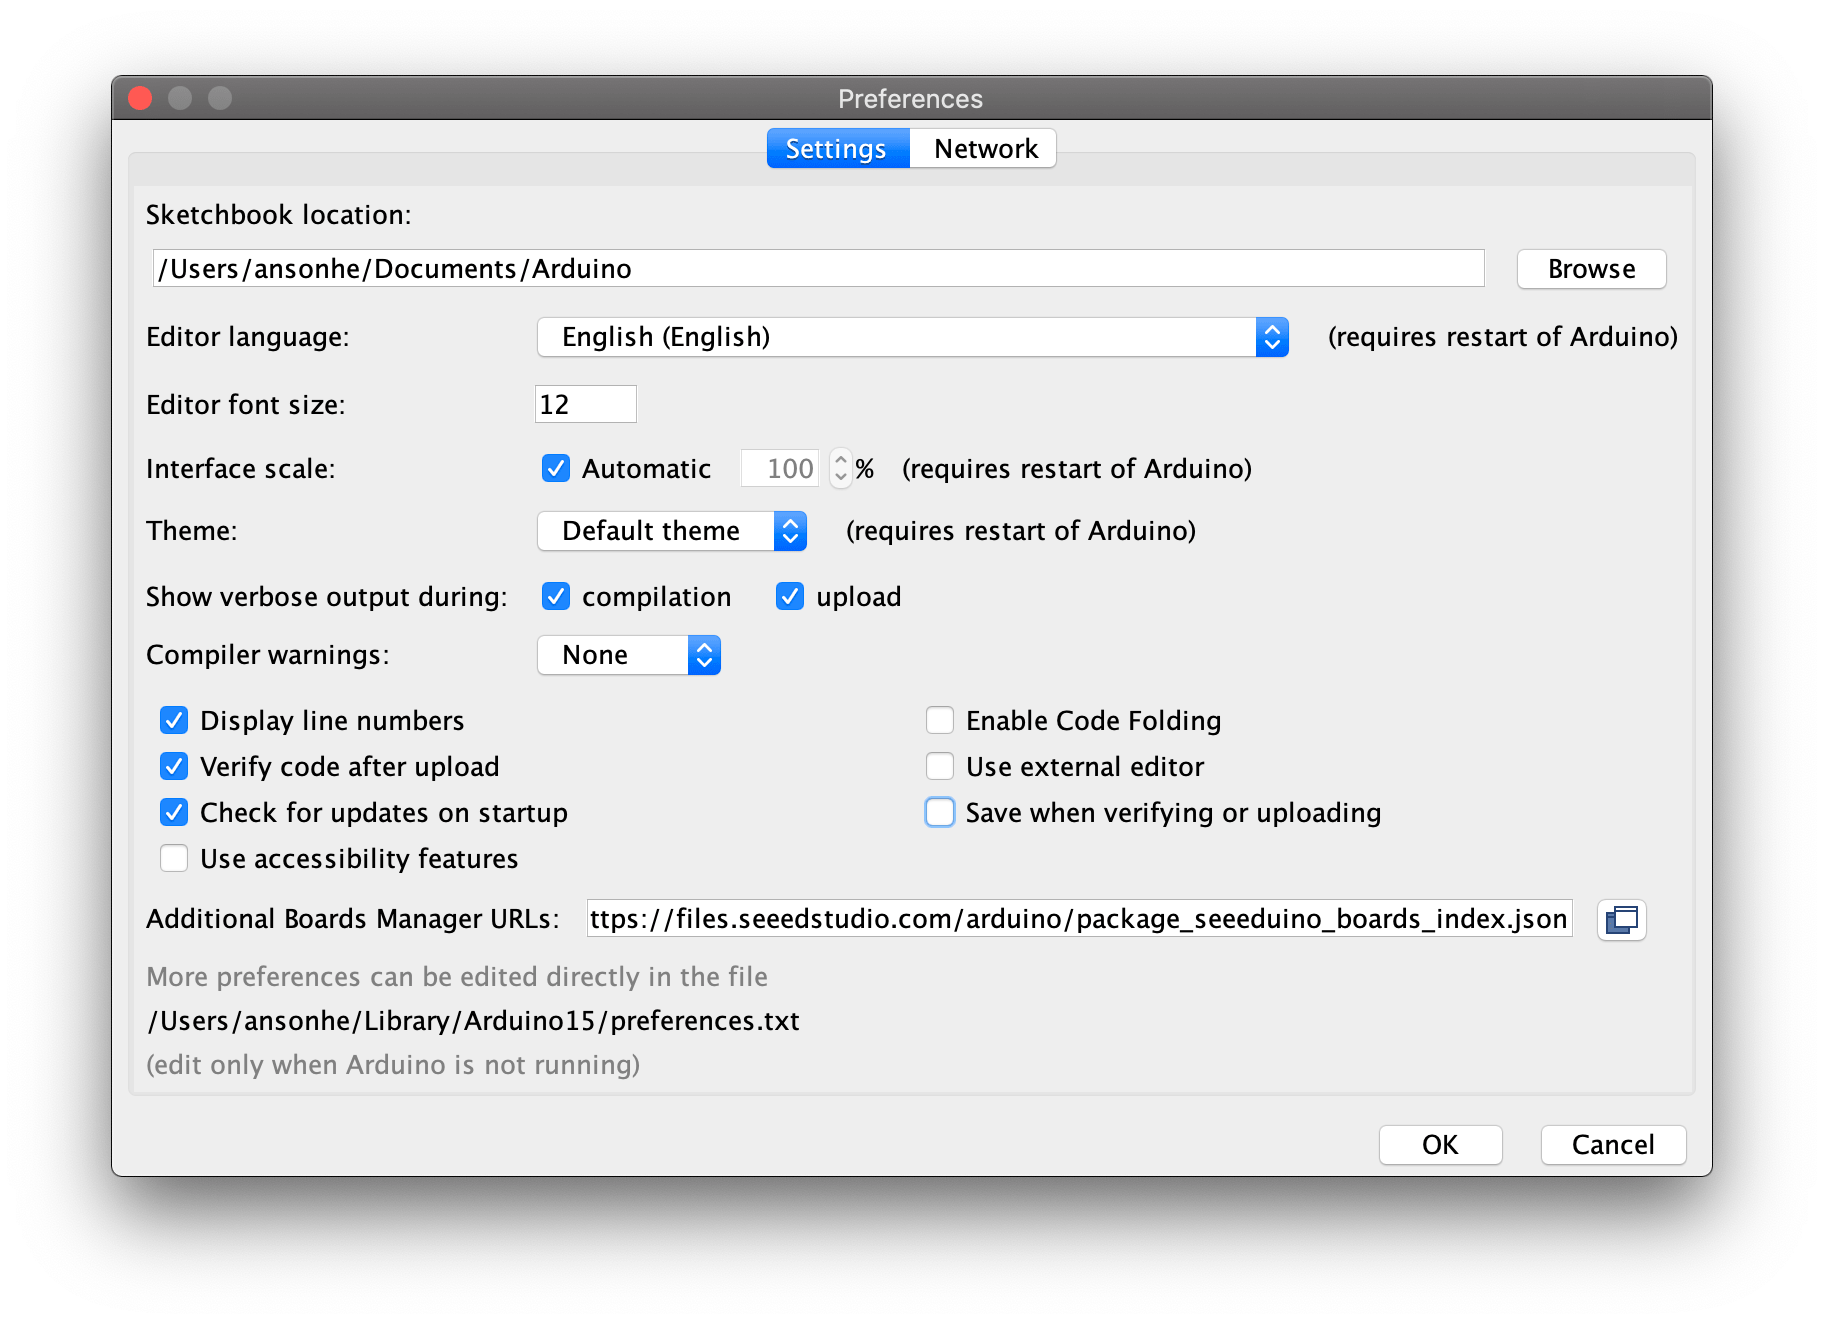
Open your Arduino IDE, click on File > Preferences, and copy below url to Additional Boards Manager URLs:
https://files.seeedstudio.com/arduino/package_seeeduino_boards_index.json
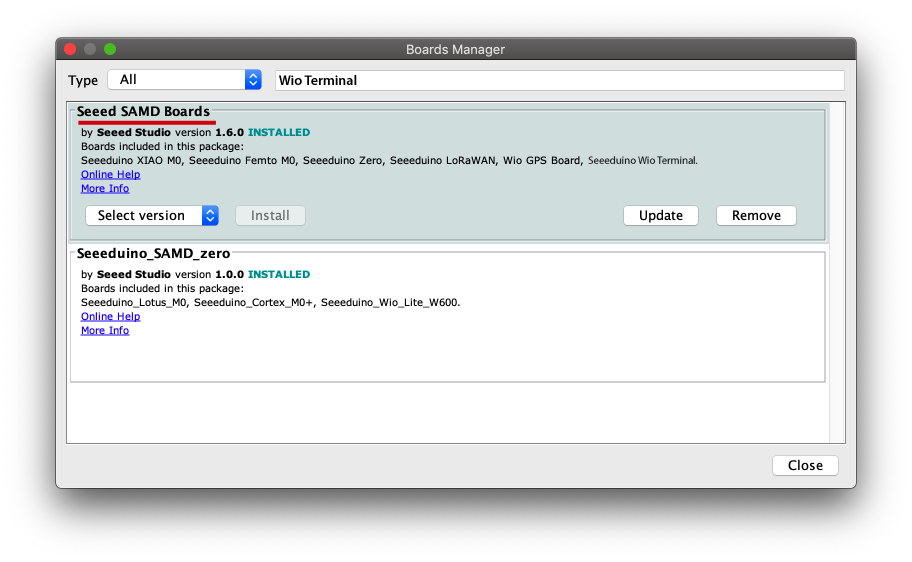
Click on Tools > Board > Board Manager and Search Wio Terminal in the Boards Manager.
Step 4. Select your board and port
You'll need to select the entry in the Tools > Board menu that corresponds to your Arduino. Selecting the Wio Terminal.
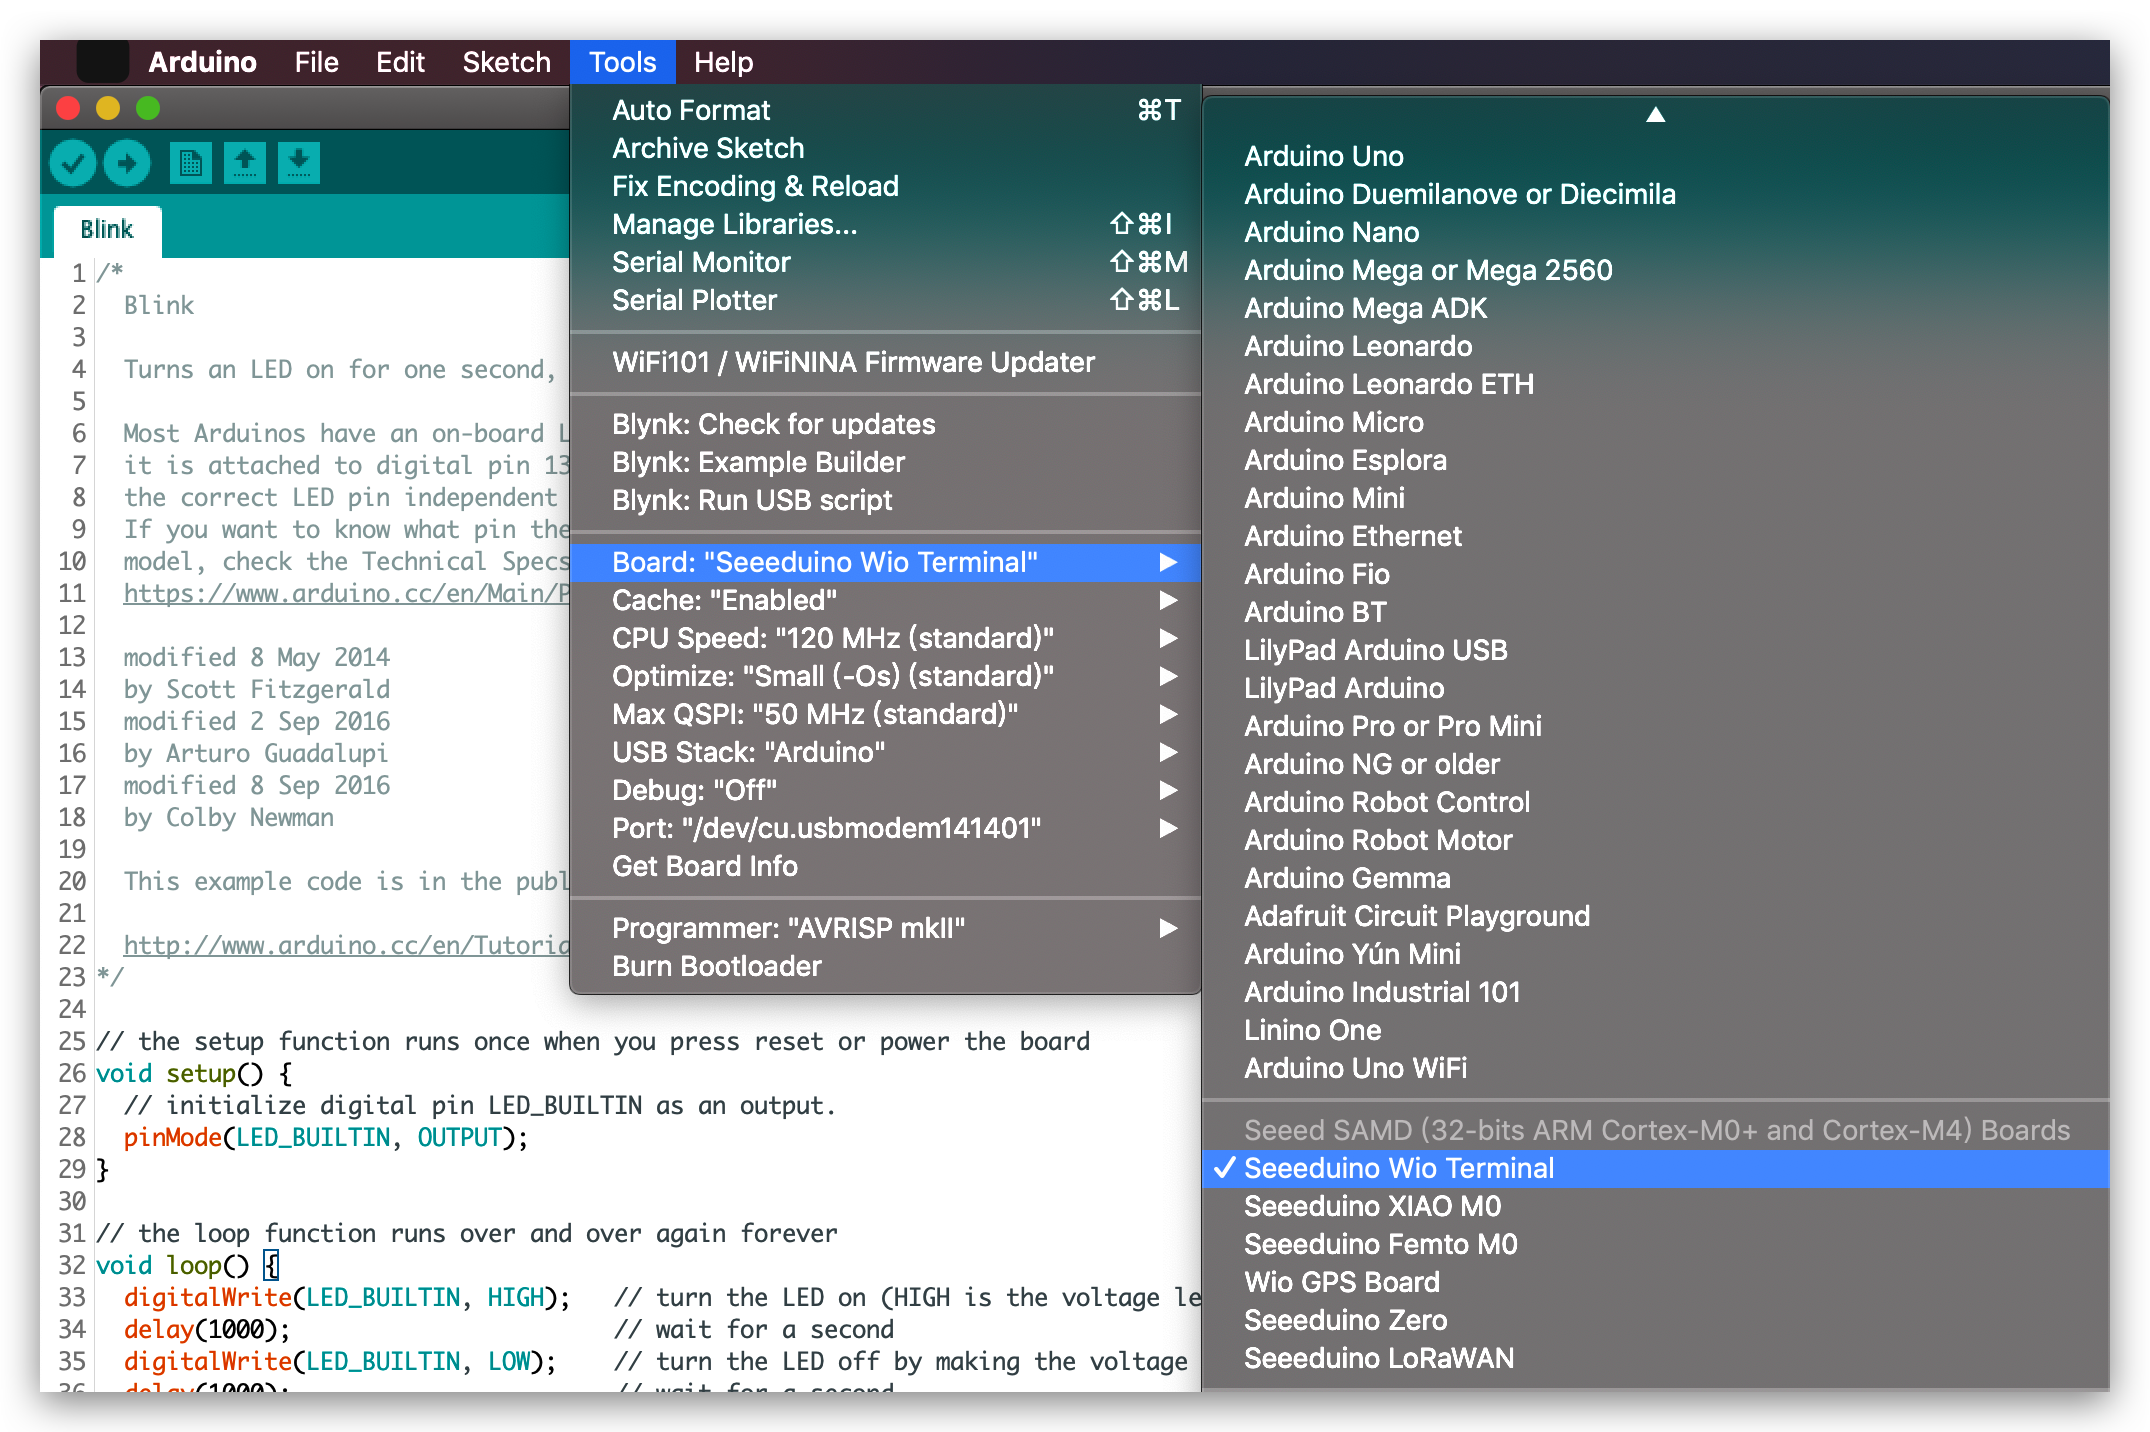
Select the serial device of the Wio Terminal board from the Tools -> Port menu. This is likely to be COM3 or higher (COM1 and COM2 are usually reserved for hardware serial ports). To find out, you can disconnect your Wio Terminal board and re-open the menu; the entry that disappears should be the Arduino board. Reconnect the board and select that serial port.
For Mac User, it will be something like /dev/cu.usbmodem141401.
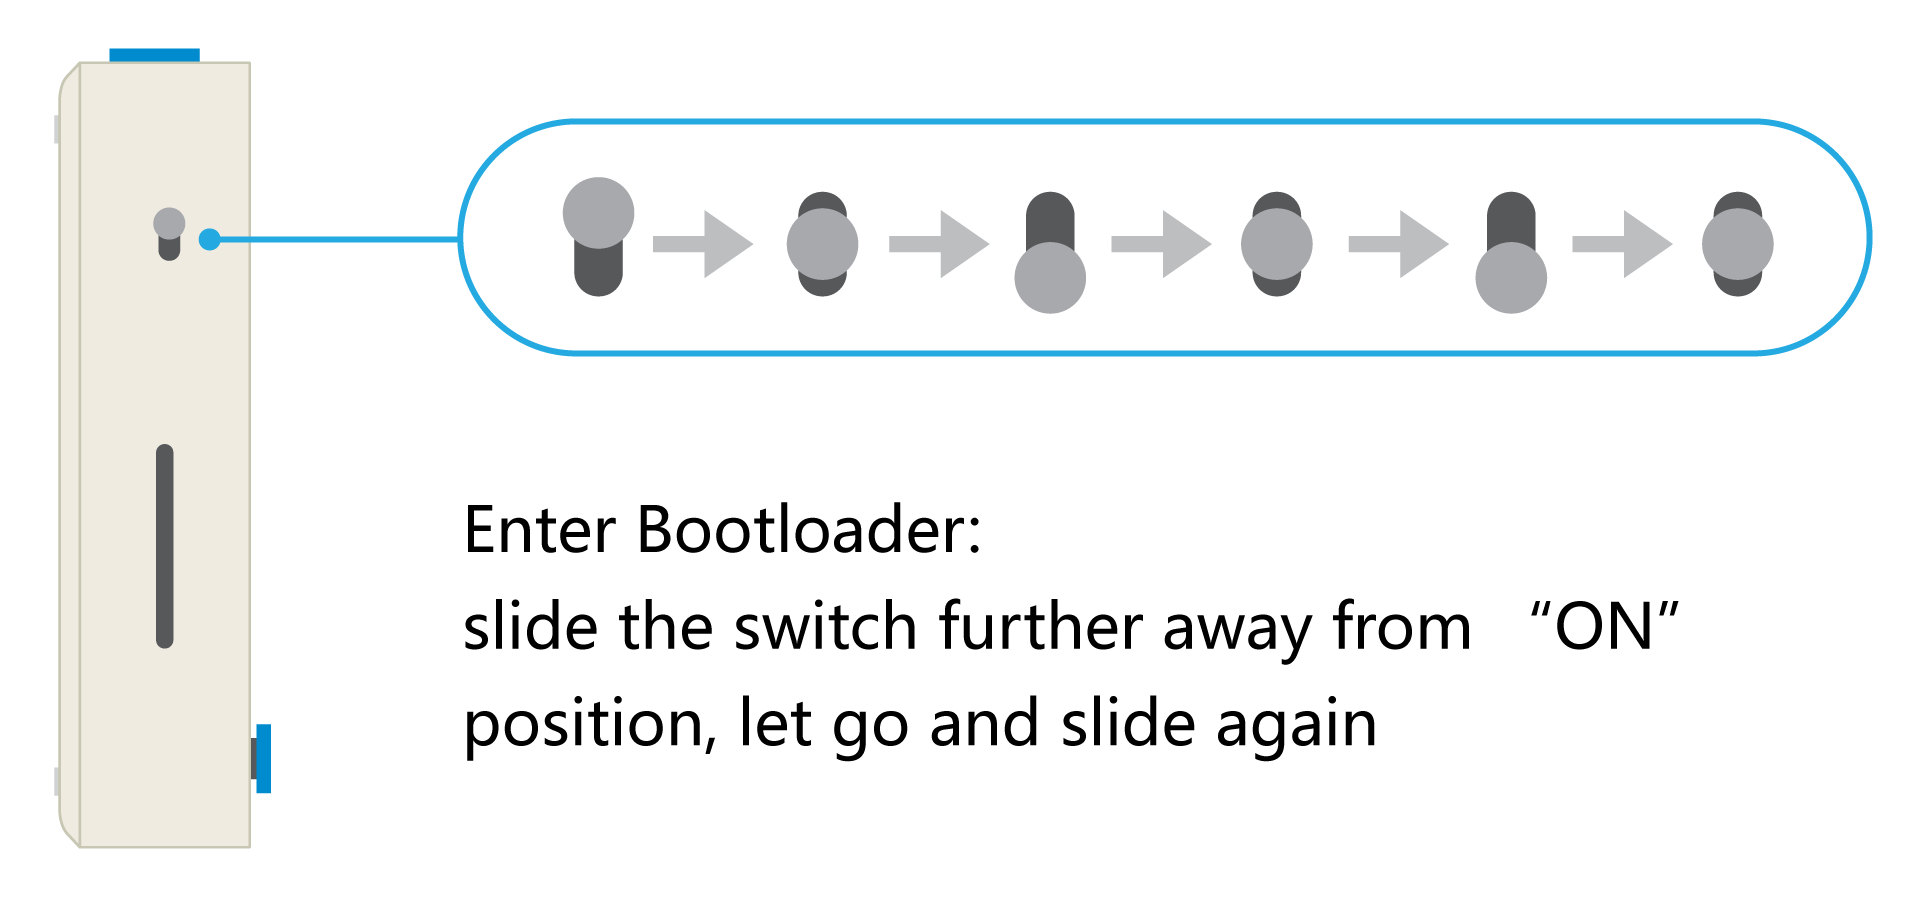
If you are not able to upload the sketch, mostly it's because Arduino IDE was not able to put Wio Terminal to bootloader mode. (Because MCU was halted or your program handling USB) Workaround is putting your Wio Terminal to bootloader mode manually.
Step Guide
Step 1. Create account
Please go to Blynk official Website,and create an account, You will be asked for your email account to register, and please check your email to verify and confirm to complete your account registration.

Step 2. Add New Template
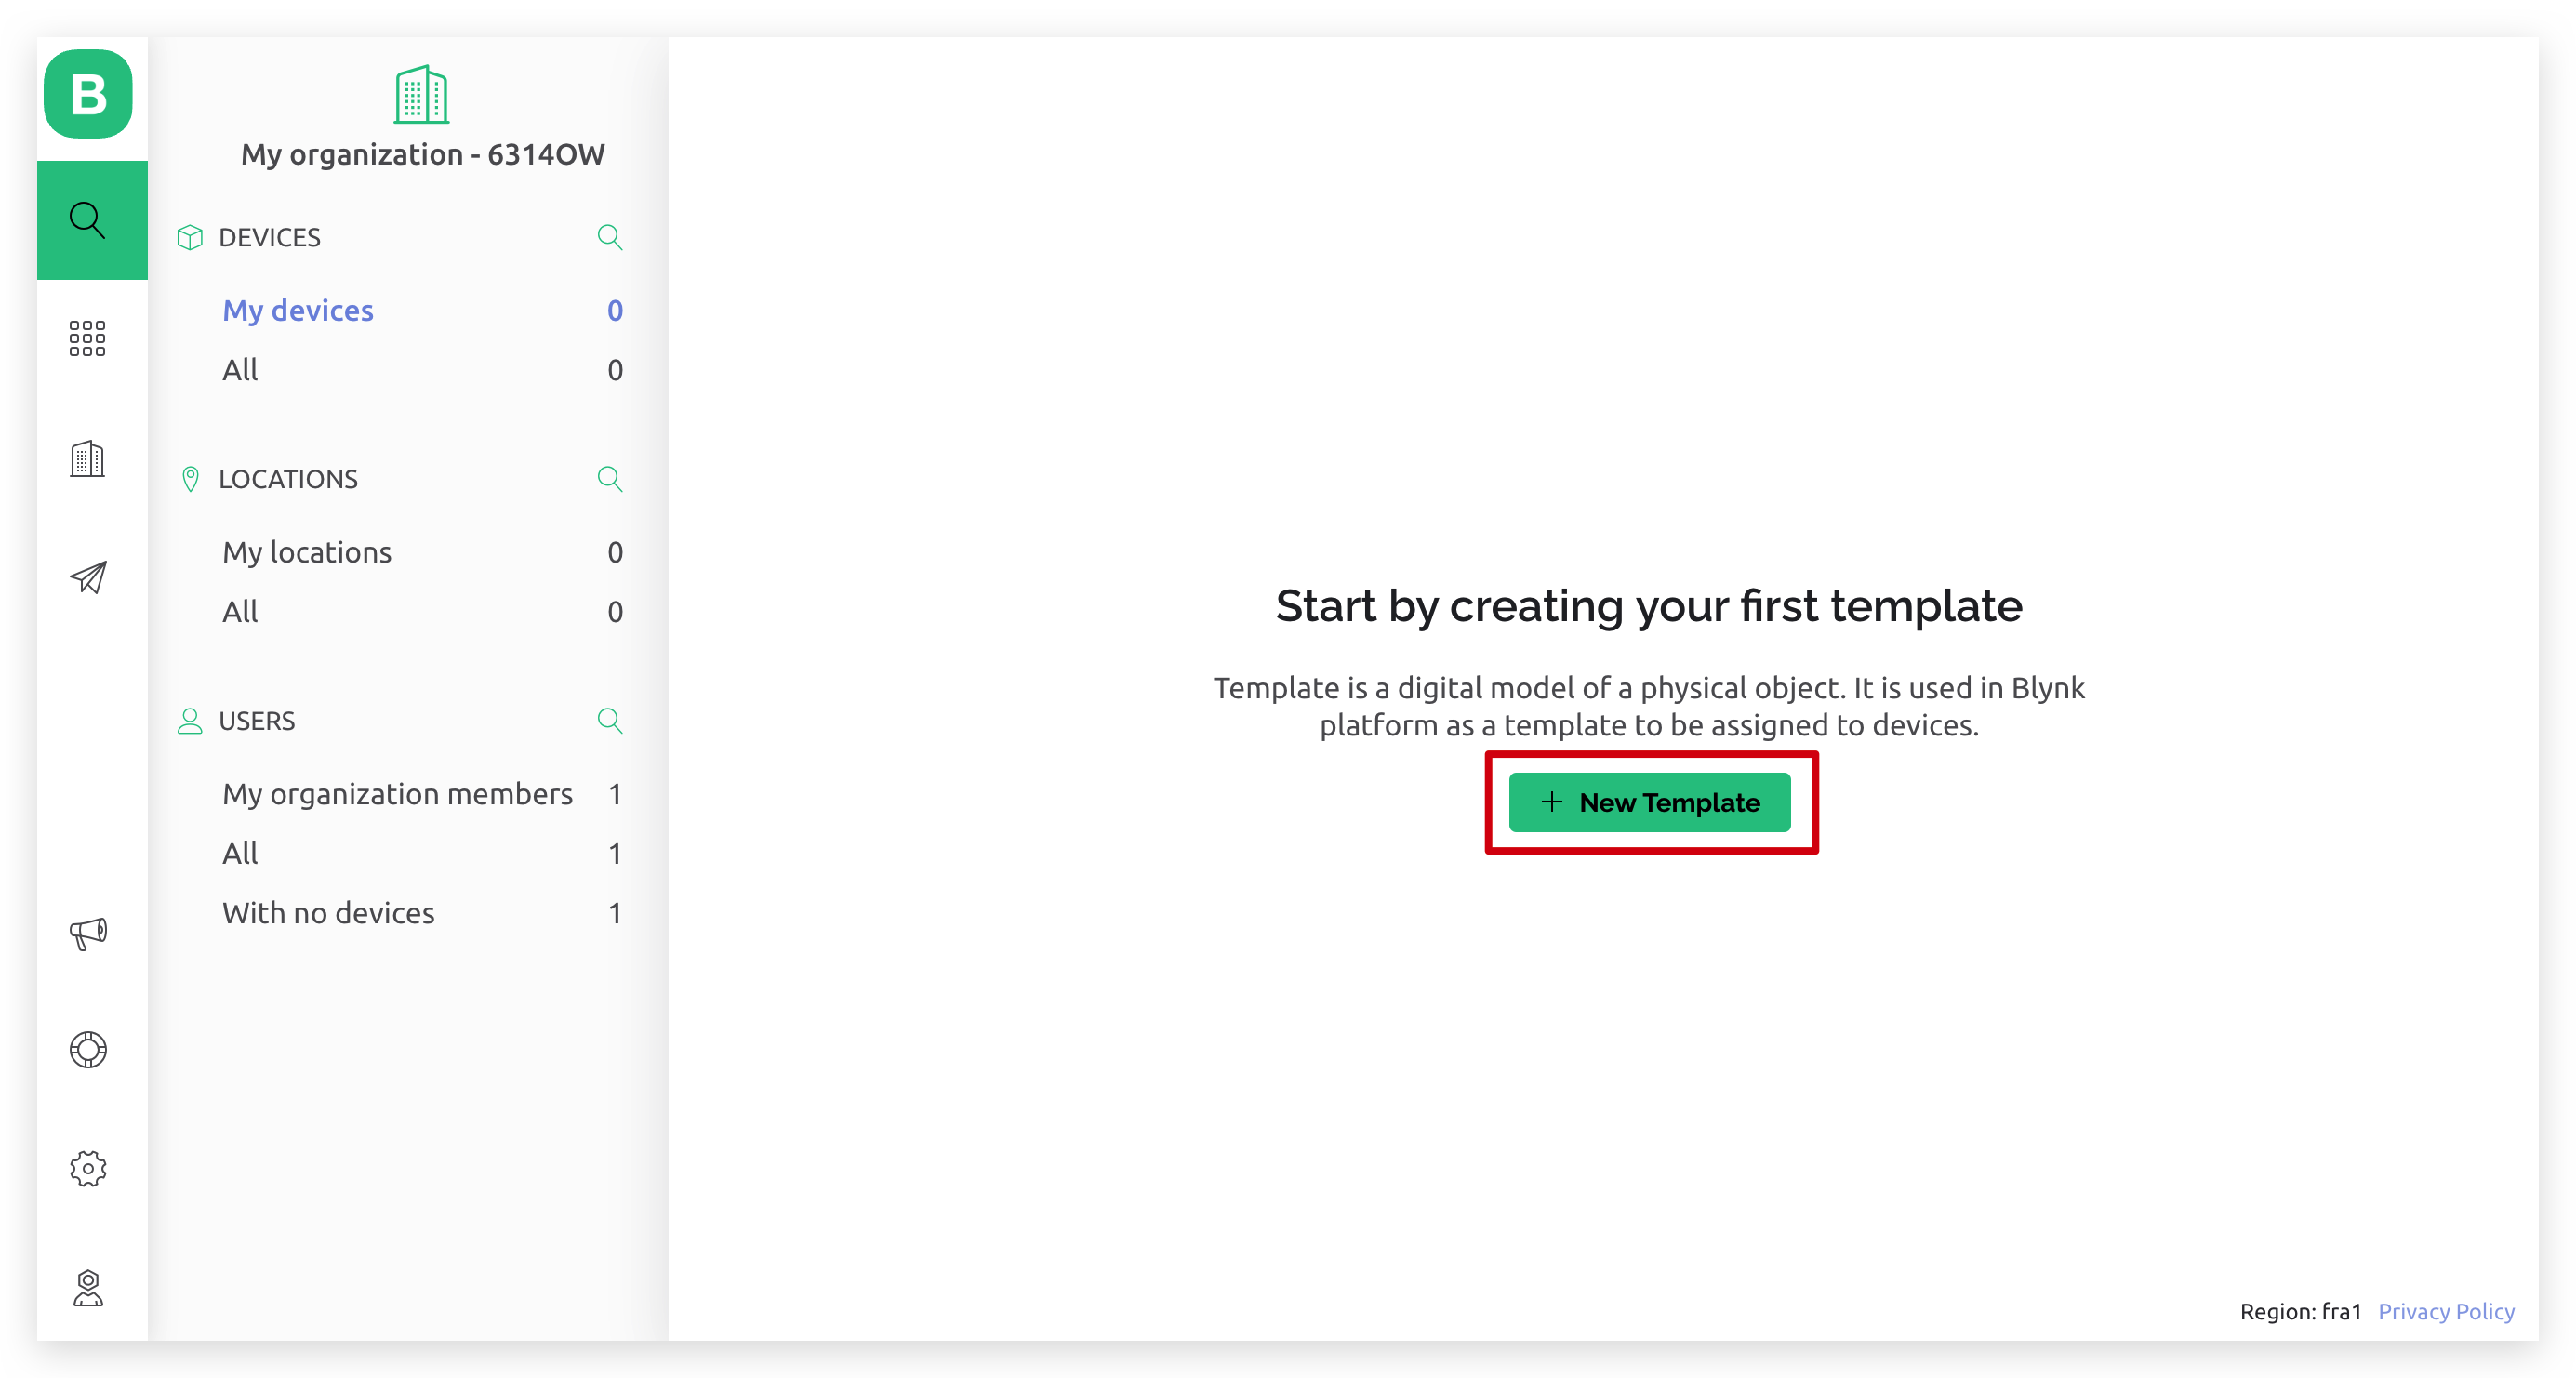
Once you login to the Blynk console, please cancel and skip the startup wizard popup and click on New Template button to create a new template.
Follow the setup wizard, in the popup window, name your template and choose Seeed Wio Terminal as HARDWARE, WiFi for CONNECTION TYPE.
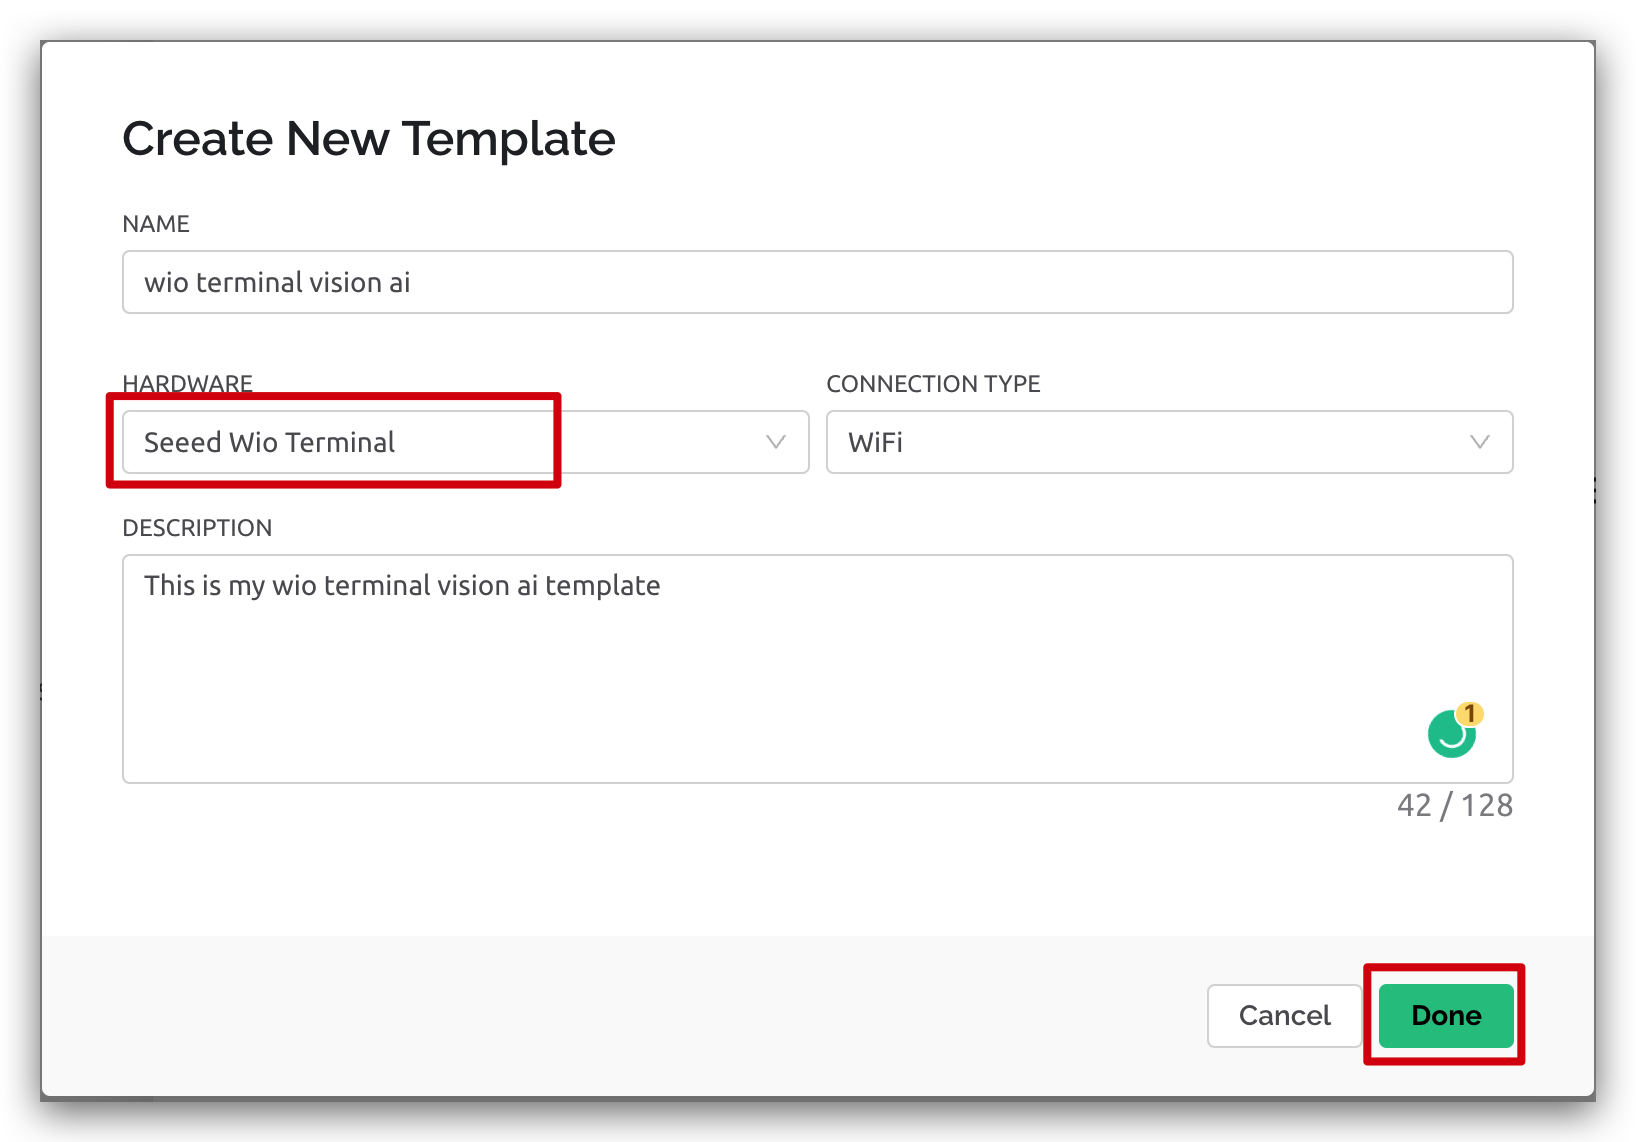
After click done, you should see the template page and to confirm all the information about the new template please click save on the top right corner.
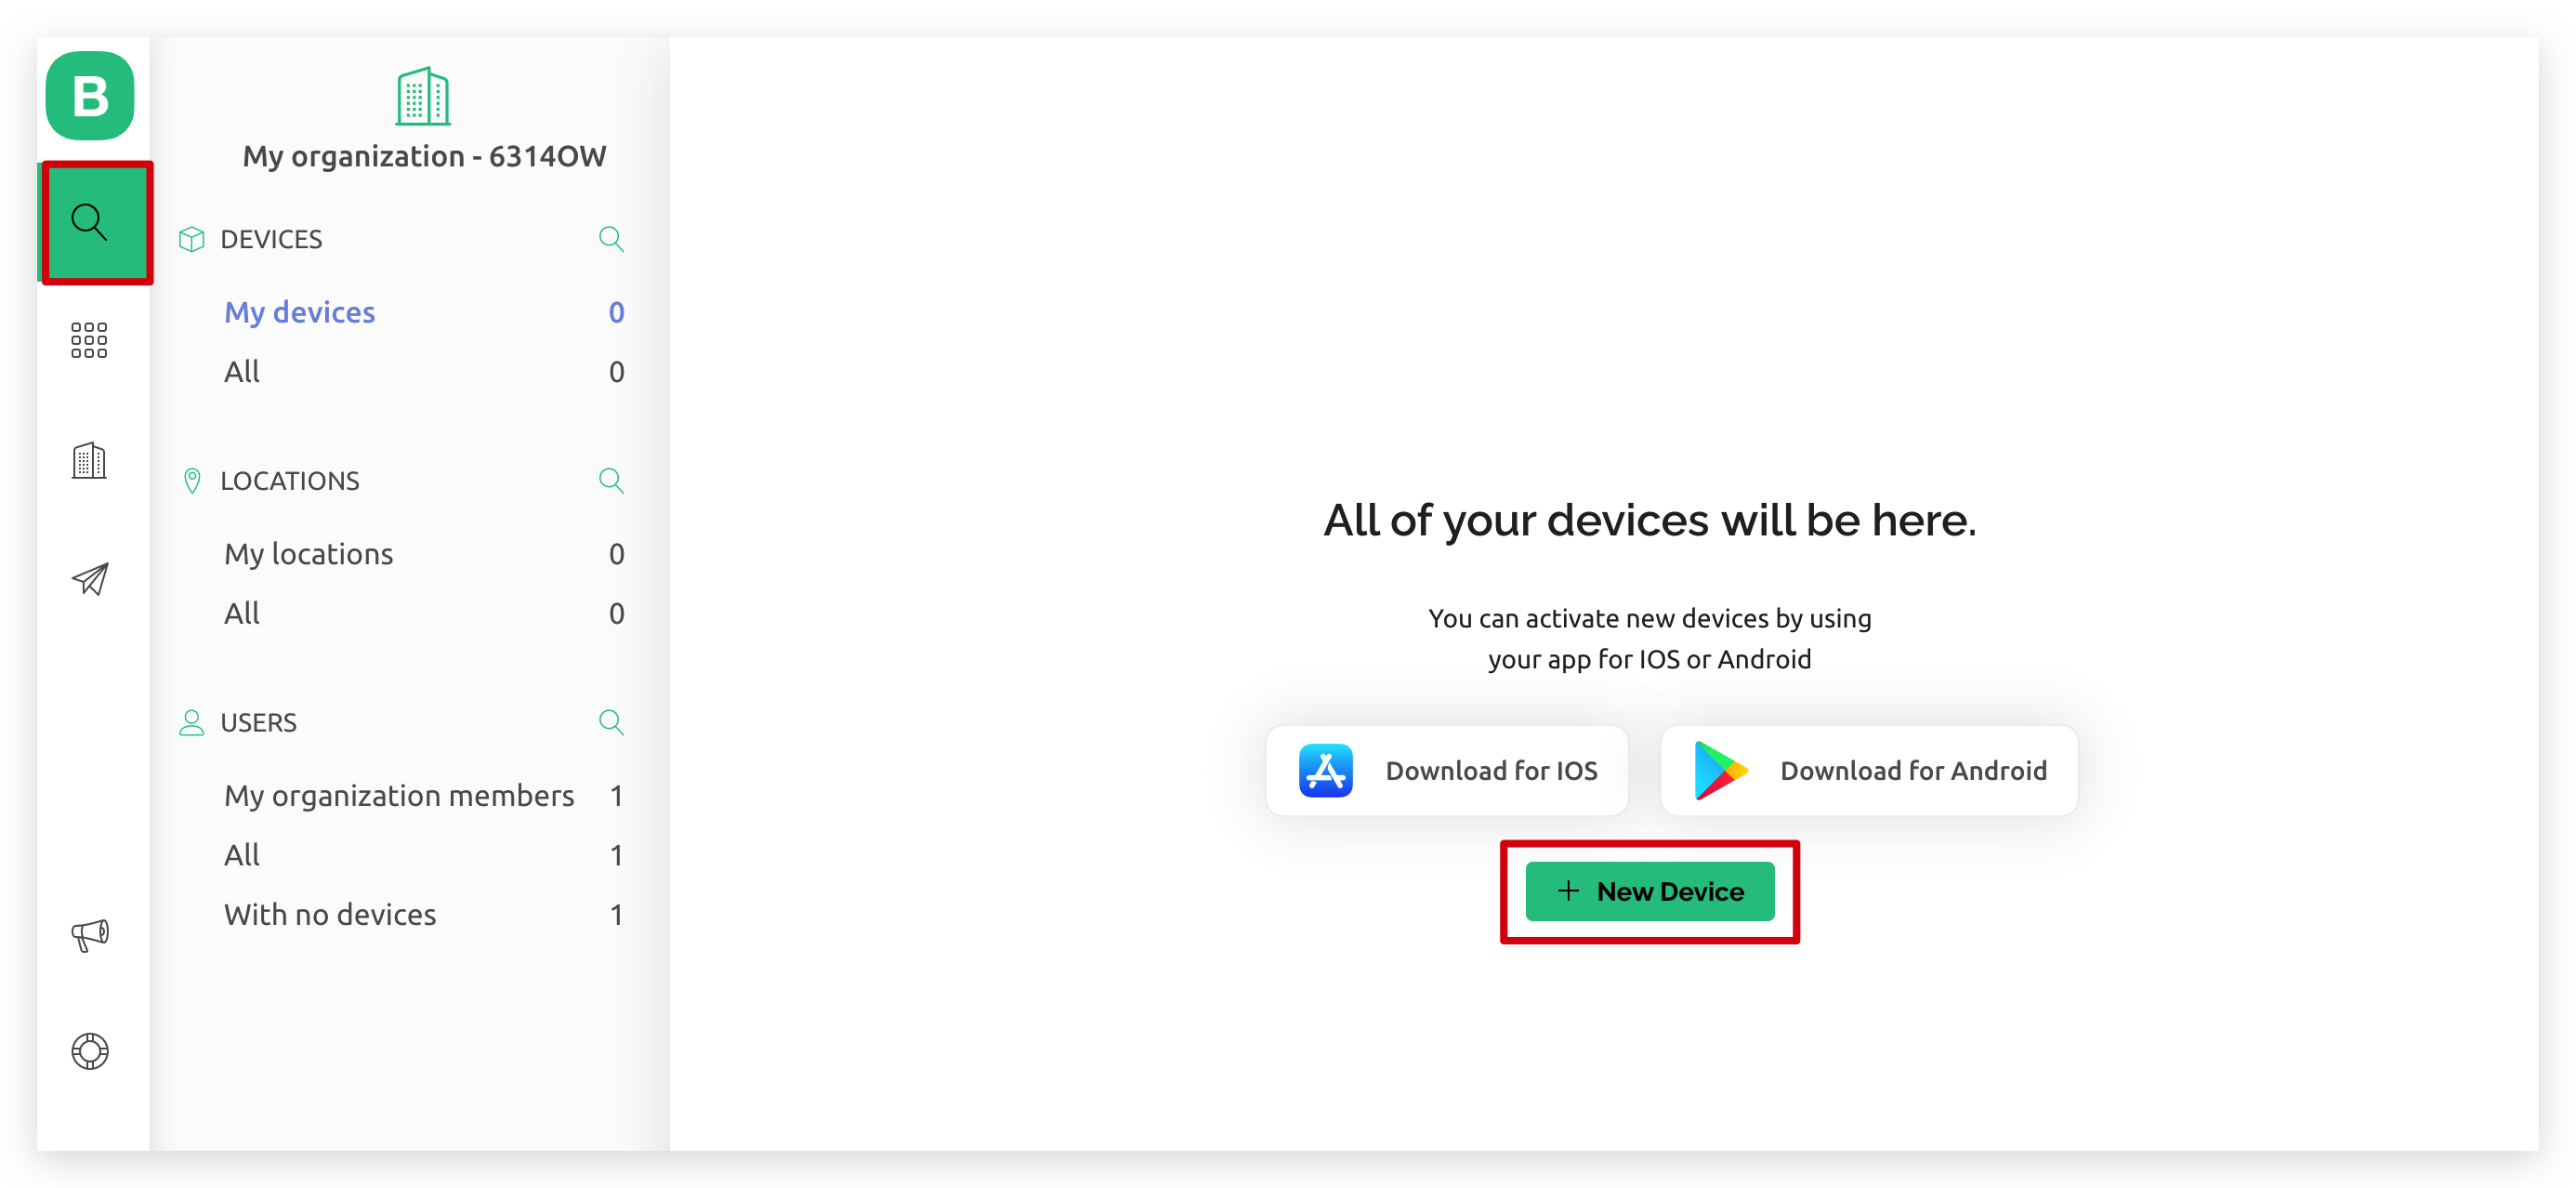
Step 3. Add New Device
After adding the dashboard template, click on the My devices tab, followed by click on the New Device button.
Then please choose From termplate.
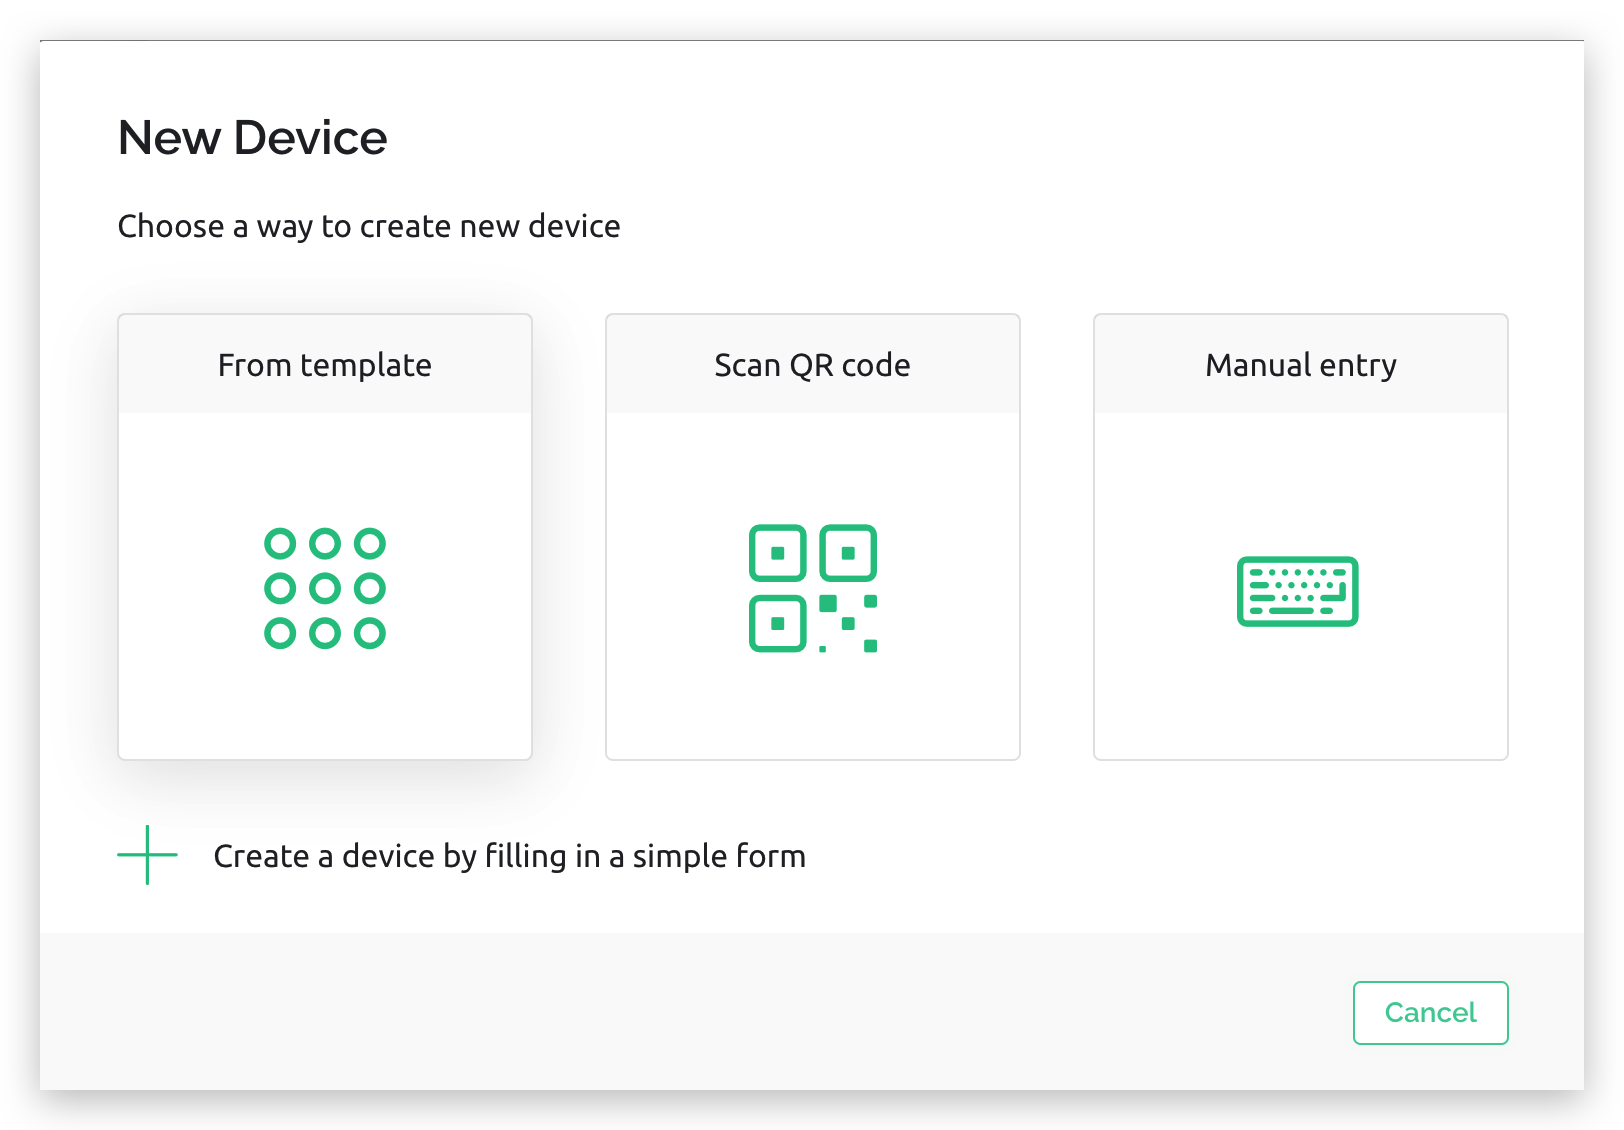
Please select the template name created from Step 2 for the TEMPLATE drop down list, in this case it's called wio terminal vision ai, and type in a device name at DEVICE NAME dialog box.

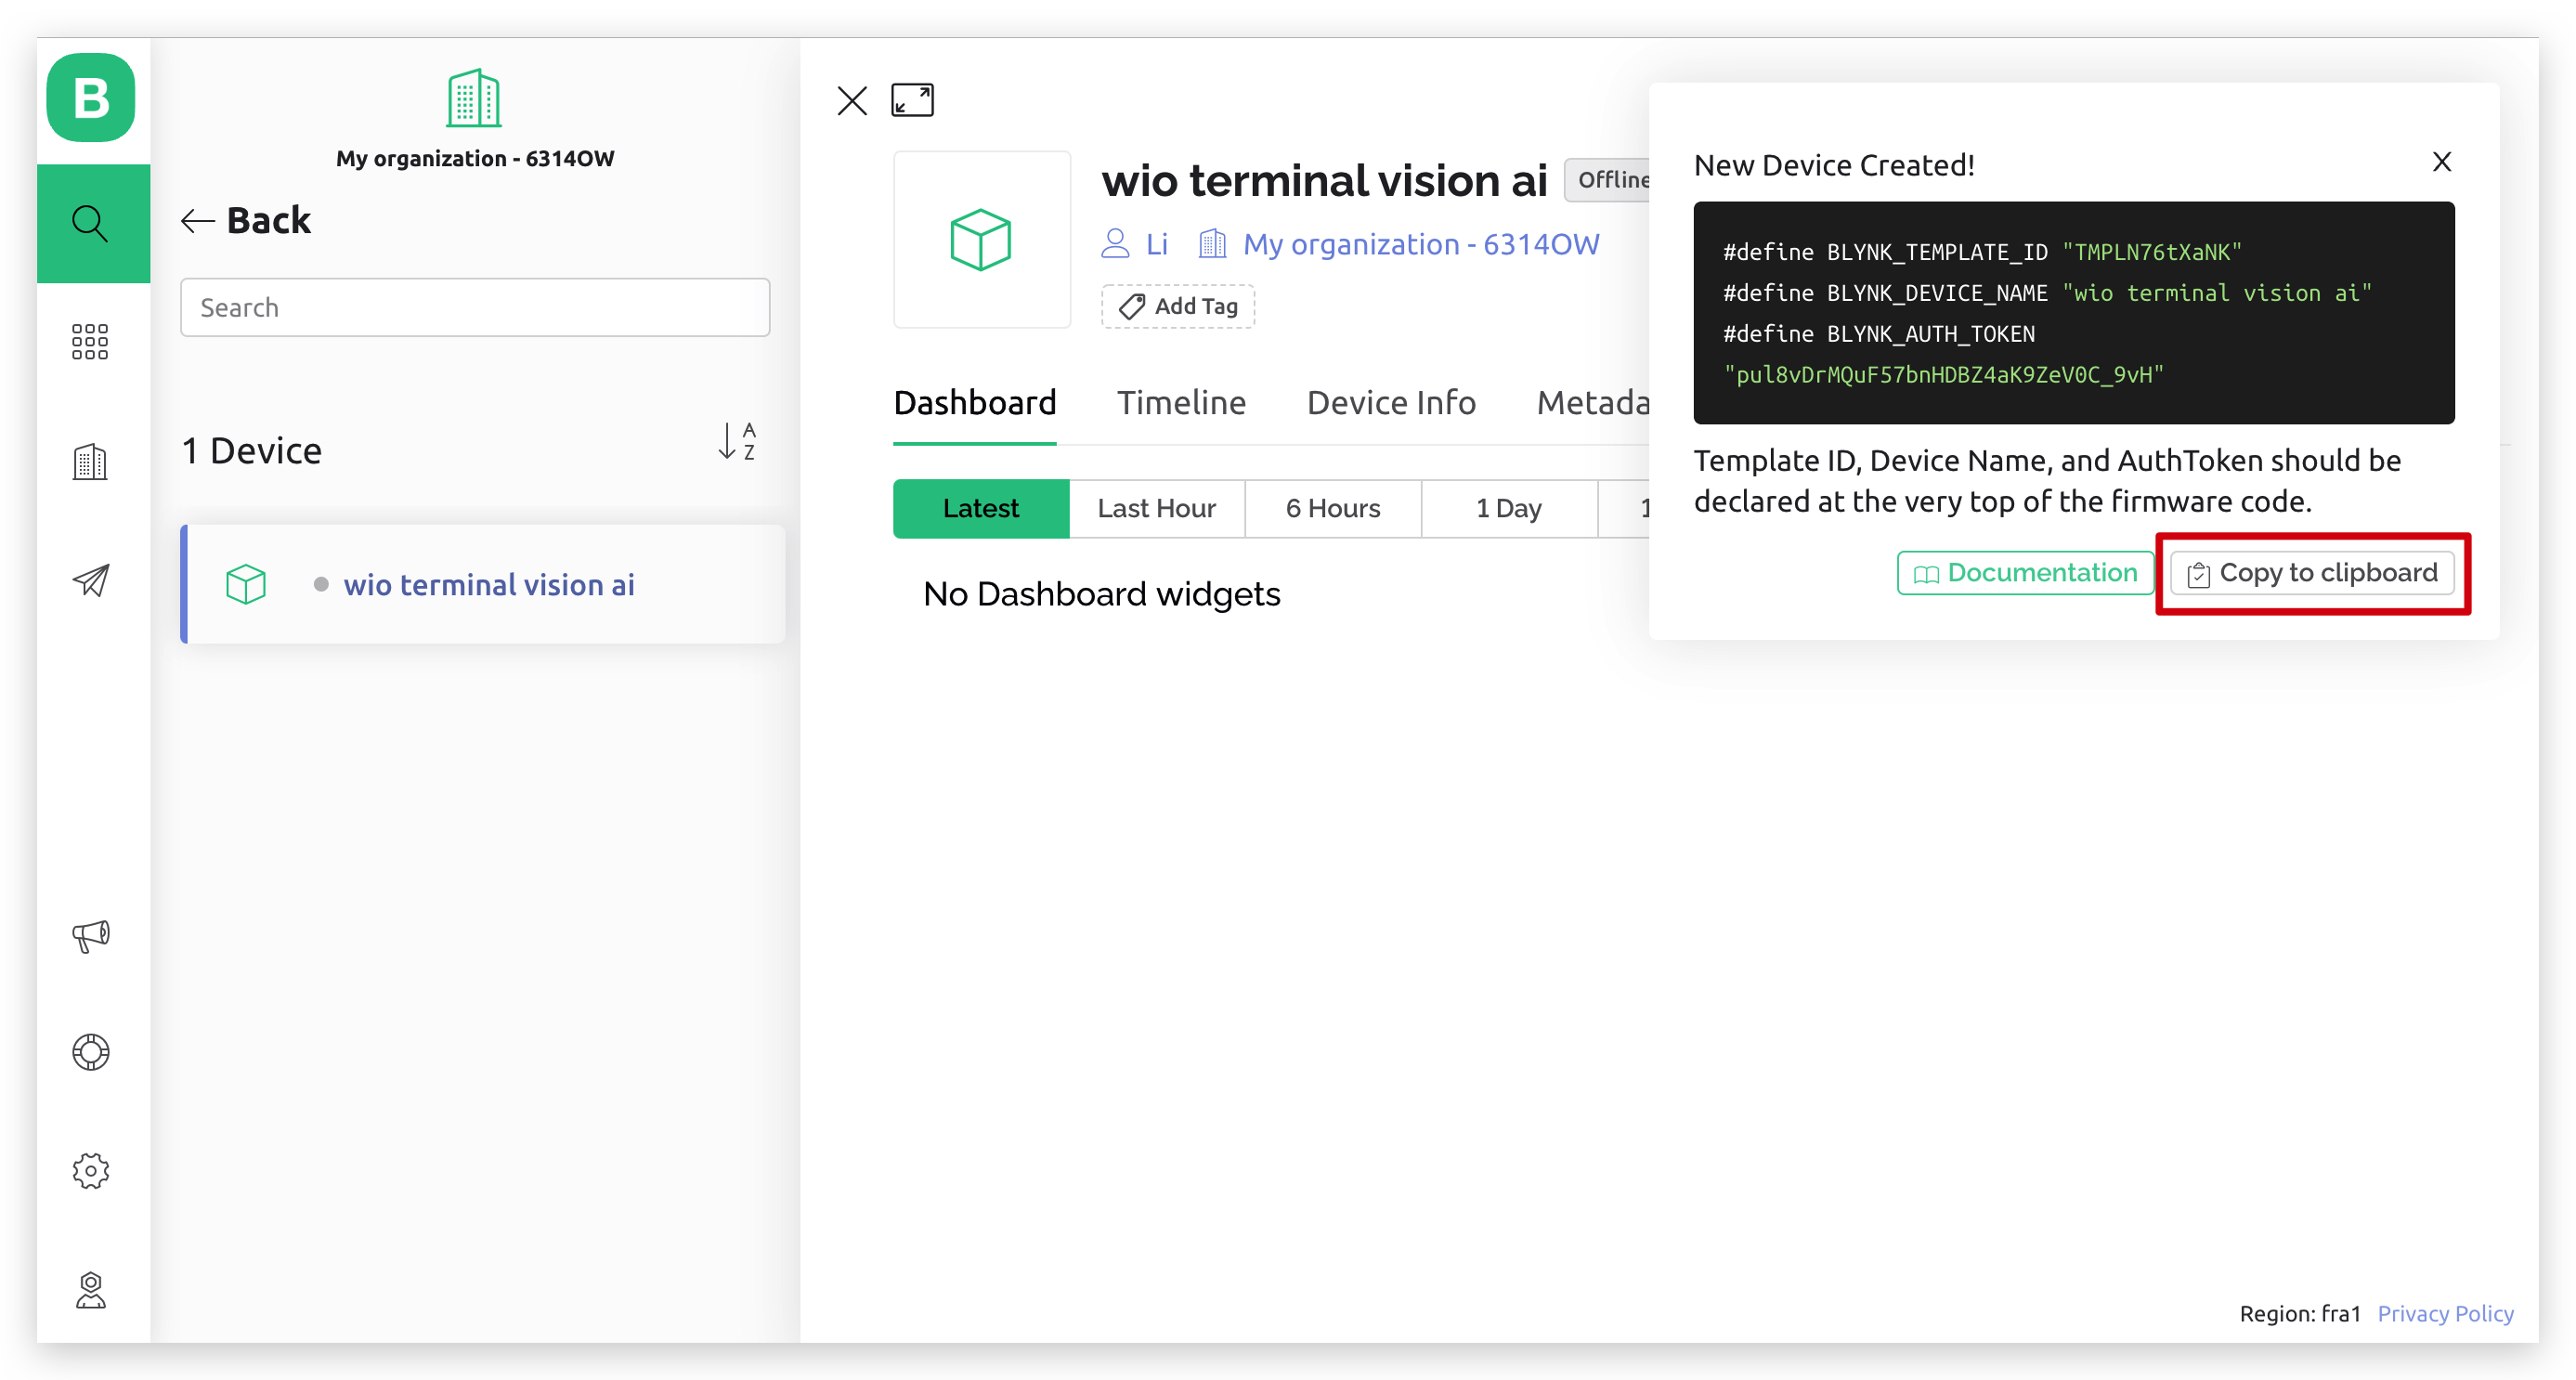
After this the new device information should show up in a popup panel, you should see Template ID, Device Name and Auth Token, please click Copy to clipboard to copy and save the header information for later use.
Step 4. Add necessary Arduino library
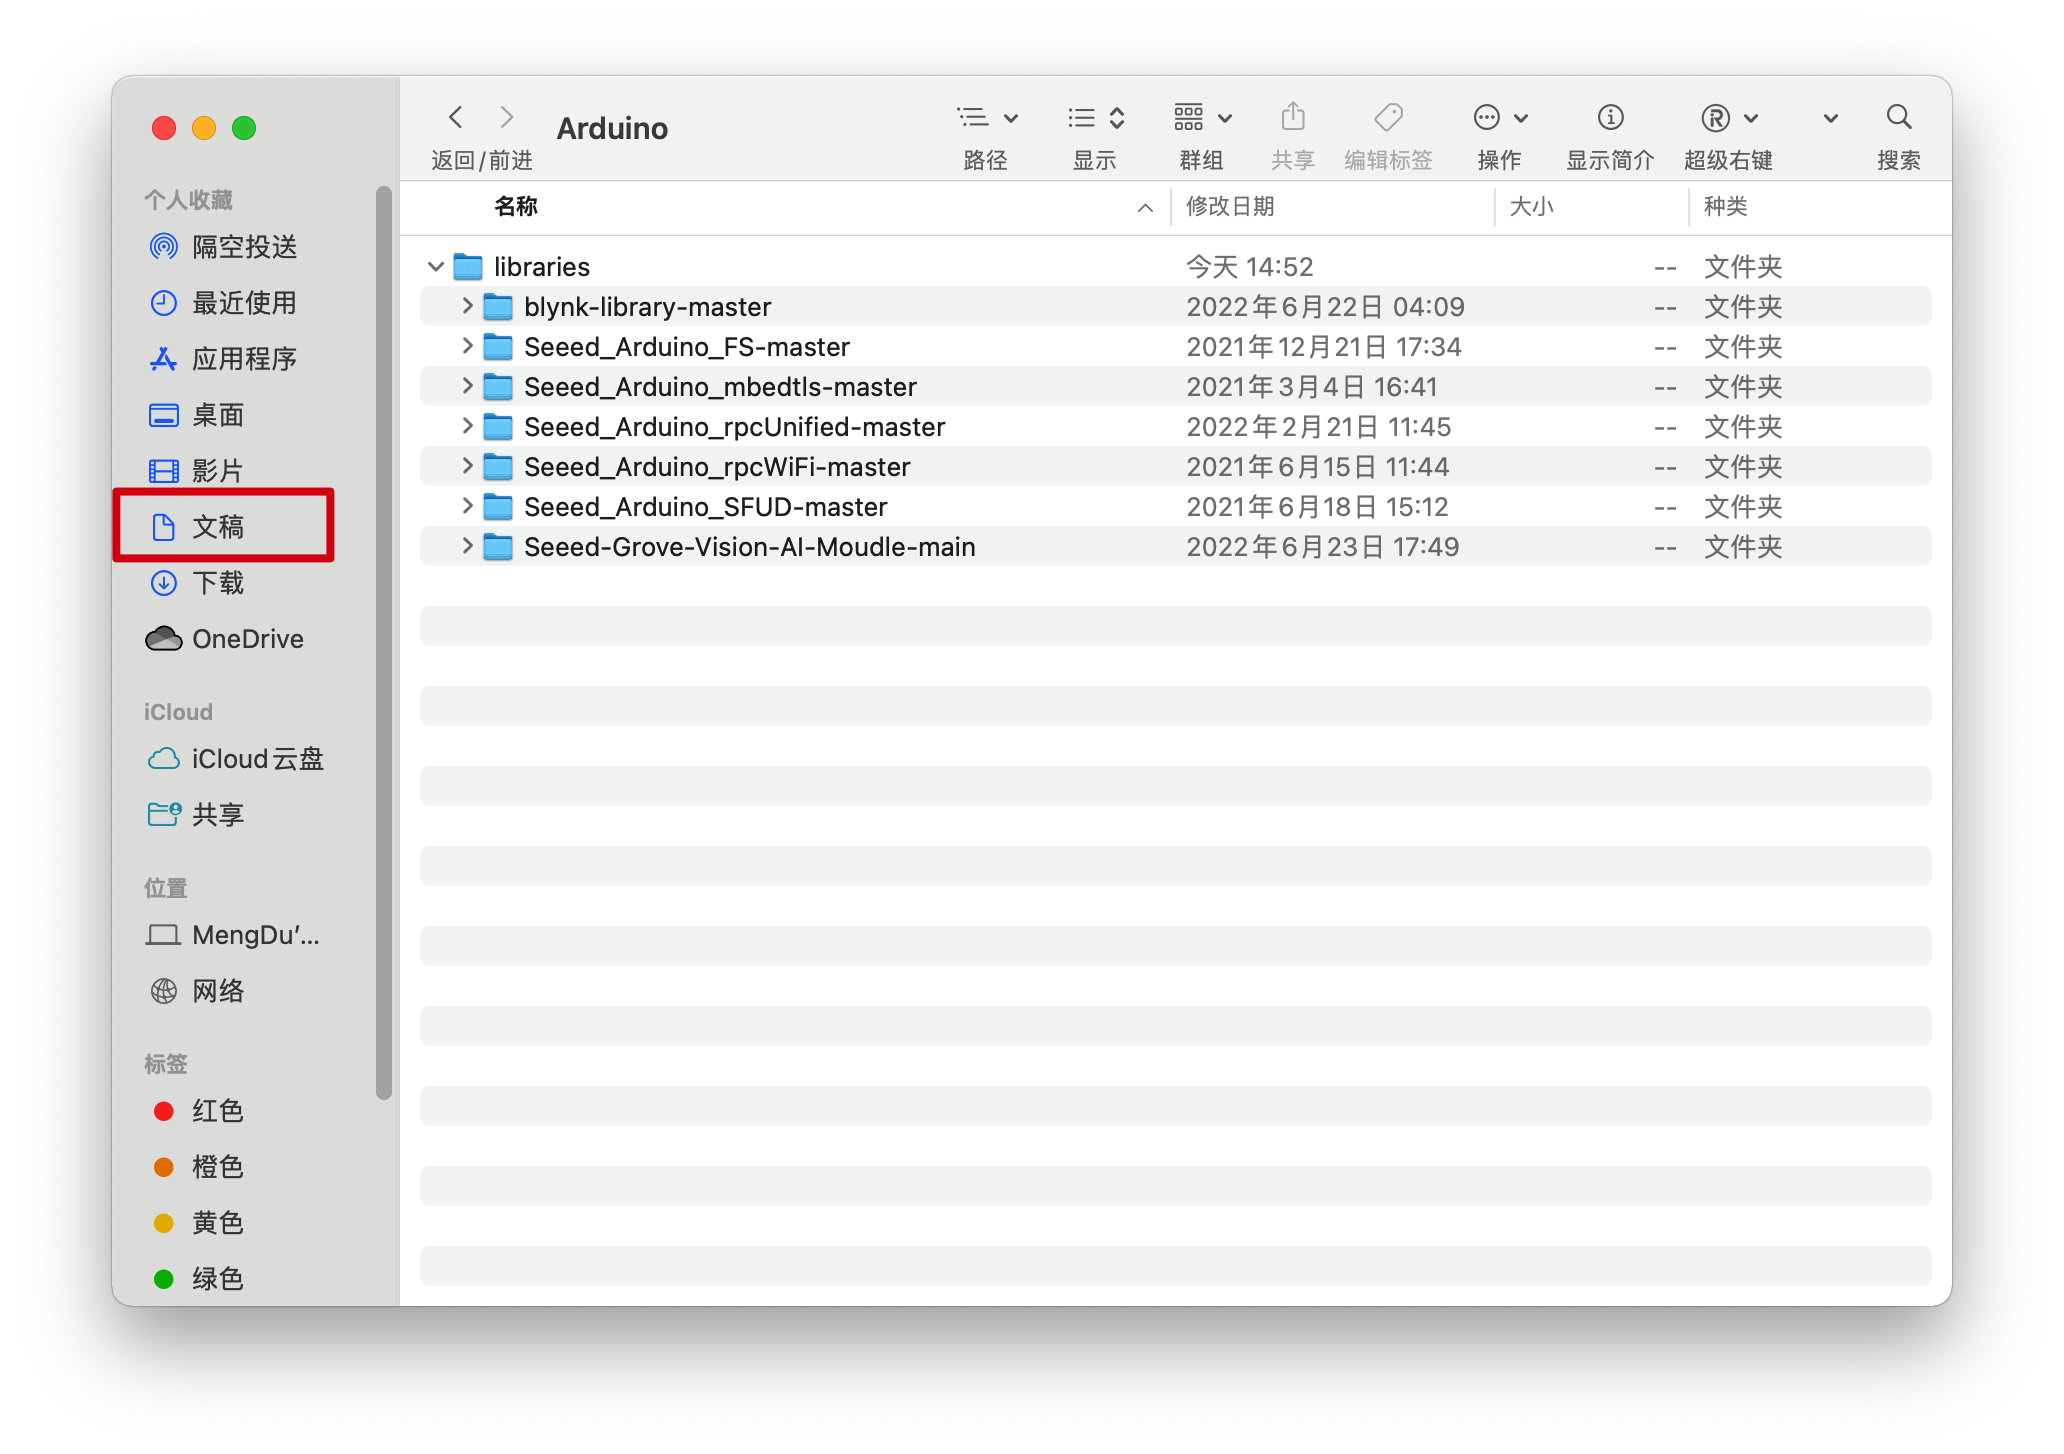
We need to add necessary Arduino library to utilizing the Grove Vision AI module with Wio Terminal, please click the icon below and download the Grove Vision AI Arduino library.
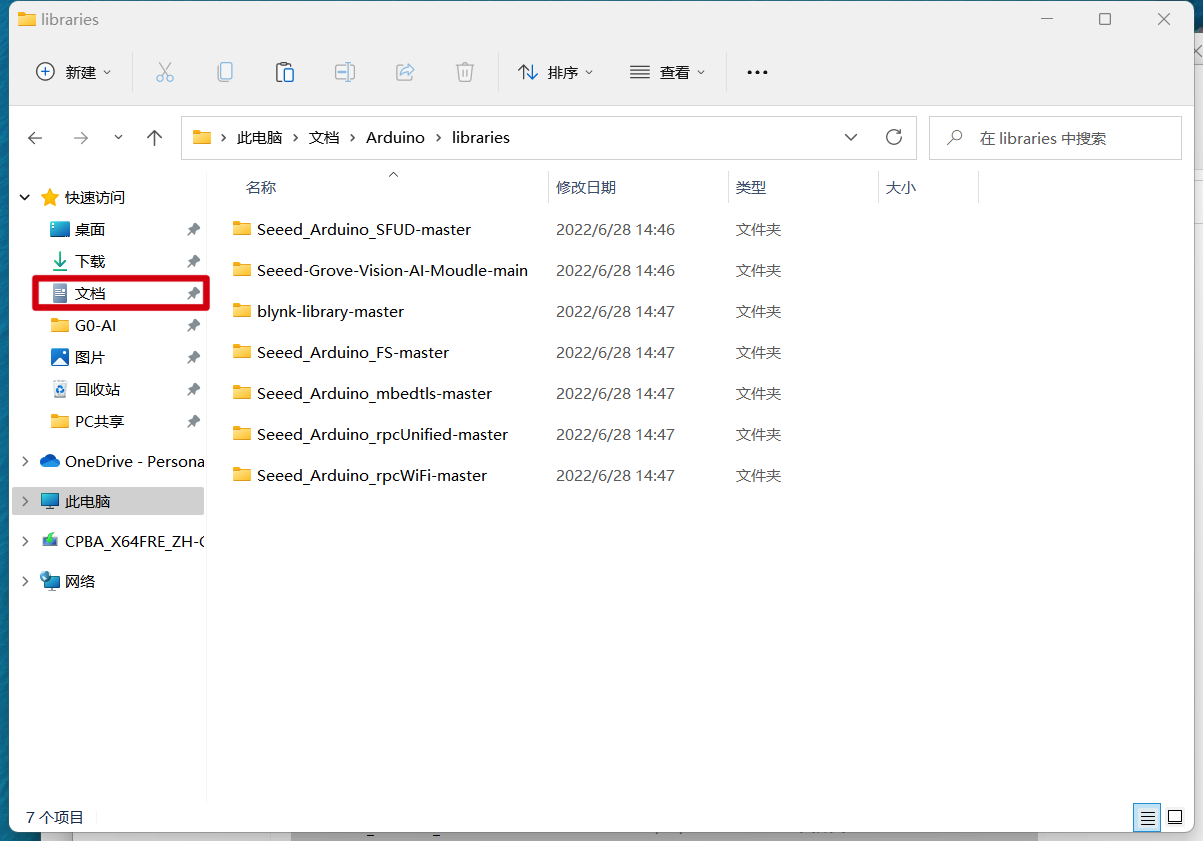
After successfully download the library zip file, please unzip the files into the following path:
- On Windows:
C:\Users\{User Name}\Documents\Arduino\libraries
- On Mac:
/Users/{User Name}/Documents/Arduino/libraries
Step 5. Prepare the firmware code
We can generate the base template code for connecting Wio Terminal to Blynk server from here.
We also have prepared the complete sample code for this quick start guide, as below:
// Template ID, Device Name and Auth Token are provided by the Blynk.Cloud
// See the Device Info tab, or Template settings
#define BLYNK_TEMPLATE_ID ""
#define BLYNK_DEVICE_NAME ""
#define BLYNK_AUTH_TOKEN ""

// Your WiFi credentials.
// Set password to "" for open networks.
char ssid[] = "";
char pass[] = "";

// Comment this out to disable prints and save space
#define BLYNK_PRINT Serial

#include <rpcWiFi.h>
#include <WiFiClient.h>
#include <BlynkSimpleWioTerminal.h>
#include "Seeed_Arduino_GroveAI.h"
#include <Wire.h>

GroveAI ai(Wire);
uint8_t state = 0;

char auth[] = BLYNK_AUTH_TOKEN;

BlynkTimer timer;

// This function sends Arduino's up time every second to Virtual Pin (5).
// In the app, Widget's reading frequency should be set to PUSH. This means
// that you define how often to send data to Blynk App.
void myTimerEvent()
{
  // You can send any value at any time.
  // Please don't send more that 10 values per second.
  if (state == 1)
  {
    if (ai.invoke()) // begin invoke
    {
      while (1) // wait for invoking finished
      {
        CMD_STATE_T ret = ai.state();
        if (ret == CMD_STATE_IDLE)
        {
          break;
        }
        delay(20);
      }
     uint8_t len = ai.get_result_len(); // receive how many people detect
     if(len)
     {
       Serial.print("Number of people: ");
       Serial.println(len);
       object_detection_t data;       //get data

       for (int i = 0; i < len; i++)
       {
          Serial.println("result:detected");
          Serial.print("Detecting and calculating: ");
          Serial.println(i+1);
          ai.get_result(i, (uint8_t*)&data, sizeof(object_detection_t)); //get result
          Serial.print("confidence:");
          Serial.print(data.confidence);
          Serial.println();
          Blynk.virtualWrite(V5, data.confidence);
          Blynk.virtualWrite(V4, len);
        }
     }
     else
     {
       Serial.println("No identification");
       Blynk.virtualWrite(V4, 0);
       Blynk.virtualWrite(V5, 0);
     }
    }
    else
    {
      delay(1000);
      Serial.println("Invoke Failed.");
    }
  }
  else
  {
    state == 0;
  }
}

void setup()
{
  // Debug console
  Serial.begin(115200);

  Wire.begin();

  Serial.println("begin");
  if (ai.begin(ALGO_OBJECT_DETECTION, MODEL_EXT_INDEX_1)) // Object detection and pre-trained model 1
  {
    Serial.print("Version: ");
    Serial.println(ai.version());
    Serial.print("ID: ");
    Serial.println( ai.id());
    Serial.print("Algo: ");
    Serial.println( ai.algo());
    Serial.print("Model: ");
    Serial.println(ai.model());
    Serial.print("Confidence: ");
    Serial.println(ai.confidence());
    state = 1;
  }
  else
  {
    Serial.println("Algo begin failed.");
  }

  Blynk.begin(auth, ssid, pass);
  // You can also specify server:
  //Blynk.begin(auth, ssid, pass, "blynk.cloud", 80);
  //Blynk.begin(auth, ssid, pass, IPAddress(192,168,1,100), 8080);

  // Setup a function to be called every second
  timer.setInterval(1000L, myTimerEvent);
}

void loop()
{
  Blynk.run();
  timer.run(); // Initiates BlynkTimer
}
You need fill-in the necessary headers at the beginning of the sample code above to be able to connect your Wio Terminal your Wifi and then send data to Blynk server.
#define BLYNK_TEMPLATE_ID ""
#define BLYNK_DEVICE_NAME ""
#define BLYNK_AUTH_TOKEN ""

char ssid[] = "";
char pass[] = "";
The first 3 lines of definition is the Blynk device information that autogenerated from process of Step 3, simply just copy and replace the first 3 lines.
Followed by the ssid[] and pass[] variables, please fill-in your Wifi ssid and password that your Wio Terminal is about to connect to accordingly. eg:
#define BLYNK_TEMPLATE_ID           "TMPLx3C44oO0"
#define BLYNK_DEVICE_NAME           "Quickstart Device"
#define BLYNK_AUTH_TOKEN            "an8FkwZgCjShpV5NGCW-Lxl1qohRigeZ"

char ssid[] = "SeeedStudio";
char pass[] = "yyds2022";
We recommend to use your Personal Hotspot to test this quick start guide, as it's more stable compared to the unknown complex public network.
Step 6. Setup Blynk Web Dashboard
Please go back to Blynk console, we can setup some dashboard widget according to the firmware code above. First, we need to select the template we have recreated, and then click the Edit button located on the top right corner.

Then click Datastreams tab to setup data stream, then Click the New Datastream followed by select Virtual Pin to configure the data incoming source.
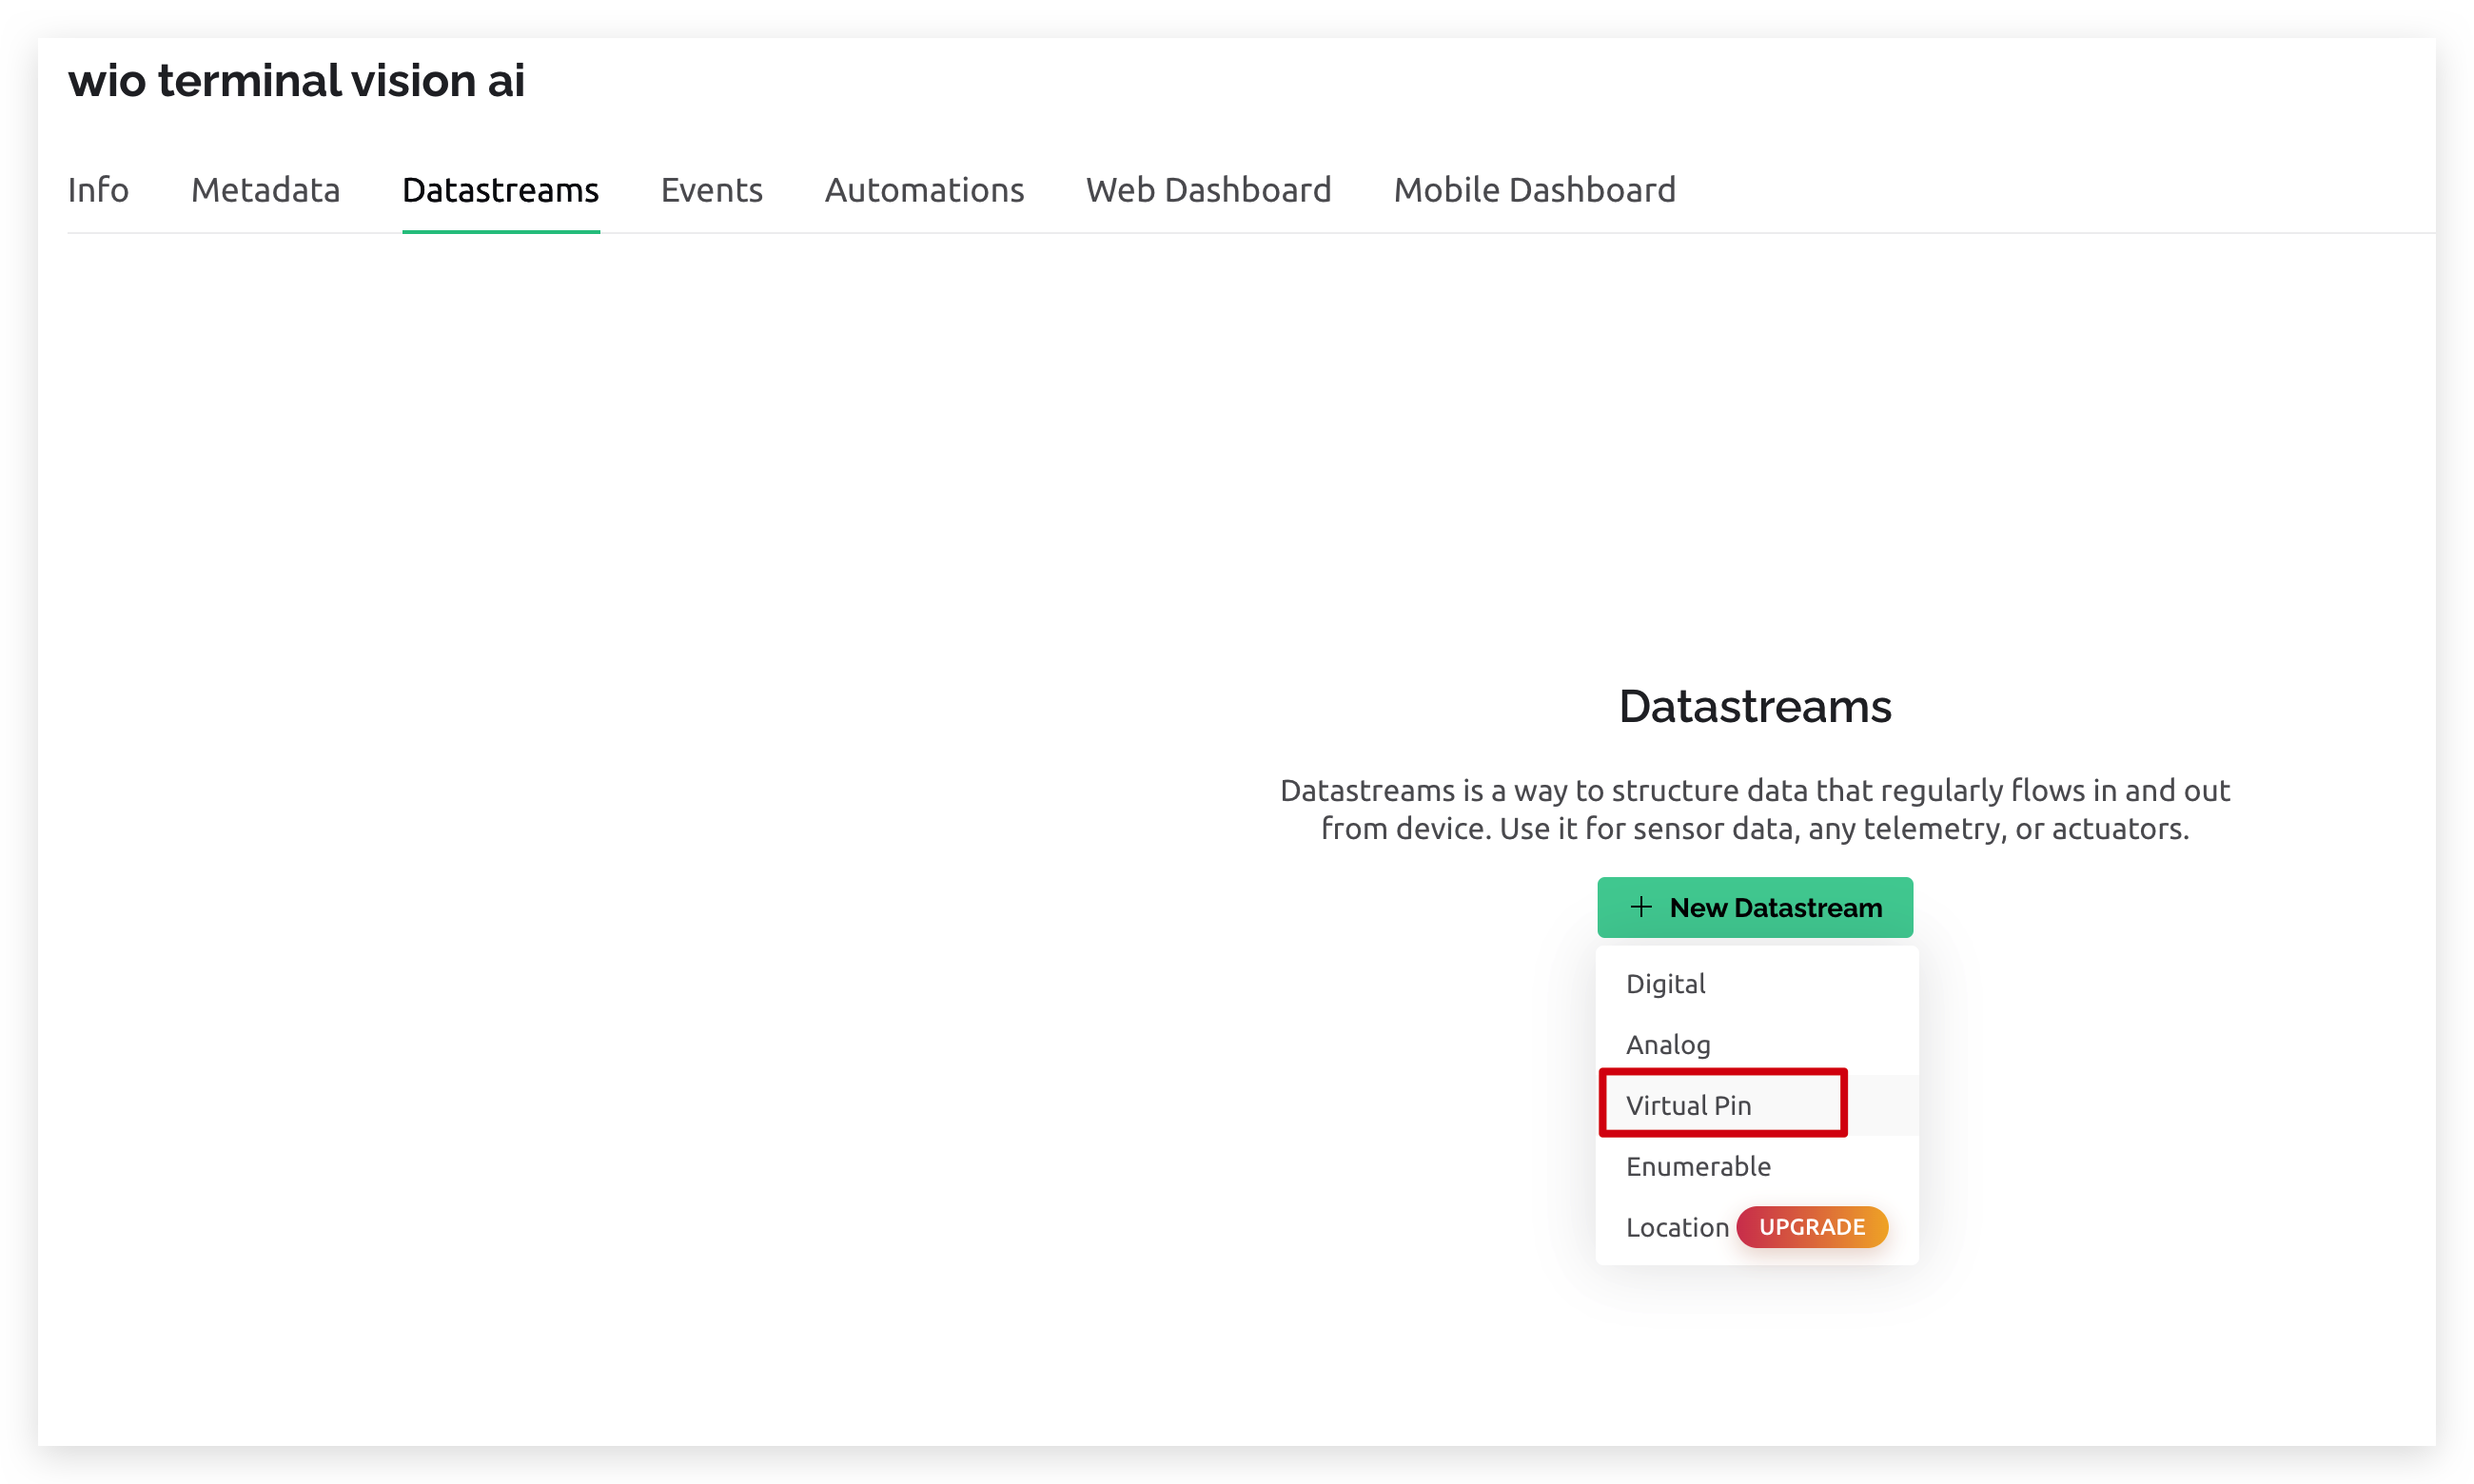
At Step 5, we used the virtual pin 4 and virtual pin 5 to send the Grove Vision AI module detection data such as head count and inference confidence percentage data accordingly.
Blynk.virtualWrite(V5, data.confidence); #confidence
Blynk.virtualWrite(V4, len); #head count
Therefore we need to setup two Virtual Pin in the Datastreams tab of Blynk Console V5 & V4 respectively.

In the Web Dashboard settings, we could define the information layout, in this case we added 3 most common visualization widget, such as Label, Gauge and Chart.
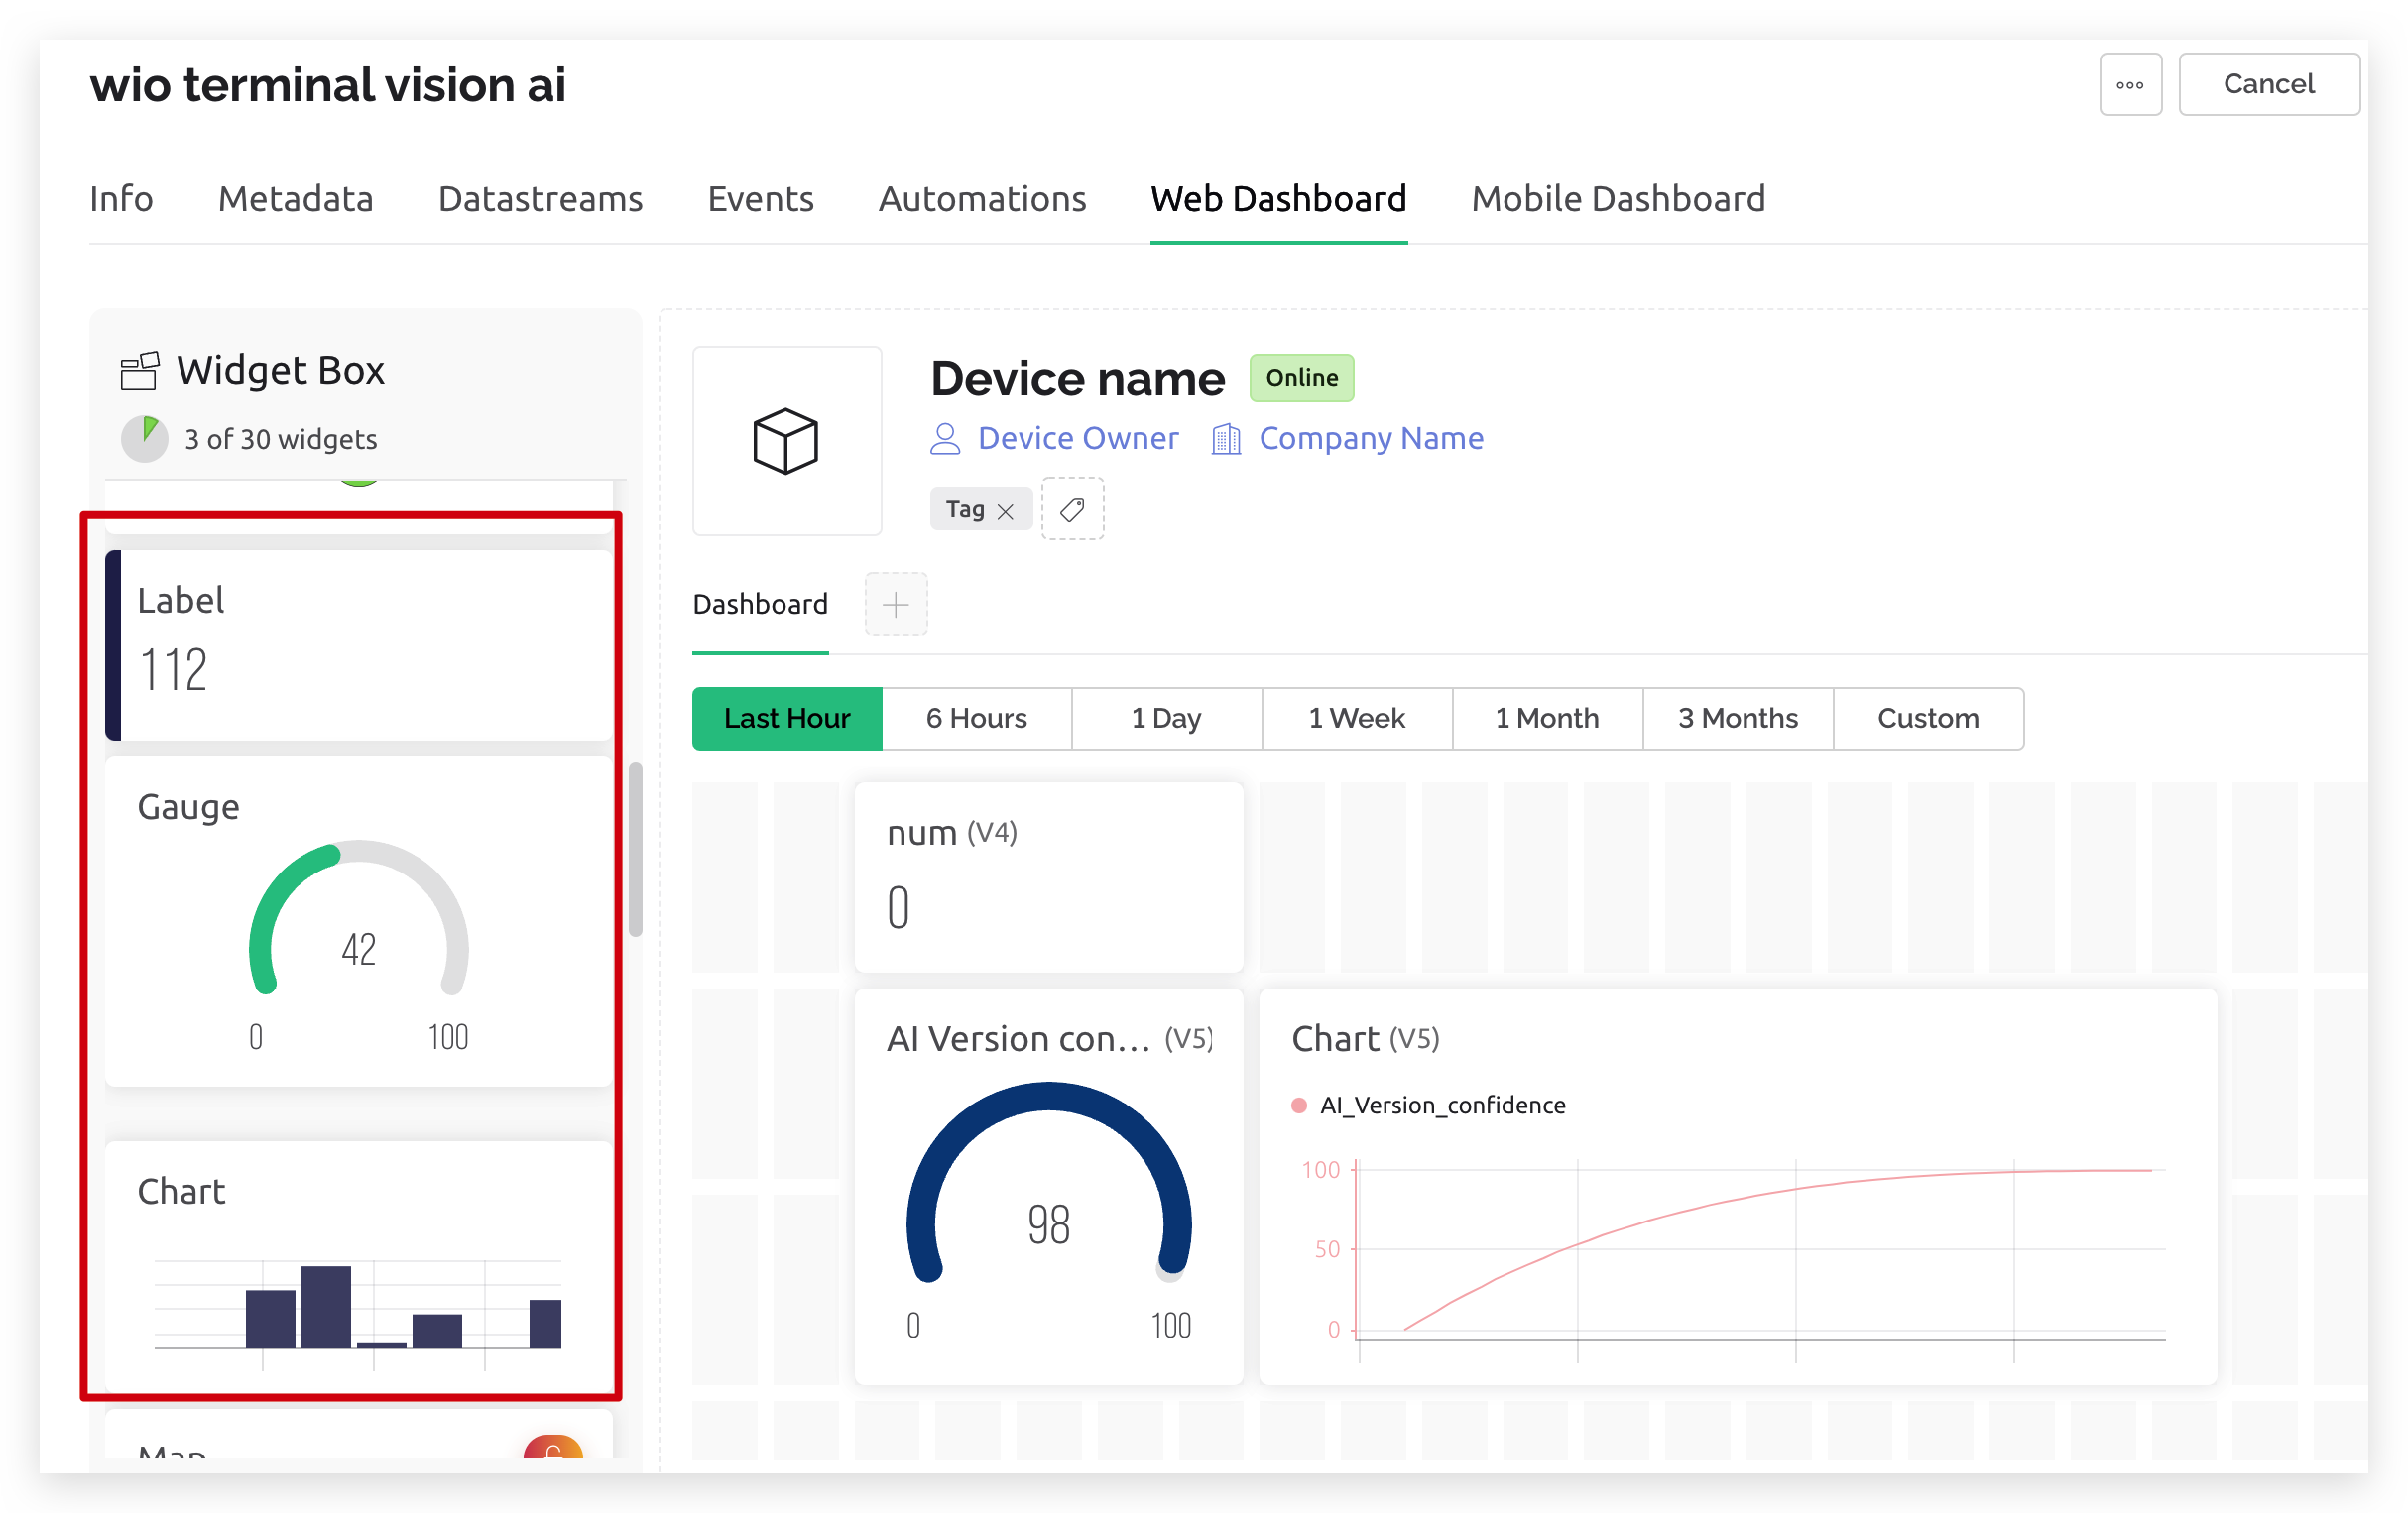
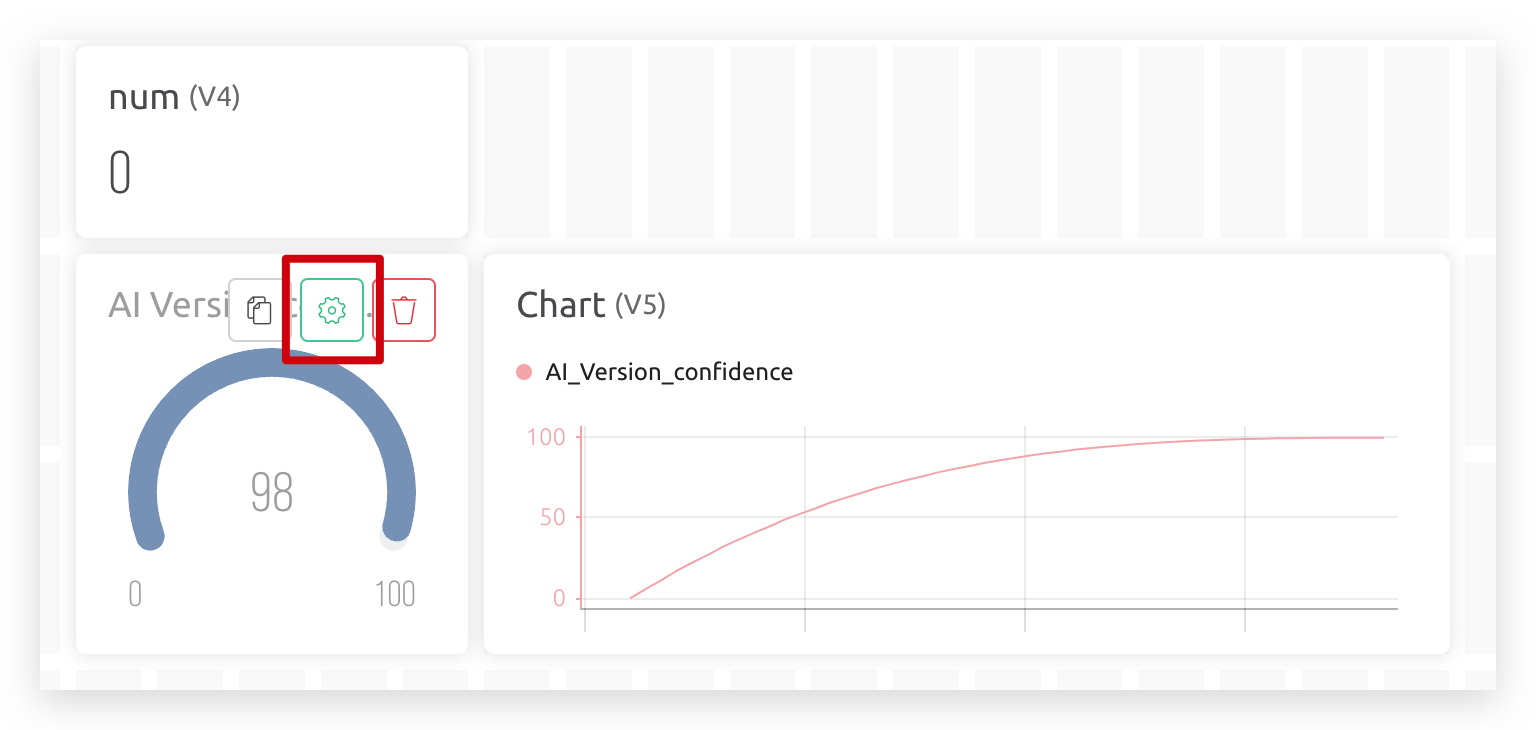
You can setup the display data by clicking the gear button on top of each widget which will show up by hovering over the widget.
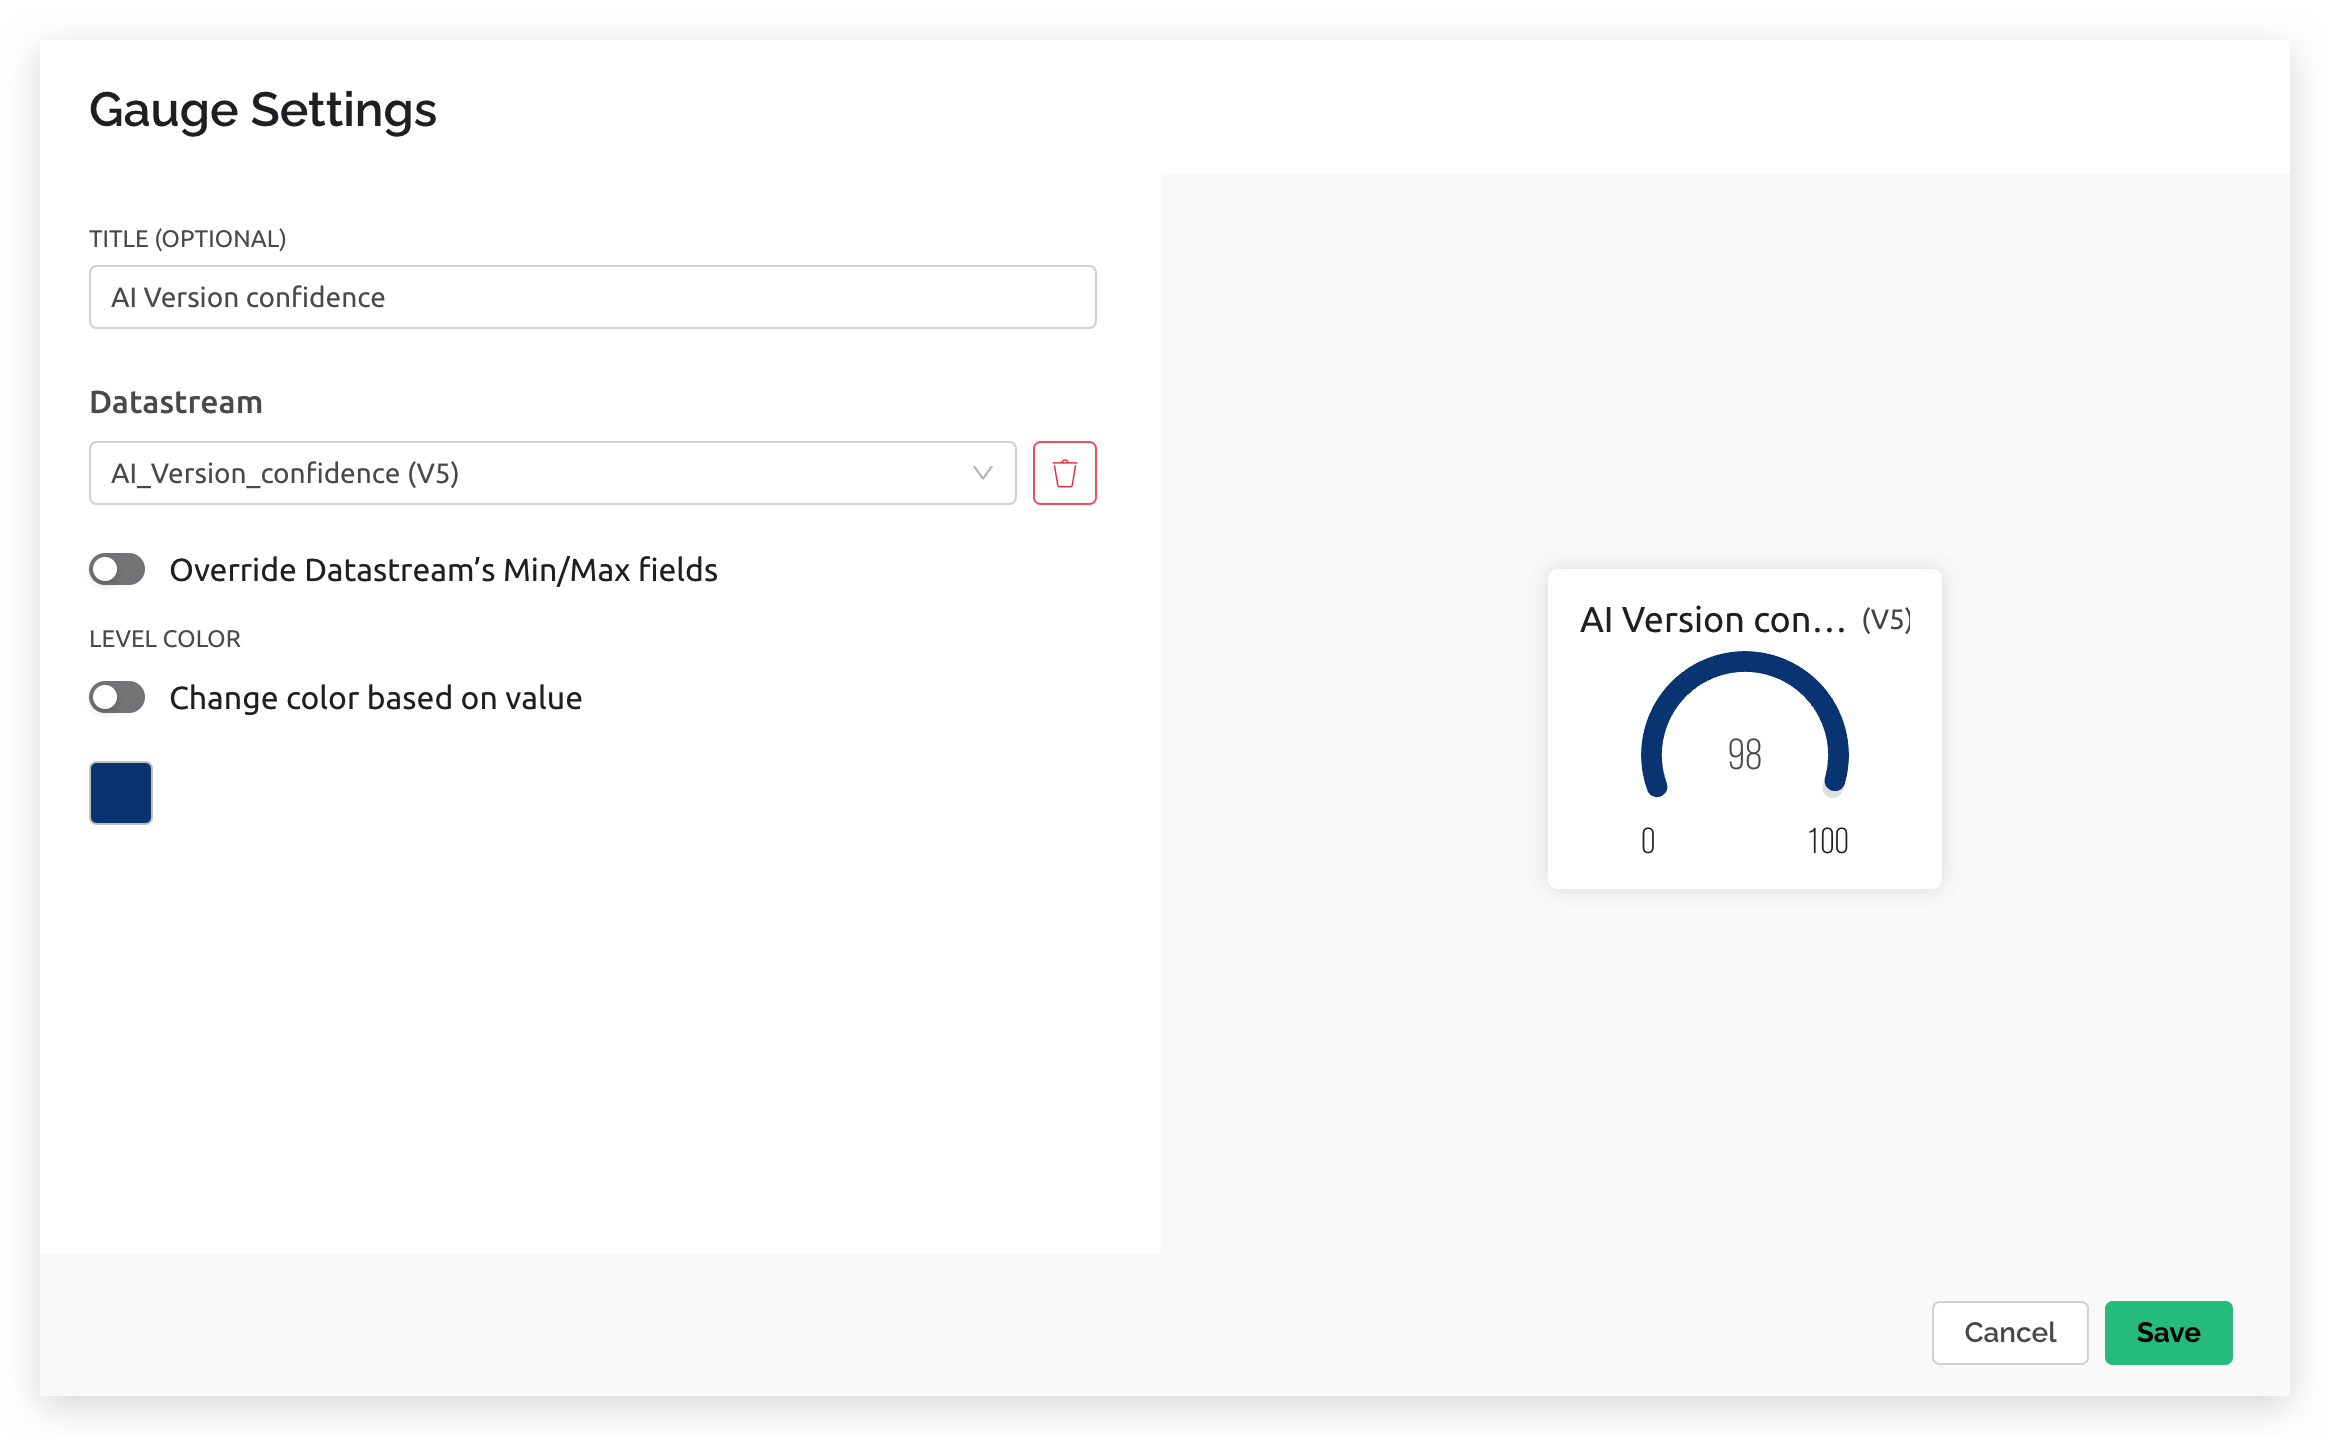
After setting up the data information layout, click the Save And Apply button at the top right corner.
Step 7. Upload the code and observe the data
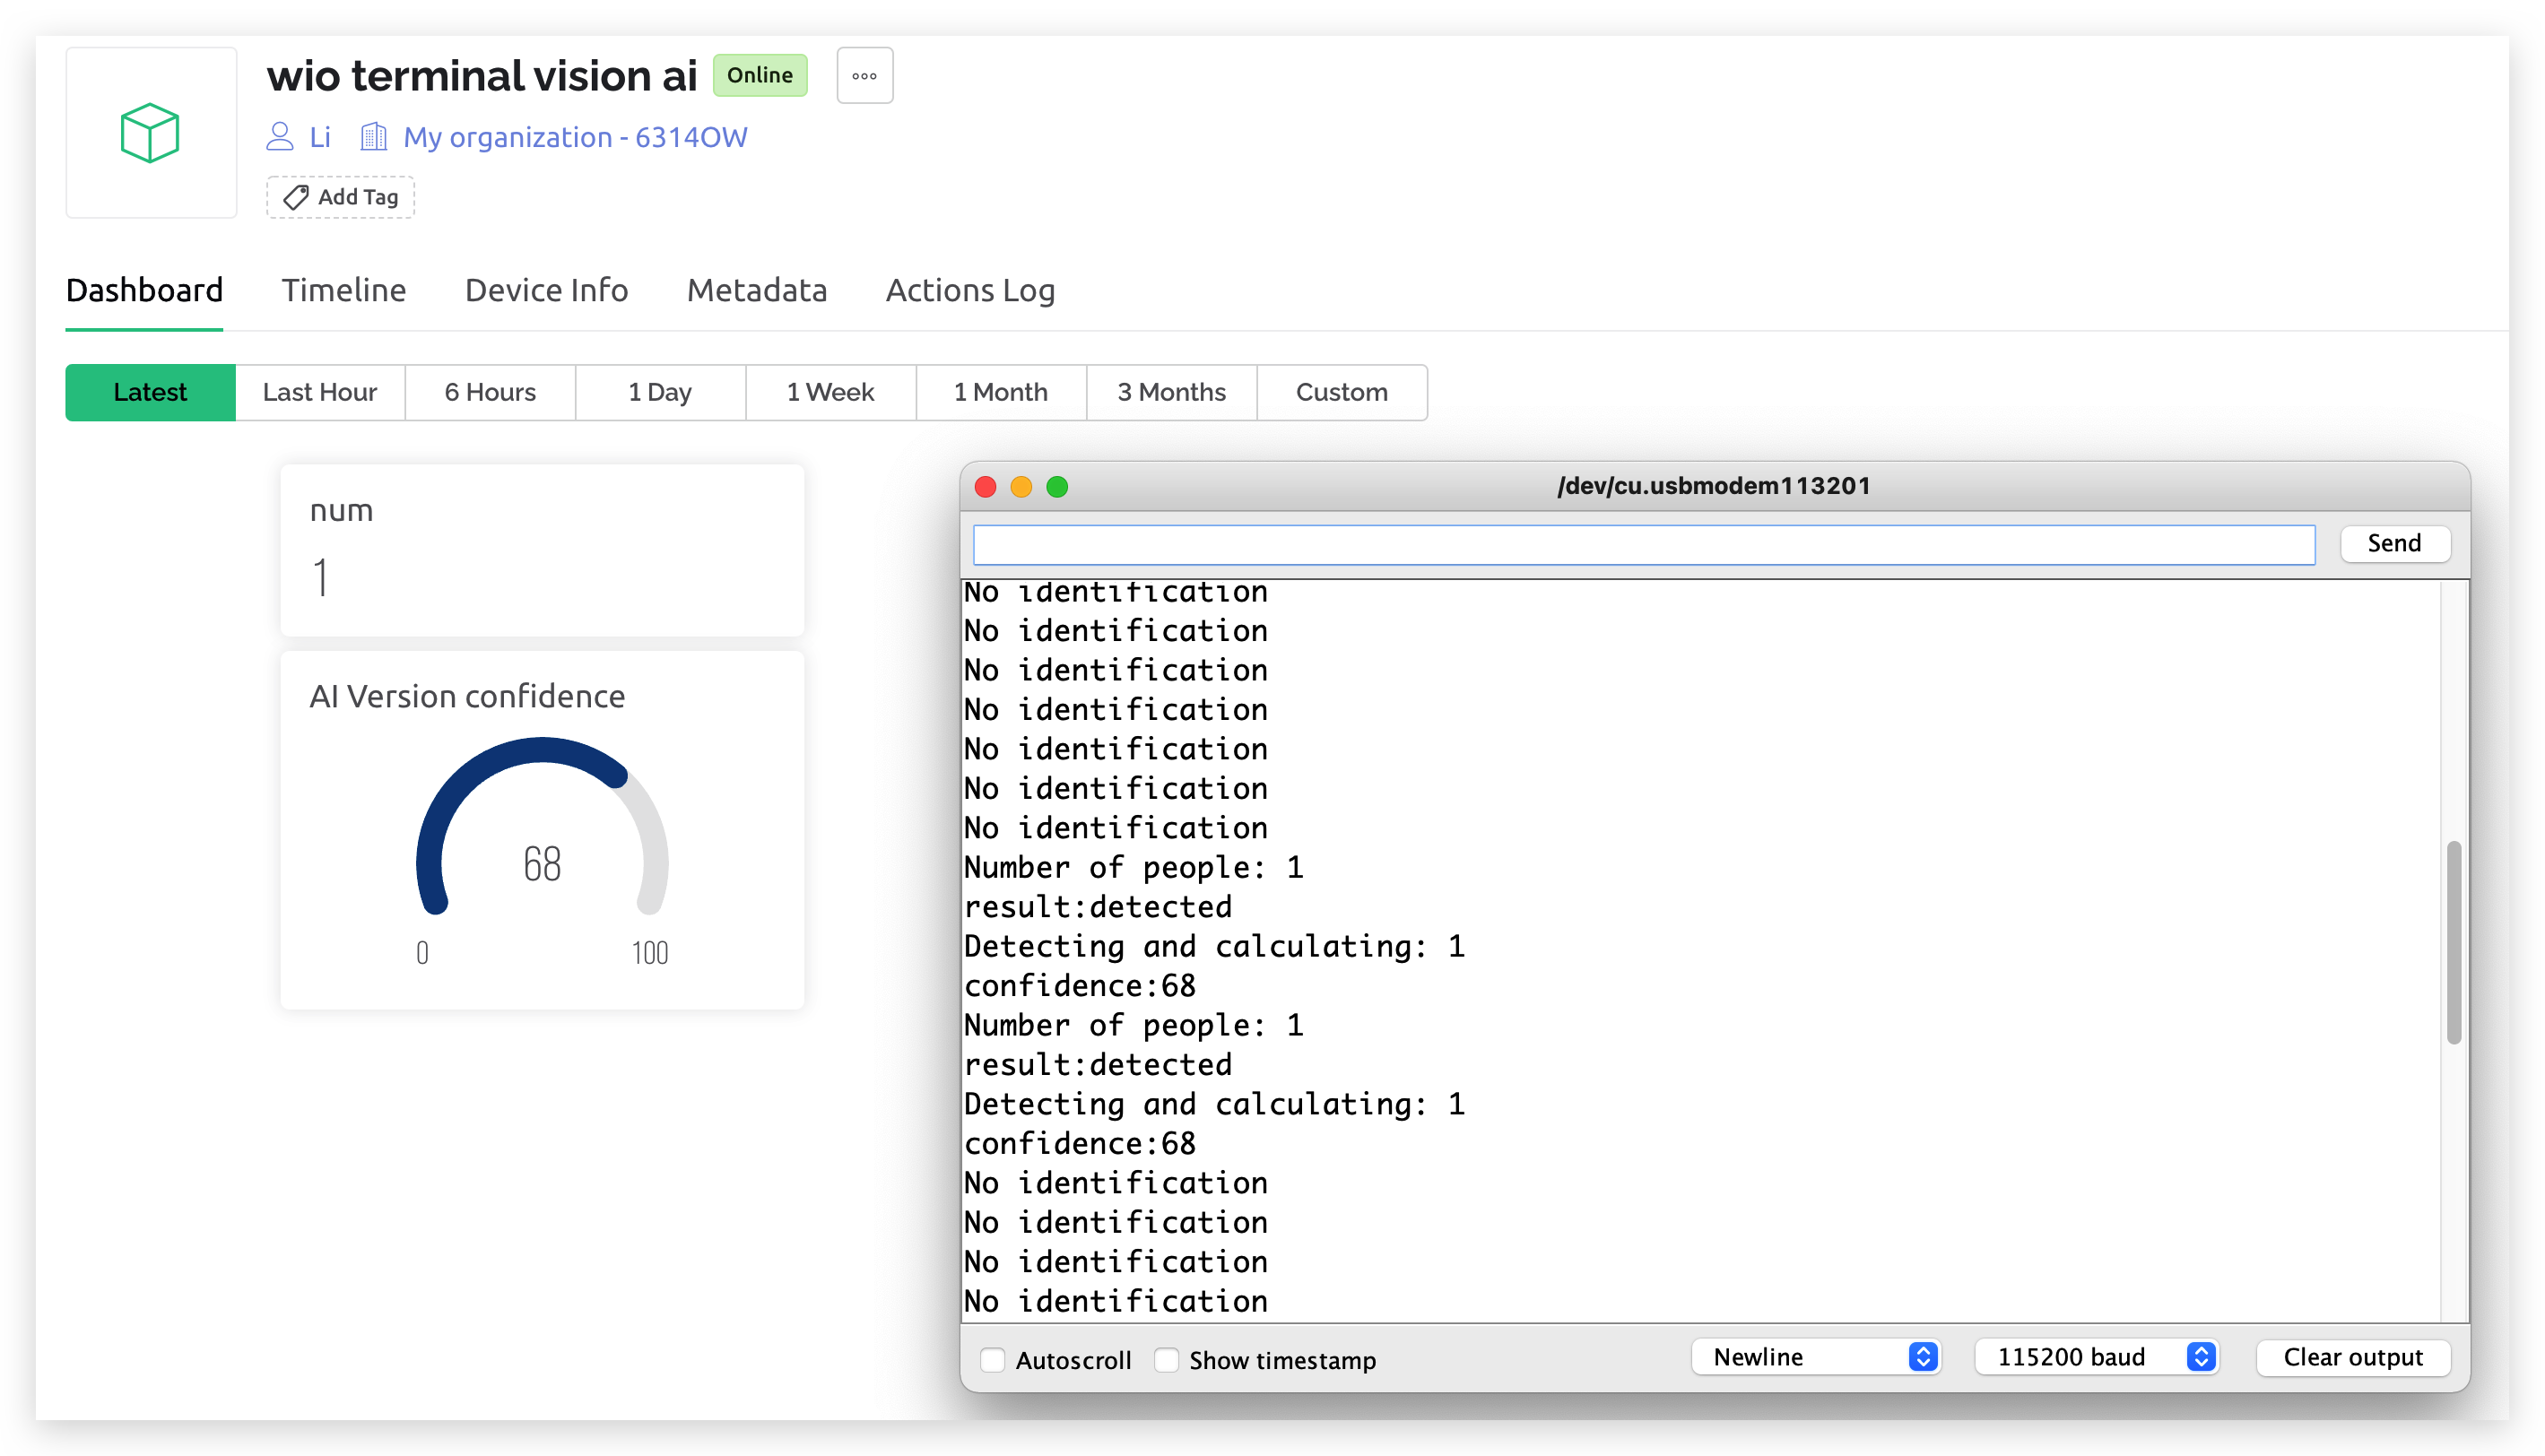
Finally, please use grove cable to connect Grove Vision AI Module and Wio Terminal's left hand side Grove port, then upload the updated firmware after step 7, then return to Blynk device console. You should see the head counting value and detection confidence value update when Grove Vision AI module has valid detection.
Using Blynk Mobile app observe live data
Blynk not only support web console dashboard to display the live sensor data, but also support view sensor data on their mobile app, however you need to complete the steps above to be able to view the data from the mobile app.
Step 1. Download Blynk APP
-
If you are using IOS devices, please download Blynk IoT.
-
If you are using Android devices, please download Blynk IoT NEW.

Step 2. Login to your account with Blynk APP
Once you have download and installed the Blynk App, please open the APP and use the same account that you have created for the web console to login, so the templates that you have created through above steps will be synced to the mobile app.
Step 3. Configure the Data dashboard on Blynk Mobile app
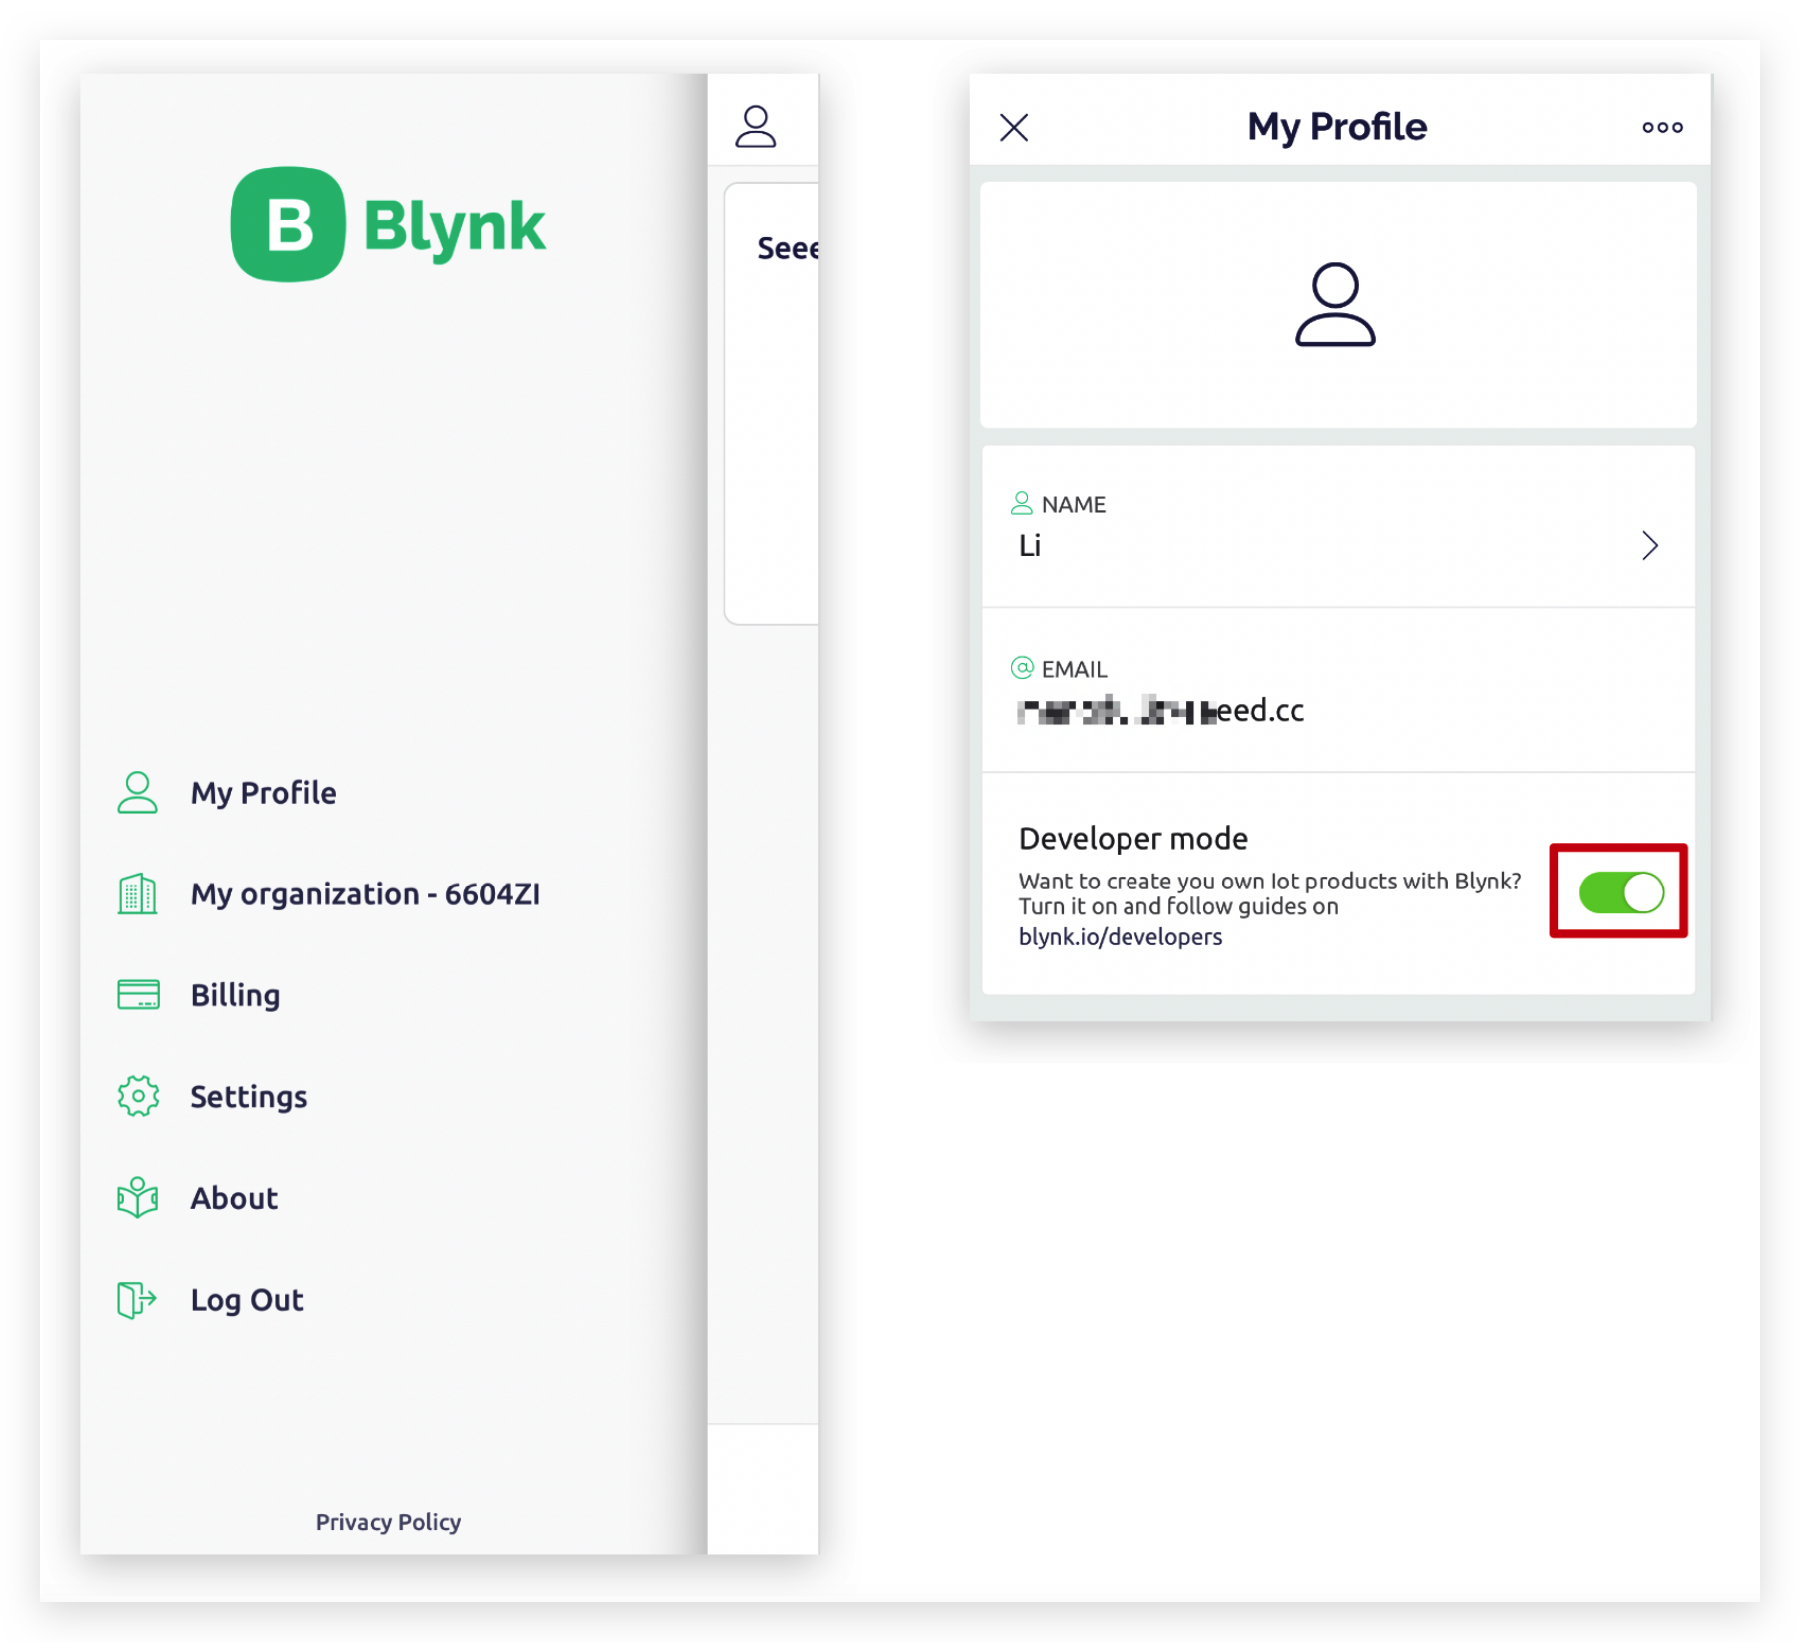
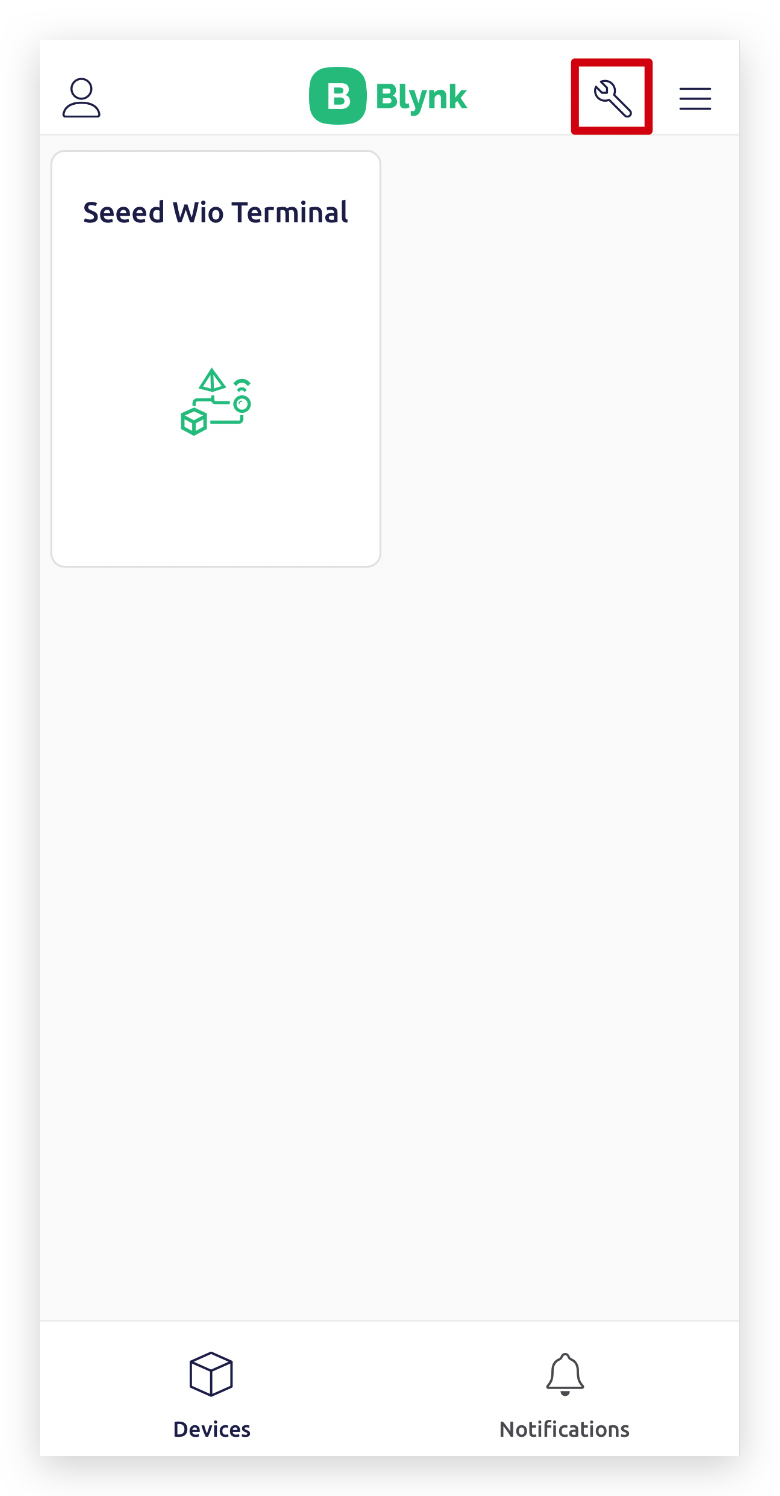
Once you have login to the APP, please swipe right and tap My Profile to go into the profile setting view, then make sure Developer Mode is enabled.
Then go back the main page, and tap wrench icon at the top right corner to enter the template setting view.
Here you could see the templates that you have created before and also the sample template from the Blynk APP.
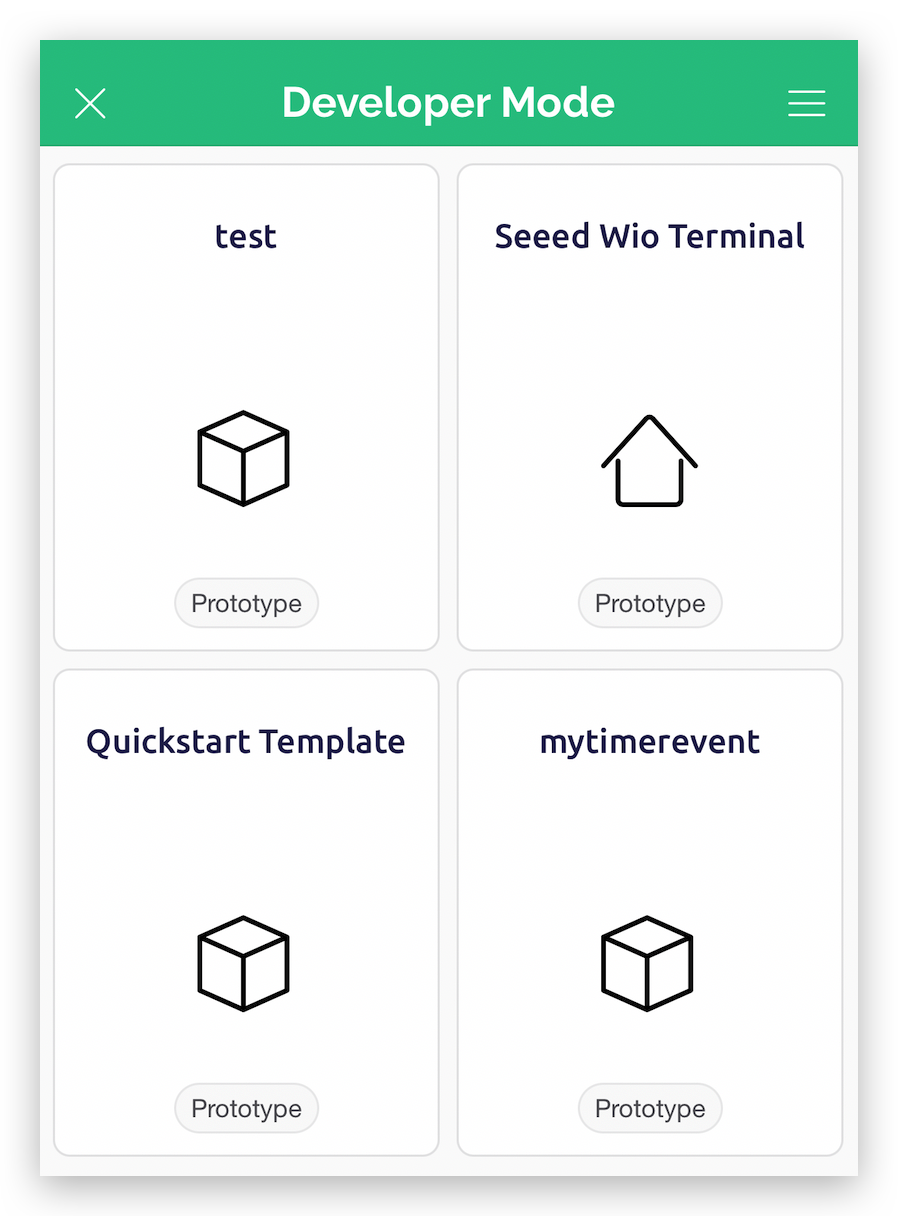
Now please tap the Seeed Wio Terminal template to enter the setting for config the mobile widget display, once you are in the template setting view, please tap the + button on the top right corner, you should see the widget box window for adding the widget.
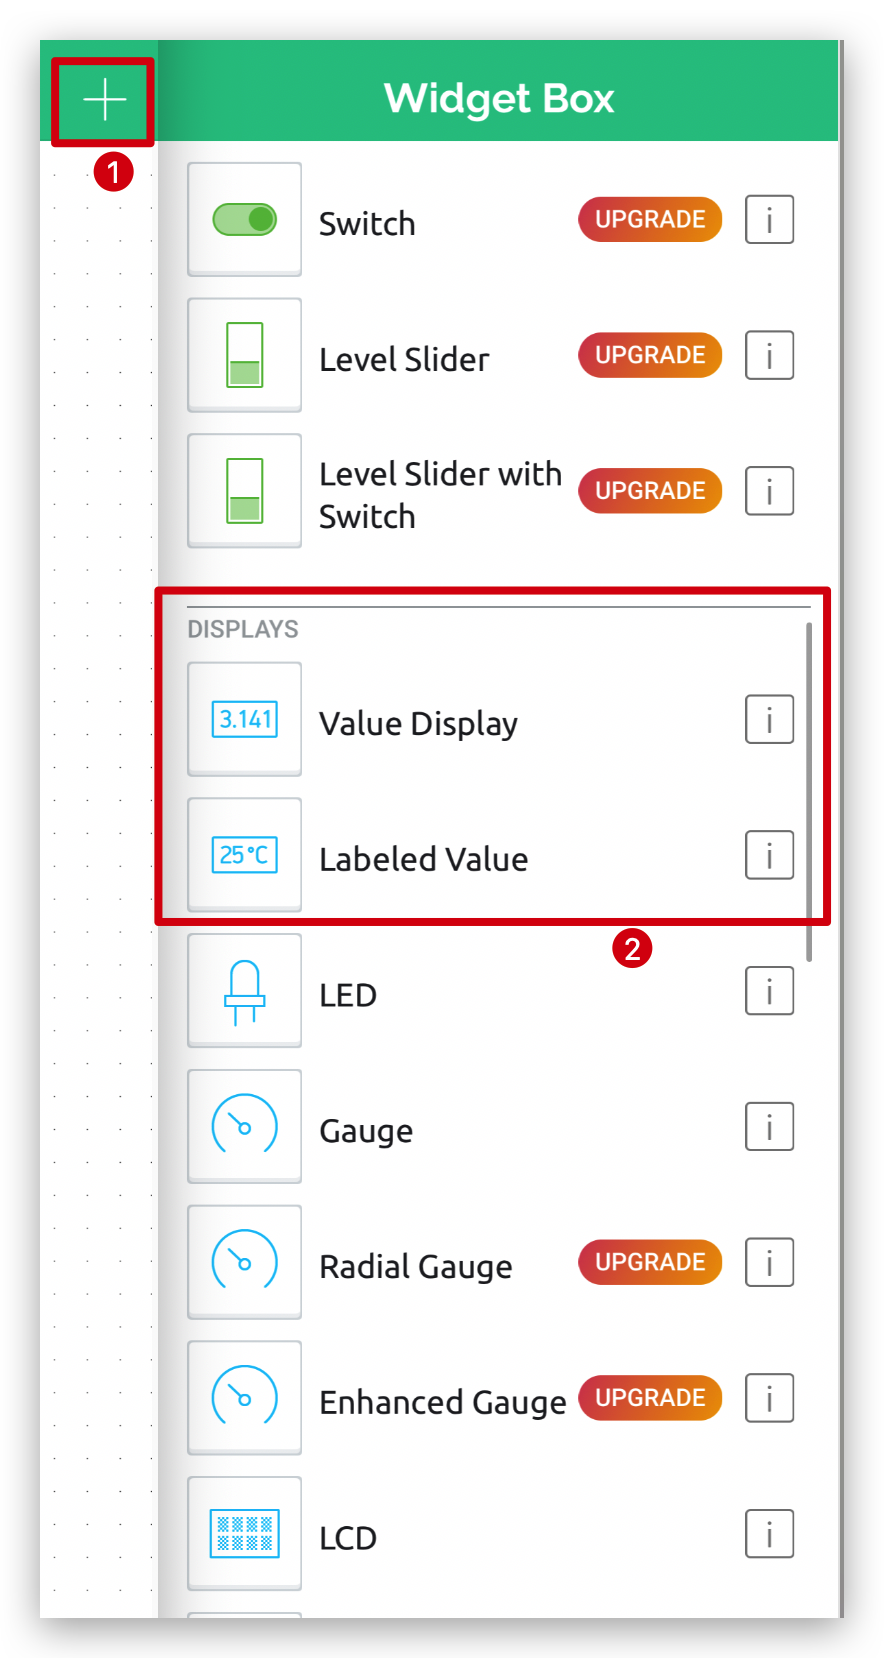
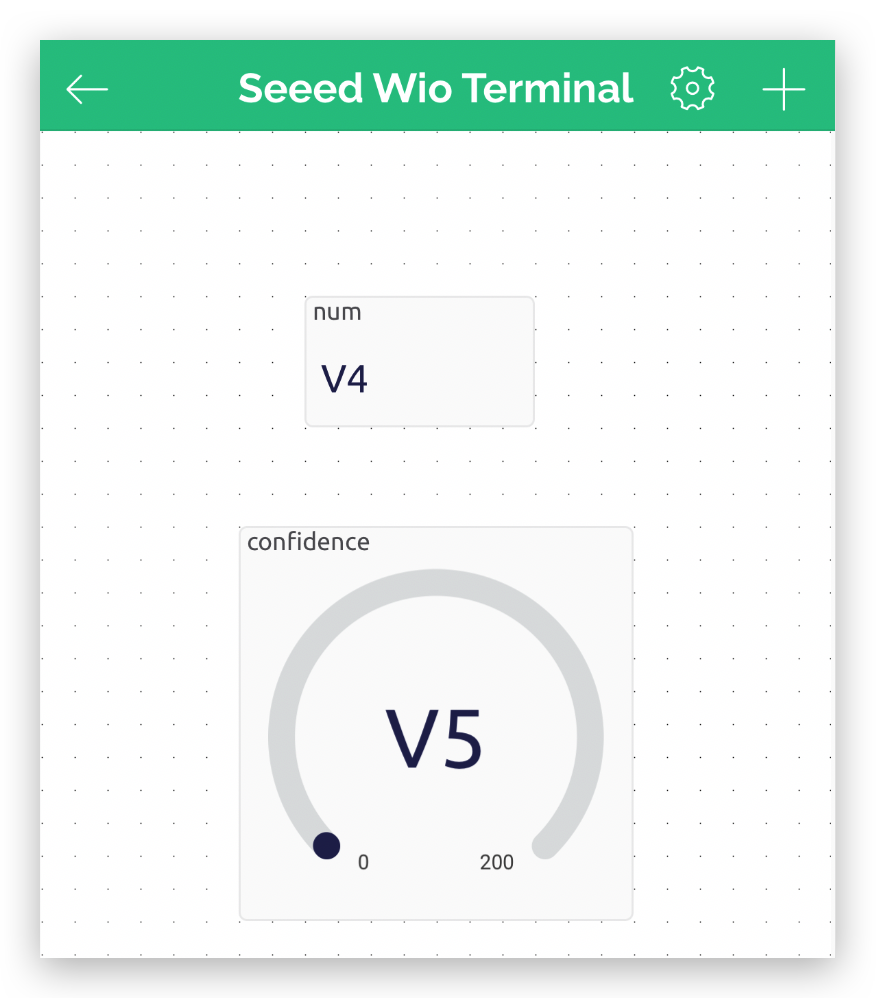
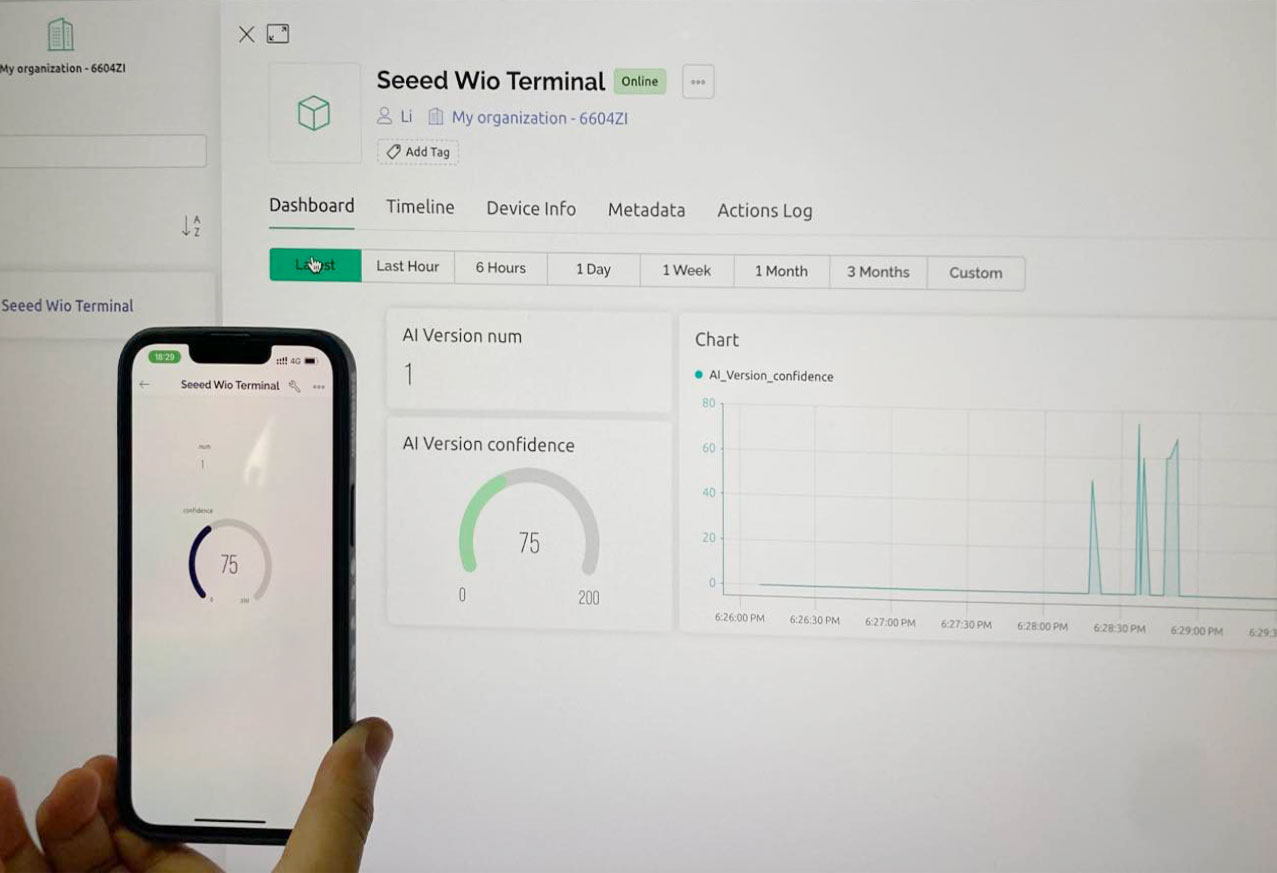
The setup step here should be similar as the setting for the web console, we choose a Value Display widget and a Labeled Value widget, then rename the them and choose the right data stream (virtual pin V4 and V5) accordingly, so the detection data collected by Wio Terminal from Grove Vision AI module should be synced and updated to both web console and mobile app continuously.
Step 4. Upload the new code and observe the outcome
Since we have upload the new code to the Wio Terminal, after the Wio Terminal connected to WIFI, the connected Wio Terminal device should show up in the Blynk mobile app, as shown below.
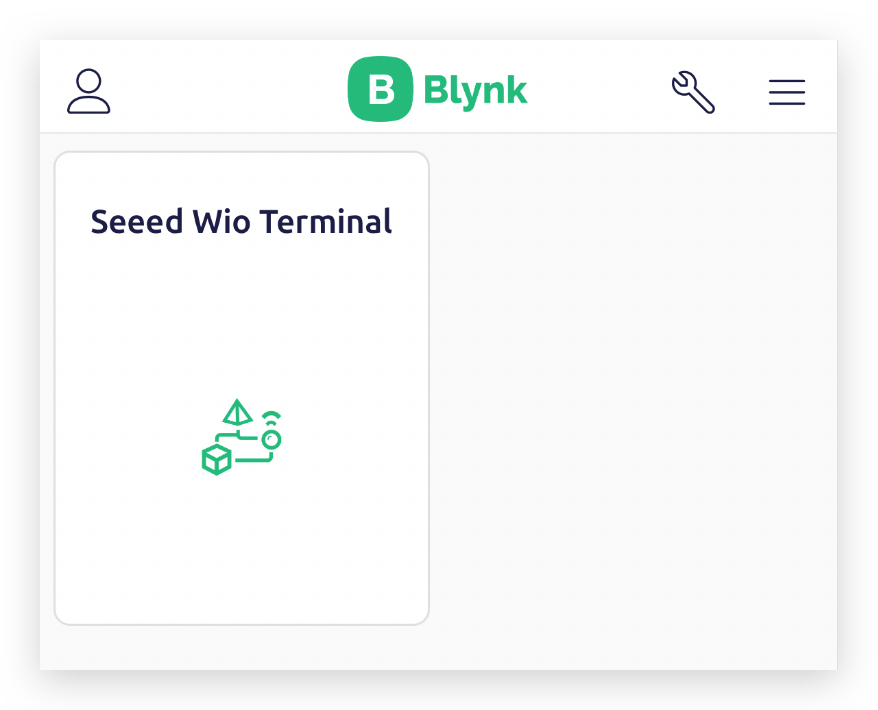
You should observe the sensor data by just simply tap into the device shown in the Blynk mobile app.
Statement
- The LoRa® Mark is a trademark of Semtech Corporation or its subsidiaries.
- LoRaWAN® is a mark used under license from the LoRa Alliance®.