XIAO 7.5inch ePaper Panel
Product Image:

Purchase Link:
Introduction
The XIAO 7.5inch ePaper Panel is a compact and efficient display solution that combines the power of XIAO ESP32C3 with a high-quality ePaper display. This gadget is designed to provide an excellent user experience with its low power consumption and crisp display quality.
Features
- Compact Design: Integrated XIAO ESP32C3 and ePaper display in a sleek 3D-printed enclosure
- Low Power Consumption: ePaper technology ensures minimal power usage
- High Display Quality: 0.75-inch ePaper display with excellent readability
- USB-C Interface: Modern and convenient connection interface
- Easy to Use: Pre-assembled and ready to use out of the box
Hardware Overview
Before everything starts, it is quite essential to have some basic parameters of the product. The following table provides information about the characteristics of XIAO 7.5inch ePaper Panel.
| Characteristic | Value | Unit |
|---|---|---|
| Operating Voltage | 3.3V | V |
| Power Consumption | <100 | mA |
| Display Resolution | 400x300 | pixels |
| Display Size | 0.75 | inch |
| Refresh Rate | 2 | s |
| USB Interface | Type-C | - |
| Dimensions | 85x45x15 | mm |
Getting Started
Equipment Installation
The XIAO 7.5inch ePaper Panel comes pre-assembled and ready to use. Simply connect it to your computer using a USB-C cable.
Environmental Preparation
Windows
- Download and install the Arduino IDE from the official website
- Install the required board support package for XIAO ESP32C3
- Install the required libraries
MacOS
- Download and install the Arduino IDE from the official website
- Install the required board support package for XIAO ESP32C3
- Install the required libraries
Boot
- Connect the XIAO 7.5inch ePaper Panel to your computer using a USB-C cable
- Open Arduino IDE
- Select the correct board and port
- Upload your code
Arduino Library Overview
If this is your first time using Arduino, we highly recommend you to refer to Getting Started with Arduino.
The library for this product is based on the Seeed Arduino LCD library. You can download it from our GitHub repository.
Function
Before we get started developing a sketch, let's look at the available functions of the library.
begin()- Initialize the ePaper displayclearDisplay()- Clear the display contentsetTextSize()- Set the text sizesetTextColor()- Set the text colordisplay()- Update the display with new content
Installation
- Method One
Since you have downloaded the zip Library, open your Arduino IDE, click on Sketch > Include Library > Add .ZIP Library. Choose the zip file you just downloaded,and if the library install correct, you will see Library added to your libraries in the notice window. Which means the library is installed successfully.

- Method Two
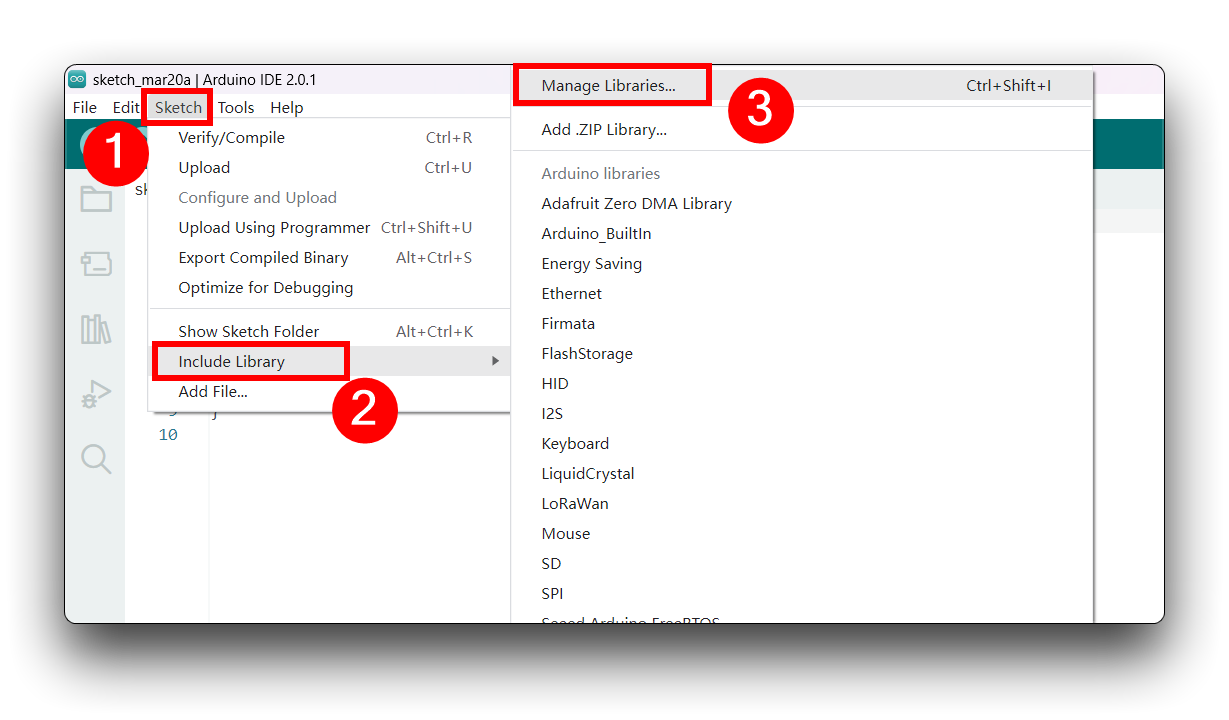
The library manager was added starting with Arduino IDE versions 1.5 and greater (1.6.x). It is found in the 'Sketch' menu under 'Include Library', 'Manage Libraries...'
Arduino / XIAO Example
Now that we have our library installed and we understand the basic functions, let's run some examples for our XIAO 7.5inch ePaper Panel to see how it behaves.
Demo 1: Basic Text Display
This example demonstrates how to display basic text on the ePaper display.
Materials Required
| Name | Quantity |
|---|---|
|  |
#include <Arduino.h>
#include <SPI.h>
#include <Seeed_Arduino_LCD.h>

Seeed_Arduino_LCD lcd;

void setup() {
  Serial.begin(115200);
  lcd.begin();
  lcd.clearDisplay();
  lcd.setTextSize(2);
  lcd.setTextColor(EPD_BLACK);
  lcd.setCursor(10, 10);
  lcd.println("Hello World!");
  lcd.display();
}

void loop() {
  // Nothing to do here
}
Troubleshooting
Display not updating
- Make sure the USB connection is stable
- Check if the correct board and port are selected in Arduino IDE
- Verify that the library is properly installed
Display showing partial content
- Ensure the display is properly initialized
- Check if the display buffer is cleared before new content
- Verify the display dimensions in your code
USB connection issues
- Try using a different USB cable
- Check if the USB port is working properly
- Ensure the correct USB drivers are installed
Resources
- [PDF] XIAO 7.5inch ePaper Panel Datasheet
- [ZIP] Arduino Library
- [STL] 3D Printing Files
Tech Support & Product Discussion
Thank you for choosing our products! We are here to provide you with different support to ensure that your experience with our products is as smooth as possible. We offer several communication channels to cater to different preferences and needs.