Configuring Web APP Visualization
Now that we have a device connected to the Helium Network as well as data flowing from the device to Helium Network to Microsoft Azure IoT Hubs, let’s start to explore how to analyze and visualize this data.
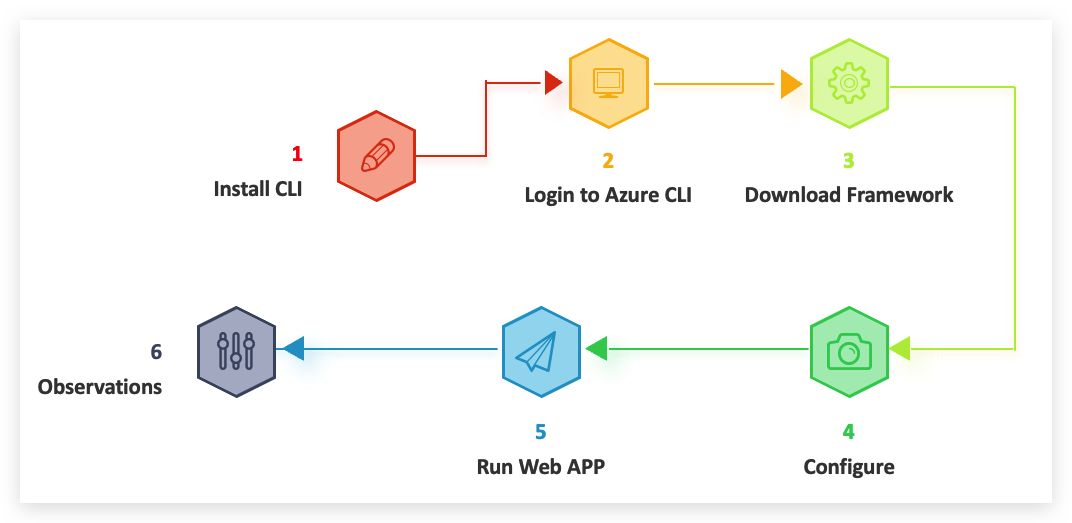
Environmental preparation
To use this routine, please download and configure Git and the Azure CLI for your computer in advance.
We will not go into the installation and configuration of Git here, but will focus on the installation of the Azure CLI for Windows and MacOS systems.
The Azure Command-Line Interface (CLI) is a cross-platform command-line tool to connect to Azure and execute administrative commands on Azure resources. It allows the execution of commands through a terminal using interactive command-line prompts or a script.
For interactive use, you first launch a shell such as cmd.exe on Windows, or Bash on Linux or macOS, and then issue a command at the shell prompt. To automate repetitive tasks, you assemble the CLI commands into a shell script using the script syntax of your chosen shell, and then you execute the script.
install -Windows
For Windows, the Azure CLI is installed via a MSI, which gives you access to the CLI through the Windows Command Prompt (CMD) or PowerShell. When installing for Windows Subsystem for Linux (WSL), packages are available for your Linux distribution.
The current version of the Azure CLI is 2.37.0. For information about the latest release, see the release notes. To find your installed version and see if you need to update, run az version.
You can also install the Azure CLI using PowerShell. Start PowerShell as administrator and run the following command:
PowerShell must be run as administrator.
Start PowerShell as administrator and run the following command:
$ProgressPreference = 'SilentlyContinue'; Invoke-WebRequest -Uri https://aka.ms/installazurecliwindows -OutFile .\AzureCLI.msi; Start-Process msiexec.exe -Wait -ArgumentList '/I AzureCLI.msi /quiet'; rm .\AzureCLI.msi
This will download and install the latest version of the Azure CLI for Windows. If you already have a version installed, the installer will update the existing version.
To install specific version, replace the -Uri argument with https://azcliprod.blob.core.windows.net/msi/azure-cli-<version>.msi with version segment changed. Available versions can be found at Azure CLI release notes.
After the installation is complete, you will need to reopen PowerShell to use the Azure CLI.
You can now run the Azure CLI with the az command from either Windows Command Prompt or PowerShell.
install -MacOS
For the macOS platform, you can install the Azure CLI with homebrew package manager. Homebrew makes it easy to keep your installation of the CLI update to date. The CLI package has been tested on macOS versions 10.9 and later.
The current version of the Azure CLI is 2.34.1. For information about the latest release, see the release notes. To find your installed version and see if you need to update, run az version.
You can install the Azure CLI on macOS by updating your brew repository information, and then running the install command:
brew update && brew install azure-cli
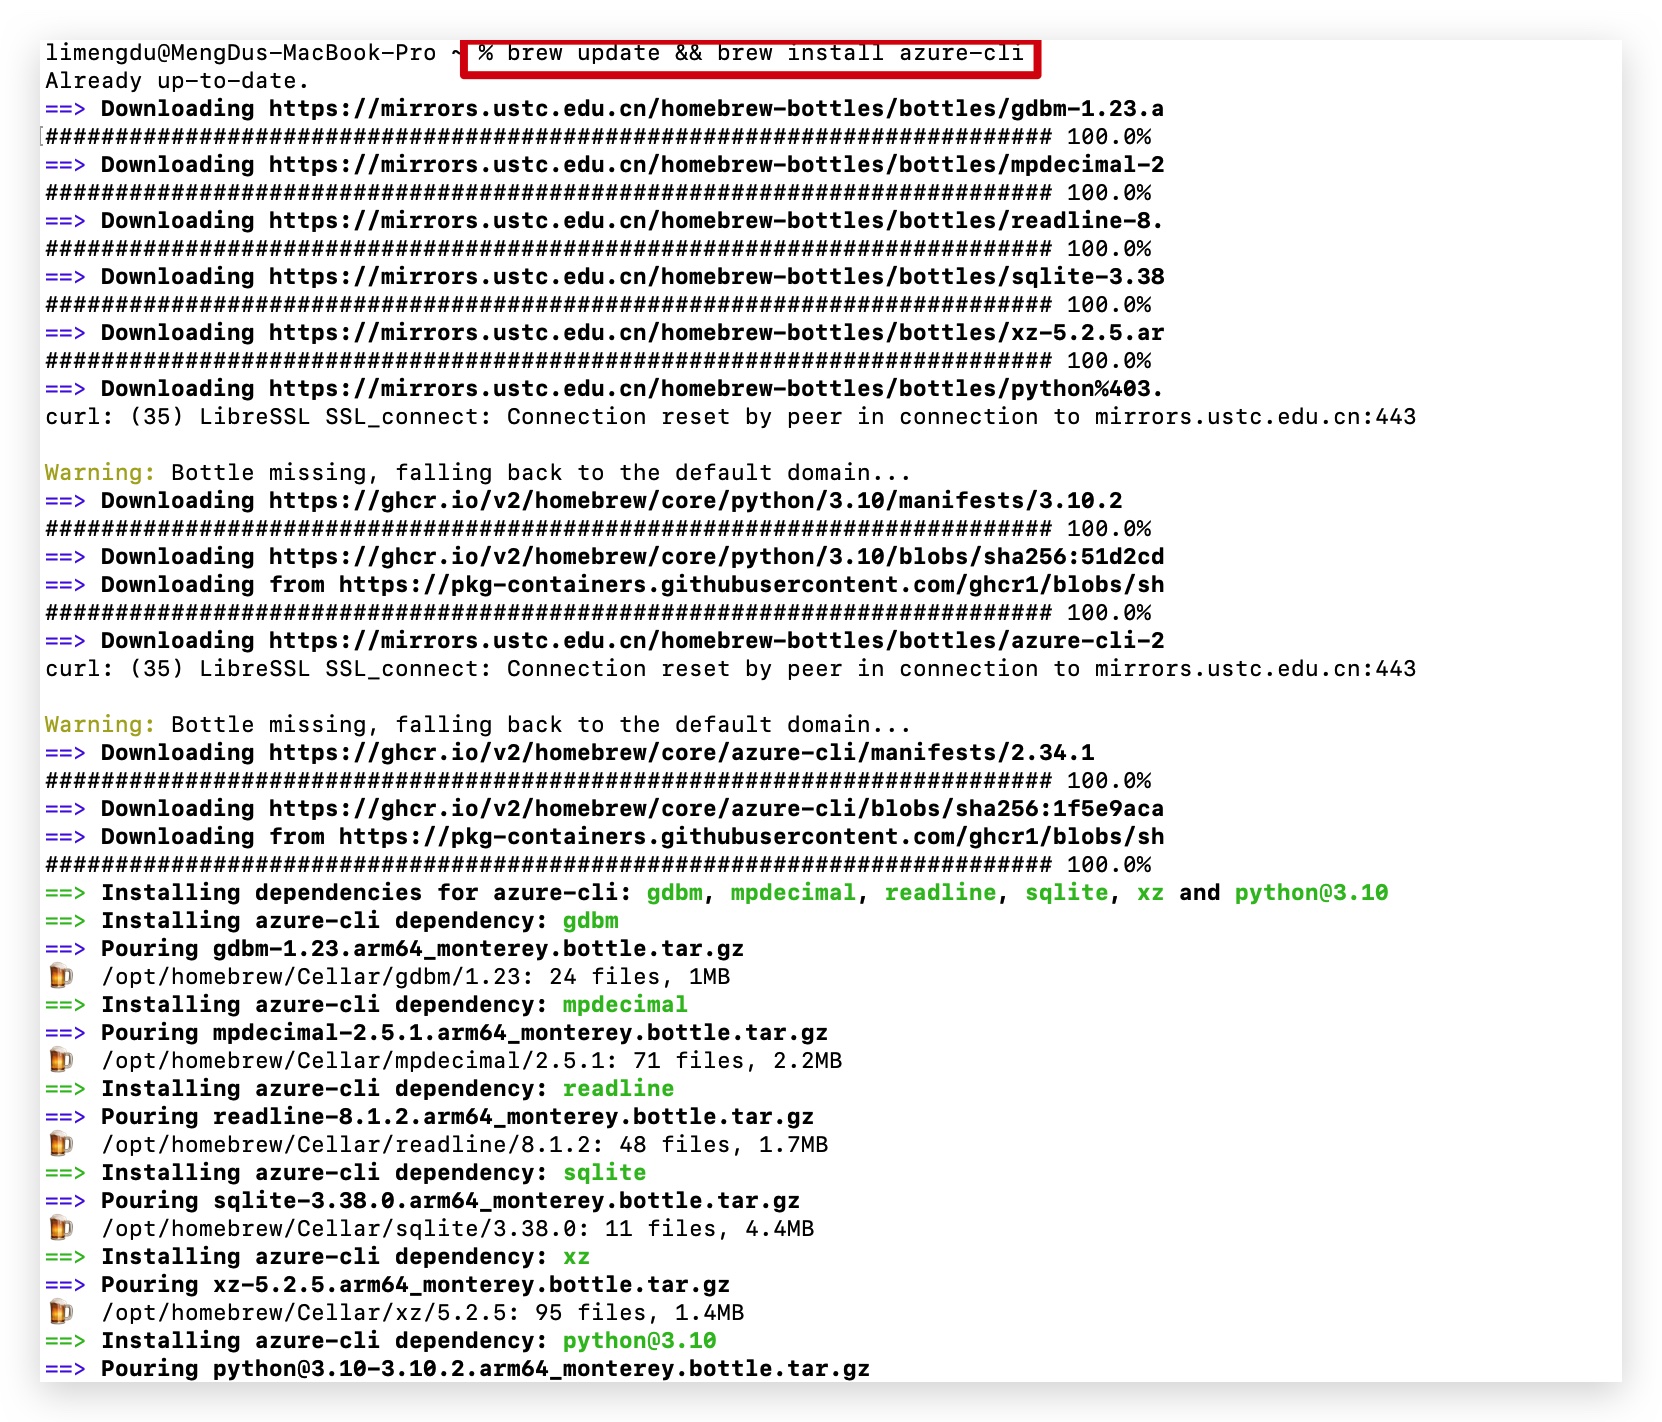
The Azure CLI has a dependency on the Homebrew [email protected] package, and will install it.
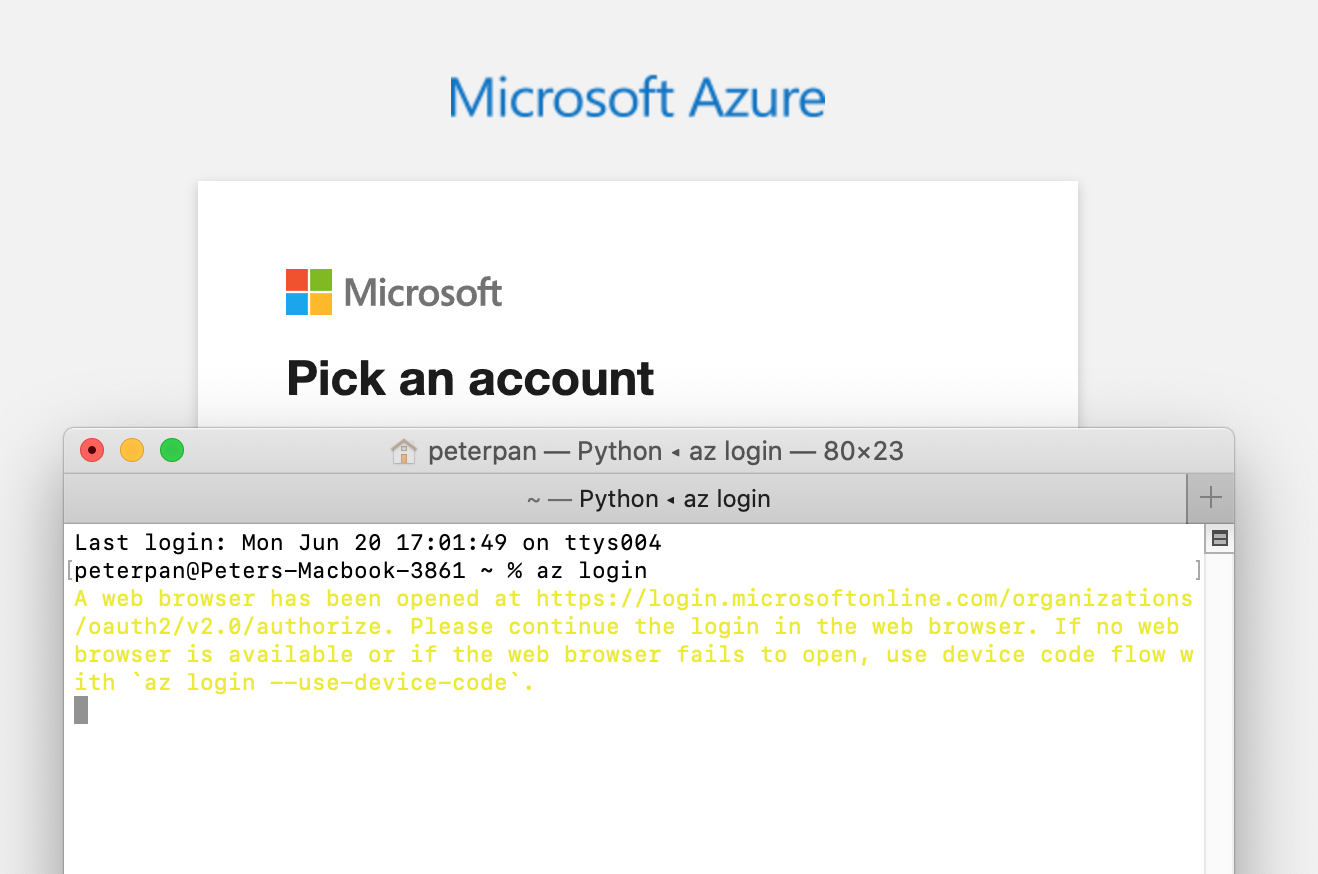
Login to Microsoft Azure CLI
When you first use Microsoft Azure CLI on your computer, you will first need to log in to the IoT hubs and type az login in the command window to bring up the login window. At this point, please complete the login operation.
If the CLI can open your default browser, it will initiate authorization code flow and open the default browser to load an Azure sign-in page.
Otherwise, it will initiate device code flow and tell you to open a browser page at https://aka.ms/devicelogin and enter the code displayed in your terminal.
Sign in with your account credentials in the browser.
Connecting Microsoft Azure CLI to Microsoft Azure IoT Hub
Consumer groups provide independent views into the event stream that enable apps and Azure services to independently consume data from the same Event Hub endpoint. In this section, you add a consumer group to your IoT hub's built-in endpoint that the Web APP will use to read data from.
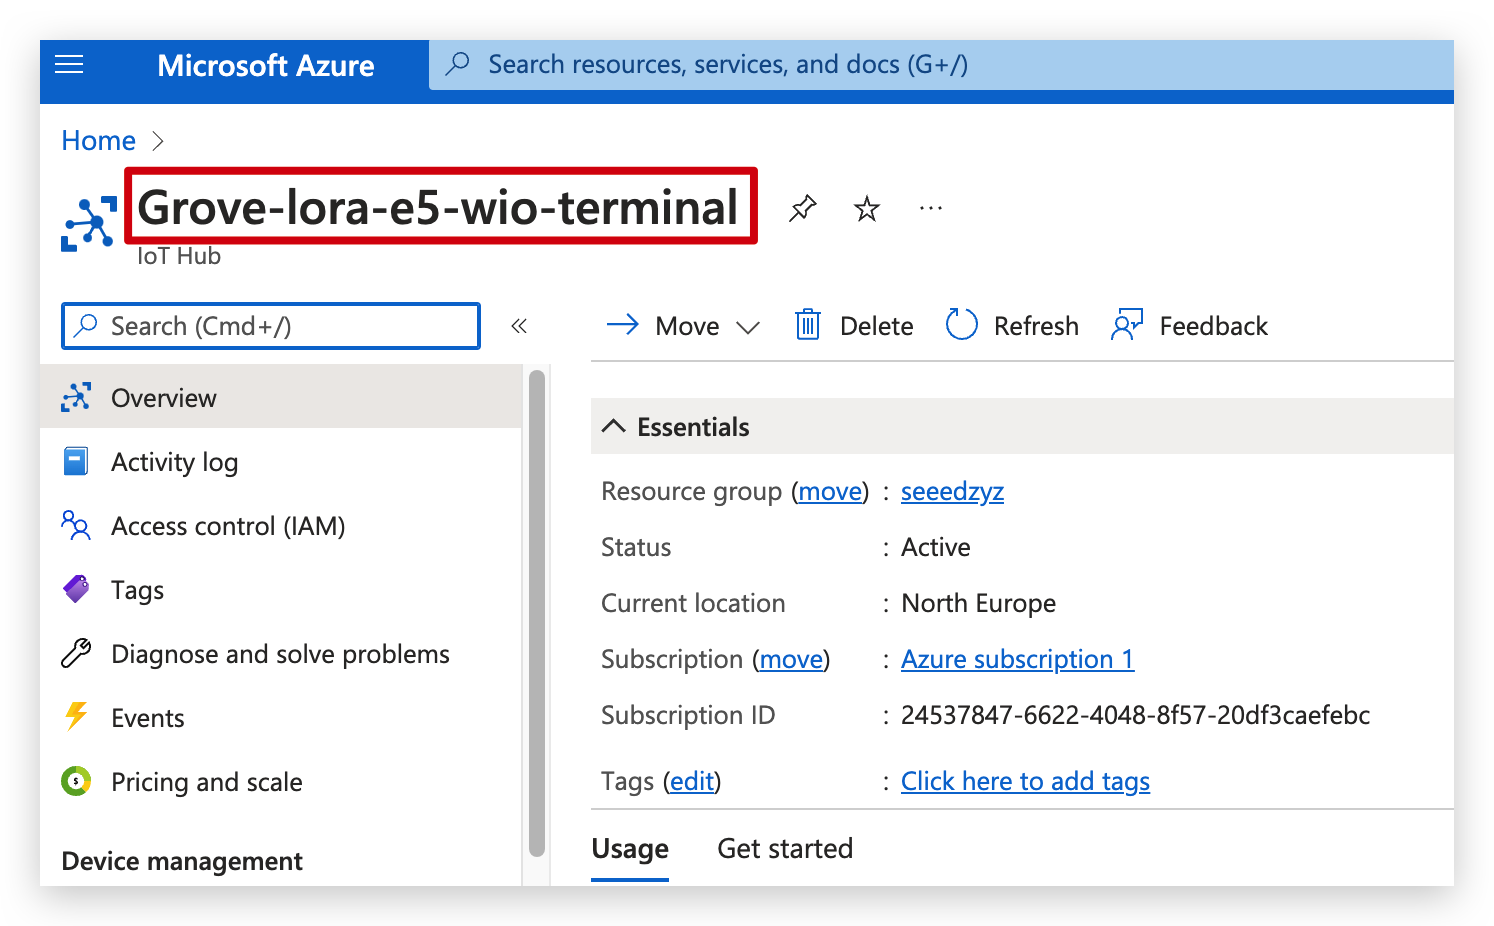
IoT hubs are created with several default access policies. One such policy is the service policy, which provides sufficient permissions for a service to read and write the IoT hub's endpoints. Run the following command to get a connection string for your IoT hub that adheres to the service policy:
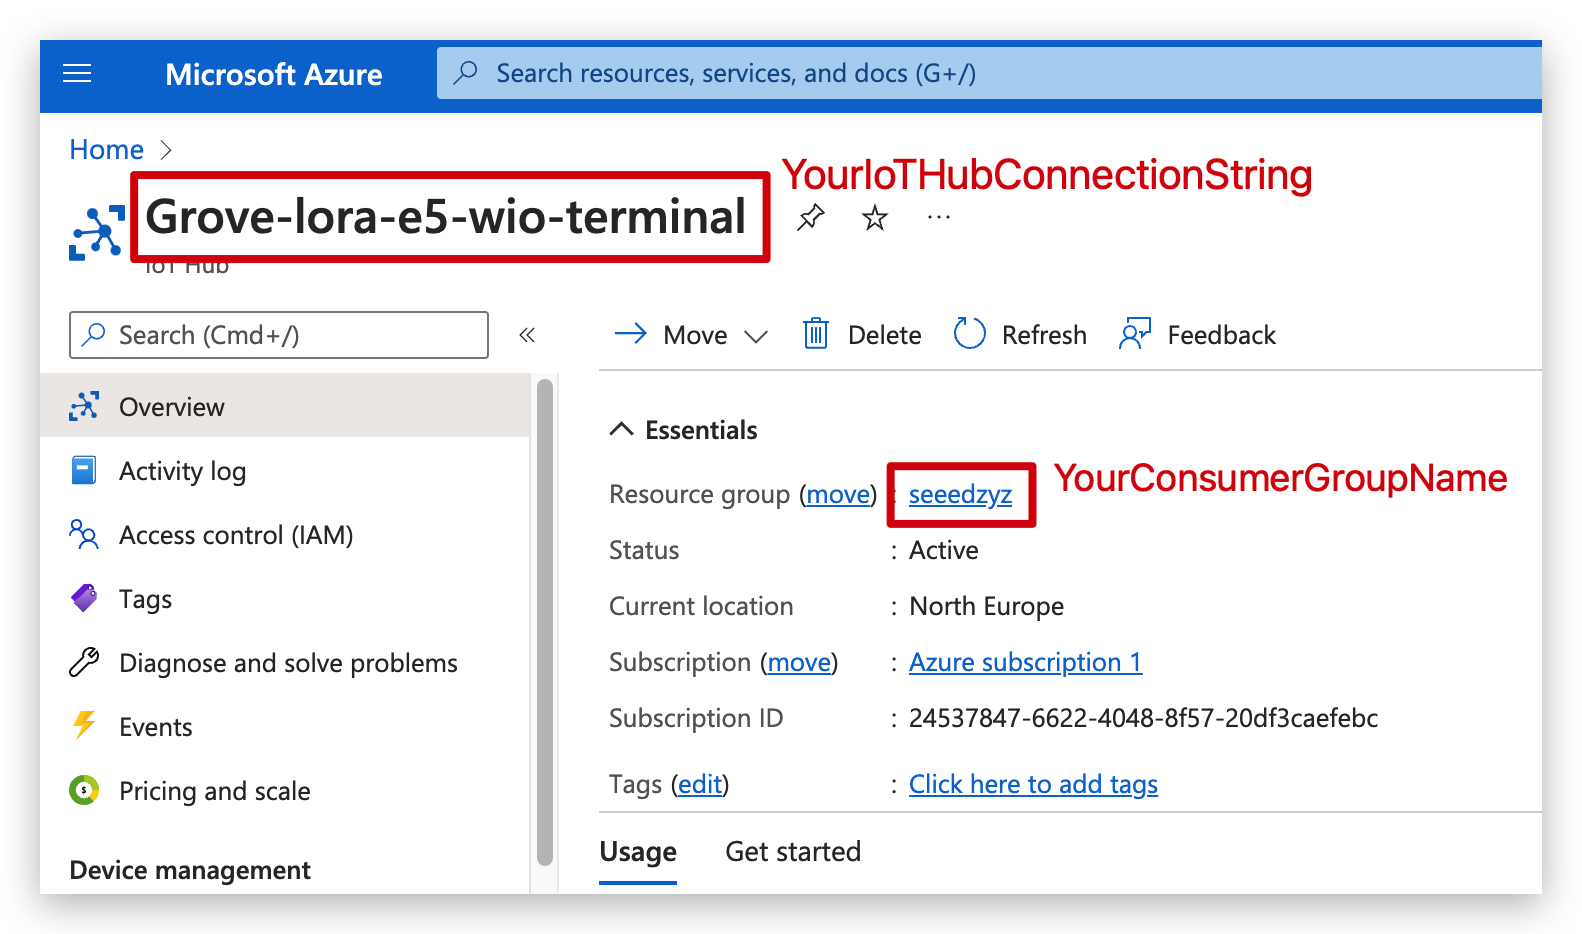
az iot hub connection-string show --hub-name ${YourIotHub} --policy-name service
Where the environment variable ${YourIotHub} indicates the name of your Azure IoT Hub, as shown below.
The connection string should look similar to the following:
"HostName={YourIotHubName}.azure-devices.net;SharedAccessKeyName=service;SharedAccessKey={YourSharedAccessKey}"

Note down the service connection string, you'll need it later in this tutorial.
If for some reason you are unable to install Azure CLI on your computer, you may consider running bash with the Azure CLI environment directly from the IoT hubs panel to help you with the next steps.
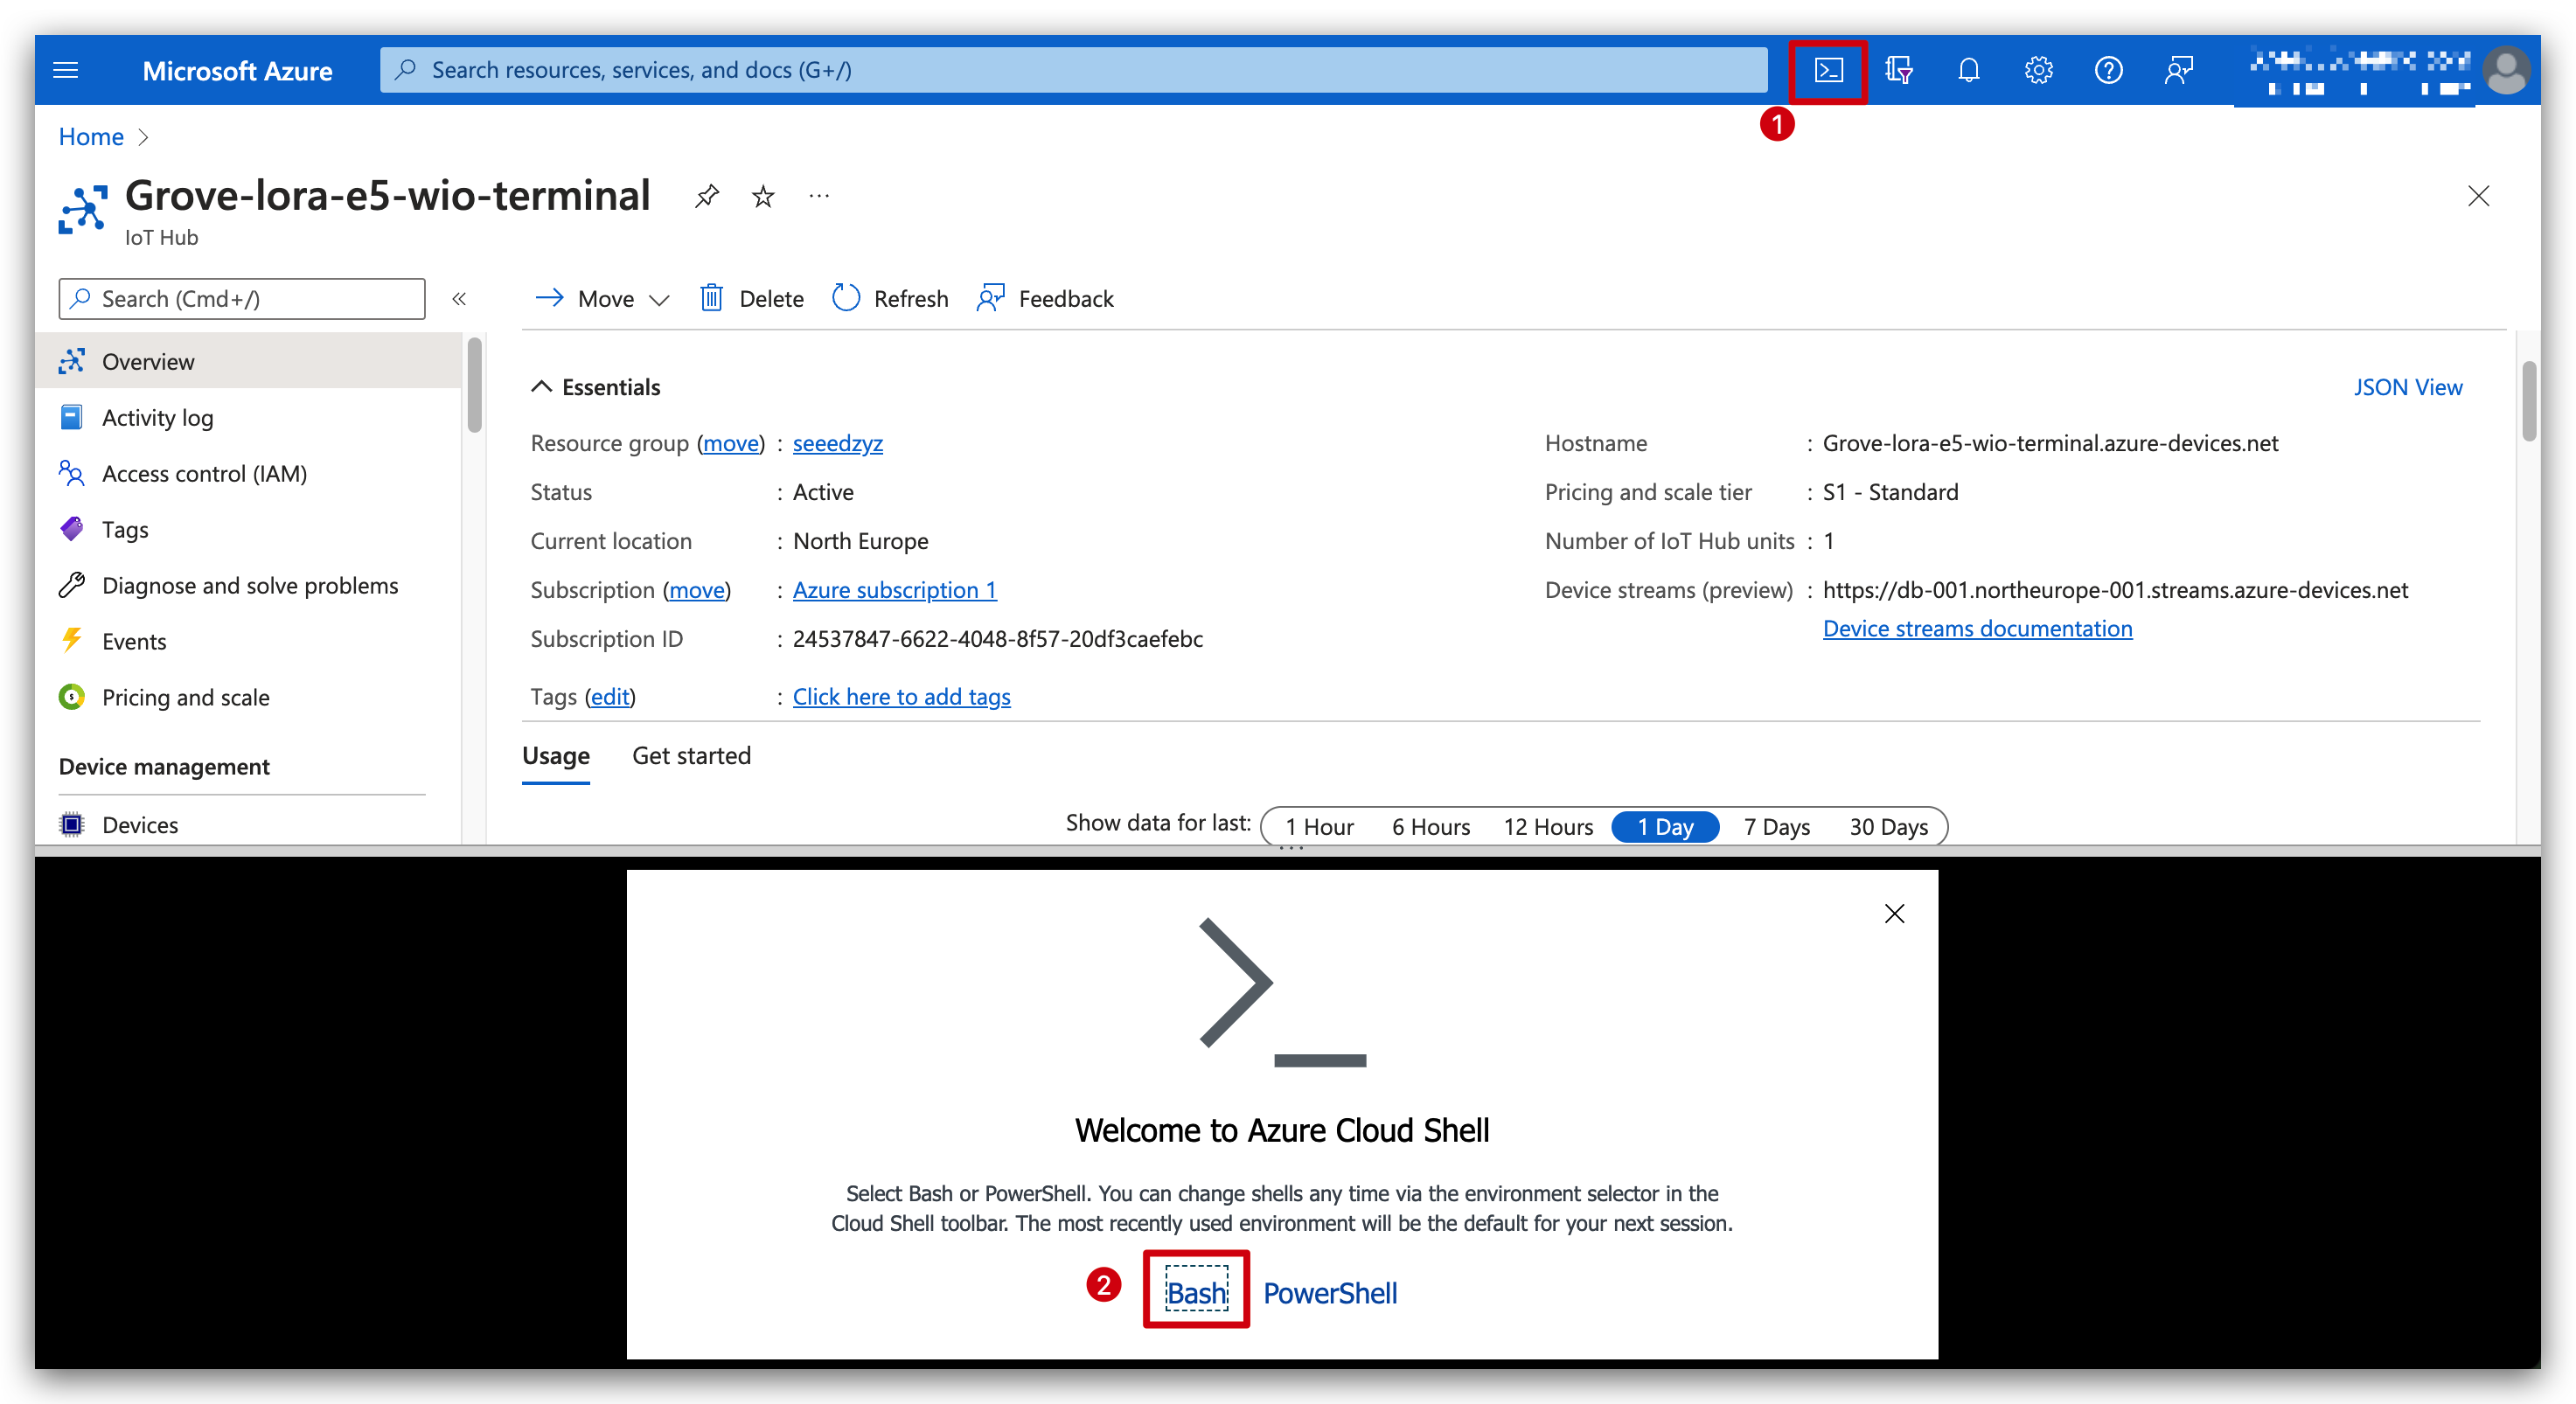
You can enter the above az command directly here to get the connection string.

Download Web APP Service Framework
Please download the corresponding library according to the type of sensor you want to use.
| Sensor Type | Download Address |
|---|---|
| Wio Terminal built-in light sensor | Download |
| Wio Terminal built-in IMU sensor | Download |
| Soil Moisture Sensor | Download |
| VOC and eCO2 Gas Sensor (SGP30) | Download |
| Temp&Humi Sensor (SHT40) | Download |
| Vision AI Module | Download |
Open the Web APP library in your favorite editor. The following shows the file structure viewed in VS Code:

Take a moment to examine the following files:
-
Chart-device-data.js is a client-side script that listens on the web socket, keeps track of each DeviceId, and stores the last 50 points of incoming data for each device. It then binds the selected device data to the chart object.
-
Index.html handles the UI layout for the web page and references the necessary scripts for client-side logic.
-
Event-hub-reader.js is a service-side script that connects to the IoT hub's built-in endpoint using the specified connection string and consumer group. It extracts the DeviceId and EnqueuedTimeUtc from metadata on incoming messages and then relays the message using the callback method registered by server.js.
-
Server.js is a service-side script that initializes the web socket and the Event Hub wrapper class. It provides a callback to the Event Hub wrapper class that the class uses to broadcast incoming messages to the web socket.
Configure environment variables for Web APP
To read data from your IoT hub, the Web APP needs your IoT hub's connection string and the name of the consumer group that it should read through. It gets these strings from the process environment in the following lines in server.js:
const iotHubConnectionString = process.env.IotHubConnectionString;
const eventHubConsumerGroup = process.env.EventHubConsumerGroup;
There will be two methods for this step, so let's start with the more common one.
- The first method. Set the environment variables in your command window with the following commands. Replace the placeholder values with the service connection string for your IoT hub and the name of the consumer group you created previously. Don't quote the strings.
set IotHubConnectionString = YourIoTHubConnectionString
set EventHubConsumerGroup = YourConsumerGroupName
- In the second method, we can make changes directly in the code. It would be suitable for cases where, for example, adding environment variables is tedious under MacOS.
Please open the server.js file with an editor and modify the code according to the name of the consumer group you created and the connection string we got in step2. Refer to the following figure for the modification.

Run the Web APP
Please upload the code according to the previous wiki content. Make sure that your device is running and sending data.
In the command window, run the following lines to download and install referenced packages and start the website:
npm install
npm start
You should see output in the console that indicates that the Web APP has successfully connected to your IoT hub and is listening on port 3000:

Open a web page to see data from Azure IoT hub
Open a browser to http://localhost:3000.
In the list selection box in the upper left corner, select your device ID number. Wait until the next set of data sent arrives and you can observe the line graph of data changes.
Light sensor live image display

You should also see output in the console that shows the messages that your Web APP is broadcasting to the browser client:

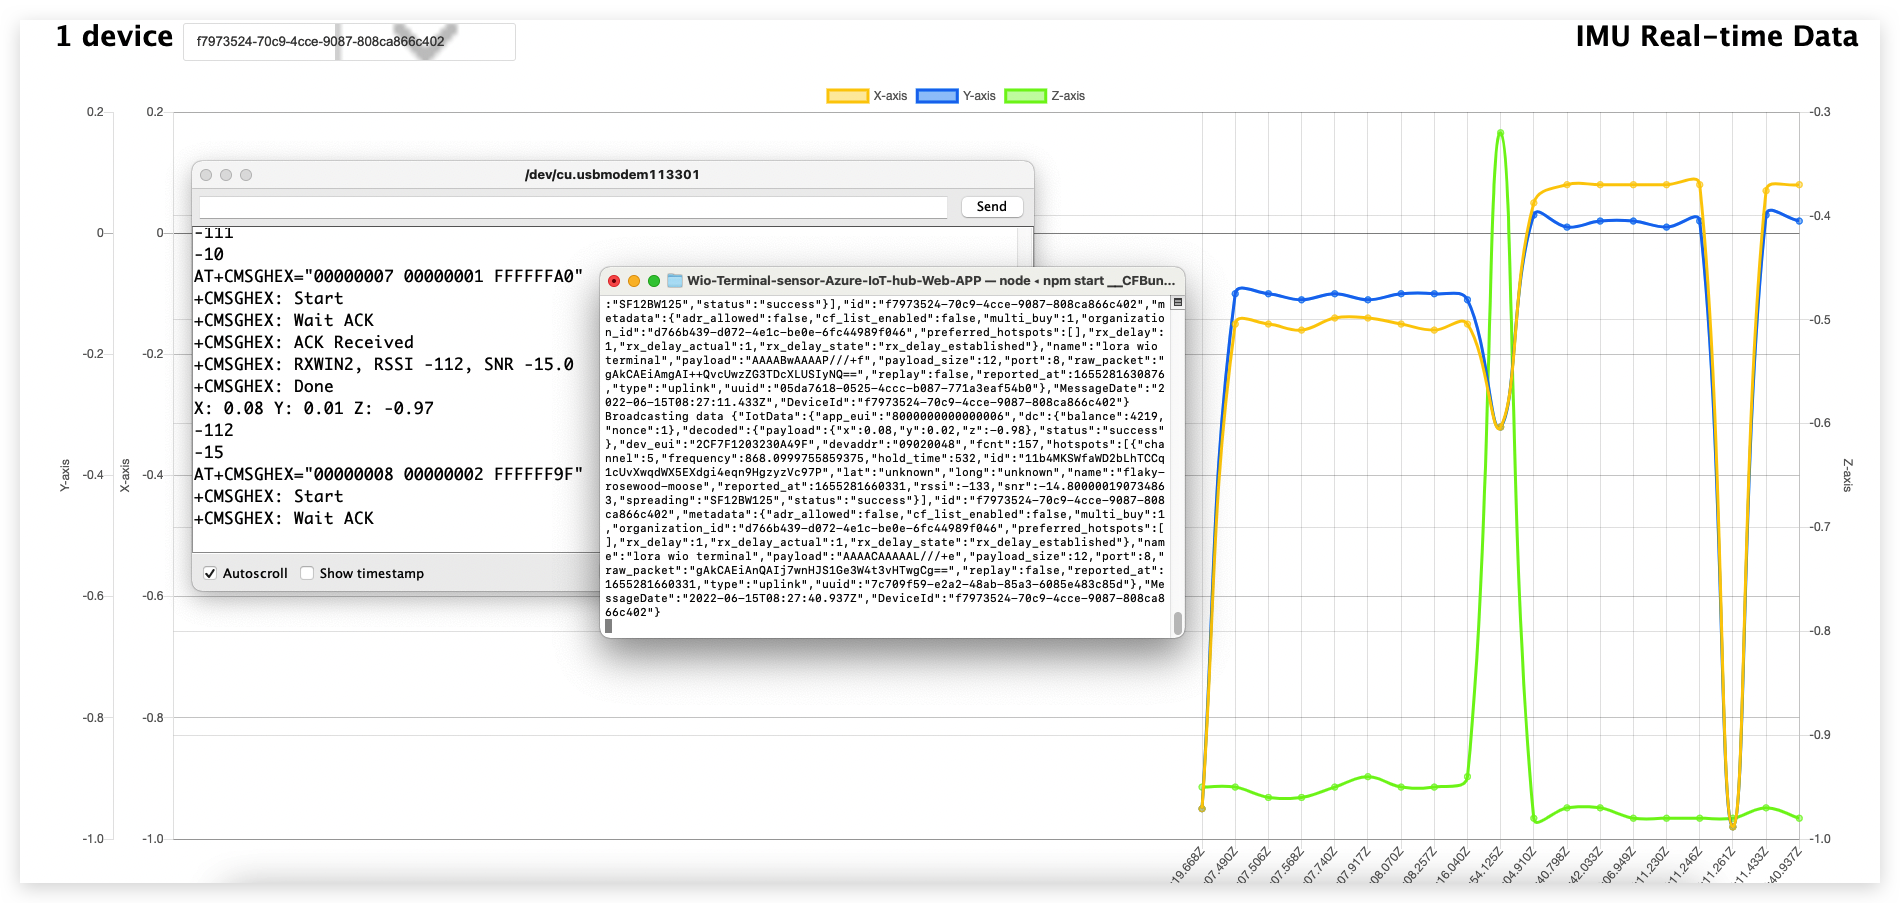
IMU sensor live image display
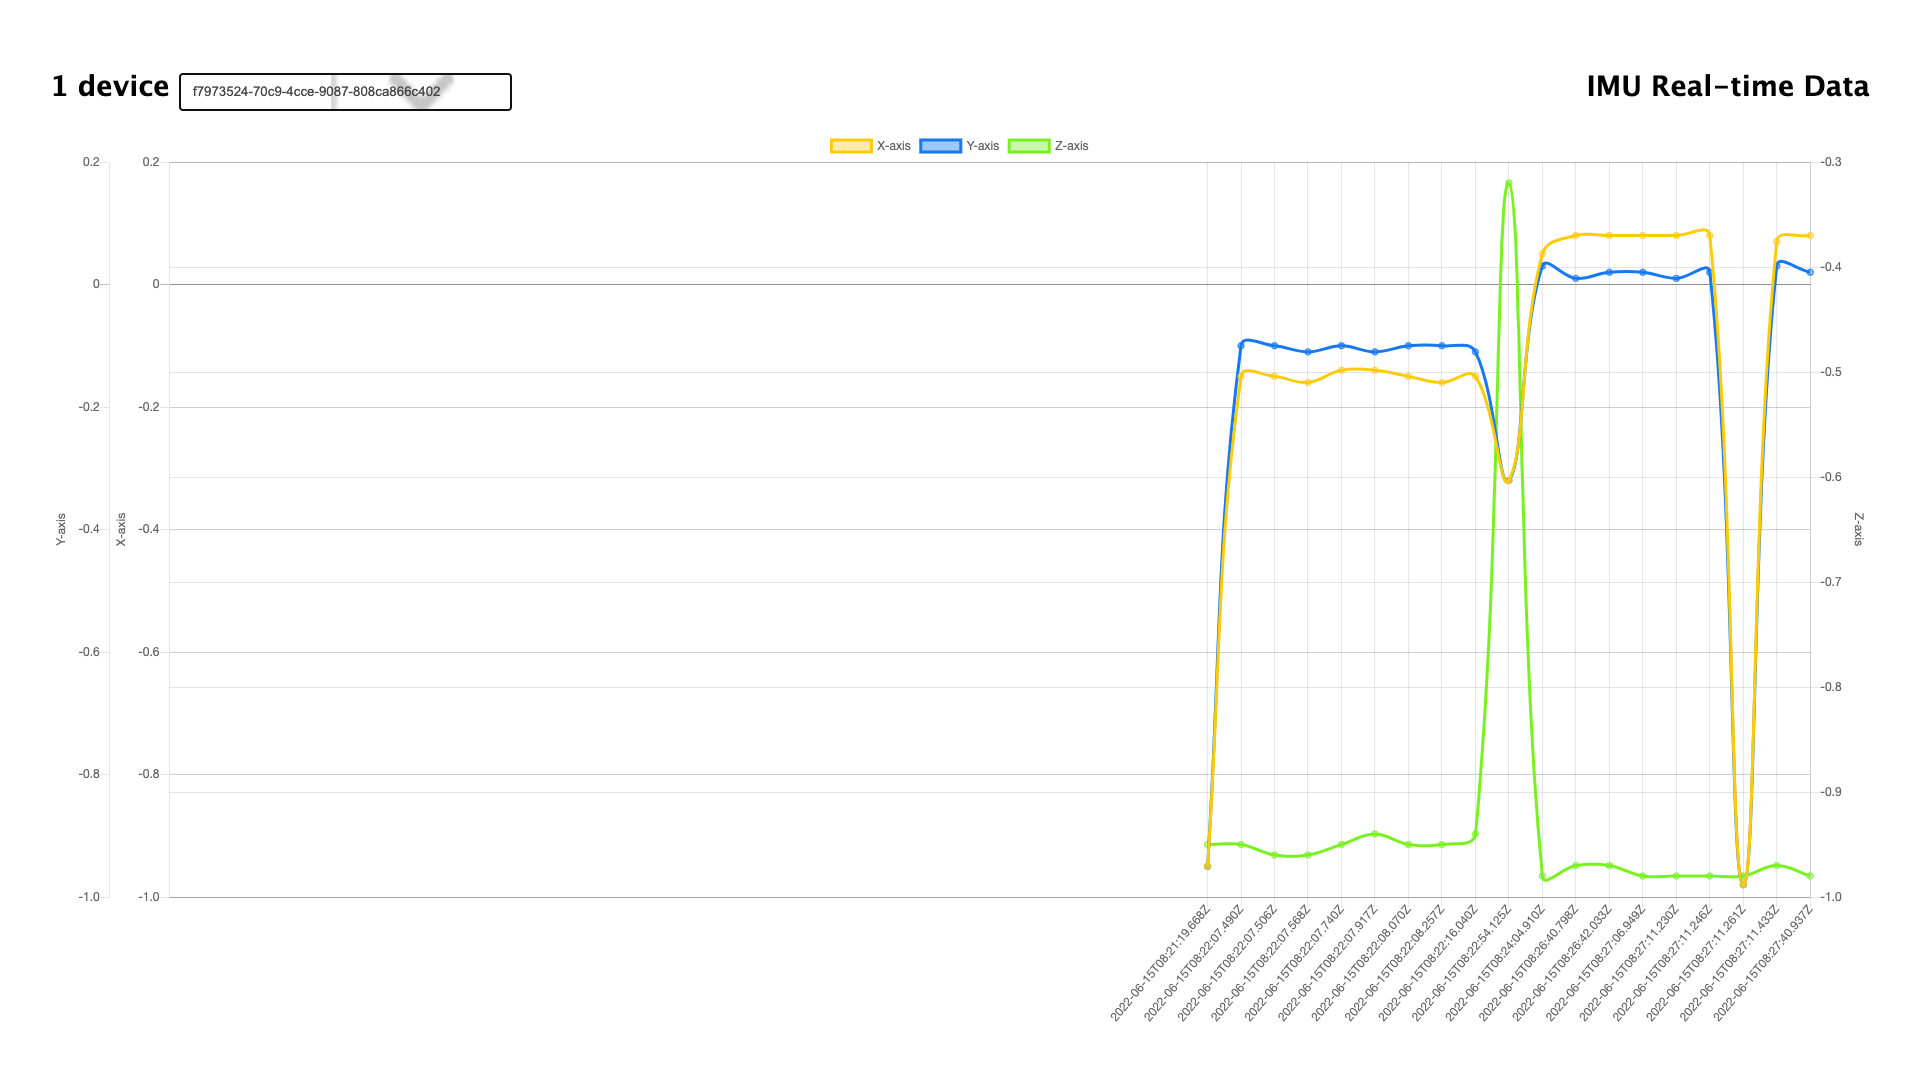
You should also see output in the console that shows the messages that your Web APP is broadcasting to the browser client:
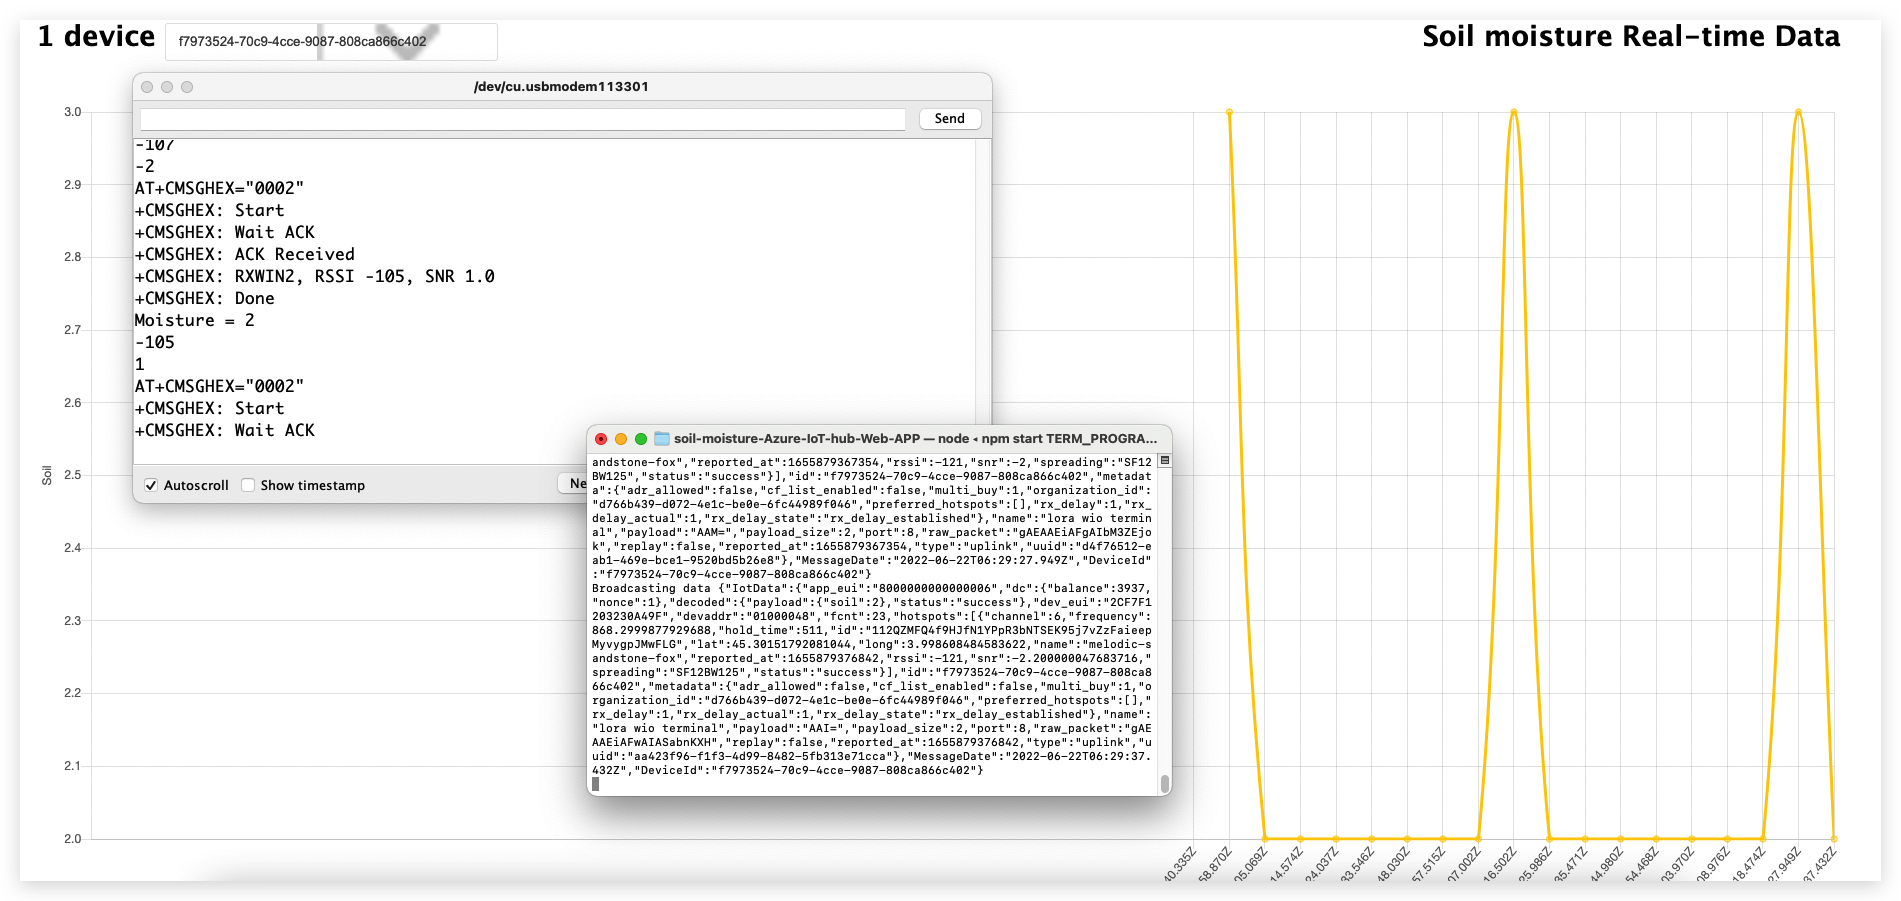
Soil moisture sensor live image display
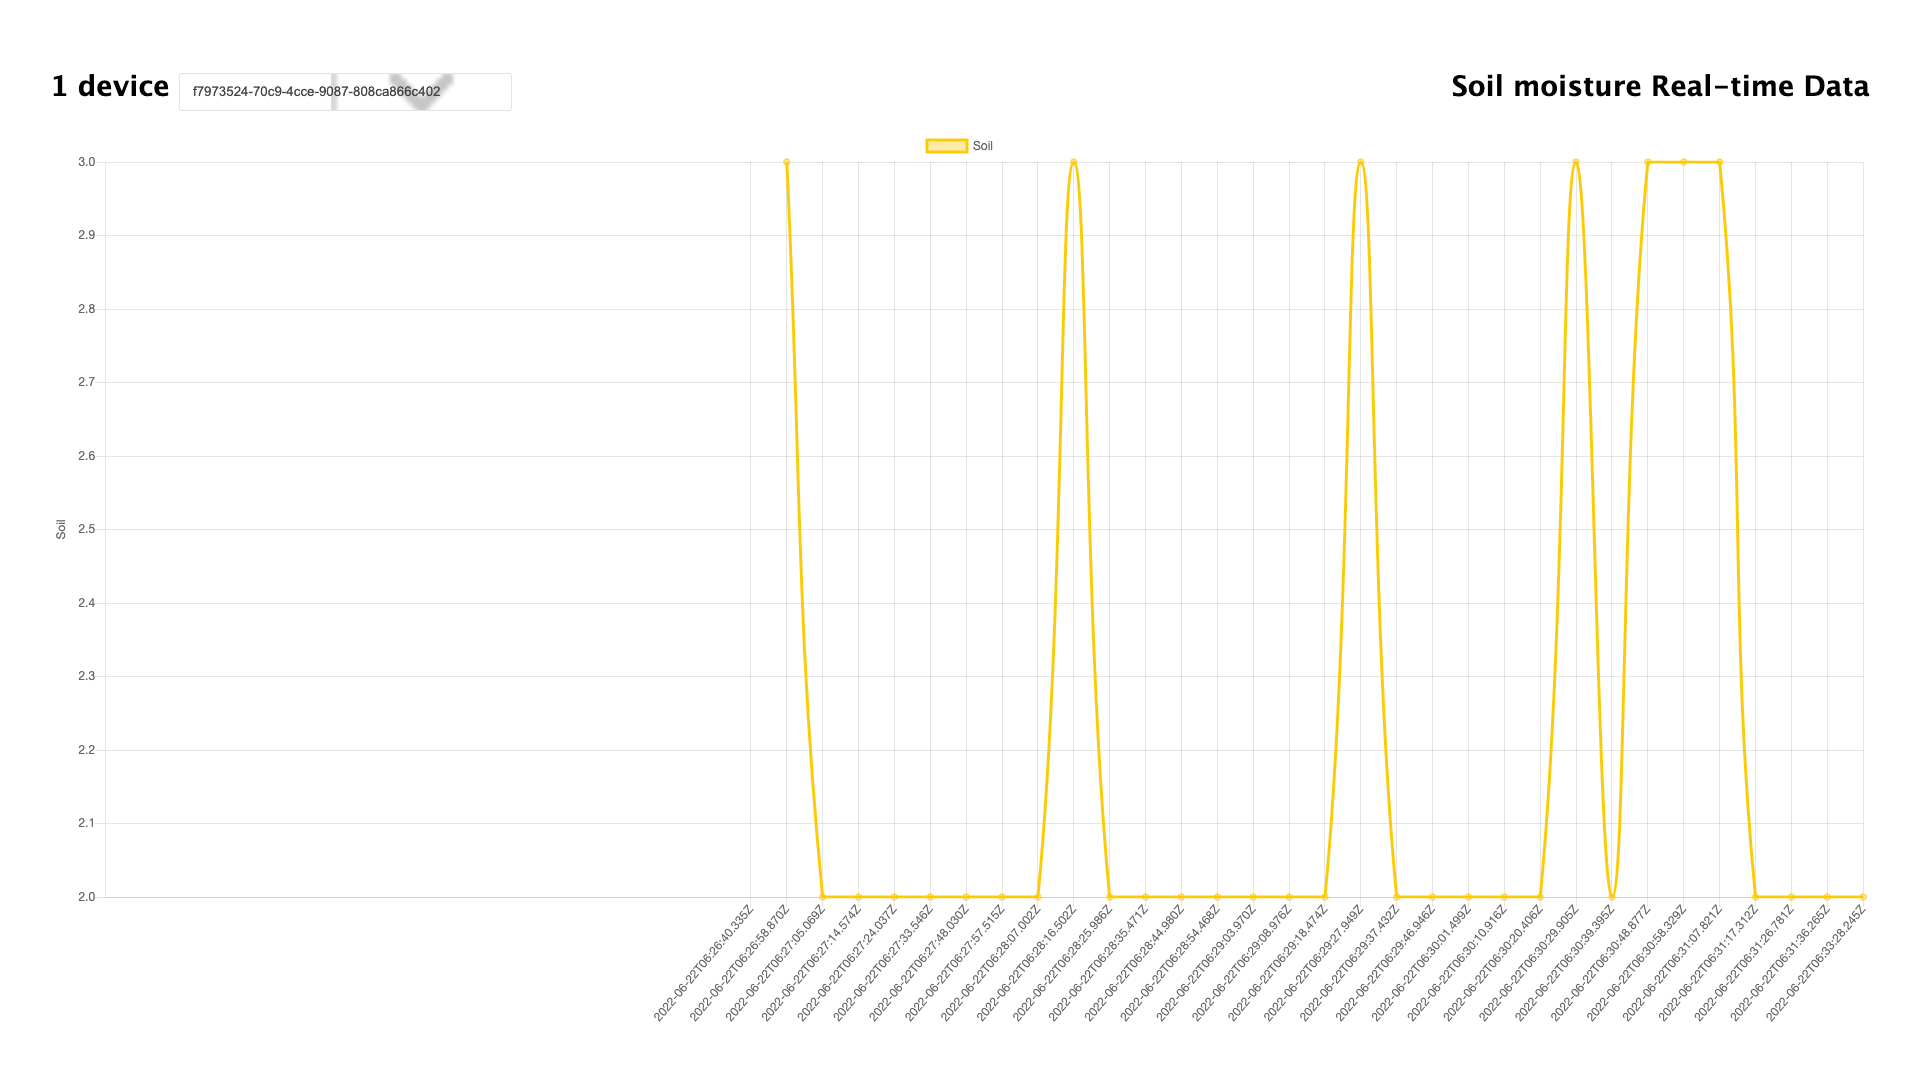
You should also see output in the console that shows the messages that your Web APP is broadcasting to the browser client:
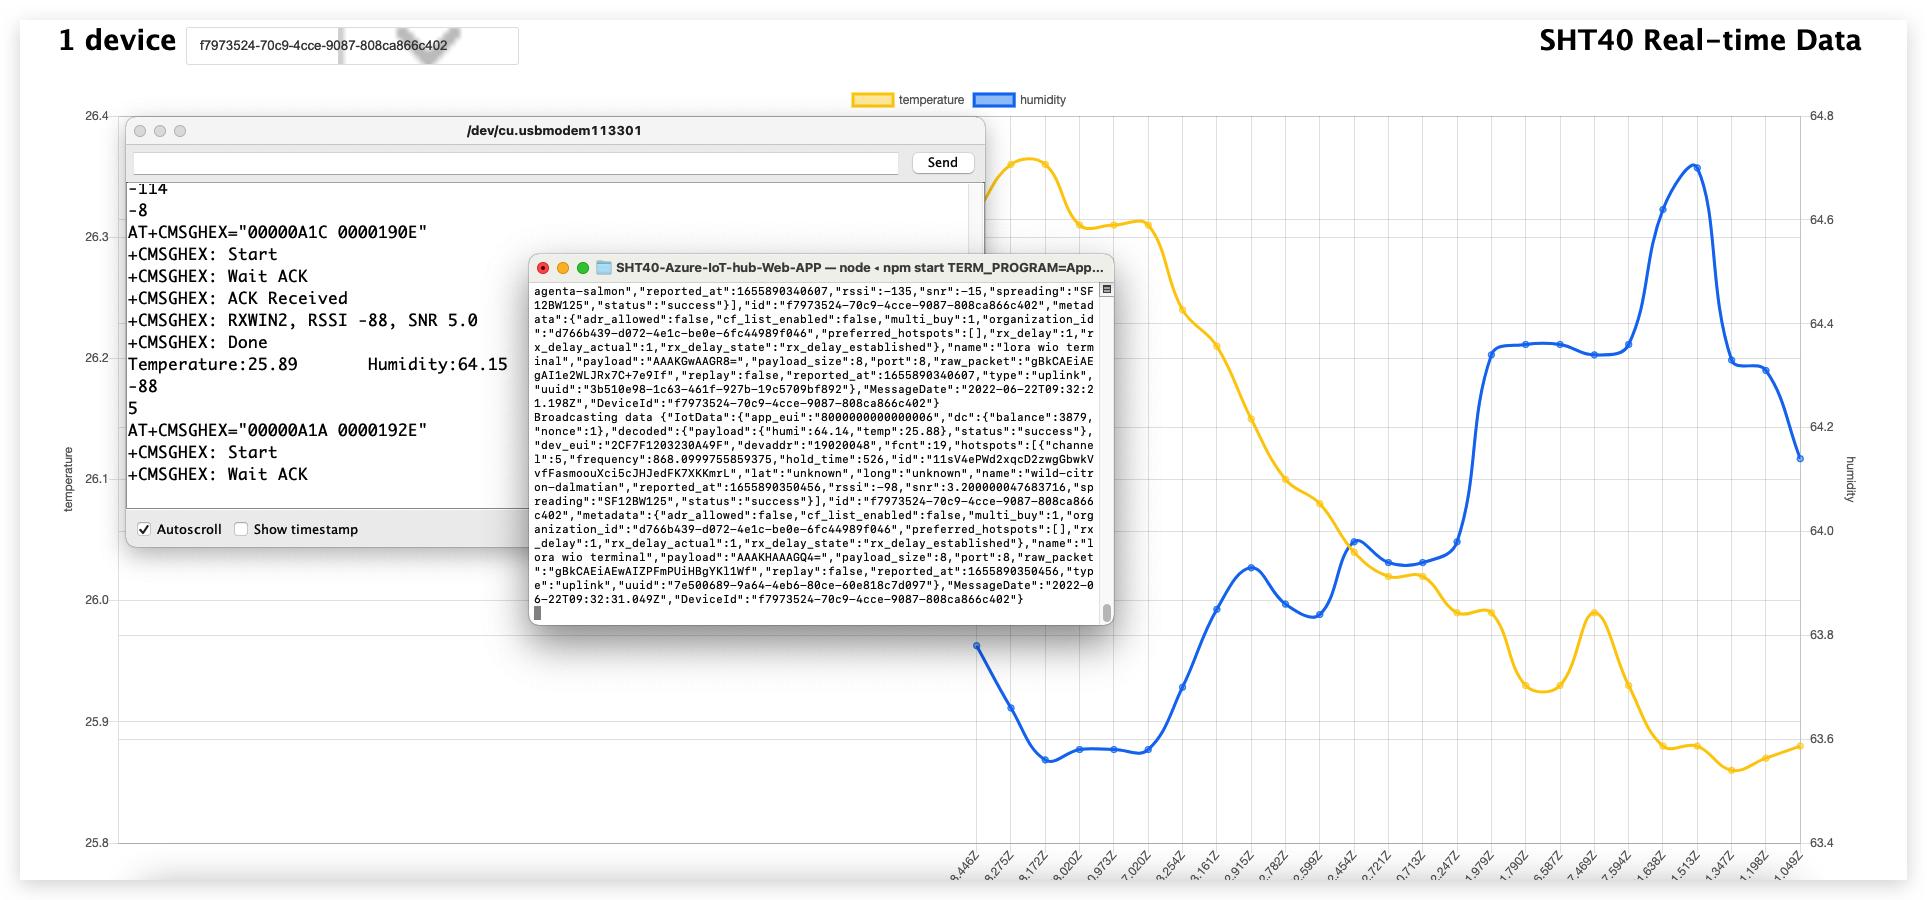
SHT40 sensor live image display
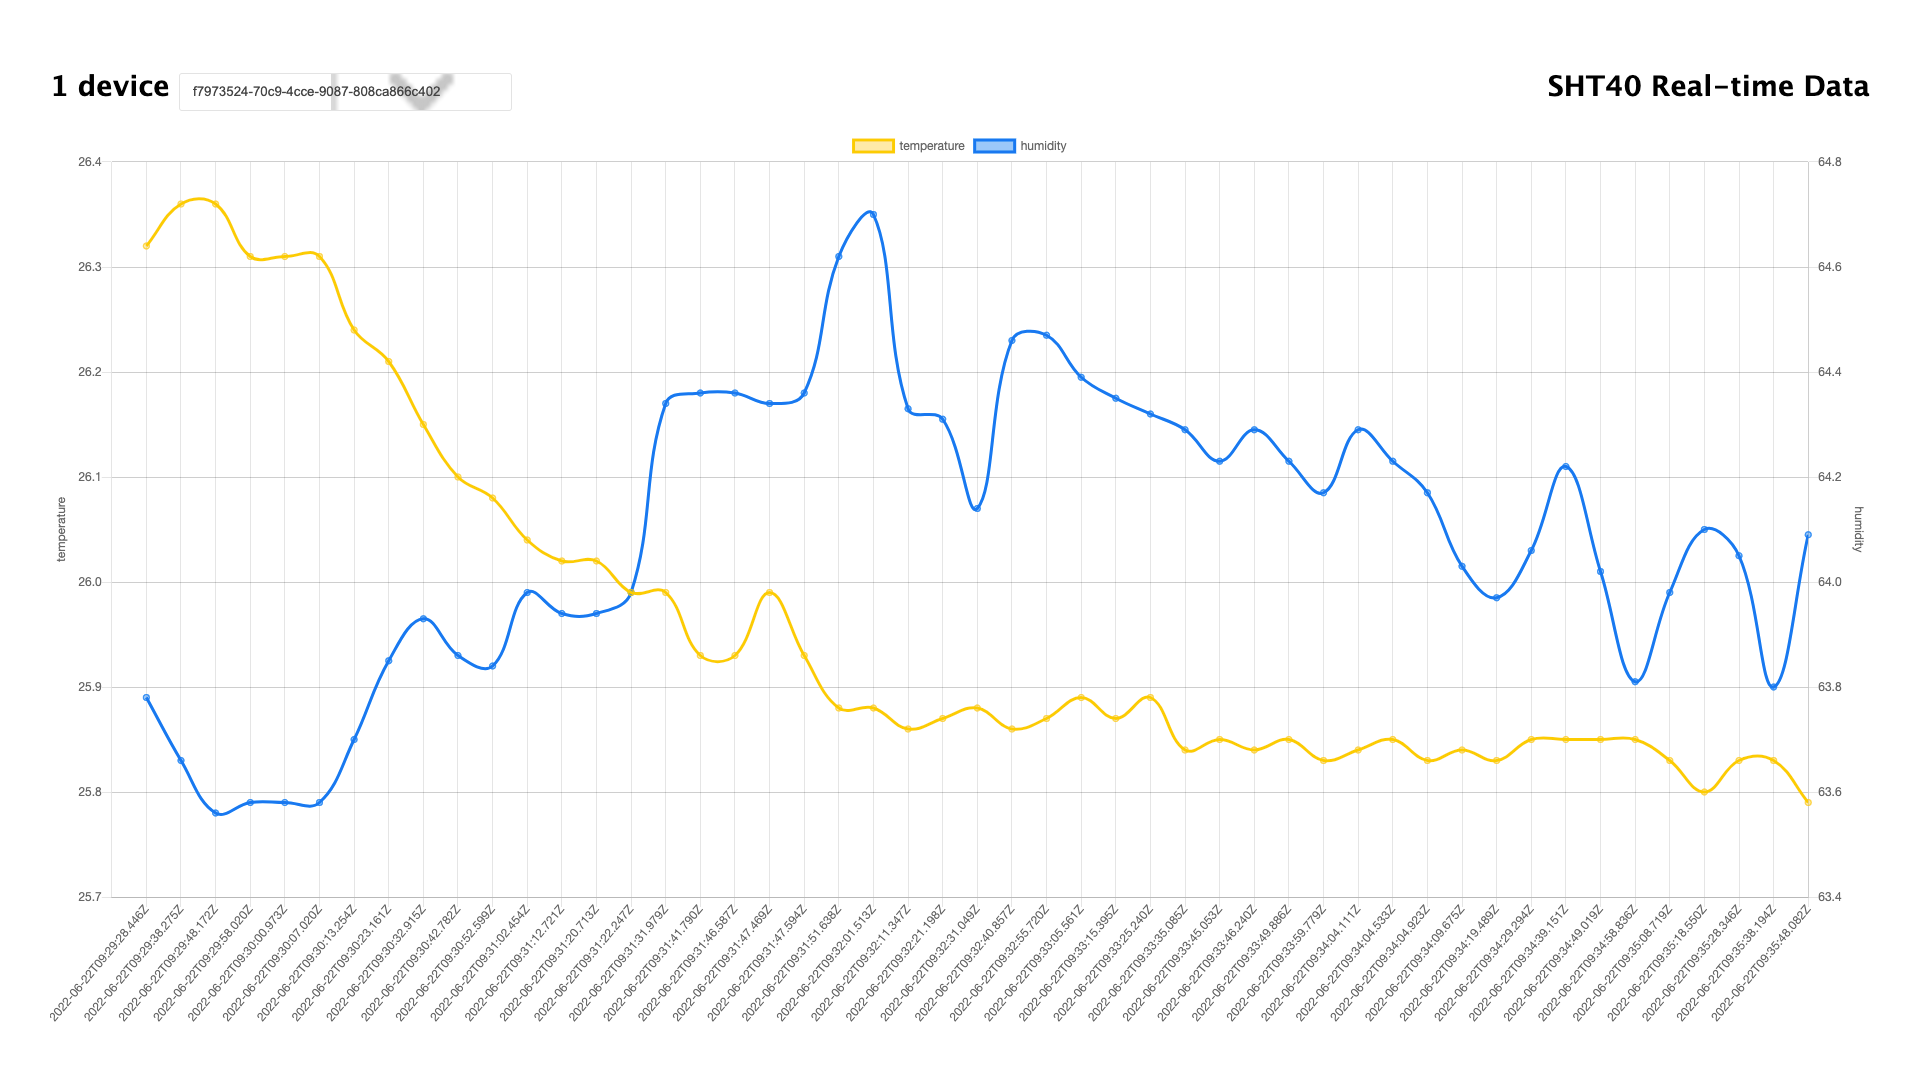
You should also see output in the console that shows the messages that your Web APP is broadcasting to the browser client:
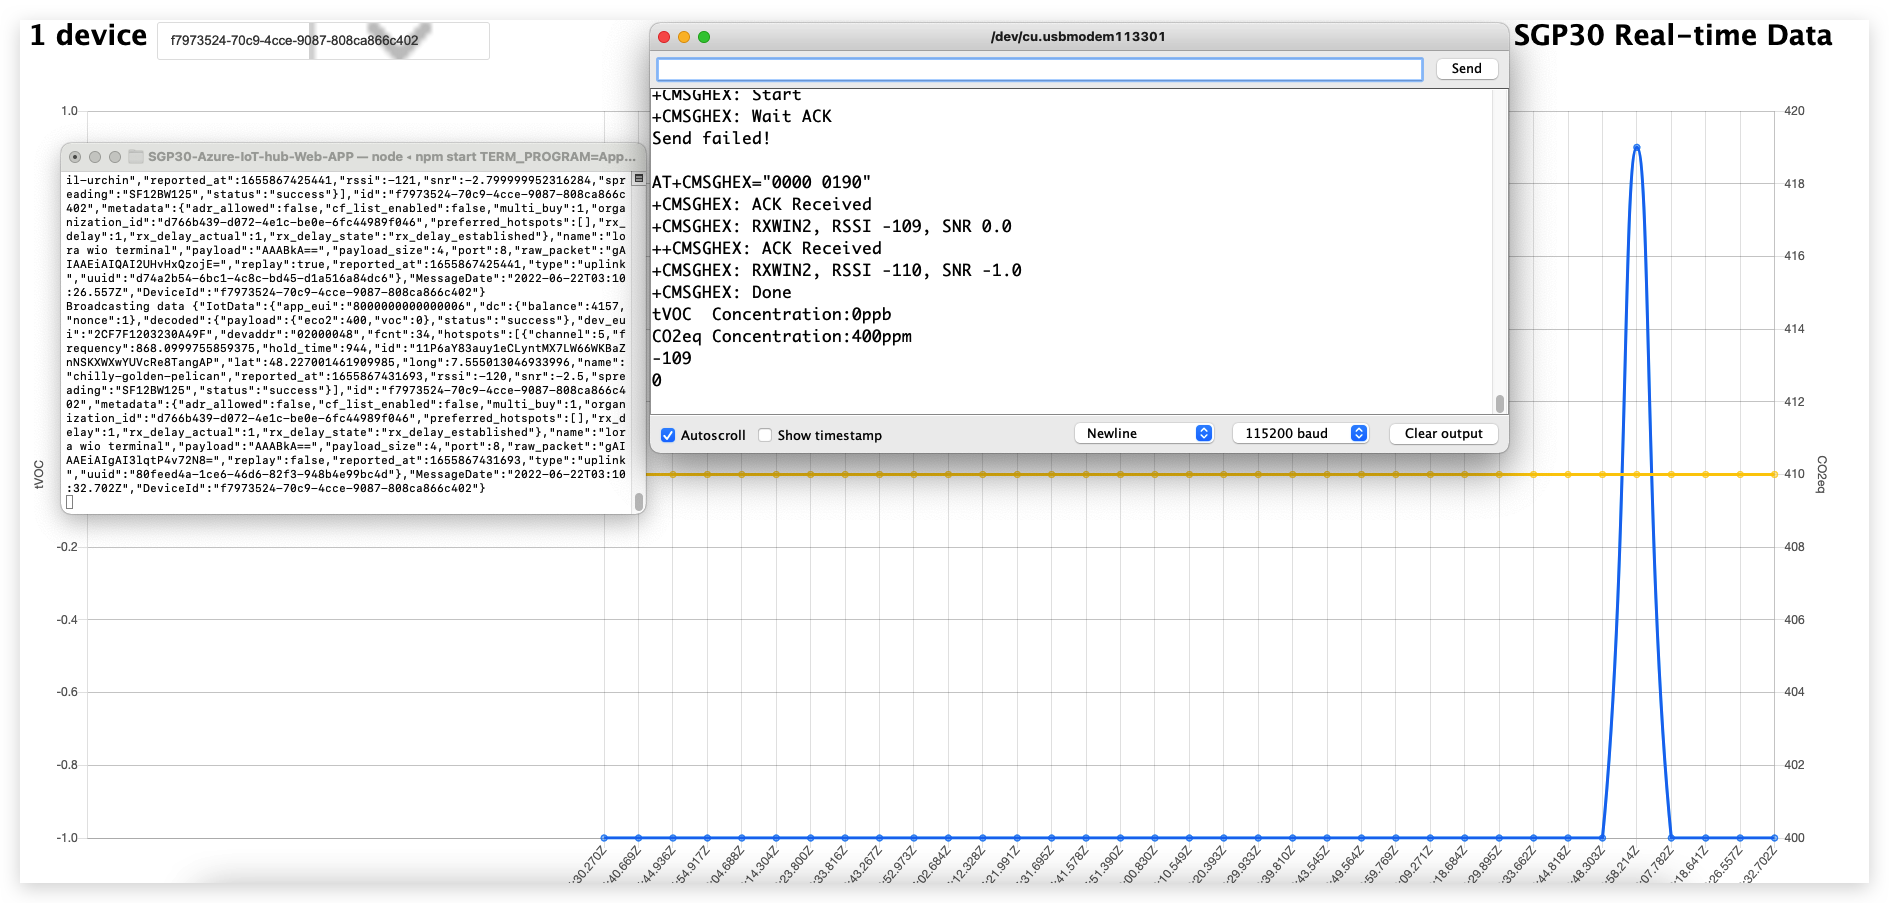
SGP30 sensor live image display
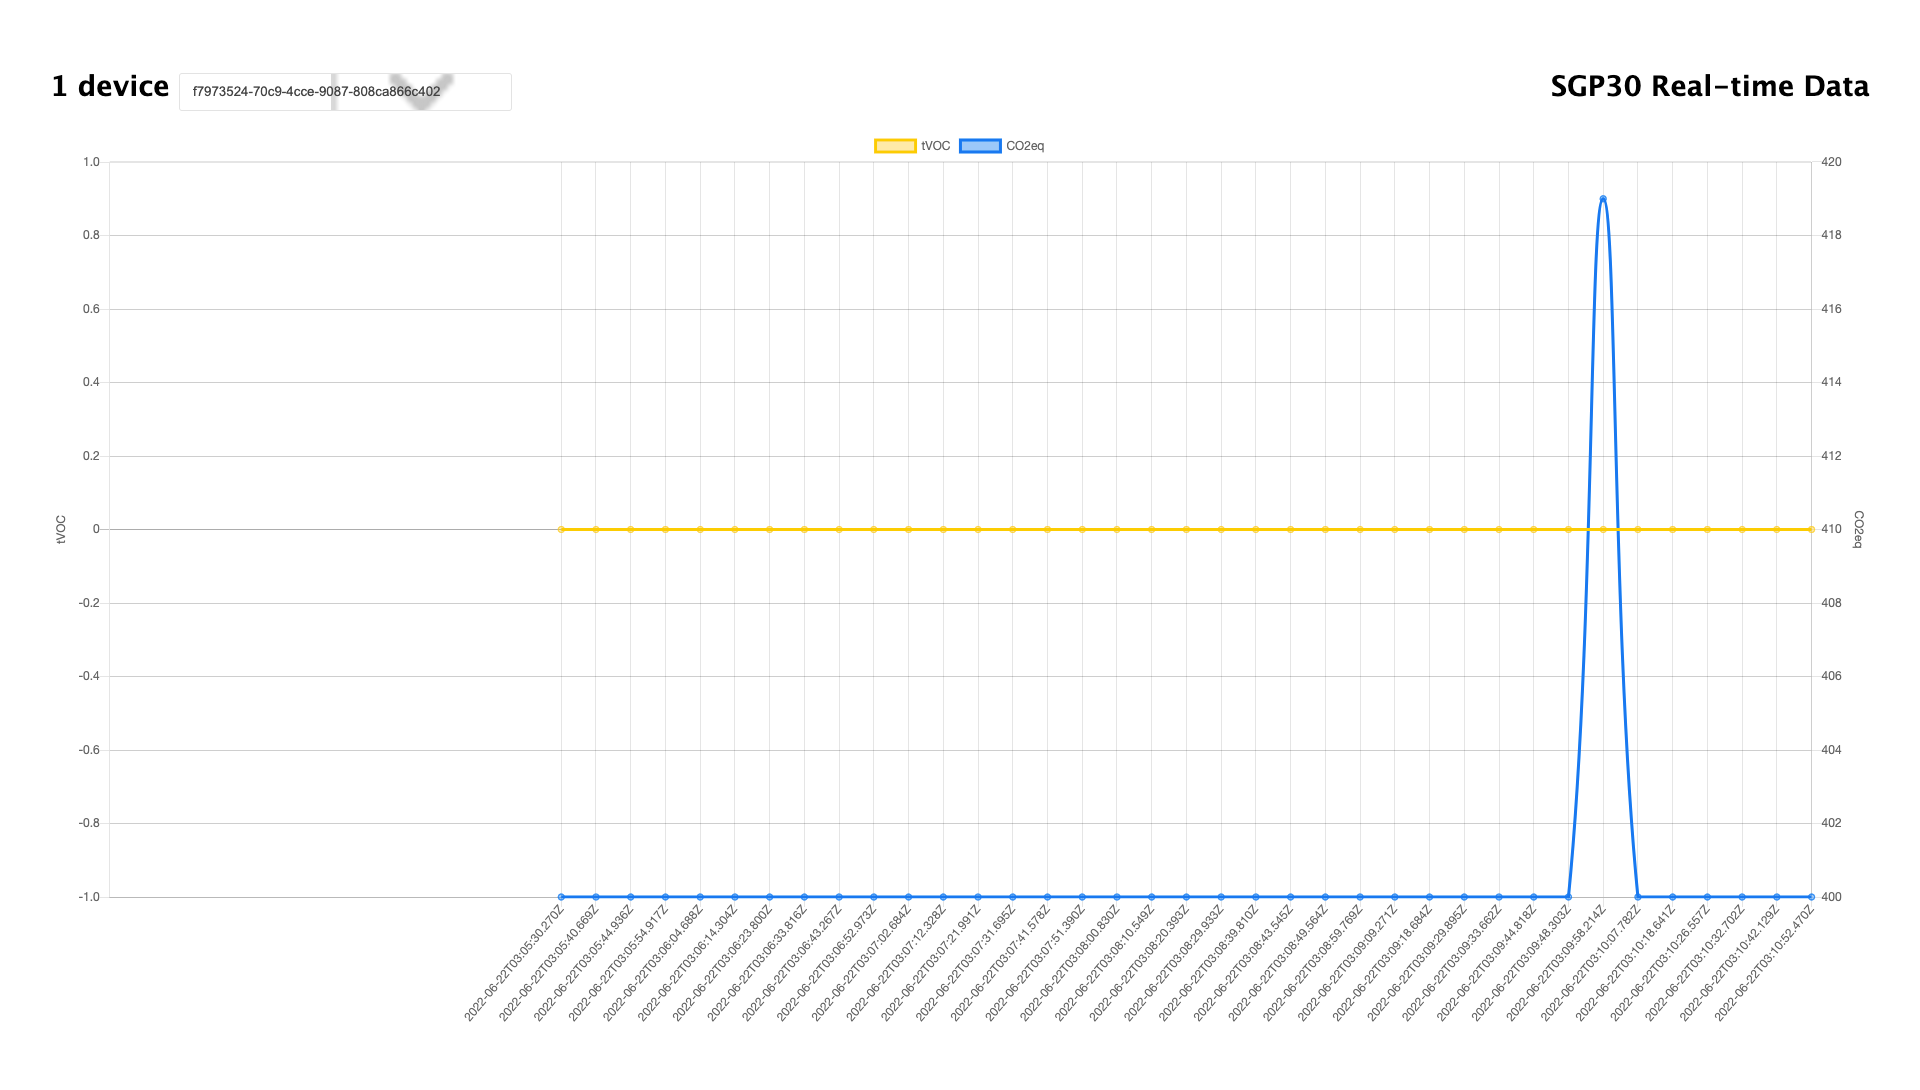
You should also see output in the console that shows the messages that your Web APP is broadcasting to the browser client:
Grove Vision AI Module live image display
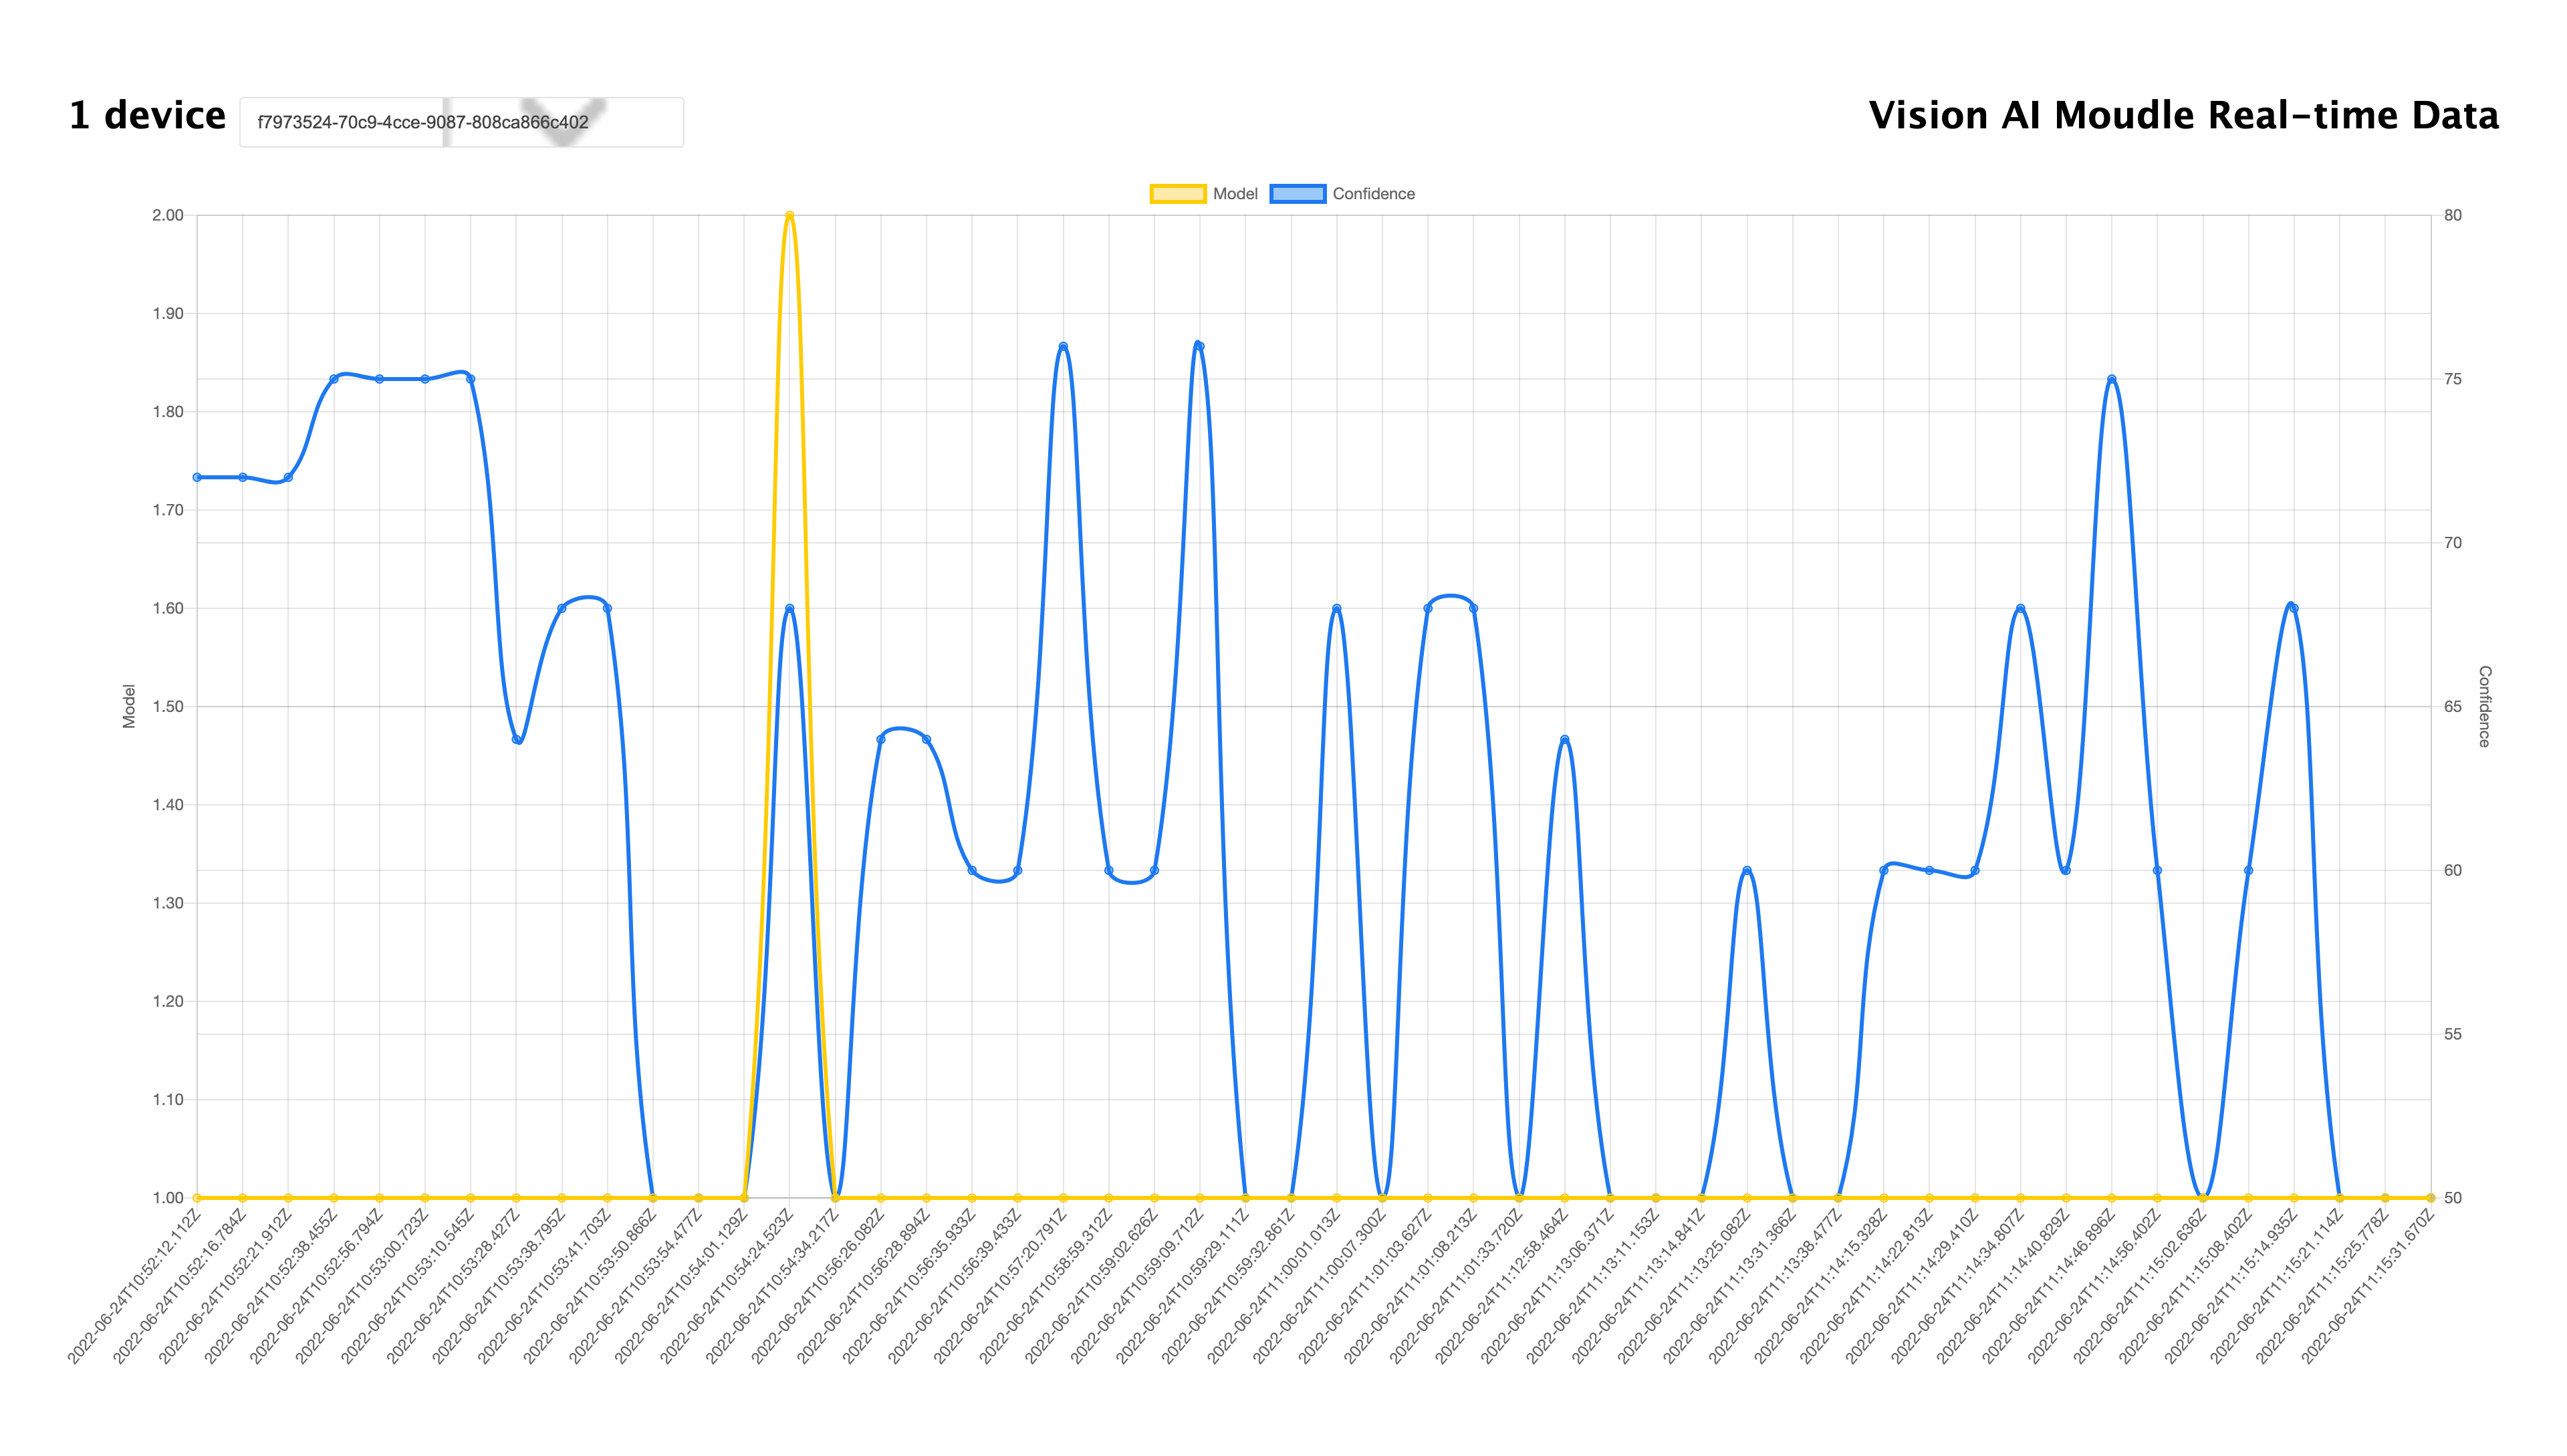
You should also see output in the console that shows the messages that your Web APP is broadcasting to the browser client:

Tech Support & Product Discussion
Thank you for choosing our products! We are here to provide you with different support to ensure that your experience with our products is as smooth as possible. We offer several communication channels to cater to different preferences and needs.