Grove - GPS (Air530 / Air530Z)
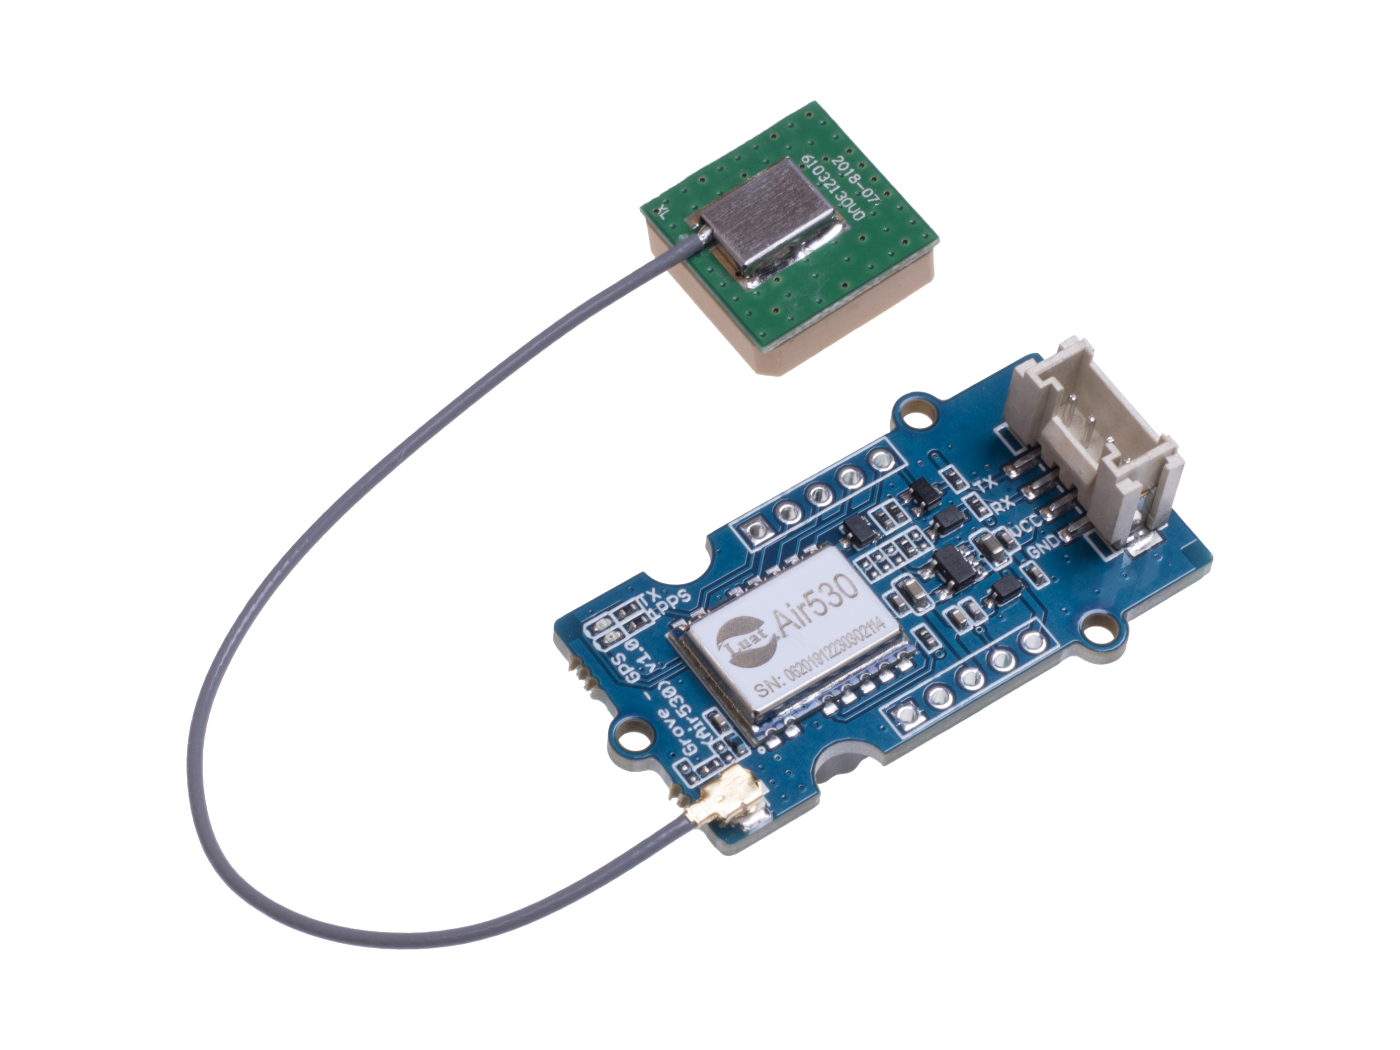
Confused of your GPS not working well in urbans or outsides under only one or few statelite module? Then you should not miss our new Grove-GPS (Air530 / Air530Z). It’s a high-performance, highly integrated multi-mode statelite positioning and navigation module. It supports GPS / Beidou / Glonass / Galileo / QZSS / SBAS, which makes it suitable for GNSS positioning applications such as car navigation, smart wear and drone.
We've released the Seeed GPS Modules Selection Guide, it will help you choose the GPS Module that best suits your needs.
Features
- Cost-effective
- Highly integrated Multi-mode statelite positioning and navigation
- Compact size for easy deployment
- Tiny volume and low power consumption
More details about Grove modules please refer to Grove System
Specifications
| Parameter | Value |
|---|---|
| Supply voltage | 3.3V/5V |
| Working current | up to 60mA |
| Time of warm start | 4s |
| Time of cold boot | 30s |
Platforms Supported
| Arduino | Raspberry Pi | |||
|---|---|---|---|---|
The platforms mentioned above as supported is/are an indication of the module's software or theoritical compatibility. We only provide software library or code examples for Arduino platform in most cases. It is not possible to provide software library / demo code for all possible MCU platforms. Hence, users have to write their own software library.
Getting Started
If this is the first time you work with Arduino, we firmly recommend you to see Getting Started with Arduino before the start.
Play With Arduino
This sample simply reads from the GPS by using software serial and sends it back on the serial port.
Hardware
- Step 1. Prepare the below stuffs:
| Seeeduino V4.2 | Base Shield | Grove - GPS (Air530 / Air530Z) |
|---|---|---|
 |  |  |
| Get One Now | Get One Now | Get One Now |
- Step 2. Connect Grove - GPS to port D2 of Grove-Base Shield.
- Step 3. Plug Grove - Base Shield into Seeeduino.
- Step 4. Connect Seeeduino to PC via a USB cable.

If we don't have Grove Base Shield, We also can directly connect Grove - GPS to Seeeduino as below.
| Seeeduino | Grove - GPS |
|---|---|
| 5V | Red |
| GND | Black |
| D3 | White |
| D2 | Yellow |
Software
Please note that the u-center software is for windows only.
- Step 1. Install u-center software.
We recommend using u-center 2, the software is more versatile and less laggy.
- Step 2. Copy the code into Arduino IDE and upload. If you do not know how to upload the code, please check how to upload code.
#include <SoftwareSerial.h>
SoftwareSerial SoftSerial(2, 3);
unsigned char buffer[64];                   // buffer array for data receive over serial port
int count=0;                                // counter for buffer array
void setup()
{
    SoftSerial.begin(9600);                 // the SoftSerial baud rate
    Serial.begin(9600);                     // the Serial port of Arduino baud rate.
}

void loop()
{
    if (SoftSerial.available())                     // if date is coming from software serial port ==> data is coming from SoftSerial shield
    {
        while(SoftSerial.available())               // reading data into char array
        {
            buffer[count++]=SoftSerial.read();      // writing data into array
            if(count == 64)break;
        }
        Serial.write(buffer,count);                 // if no data transmission ends, write buffer to hardware serial port
        clearBufferArray();                         // call clearBufferArray function to clear the stored data from the array
        count = 0;                                  // set counter of while loop to zero
    }
    if (Serial.available())                 // if data is available on hardware serial port ==> data is coming from PC or notebook
    SoftSerial.write(Serial.read());        // write it to the SoftSerial shield
}


void clearBufferArray()                     // function to clear buffer array
{
    for (int i=0; i<count;i++)
    {
        buffer[i]=NULL;
    }                      // clear all index of array with command NULL
}
-
Step 3. Open U-center.
-
Step 4. Click Receiver -> Port and select the COM port that the Arduino is using.
-
Step 5. Click Receiver -> Baudrate and make sure 9600 is selected.
-
Step 6. Click View -> Text Console and you should get a window that will stream NMEA data.
-
Step 7. Open the serial monitor,You can see as show below:

We also can view data in Google Earth:
If you are using u-center 2, then you can skip the following steps, all these features are integrated in u-center 2.
-
Step 1. Click File -> Database Export -> Google Earth KML
-
Step 2. This should launch Google Earth with the history that was captured by u-center.
-
Step 3. Alternatively, data can be recorded by pressing the red circle on the toolbar which will then ask where you want to save the record.
-
Step 4. When we have captured enough data, click the black square to stop recording.
-
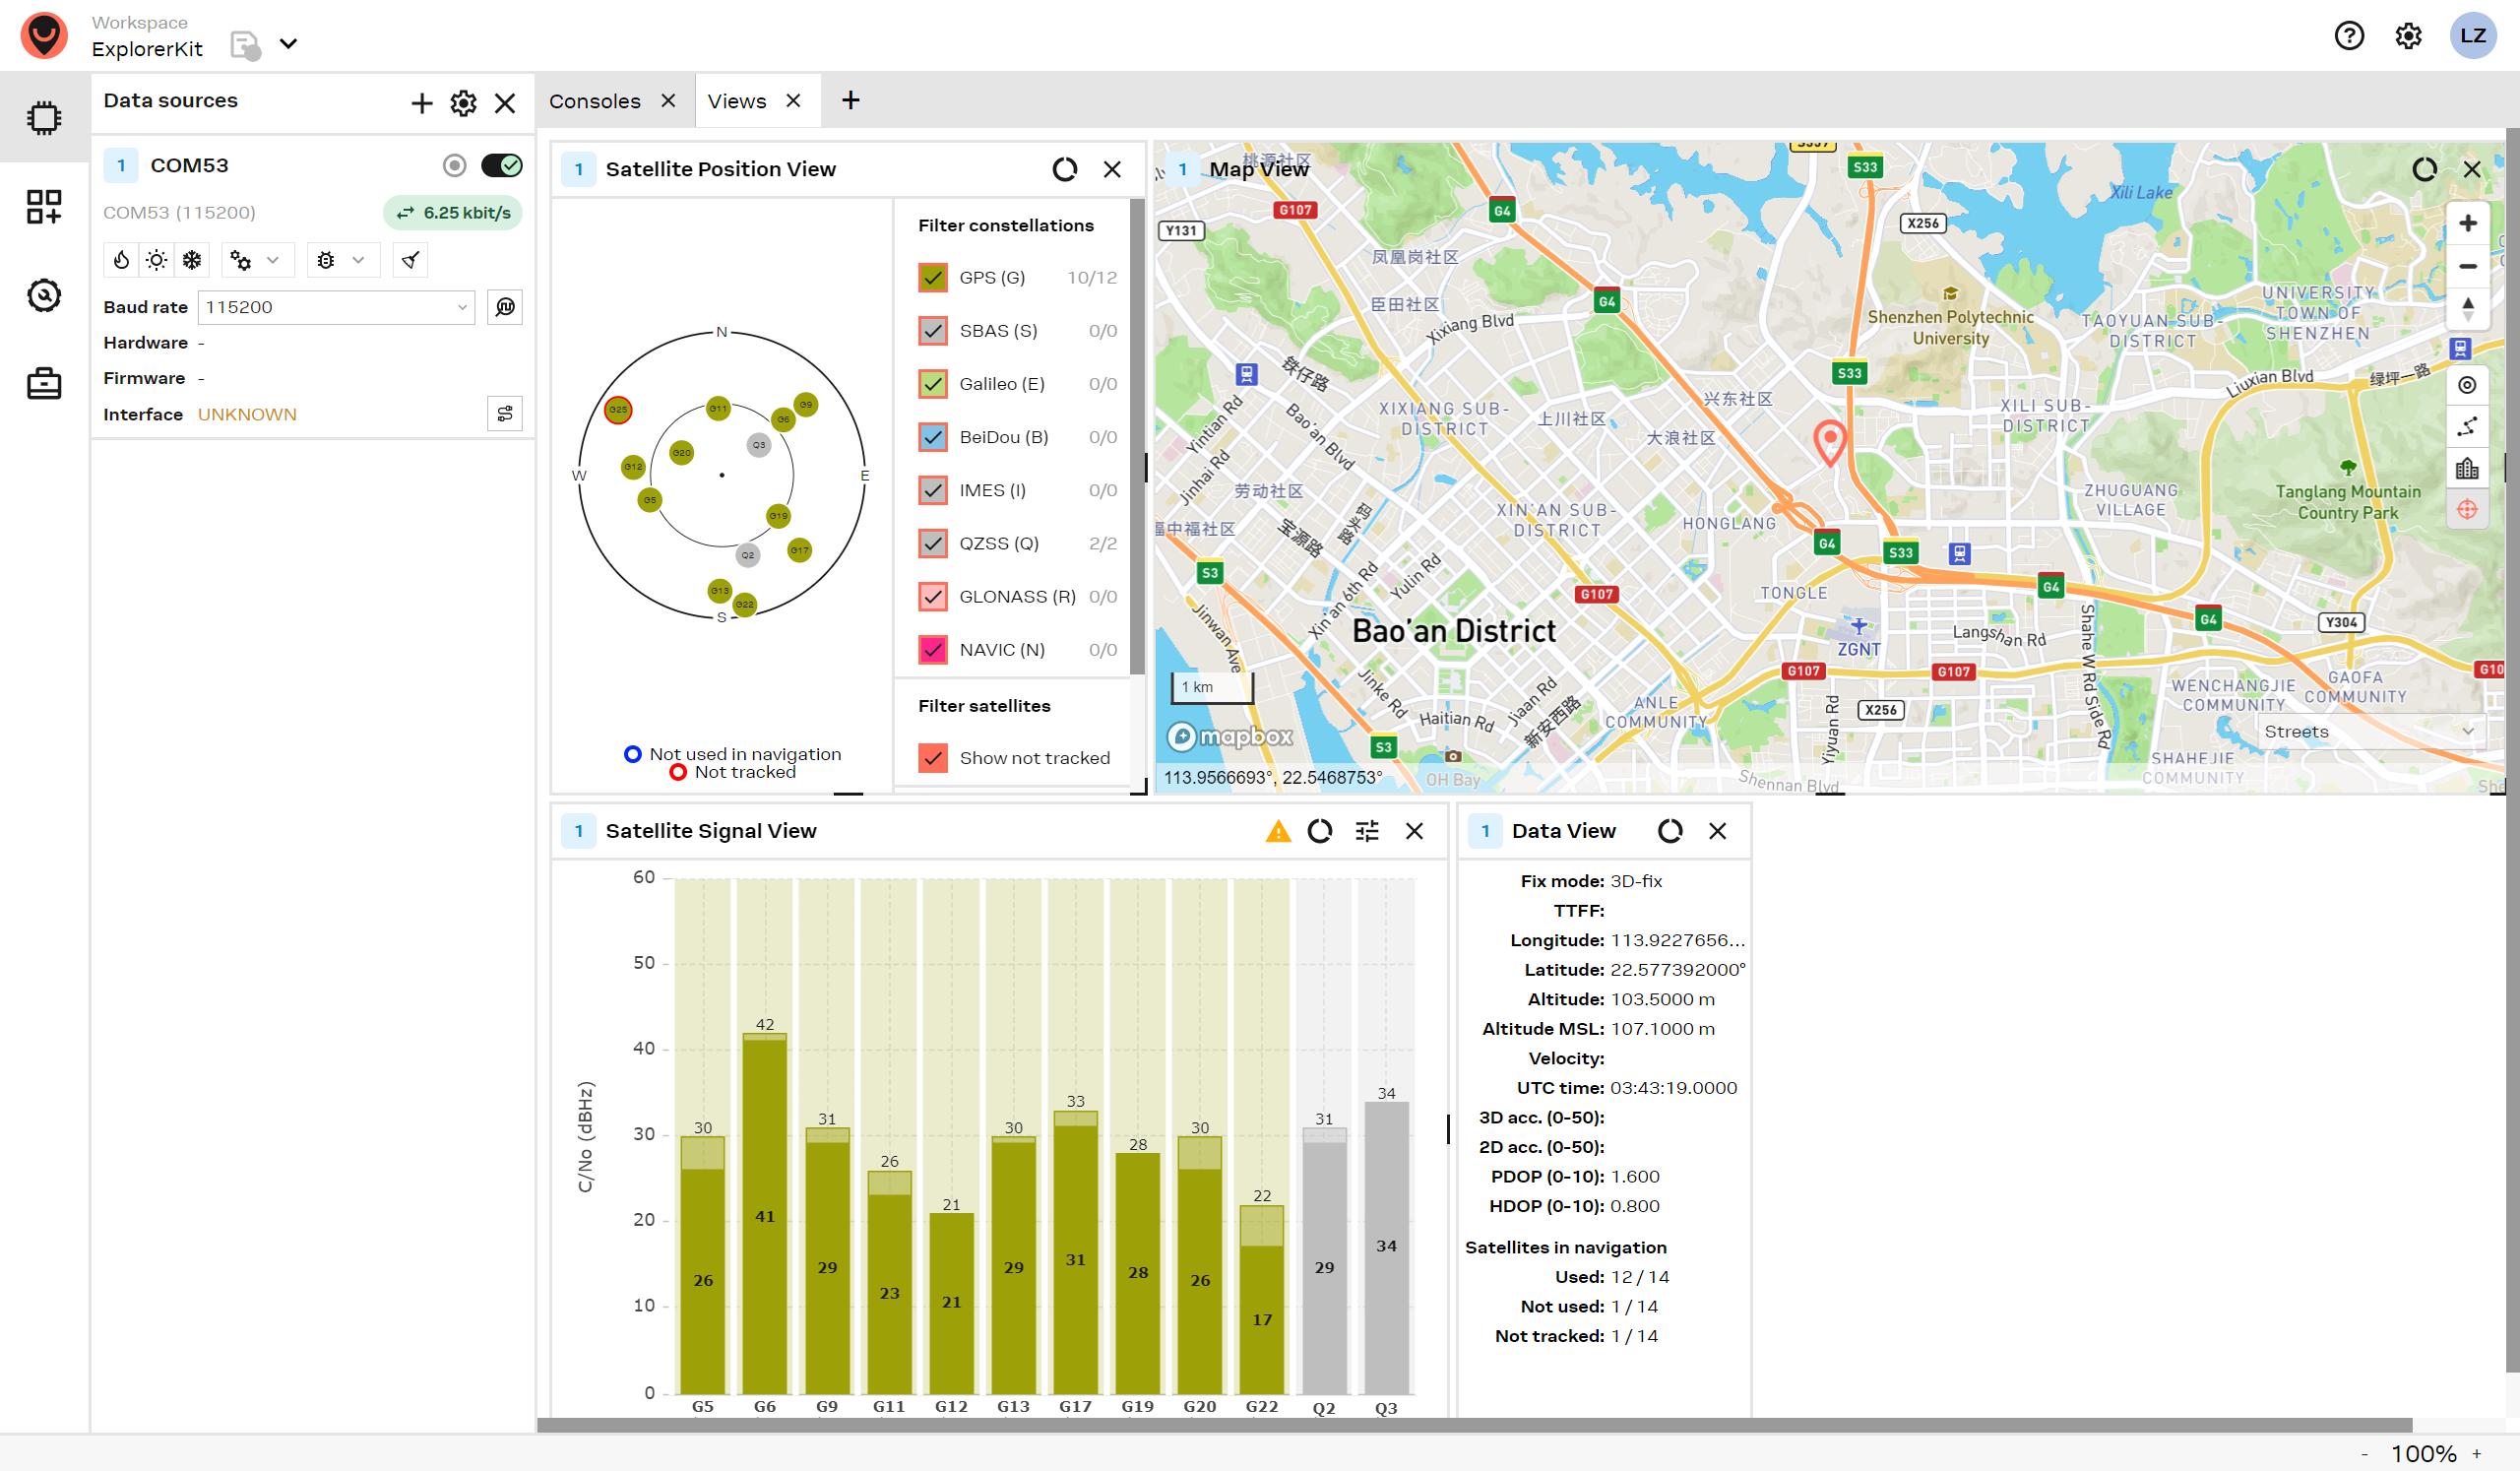
Step 5. We can then convert the .ubx file generated to KML by using uploading the ubx file to GPSVisualizer, and the location (Red spot) would be shown on the map as following:

Tests would rather be taken outdoors to avoid location inaccuracy caused by bad signal transmission.
Schematic Online Viewer
Resources
- [ZIP] GPS Schematic(PDF)
- [PDF] Air 530 User Booklet
- [PDF] Air 530Z User Manual (CN)
Projects
Project of GPS/GPRS Tracker: In this new project we will present our GPS Tracker connected using the GPRS technique and MQTT protocol.
Tech Support & Product Discussion
Thank you for choosing our products! We are here to provide you with different support to ensure that your experience with our products is as smooth as possible. We offer several communication channels to cater to different preferences and needs.