Grove - OLED Display 1.12 (SH1107) V3.0 - SPI/IIC -3.3V/5V
_V3.0/img/10402050_Main-02.png)
The Grove - OLED Display 1.12 V3.0 (SH1107) is a monochrome display with 128*128 resolution. Compared with LCDs, there are many advantages on OLED(Organic Light Emitting Diode) like self-emission, high contrast ratio, slim/thin outline, wide viewing angle and low power consumption. The display works on both 3.3V and 5V supply voltage. You can use either I2C or SPI interface to light up the display with your microcontroller to display words, images, and whatever you want.

Feature
- 3.3V/5V power supply compatible
- Changeable I2C address
- SPI available
- Low power consumption
- monochrome 128×128 pixels
- High contrast, high brightness
- Wide operating temperature range: -40℃ ~ +85 ℃
Version
| Product Version | Changes | Released Date |
|---|---|---|
| Grove - OLED Display 1.12" V1.0 | Initial | Mar 2012 |
| Grove - OLED Display 1.12" V2.1 | Change the driver IC from SSD1327 to SH1107G, upgrade the grayscale pixels from 96X96 to 128X128 | Nov 2015 |
| Grove - OLED Display 1.12" V3.0 | Change the driver IC from SSD1107G to SH1107, upgrade the interface from I2C to I2C/SPI | July 2021 |
More details about Grove modules please refer to [Grove System](https://wiki.seeedstudio.com/Grove_System/)
Platforms Supported
| Arduino | Raspberry Pi |
|---|---|
|
|
The platforms mentioned above as supported is/are an indication of the module's software or theoritical compatibility. We only provide software library or code examples for Arduino platform in most cases. It is not possible to provide software library / demo code for all possible MCU platforms. Hence, users have to write their own software library.
Getting Started
Hardware
Here we will show you how this Grove - OLED Display works via a simple demo. First of all, you need to prepare the below stuffs:
| Seeeduino V4 | Grove - OLED Display 1.12`` V3.0 | Base Shield |
|---|---|---|
|
|
|
| Get ONE Now | Get ONE Now | Get ONE Now |

_V3.0/img/10402050_Preview-07-thumbnail.png)

This is an easy-to-use module, what you need to do is connect the module to I2C port of a Base Shield. There're 4 pins, defined as below.
| pin | Function | Note | Cable color |
|---|---|---|---|
| pin1 | SCL | I2C Clock | YELLOW |
| pin2 | SDA | I2C Data | WHITE |
| pin3 | VCC | Power, 5V/3.3V | RED |
| pin4 | GND | Ground | BLACK |
Hardware Overview (I2C)
_V3.0/img/IMG_2185.JPG)
Software (I2C)
Step 1. Connect Grove - OLED Display 1.12'' V3.0. to I2C port of Base Shield via Grove cable.
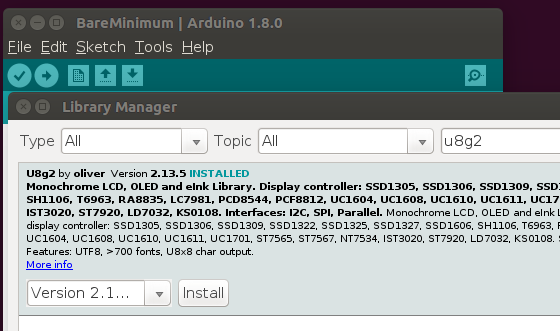
Step 2. Open Arduino IDE and the Library Manager (Sketch > Include Library > manage Libraries) to install the library of u8g2.
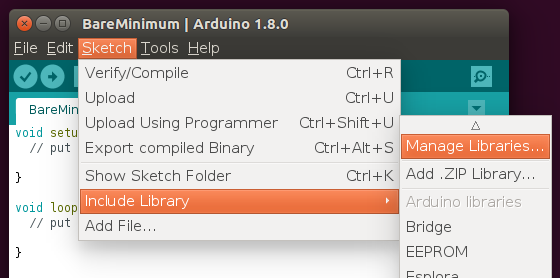
- Step 3. Enter "u8g2" into the search field and select latest version and Cclick "Install" button.
- Step 4. Upload the demo code below in your Arduino IDE.
#include <Arduino.h>
#include <U8g2lib.h>
#include <SPI.h>
#include <Wire.h>

U8G2_SH1107_SEEED_128X128_1_SW_I2C u8g2(U8G2_R0, /* clock=*/ SCL, /* data=*/ SDA, /* reset=*/ U8X8_PIN_NONE);

void setup(void) {
  u8g2.begin();
}

void loop(void) {
  u8g2.firstPage();

  do {
    u8g2.setFont(u8g2_font_luBIS08_tf);
    u8g2.drawStr(0,24,"Hello Seeed!");
  } while ( u8g2.nextPage() );
}
There will be a "Hello Seeed!" displayed on the screen of Grove - OLED Display 1.12'' if everything goes well.
_V3.0/img/IMG_2186.JPG)
If there's no Base Shield with you, [Seeeduino Vx Series](https://www.seeedstudio.com/catalogsearch/result/index/?q=Seeeduino+v&product_list_limit=all) with **I2C interface** do work as well.
Hardware Overview (SPI)
Step 1. Soldering male header and connect the wires.
Step 2. Please follow the YELLOW line to cut down the wire on the board and follow the WHITE line to solder the SPI pannels and the middle pannels one by one.
_V1.0/img/10402049_Back.png)
Please **be careful** to cut the wires one by one by following the **YELLOW** lines, otherwise you will damage all the display. We recommand you to cut the wires under magnifying glass.
Caution: This is the wrong method to cut wires!
_V1.0/img/10402049_Back_Wrong.png)
- Step 3. Follow the picture to connect the display and Seeeduino with wires.
_V3.0/img/wires.png)
- Step 4. Connect Seeeduino to a PC via a USB cable.
_V3.0/img/IMG_2188.JPG)
Software (SPI)
- Step 1. Open Arduino IDE and the Library Manager (Sketch > Include Library > manage Libraries) to install the library of u8g2.
- Step 2. Enter "u8g2" into the search field and select latest version and Cclick "Install" button.
- Step 3. Upload the demo code below in your Arduino IDE.
#include <Arduino.h>
#include <U8g2lib.h>
#include <SPI.h>
#include <Wire.h>

U8G2_SH1107_128X128_1_4W_HW_SPI u8g2(U8G2_R3, /* cs=*/ 10, /* dc=*/ 9, /* reset=*/ 8);

void setup(void) {
  u8g2.begin();
}

void loop(void) {
  u8g2.firstPage();

  do {
    u8g2.setFont(u8g2_font_luBIS08_tf);
    u8g2.drawStr(0,24,"Hello Seeed!");
  } while ( u8g2.nextPage() );
}
There will be a "Hello Seeed!" displayed on the screen of Grove - OLED Display 1.12'' if everything goes well.
Play on RaspberryPi
Materials required
| Raspberry pi | Grove Base Hat for Raspberry Pi | Grove - OLED Display 1.12" V3.0 |
|---|---|---|
|
|
|
| Get One Now | Get ONE Now | Get ONE Now |


Get ready for RaspberryPi
I2C Connection
Step 1. Plug OLED Yellow&Blue Display 0.96" to I2C port of Grove - Base Hat.
Step 2. Plug Grove - Base Hat into RaspberryPi.
Step 3. Connect RaspberryPi to a PC via Serial or SSH.
SPI Connection
- Step 1. Follow the sheet to connect the wires on Grove - Base Hat.
| Grove - OLED Display 1.12" V3.0 Pins | Raspberry Pi GPIO | BCM2835 Code |
|---|---|---|
| VCC | 3.3V | 3.3V |
| GND | GND | GND |
| SI | MOSI | 10 |
| SCL | SCLK | 11 |
| CS | CE0 | 8 |
| DC | GPIO.6 | 25 |
| RES | GPIO.2 | 27 |
Step 2. Plug Grove - Base Hat into RaspberryPi.
Step 3. Connect RaspberryPi to a PC via Serial or SSH.
_V3.0/img/IMG_2190.JPG)
Software
- Step 1. Enable I2C and SPI on RaspberryPi
sudo apt-get install -y i2c-tools
sudo raspi-config
Follow the pictures to enable I2C and SPI on your RaspberryPi.
_V1.0/img/rpicon.png)
_V1.0/img/rpicon1.png)
_V1.0/img/rpicon2.png)
_V3.0/img/spi.jpg)
_V3.0/img/spi1.jpg)
And then reboot your RaspberryPi
sudo reboot
- Step 2. Install necessary libraries
sudo apt-get install wget gcc make unzip -y
Install WiringPi Library
If you use WiringPi, you need to update WiringPi to version 2.52. This library may not be updated. Other libraries are recommended
cd
sudo apt-get install wiringpi
wget https://project-downloads.drogon.net/wiringpi-latest.deb
sudo dpkg -i wiringpi-latest.deb
gpio -v
Install bcm2835
cd
wget http://www.airspayce.com/mikem/bcm2835/bcm2835-1.60.tar.gz
tar zxvf bcm2835-1.60.tar.gz
cd bcm2835-1.60/
sudo ./configure
sudo make && sudo make check && sudo make install
For more information and the newest libraries please refer to website:bcm2835
- Step 3. Download the demo codes
1. For I2C
wget https://files.seeedstudio.com/wiki/Grove-OLED-Display-1.12-(SH1107)_V3.0/demo/RaspberryPiI2C.zip
mkdir I2C
unzip RaspberryPiI2C.zip ./I2C/
cd ./I2C/RaspberryPiI2C/c/
sudo chmod 777 test.sh
./test.sh
2. For SPI
wget https://files.seeedstudio.com/wiki/Grove-OLED-Display-1.12-(SH1107)_V3.0/demo/RaspberryPiSPI.zip
mkdir SPI
unzip RaspberryPiSPI.zip ./SPI/
cd ./SPI/RaspberryPiSPI/c/
sudo chmod 777 test.sh
./test.sh
If you want to have more demo, we also have a little video clip.
sudo chmod 777 badapple.sh
./badapple.sh
U8g2 Library Introduction
U8g2 is a monochrome graphics library for embedded devices. U8g2 supports monochrome OLEDs and LCDs, which include our chip SSD1327/SH1107G.
The Arduino library U8g2 can be installed from the library manager of the Arduino IDE. U8g2 also includes U8x8 library:
U8g2
- Includes all graphics procedures (line/box/circle draw).
- Supports many fonts. (Almost) no restriction on the font height.
- Requires some memory in the microcontroller to render the display.
U8x8
- Text output only (character) device.
- Only fonts allowed with fit into a 8x8 pixel grid.
- Writes directly to the display. No buffer in the microcontroller required.
Here provides the U8g2 Library wiki as well as the U8g2 API Reference page.
Schematic Online Viewer
Resources
- [Eagle] Grove-OLED Display 1.12inch in Eagle
- [PDF] Grove-OLED Display 1.12inch V3.0 Sch
- [Datasheet] SH1107_datasheet
Tech Support & Product Discussion
Thank you for choosing our products! We are here to provide you with different support to ensure that your experience with our products is as smooth as possible. We offer several communication channels to cater to different preferences and needs.