Getting Started with ODYSSEY - X86J41x5

ODYSSEY - X86J41x5 SBC series consists of ODYSSEY - X86J4105, ODYSSEY - X86J4125 and ODYSSEY - X86J4125 V2. They are based on Intel Celeron J4105/ J4125 and has all the great features that a standard computer needs, including an 8GB LPDDR4 RAM, 64GB eMMC Storage(eMMC version only), onboard Wi-Fi/BLE, Dual 1GbE/ 2.5GbE Ports, Audio Input and Output, USB Ports, HDMI, SATA connectors, PCIe and more.
| ODYSSEY - X86J4105 | ODYSSEY - X86J4125 | ODYSSEY - X86J4125 V2 |
|---|---|---|
Key Features
- Intel® Celeron® J4105/ J4125
- Dual-Band Frequency 2.5GHz/5GHz WiFi and Bluetooth 5.0
- Intel® UHD Graphics 600
- Dual 1GbE/ 2.5GbE
- Integrated Coprocessor: Arduino ATSAMD21 ARM® Cortex®-M0+/ Raspberry Pi RP2040 Dual-Core ARM® Cortex®-M0+
- Raspberry Pi 40-Pin Compatible
- 2 x M.2 PCIe (B Key and M Key)
- Pre-installed with Windows 10 Enterprise/ Windows 11 Pro
- Compatible with Grove Ecosystem
Hardware Specifications
| Components | ODYSSEY - X86J4105 | ODYSSEY - X86J4125 | ODYSSEY - X86J4125 V2 |
|---|---|---|---|
| Processor | Intel® Celeron® J4105 (Frequency: 1.5 - 2.5GHz) | Intel® Celeron® J4125 (Frequency: 2.0 - 2.7GHz) | |
| Coprocessor | Microchip® ATSAMD21G18 32-bit ARM® Cortex® M0+ | Raspberry Pi RP2040 32-bit Dual-Core ARM® Cortex®-M0+ | |
| Graphics | Intel® UHD Graphics 600 (Frequency: 250 – 750MHz) | ||
| Memory | LPDDR4 8GB | ||
| Storage | 64GB eMMC V5.1 (eMMC version only) | ||
| Wireless | Wi-Fi 802.11 a/b/g/n/ac @ 2.4/5 GHz HT160 & Bluetooth® 5.0 | ||
| Networking | Intel® I211AT PCIe Gigabit LAN | Intel® I226-V PCIe 2.5GbE LAN x 2 | |
| Audio | Microphone + headphone Combo Connector | ||
| Headers | 28-pin header from SAMD21G18 & 40-pin header compatible with Raspberry Pi | 28-pin header from Raspberry Pi RP2040 | |
| USB | USB 2.0 Type-A x2, USB 3.1 Type-A x1, USB 3.1 Type-C x1 | ||
| Video Interfaces | HDMI2.0a: Up to 4096x2160 @ 60Hz 24bpp / DP1.2a: Up to 4096x2160 @60Hz 24bpp | ||
| Expansion Slots | M.2(Key B, 2242/2280): SATA III, USB2.0, UIM; M.2 (Key M, 2242/2280): PCIe 2.0 ×4; Micro SD card Socket; SIM Card Socket; SATA III | ||
| RTC | JST 1.0 CR2032 3V | ||
| TPM | Built-in TPM (2.0) | Built-in TPM (2.0), optional external TPM | |
| Power Connector | DC Jack 5.5/2.1mm or Type-C PD | ||
| Power Supply (for bare board) | DC Jack Input: Min:12V @ 300mA - 1.2A, Max:19V @ 200mA - 0.7A Type-C Input: Min: 15V @ 0.27A, Max:15V @ 0.93A | ||
| Dimensions | 110x110mm | ||
| Certifications | FCC, CE | ||
If you are using 3.5inch HDD drives with the ODYSSEY – X86J41x5, make sure to use a DC power supply of 12V@2A or Type-C power supply of 15V@2A.
You can power the ODYSSEY – X86J41x5 using a power bank, but you need to make sure to use a power bank with USB PD protocol and connect via USB C. Also, you can seamlessly switch between USB C power and DC power with no issue.
Hardware Overview
ODYSSEY - X86J4105/ X86J4125

ODYSSEY - X86J4125 V2

Pinout Diagram
ODYSSEY - X86J4105/ X86J4125

ODYSSEY - X86J4125 V2

Hardware Required
-
ODYSSEY - X86J41x5
-
Power Adapter (provided)
-
External monitor
-
HDMI cable
-
Keyboard and Mouse
Attaching External Storage
For 64 GB EMMC storage version of the ODYSSEY - X86J41x5, you can skip this step. However, if you need more storage for your needs, feel free to follow this step.
There are 4 methods of adding storage for ODYSSEY - X86J41x5, but only 3 methods support installing the operating system(M.2 SATA, M.2 PCIE and SATA), and the Micro SD card slot can only be used as external storage.
-
Method 1 - M.2 PCIE Connector
-
Method 2 - M.2 SATA Connector
-
Method 3 - SATA Connector
-
Method 4 - Micro SD Card Slot

Installing the Operating System
ODYSSEY - X86J41x5 supports both Windows and Linux operating systems.
-
For Non-EMMC version, attach extenal storage following previous steps, and install your desired operating system through a bootable USB drive.
-
For EMMC version, Windows 10 Enterprise is pre-installed.
Step 1
Connect bootable USB drive into one of the USB ports on ODYSSEY - X86J41x5.

Please visit Creating Bootable USB and Installing OS for more information about creating a bootable USB Drive.
Step 2
Press the power button and keep pressing the F7 key on the keyboard until the Boot Manager screen appears.

Step 3
Select the connected USB Drive as the 1st boot drive and press Enter.

Step 4
Follow the instructions on the installation to complete installing the operating system.
To access the BIOS setup, keep pressing DEL key when booting up.
Connecting Antennas
Connect two antennas into the two sockets on the board.

One Antenna is for Wi-Fi and Bluetooth, and the other is for strong 5G Connectivity.
Adding 4G Cellular Connectivity
For 4G Cellular connectivity, insert a standard SIM card into the SIM card slot of the board.

Insert a PCIE 4G Module

Note: This module is a must have if you want to use the connected SIM Card.
Connecting to Display
There are 2 methods for display:
Method 1 - HDMI Port

Method 2 - DP over USB-C Port

Connecting to Keyboard and Mouse
Connect Keyboard and Mouse through USB ports

Powering up
There are two ways to power up the ODYSSEY - X86J41x5:
The 'PWR' pin serves as the power-on pin on the board, and the device can be powered on by shorting the 'PWR' pin to ground.
Method 1
The simplest way is to use the 12V/2A power adaptor included in the package, and connect to the DC jack of ODYSSEY - X86J41x5.

Method 2
You can also power the ODYSSEY - X86J41x5 through the USB-C port with 12V input. Furthermore, if your Monitor supports USB-PD, you are able to power and display ODYSSEY - X86J41x5 using only 1 cable!
Performance Stats

Wi-Fi Connecitivity

Bluetooth Connecitivity

Operating as a Computer
- Browsing and watch videos on Youtube

- Playing Google T-Rex!

Using the Arduino Core (ATSAMD21G18) on ODYSSEY - X86J4105/ X86J4125 in Windows
Odyssey J4105/J4125 v1
The ODYSSEY - X86J4105/ X86J4125 is built with Arduino Core(ATSAMD21G18) which provides more functionality to the board, and to use it, simply download the Arduino IDE, and Install the Windows version.
-
Click
File->Preferences->Additional Boards Manager URL:and Copy the following link into ithttps://files.seeedstudio.com/arduino/package_seeeduino_boards_index.json. -
Click
Tools->Board:->Boards Manager..., and Boards Manager will appear. Search and install theSeeeduino Zeroboard library.

- Select the right Port and Board before uploading.
-
Port->COMxx(Seeeduno Zero) -
Board->Seeeduino Zero

Feel free to explore your creativity with ODYSSEY - X86J4105/ X86J4125!
Odyssey J4125 v2
The ODYSSEY - X86J4125 v2 is built with Arduino Core(RP2040) which provides more functionality to the board, and to use it, simply download the Arduino IDE, and Install the Windows version.
-
Install Arduino in the same way as described in the Wiki.
Getting Started with ODYSSEY - X86J41x5 | Seeed Studio Wiki -
Click
File->Preferences->Additional Boards Manager URL:and Copy the following link into ithttps://github.com/earlephilhower/arduino-pico/releases/download/global/package_rp2040_index.json.

- Go to
Tools>Board>Boards Manager…, and enterRP2040in the search box. Select the latest version ofRaspberry Pi Pico/RP2040and install it.

-
Select your
Raspberry Pi Picoand the corresponding port. -
You have now finished setting up the Odyssey J4125V2 RP2040 for Arduino IDE on Ubuntu 20.04.I wrote a simple program and the serial monitor shows as expected

Feel free to explore your creativity with ODYSSEY - X86J4125 v2!
Using the Arduino Core (ATSAMD21G18) on ODYSSEY - X86J4105/ X86J4125 in Linux OS
If you have installed Linux OS, Download the Linux version of Arduino IDE and install the IDE as follow:
Installing Arduino IDE
- Open terminal and goto Downloads
cd ~/Downloads
-
Click
File->Preferences->Additional Boards Manager URL:and Copy the following link into ithttps://github.com/earlephilhower/arduino-pico/releases/download/global/package_rp2040_index.json. -
Use tar command to unzip the downloaded file
tar -xvf arduino -1.8.10-linux64.tar.xz
- Move the file to opt
sudo mv arduino-1.8.10 /opt
- Install Arduino IDE and make a Desktop shortcut
cd /opt/arduino-1.8.10/ && chmod +x install.sh && ./install.sh
- Allow permissions for Arduino to upload
cd /opt/arduino-1.8.10 && ./arduino-linux-setup.sh
Installing Board Libraries
Odyssey J4105/J4125 v1
-
Click
File->Preferences->Additional Boards Manager URL:and Copy the following link into ithttps://files.seeedstudio.com/arduino/package_seeeduino_boards_index.json. -
Click
Tools->Board:->Boards Manager..., and Boards Manager will appear. Search and install theSeeeduino Zeroboard library.

- Select the right Port and Board before uploading.
-
Port->ttyACM0(Seeeduno Zero) -
Board->Seeeduino Zero
Odyssey J4125 v2
- Click
File->Preferences->Additional Boards Manager URL:and Copy the following link into ithttps://github.com/earlephilhower/arduino-pico/releases/download/global/package_rp2040_index.json.
- Go to
Tools>Board>Boards Manager…, and enterRP2040in the search box. Select the latest version ofRaspberry Pi Pico/RP2040and install it.
- Select your
Raspberry Pi Picoand the corresponding port.
FAQs
How can I access the BIOS setup
Press the Power Button and keep pressing DEL key until you see the BIOS Setup.
Arduino IDE doesn't recognize the onboard microcontroller on ODYSSEY - X86J4105/ X86J4125
Add a jumper wire between RST Pin and GND Pin on the 4-Pin header (to the left of SAMD21's 28 pins) to reset the AMSAMDG21.
I cannot connect Wi-Fi and Bluetooth
Check BIOS settings and enable Wi-Fi and Bluetooth from BIOS
ODYSSEY - X86J41x5 doesn't power up
Maker sure you use the 12V/2A power adapter provided in the box and check connection.
Different status of Power button of ODYSSEY - X86J41x5
It has the same power button state as other computers:
-
Short Press(While it's off)->Turn on -
Short Press(While it's on)->Sleep -
Long Press(While it's on)->Force shutdown
Is the built-in fan controllable
Currently the fan is controlled by BIOS, and not controlled by user. The fan speed is set according to the CPU temperature. Check Chipset -> FAN Contorl in the BIOS setup screen for more information.
How to upgrade BIOS
For the instructions of upgrading BIOS, please check the Installing OS section.
How to set the ODYSSEY - X86J41x5 to auto power on when power plugged in
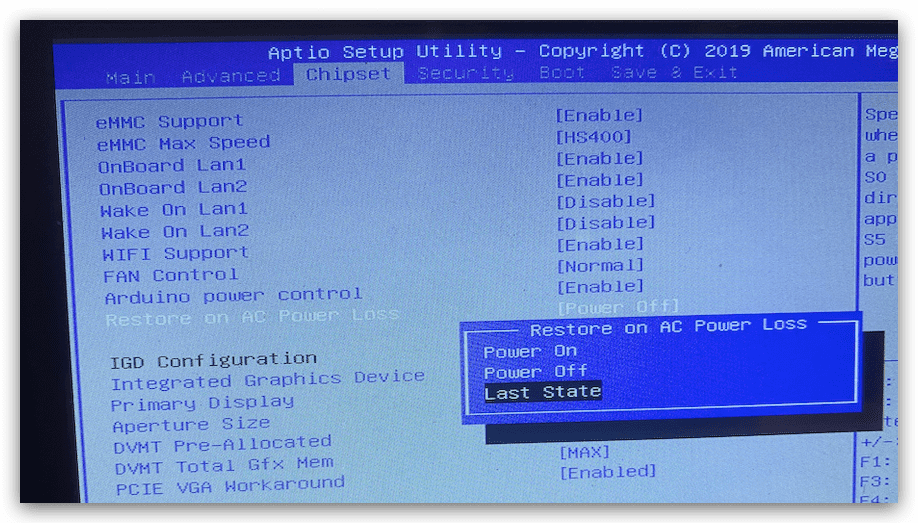
This also need to be configured in the BIOS. Enter BIOS settings by pressing DEL key. Navigate to Chipset -> Restore on AC Power Loss and change settings to Last State.
Fan is not turning on
ODYSSEY - X86J41x5 fan is controlled by Embedded controller (EC) which role as initialize the device before system is up. The temperature in BIOS is detected by EC and the temperature sensor place close to the intel CPU which do not have the sensor pin. In another word, the temperature is not the CPU's direct value, maybe 5 degrees centigrade error. What you saw the temperature value in system is feedback by CPU internal, temperature in BIOS screen feedback by EC, fan run or stop according the EC value.
- EC detect value (BIOS screen) and fan speed table like this:
Disable fan state: stop
Normal fan state: less than 40°C–stop,45-50°C–50%,50-60℃–60%,above 60℃–80%
Positive fan state: less than 40°C–stop,45-50°C–70%,50-60℃–80%,above 60℃–100%
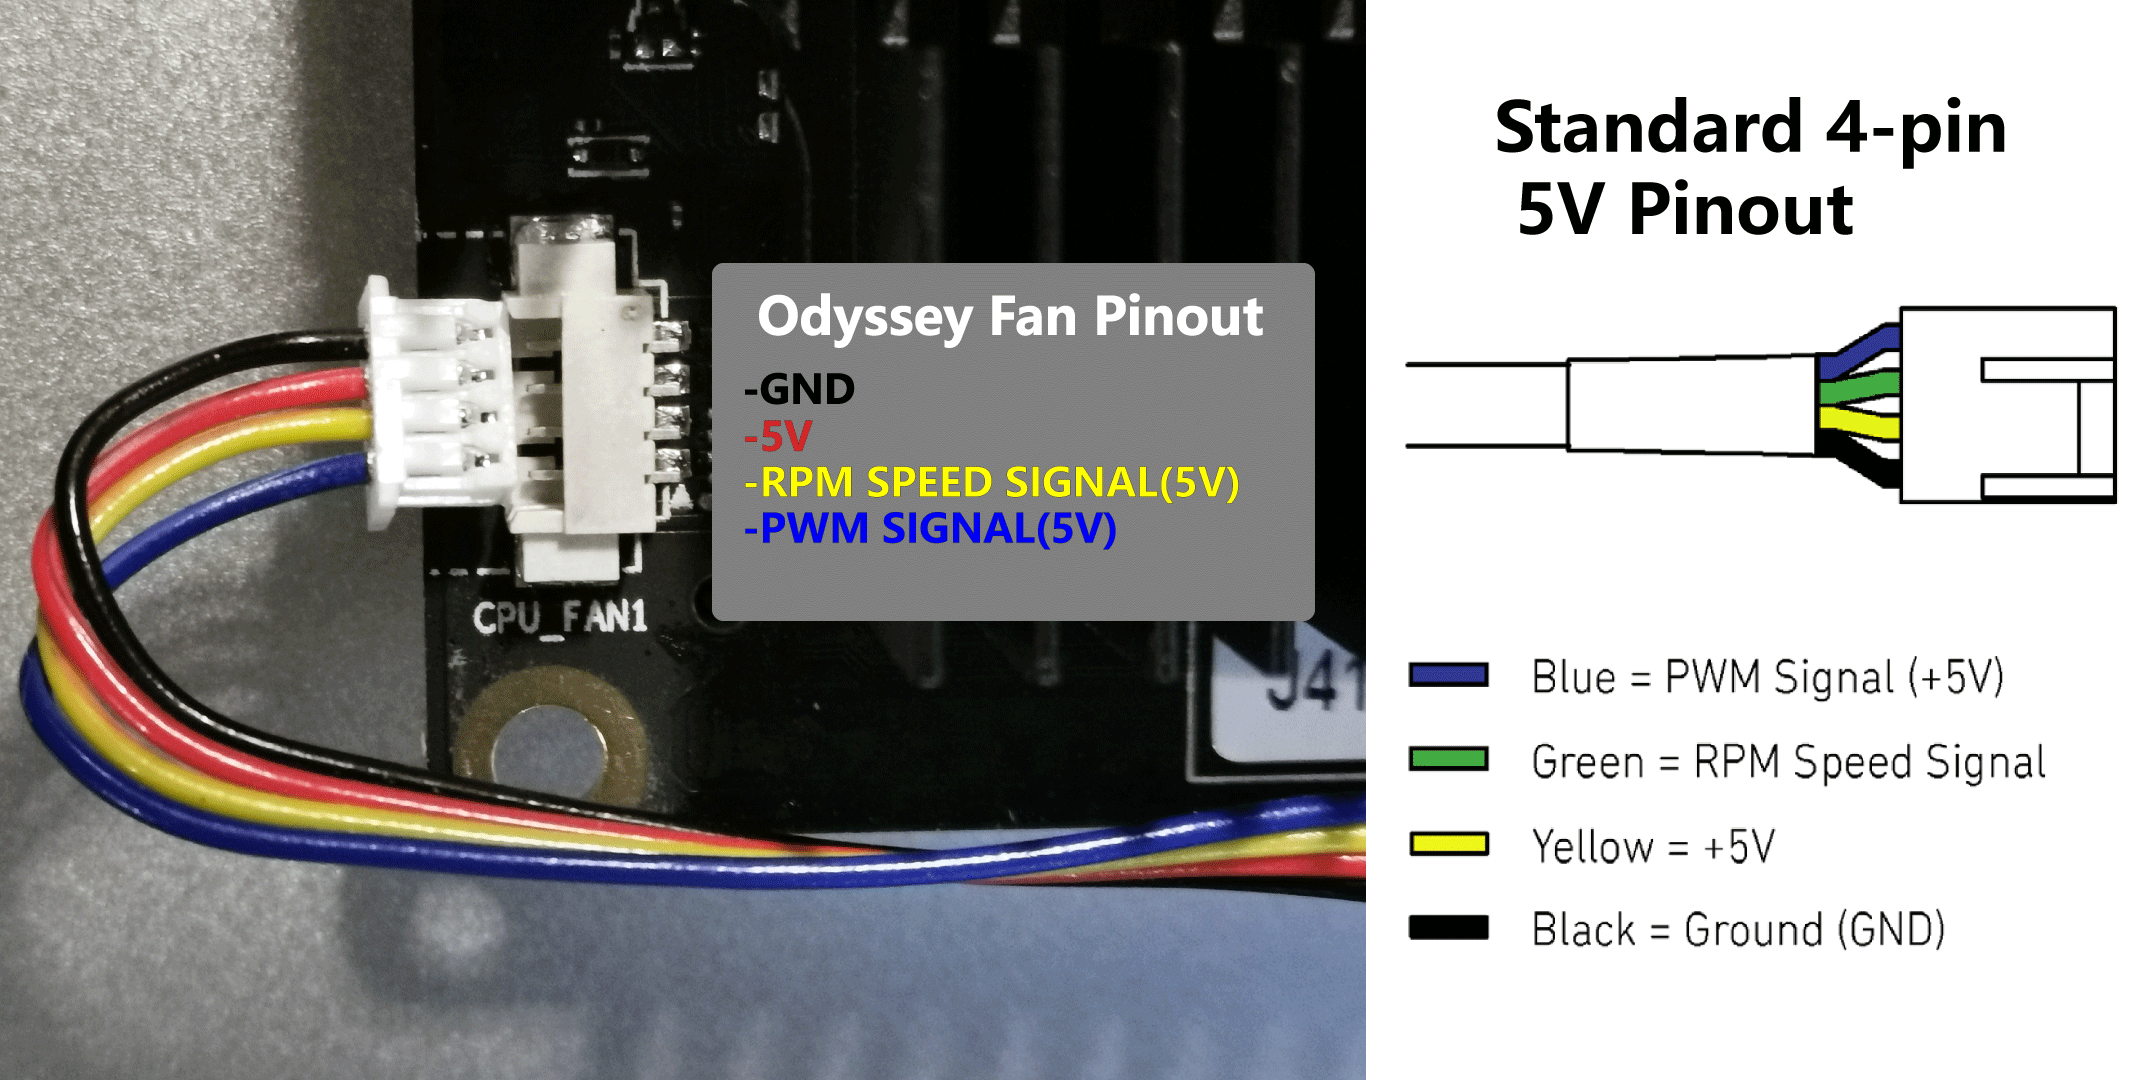
Fan Pinout
Some of you may need to know the 5V PWM fan pinout in order to DIY/replace to your own fans. Odyssey has a 5V PWM pin for the fan with a smaller header than the usual 5V pin header. You may need to replace the header in order to fit in.
Re-Installing the Original Windows
The eMMC versions of ODYSSEY - X86J41x5 will have Windows 10 pre-installed into the device. If you install another OS and wanting to go back to the original Windows 10 please check here:
-
-
This image supports Auto Flash. Simply download the above image and unzip the files and place in the root location of a USB drive.
-
Plug in the USB drive to ODYSSEY-X86J41x5 and boot up from the USB Drive. This will auto flash the Original Windows 10 Image back in the eMMC.
-
Does ODYSSEY-X86J41x5 have TPM?
ODYSSEY-X86J4105, ODYSSEY-X86J4125 and ODYSSEY-X86J4125 V2, all have FTPM integrated in the processor. In addition, ODYSSEY-X86J4125 V2 has an optional external TPM
Does ODYSSEY board have Boot Guard for Secure Boot?
Yes, you can enable the "Security Boot" option in the BIOS. When this is enabled, the BIOS will disable booting from unauthenticated devices.
Why is GPIO still working after Odyssey is Shut down?
To set this up, you need to update to the latest BIOS we provide. In the latest BIOS, you can change enable to disable here to turn off both GPIO and ODYSSEY.

Resources
-
[PDF] Atmel-SAMD21-datasheet
Tech Support & Product Discussion
Thank you for choosing our products! We are here to provide you with different support to ensure that your experience with our products is as smooth as possible. We offer several communication channels to cater to different preferences and needs.