Creating Bootable USB and Installing OS (Ubuntu Desktop 18.04)
This tutorial demonstrates how to create a bootable USB drive and install Linux OS(Ubuntu Desktop 18.04) onto the ODYSSEY - X86J4105.
Hardware Requirements
-
A Working Computer
-
A USB Drive(>= 8GB is recommended)
-
A Monitor
-
Keyboard and Mouse
Creating a Bootable USB
Step 1 - Download the Operating System Image
Download your required OS Image to your local drive. In this tutorial, Ubuntu Desktop 18.04 is used to demonstrate to install into the ODYSSEY - X86J4105.
- You can download Ubuntu OS Image from here.
Step 2 - Prepare your Bootable USB
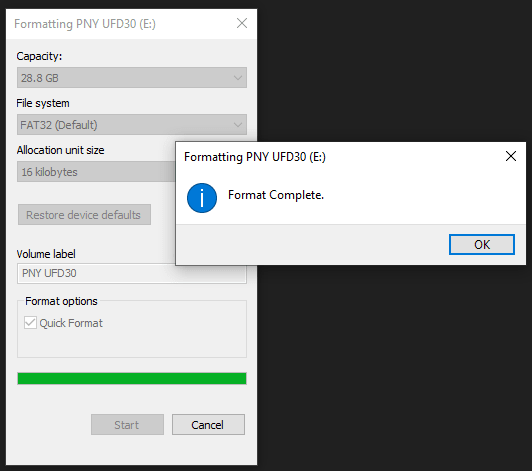
Format the USB drive. If you are a Windows user, you can format the USB drive by right-clicking the USB Drive and select Format
.
Note: Choose FAT32
for the File System.

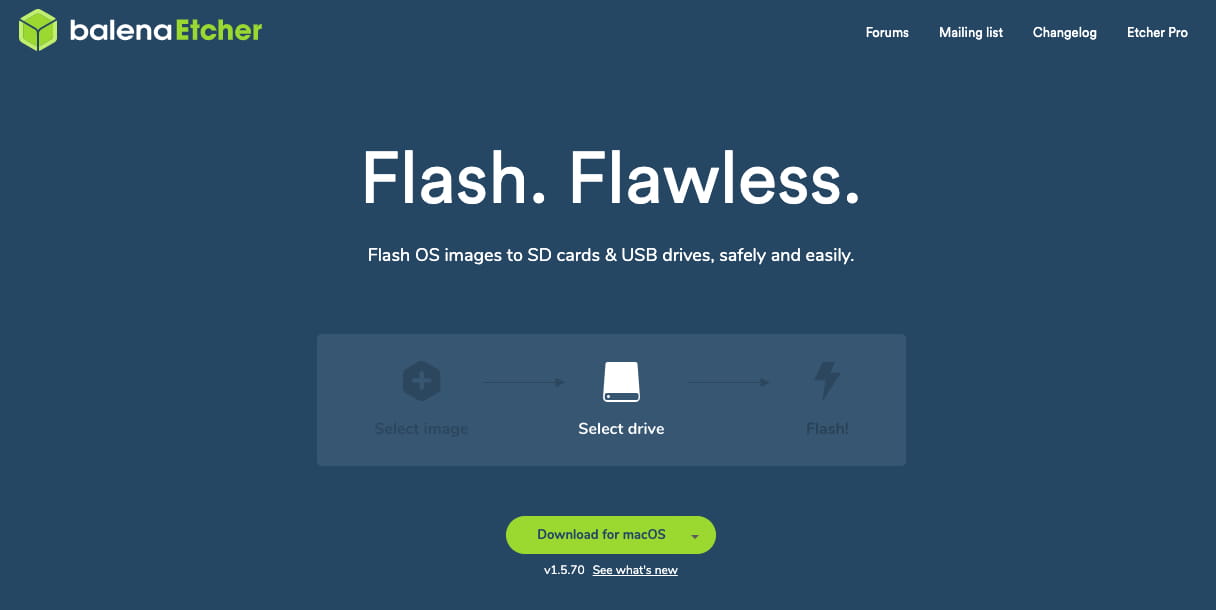
Step 3 - Download Flash Burner
Download the Open Source Flash burner balenaEtcher. Download the version according to your operating system(Windows/macOS/Linux).

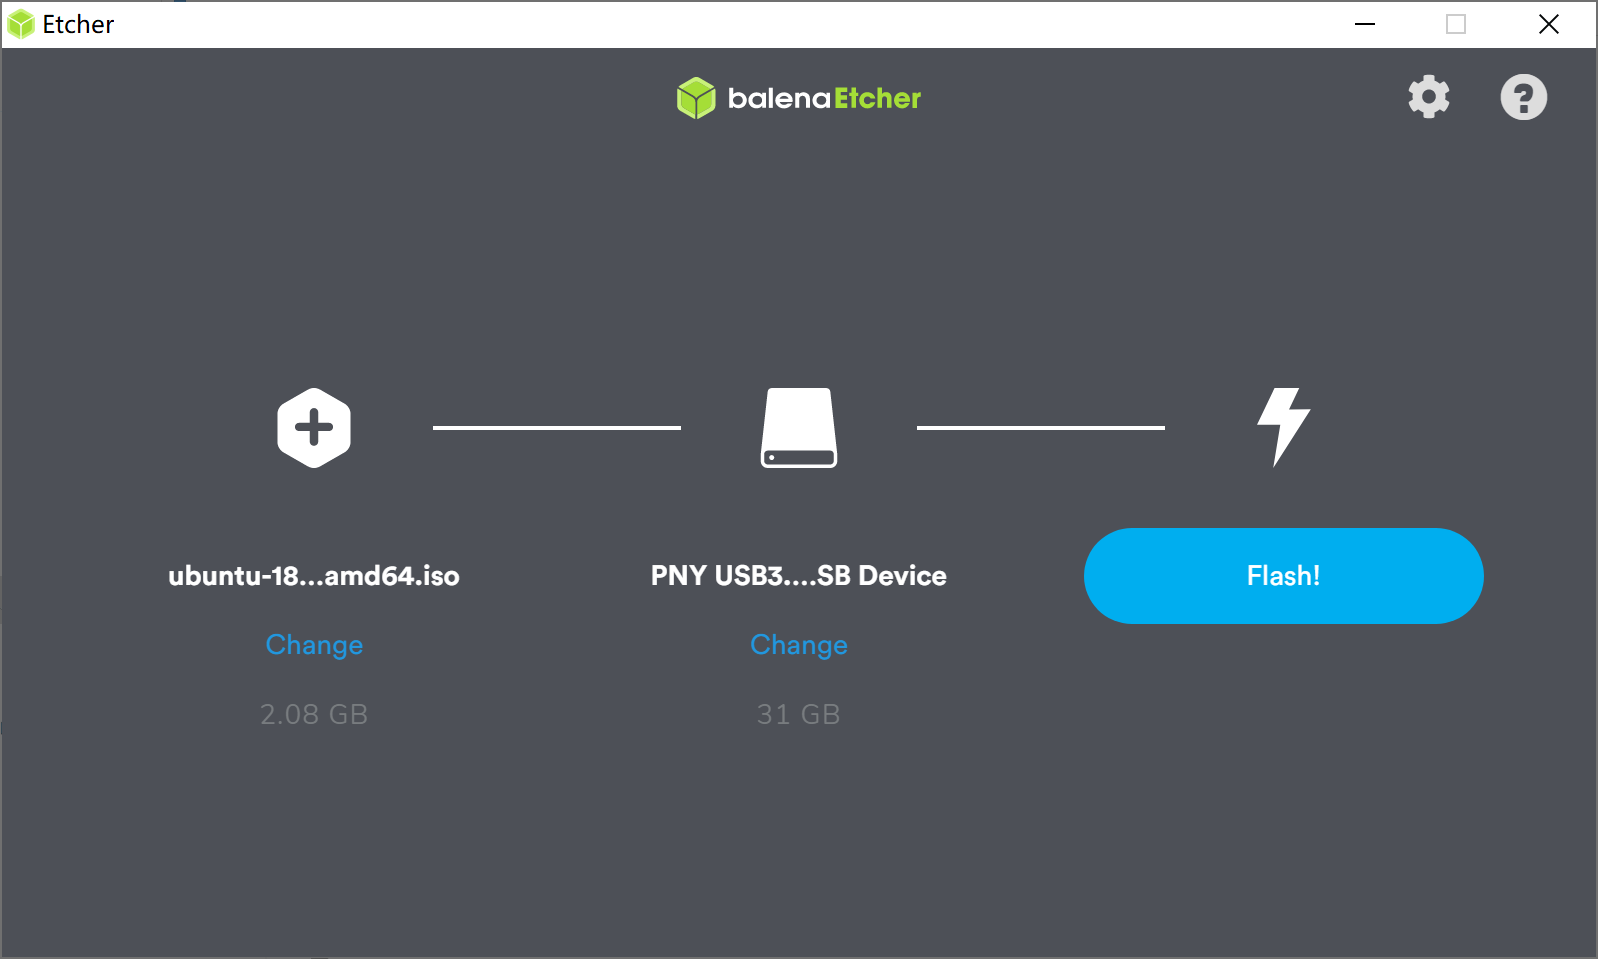
Step 4 - Writing the OS Image into USB
Select the downloaded Operating System Image, select the formatted USB Drive and Flash! Now, the bootable USB is all set to go.

Installing Operating System (Ubuntu)
Step 1 - Selecting Bootable USB as Boot Device
Plug in your bootable USB, Monitor and keyboard to ODYSSEY - X86J4105, and power up. When booting up, keep pressing F7
to enter the Boot Manager Screen. And use ↑ and ↓ Key on keyboard to select your bootable USB.
In this Tutorial, UEFI: Mass Storage Device 1.00
is the bootable USB.

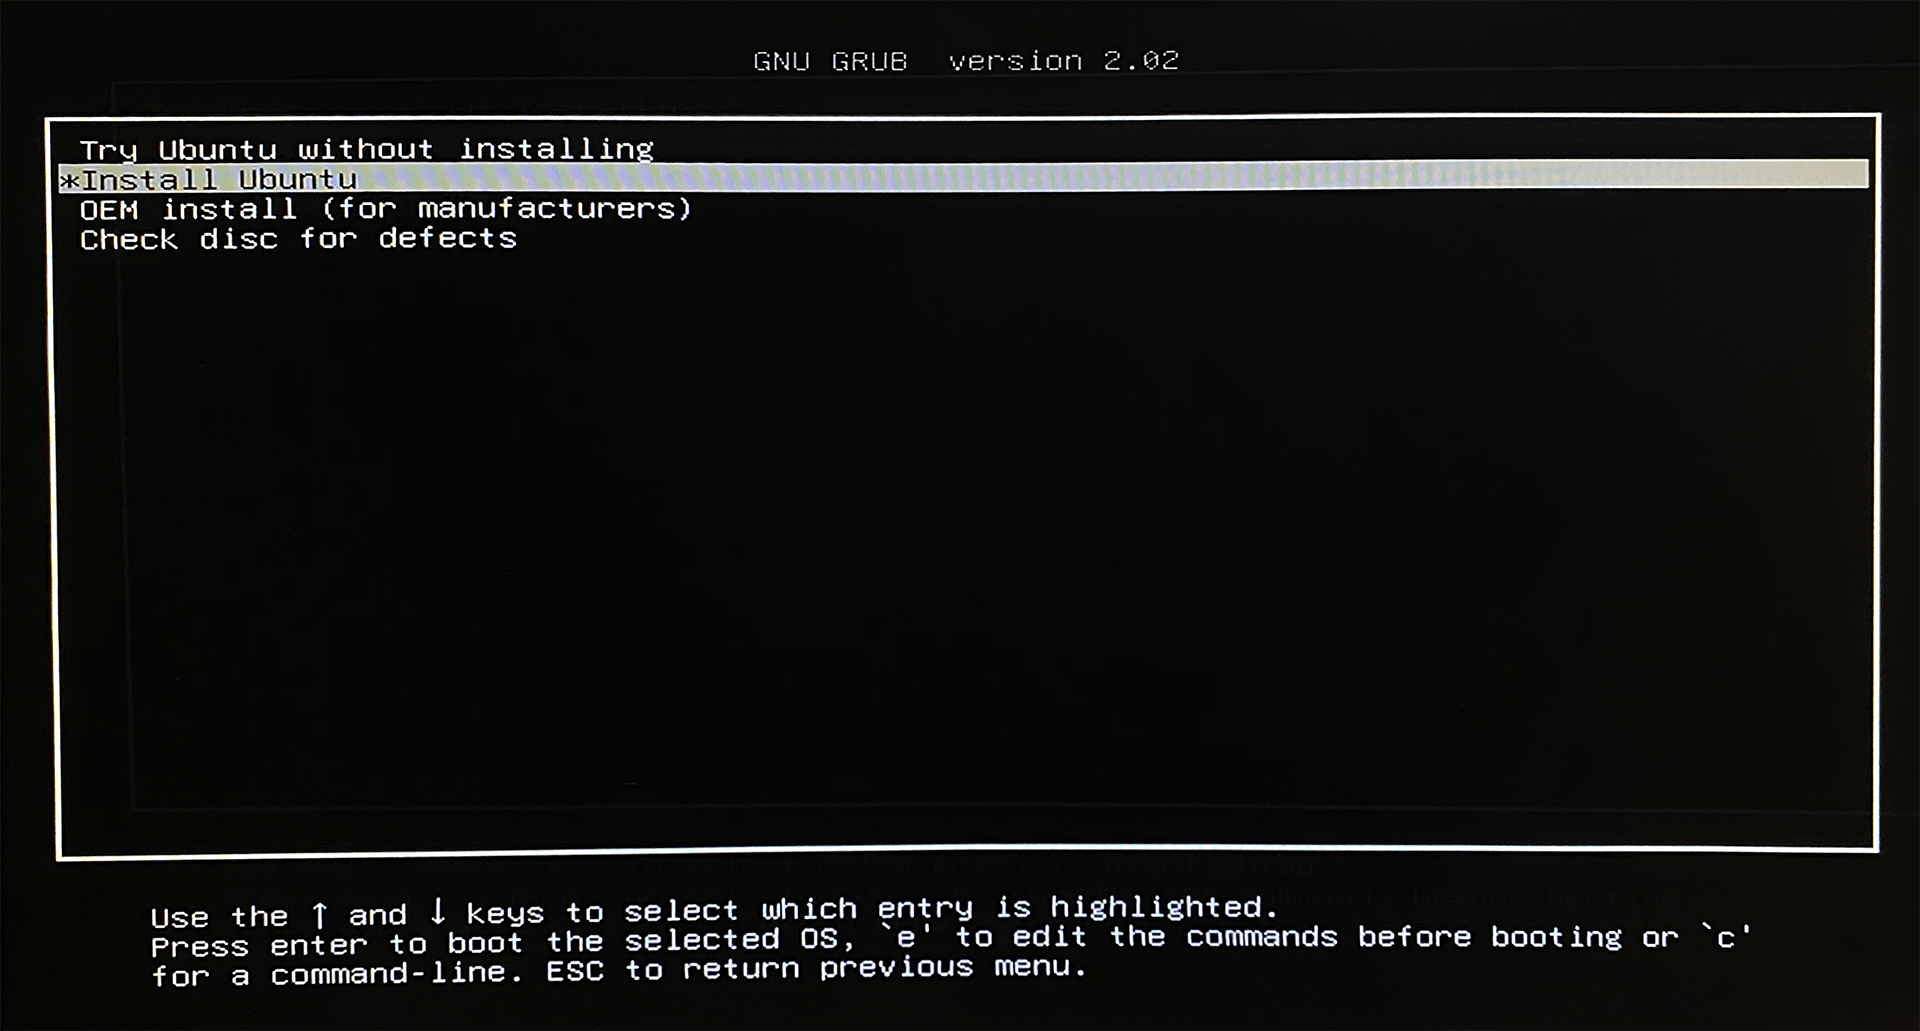
Step 2 - Installing the OS
Select the Install ubuntu
and press Enter. Follow through the installing instructions on the screen, i.e. system language, user name, location and etc.
Note: For detail steps of Installing ubuntu, you can follow this video for more information. The Installing part starts at 3:20 in the video.

Step 3 - Reboot and Enjoy New OS!
If everything goes well, ubuntu should be installed on the ODYSSEY - X86J4105 and you can start enjoying your new OS!

How to Upgrade the BIOS
BIOS is also like an OS and can be upgraded to fix bugs and enhance performance of the ODYSSEY - X86J4105. Here is the instruction how to upgrade the BIOS version on ODYSSEY - X86J4105.
Current Latest BIOS Version and Changelog
Important Notes
1. It wipes the old BIOS settings, and so you would need to re-activate your Windows(if using Windows) again (wipes the activation key, needs Internet to activate again).
2. If you have the non-EMMC version of ODYSSEY-X86, before updating the BIOS, Please make sure to disable eMMC in the BIOS Settings Before and After the updates.
You may check in the BIOS main page for BIOS and EC Firmware's versions.

- Latest BIOS:
SD-BS-CJ41G-300-101-C 03/11/2021 16:28:07
- SHA256: 12f4ce1ab81008525138fcd7d830e18dc13936f3ce4a51e17c314fc55debe480
- Fix bug: loads into other OS other than Windows when set to load others.
History BIOS:
SD-BS-CJ41G-M-101-K 12/31/2020 20:34:37
SHA256: 7208d39c4f77a4837a0a1072dce45c7bc8feba28597522ea036778a9c09aa61a
Added Secure Boot.
- Added Wake on LAN.
- Fix reboot into BIOS settings page under Linux environment (Eg.
systemctl reboot --firmware-setup
).- Fix Linux Wake on Lan light issue.
SD-BS-CJ41G-M-101-G 08/31/2020 14:01:20
SHA256: eb932b69435d26a5b076c485c90e4289a697681ac092c18e85c86804e3fe4206
- Under BIOS Menu, Setup -> Chipset -> Fan Control, added Always On options.
SD-BS-CJ41G-M-101-E 01/07/2020 14:03:11
SHA256: 98bb25d6d32250fb10bf047f5902630b82a8560020fb4336d7723b4dfb3f9df2
- Fix the problem of incomplete display of startup Seeed logo screen.
Note
Latest BIOS support auto-flash feature, where you only need to place the files in the root location of FAT32 format USB and select the USB-drive as boot up option. It will automatic enters flashing.
Step 1 - Download the newest version of BIOS
Download the latest version of BIOS from here.
Step 2 - Prepare bootable USB
Just like creating a bootable USB for installing OS, format the USB into FAT32
file system. This time, just unzip the downloaded file and copy the unzipped folder into the USB.
Step 3 - Upgrading BIOS
Attention
The first boot up from the BIOS upgrade is relatively long, please be patient to wait, and the installed OS will launch eventually. It will take around 3 ~ 5 minutes.
Plug the USB into ODYSSEY - X86J4105 and boot up and follow steps below:
- Keep pressing
F7
Key to Enter Boot Manager Screen. Select theUEFI: Built-in EFI Shell
as boot device and pressEnter
.

- Enter the shell by pressing any key.

- Enter the USB drive by typing
fs1:
and pressEnter
. Then, usedir
to check the directories. The folder name will appear and usecd SD-BS-CJ41G-M101-A
to go into the folder.
Note: Can use tab
to autofill the folder name

- Once inside this folder, use
dir
again to list out all the files in the folder and usecd SD-BS-CJ41G-M-101-A
to go in this folder. Usedir
one more time to list out files in this secondary folder.

- Run the
BIOS.nsh
and the updating process will begin.

- The BIOS update will finish in few moments.

Step 4 - Reboot
-
When the BIOS is upgraded, press the ON/OFF button, and you should see the blue light goes off.
-
Unplug the DC power and RTC battery from the ODYSSEY-X86.
-
Plug the DC power and RTC battery back to the ODYSSEY-X86.
-
Press the ON/OFF button and wait patiently. You should see the blue light goes on.
Step 5 - Wait Patiently
Please wait patiently and DO NOT unplug power (or the hardware) to corrupt the updating process. The process will take 6 ~ 8 minutes, feel free for a coffee break!
Attention
The first boot up from the BIOS upgrade is relatively long, please be patient to wait, and the installed OS will launch eventually. It will take around 6 ~ 8 minutes.
How to update the Embedded Controller
The X86 also has a embedded controller that can be updated. Updating the EC has the same procedure as updating BIOS(auto-update):
-
Download the firmware files.
-
Save them in the root location of a FAT32 format USB drive.
-
Start ODYSSEY-X86 and boot up from the USB drive. Wait and it will automatically start the flashing process.
-
Reboot the device when it's done.
Latest EC Firmware
SD-EC-CJ41G-M-101-K 03/23/2021 10:57:32
-
SHA256: 5e479185398121b1913ada3cff03264ea1522196b53f34c9ace77bd1f3ecc47e
-
Fixing bug: Increase stability of the EC firmware.
History EC Firmware:
SD-EC-CJ41G-M-101-J 02/02/2021 15:39:11
SHA256: 4ab099f45439f8f6ec14e25ae50a64f878eed4c998e39000e17f2047df6bbb83
Fixing bug: Shutting down during BIOS setting page causes the ODYSSEY needs to reset the power in order to turn back on.
SD-EC-CJ41G-M-101-I 12/31/2020 20:34:37
SHA256: 94f664401120183238c5eaa41ea267b240dd5836fa879c568bf3275bca508c52
Optimize FAN control logic
SD-EC-CJ41G-M-101-C 08/31/2020 14:01:20
SHA256: 4b7ed82357eb608c3ec00f6f5f0358a35e63b327ae33855eb5e7608814f8df6a
Optimize the problem of incorrect starting and turning temperature of the Fan.
Notes
- Ubuntu 16 is not supported by ODYSSEY - X86J4105
Tech Support
Please submit any technical issue into our forum