Grove - Wio-E5 Helium Demo
Getting Started
The Helium IOT Network uses the LoRaWAN protocol to provide internet connectivity to "Internet of Things" devices and is the original sub network in the Helium ecosystem. Developers and companies around the world rely on the Helium IOT Network for connectivity.
Make sure you are inside the helium network coverage. You can find the network coverage at explorer.helium.com
Preparations
Here is a demo showing you how to connect Helium IoT Network and Seeeduino XIAO module via Grove - Wio-E5 module. These modules are able to collect temperature and humidity parameters from the environment and send them back to TTN. The flashing LED lights on the Seeeduino Xiao indicate the status of the temperature and humidity sensor as connecting to TTN cloud.
Please ensure the consistent of the frequency band among the end nodes, gateway, and Helium configuration you are using by following this instruction. The frequency plan this demo applied is for IN865.
Hardware Required
| Seeeduino XIAO | Grove - Wio-E5 | Seeeduino XIAO Expansion Board | Grove - Temperature & Humidity Sensor (DHT11) |
|---|---|---|---|
|
|
|
|


If this is your first time using Seeeduino XIAO, please refer to Seeeduino XIAO's wiki. If this is your first time to use Arduino, Arduino’s website is a great resource for you to start your Arduino journey.
Hardware Connection
-
Step 1. Connect the Wio-E5 module directly to the "UART" slot.
-
Step 2. Put DH11 into the "A0/D0" socket.
-
Step 3. Download the code, please refer to the software part.
Helium IoT Console Prepration
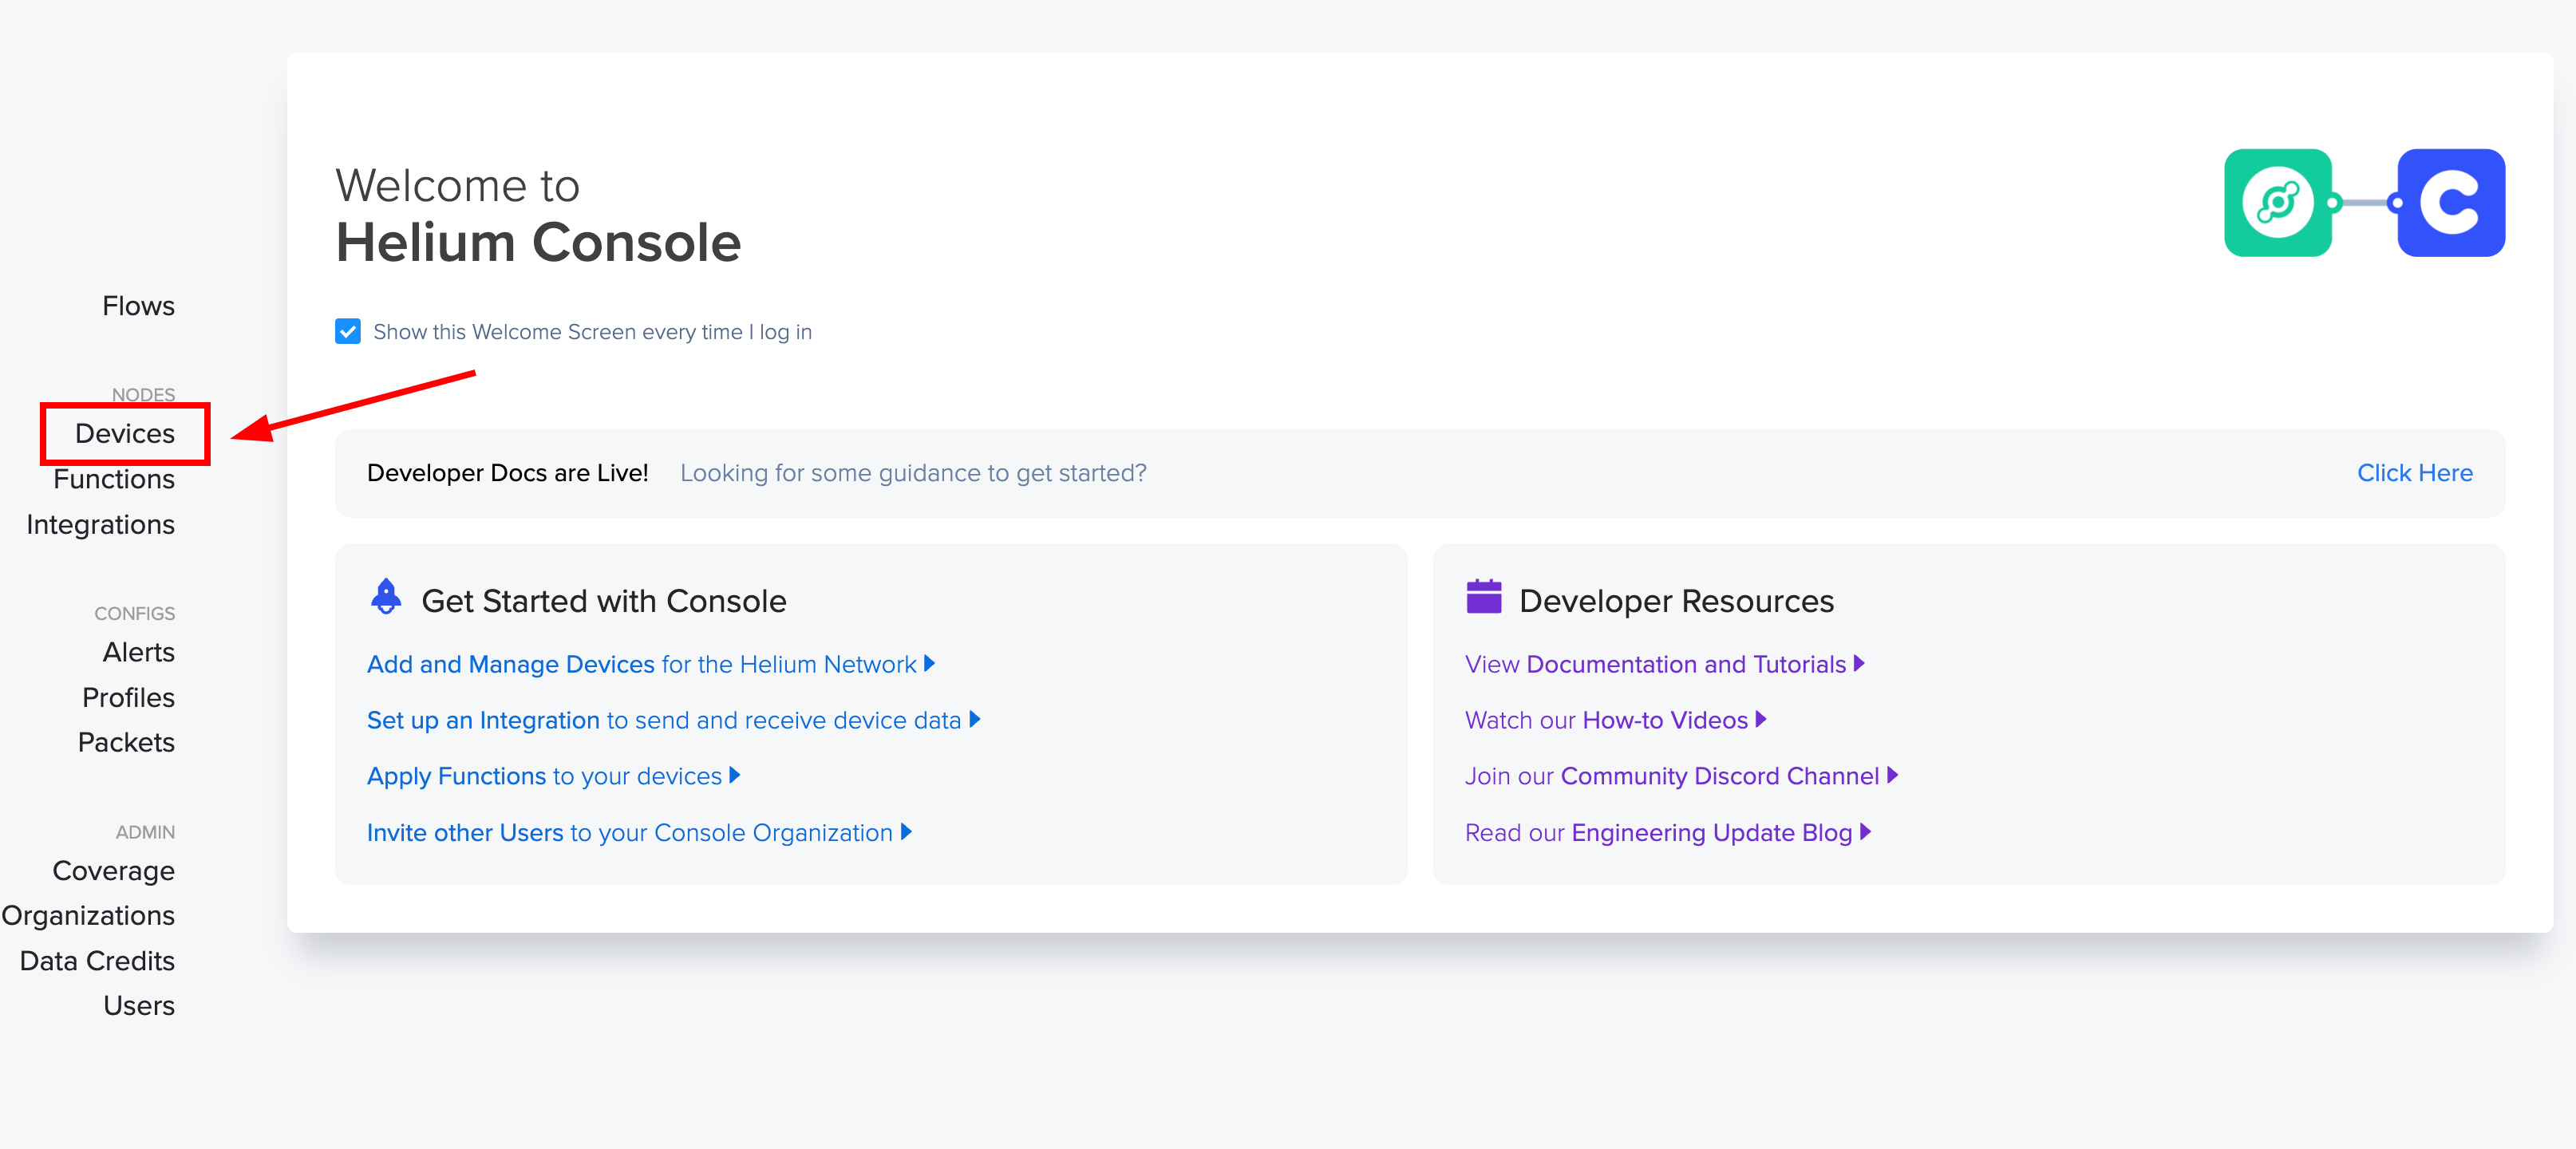
- Step 1. Visit Helium Console website and login if you have an existing account. If you do not have an existing account then you will have to use one of the other Public Console LNS providers like Metroscientific.

- Step 2. After logging in, click "Devices" to manage devices.
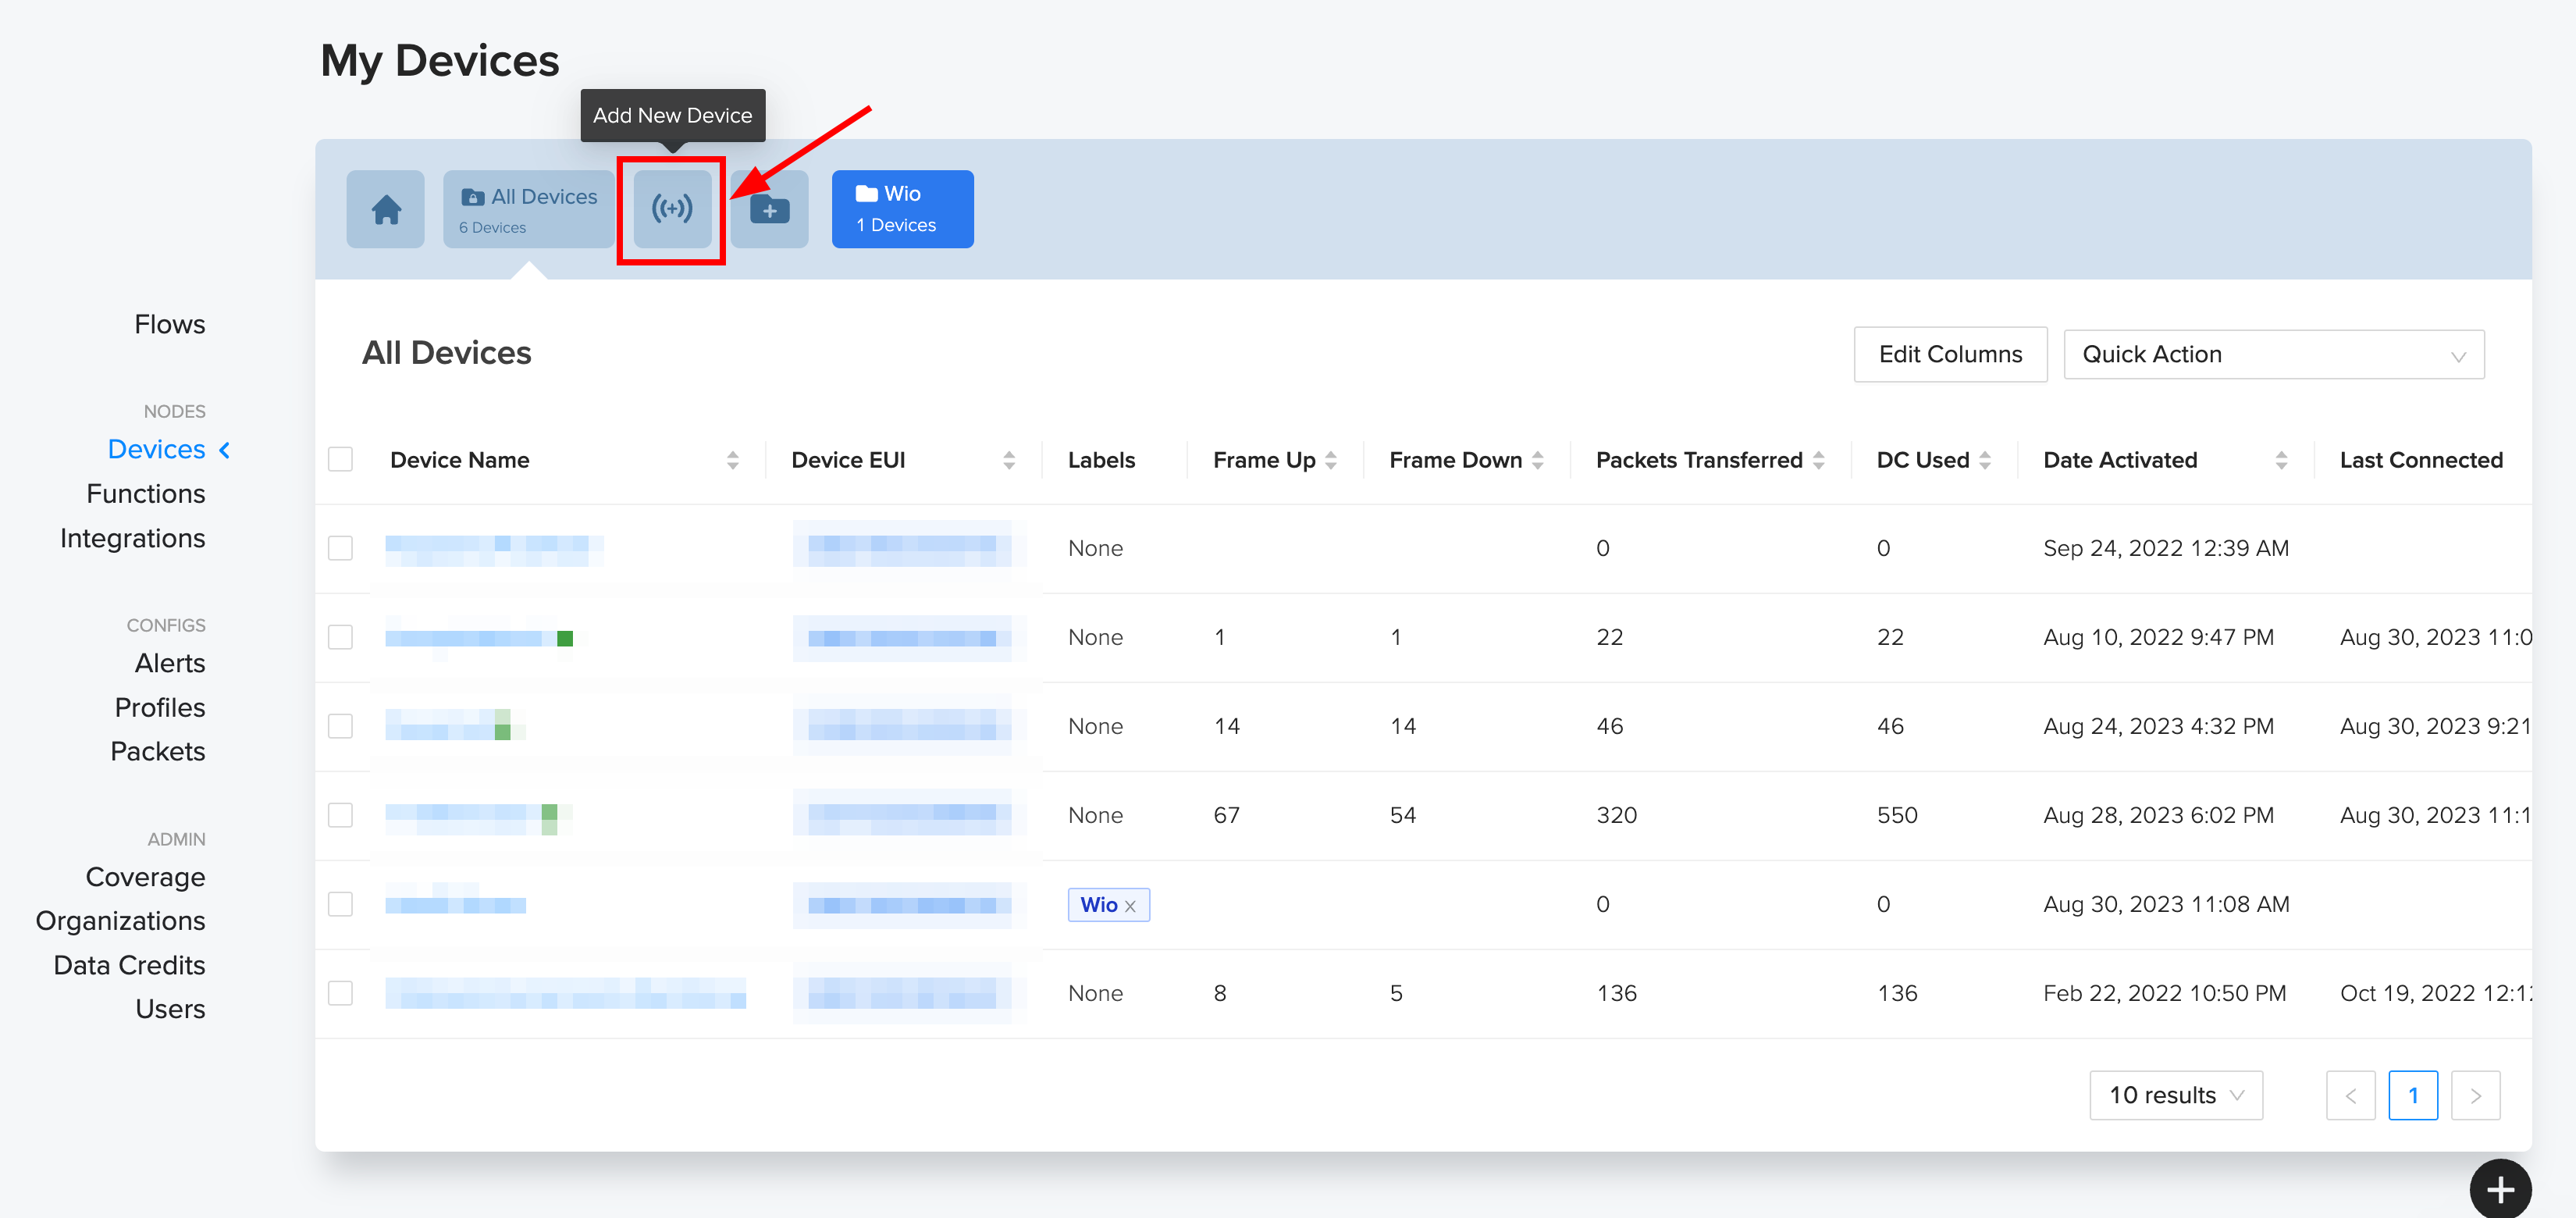
- Step 3. Then click on "Add New Device"
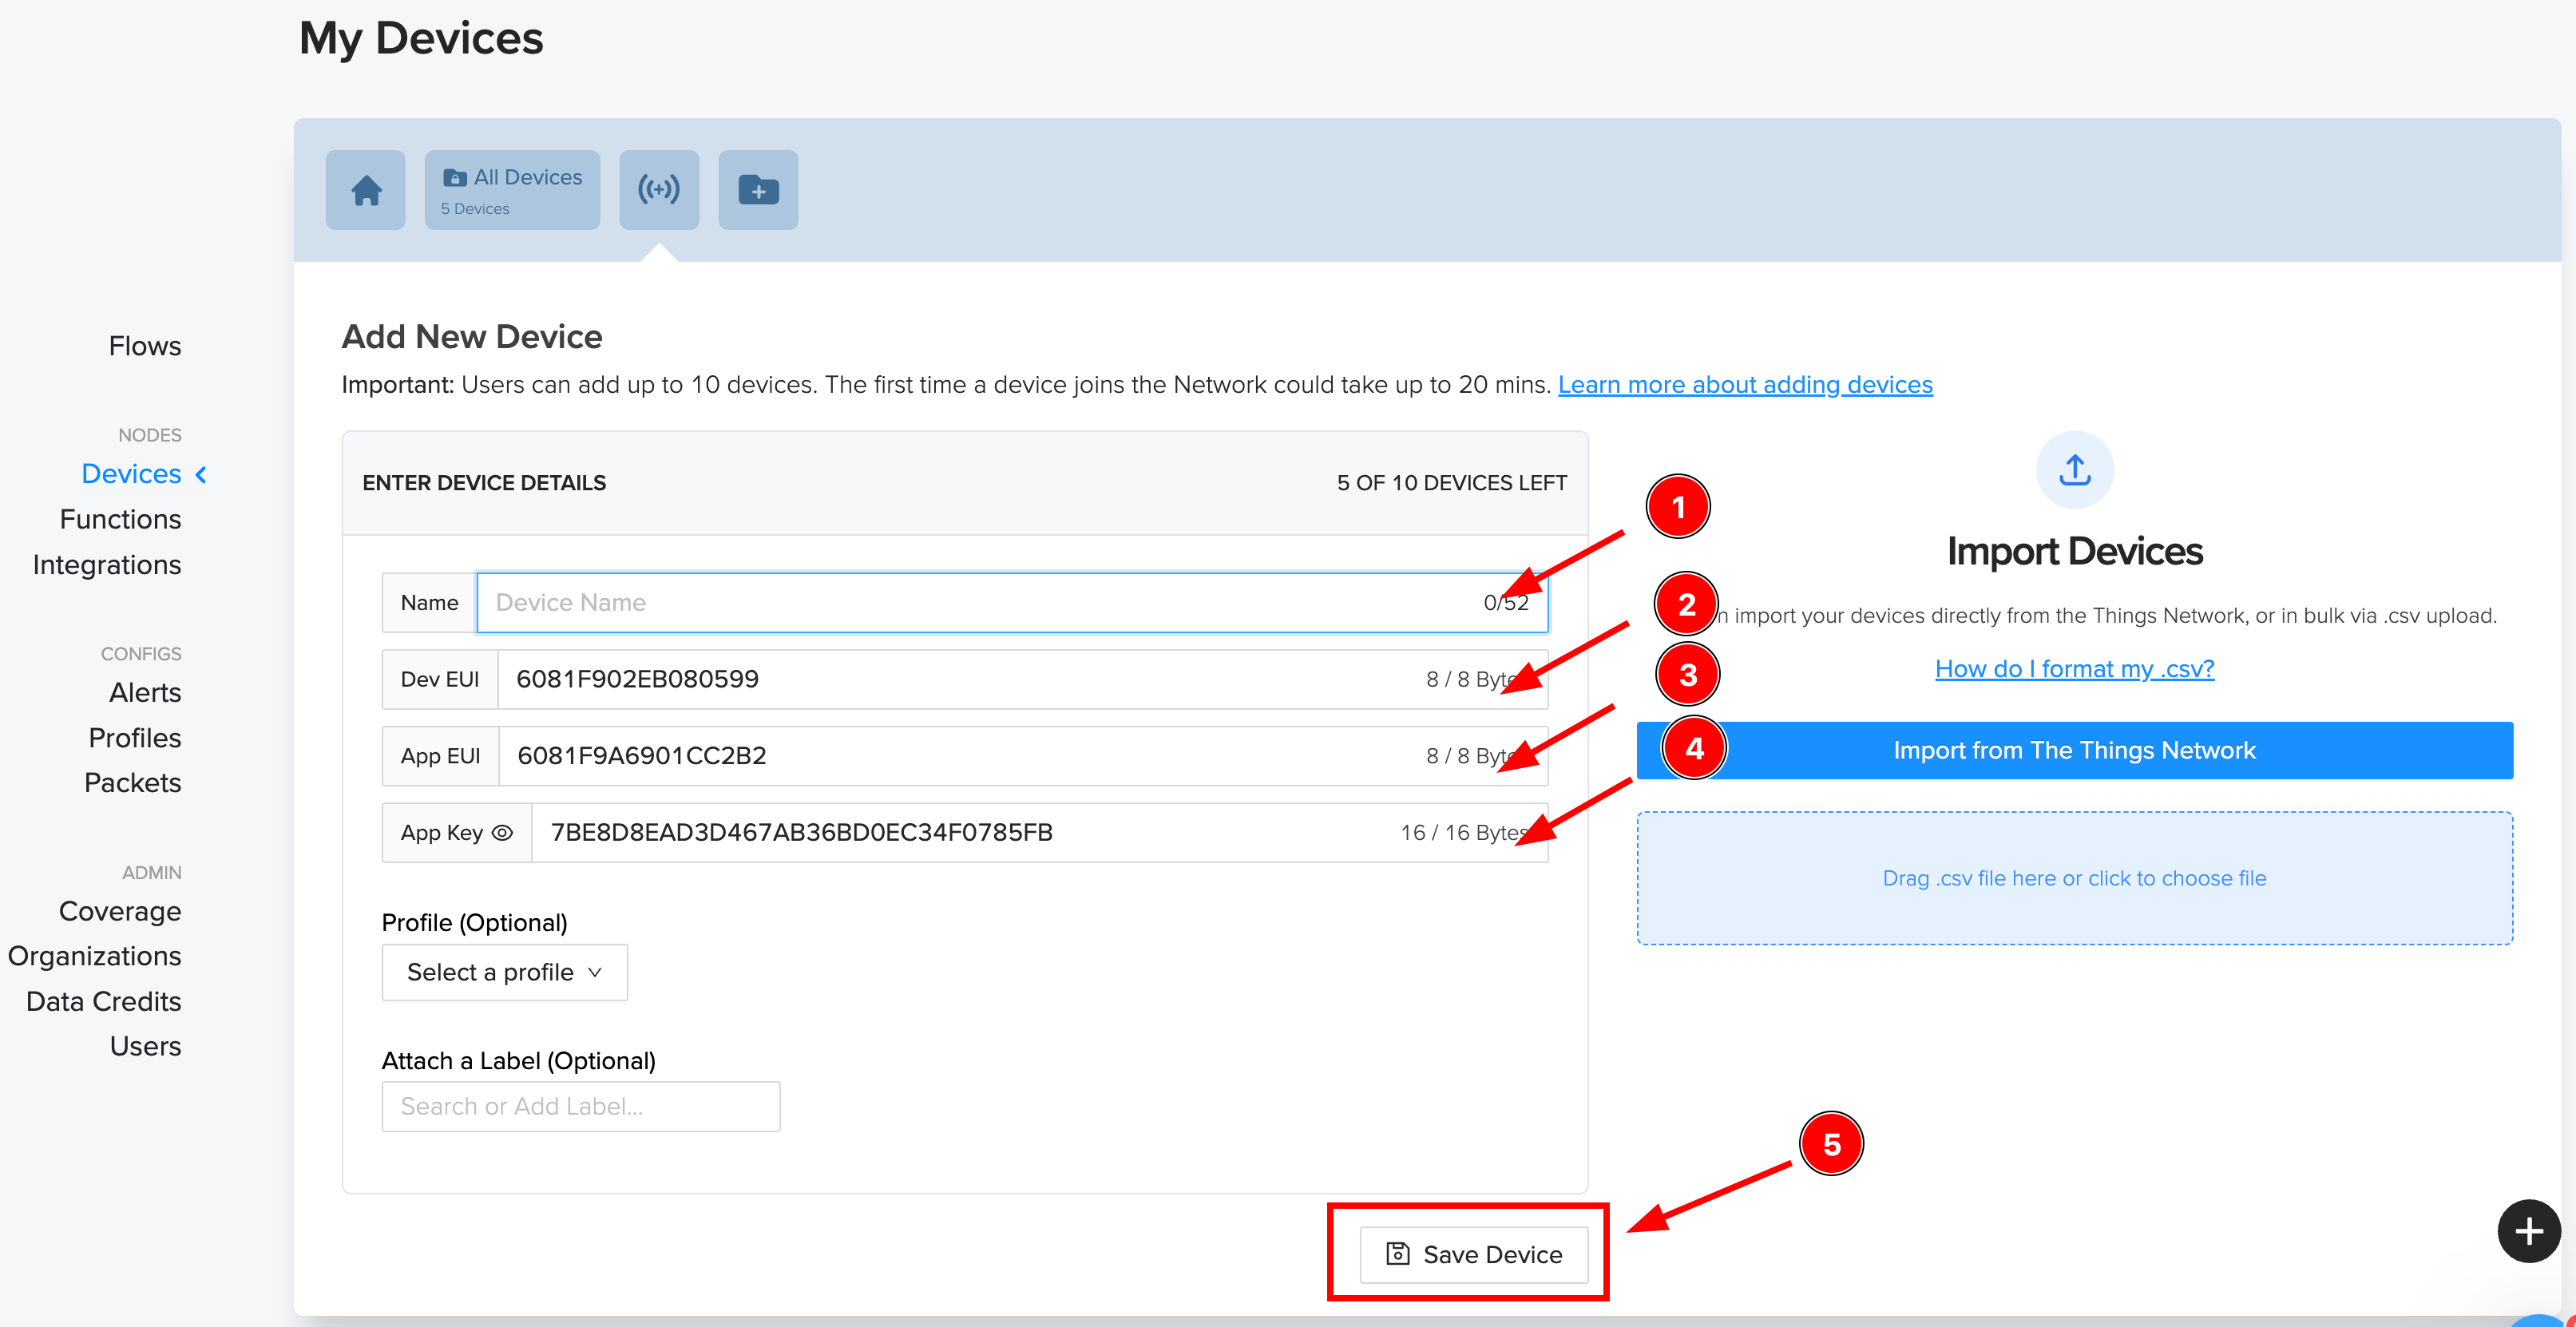
- Step 4. Here, 1) Add device a new , 2) Copy the Dev EUI , 3) Copy the App EUI, 4) Copy the App Key, 5) Finally Click Save.
- Step 5. Now you can see the device under the "Devices" section.

Now, the helium console setup is done. we can move to the Software part and upload data to the helium console over the helium LoRa network.
Software Preparation
If this is the first time you work with Arduino, we strongly recommend you to see Getting Started with Arduino before the start. Click to learn about detail about how to install an Arduino Library
Download Library
-
Step 1. Install the u8g2 library
-
Step 2. Install the DHT sensor library
Software Code
Download the example; copy the code stick onto the Aruino IDE and then upload it.
/*
* Grove - Wio-E5 Helium Demo
*  Date: 30/08/2023
* Author: Salman Faris (Modified Seeed TTN Sketch)

*/


#include <Arduino.h>
#include <U8x8lib.h>
#include "DHT.h"

//# define DHTPIN 0 // what pin we're connected to

// Uncomment whatever type you're using!
#define DHTTYPE DHT11  // DHT 11
// #define DHTTYPE DHT22   // DHT 22  (AM2302)
//#define DHTTYPE DHT21   // DHT 21 (AM2301)

DHT dht(DHTPIN, DHTTYPE);

U8X8_SSD1306_128X64_NONAME_HW_I2C u8x8(/*reset=*/U8X8_PIN_NONE);
// U8X8_SSD1306_128X64_NONAME_SW_I2C u8x8(/*clock=*/ SCL, /*data=*/ SDA, /*reset=*/ U8X8_PIN_NONE);   // OLEDs without Reset of the Display

static char recv_buf[512];
static bool is_exist = false;
static bool is_join = false;
static int led = 0;

static int at_send_check_response(char *p_ack, int timeout_ms, char *p_cmd, ...) {
  int ch;
  int num = 0;
  int index = 0;
  int startMillis = 0;
  va_list args;
  memset(recv_buf, 0, sizeof(recv_buf));
  va_start(args, p_cmd);
  Serial1.printf(p_cmd, args);
  Serial.printf(p_cmd, args);
  va_end(args);
  delay(200);
  startMillis = millis();

  if (p_ack == NULL) {
    return 0;
  }

  do {
    while (Serial1.available() > 0) {
      ch = Serial1.read();
      recv_buf[index++] = ch;
      Serial.print((char)ch);
      delay(2);
    }

    if (strstr(recv_buf, p_ack) != NULL) {
      return 1;
    }

  } while (millis() - startMillis < timeout_ms);
  return 0;
}

static void recv_prase(char *p_msg) {
  if (p_msg == NULL) {
    return;
  }
  char *p_start = NULL;
  int data = 0;
  int rssi = 0;
  int snr = 0;

  p_start = strstr(p_msg, "RX");
  if (p_start && (1 == sscanf(p_start, "RX: \"%d\"\r\n", &data))) {
    Serial.println(data);
    u8x8.setCursor(2, 4);
    u8x8.print("led :");
    led = !!data;
    u8x8.print(led);
    if (led) {
      digitalWrite(LED_BUILTIN, LOW);
    } else {
      digitalWrite(LED_BUILTIN, HIGH);
    }
  }

  p_start = strstr(p_msg, "RSSI");
  if (p_start && (1 == sscanf(p_start, "RSSI %d,", &rssi))) {
    u8x8.setCursor(0, 6);
    u8x8.print("                ");
    u8x8.setCursor(2, 6);
    u8x8.print("rssi:");
    u8x8.print(rssi);
  }
  p_start = strstr(p_msg, "SNR");
  if (p_start && (1 == sscanf(p_start, "SNR %d", &snr))) {
    u8x8.setCursor(0, 7);
    u8x8.print("                ");
    u8x8.setCursor(2, 7);
    u8x8.print("snr :");
    u8x8.print(snr);
  }
}

void setup(void) {
  u8x8.begin();
  u8x8.setFlipMode(1);
  u8x8.setFont(u8x8_font_chroma48medium8_r);

  Serial.begin(115200);
  pinMode(LED_BUILTIN, OUTPUT);
  digitalWrite(LED_BUILTIN, HIGH);

  Serial1.begin(9600);
  Serial.print("E5 LORAWAN TEST\r\n");
  u8x8.setCursor(0, 0);

  if (at_send_check_response("+AT: OK", 100, "AT\r\n")) {
    is_exist = true;
    at_send_check_response("+ID: DevEui", 1000, "AT+ID=DevEui,\"xxxxxxxxxxxxx\"\r\n"); // replace 'xxxxxxxxxxxxx' with your DevEui
    at_send_check_response("+ID: AppEui", 1000, "AT+ID=AppEui,\"xxxxxxxxxxxxx\"\r\n"); // replace 'xxxxxxxxxxxxx' with your AppEui
    at_send_check_response("+KEY: APPKEY", 1000, "AT+KEY=APPKEY,\"xxxxxxxxxxxxx\"\r\n"); // replace 'xxxxxxxxxxxxx' with your AppKey
    at_send_check_response("+ID: DevAddr", 1000, "AT+ID=DevAddr\r\n");
    at_send_check_response("+ID: AppEui", 1000, "AT+ID\r\n");
    at_send_check_response("+MODE: LWOTAA", 1000, "AT+MODE=LWOTAA\r\n");
    at_send_check_response("+DR: IN865", 1000, "AT+DR=IN865\r\n");  // Change FREQ as per your location
    at_send_check_response("+CH: NUM", 1000, "AT+CH=NUM,0-2\r\n");
    at_send_check_response("+CLASS: C", 1000, "AT+CLASS=A\r\n");
    at_send_check_response("+PORT: 8", 1000, "AT+PORT=8\r\n");
    delay(200);
    u8x8.setCursor(5, 0);
    u8x8.print("LoRaWAN");
    is_join = true;
  } else {
    is_exist = false;
    Serial.print("No E5 module found.\r\n");
    u8x8.setCursor(0, 1);
    u8x8.print("unfound E5 !");
  }

  dht.begin();

  u8x8.setCursor(0, 2);
  u8x8.setCursor(2, 2);
  u8x8.print("temp:");

  u8x8.setCursor(2, 3);
  u8x8.print("humi:");

  u8x8.setCursor(2, 4);
  u8x8.print("led :");
  u8x8.print(led);
}

void loop(void) {

  temp = dht.readTemperature();
  humi = dht.readHumidity();

  Serial.print("Humidity: ");
  Serial.print(humi);
  Serial.print(" %\t");
  Serial.print("Temperature: ");
  Serial.print(temp);
  Serial.println(" *C");

  u8x8.setCursor(0, 2);
  u8x8.print("      ");
  u8x8.setCursor(2, 2);
  u8x8.print("temp:");
  u8x8.print(temp);
  u8x8.setCursor(2, 3);
  u8x8.print("humi:");
  u8x8.print(humi);

  if (is_exist) {
    int ret = 0;
    if (is_join) {

      ret = at_send_check_response("+JOIN: Network joined", 12000, "AT+JOIN\r\n");
      if (ret) {
        is_join = false;
      } else {
        at_send_check_response("+ID: AppEui", 1000, "AT+ID\r\n");
        Serial.print("JOIN failed!\r\n\r\n");
        delay(5000);
      }
    } else {
      char cmd[128];
      sprintf(cmd, "AT+CMSGHEX=\"%04X%04X\"\r\n", (int)temp, (int)humi);
      ret = at_send_check_response("Done", 5000, cmd);
      if (ret) {
        recv_prase(recv_buf);
      } else {
        Serial.print("Send failed!\r\n\r\n");
      }
      delay(5000);
    }
  } else {
    delay(1000);
  }
}
Make sure to replace the DevEui, AppEui and AppKey before uploading the code.
at_send_check_response("+ID: DevEui", 1000, "AT+ID=DevEui,\"xxxxxxxxxxxxx\"\r\n"); // replace 'xxxxxxxxxxxxx' with your DevEui
at_send_check_response("+ID: AppEui", 1000, "AT+ID=AppEui,\"xxxxxxxxxxxxx\"\r\n"); // replace 'xxxxxxxxxxxxx' with your AppEui
at_send_check_response("+KEY: APPKEY", 1000, "AT+KEY=APPKEY,\"xxxxxxxxxxxxx\"\r\n"); // replace 'xxxxxxxxxxxxx' with your AppKey
- Step 8: Upload the Arduino code to Seeeduino XIAO as explained before, and open serial monitor to see the following output
+ID: DevAddr, 26:0B:20:25
+ID: DevEui, 60:81:F9:A4:84:XX:XX:XX
+ID: AppEui, 60:81:F9:A6:90:XX:XX:XX
AT+MODE=LWOTAA
+MODE: LWOTAA
AT+DR=IN865
+DR: IN865
AT+CH=NUM,0-2
+CH: NUM, 0-2
AT+CLASS=A
+CLASS: A
AT+PORT=8
+PORT: 8
Humidity: 43.00 %	Temperature: 23.00 *C
AT+JOIN
+JOIN: Start
+JOIN: NORMAL
+JOIN: Network joined
+JOIN: NetID 326548 DevAddr 48:00:00:0E
+JOIN: Done
Humidity: 29.00 %	Temperature: 32.00 *C
AT+CMSGHEX="0020001D"
+CMSGHEX: Start
+CMSGHEX: Wait ACK
+CMSGHEX: ACK Received
+CMSGHEX: RXWIN1, RSSI -30, SNR 6.0
+CMSGHEX: Done
Humidity: 8.00 %	Temperature: 30.00 *C
AT+CMSGHEX="001E0008"
+CMSGHEX: Start
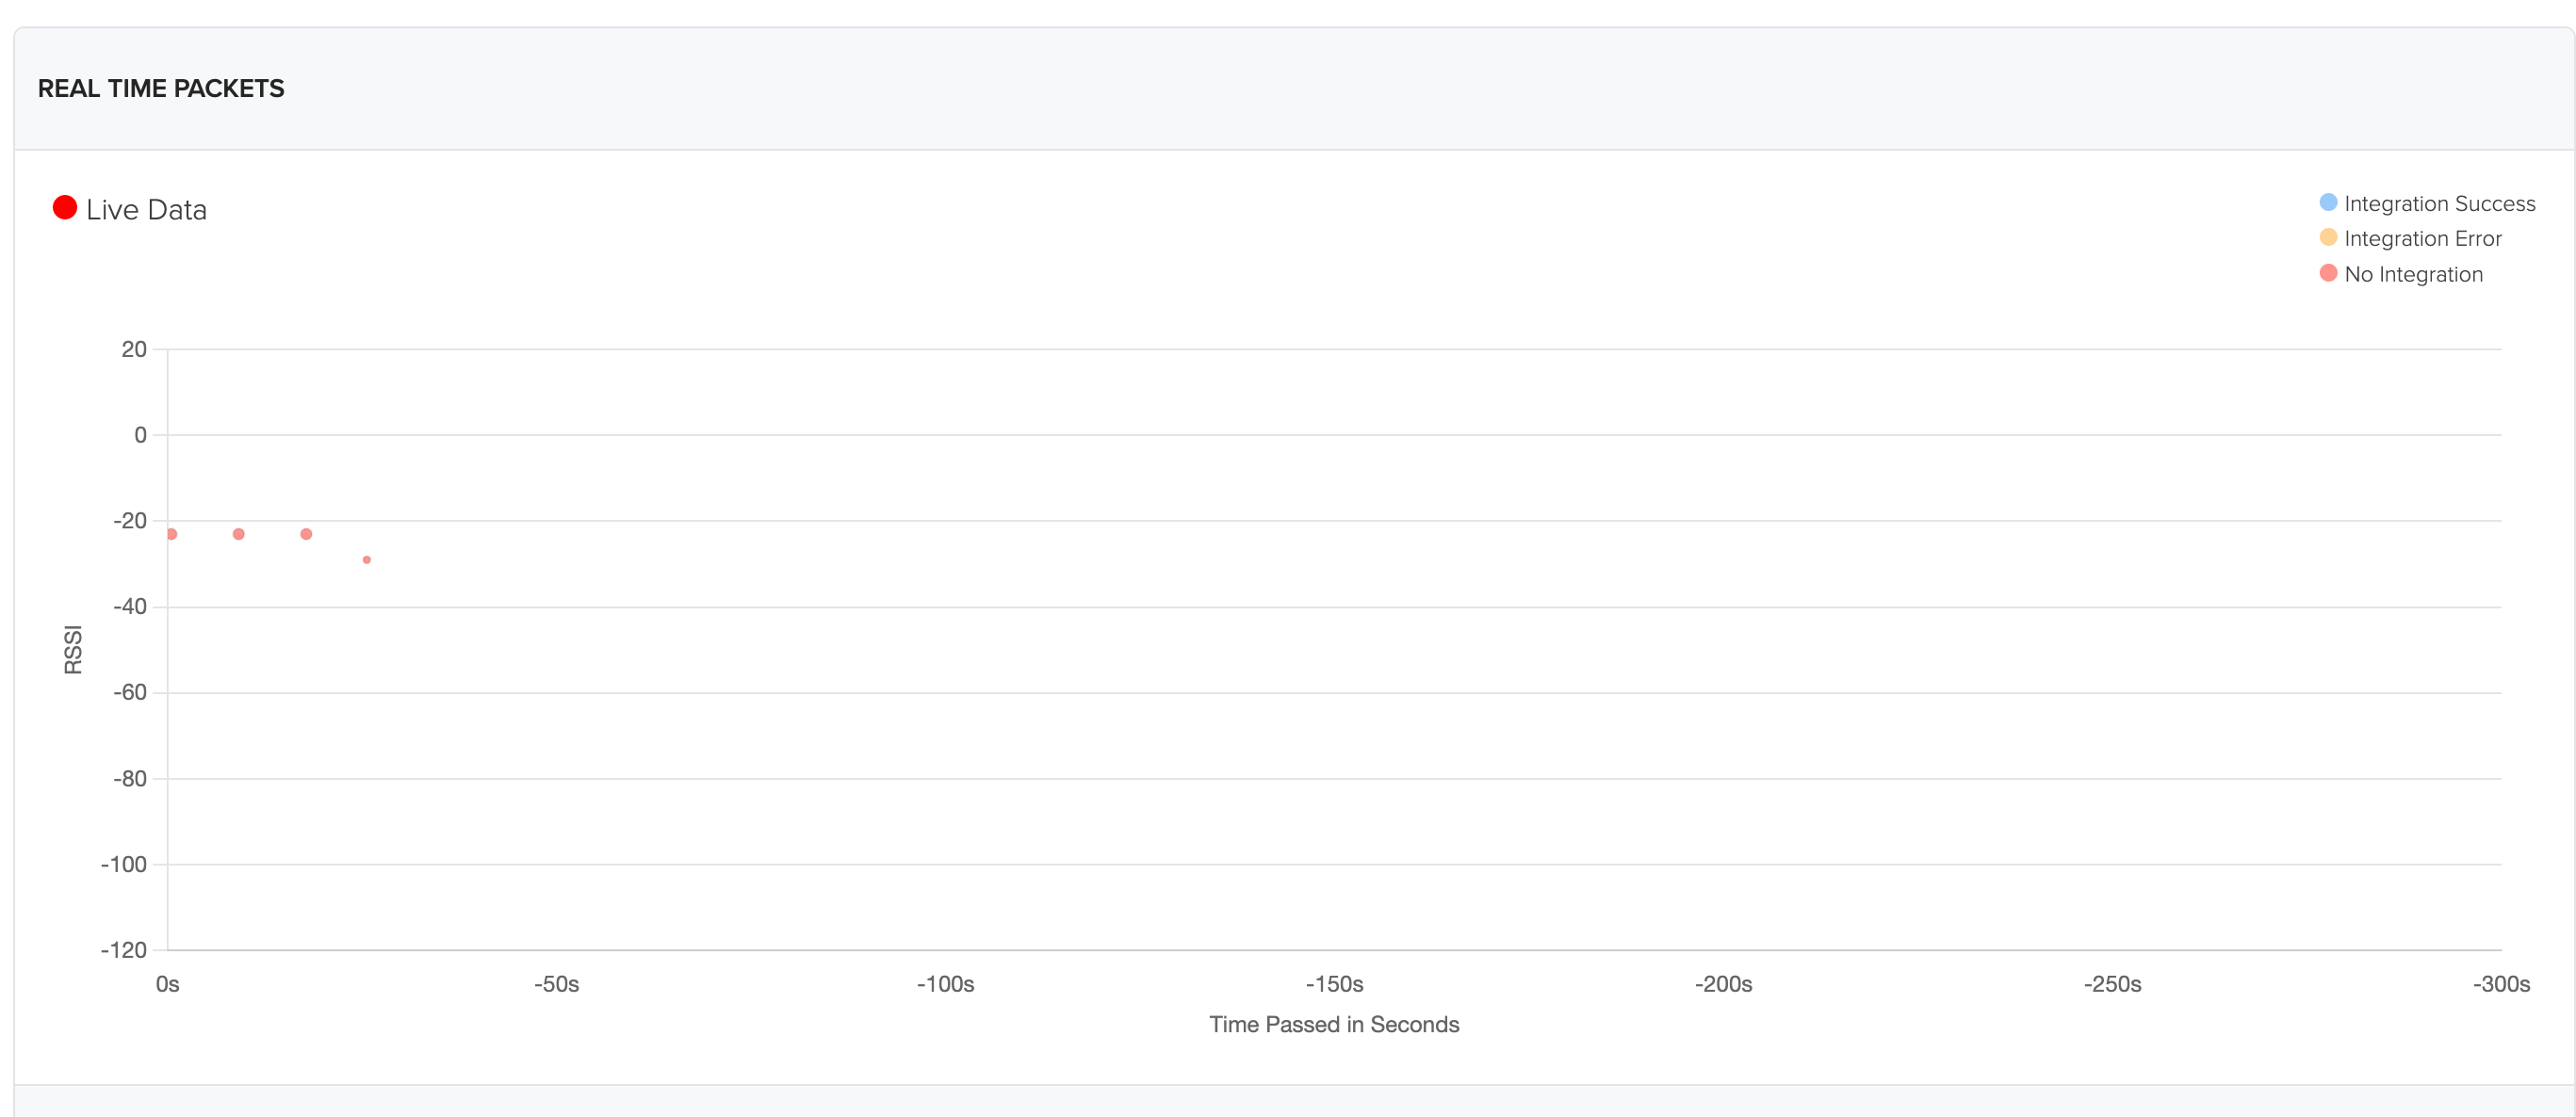
Once you see the message like this +JOIN: Network joined, open the "REAL TIME PACKETS" section and see uplink information.
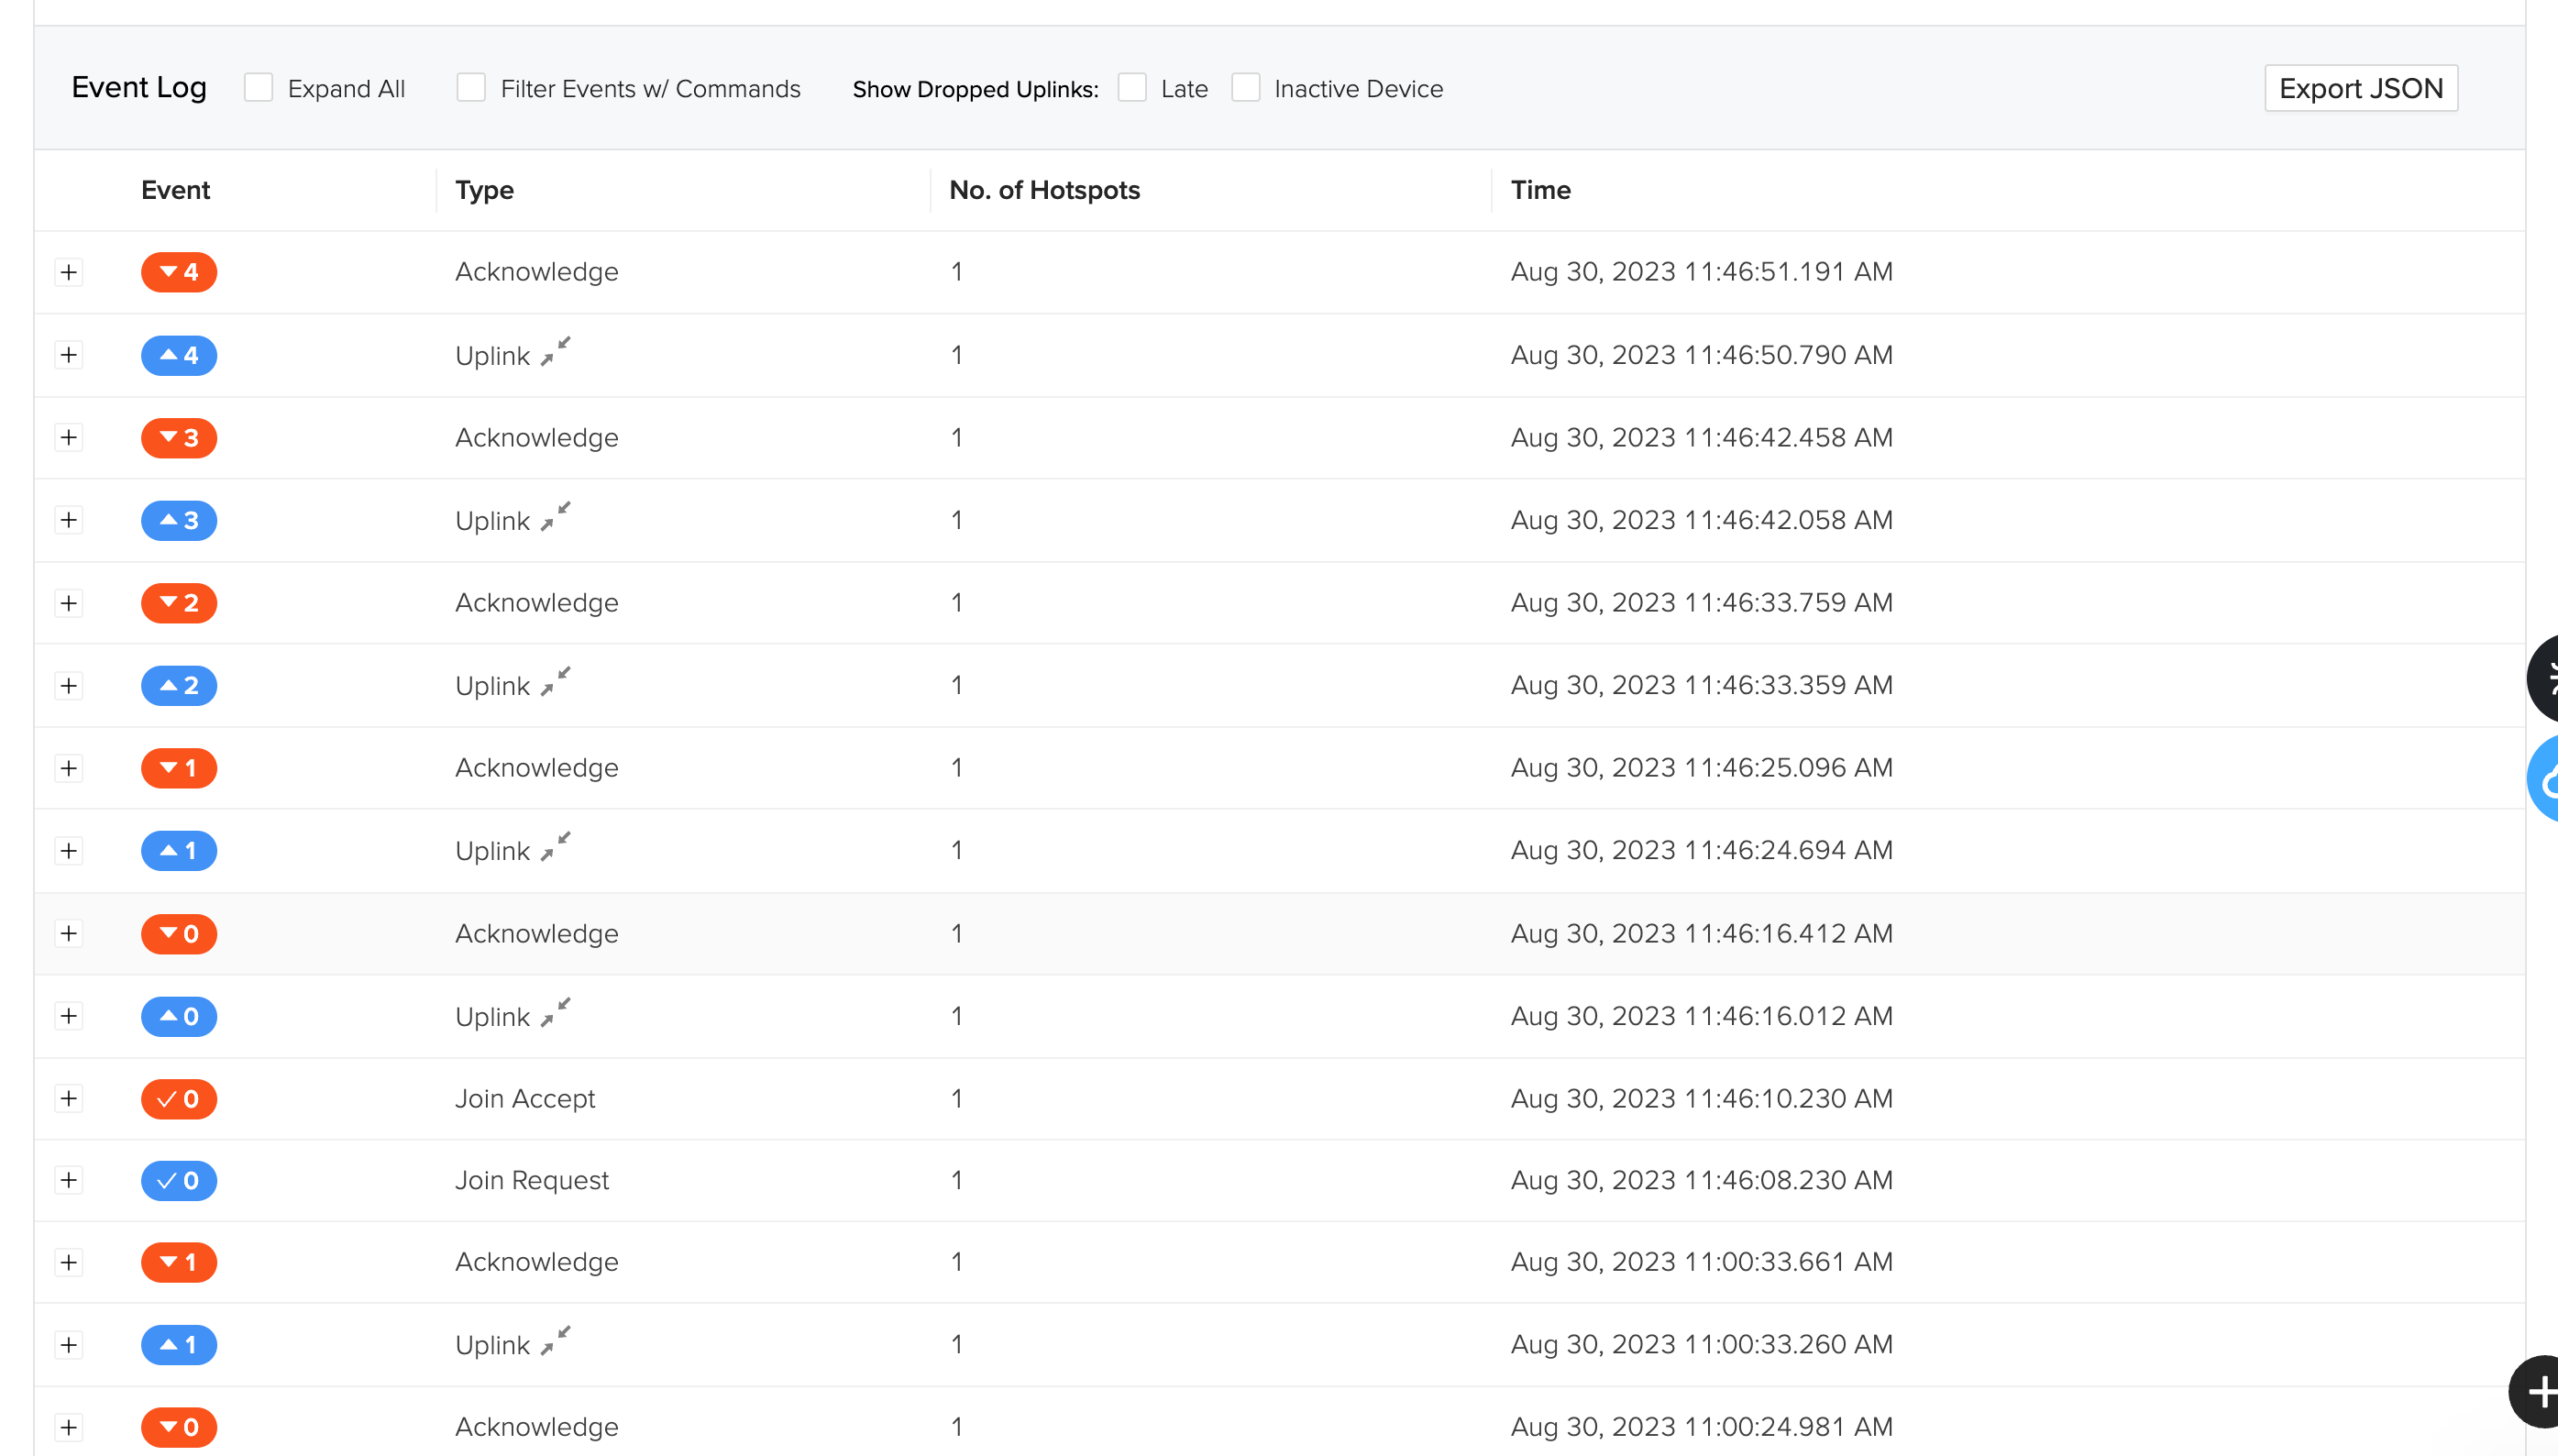
You can also see the event log at the "Event Log" section.
and if we open the Debug window, we can see the live data payload and other informations.

Resources
Datasheet:
Certifications:
Relevant SDK:
Tech Support & Product Discussion
Thank you for choosing our products! We are here to provide you with different support to ensure that your experience with our products is as smooth as possible. We offer several communication channels to cater to different preferences and needs.