FRIGATE NVR Project with Seeed Odyssey
What is Frigate NVR?
*frigate show case image from frigate official site
"Frigate is an open source NVR built around real-time AI object detection. All processing is performed locally on your own hardware, and your camera feeds never leave your home." -- Frigate NVR
Frigate NVR is one of the most popular network video recorder project which adds local processed AI function to your security cameras, therefore not only you won't be charged with ridiculously amount of money for the cloud inference server, but also your valuable private camera stream date won't need to exposed to the wild internet. Frigate can process 100+ object detections per second with a single Google Coral TPU on board, you could customize the detect zones and masks to met your use case, it can also be integrated into Home Assistant and other automation platforms with minimum amount of setup effort to provide more security features and integrate Edge AI solutions to your valuable property.
Prerequisites
- 1 x Odyssey Blue: Quad Core Celeron J4125 Mini PC with 128GB external SSD
- 1 x Coral USB Accelerator (optional)
- RTSP camera(s) stream
- Keyboard and HDMI display
Make sure Odyssey Blue is connected to the same network or have access to your RTSP web camera.
Getting started
In this guide, we will show you how to config Frigate docker environment to preform local AI detection on the RTSP camera stream on Seeed Studio Odyssey Blue with Coral USB Accelerator, for home assistant add-on setup, please stay turned!!
STEP 1: Make sure you have installed Debian 11 on Odyssey Blue
Please go a head download Debian 11 OS image and follow this setup guide to install Debian 11 Operating System on Odyssey Blue.
STEP 2: Make sure you have installed Docker Engine and Docker Compose on Debian 11
Please follow the Install Docker Engine on Debian guide to install Docker Engine and Docker Compose.
To check if you have successfully installed Docker:
Please open the terminal app and type in following command:
docker -v
you should see following output printed in the terminal:

STEP 3: Create frigate Docker file
Type in following command in terminal app to create frigate docker file with vi text-editor:
1 mkdir ~/Documents/frigate
2 cd ~/Documents/frigate
3 vi frigate.yml
Insert following lines in the frigate.yml file for frigate docker-compose setup, and replace the necessary part according to your enviroment setup.
version: "3.9"
services:
  frigate:
    container_name: frigate
    privileged: true # this may not be necessary for all setups
    restart: unless-stopped
    image: blakeblackshear/frigate:stable-amd64
    shm_size: "64mb" # update for your cameras based on calculation above
    devices:
      - /dev/bus/usb:/dev/bus/usb # passes the USB Coral, needs to be modified for other versions
      - /dev/apex_0:/dev/apex_0 # passes a PCIe Coral, follow driver instructions here https://coral.ai/docs/m2/get-started/#2a-on-linux
      - /dev/dri/renderD128 # for intel hwaccel, needs to be updated for your hardware
    volumes:
      - /etc/localtime:/etc/localtime:ro
      - /path/to/your/config.yml:/config/config.yml:ro
      - /path/to/your/storage:/media/frigate
      - type: tmpfs # Optional: 1GB of memory, reduces SSD/SD Card wear
        target: /tmp/cache
        tmpfs:
          size: 1000000000
    ports:
      - "5000:5000"
      - "1935:1935" # RTMP feeds
    environment:
      FRIGATE_RTSP_PASSWORD: "password"
For more details on the frigate docker-compose yaml setup options, please to go to the frigate documentation page
In my case, my frigate.yml looks like this:
version: "3.7"
services:
  frigate:
    container_name: frigate
    privileged: true # this may not be necessary for all setups
    restart: unless-stopped
    image: blakeblackshear/frigate:stable-amd64
    shm_size: "64mb" # update for your cameras based on calculation above
    devices:
      - /dev/bus/usb:/dev/bus/usb # passes the USB Coral, needs to be modified for other versions
      - /dev/apex_0:/dev/apex_0 # passes a PCIe Coral, follow driver instructions here https://coral.ai/docs/m2/get-started/#2a-on-linux
      - /dev/dri/renderD128 # for intel hwaccel, needs to be updated for your hardware
    volumes:
      - /etc/localtime:/etc/localtime:ro
      - /home/seeed/Documents/frigate/config/config.yml:/config/config.yml:ro
      - /home/seeed/Documents/frigate:/media/frigate
      - type: tmpfs # Optional: 1GB of memory, reduces SSD/SD Card wear
        target: /tmp/cache
        tmpfs:
          size: 1000000000
    ports:
      - "5000:5000"
      - "1935:1935" # RTMP feeds
    environment:
      FRIGATE_RTSP_PASSWORD: "password"
STEP 4: Create frigate config file
Type following command in terminal app to create a config folder:
1 cd ~/Documents/frigate
2 mkdir config/
3 cd config/
Type following command to create frigate config file with vi text-editor:
1 vi config.yml
Then copy following lines to for the minimum configuration setup to get frigate running:
mqtt:
  host: mqtt.server.com #Please replace with a valid mqtt broker
cameras:
  back:
    ffmpeg:
      inputs:
        - path: rtsp://viewer:{FRIGATE_RTSP_PASSWORD}@10.0.10.10:554/cam/realmonitor?channel=1&subtype=2 #replace with your RTSP camera url
          roles:
            - detect
            - rtmp
    detect:
      width: 1280
      height: 720
Please to go to the frigate documentation page configuration section for all the configuration options
In my case, beside the following list of configs that I have customized according to my setup, all the rest config settings are kept as default:
- MQTT: broker.hivemq.com
- Detector: Coral USB Accelerator
- Cameras: rtsp://192.168.8.34:8080/unicast
- Tracking object: person, cup (Note: the list of object labels can be found at frigate documentation page Objects section)
- Record: when Person or Cup gets detected the during of the recording is 2s before detection and 2s after detection.
So my config.yml looks like this:
mqtt:
  host: broker.hivemq.com # using HiveMQ MQTT Broker for testing purpose
detectors:
  # Required: name of the detector
  coral:
    # Required: type of the detector
    # Valid values are 'edgetpu' (requires device property below) and 'cpu'.
    type: edgetpu
    # Optional: device name as defined here: https://coral.ai/docs/edgetpu/multiple-edgetpu/#using-the-tensorflow-lite-python-api
    device: usb
# Optional: model modifications
model:
  # Optional: path to the model (default: automatic based on detector)
  path: /edgetpu_model.tflite
  # Optional: path to the labelmap (default: shown below)
  labelmap_path: /labelmap.txt
  # Required: Object detection model input width (default: shown below)
  width: 320
  # Required: Object detection model input height (default: shown below)
  height: 320
cameras:
  back:
    ffmpeg:
      inputs:
        - path: rtsp://192.168.8.34:8080/unicast
          roles:
            - detect
            - rtmp
# Optional: Detect configuration
# NOTE: Can be overridden at the camera level
detect:
  # Optional: width of the frame for the input with the detect role (default: shown below)
  width: 800
  # Optional: height of the frame for the input with the detect role (default: shown below)
  height: 600
  # Optional: desired fps for your camera for the input with the detect role (default: shown below)
  # NOTE: Recommended value of 5. Ideally, try and reduce your FPS on the camera.
  fps: 8
  # Optional: enables detection for the camera (default: True)
  # This value can be set via MQTT and will be updated in startup based on retained value
  enabled: True
  # Optional: Number of frames without a detection before frigate considers an object to be gone. (default: 5x the frame rate)
  max_disappeared: 25
  # Optional: Configuration for stationary object tracking
  stationary:
    # Optional: Frequency for confirming stationary objects (default: shown below)
    # When set to 0, object detection will not confirm stationary objects until movement is detected.
    # If set to 10, object detection will run to confirm the object still exists on every 10th frame.
    interval: 0
    # Optional: Number of frames without a position change for an object to be considered stationary (default: 10x the frame rate or 10s)
    threshold: 50
    # Optional: Define a maximum number of frames for tracking a stationary object (default: not set, track forever)
    # This can help with false positives for objects that should only be stationary for a limited amount of time.
    # It can also be used to disable stationary object tracking. For example, you may want to set a value for person, but leave
    # car at the default.
    # WARNING: Setting these values overrides default behavior and disables stationary object tracking.
    #          There are very few situations where you would want it disabled. It is NOT recommended to
    #          copy these values from the example config into your config unless you know they are needed.
    max_frames:
      # Optional: Default for all object types (default: not set, track forever)
      default: 3000
      # Optional: Object specific values
      objects:
        person: 1000
# Optional: Object configuration
# NOTE: Can be overridden at the camera level
objects:
  # Optional: list of objects to track from labelmap.txt (default: shown below)
  track:
    - person
    - cup
# Optional: Record configuration
# NOTE: Can be overridden at the camera level
record:
  # Optional: Enable recording (default: shown below)
  # WARNING: If recording is disabled in the config, turning it on via
  #          the UI or MQTT later will have no effect.
  # WARNING: Frigate does not currently support limiting recordings based
  #          on available disk space automatically. If using recordings,
  #          you must specify retention settings for a number of days that
  #          will fit within the available disk space of your drive or Frigate
  #          will crash.
  enabled: True
  # Optional: Number of minutes to wait between cleanup runs (default: shown below)
  # This can be used to reduce the frequency of deleting recording segments from disk if you want to minimize i/o
  expire_interval: 60
  # Optional: Retention settings for recording
  retain:
    # Optional: Number of days to retain recordings regardless of events (default: shown below)
    # NOTE: This should be set to 0 and retention should be defined in events section below
    #       if you only want to retain recordings of events.
    days: 0
    # Optional: Mode for retention. Available options are: all, motion, and active_objects
    #   all - save all recording segments regardless of activity
    #   motion - save all recordings segments with any detected motion
    #   active_objects - save all recording segments with active/moving objects
    # NOTE: this mode only applies when the days setting above is greater than 0
    mode: all
  # Optional: Event recording settings
  events:
    # Optional: Maximum length of time to retain video during long events. (default: shown below)
    # NOTE: If an object is being tracked for longer than this amount of time, the retained recordings
    #       will be the last x seconds of the event unless retain->days under record is > 0.
    max_seconds: 300
    # Optional: Number of seconds before the event to include (default: shown below)
    pre_capture: 2
    # Optional: Number of seconds after the event to include (default: shown below)
    post_capture: 2
    # Optional: Objects to save recordings for. (default: all tracked objects)
    objects:
      - person
      - cup
    # Optional: Restrict recordings to objects that entered any of the listed zones (default: no required zones)
    required_zones: []
    # Optional: Retention settings for recordings of events
    retain:
      # Required: Default retention days (default: shown below)
      default: 10
      # Optional: Mode for retention. (default: shown below)
      #   all - save all recording segments for events regardless of activity
      #   motion - save all recordings segments for events with any detected motion
      #   active_objects - save all recording segments for event with active/moving objects
      #
      # NOTE: If the retain mode for the camera is more restrictive than the mode configured
      #       here, the segments will already be gone by the time this mode is applied.
      #       For example, if the camera retain mode is "motion", the segments without motion are
      #       never stored, so setting the mode to "all" here won't bring them back.
      mode: motion
      # Optional: Per object retention days
      objects:
        person: 2
        cup: 3
STEP 5: Start frigate docker container
1 cd ~/Documents/frigate
2 sudo docker-compose -f frigate.yml up
To trouble shooting, you could spot errors by print out the docker log:
sudo docker logs frigate
STEP 6: View the frigate web front-end
Find the ip address of your Odyssey Blue server by type in following command in terminal:
1 ip a
you should see similar output printed in the the terminal, you can find the valid ip address according to your connection setup:
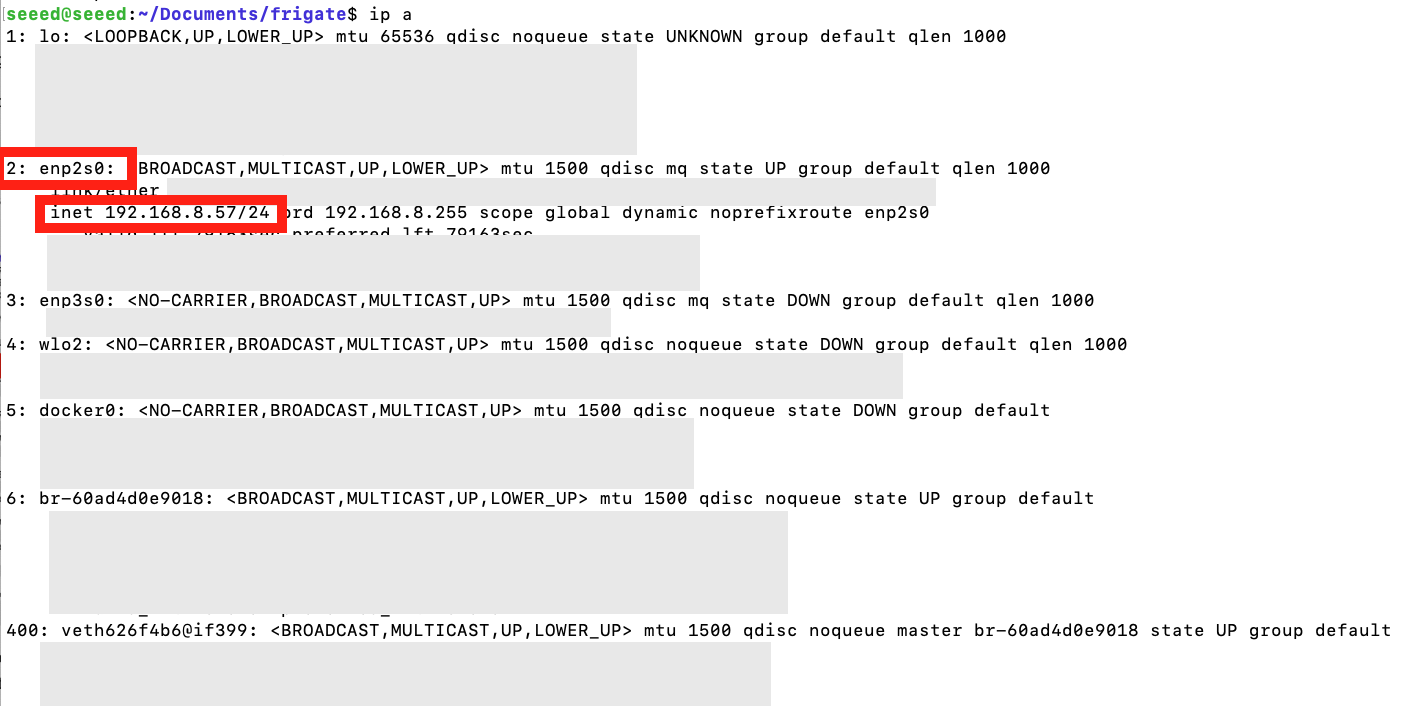
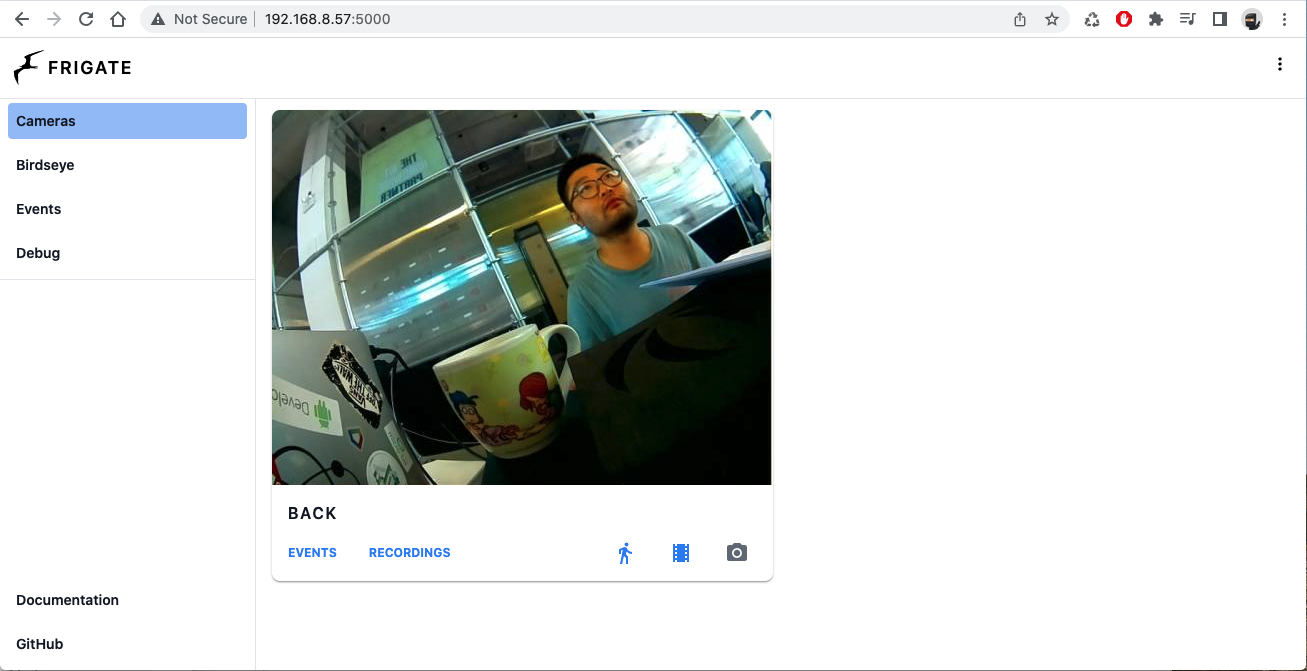
once you have locate your Odyssey Blue ip address, please open your favorite web browser and type in the ip-address:5000 in the address bar. In my case, the ip address is 192.168.8.57, therefore the url I put into the web browser address bar is 192.168.8.57:5000, you should land into the similar home page as the image below:
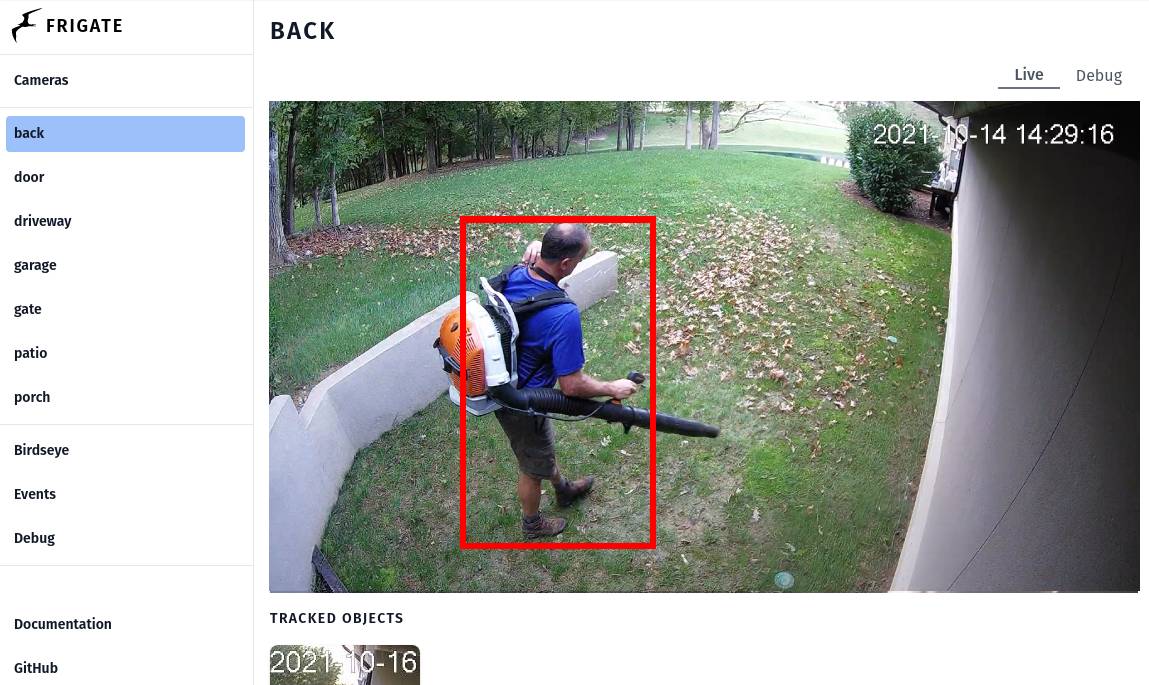
To observe the live detection please click on the video feed and click Debug on the top right corner of the main view, then click SHOW OPTIONS button under the live feed, then check the Bonding Box or any other options you like to see on the live feed.

Have fun to explore more options on Frigate with Odyssey Blue, feel free the checkout other SBC option such as, the reComputer series to add Edge AI to your applications.
Tech Support & Product Discussion
Thank you for choosing our products! We are here to provide you with different support to ensure that your experience with our products is as smooth as possible. We offer several communication channels to cater to different preferences and needs.