SenseCAP Indicator - Matter Application Development
Introduction
This is a demo of how to use the Matter SDK to build enriched applications for your SenseCAP Indicator.
The SenseCAP Indicator has a touchscreen which makes it capable of acting as a powerful home automation interface. Matter makes the process easier than ever as it takes away a lot of the complicated aspects of configuration. With the help of Matter's SDK one can quickly scan a QR code and configure their device onto their home network.
For this article we'll go through the steps involved to get your device up and running with the demo.
The Matter SDK provides a standard set of devices and allows access to their data and the uploading of their state to the controller. ESP-Matter was developed by Espressif as an official Matter development framework for ESP32 series SoCs.
To get your SenseCAP Indicator working with Matter, you need to follow a few main steps:
- Install esp-idf and esp-matter
- Configuring your environment and building
- Using the application
- Configuring the Home Assistant UI further
Prerequisites
Before we begin, make sure you have read the User Guide of the SenseCAP Indicator Board to familiarize yourself with its software and hardware information.
Install ESP IDF and ESP Matter
You'll want to follow the instructions provided by the ESP-Matter SDK documentation and install version 5.0.1 of ESP-IDF and the release version 1.1 from ESP-Matter.
After those version has been installed please install the patch provided by Seeed Studio apply the provided patch.
Configuring your environment and building
Using the CLI to configure and build
~/esp/esp-idf/install.sh
~/.espressif/esp-matter/install.sh

. ~/esp/esp-idf/export.sh
. ~/.espressif/esp-matter/export.sh

cd examples/indicator_matter
idf.py set-target esp32s3
idf.py fullclean
idf.py erase-flash
idf.py build flash monitor
Using the application
Once the firmware has been flashed the screen starts with just the QR code. Open your home automation's phone application and enter into the device provisioning flow (varies depending upon manufacturer).
In the following example you can see my use of the Home Assistant mobile application to connect to my Home Assistant Yellow running the Matter Beta service.
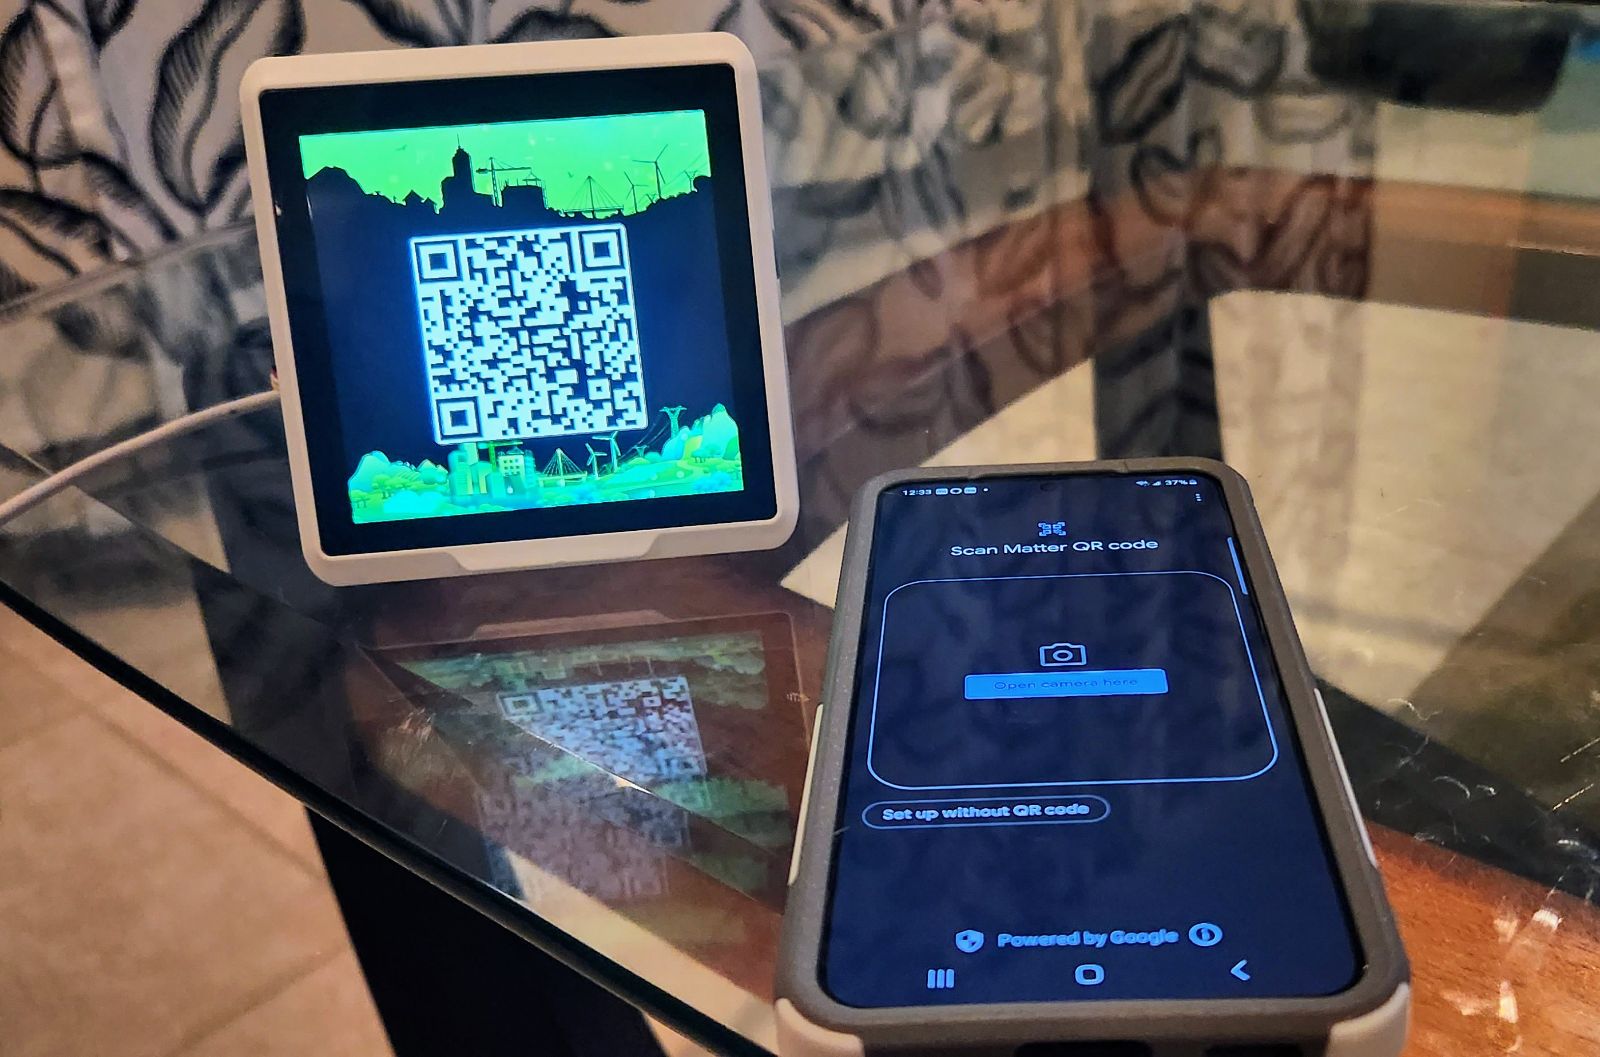
Upon scanning the device my phone immediately begins the process of provisioning. The provisioning process handled securely passing your credentials to the device allowing it to connect to the home automation controller device over wifi. In this way you never need to actually write the wifi credentials anywhere.
After provisioning the device will begin reporting its temperature and humidity to the home assistant controller at intervals of 10 seconds.
Standard functionality
The Indicator Matter application allows for browsing sensor data in a similar way to the standard firmware. Upon loading the device shows the clock screen which is configured based upon your location to give you an accurate time. The screen has events to detect being slid to the right and left to cycle through the time, sensor display, and settings screen.
 |  |
 |  |
Clicking a sensor further shows additional information about the state of that sensor and the history can be viewed in this way.
The settings screen allows configuration of several elements of the device's function. A 12 or 24 hour clock can be configured, the timezone is overridable, and the display brightness is adjustable.
Matter Home Assistant Dashboard
To access the Matter Home Assistant Dashboard swipe down from the main clock screen. This dashboard has multiple different components which are associated with demo devices on the Matter side. During the provisioning process these devices have endpoints created which can be used for accessing common features such as dimming a light or turning it off completely.
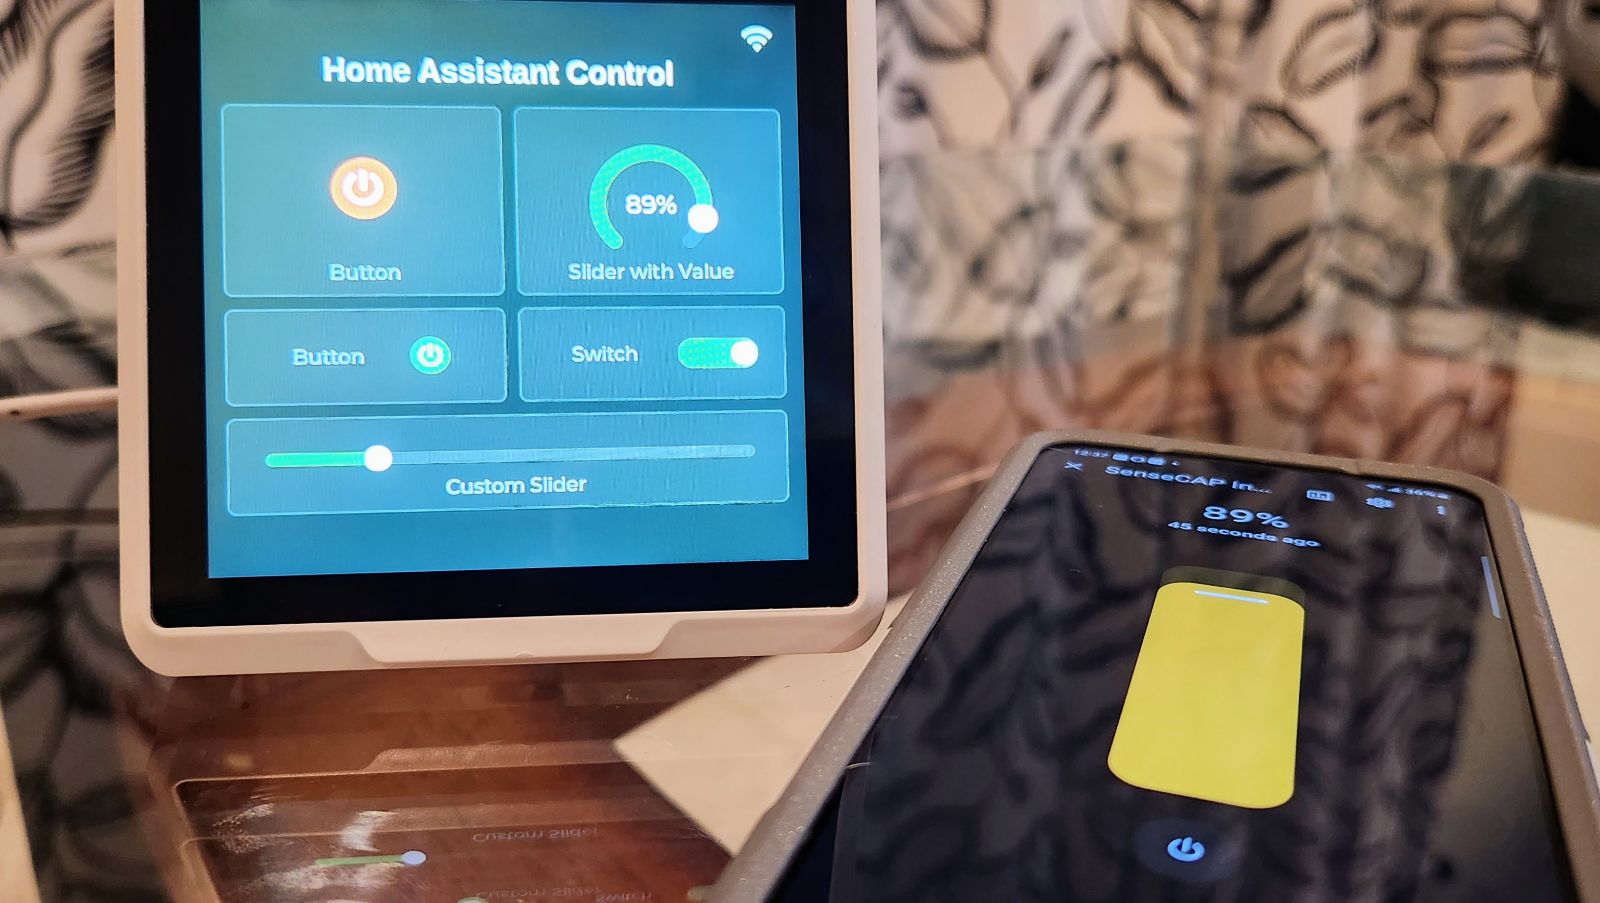
In the case of this demo two dimmable lights were setup along with a door lock. You can see as you click the buttons the home assistant side is also updated to reflect these changes. The sliders can be moved to set the brightness of the light.
From the home assistant side the devices can be enabled and disabled or modified as needed and the SenseCAP Indicator also is updated to reflect it. In this way you can have additional automations disable or enable functionality on your Indicator device and have the screen reflect their state in realtime.
The virtual dashboard and automation capabilities of the home controller in use allow for various interesting combinations. With the SenseCAP Indicator you can build dashboards of your own imagination to control devices across your home environment.

Configuring the Home Assistant UI further
The UI itself is built using LVGL. For more detailed information about configuring LVGL see the following article.
The UI for the dashboard is composed of LGVL components with events setup for callbacks such that their data is persisted both to local storage and to the matter endpoint. The virtual dashboard controller (indicator_virtual_dashboard_controller.c) handles updating the form and posting associated events for other consumers when the underlying data is changed.
For the initial example three devices have been setup and the underlying logic in the matter model handles responding to events from the view and persisting the data on to the matter endpoints or updating the state of the UI.
In general the following considerations must be made when updating the UI and persisting to Matter:
- During the initialization process the method
indicator_matter_setup()of theindicator_matter.cppmodel sets up any associated devices for use with Matter. In addition a callback is setup for view events such that the matter endpoints are updated on change. - The
indicator_virtual_dashboard.cmodel listens to view events associated with the virtual dashboard and persists the data to storage for retreival on initialization. - The matter logic subscribes to the events around modified matter data (whether remotely or locally)
- The virtual dashboard controller handles updating the state of the form as needed in response to events sent via the
indicator_matter.cppMatter callbacks on changes from Matter controller.
Resources
- Demo SDK: The Demo SDK for the SenseCAP Indicator is available on GitHub.
- User Guide: The User Guide provides detailed information about the software and hardware of the SenseCAP Indicator Board. You can read it here.
- Getting Started Guide for ESP-IDF: This guide provides full steps to configure and use ESP-IDF to build projects. You can access it here.
- Matter Installation Guide: If you're new to ESP-Matter, this guide will help you get it installed and set up. You can find it here.
Tech Support
Need help with your SenseCAP Indicator? We're here to assist you!
If you encounter any issues or have any questions while following this tutorial, please feel free to reach out to our tech support. We are always here to help!
Visit our Seeed Official Discord Channel to ask your questions or the GitHub discussions to share all you want!