How To Flash The Native Firmware
The SenseCAP indicator has two MCUs, ESP32-S3 and RP2040. This tutorial provides comprehensive guide to help developer get onboard, including flashing the out-of-the-box factory Native Firmware and updating early shipped devices to the latest firmware.
The firmware update is particularly applicable in two scenarios:
- If you purchased a product without OpenAI firmware before June 2023, with firmware version
1.0.0, you can download and update to the latest firmware that includes OpenAI functionality. The latest firmware can be downloaded from here. - If you have developed an application and wish to flash a custom firmware, you can follow the tutorial provided below.
Briefly, you need this tutorial since:
- You have a firmware that you need to flash into the ESP32-S3 or RP2040.
- You've modified the code, and need to compile it and flash it to the device.
Let's jump into this tutorial.
Preparation
To get started, all you need is your SenseCAP Indicator and a Windows/Mac/Linux computer.

Get the Native Firmware
The default shipping firmware of the SenseCAP Indicator is fully open source for both ESP32-S3 and RP2040.
- Source code: Before flashing it, you have the option to modify the code as per your requirements. You will need a toolchain(ESP-IDF, Arduino) to compile it.
- Firmware: Directly flash the pre-compiled binary file without the need for any code modification or compilation. Using tools like Esptool and Flash Download Tools.
Source Code
Firmware
For ESP32-S3
ESP-IDF
ESP-IDF (Espressif IoT Development Framework) is a software development framework provided by Espressif Systems for designing firmware and applications specifically for their ESP32 and ESP8266 series of microcontrollers. For further information, you can refer to the ESP-IDF Programming Guide
If you've opted to compile the source code into firmware, you'll require the ESP-IDF to perform the compilation process.
The ESP-IDF version must be greater than v5.0. If you're using an older version, you'll need to update it to the latest version.
For newer users, this video may help you better understand the steps below:
Toolchain Installation
- Windows
- Linux and MacOS
Official Espressif Docs: Standard Setup of Toolchain for Windows
Option 1: Using the Offline Installer
For Windows users, you have the option to download the ESP-IDF offline installer directly. Here's a direct download link: 🖱️Donwload Offline Installer v5.1.1
Option 2: Using the Recommended Script
Navigate yourself to Using the Command Promp
Official Espressif Docs: Standard Toolchain Setup for Linux and macOS
If in Linux or MacOS, you can follow this guide to change the version of git repo.
git clone --recursive https://github.com/espressif/esp-idf.git
Navigate to esp-idf directory:
- Run
./install.sh esp32s3, to add ESP32-S3 support (needed for SenseCAP indicator) - type
./export.shto set up the PATH and IDF_PATH variables in the current terminal session.
if you want to call in any shell session, you can add the following line to your shell configuration file (e.g. ~/.bash_profile):
alias get_idf='. $HOME/esp/esp-idf/export.sh'
Then you can use get_idf to activate the environment.^refer
Building Project and flashing
If you opt to compile the source code into firmware, you'll require the ESP-IDF to perform the compilation process.
To build, flash, and monitor your project, execute the following command:
cd  <your_sdk_path>/examples/indicator_basis/
idf.py -p PORT build flash monitor
Without PORT, the IDF will automatically select the available port.
Up to this point, by typing the command idf.py -p PORT flash, the firmware has been successfully flashed into the ESP32-S3.
Esptool
ESPtool - GitHub is a Python-based, open-source utility that provides a platform-independent way to communicate with the ROM bootloader in Espressif chips.
Esptool can be used as part of your Python script. In this guide, we'll use the packaged software available on the Esptool releases page. Choose the software that corresponds to your computer's operating system.
Using Esptool for Flashing
There are two scripts provided that showcase how to effectively utilize Esptool for flashing firmware onto ESP32-S3 microcontrollers.
Please be aware that the provided scripts are tailored for Windows operating systems. If you are using a different operating system, you will need to adapt the scripts to suit your environment.
The merge.bat script is particularly useful as it intelligently consolidates the bootloader, partition table, and indicator basis binaries into a single firmware file. Once merged, this firmware can be seamlessly flashed onto the ESP32-S3 using the flash.bat script. When prompted, input the COM port corresponding to your device, and the flashing process will initiate. The complete operation can be summarized as follows:
esptool.exe --chip esp32s3 ^
merge_bin -o sensecap_indicator_basis_v1.0.0.bin ^ # Target file name
--flash_mode dio ^
--flash_size 8MB ^
0x0 ../../build/bootloader/bootloader.bin ^
0x8000 ../../build/partition_table/partition-table.bin ^
0x10000 ../../build/indicator_basis.bin
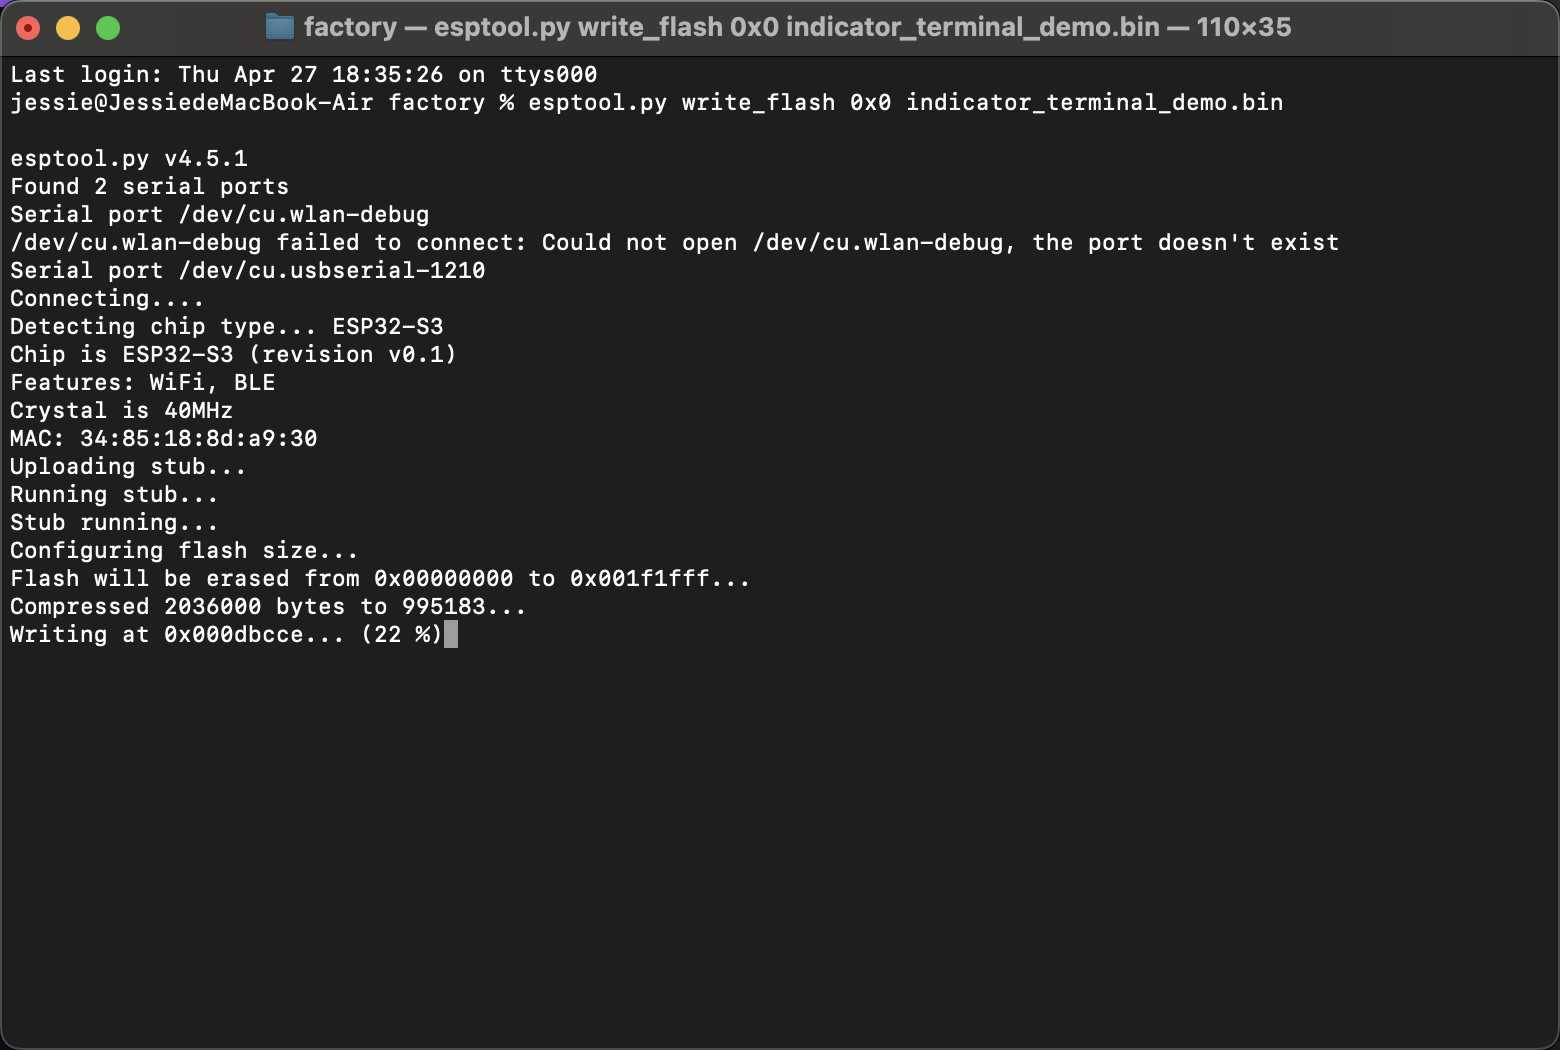
Alternatively, if you prefer to flash individual binary files instead of merging files then flashing, you can directly use the just_flash.bat script:
esptool.exe --chip esp32s3 --port COMx --baud 921600 write_flash -z ^
0x0 ../../build/bootloader/bootloader.bin ^
0x8000 ../../build/partition_table/partition-table.bin ^
0x10000 ../../build/indicator_basis.bin
And for a straightforward flashing process using the merged firmware:
esptool.exe --chip esp32s3 --port COMx --baud 921600 write_flash -z 0x0 indicator_basis_v1.0.0.bin
Pay close attention to the starting(0x0) address, especially when not merging binaries. For separate binary files, refer to the instructions in Flash Download Tools for separate binary files. Following these guidelines ensures error-free flashing.
To utilize these scripts, save the code into separate text files named merge.bat and flash.bat within the project folder. This organizational approach simplifies access and usage.
By employing these scripts, you streamline both firmware preparation and the flashing stages, contributing to a smoother and more reliable process.
├── indicator_basis
│   ├── CMakeLists.txt
│   ├── build
│   ├── docs
│   ├── main
│   ├── partitions.csv
│   ├── sdkconfig
│   └── .defaults
│   └── flash.bat
│   └── merge.bat
- Merge the binaries using
merge.bat. - Flash the merged firmware using
flash.bat.
Flashing Firmware
For flashing firmware, you can use the provided flash.bat script. This script is designed to simplify the process of flashing your firmware onto the ESP32-S3 microcontroller.
Show flash.bat code
@echo off
setlocal
cd /d "%~dp0"
:: Set Chip
set chip=esp32s3
:: Set Baud
set baud=921600
:: List COM ports
echo Available ports and devices:
echo.
for /F "tokens=* delims=" %%A in ('wmic path Win32_PnPEntity get Name ^| findstr /C:"COM" ^| findstr /C:"CH340"') do (
echo %%A
)
:: Prompt for port
:chooseport
echo.
echo Please enter the COM port to use (e.g., COM5):
set /p port=
:: Check if chosen port is valid and contains "CH340"
for /F "tokens=* delims=" %%A in ('wmic path Win32_PnPEntity get Name ^| findstr /C:"%port%" ^| findstr /C:"CH340"') do (
set device=%%A
goto :flash
)
echo Port %port% not found
goto :chooseport
:flash:: Print chosen parameters
echo.
echo You have chosen:
echo Chip: %chip%
echo Port: %port% - %device%
echo Baud: %baud%
@REM echo Press any key to continue to...
@REM pause >nul
:: Run esptool for the single file
esptool.exe --chip %chip% --port %port% --baud %baud% write_flash -z 0x0 indicator_basis_v1.0.0.bin
if ERRORLEVEL 1 (
echo Flashing with the single file failed with error %ERRORLEVEL%.
goto :end
)
:: End of script
:end
endlocal
Merging Binaries
The provided merge.bat script can be used to merge the necessary binary files into one firmware file. This script simplifies the process and ensures correct merging for successful flashing, which allows you to flash a sigal bin file as not to flash separate files.
Show merge.bat code
@echo off
SETLOCAL
SET CurrentDir=%cd%
SET ScriptDir=%~dp0
SET CurrentDir=%CurrentDir:~0,-1%
SET ScriptDir=%ScriptDir:~0,-1%
IF NOT "%CurrentDir%"=="%ScriptDir%" (
cd /d "%ScriptDir%"
)
esptool.exe --chip esp32s3 ^
merge_bin -o indicator_basis_v1.0.0.bin ^
--flash_mode dio ^
--flash_size 8MB ^
0x0 ../../build/bootloader/bootloader.bin ^
0x8000 ../../build/partition_table/partition-table.bin ^
0x10000 ../../build/indicator_basis.bin
ENDLOCAL
Flash Download Tools (Windows only)
Flash Download Tools are used for programming or flashing firmware onto ESP8266 and ESP32 series of microcontrollers. They provide a graphical user interface (GUI) for users to easily flash firmware onto the ESP microcontrollers.
Follow the steps to flash a pre-compiled firmware:
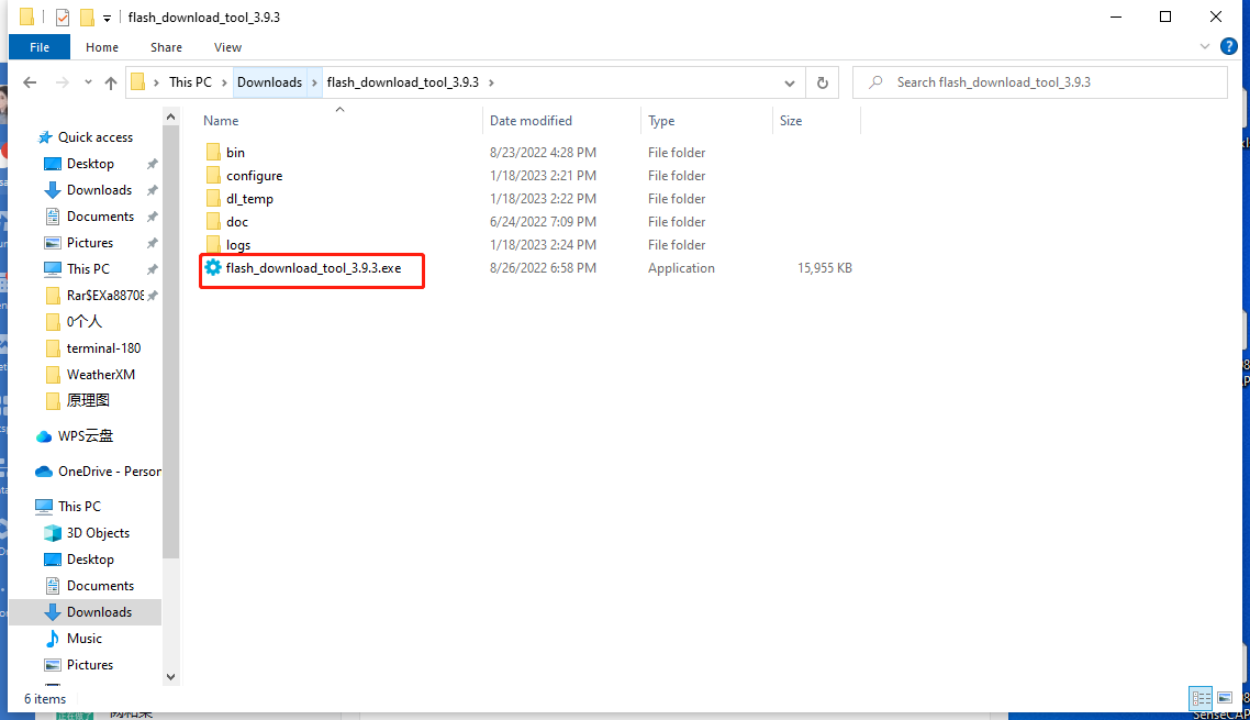
Download: Flash Download Tools (for Windows only)
-
Step 1: Double-click the
.exefile to enter the main interface of the tool. -
Step 2: Select the following options:
| Option | Param |
|---|---|
Chip Type | ESP32-S3 |
WorkMode | Develop |
LoadMode | UART |

-
Step 3: Connect the SenseCAP Indicator to your laptop with a USB type-C cable.
-
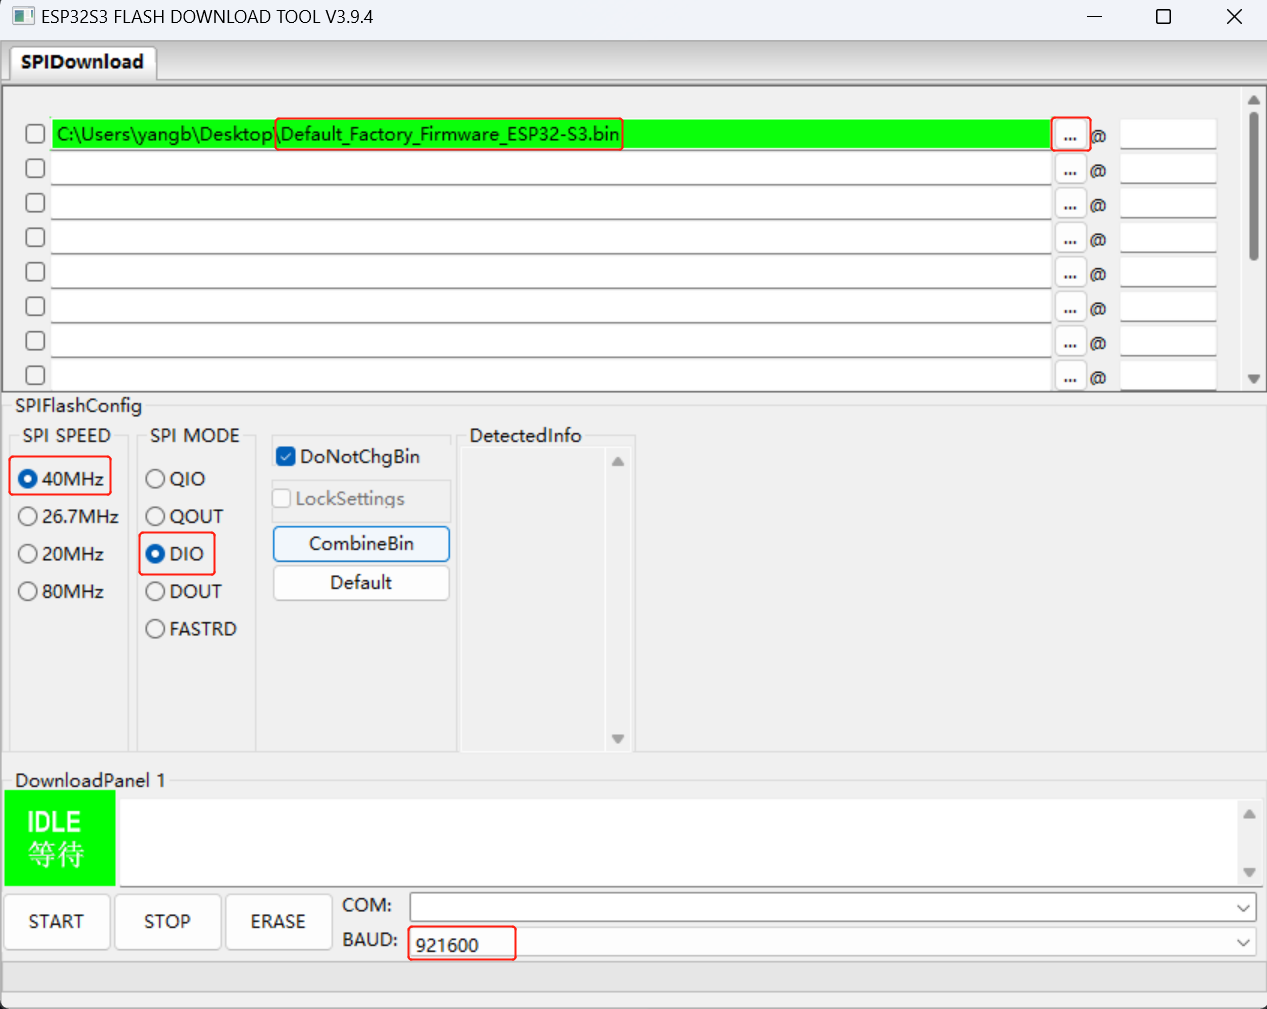
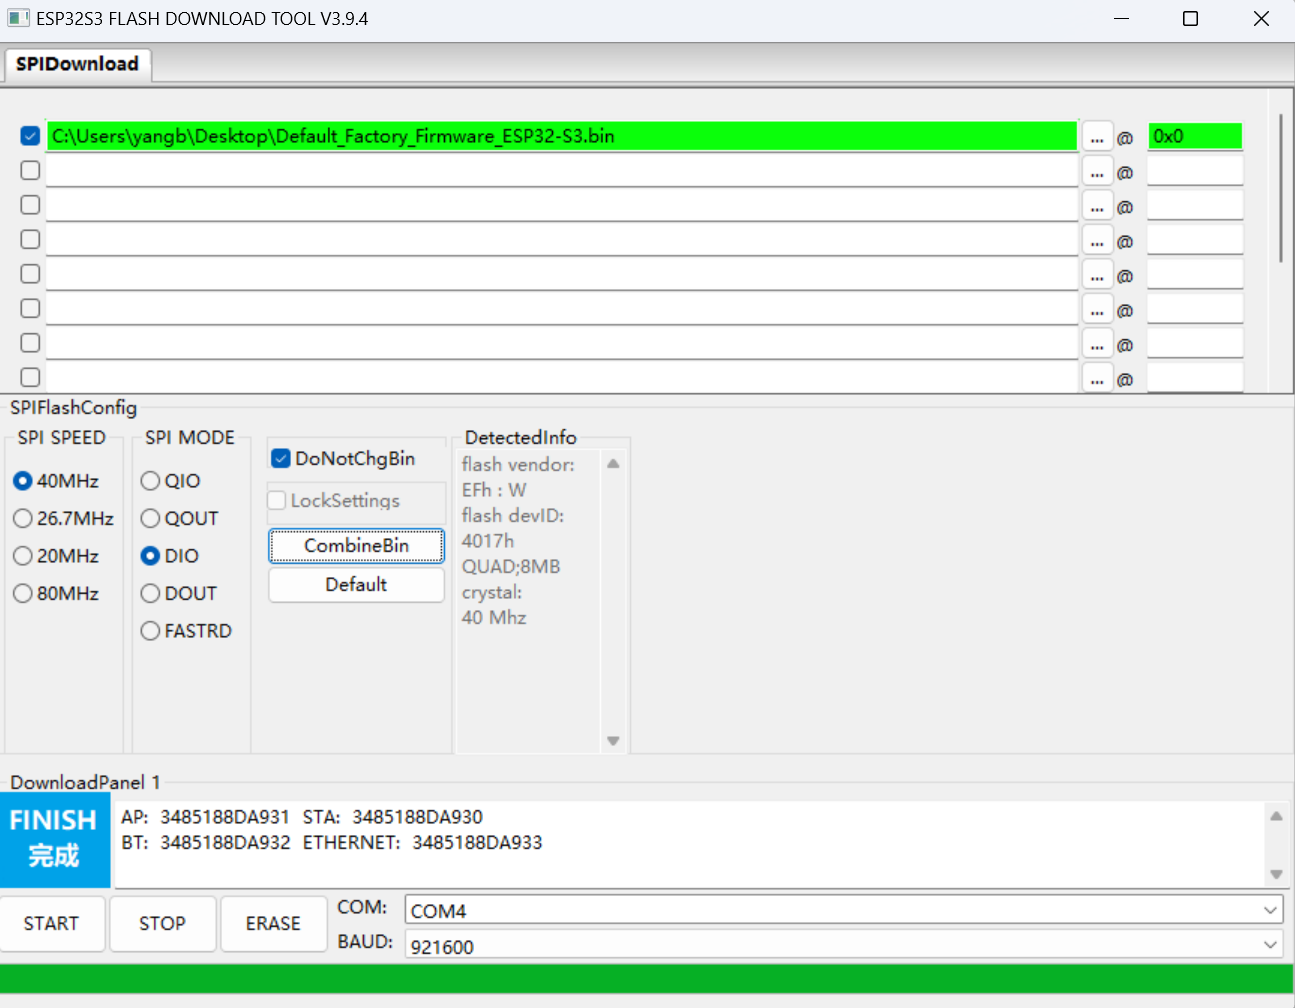
Step 4: In the SPI Download Tab and Click "..." and navigate to the firmware you just downloaded.
-
Step 5: Configure SPI Flash:
| Option | Param |
|---|---|
SPI SPEED | 40MHz |
SPI MODE | DIO |
- Step 6: Configure the Download Panel:
- COM: Check the ports on your Device Manage, the USB-SERIAL is the correct one.
(
Here we chose COM4) - Baud: 921600(recommended value)
Then click START to start the flashing.
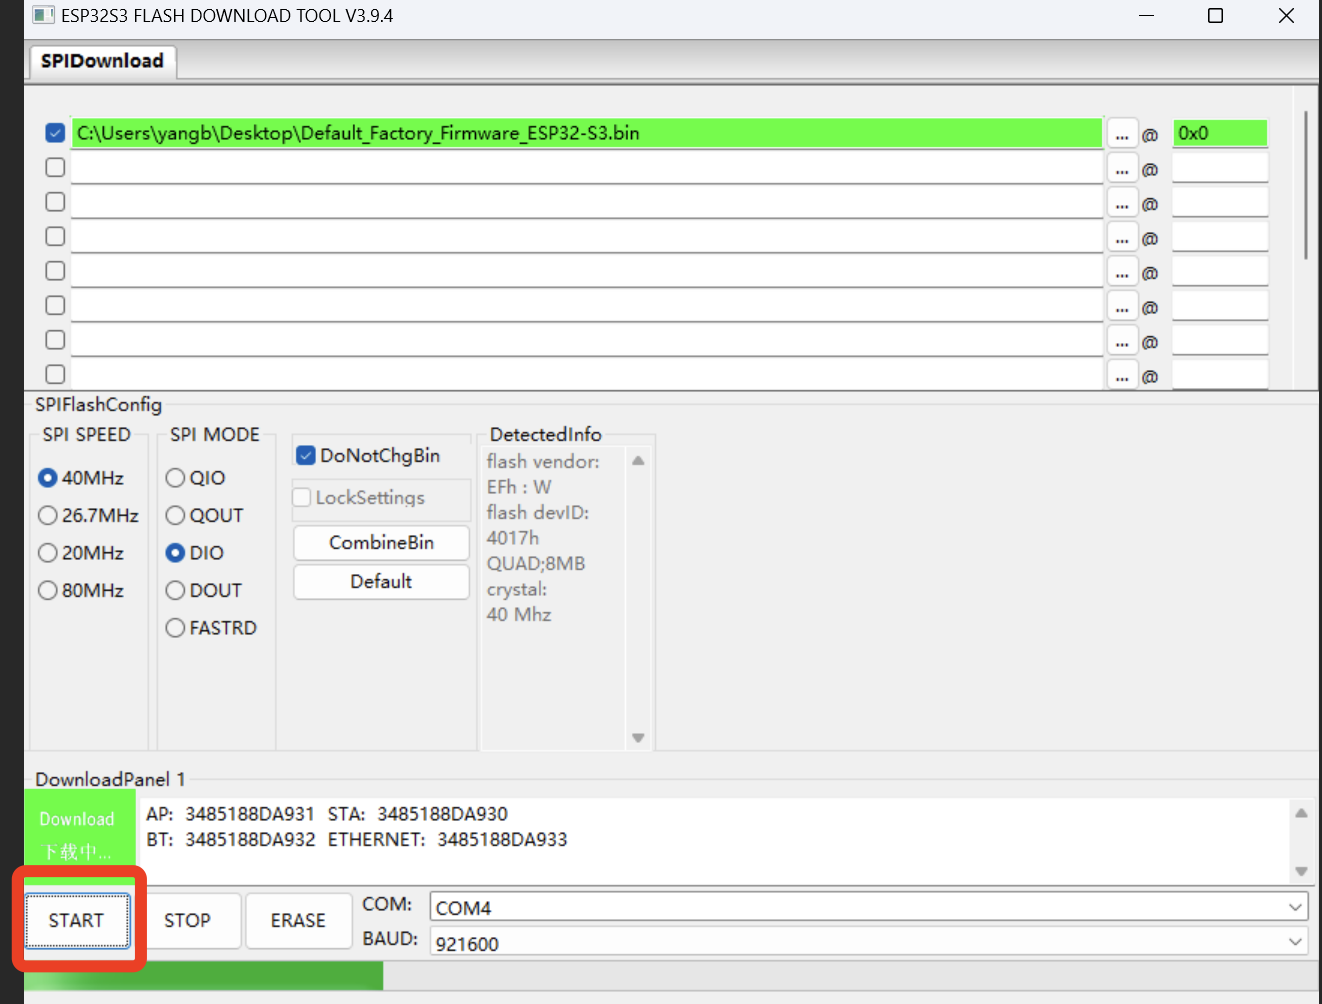
When it shows FINISH, the firmware flashing has been completed.
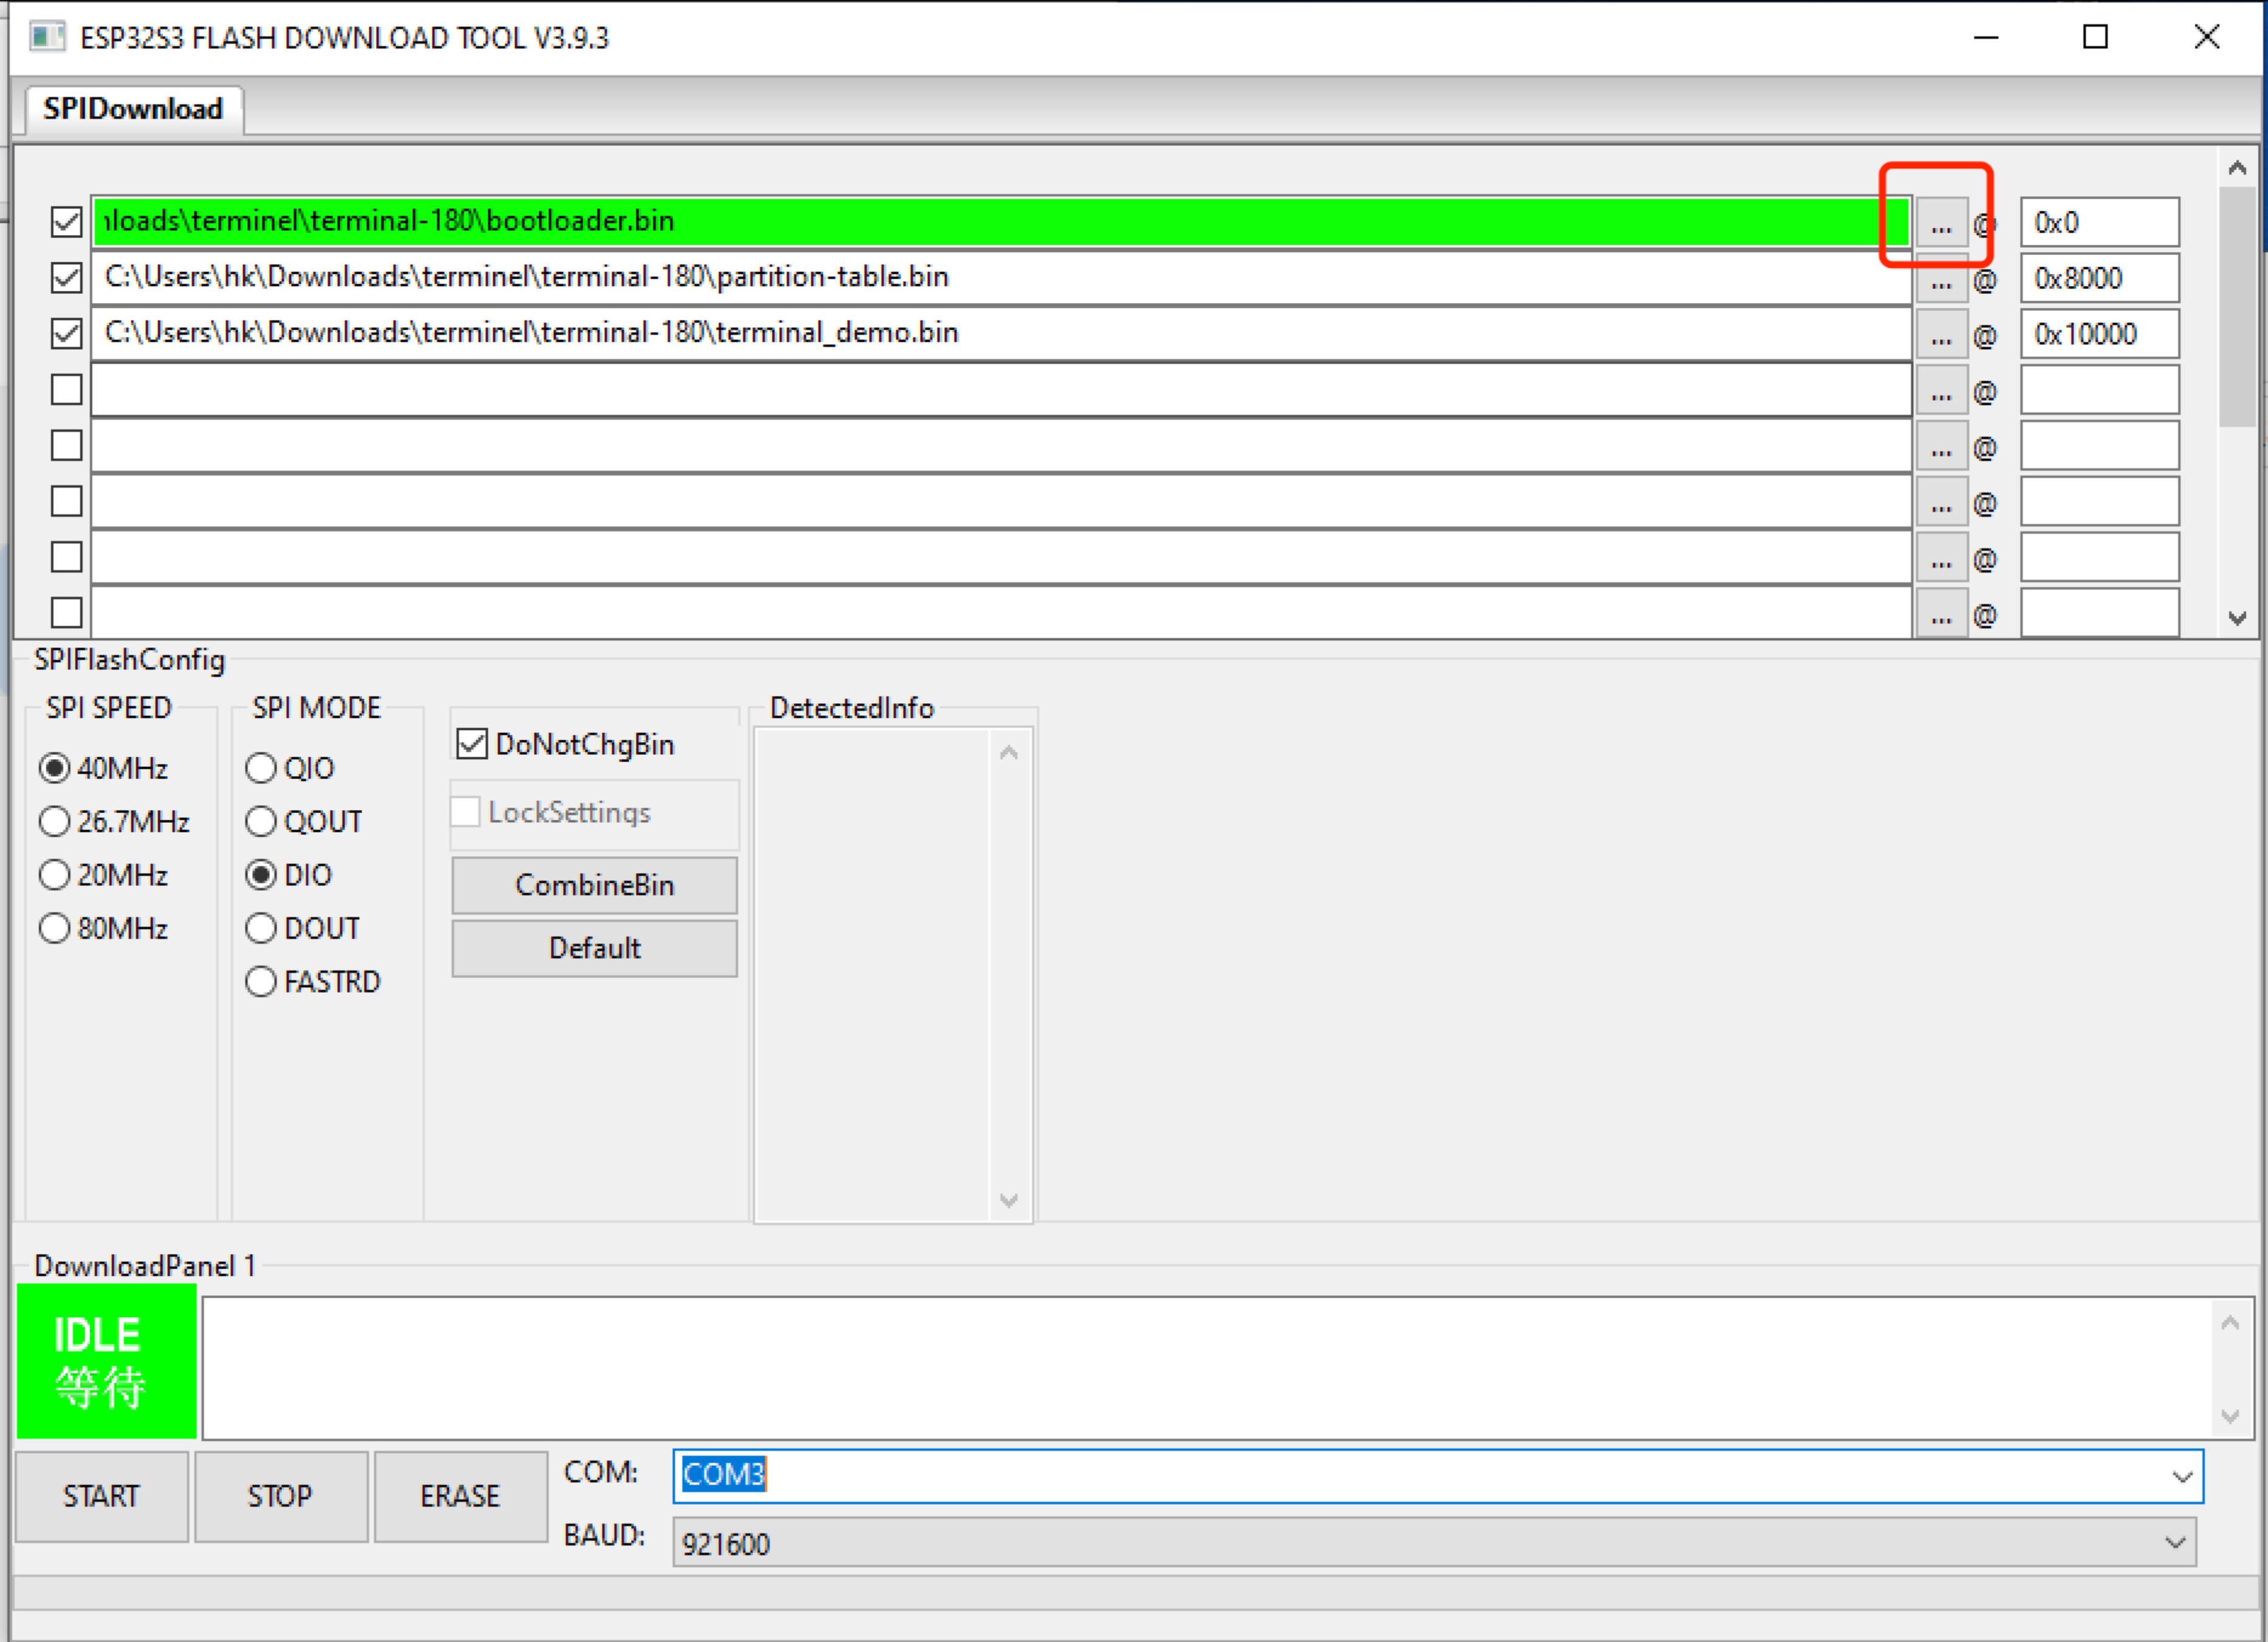
Flash Download Tools for separate binary files
In the previously mentioned guide, the binary file "Default_Factory_Firmware_ESP32-S3.bin" merges three binaries into one.
However, if you're using ESP-IDF to build firmware, directly flashing a single file might result in errors. Instead, you'll need to find three separate binary files that you've built and specify the correct addresses (you can use your own addresses) as follows:
- bootloader.bin ----> 0x0
- partion-table.bin ----> 0x6800
- termial_demo.bin ----> 0x10000
For RP2040
Flash by Arduino IDE
The RP2040 Development Tool leverages Arduino to enhance your coding experience.
The Arduino IDE is free software for coding Arduino boards. With its user-friendly interface, you can write and upload code easily. Based on a simpler version of C++, it offers libraries and examples, making it great for beginners.
Download:
-
Step 1: Install Arduino IDE
-
Step 2: Add the Raspberry Pi Pico Board
Open your Arduino IDE, click on Arduino IDE > Preferences, and copy the below URL to Additional Boards Manager URLs:
https://github.com/earlephilhower/arduino-pico/releases/download/global/package_rp2040_index.json
 |  |
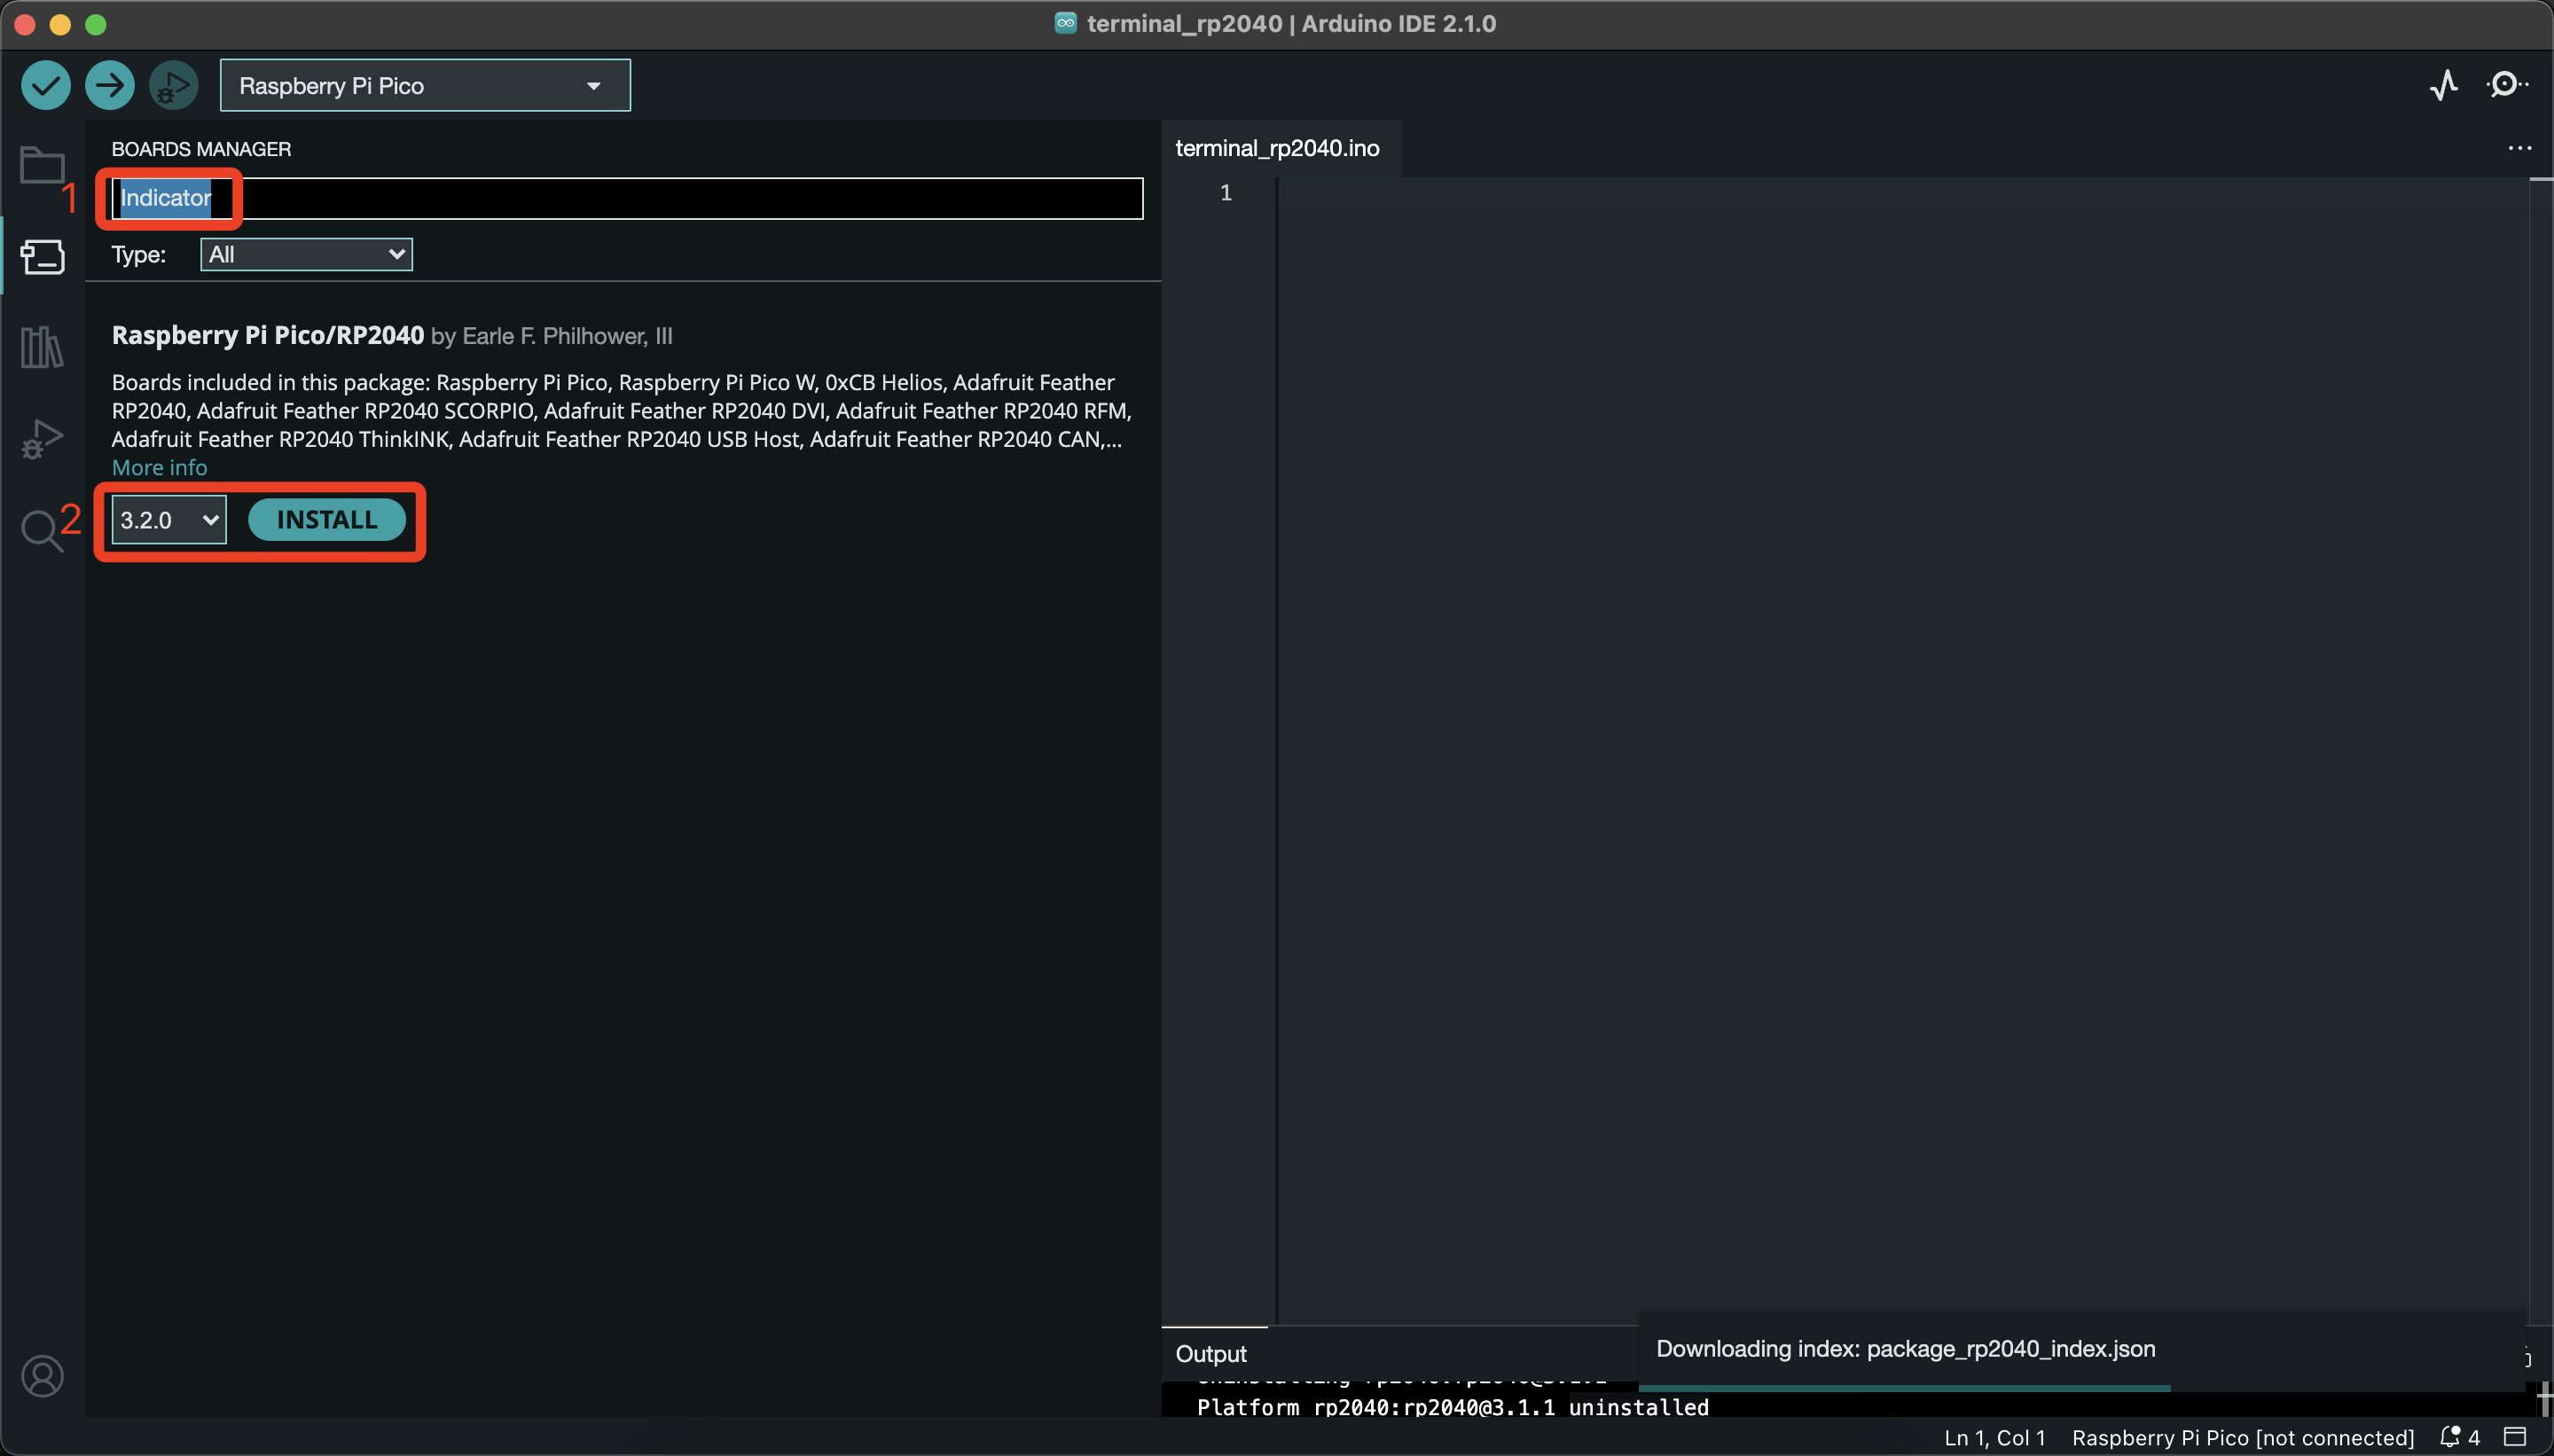
Click on Tools > Board > Board Manager.
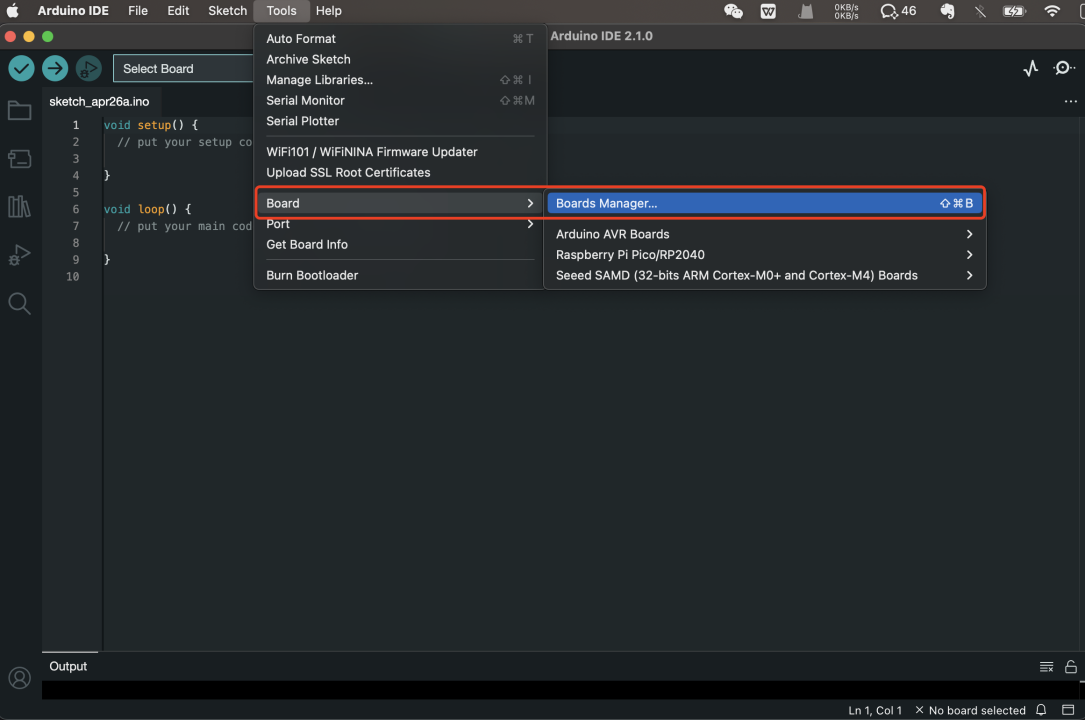
Search "indicator" and install "Raspberry Pi Pico/RP2040" in the Boards Manager
- Step 3: Add Libraries
- Sensirion Core: Sensirion Arduino Core library
- PacketSerial : Serial communication protoco
- Sensirion I2C SGP40 : SGP40 TVOC sensor library
- Sensirion I2C SCD4x : SCD41 CO2 sensor library
- Sensirion Gas Index Algorithm : Transfer index library
- Seeed_Arduino_AHT20 : AHT20 temperature and humidity sensor library
In the Arduino IDE, you can search for it in the Library Manager, e.g. Seeed_Arduino_AHT20, and then install it.
Click to preview offline installation
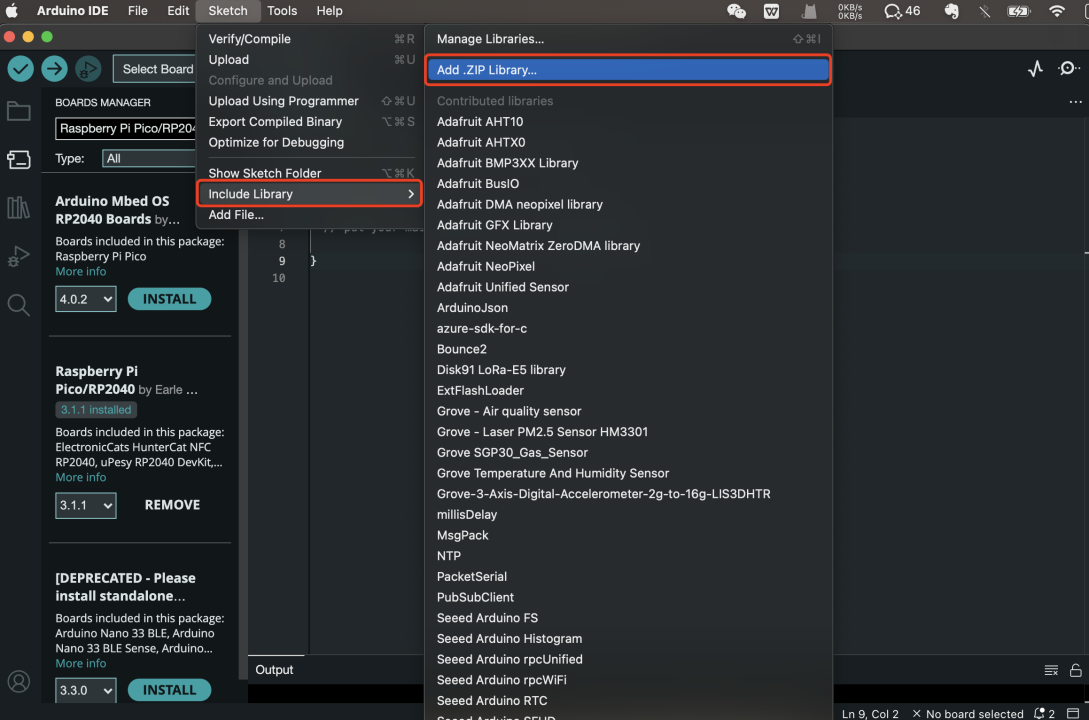
To install it offline, you can download the repo zip from GitHub, navigate to Sketch -> Include Library -> Add .ZIP Library, then select the libraries you downloaded.
-
Step 4: Connect the device to your PC with the provided USB Typc-C cable.
-
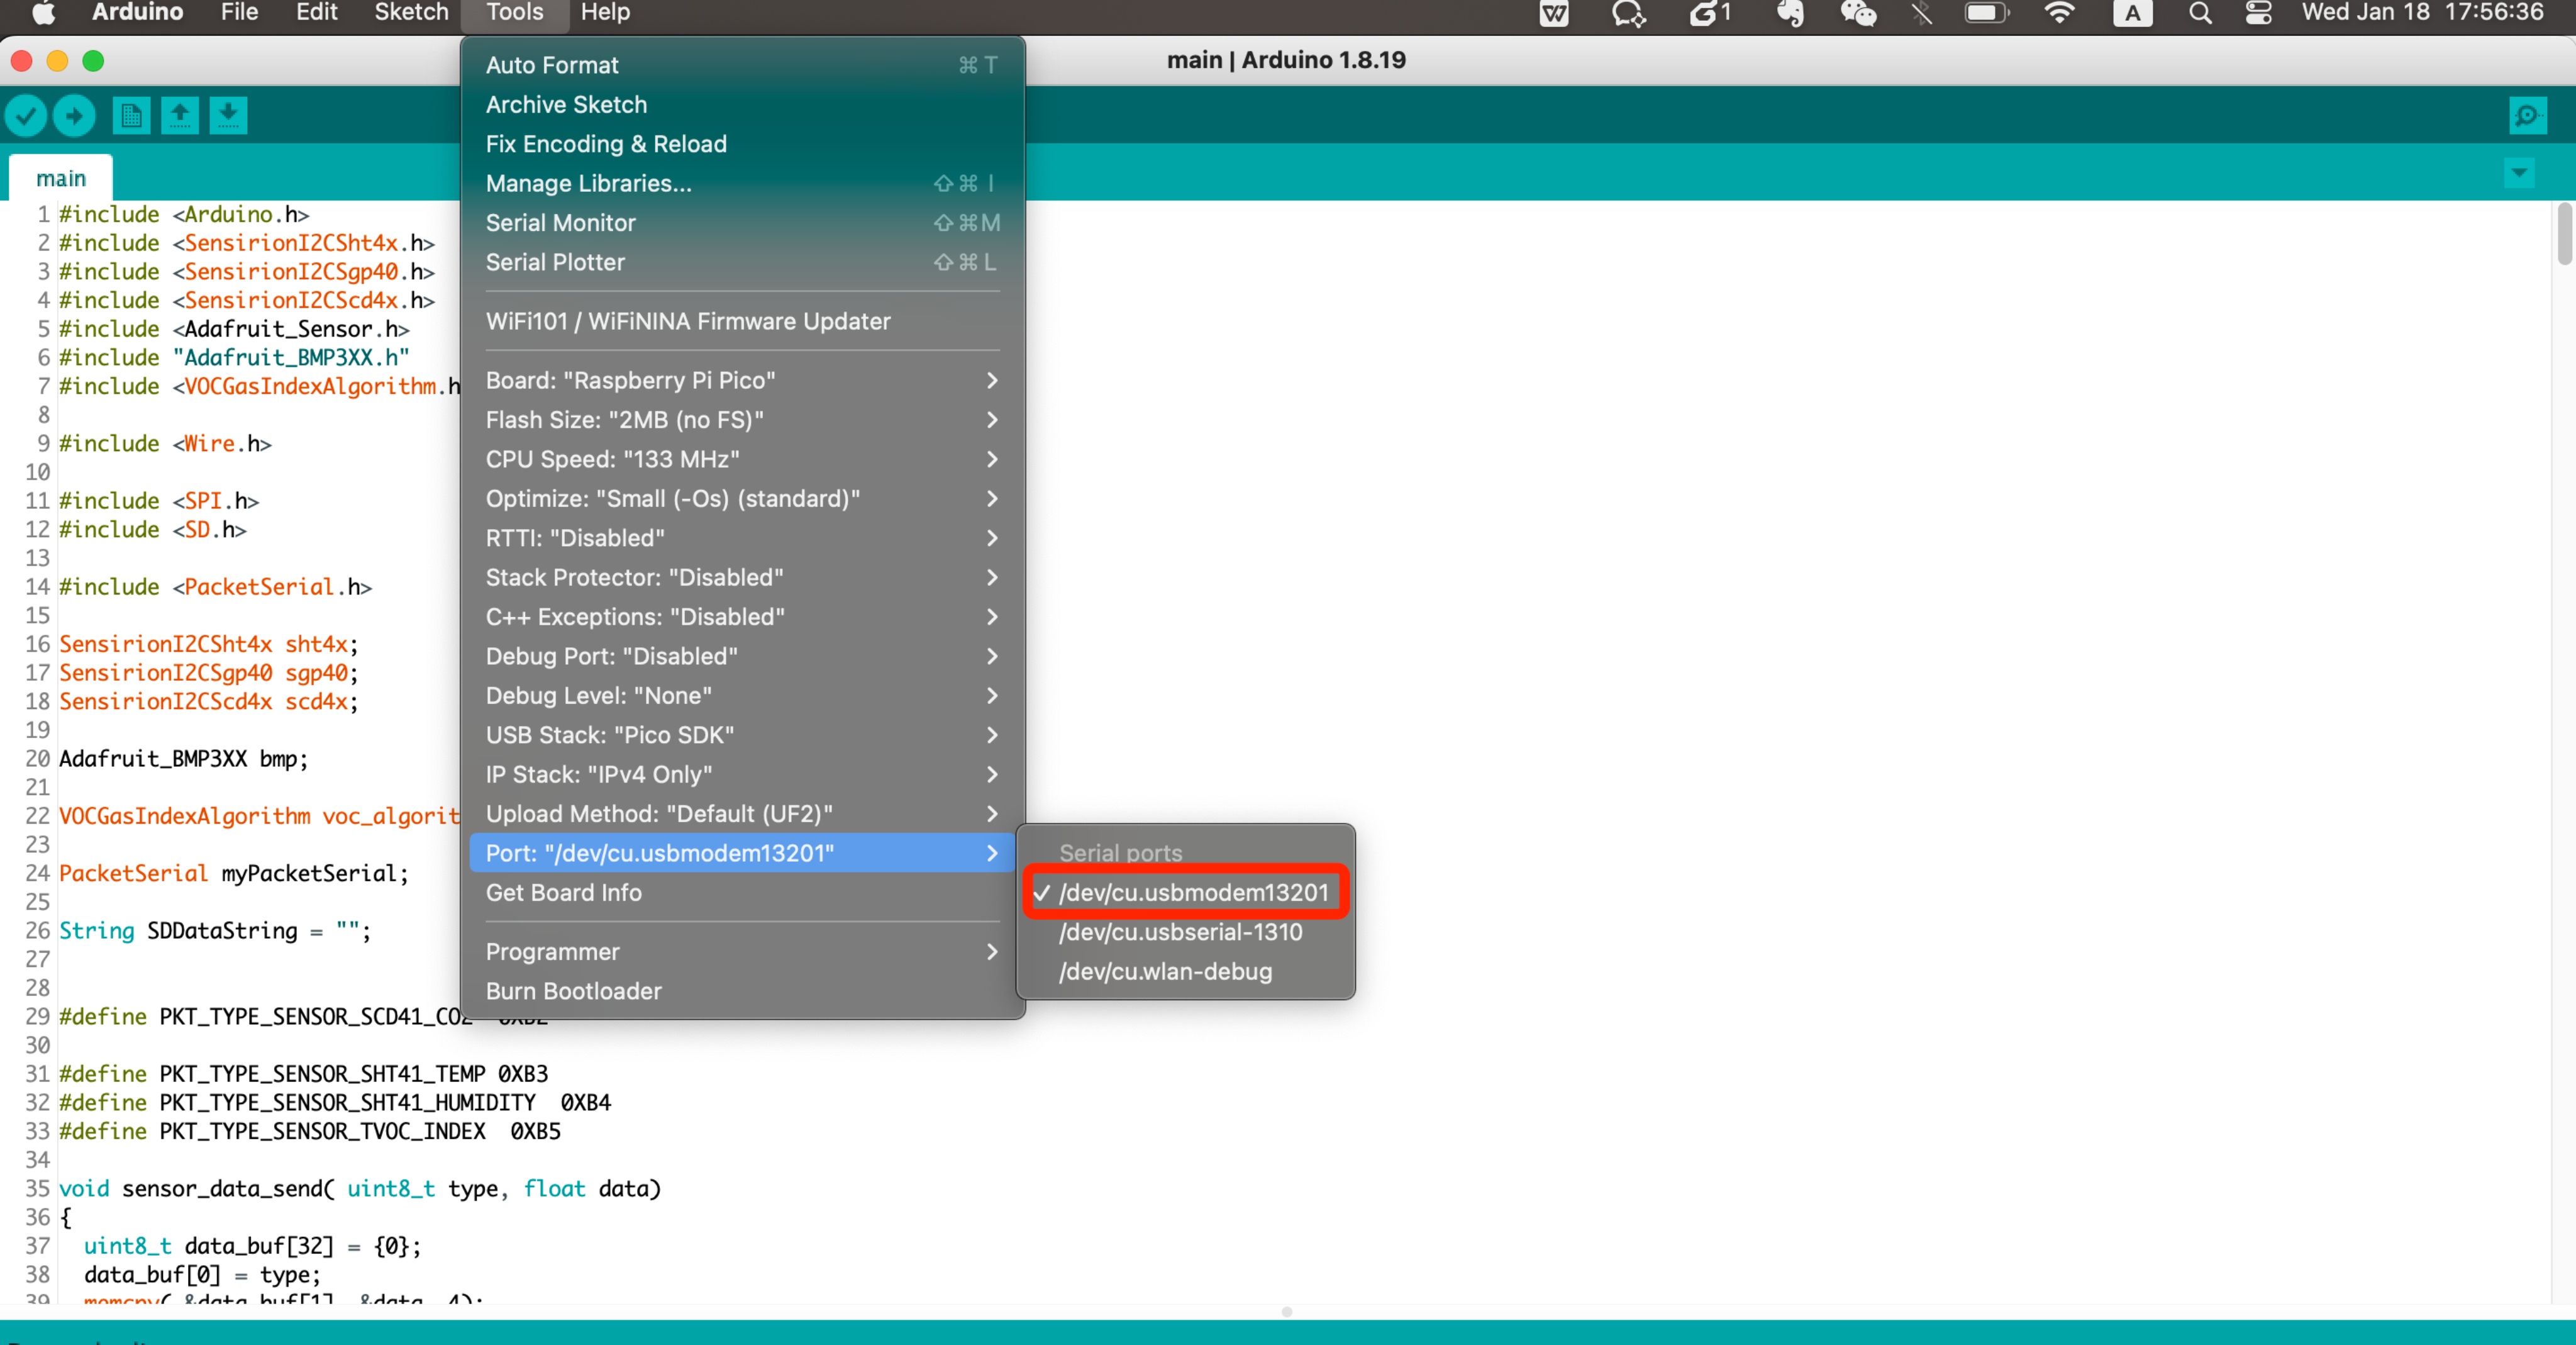
Step 5: Select the board and port
Search "Indicator" and select Seeed INDICATOR RP2040 board and select the usbmodem Serial Port.
 |
 |
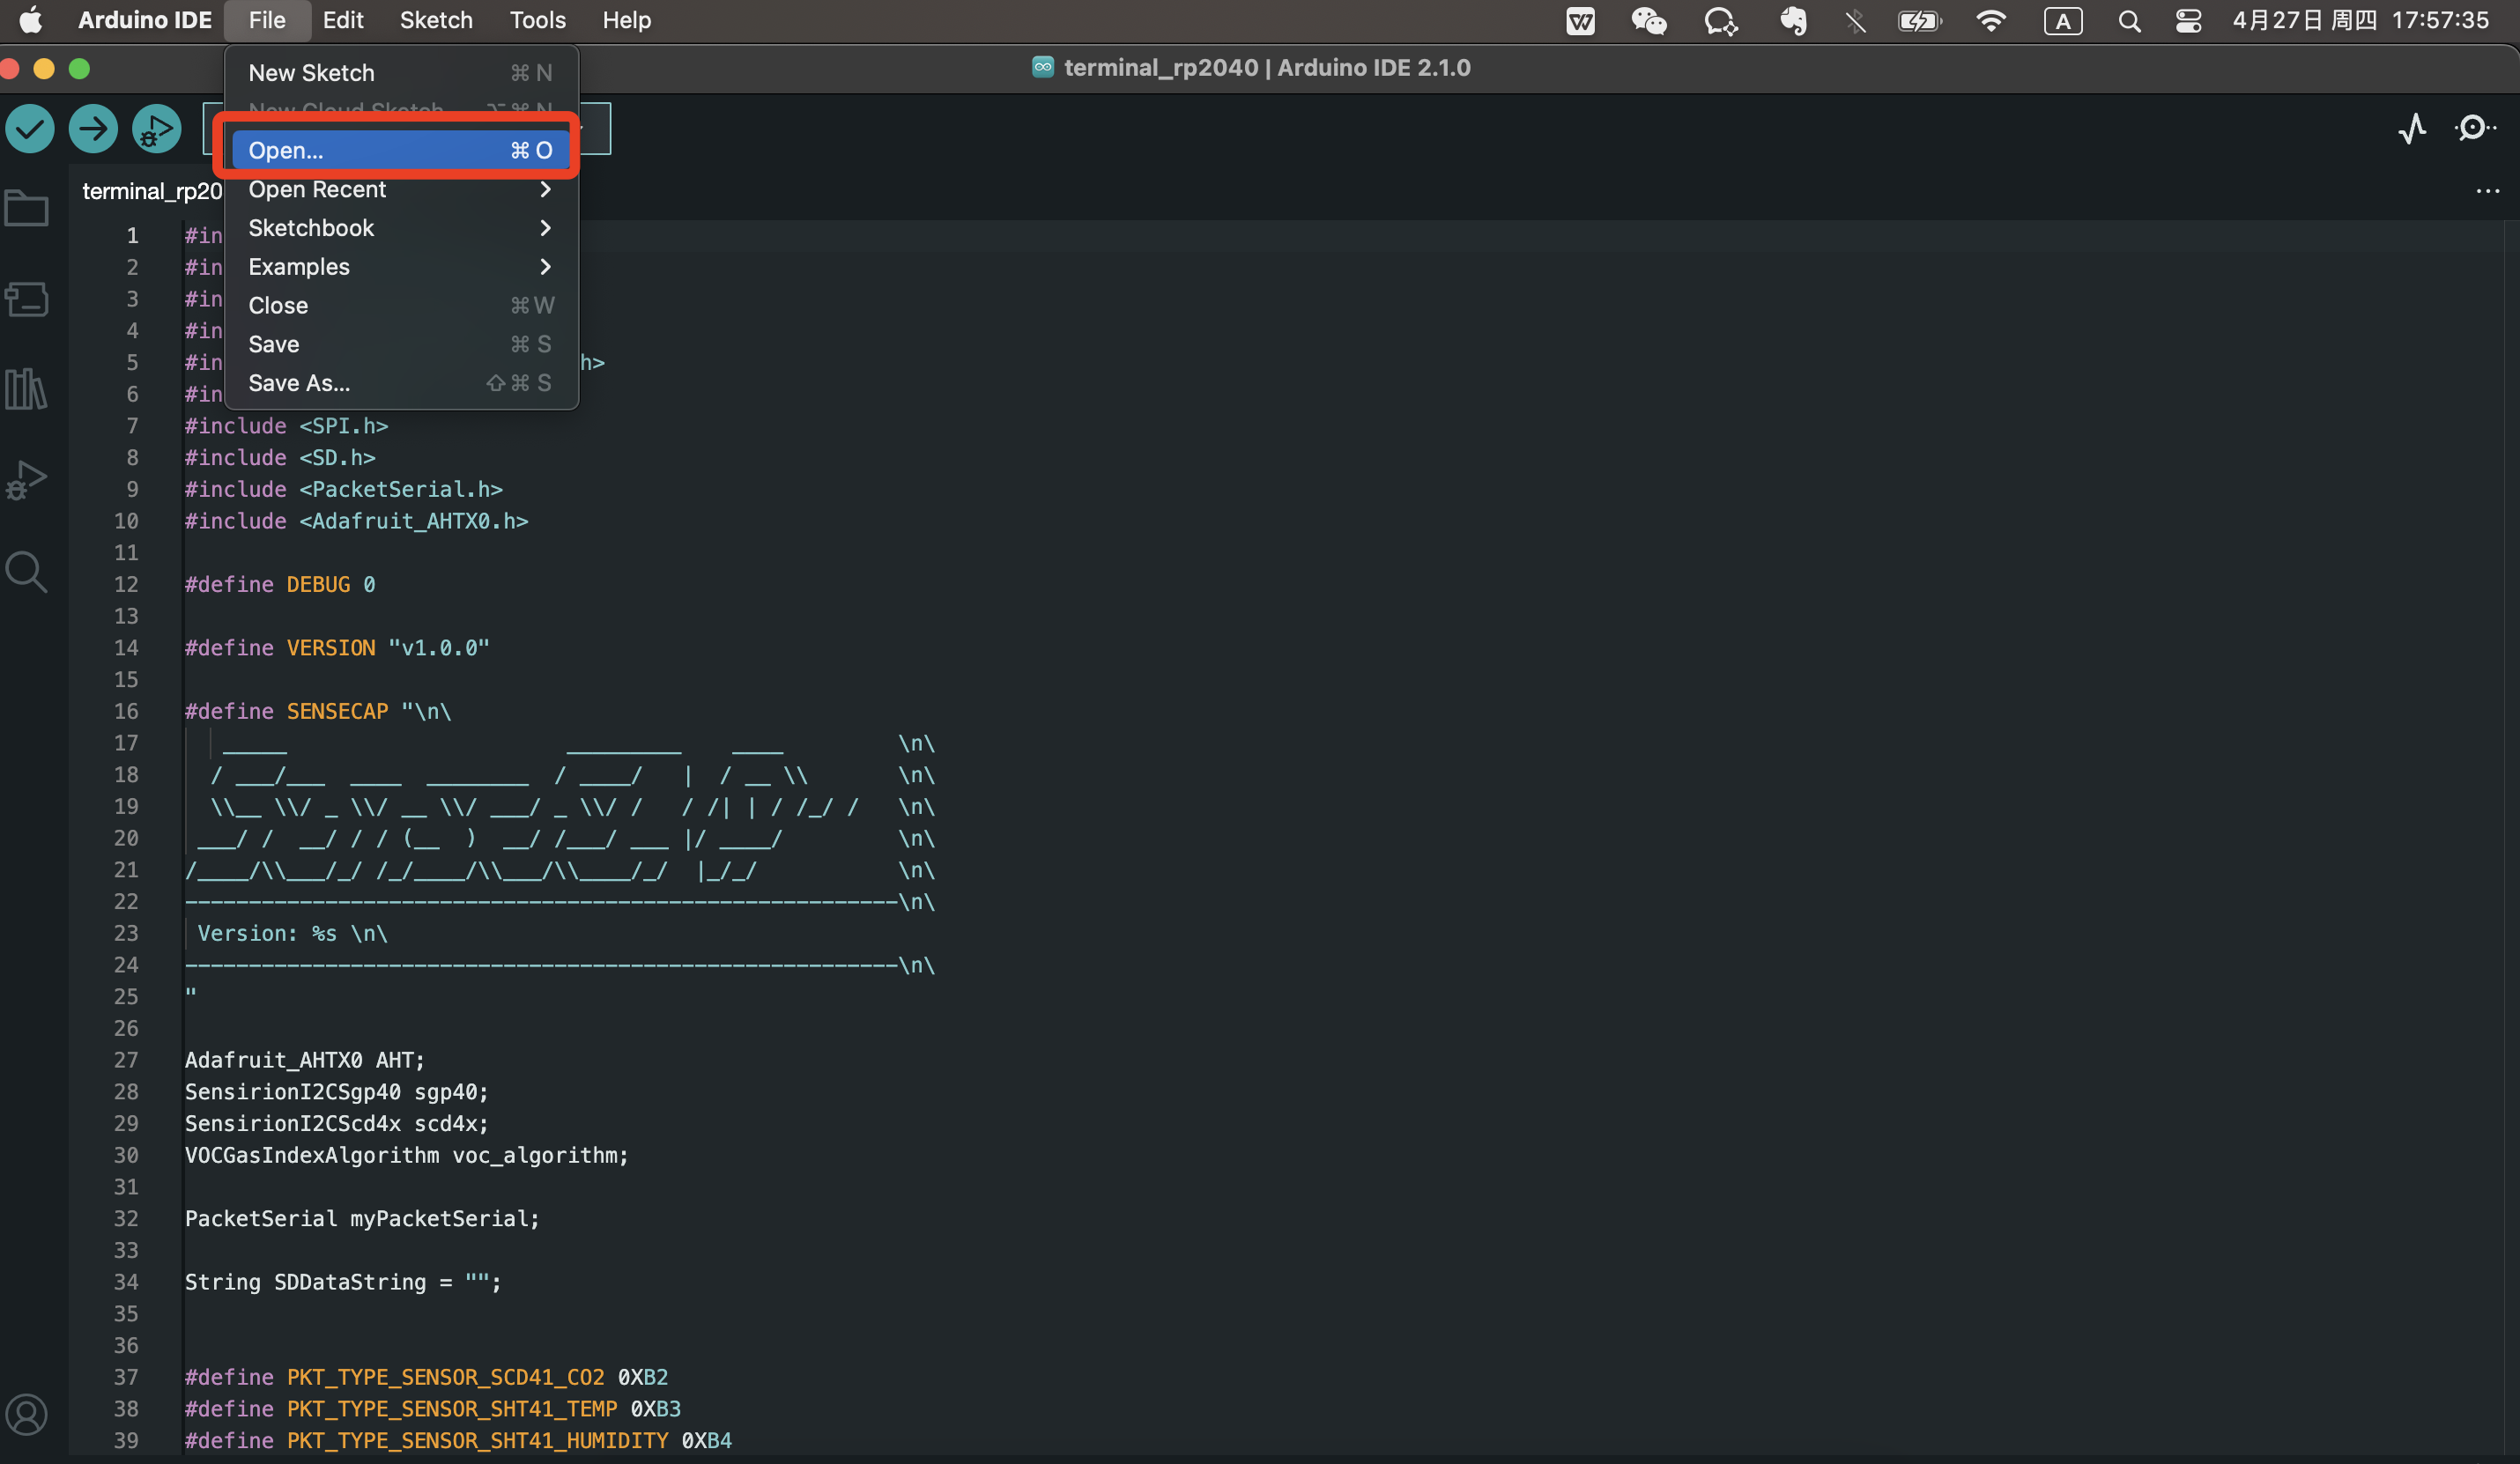
- Step 6: Open the example code file
File -> Open, then select the example code file (.ino file).
We provide an example code file, you can modify the code according to your needs.
- Step 7: Verify and Upload the file.
 |
 |
 |
Here, we've completed building and flashing(downloading) firmware on the RP2040.
Flash the .uf2 file
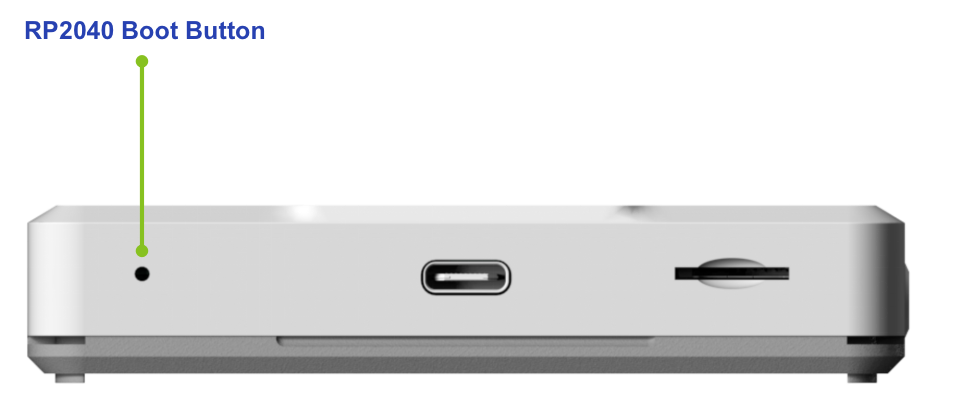
- Step 1: Connect the device to your PC
Long press this internal button using a needle, then connect the device to your PC by the provided USB type-C cable, release the button once connected.
- Step 2: Firmware Flash
After the connection is successful, your PC will show a disk.
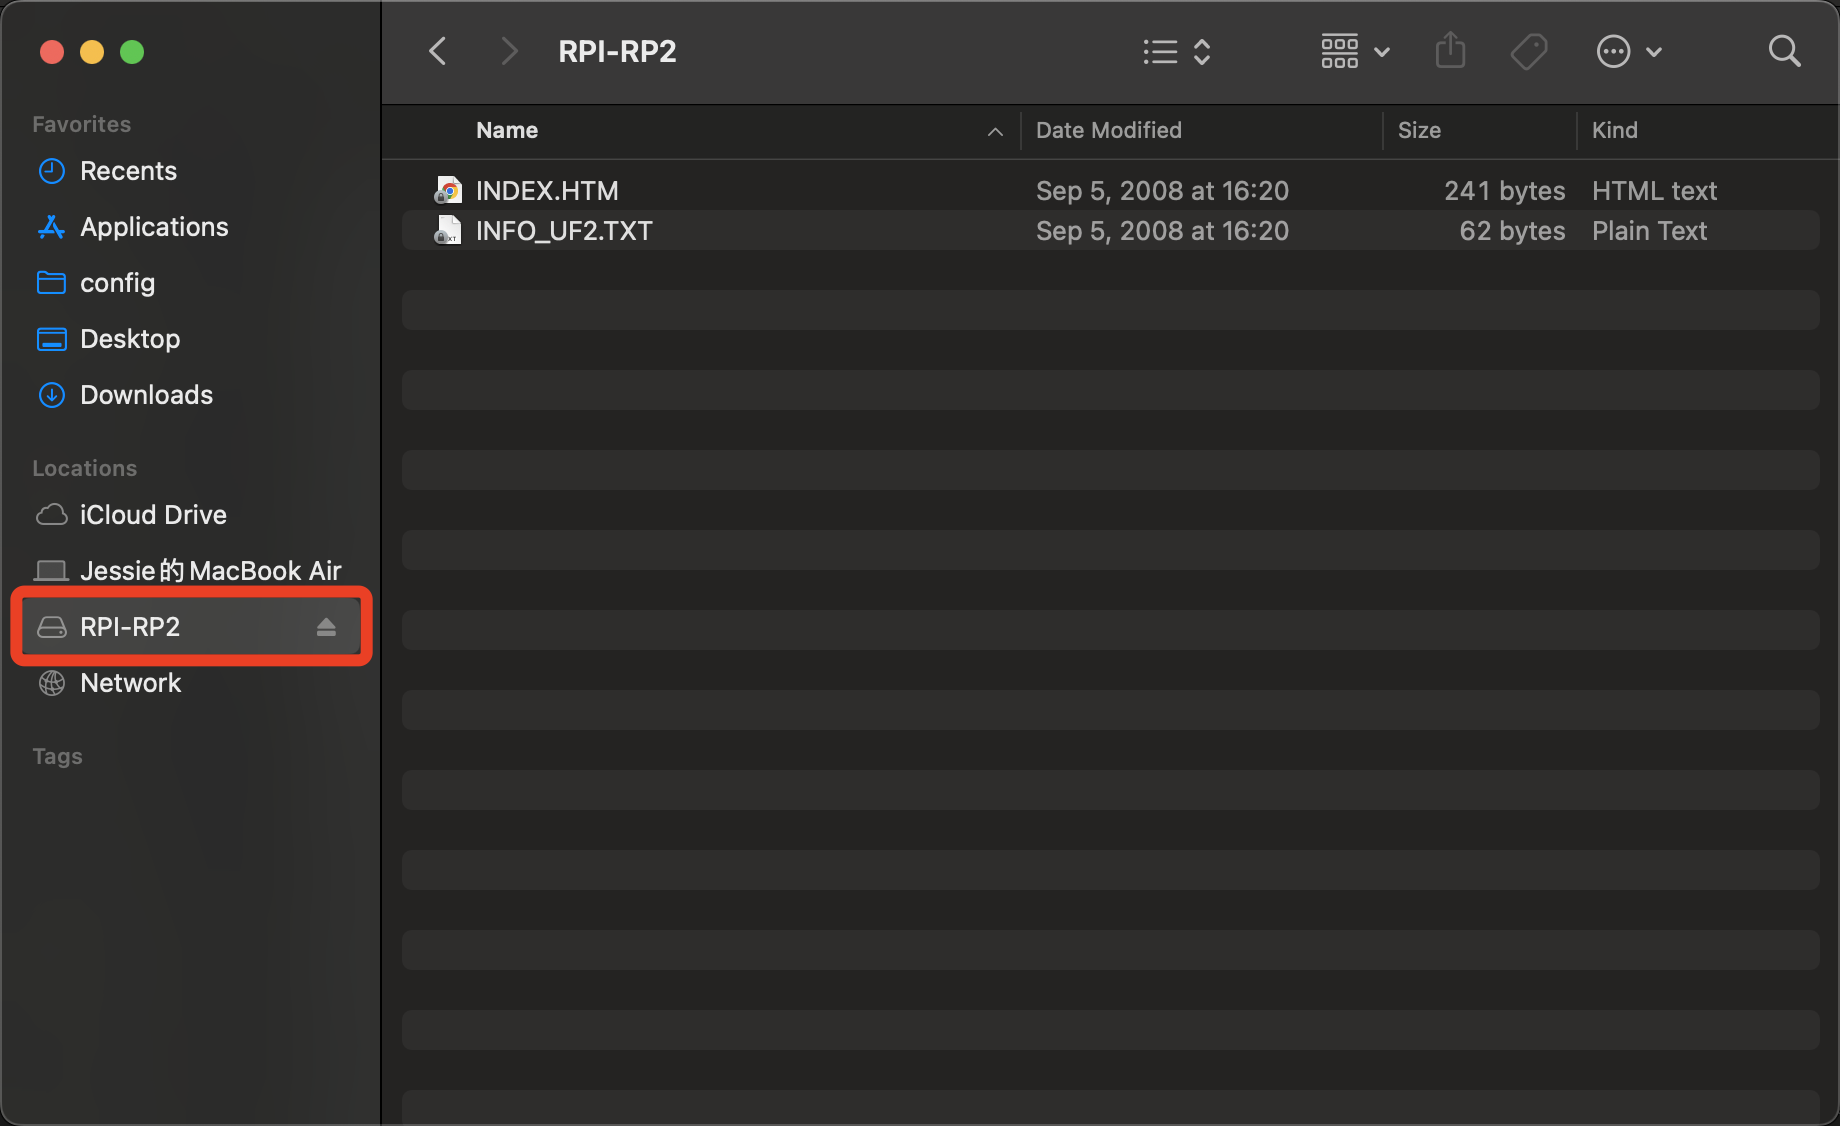
Copy the .uf2 file to the disk, then the disk will log out.
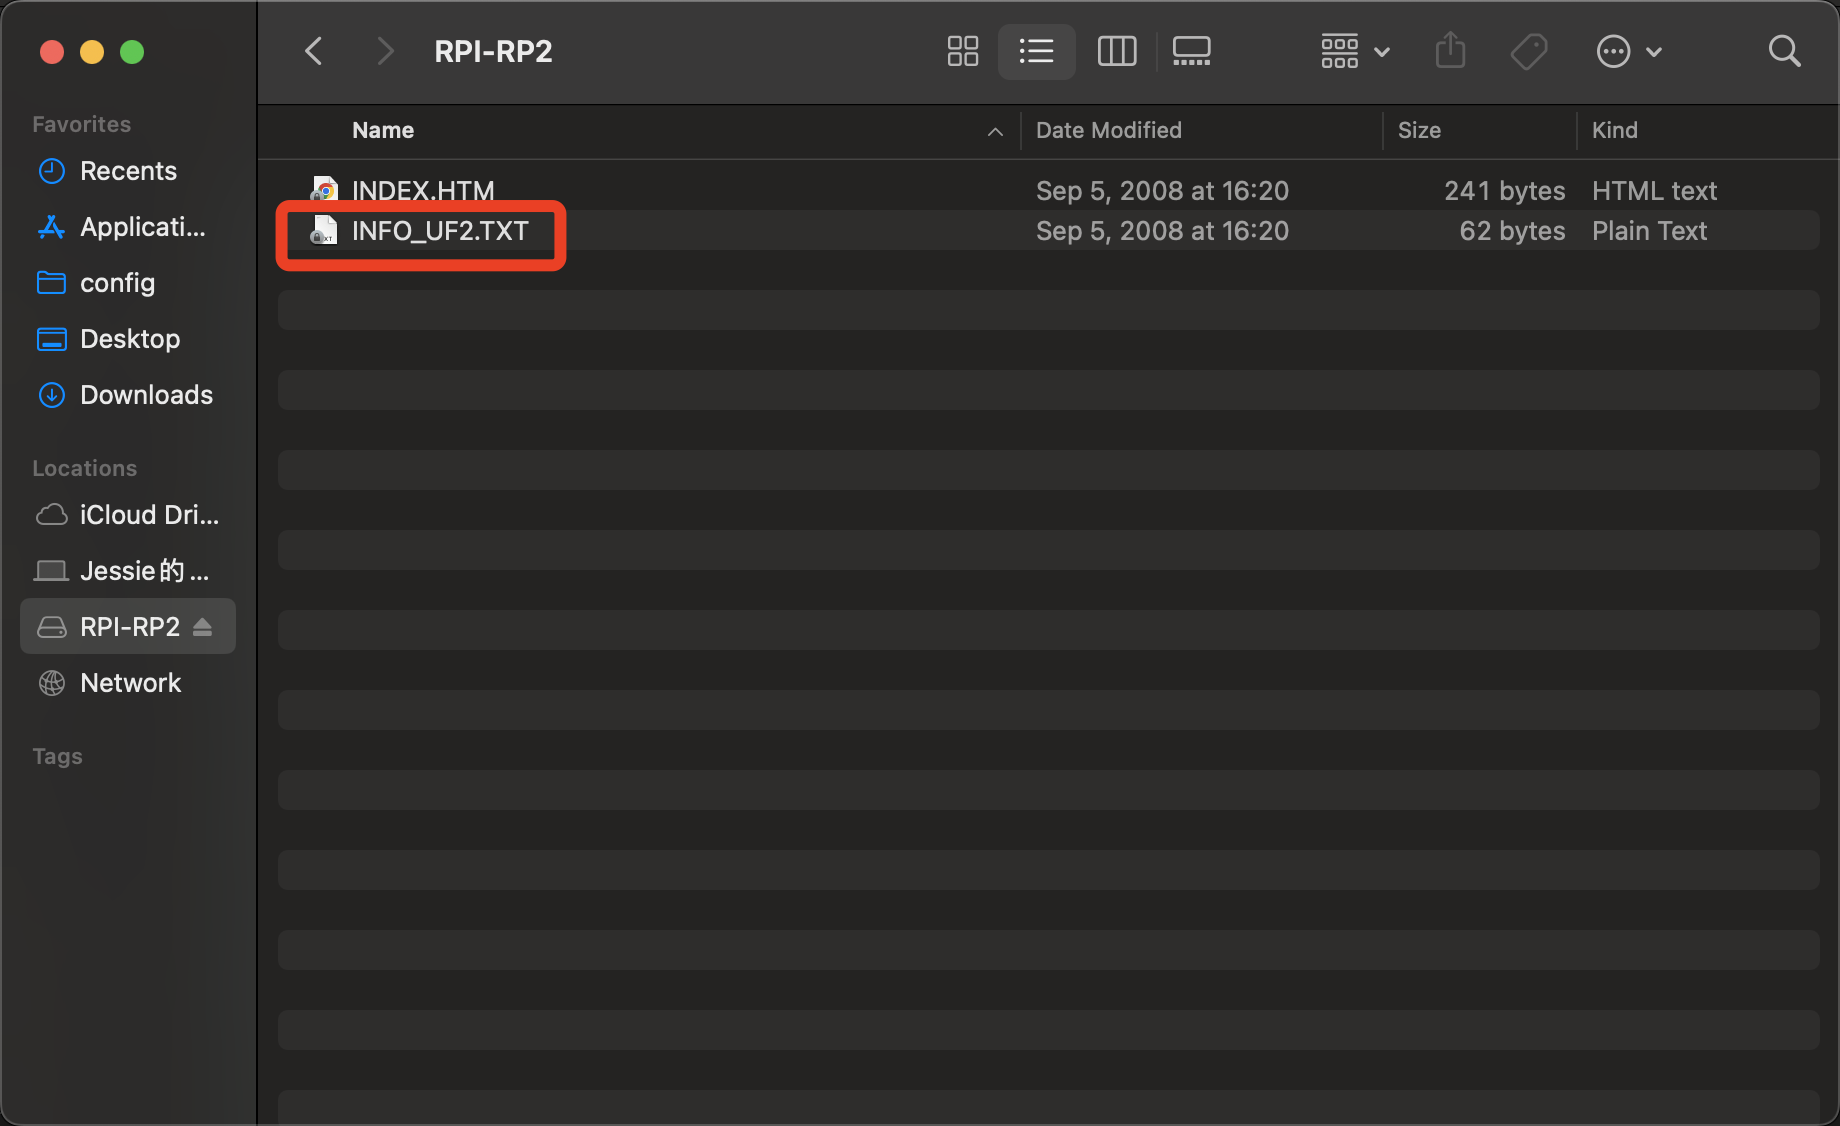
The upgrade will run automatically.
ESP32 & RP2040 Communication Protocol
ESP32 and RP2040 use serial port communication, using the cobs communication protocol. The list of commands used in the demo is as follows:
The command format consists of the packet type and packet parameters.

Resource
SenseCAP Indicator RP2040 Demo
FAQ
How to distinguish the serial port?
- Windows
- MacOS
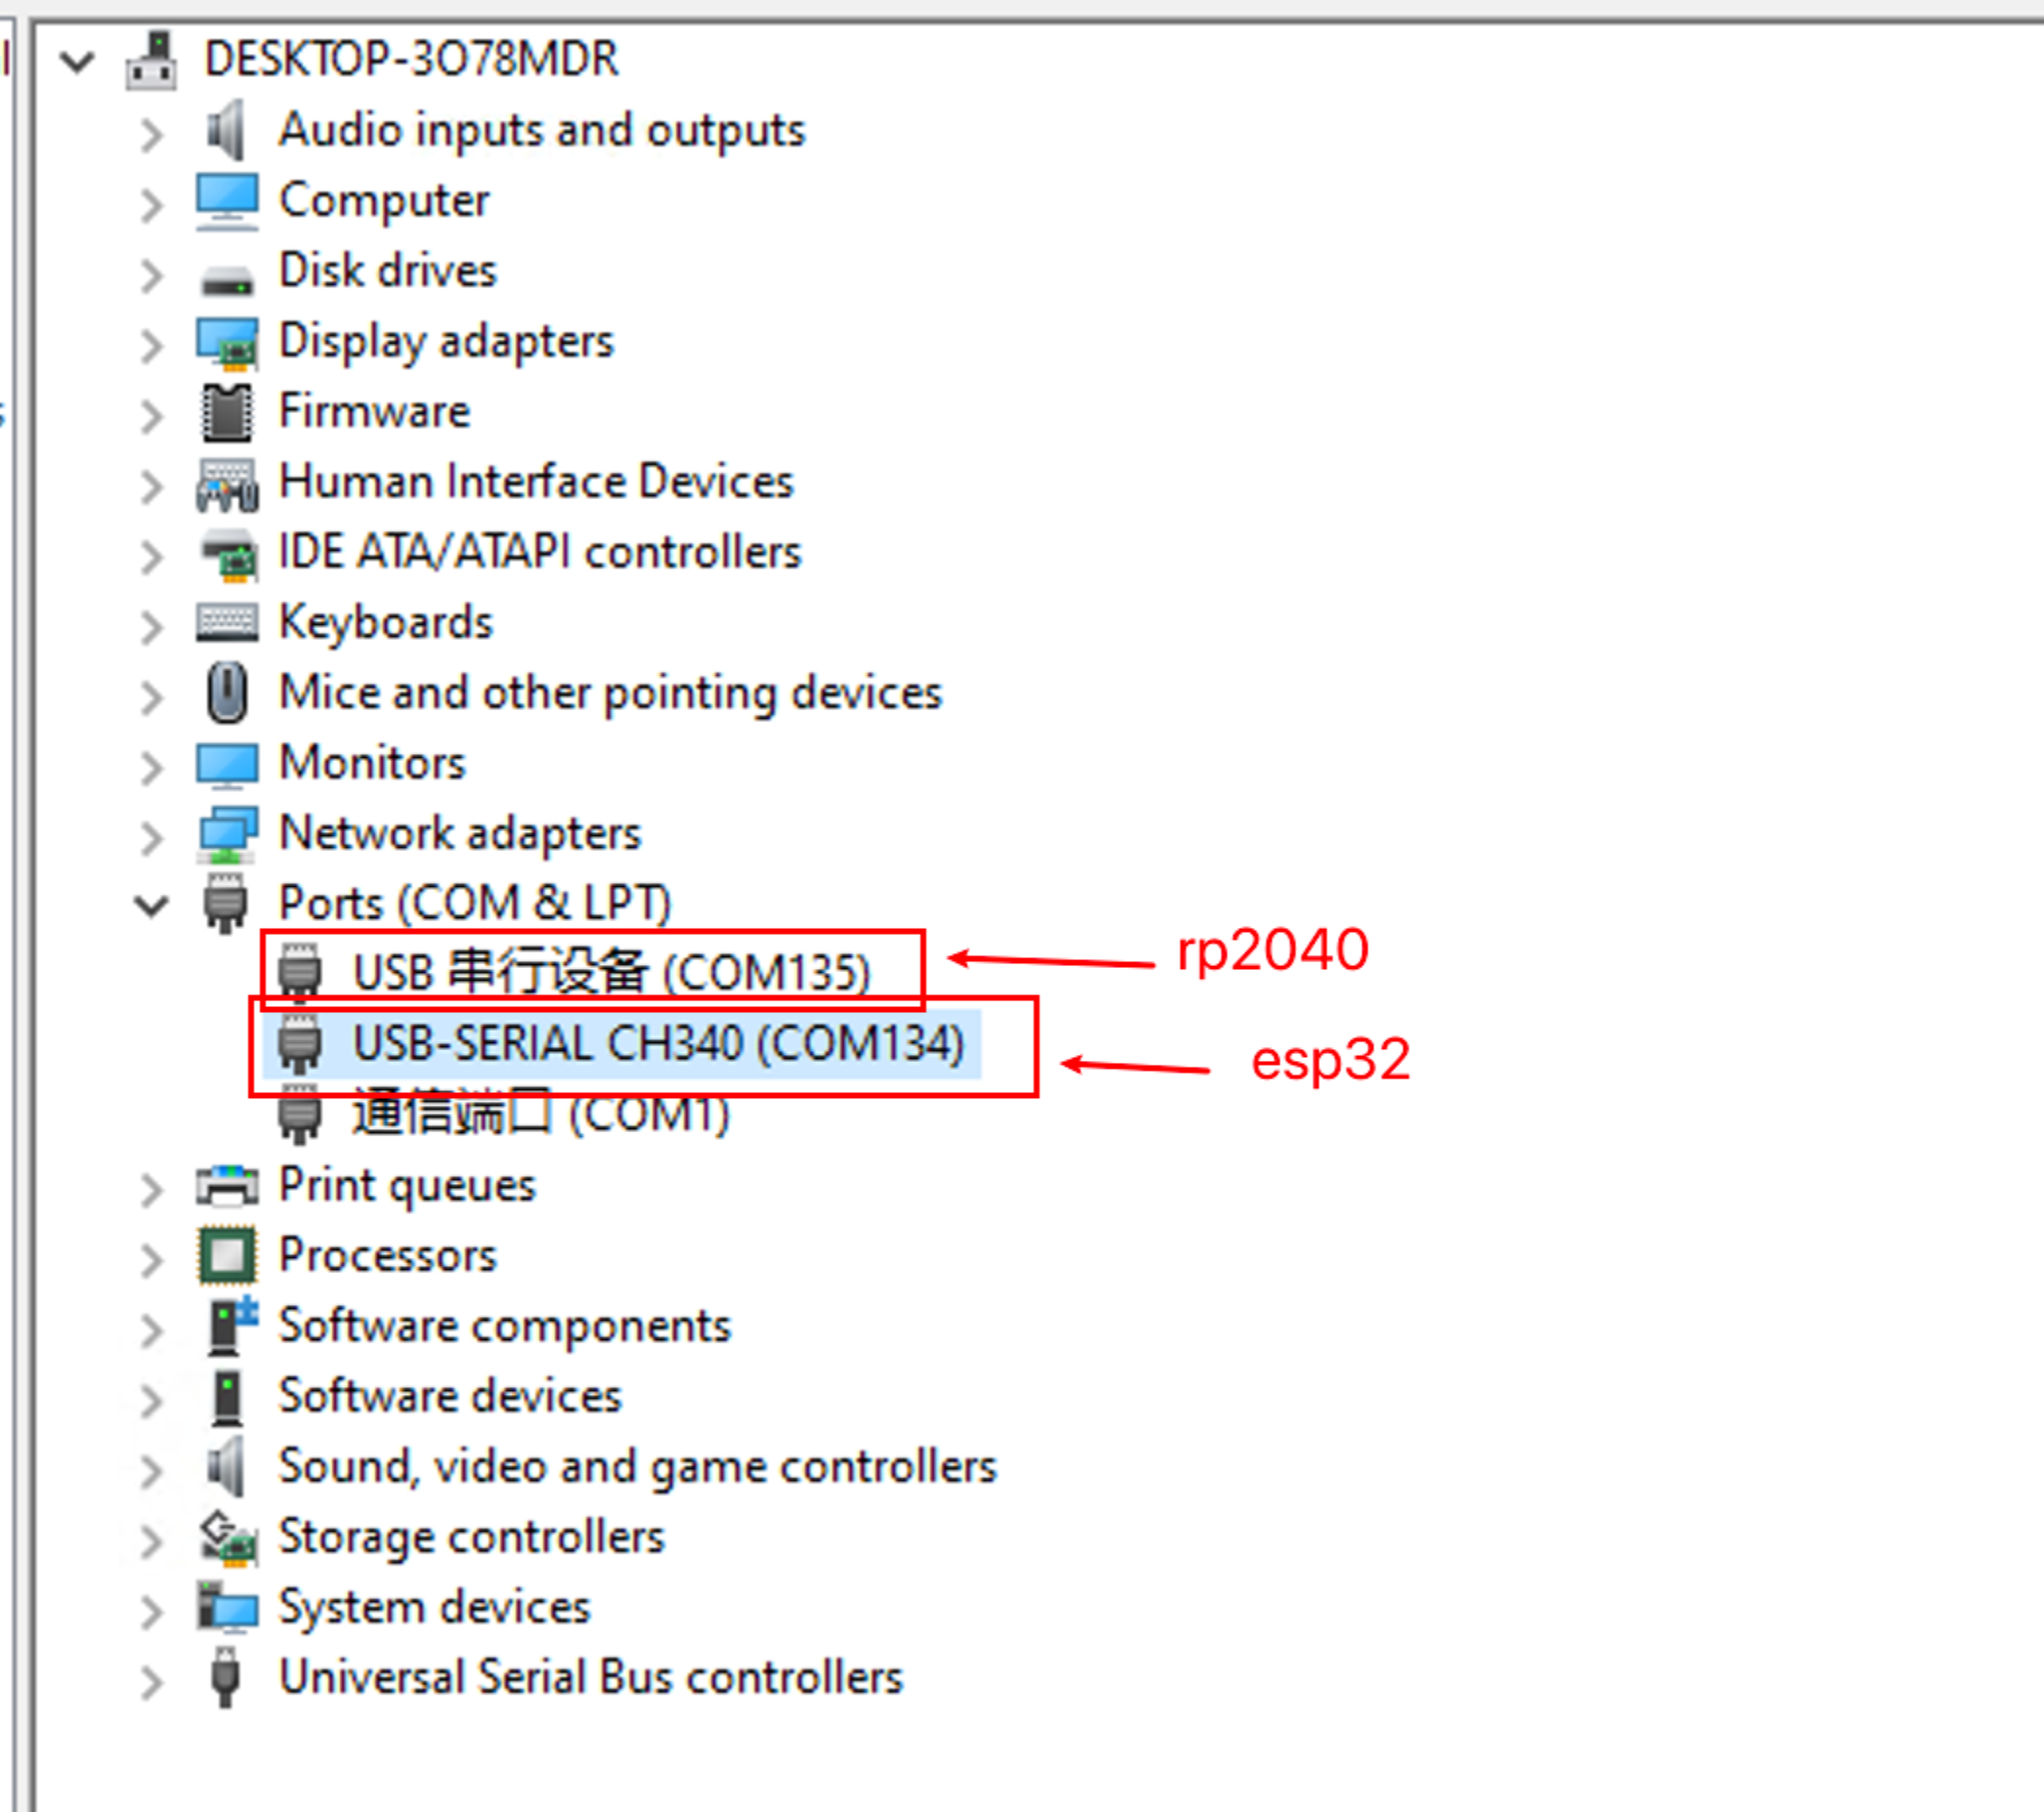
Check the port on your Device Manage
- "USB Serial Device(COMx)" or "USB 串行设备" is for RP2040
- "USB-SERIAL CH340" is for ESP32 In a nut shell, CH340 port is for ESP32.
- "/dev/cu.usbmodem" is for RP2040
Recent Updates
- 2023-11-17
- Removed patching section
- 2023-08-25
- Make Patching section more clear
- 2023-07-25
- Added content for flashing firmware using Esptool
- 2023-05-29
- Added Patching section
Tech Support
Need help with your SenseCAP Indicator? We're here to assist you!