Watcher UI Integration Guide
1. UI Component Structure
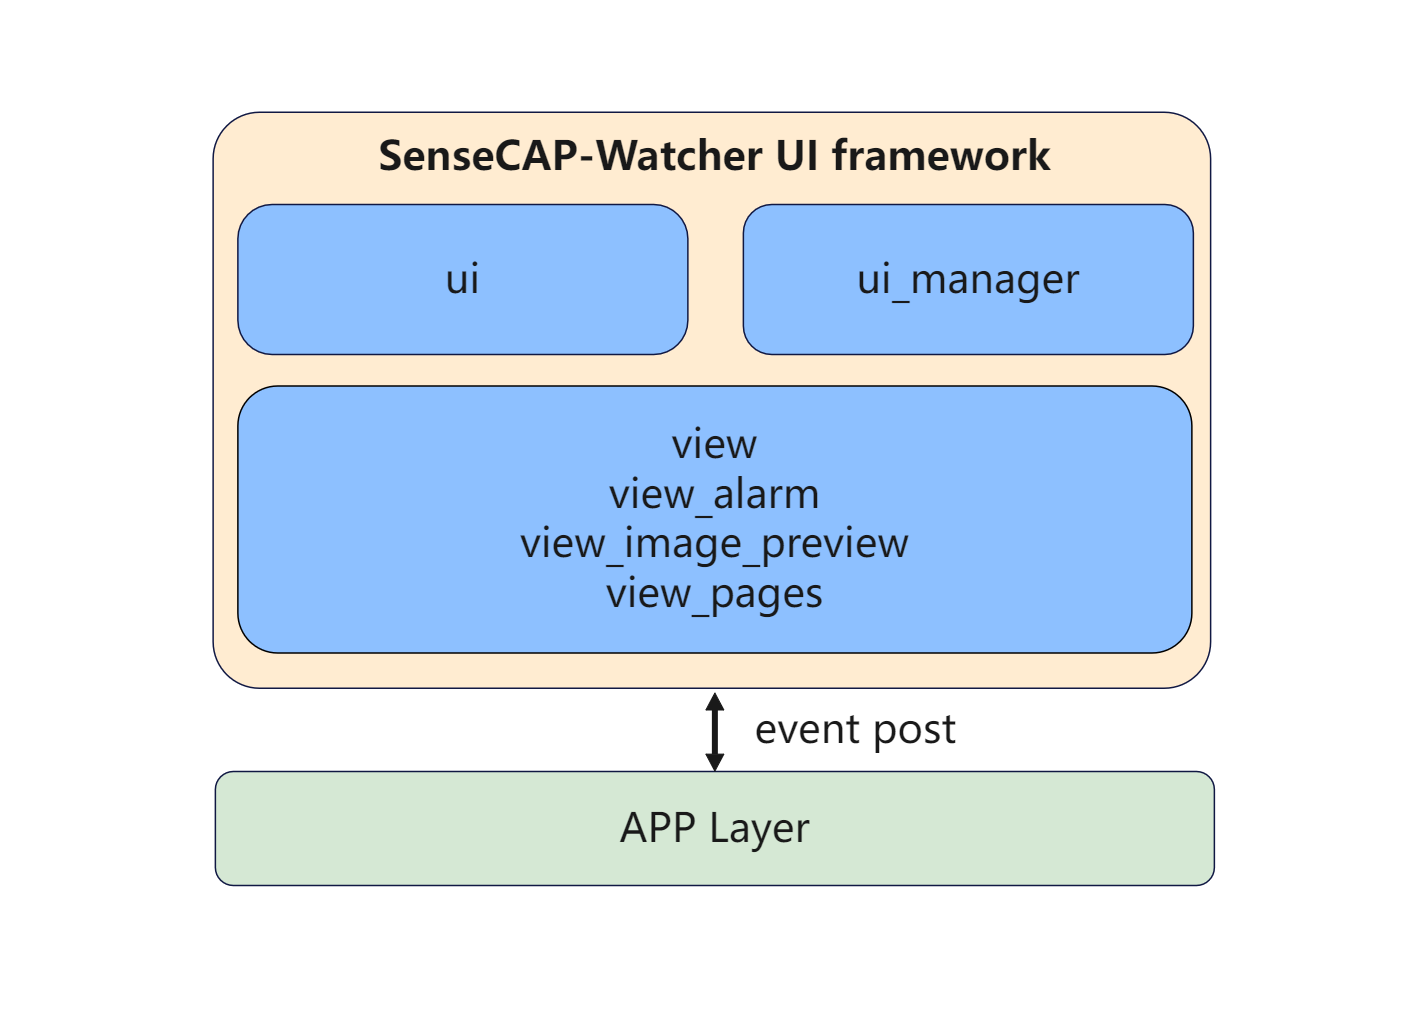
In this tutorial, you will learn how to integrate your own UI design and related logic functions into the view directory. All UI designs and logic functions will be placed in the view directory, which contains the ui and ui_manager subdirectories. Additionally, the view directory includes view.c, view_alarm.c, view_image_preview.c, view_pages.c, and corresponding .h header files. The specific framework is shown below:
-
The
uisubdirectory contains all user-defined UI designs. In this project, theuiis generated by the Squareline tool. -
The
ui_managersubdirectory contains custom animations, object group management, and various event callback definitions. -
The source files starting with
viewdefine global pages and related event callback functions. -
The UI interacts with the APP layer by sending and listening to events.
Reading the module definitions below will help you understand and use the entire UI framework. If you want to quickly grasp UI integration, you can skip to Chapter 6 for application reading.
2. Group Management
2.1 Overview
SenseCAP Watcher supports touchscreen and encoder input devices. To synchronize these input device actions and ensure correctness, group management is required to maintain focus on the correct object and avoid event conflicts.
Group management functions are implemented in the following files:
- pm.c: Contains function implementations.
- pm.h: Contains function prototypes and type definitions.
2.2 Adding Objects to a Group
static void addObjToGroup(GroupInfo *groupInfo, lv_obj_t *objects[], int count);
Here, groupInfo is a pointer to the GroupInfo structure to which objects will be added, objects is the array of objects to be added to the group, and count is the number of objects in the array.
Usage:
// Define the objects to be added to the page
lv_obj_t *example_objects[] = {example_obj1, example_obj2, ...};
// Add the objects to the group structure variable
addObjToGroup(&group_page_example, example_objects, sizeof(example_objects) / sizeof(example_objects[0]));
2.3 Page Navigation and Object Management
void lv_pm_open_page(lv_group_t *group,
                      GroupInfo *groupInfo,
                      pm_operation_t operation,
                      lv_obj_t **target,
                      lv_scr_load_anim_t fademode,
                      int spd,
                      int delay,
                      void (*target_init)(void));
Parameters:
group: Pointer to the LVGL group.groupInfo: Pointer to theGroupInfostructure containing page objects.operation: The operation to be performed (add objects to group, no operation, or clear group).target: The target object of the new page.fademode: Screen load animation mode.spd: Speed of the screen load animation.delay: Delay before the screen load animation starts.target_init: Initialization function for the target screen.
Usage:
// Add the objects from the structure variable to the group and navigate to the corresponding page
lv_pm_open_page(g_example, &group_page_example, PM_ADD_OBJS_TO_GROUP, &ui_Page_Example, LV_SCR_LOAD_ANIM_NONE, 0, 0, &ui_Page_Example_screen_init);
2.4 Associating Encoder with Group
Create a group, iterate to get input devices, and associate the encoder with the group so that the encoder can control the objects in the group.
void lv_pm_init(void)
{
  // Create a group
  g_main = lv_group_create();
  cur_drv = NULL;
  // Loop to get input devices
  while ((cur_drv = lv_indev_get_next(cur_drv)))
  {
    // Associate the encoder with the group when the input device is an encoder
    if (cur_drv->driver->type == LV_INDEV_TYPE_ENCODER)
    {
      lv_indev_set_group(cur_drv, g_main);
      break;
    }
  }
  // Define objects in different GroupInfo structure variables
  initGroup();
}
Usage:
// Call in `view_init` to initialize the group and associate the encoder with the group
int view_init(void)
{
  // Note: Any operations on objects in the lvgl task must be performed within a thread lock!
  lvgl_port_lock(0);
  // Initialize UI
  ui_init();
  // Initialize the group and associate the encoder
  lv_pm_init();
  lvgl_port_unlock();
}
2.5 Printing GroupInfo Objects
static void printGroup(GroupInfo *groupInfo);
Here, groupInfo is a pointer to the GroupInfo structure to which objects will be added. Note that before printing, you need to set the user_data for the objects by using lv_obj_set_user_data(example_obj, "example_obj_print").
Usage:
printGroup(&group_page_example);
2.6 Example Usage
- Define a
GroupInfovariable
GroupInfo group_page_example;
- Initialize objects in
initGroup()
lv_obj_t * example_objects[] = {example_obj1, example_obj2, ...};
- Add objects to the group
addObjToGroup(&group_page_example, example_objects, sizeof(example_objects) / sizeof(example_objects[0]));
- Open the page and add the group
lv_pm_open_page(g_example, &group_page_example, PM_ADD_OBJS_TO_GROUP, &ui_Page_Example, LV_SCR_LOAD_ANIM_NONE, 0, 0, &ui_Page_Example_screen_init);
By following these steps, you can ensure that the touchscreen and encoder input operate synchronously and correctly in your application.
3. Device Alarm
3.1 Overview
This section explains how to integrate and use the alarm UI components in your Watcher. By understanding and using the following functions, you can manage the device's UI alarm behavior.
The alarm UI is implemented in the following files:
- view_alarm.c: Contains function implementations.
- view_alarm.h: Contains function prototypes and type definitions.
3.2 Initializing Alarm UI
int view_alarm_init(lv_obj_t *ui_screen);
ui_screen is a pointer to the screen object used to display the alarm UI components.
Usage:
// Create alarm-related UI on the top layer
view_alarm_init(lv_layer_top());
3.3 Turning On Alarm UI
int view_alarm_on(struct tf_module_local_alarm_info *alarm_st);
alarm_st is a pointer to the tf_module_local_alarm_info structure, which contains alarm-related information such as the duration of the alarm, whether to display text and images, and specific content of the text and images.
Usage:
struct tf_module_local_alarm_info info;
view_alarm_on(&info);
3.4 Turning Off Alarm UI
void view_alarm_off();
Usage:
// Hide the alarm-related UI, set corresponding flags, or execute page transition logic
view_alarm_off();
4. AI Inference Real-time Image Rendering
4.1 Overview
This section explains how to decode images on the device and display them in LVGL.
This functionality is implemented in the following files:
- view_image_preview.c: Contains function implementations.
- view_image_preview.h: Contains function prototypes and type definitions.
4.2 Initializing Image Preview Function
int view_image_preview_init(lv_obj_t *ui_screen);
ui_screen is a pointer to the screen object used to display real-time previews. This function initializes the JPEG decoder, allocates memory, and creates some UI objects to render AI inference results, such as target detection boxes and classification names.
Usage:
// Create image preview UI on the ViewLive page
view_image_preview_init(ui_Page_ViewLive);
4.3 Refreshing Preview Image
int view_image_preview_flush(struct tf_module_ai_camera_preview_info *p_info);
p_info is a pointer to the tf_module_ai_camera_preview_info structure, which contains image and AI model inference information.
Usage:
struct tf_module_ai_camera_preview_info info;
view_image_preview_flush(&info);
5. UI Message Event Definition
5.1 Overview
The front-end UI of the device needs to interact with back-end APP tasks. By listening to and consuming specific events, various UI updates and page transition logic can be realized. For detailed information on ESP32 event handling, refer to the Event Loop Library section in Espressif's official documentation.
UI message event handling is implemented in the following files:
- view.c: Contains function implementations.
- view.h: Contains function prototypes and type definitions.
- data_defs.h: Contains enumeration declarations for various event IDs (both front-end and back-end).
5.2 UI Event Handling Functions
esp_err_t esp_event_handler_instance_register_with( esp_event_loop_handle_t event_loop,
                                                    esp_event_base_t event_base,
                                                    int32_t event_id,
                                                    esp_event_handler_t event_handler,
                                                    void * event_handler_arg,
                                                    esp_event_handler_instance_t * instance )
Parameters:
event_loop: Event loop to which this handler function is registered; cannot be NULL.event_base: Base ID of the event to register the handler for.event_id: ID of the event to register the handler for.event_handler: Handler function to call when the event is dispatched.event_handler_arg: Argument to pass to the handler function in addition to event data.instance: Event handler instance object associated with the registered handler and data; can be NULL.
5.3 Usage
1. Declare and Define Events, and Register UI Event Handler Instance to a Specific Loop
// Declaration and definition of VIEW event base
ESP_EVENT_DECLARE_BASE(VIEW_EVENT_BASE);
esp_event_loop_handle_t app_event_loop_handle;
// Declare event IDs as an enumeration; in the SenseCAP-Watcher project, this is placed in data_defs.h
enum {
    VIEW_EVENT_EXAMPLE
}
// Register instance
ESP_ERROR_CHECK(esp_event_handler_instance_register_with(app_event_loop_handle,
                                                            VIEW_EVENT_BASE, VIEW_EVENT_EXAMPLE,
                                                            __view_event_handler, NULL, NULL));
2. UI Message Event Handling
static void __view_event_handler(void* handler_args, esp_event_base_t base, int32_t id, void* event_data)
{
  // Acquire lvgl thread lock
  lvgl_port_lock(0);
  if (base == VIEW_EVENT_BASE) {
    switch (id) {
      // Custom event
      case VIEW_EVENT_EXAMPLE: {
        ESP_LOGI("ui_event", "VIEW_EVENT_EXAMPLE");
        // Execute corresponding logic based on the received event
        break;
      }
    }
  }
  // Release lvgl thread lock
  lvgl_port_unlock();
}
3. Sending UI Message Events
// Send event to trigger corresponding logic
esp_event_post_to(app_event_loop_handle, VIEW_EVENT_BASE, VIEW_EVENT_EXAMPLE, NULL, 0, pdMS_TO_TICKS(10000));
6. Application
Now we will integrate a simple UI example into the SenseCAP Watcher device using the functions introduced above. This will involve using Squareline for UI design, defining UI callback events, managing object groups, and more.
6.1 Creating UI Objects and Callback Functions in Squareline
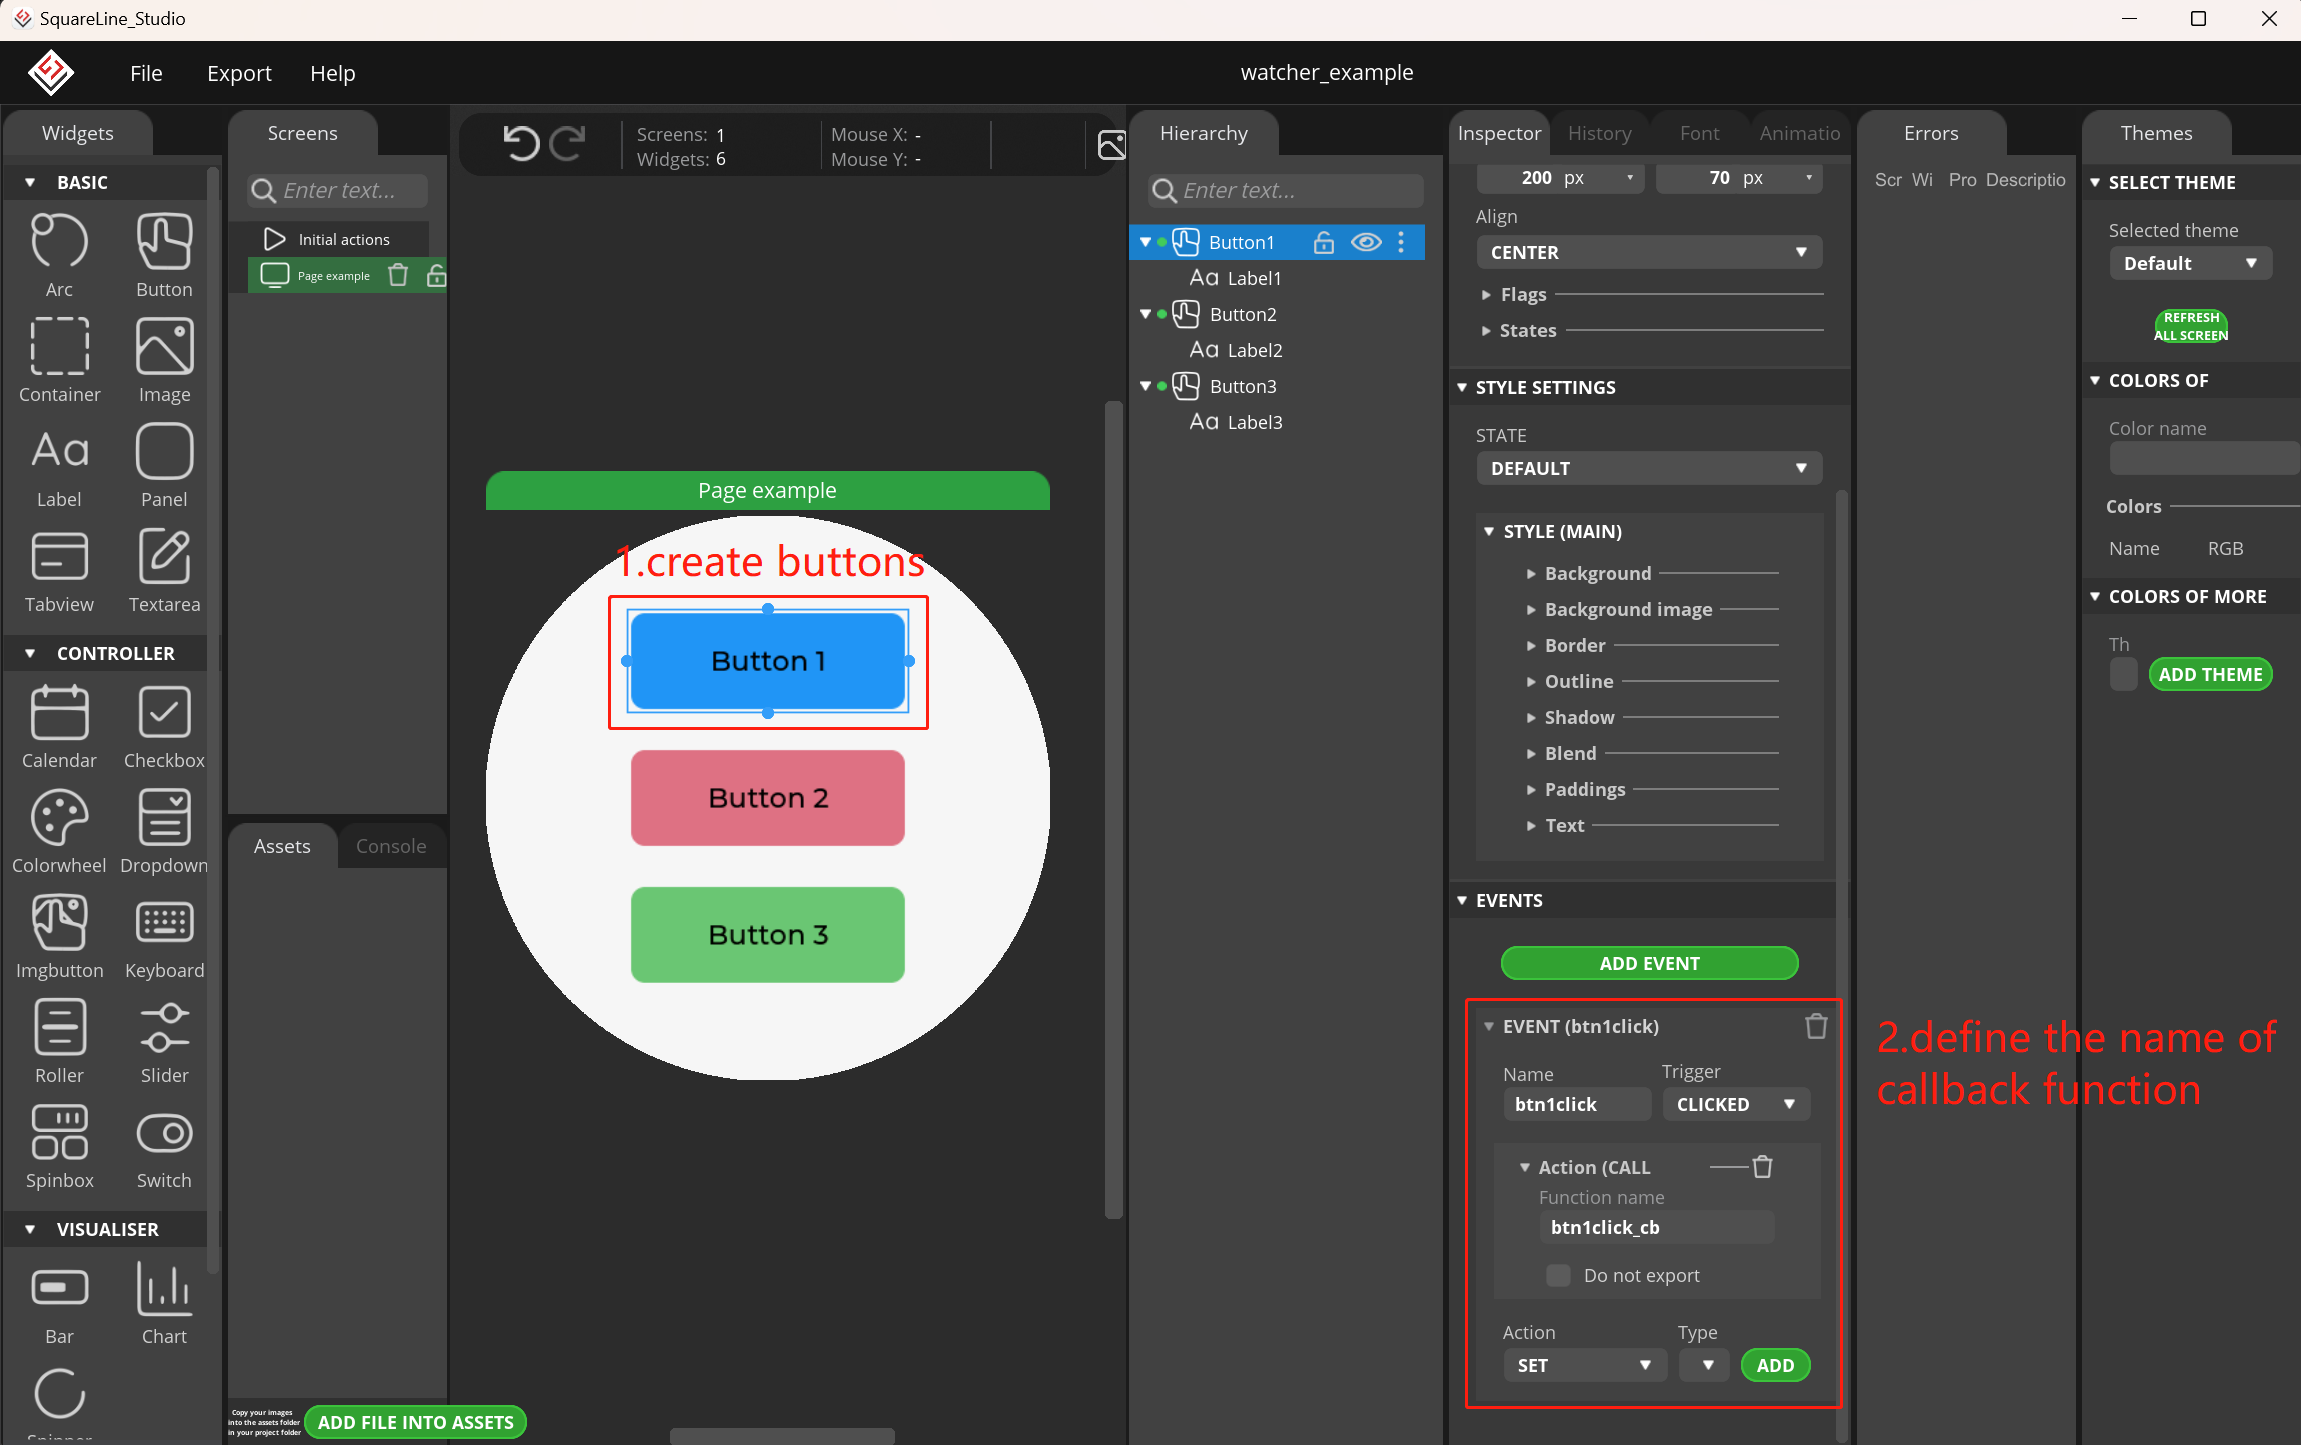
Create buttons in Squareline, set their names and styles, and assign callback functions to each button. Click ADD EVENT in the Events section, choose the trigger type for the event, and name the callback function. This completes the creation of UI objects and their related callback functions.
6.2 Exporting the ui Project from Squareline
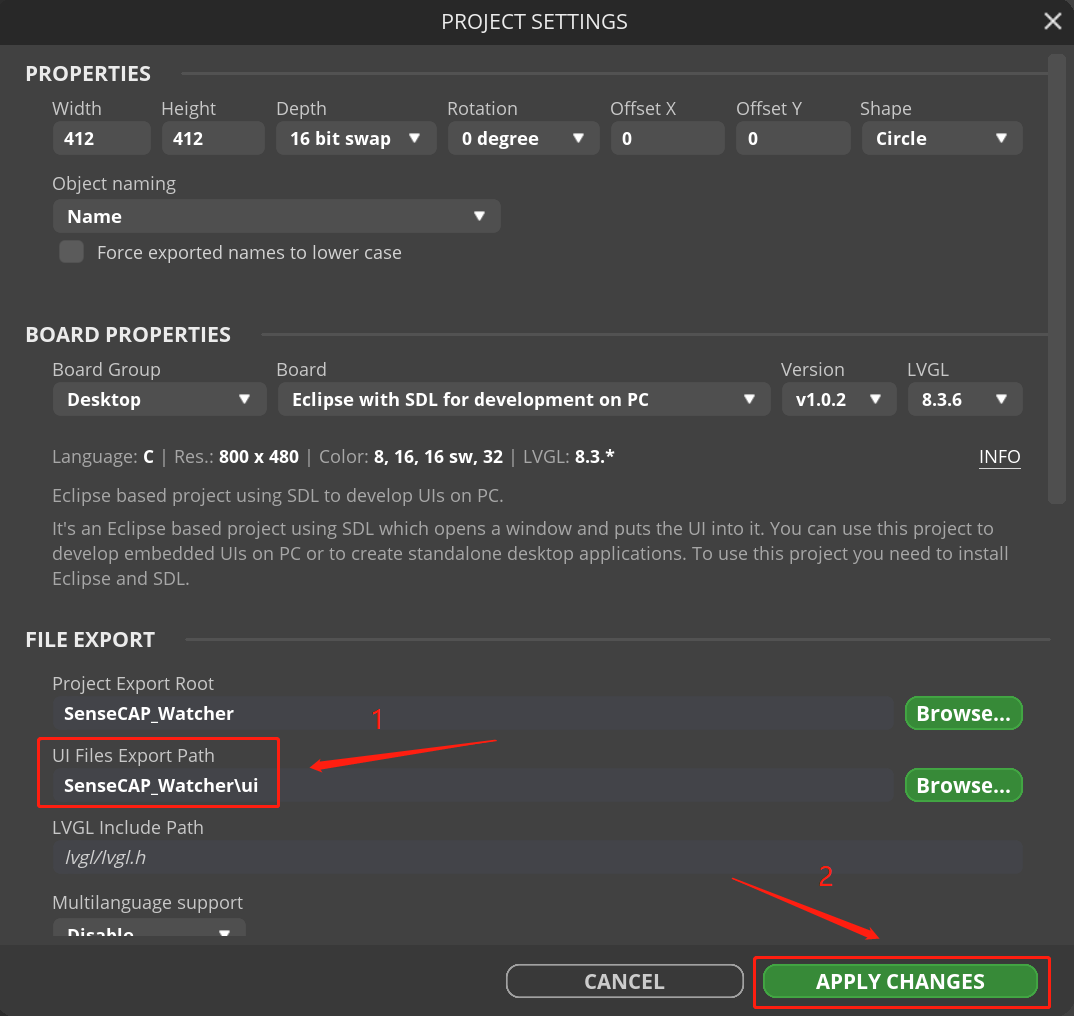
In the application, choose File -> Project Settings in the navigation bar, and set the UI Files Export Path to project_path/ui, where project_path is the path to the Squareline project. This sets the export path for the UI design.
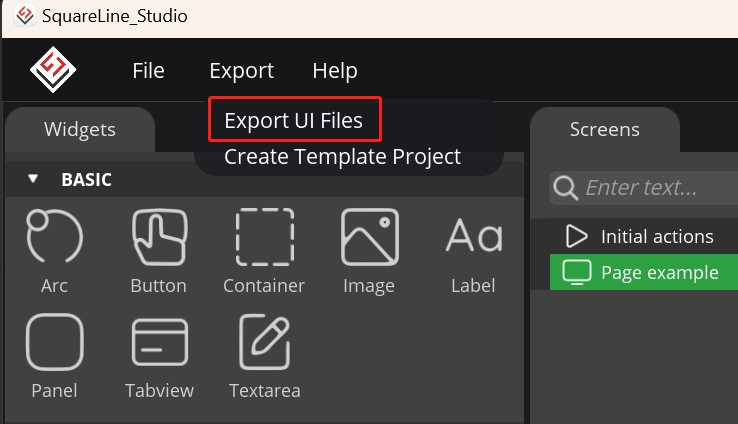
Next, click Export -> Export UI Files in the navigation bar to export a directory folder containing all the UI designs.
6.3 Implementing Callback Functions Declared in Header Files
Import the ui folder into the SenseCAP Watcher project, open and refer to the functions declared in ui_events.h of the ui folder, and implement these functions in ui_events.c of the ui_manager folder to complete the logic of these callback functions.
For example, in ui_events.h:
void btn1click_cb(lv_event_t * e);
void btn2click_cb(lv_event_t * e);
void btn3click_cb(lv_event_t * e);
And the code will be like this in ui_events.c:
void btn1click_cb(lv_event_t * e)
{
    ESP_LOGI("ui_example", "btn1click_cb");
    // Define the logic for this object when the clicked event is triggered
}

void btn2click_cb(lv_event_t * e)
{
    ESP_LOGI("ui_example", "btn2click_cb");
    // Define the logic for this object when the clicked event is triggered
}

void btn3click_cb(lv_event_t * e)
{
    ESP_LOGI("ui_example", "btn3click_cb");
    // Define the logic for this object when the clicked event is triggered
}
6.4 Adding Objects to Structure Variables
In this step, we need to manage the encoder and the created group. Adding and removing objects to and from the group will enable the encoder to control the objects.
// Define a GroupInfo variable
GroupInfo group_page_example;
// Initialize objects in initGroup()
lv_obj_t * example_objects[] = {ui_Button1, ui_Button2, ui_Button3};
// Add objects to the structure variable to facilitate adding objects to the group in different pages
addObjToGroup(&group_page_example, example_objects, sizeof(example_objects) / sizeof(example_objects[0]));
6.5 UI Initialization
In view_init in view.c, call ui_init to initialize the UI. This way, when the lvgl task thread runs, it can load the designed UI. The default loaded page is the first page designed in Squareline.
int view_init(void)
{
  // Note: Any operations on objects in the lvgl task must be performed within a thread lock!
  lvgl_port_lock(0);

  ui_init();
  lv_pm_init();
  // There are two ways to add objects to the group
  // First: Clear the objects in the group and add them to the group one by one
  lv_group_remove_all_objs(g_example);
  lv_group_add_obj(ui_Button1);
  lv_group_add_obj(ui_Button2);
  lv_group_add_obj(ui_Button3);

  // Second: Add the corresponding objects to the group through the page transition function:
  lv_pm_open_page(g_example, &group_page_example, PM_ADD_OBJS_TO_GROUP, &ui_Page_Example, LV_SCR_LOAD_ANIM_NONE, 0, 0, &ui_Page_Example_screen_init);

  lvgl_port_unlock();

  // Other initialization code
}
6.6 Viewing the Running Effect
Now we have simply implemented UI integration into the project. Next, we can compile and burn the code into the Watcher to see the running effect!
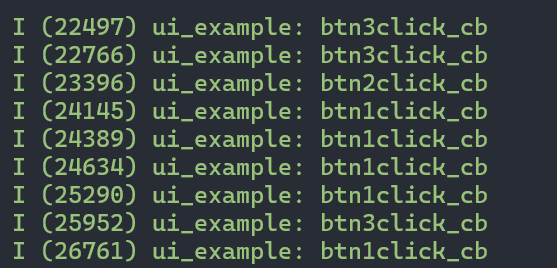
As shown above, by clicking the buttons on the page using the touchscreen or the wheel, you can see the corresponding objects triggering callback events in the serial debugging assistant, indicating that the callback functions are working successfully!
7. SquareLine Project
Most of the pages in the SenseCAP-Watcher are created using Squareline. The Squareline tool allows for easy and quick style modifications of various page objects in the Watcher. Therefore, it is highly recommended to use Squareline for UI development and iteration.
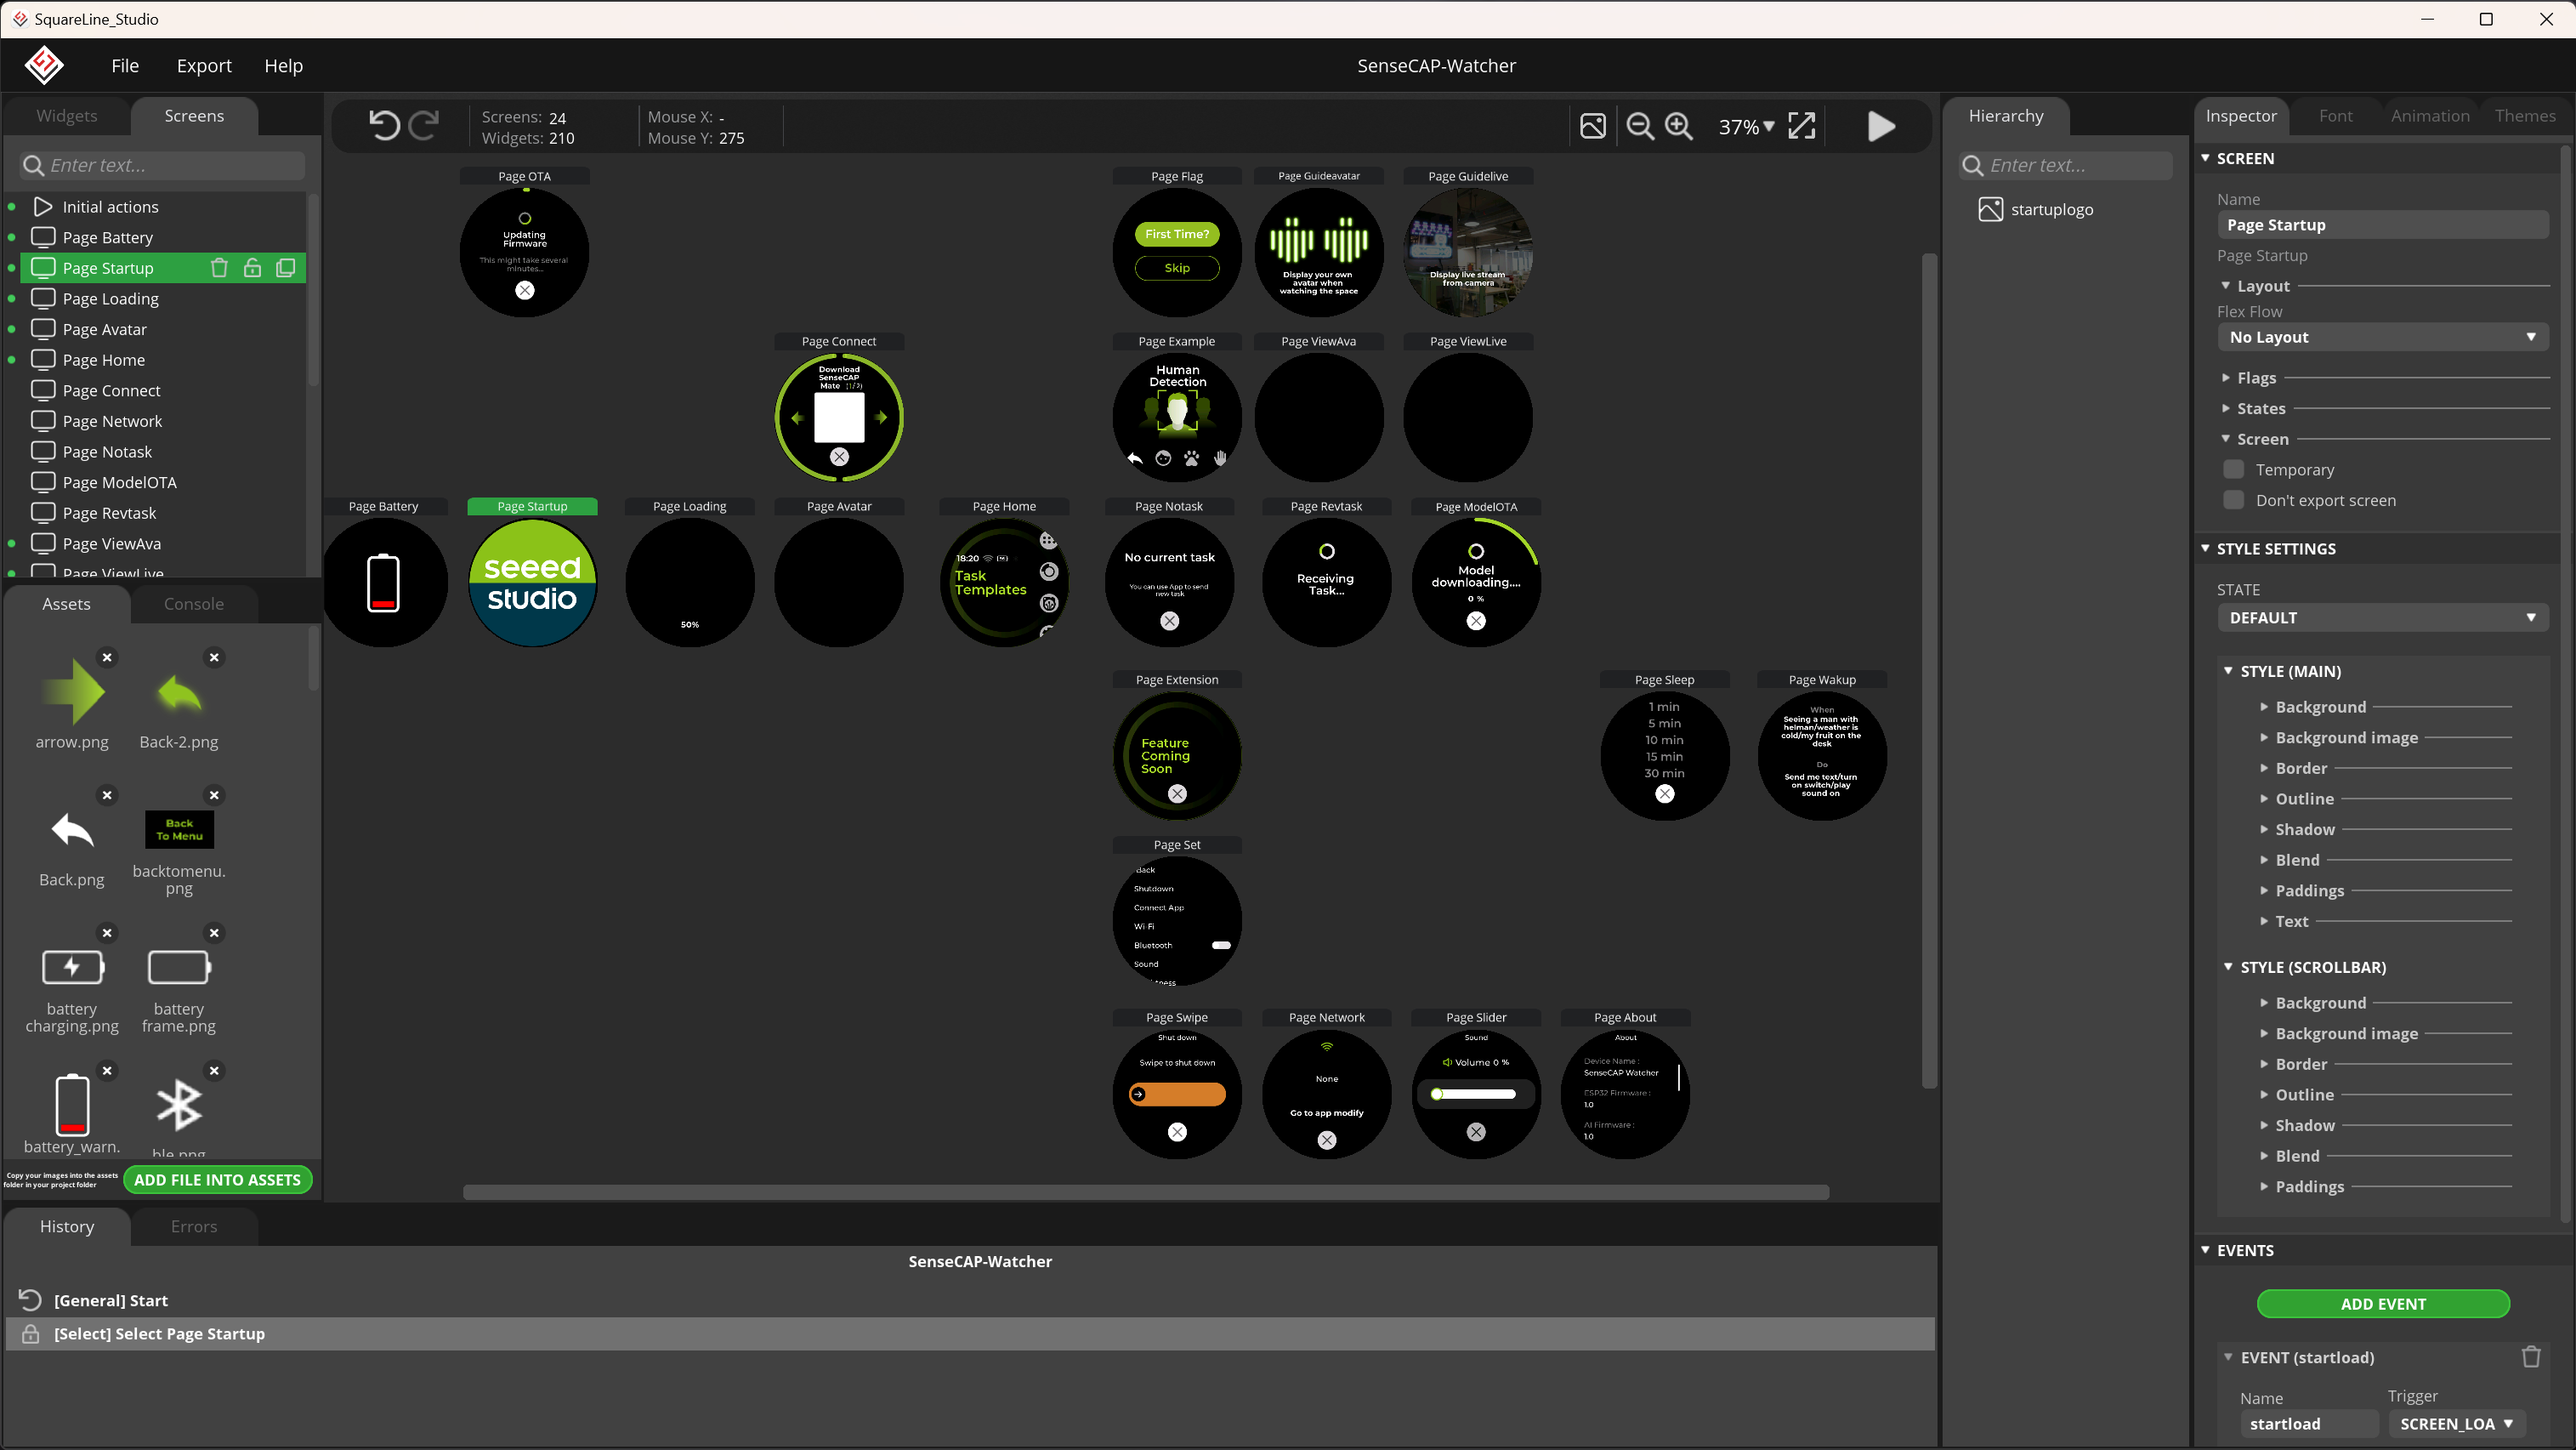
As shown in the image above, the pages in the tool are arranged according to the navigation logic. Adjacent pages can be navigated through buttons or other triggerable objects. You can click on the corresponding page and objects to view defined events, making it very simple to modify the styles of different pages and objects, customizing your AI assistant! However, note that the objects and callback events defined in the current pages are bound to the Watcher's APP layer functions. Modifying them may affect the normal operation of the Watcher. It is recommended to only modify the styles of objects, such as color and size, to ensure the Watcher's normal functionality.
8. File Description
-
The
ui_intergration_demo\SenseCAP-Watcher_examplefolder contains the complete Squareline project for the SenseCAP-Watcher, including almost all UI resource designs. -
The
ui_intergration_demo\ui_intergration_examplefolder contains the Squareline project for the example in the Application chapter. -
The
ui_intergration_demo\viewfolder contains theviewcomponent for the example in the Application chapter. You can use the example by directly replacing the originalviewin the project.
Tech Support & Product Discussion
Thank you for choosing our products! We are here to provide you with different support to ensure that your experience with our products is as smooth as possible. We offer several communication channels to cater to different preferences and needs.