How to Train and Deploy YOLOv8 on reComputer
Introduction
In the face of increasingly complex and dynamic challenges, the application of artificial intelligence provides new avenues for solving problems and has made significant contributions to the sustainable development of global society and the improvement of people's quality of life. Typically, before deploying artificial intelligence algorithms, the design and training of AI models take place on high-performance computing servers. Once the model training is complete, it is exported to edge computing devices for edge inference. In fact, all these processes can occur directly on edge computing devices. Specifically, tasks such as preparing datasets, training neural networks, validating neural networks, and deploying models can be performed on edge devices. This not only ensures data security but also saves costs associated with purchasing additional devices.
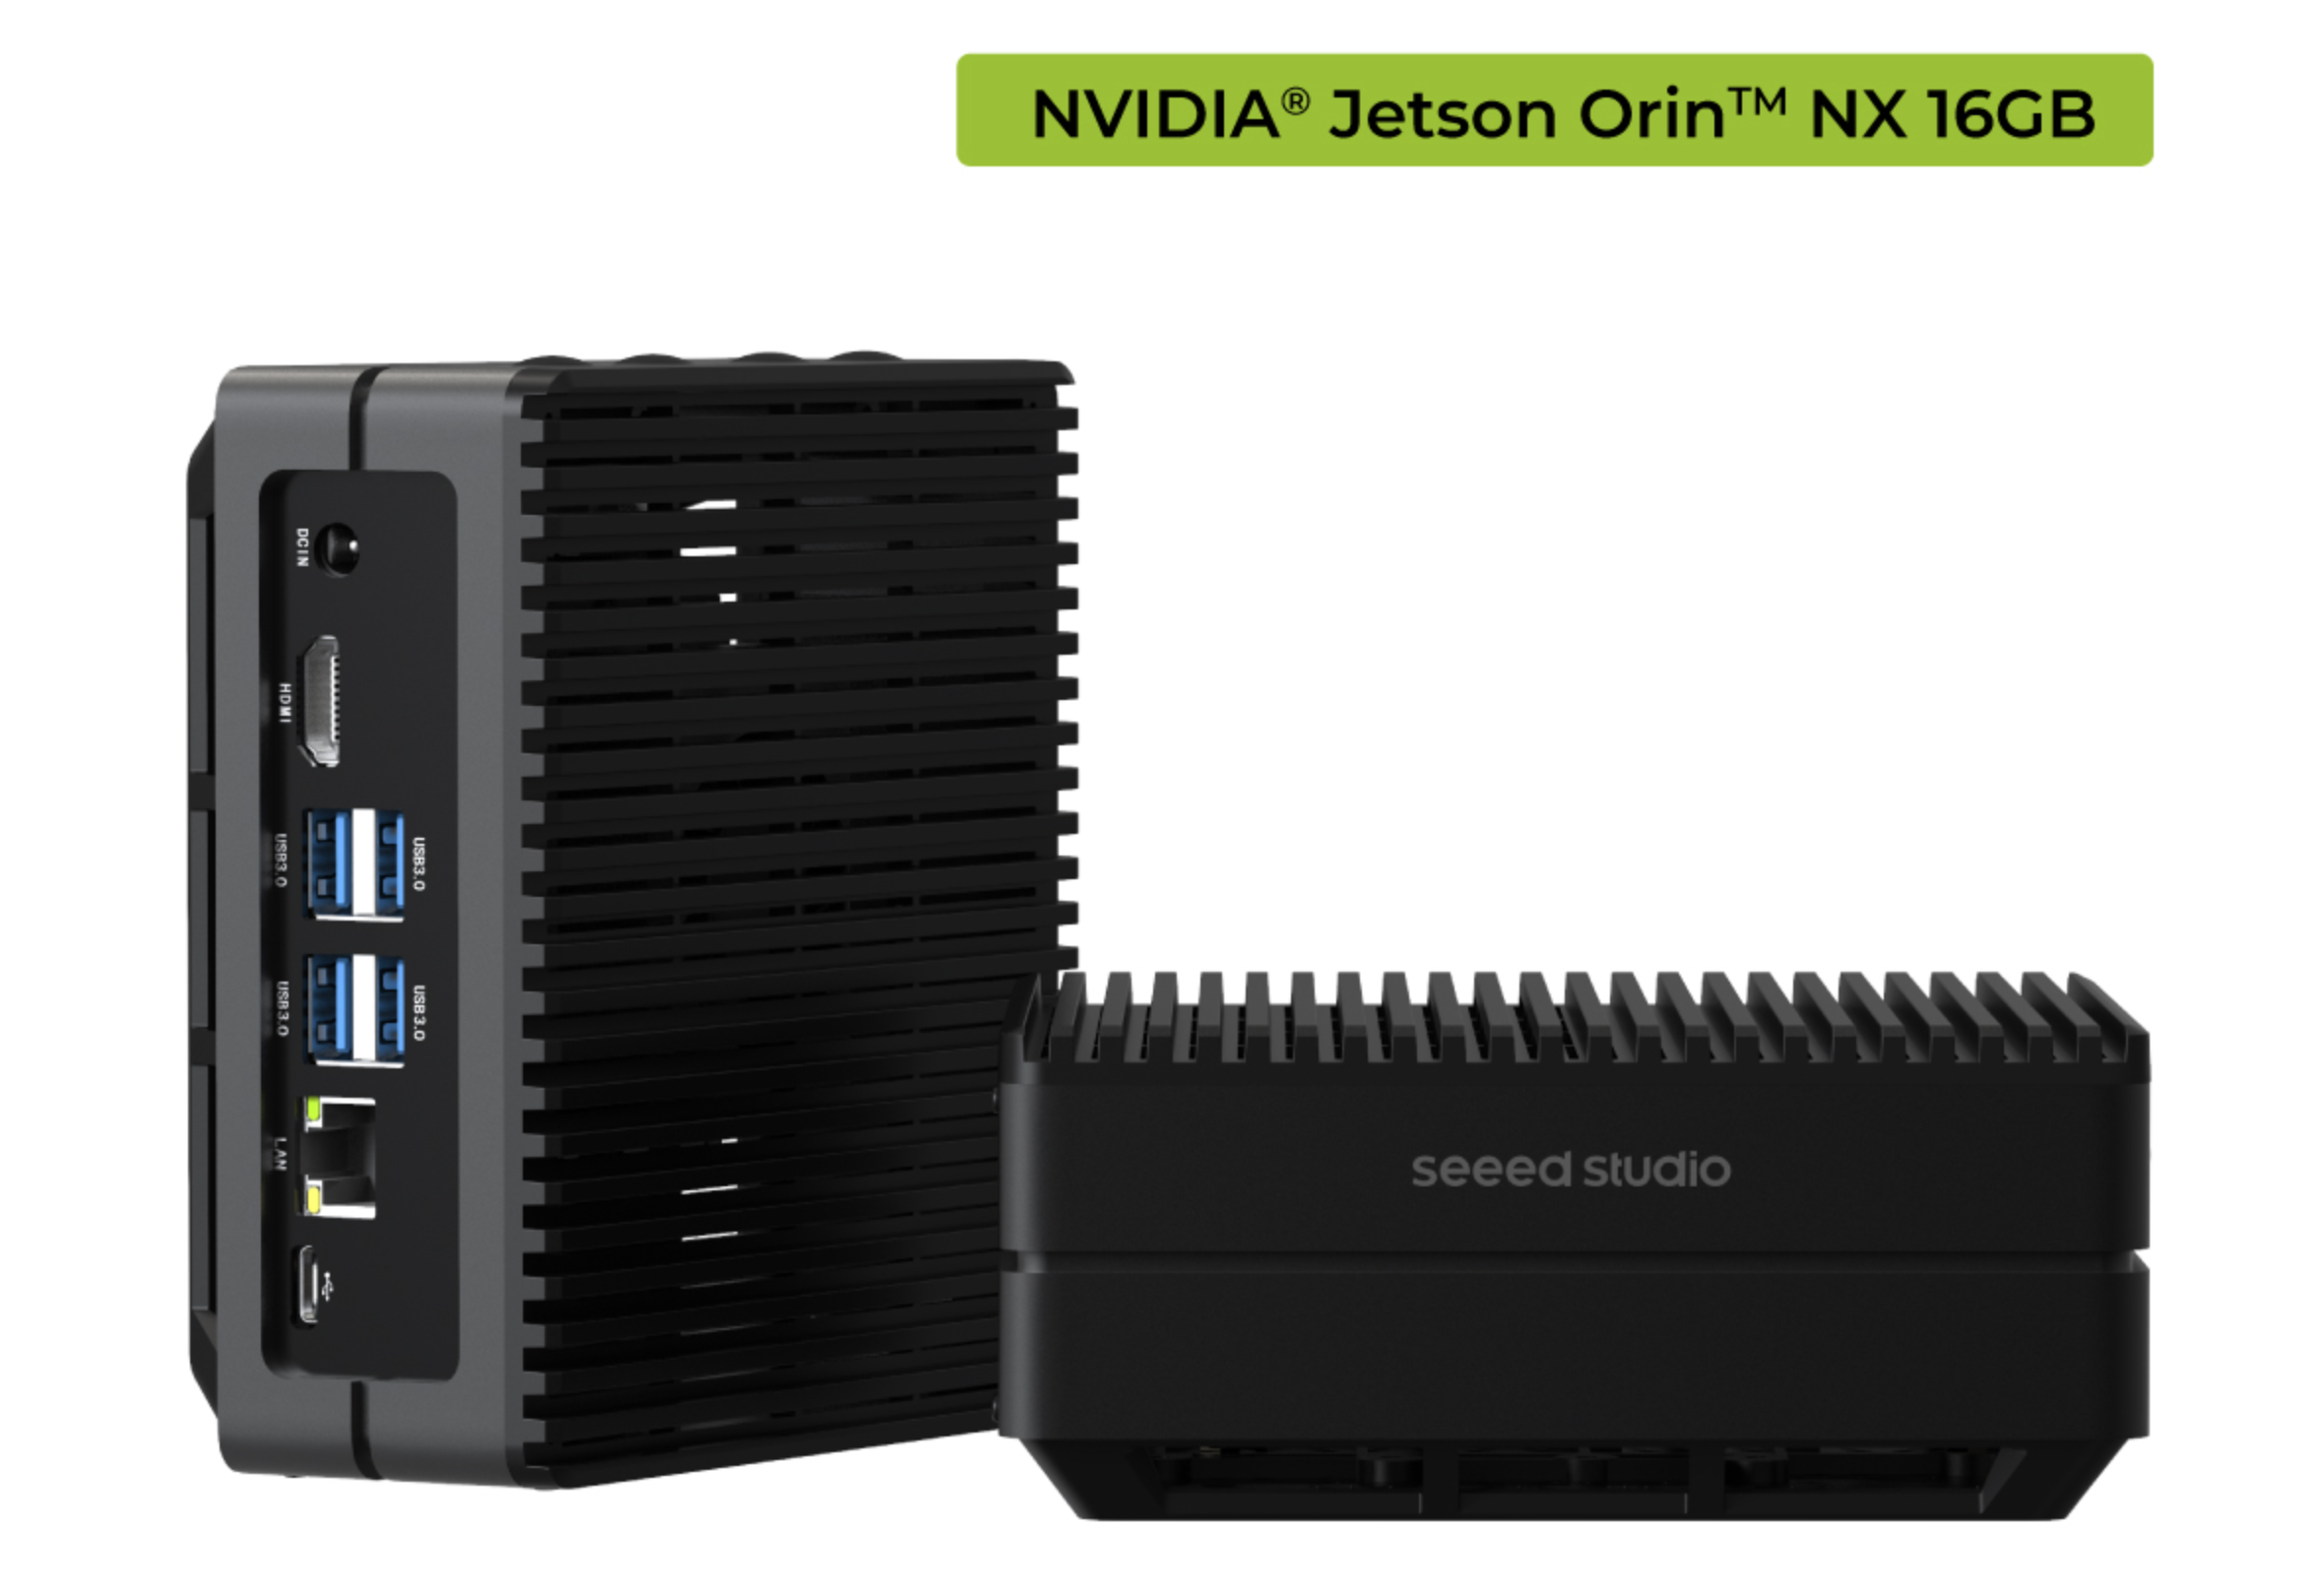
In this document, we train and deploy a object detection model for traffic scenes on the reComputer J4012. This document uses the YOLOv8 object detection algorithm as an example and provides a detailed overview of the entire process. Please note that all the operations described below take place on the Jetson edge computing device, ensuring that the Jetson device has an operating system installed that is JetPack 5.0 or above.
Dataset
The process of machine learning involves finding patterns within given data and then using a function to capture these patterns. Therefore, the quality of the dataset directly affects the performance of the model. Generally speaking, the better the quality and quantity of training data, the better the model trained. Therefore, the preparation of the dataset is crucial.
There are various methods for collecting training dataset. Here, two methods are introduced: 1. Download pre-annotated open-source public datasets. 2. Collect and annotate training data. Finally, consolidate all the data to prepare for the subsequent training phase.
Download public datasets
Public datasets are shared standardized data resources widely used in machine learning and artificial intelligence research. They provide researchers with standard benchmarks to evaluate algorithm performance, fostering innovation and collaboration in the field. These datasets drive the AI community towards a more open, innovative, and sustainable direction.
There are many platforms where you can freely download datasets, such as Roboflow, Kaggle, and more. Here, we download an annotated dataset related to traffic scenes, Traffic Detection Project, from Kaggle.
The file structure after extraction is as follows:
archive
├── data.yaml
├── README.dataset.txt
├── README.roboflow.txt
├── test
│   ├── images
│   │   ├── aguanambi-1000_png_jpg.rf.7179a0df58ad6448028bc5bc21dca41e.jpg
│   │   ├── aguanambi-1095_png_jpg.rf.4d9f0370f1c09fb2a1d1666b155911e3.jpg
│   │   ├── ...
│   └── labels
│       ├── aguanambi-1000_png_jpg.rf.7179a0df58ad6448028bc5bc21dca41e.txt
│       ├── aguanambi-1095_png_jpg.rf.4d9f0370f1c09fb2a1d1666b155911e3.txt
│       ├── ...
├── train
│   ├── images
│   │   ├── aguanambi-1000_png_jpg.rf.0ab6f274892b9b370e6441886b2d7b9d.jpg
│   │   ├── aguanambi-1000_png_jpg.rf.dc59d3c5df5d991c1475e5957ea9948c.jpg
│   │   ├── ...
│   └── labels
│       ├── aguanambi-1000_png_jpg.rf.0ab6f274892b9b370e6441886b2d7b9d.txt
│       ├── aguanambi-1000_png_jpg.rf.dc59d3c5df5d991c1475e5957ea9948c.txt
│       ├── ...
└── valid
    ├── images
    │   ├── aguanambi-1085_png_jpg.rf.0608a42a5c9090a4efaf9567f80fa992.jpg
    │   ├── aguanambi-1105_png_jpg.rf.0aa6c5d1769ce60a33d7b51247f2a627.jpg
    │   ├── ...
    └── labels
        ├── aguanambi-1085_png_jpg.rf.0608a42a5c9090a4efaf9567f80fa992.txt
        ├── aguanambi-1105_png_jpg.rf.0aa6c5d1769ce60a33d7b51247f2a627.txt
        ├──...
Each image has a corresponding text file that contains the complete annotation information for that image. The data.json file records the locations of the training, testing, and validation sets, and you need to modify the paths:
train: ./train/images
val: ./valid/images
test: ./test/images

nc: 5
names: ['bicycle', 'bus', 'car', 'motorbike', 'person']
Collecting and annotating data
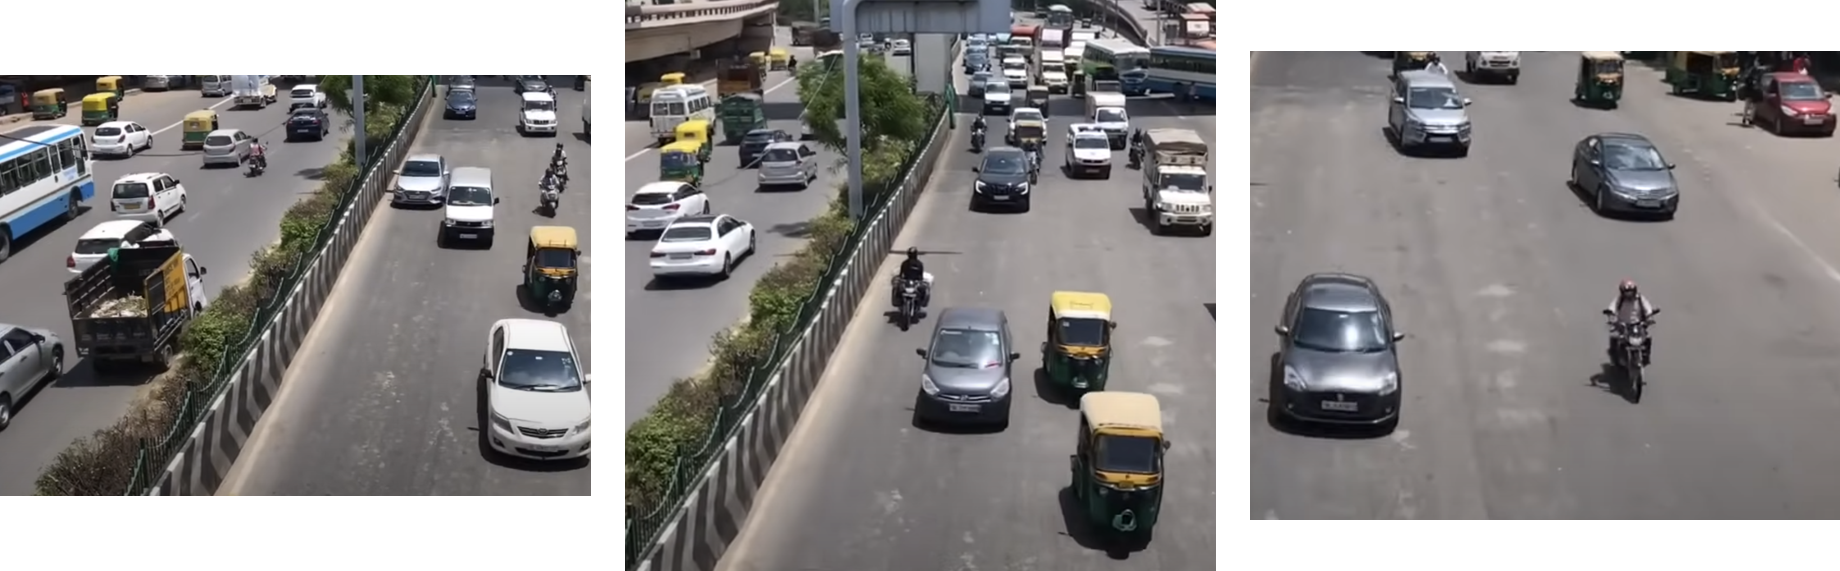
When public datasets cannot meet user requirements, neet to consider collecting and creating custom datasets tailored to specific needs. This can be achieved by collecting, annotating, and organizing relevant data. For demonstration purposes, I captured and saved three images from YouTube , and try to use Label Studio to annotate the images.
Step 1. Collect raw data:
Step 2. Install and run the annotation tool:
sudo groupadd docker
sudo gpasswd -a ${USER} docker
sudo systemctl restart docker
sudo chmod a+rw /var/run/docker.sock

mkdir label_studio_data
sudo chmod -R 776 label_studio_data
docker run -it -p 8080:8080 -v $(pwd)/label_studio_data:/label-studio/data heartexlabs/label-studio:latest
Step 3. Create a new project and complete the annotation as per the prompts: Label Studio Reference Documentation

After completing the annotation, you can export the dataset in YOLO format and organize the annotated data along with the downloaded data. The simplest approach is to copy all the images to the train/images folder of the public dataset and the generated annotation text files to the train/labels folder of the public dataset.
At this point, we have obtained the training data through two different methods and integrated them. If you want higher-quality training data, there are many additional steps to consider, such as data cleaning, class balancing, and more. Since our task is relatively simple, we will skip these steps for now and proceed with training using the data obtained above.
Model
In this section, we will download the YOLOv8 source code on reComputer and configure the runtime environment.
Step 1. Use the following command to download the source code:
git clone https://github.com/ultralytics/ultralytics.git
cd ultralytics
Step 2. Open requirements.txt and modify the relevant content:
# Use the `vi` command to open the file
vi requirements.txt

# Press `a` to enter edit mode, and modify the following content:
torch>=1.7.0 --> # torch>=1.7.0
torchvision>=0.8.1 --> # torchvision>=0.8.1

# Press `ESC` to exit edit mode, and finally input `:wq` to save and exit the file.
Step 3. Run the following commands to download the required dependencies for YOLO and install YOLOv8:
pip3 install -e .
cd ..
Step 4. Install the Jetson version of PyTorch:
sudo apt-get install -y libopenblas-base libopenmpi-dev
wget https://developer.download.nvidia.cn/compute/redist/jp/v512/pytorch/torch-2.1.0a0+41361538.nv23.06-cp38-cp38-linux_aarch64.whl -O torch-2.1.0a0+41361538.nv23.06-cp38-cp38-linux_aarch64.whl
pip3 install torch-2.1.0a0+41361538.nv23.06-cp38-cp38-linux_aarch64.whl
Step 5. Install the corresponding torchvision:
sudo apt install -y libjpeg-dev zlib1g-dev
git clone --branch v0.16.0 https://github.com/pytorch/vision torchvision
cd torchvision
python3 setup.py install --user
cd ..
Step 6. Use the following command to ensure that YOLO has been successfully installed:
yolo detect predict model=yolov8s.pt source='https://ultralytics.com/images/bus.jpg'
Train
Model training is the process of updating model weights. By training the model, machine learning algorithms can learn from the data to recognize patterns and relationships, enabling predictions and decisions on new data.
Step 1. Create a Python script for training:
vi train.py
Press a to enter edit mode, and modify the following content:
from ultralytics import YOLO

# Load a model
model = YOLO('yolov8s.pt')

# Train the model
results = model.train(
    data='/home/nvidia/Everything_Happens_Locally/Dataset/data.yaml',
    batch=8, epochs=100, imgsz=640, save_period=5
)
Press ESC to exit edit mode, and finally input :wq to save and exit the file.
The YOLO.train() method has many configuration parameters; please refer to the
documentation
for details. Additionally, you can use a more streamlined CLI approach to start training based on your specific requirements.
Step 2. Start training with the following command:
python3 train.py
Then comes the lengthy waiting process. Considering the possibility of closing the remote connection window during the wait, this tutorial uses the Tmux terminal multiplexer. Thus, the interface I see during the process looks like this:
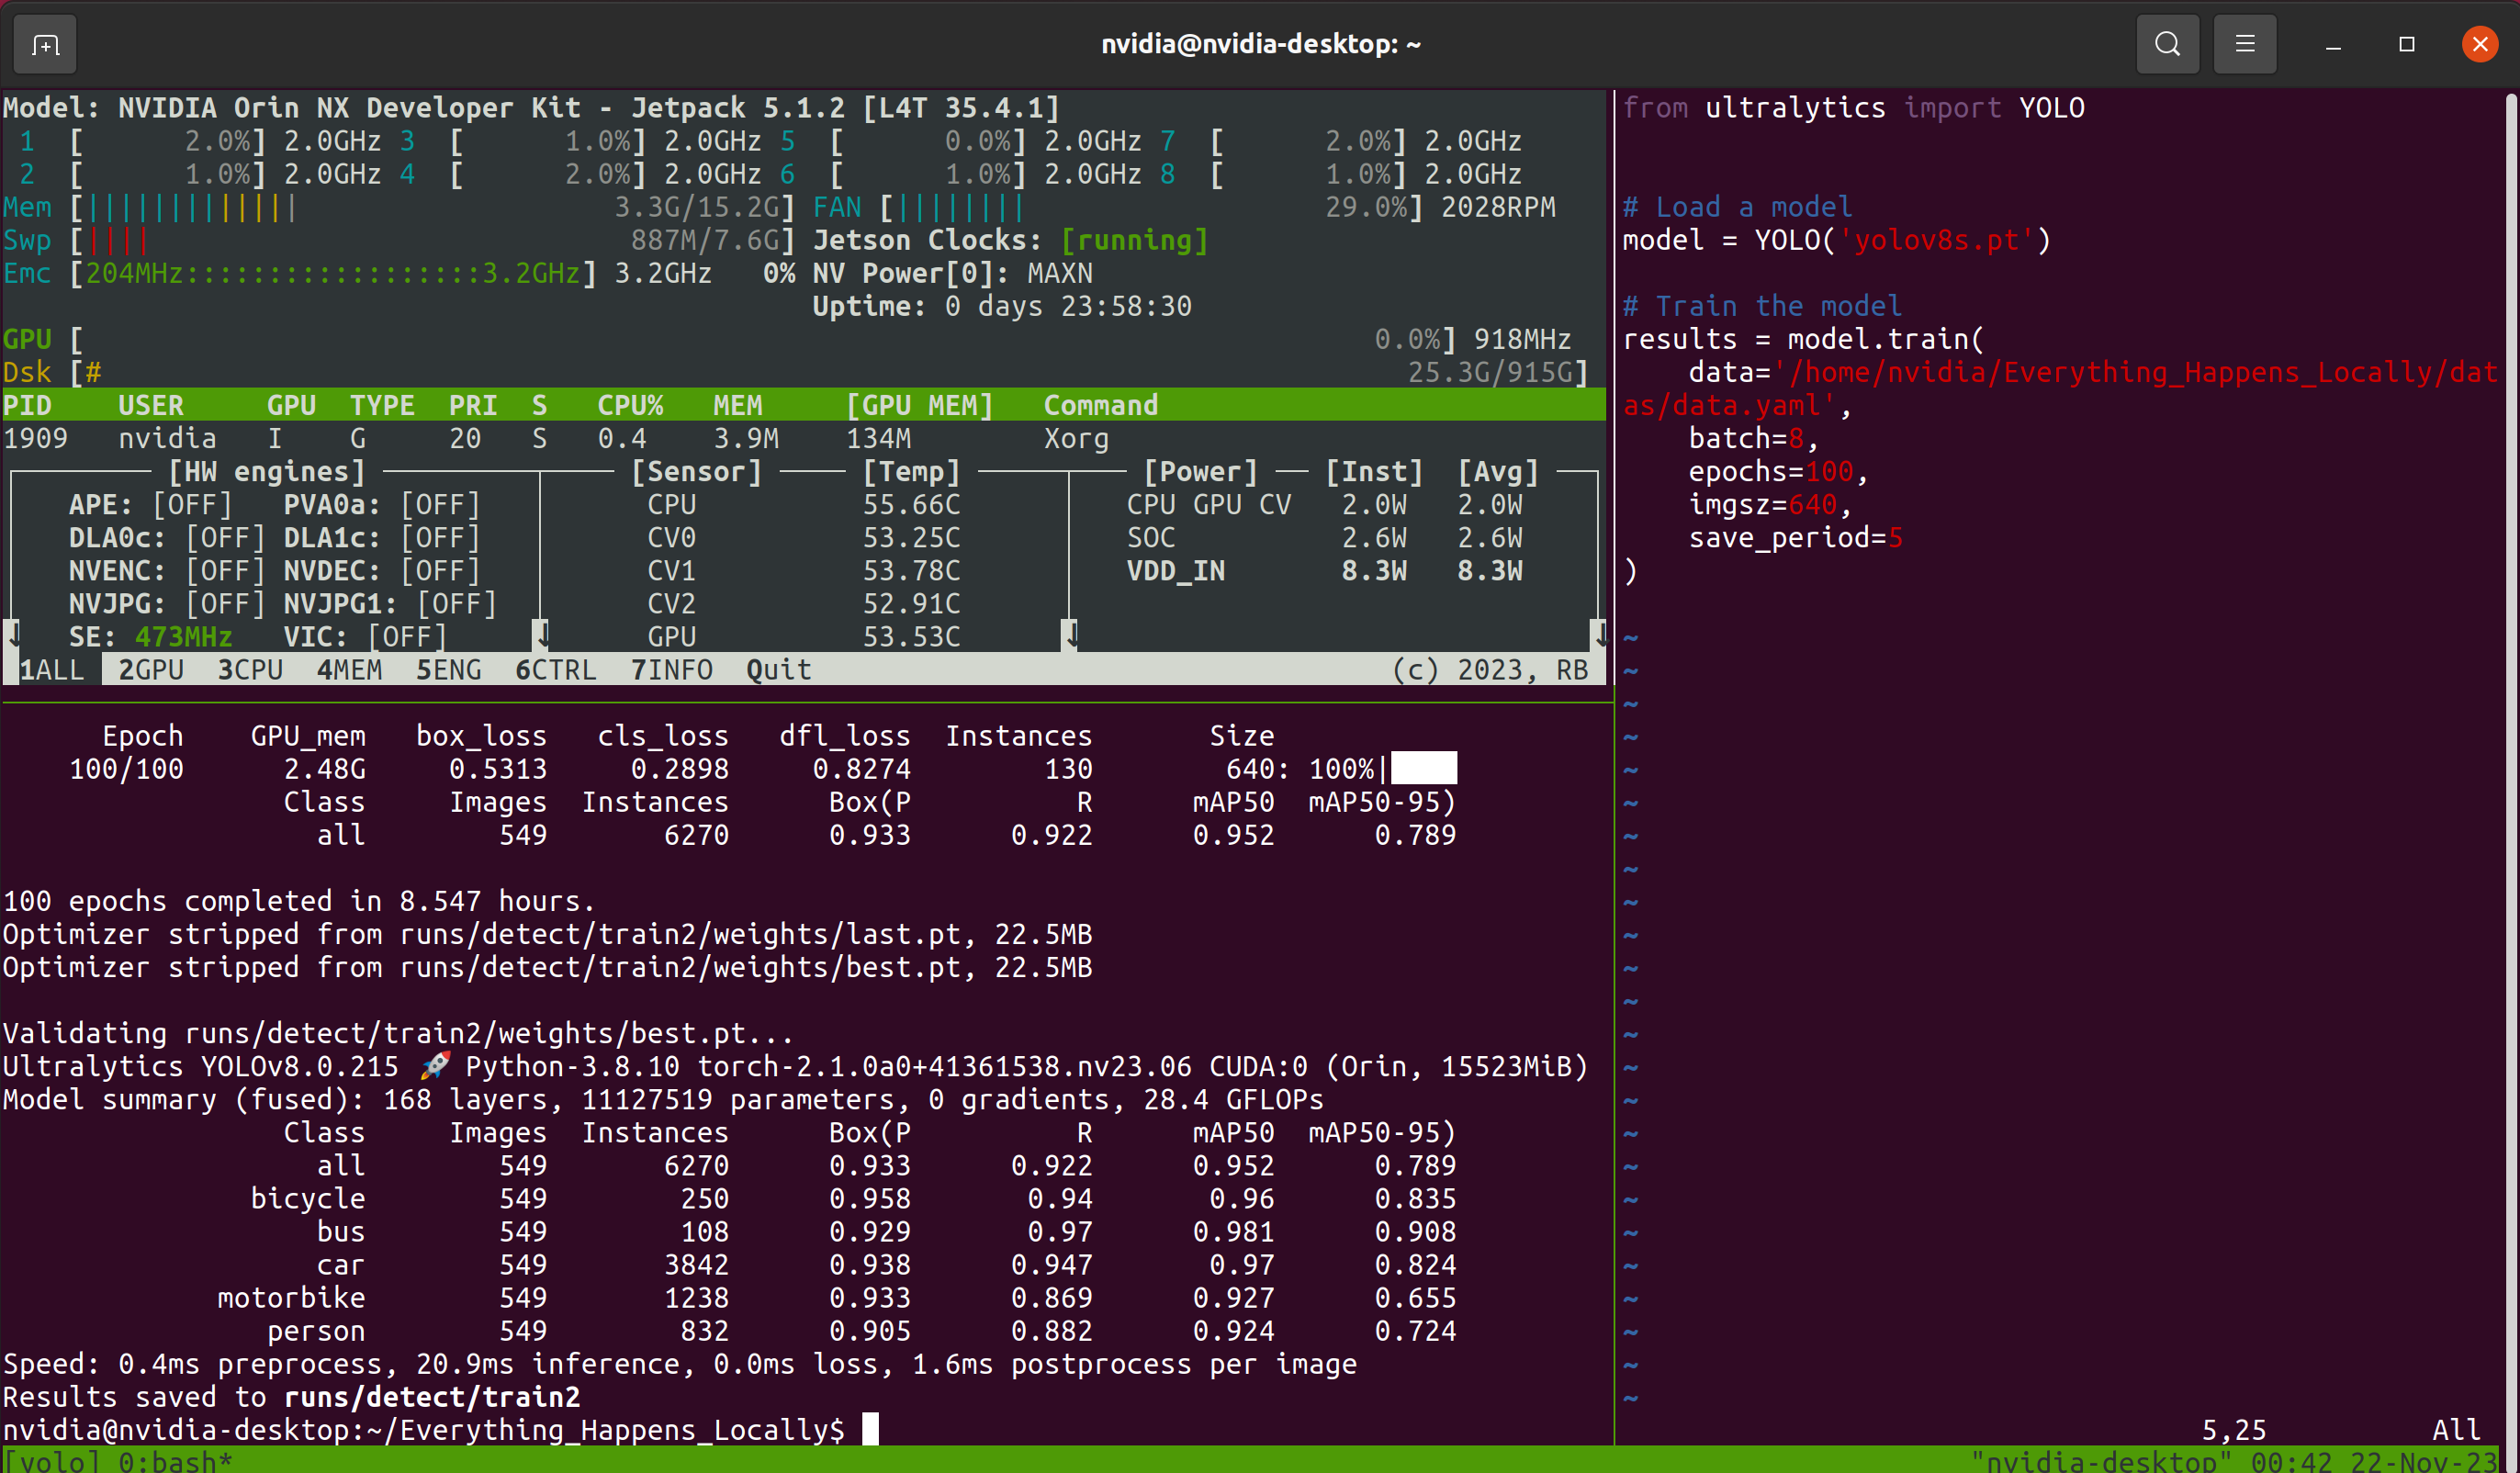
Tmux is optional; as long as the model is training normally. After the training program finishes, you can find the model weight files saved during the training process in the designated folder:

Validation
The validation process involves using a portion of the data to validate the reliability of the model. This process helps ensure that the model can perform tasks accurately and robustly in real-world applications. If you closely examine the information output during the training process, you'll notice that many validations are interspersed throughout the training. This section won't analyze the meaning of each evaluation metric but will instead analyze the model's usability by examining the prediction results.
Step 1. Use the trained model to infer on a specific image:
yolo detect predict \
    model='./runs/detect/train2/weights/best.pt' \
    source='./datas/test/images/ant_sales-2615_png_jpg.rf.0ceaf2af2a89d4080000f35af44d1b03.jpg' \
    save=True show=False
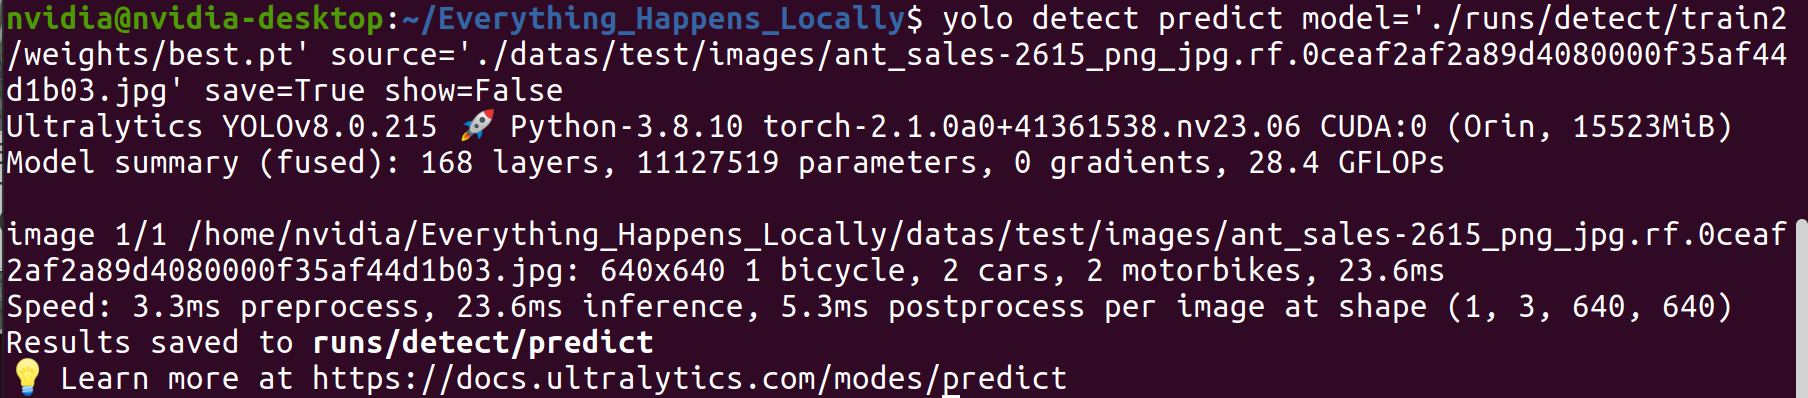
Step 2. Examine the inference results.
From the detection results, it can be observed that the trained model achieves the expected detection performance.

Deployment
Deployment is the process of applying a trained machine learning or deep learning model to real-world scenarios. The content introduced above has validated the feasibility of the model, but it has not considered the inference efficiency of the model. In the deployment phase, it's necessary to find a balance between detection accuracy and efficiency. TensorRT inference engine can be used to improve the inference speed of the model.
Step 1. To visually demonstrate the contrast between the lightweight and original models, create a new inference.py file using the vi tool to implement video file inference. You can replace the inference model and input video by modifying lines 8 and 9. The input in this document is a video I shot with my phone.
from ultralytics import YOLO
import os
import cv2
import time
import datetime


model = YOLO("/home/nvidia/Everything_Happens_Locally/runs/detect/train2/weights/best.pt")
cap = cv2.VideoCapture('./sample_video.mp4')

save_dir = os.path.join('runs/inference_test', datetime.datetime.now().strftime('%Y-%m-%d-%H-%M-%S'))
if not os.path.exists(save_dir):
    os.makedirs(save_dir)
fourcc = cv2.VideoWriter_fourcc(*'mp4v')
fps = cap.get(cv2.CAP_PROP_FPS)
size = (int(cap.get(cv2.CAP_PROP_FRAME_WIDTH)), int(cap.get(cv2.CAP_PROP_FRAME_HEIGHT)))
output = cv2.VideoWriter(os.path.join(save_dir, 'result.mp4'), fourcc, fps, size)

while cap.isOpened():
    success, frame = cap.read()
    if success:
        start_time = time.time()
        results = model(frame)
        annotated_frame = results[0].plot()
        total_time = time.time() - start_time
        fps = 1/total_time
        cv2.rectangle(annotated_frame, (20, 20), (200, 60), (55, 104, 0), -1)
        cv2.putText(annotated_frame, f'FPS: {round(fps, 2)}', (30, 50), 0, 0.9, (255, 255, 255), thickness=2, lineType=cv2.LINE_AA)
        print(f'FPS: {fps}')
        cv2.imshow("YOLOv8 Inference", annotated_frame)
        output.write(annotated_frame)
        if cv2.waitKey(1) & 0xFF == ord("q"):
            break
    else:
        break

cv2.destroyAllWindows()
cap.release()
output.release()
Step 2. Run the following command and record the inference speed before model quantization:
python3 inference.py
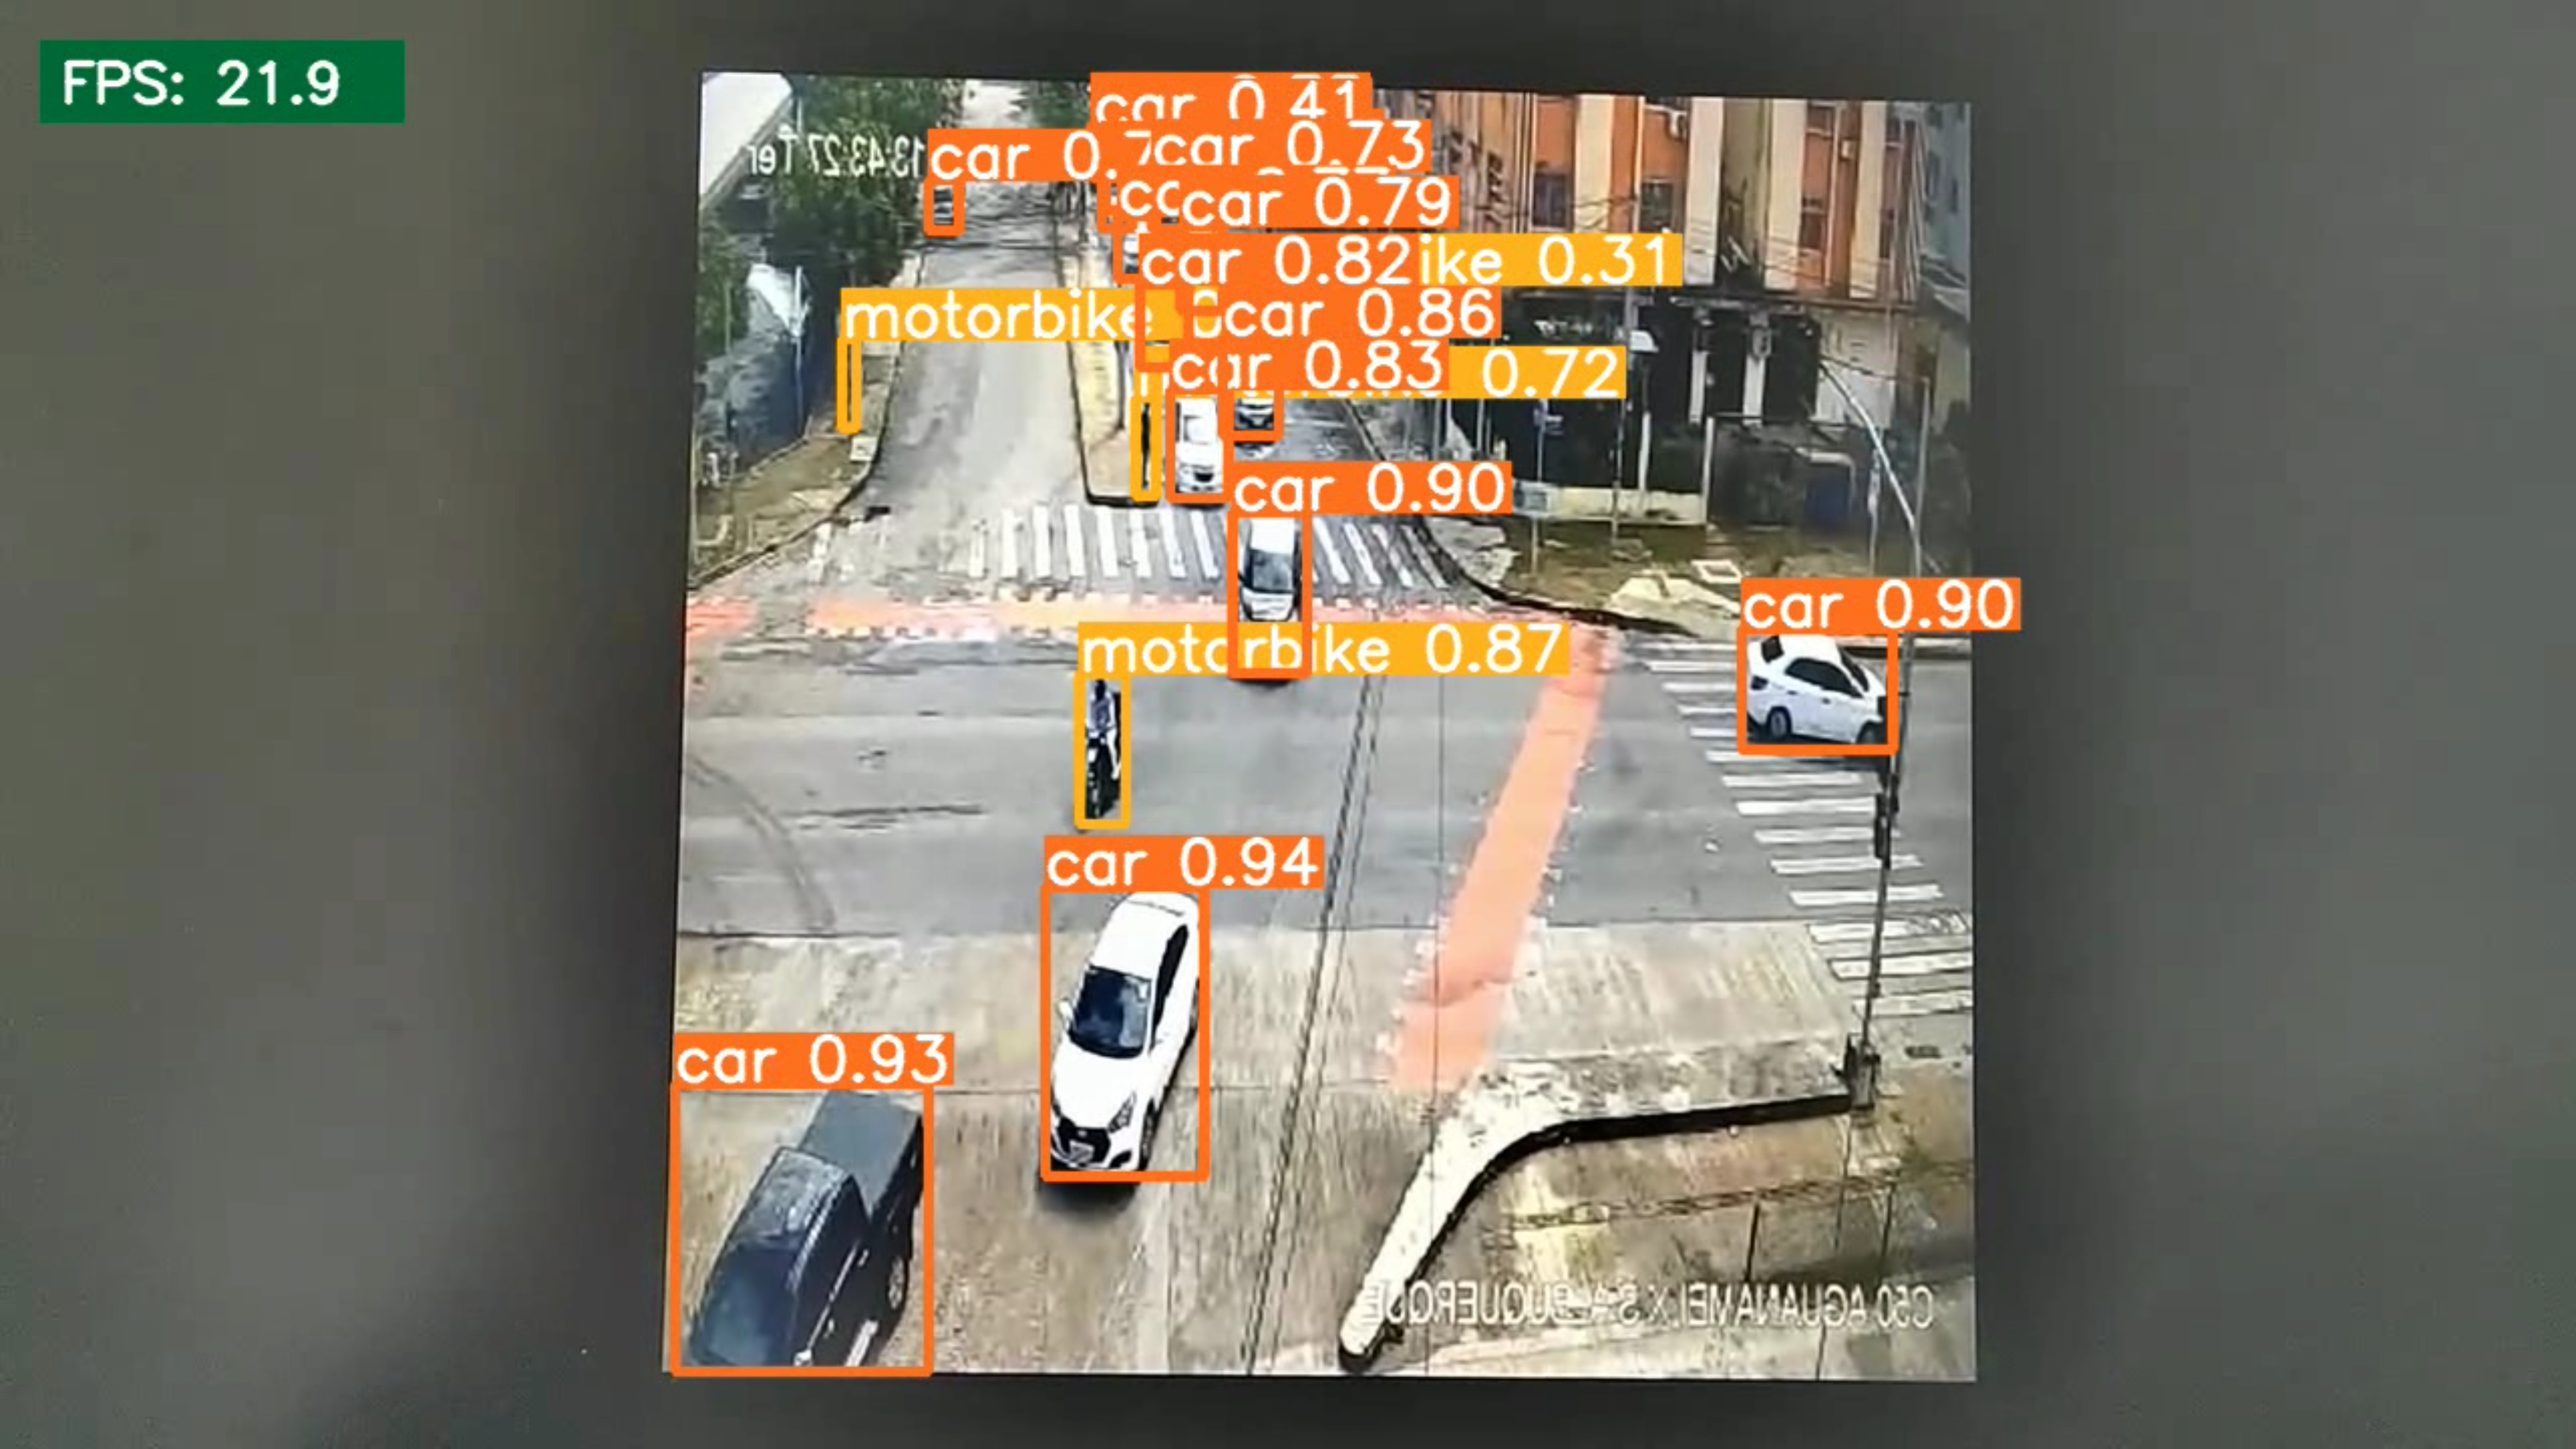
The result indicates that the inference speed of the model before quantization is 21.9 FPS
Step 3. Generate the quantized model:
pip3 install onnx
yolo export model=/home/nvidia/Everything_Happens_Locally/runs/detect/train2/weights/best.pt format=engine half=True device=0
After the program to complete(about 10-20 minutes), a .engine file will be generated in the same directory as the input model. This file is the quantized model.

Step 4. Test the inference speed using the quantized model.
Here, you need to modify the content of line 8 in the script created in Step 1.
model = YOLO(<path to .pt>) --> model = YOLO(<path to .engine>)
Then, rerun the inference command:
python3 inference.py
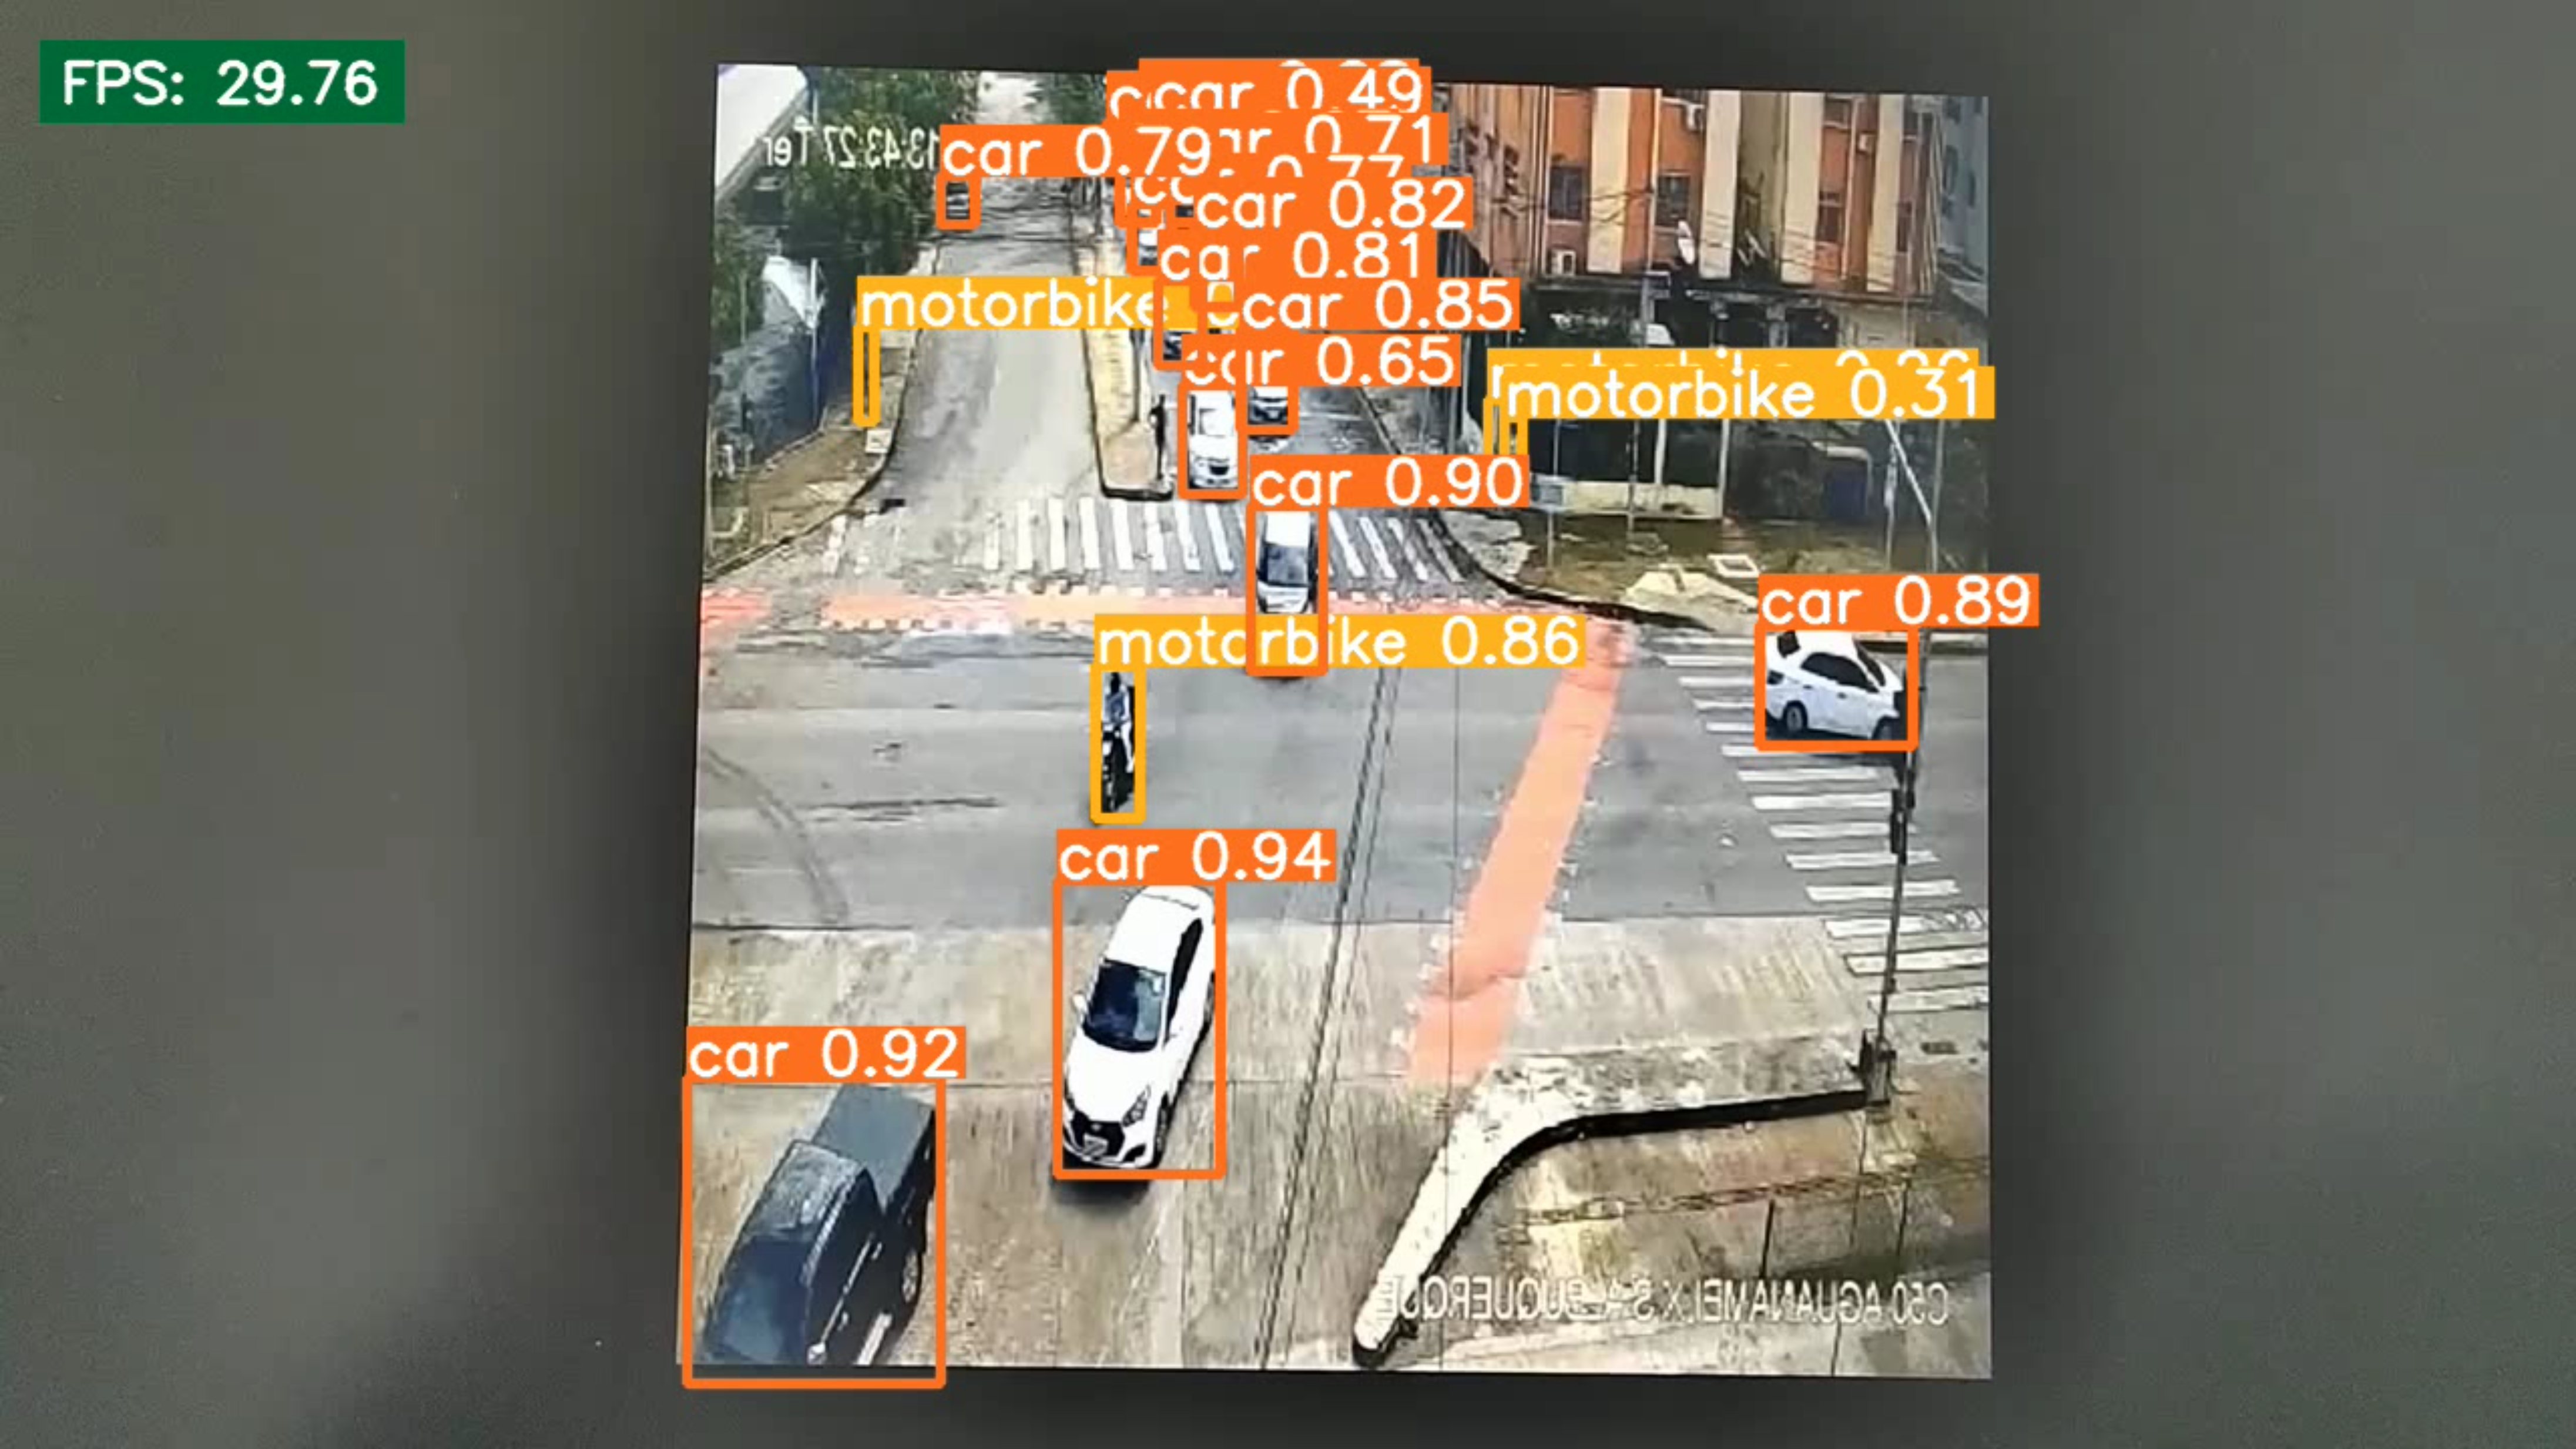
From the perspective of inference efficiency, the quantized model shows a significant improvement in inference speed.
Summary
This article provides readers with a comprehensive guide that covers various aspects from data collection and model training to deployment. Importantly, all processes occur in reComputer, eliminating the need for additional GPUs from users.
Tech Support & Product Discussion
Thank you for choosing our products! We are here to provide you with different support to ensure that your experience with our products is as smooth as possible. We offer several communication channels to cater to different preferences and needs.