Deploy YOLOv8 on NVIDIA Jetson using TensorRT
This wiki guide explains how to deploy a YOLOv8 model into NVIDIA Jetson Platform and perform inference using TensorRT. Here we use TensorRT to maximize the inference performance on the Jetson platform.
Different computer vision tasks will be introduced here such as:
- Object Detection
- Image Segmentation
- Image Classification
- Pose Estimation
- Object Tracking
Prerequisites
- Ubuntu Host PC (native or VM using VMware Workstation Player)
- reComputer Jetson or any other NVIDIA Jetson device running JetPack 5.1.1 or higher
This wiki has been tested and verified on a reComputer J4012 and reComputer Industrial J4012[https://www.seeedstudio.com/reComputer-Industrial-J4012-p-5684.html] powered by NVIDIA Jetson orin NX 16GB module
Flash JetPack to Jetson
Now you need to make sure that the Jetson device is flashed with a JetPack system. You can either use NVIDIA SDK Manager or command-line to flash JetPack to the device.
For Seeed Jetson-powered devices flashing guides, please refer to the below links:
- reComputer J1010 | J101
- reComputer J2021 | J202
- reComputer J1020 | A206
- reComputer J4012 | J401
- A203 Carrier Board
- A205 Carrier Board
- Jetson Xavier AGX H01 Kit
- Jetson AGX Orin 32GB H01 Kit
Make sure to Flash JetPack version 5.1.1 because that is the version we have verified for this wiki
Deploy YOLOV8 to Jetson in One Line of Code
After you flash the Jetson device with JetPack, you can simply run the below commands to run YOLOv8 models. This will first download and install the necessary packages, dependencies, setup the environment and download pretrained models from YOLOv8 to perform object detection, Image segmentation, pose estimation and image classifications tasks!
wget files.seeedstudio.com/YOLOv8-Jetson.py && python YOLOv8-Jetson.py
The source code for the above script can be found here
Use Pre-trained models
The fastest way to get started with YOLOv8 is to use pre-trained models provided by YOLOv8. However, these are PyTorch models and therefore will only utilize the CPU when inferencing on the Jetson. If you want the best performance of these models on the Jetson while running on the GPU, you can export the PyTorch models to TensorRT by following this section of the wiki.
- Object Detection
- Image Classification
- Image Segmentation
- Pose Estimation
- Object Tracking
YOLOv8 offers 5 pre-trained PyTorch model weights for object detection, trained on COCO dataset at input image size 640x640. You can find them below
| Model | size (pixels) | mAPval 50-95 | Speed CPU ONNX (ms) | Speed A100 TensorRT (ms) | params (M) | FLOPs (B) |
|---|---|---|---|---|---|---|
| YOLOv8n | 640 | 37.3 | 80.4 | 0.99 | 3.2 | 8.7 |
| YOLOv8s | 640 | 44.9 | 128.4 | 1.20 | 11.2 | 28.6 |
| YOLOv8m | 640 | 50.2 | 234.7 | 1.83 | 25.9 | 78.9 |
| YOLOv8l | 640 | 52.9 | 375.2 | 2.39 | 43.7 | 165.2 |
| YOLOv8x | 640 | 53.9 | 479.1 | 3.53 | 68.2 | 257.8 |
Reference: https://docs.ultralytics.com/tasks/detect
You can choose and download your desired model from the above table and execute the below command to run inference on an image
yolo detect predict model=yolov8n.pt source='https://ultralytics.com/images/bus.jpg' show=True
Here for model, you can change to either yolov8s.pt, yolov8m.pt, yolov8l.pt, yolov8x.pt and it will download the relavant pre-trained model
You can also connect a webcam and execute the below command
yolo detect predict model=yolov8n.pt source='0' show=True
If you face any errors when executing the above commands, try adding "device=0" at the end of the command
The above is run on a reComputer J4012/ reComputer Industrial J4012 and uses YOLOv8s model trained with 640x640 input and uses TensorRT FP16 precision.
YOLOv8 offers 5 pre-trained PyTorch model weights for image classification, trained on ImageNet at input image size 224x224. You can find them below
| Model | size (pixels) | acc top1 | acc top5 | Speed CPU ONNX (ms) | Speed A100 TensorRT (ms) | params (M) | FLOPs (B) at 640 |
|---|---|---|---|---|---|---|---|
| YOLOv8n-cls | 224 | 66.6 | 87.0 | 12.9 | 0.31 | 2.7 | 4.3 |
| YOLOv8s-cls | 224 | 72.3 | 91.1 | 23.4 | 0.35 | 6.4 | 13.5 |
| YOLOv8m-cls | 224 | 76.4 | 93.2 | 85.4 | 0.62 | 17.0 | 42.7 |
| YOLOv8l-cls | 224 | 78.0 | 94.1 | 163.0 | 0.87 | 37.5 | 99.7 |
| YOLOv8x-cls | 224 | 78.4 | 94.3 | 232.0 | 1.01 | 57.4 | 154.8 |
Reference: https://docs.ultralytics.com/tasks/classify
You can choose your desired model and execute the below command to run inference on an image
yolo classify predict model=yolov8n-cls.pt source='https://ultralytics.com/images/bus.jpg' show=True
Here for model, you can change to either yolov8s-cls.pt, yolov8m-cls.pt, yolov8l-cls.pt, yolov8x-cls.pt and it will download the relavant pre-trained model
You can also connect a webcam and execute the below command
yolo classify predict model=yolov8n-cls.pt source='0' show=True
If you face any errors when executing the above commands, try adding "device=0" at the end of the command
(update with 224 inference)
The above is run on a reComputer J4012/ reComputer Industrial J4012 and uses YOLOv8s-cls model trained with 224x224 input and uses TensorRT FP16 precision. Also, make sure to pass the argument imgsz=224 inside the inference command with TensorRT exports because the inference engine accepts 640 image size by default when using TensorRT models.
YOLOv8 offers 5 pre-trained PyTorch model weights for image segmentation, trained on COCO dataset at input image size 640x640. You can find them below
| Model | size (pixels) | mAPbox 50-95 | mAPmask 50-95 | Speed CPU ONNX (ms) | Speed A100 TensorRT (ms) | params (M) | FLOPs (B) |
|---|---|---|---|---|---|---|---|
| YOLOv8n-seg | 640 | 36.7 | 30.5 | 96.1 | 1.21 | 3.4 | 12.6 |
| YOLOv8s-seg | 640 | 44.6 | 36.8 | 155.7 | 1.47 | 11.8 | 42.6 |
| YOLOv8m-seg | 640 | 49.9 | 40.8 | 317.0 | 2.18 | 27.3 | 110.2 |
| YOLOv8l-seg | 640 | 52.3 | 42.6 | 572.4 | 2.79 | 46.0 | 220.5 |
| YOLOv8x-seg | 640 | 53.4 | 43.4 | 712.1 | 4.02 | 71.8 | 344.1 |
Reference: https://docs.ultralytics.com/tasks/segment
You can choose your desired model and execute the below command to run inference on an image
yolo segment predict model=yolov8n-seg.pt source='https://ultralytics.com/images/bus.jpg' show=True
Here for model, you can change to either yolov8s-seg.pt, yolov8m-seg.pt, yolov8l-seg.pt, yolov8x-seg.pt and it will download the relavant pre-trained model
You can also connect a webcam and execute the below command
yolo segment predict model=yolov8n-seg.pt source='0' show=True
If you face any errors when executing the above commands, try adding "device=0" at the end of the command
The above is run on a reComputer J4012/ reComputer Industrial J4012 and uses YOLOv8s-seg model trained with 640x640 input and uses TensorRT FP16 precision.
YOLOv8 offers 6 pre-trained PyTorch model weights for pose estimation, trained on COCO keypoints dataset at input image size 640x640. You can find them below
| Model | size (pixels) | mAPpose 50-95 | mAPpose 50 | Speed CPU ONNX (ms) | Speed A100 TensorRT (ms) | params (M) | FLOPs (B) |
|---|---|---|---|---|---|---|---|
| YOLOv8n-pose | 640 | 50.4 | 80.1 | 131.8 | 1.18 | 3.3 | 9.2 |
| YOLOv8s-pose | 640 | 60.0 | 86.2 | 233.2 | 1.42 | 11.6 | 30.2 |
| YOLOv8m-pose | 640 | 65.0 | 88.8 | 456.3 | 2.00 | 26.4 | 81.0 |
| YOLOv8l-pose | 640 | 67.6 | 90.0 | 784.5 | 2.59 | 44.4 | 168.6 |
| YOLOv8x-pose | 640 | 69.2 | 90.2 | 1607.1 | 3.73 | 69.4 | 263.2 |
| YOLOv8x-pose-p6 | 1280 | 71.6 | 91.2 | 4088.7 | 10.04 | 99.1 | 1066.4 |
Reference: https://docs.ultralytics.com/tasks/pose
You can choose your desired model and execute the below command to run inference on an image
yolo pose predict model=yolov8n-pose.pt source='https://ultralytics.com/images/bus.jpg'
Here for model, you can change to either yolov8s-pose.pt, yolov8m-pose.pt, yolov8l-pose.pt, yolov8x-pose.pt, yolov8x-pose-p6 and it will download the relavant pre-trained model
You can also connect a webcam and execute the below command
yolo pose predict model=yolov8n-pose.pt source='0'
If you face any errors when executing the above commands, try adding "device=0" at the end of the command

Object tracking is a task that involves identifying the location and class of objects, then assigning a unique ID to that detection in video streams.
Basically the output of object tracking is the same as object detection with an added object ID.
Reference: https://docs.ultralytics.com/modes/track
You can choose your desired model based on object detection/ image segmentation and execute the below command to run inference on an video
yolo track model=yolov8n.pt source="https://youtu.be/Zgi9g1ksQHc"
Here for model, you can change to either yolov8n.pt, yolov8s.pt, yolov8m.pt, yolov8l.pt, yolov8x.pt, yolov8n-seg.pt, yolov8s-seg.pt, yolov8m-seg.pt, yolov8l-seg.pt, yolov8x-seg.pt, and it will download the relavant pre-trained model
You can also connect a webcam and execute the below command
yolo track model=yolov8n.pt source="0"
If you face any errors when executing the above commands, try adding "device=0" at the end of the command
Use TensorRT to Improve Inference Speed
As we mentioned before, if you want to improve the inference speed on the Jetson running YOLOv8 models, you first need to convert the original PyTorch models to TensorRT models.
Follow the steps below to convert YOLOv8 PyTorch models to TensorRT models.
This works for all four computer vision tasks that we have mentioned before
- Step 1. Execute the export command by specifying the model path
yolo export model=<path_to_pt_file> format=engine device=0
For example:
yolo export model=yolov8n.pt format=engine device=0
If you, encouter an error about cmake, you can ignore it. Please be patient until the TensorRT export is finished. It might take a few minutes
After the TensorRT model file (.engine) is created, you will see the output as follows

- Step 2. If you want to pass additional arguments, you can do so by following the below table
| Key | Value | Description |
|---|---|---|
| imgsz | 640 | Image size as scalar or (h, w) list, i.e. (640, 480) |
| half | False | FP16 quantization |
| dynamic | False | Dynamic axes |
| simplify | False | Simplify model |
| workspace | 4 | Workspace size (GB) |
For example, if you want to convert your PyTorch model into a TensorRT model in FP16 quantization, execute as
yolo export model=yolov8n.pt format=engine half=True device=0
Once the model is exported successfully, you can directly replace this model with model= argument inside predict command of yolo when running all 4 tasks of detection, classification, segmentation, pose estimation.
For example, with object detection:
yolo detect predict model=yolov8n.engine source='0' show=True
Bring Your Own AI Model
Data Collection and Labelling
If you have a specific AI application and want to bring your own AI model that is suitable for your application, you can collect your own dataset, label them and then train using YOLOv8.
If you do not want to collect data by yourself, you can also choose public datasets which are readily available. You can download a number of publically available datasets such as the COCO dataset, Pascal VOC dataset and much more. Roboflow Universe is a recommended platform which provides a wide-range of datasets and it has 90,000+ datasets with 66+ million images available for building computer vision models. Also, you can simply search open-source datasets on Google and choose from a variety of datasets available.
If you have your own dataset and want to annotate the images, we recommend you to use the annotation tool provided by Roboflow. Please follow this part of the wiki to learn more about it. You can also follow this guide from Roboflow about annotation.
Training
Here we have 3 methods to train a model.
-
First way would be to use Ultralytics HUB. You can easily integrate Roboflow into Ultralytics HUB so that all your Roboflow projects will be readily available for training. Here it offers a Google Colab notebook to easily start the training process and also view the training progress in real-time.
-
Second way would be to use a Google Colab workspace created by us to make the training process easier. Here we use Roboflow API to download the dataset from Roboflow project.
-
Third way would be to use a local PC for the training process. Here you need to make sure you have a powerful enough GPU and also need to manually download the dataset.
- Ultralytics HUB + Roboflow + Google Colab
- Roboflow + Google Colab
- Roboflow + Local PC
Here we use Ultralytics HUB to load the Roboflow project and then train on Google Colab.
-
Step 1. Visit this URL and sign up for an Ultralytics account
-
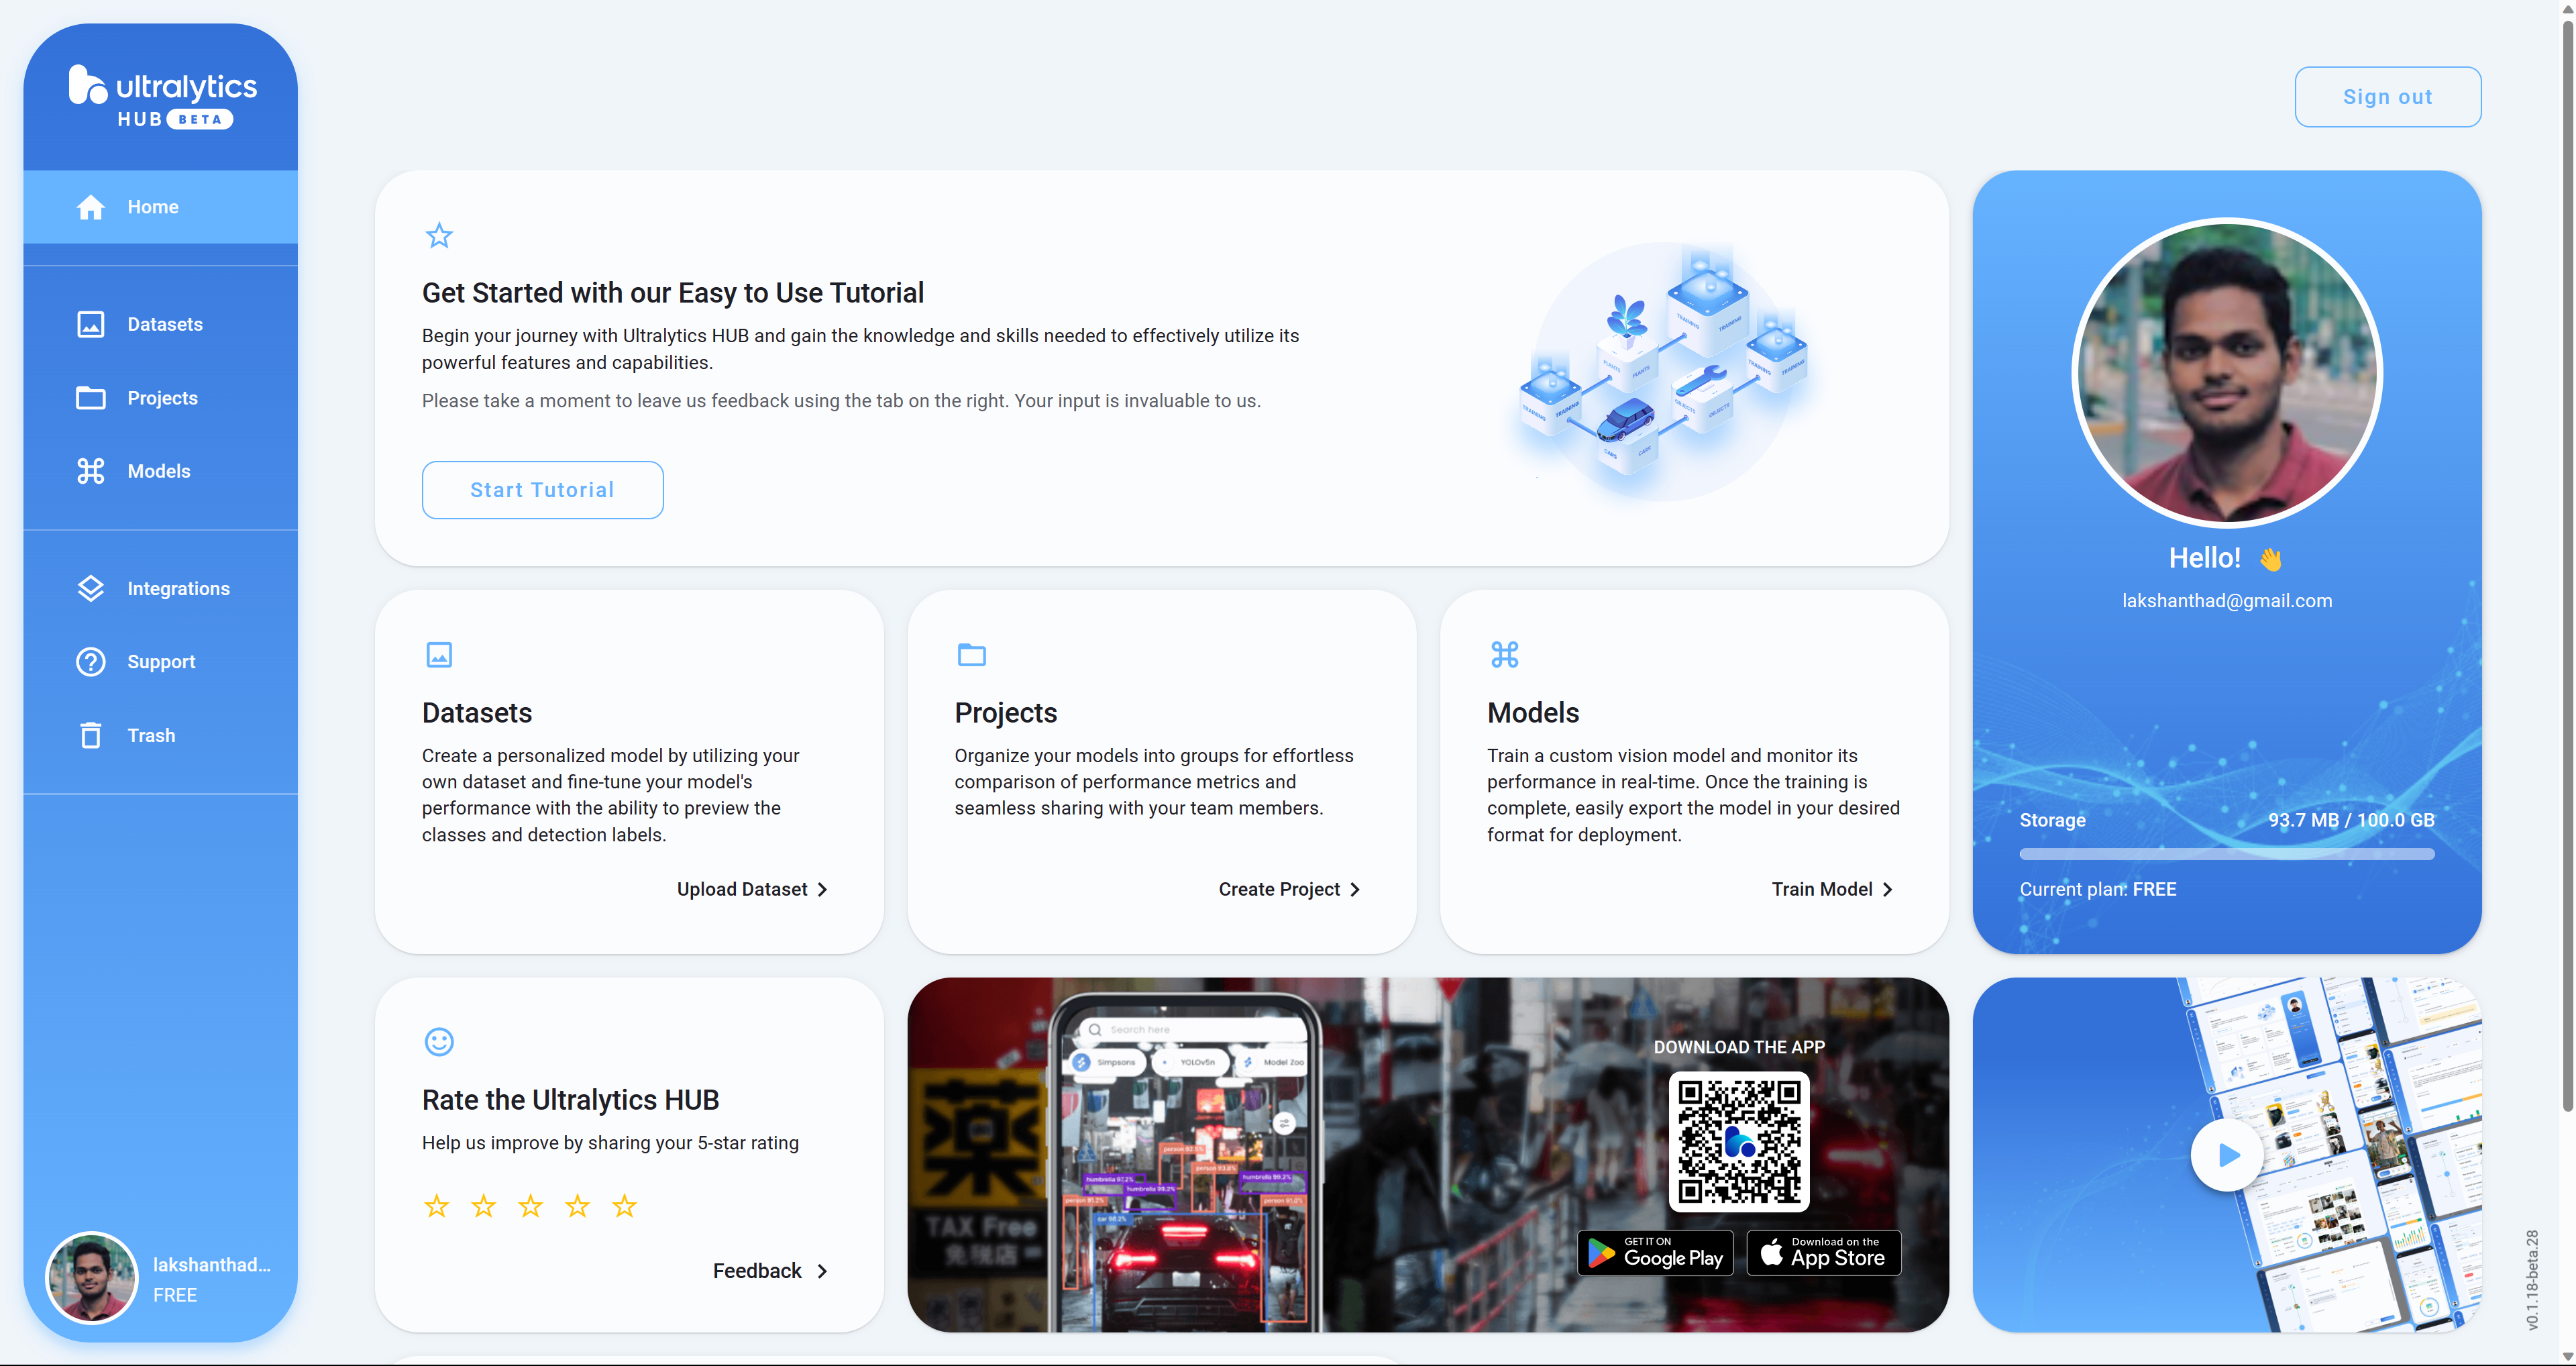
Step 2. Once you sign in with the newly created account, you will be greeted with the following dashboard
-
Step 3. Visit this URL and sign up for a Roboflow account
-
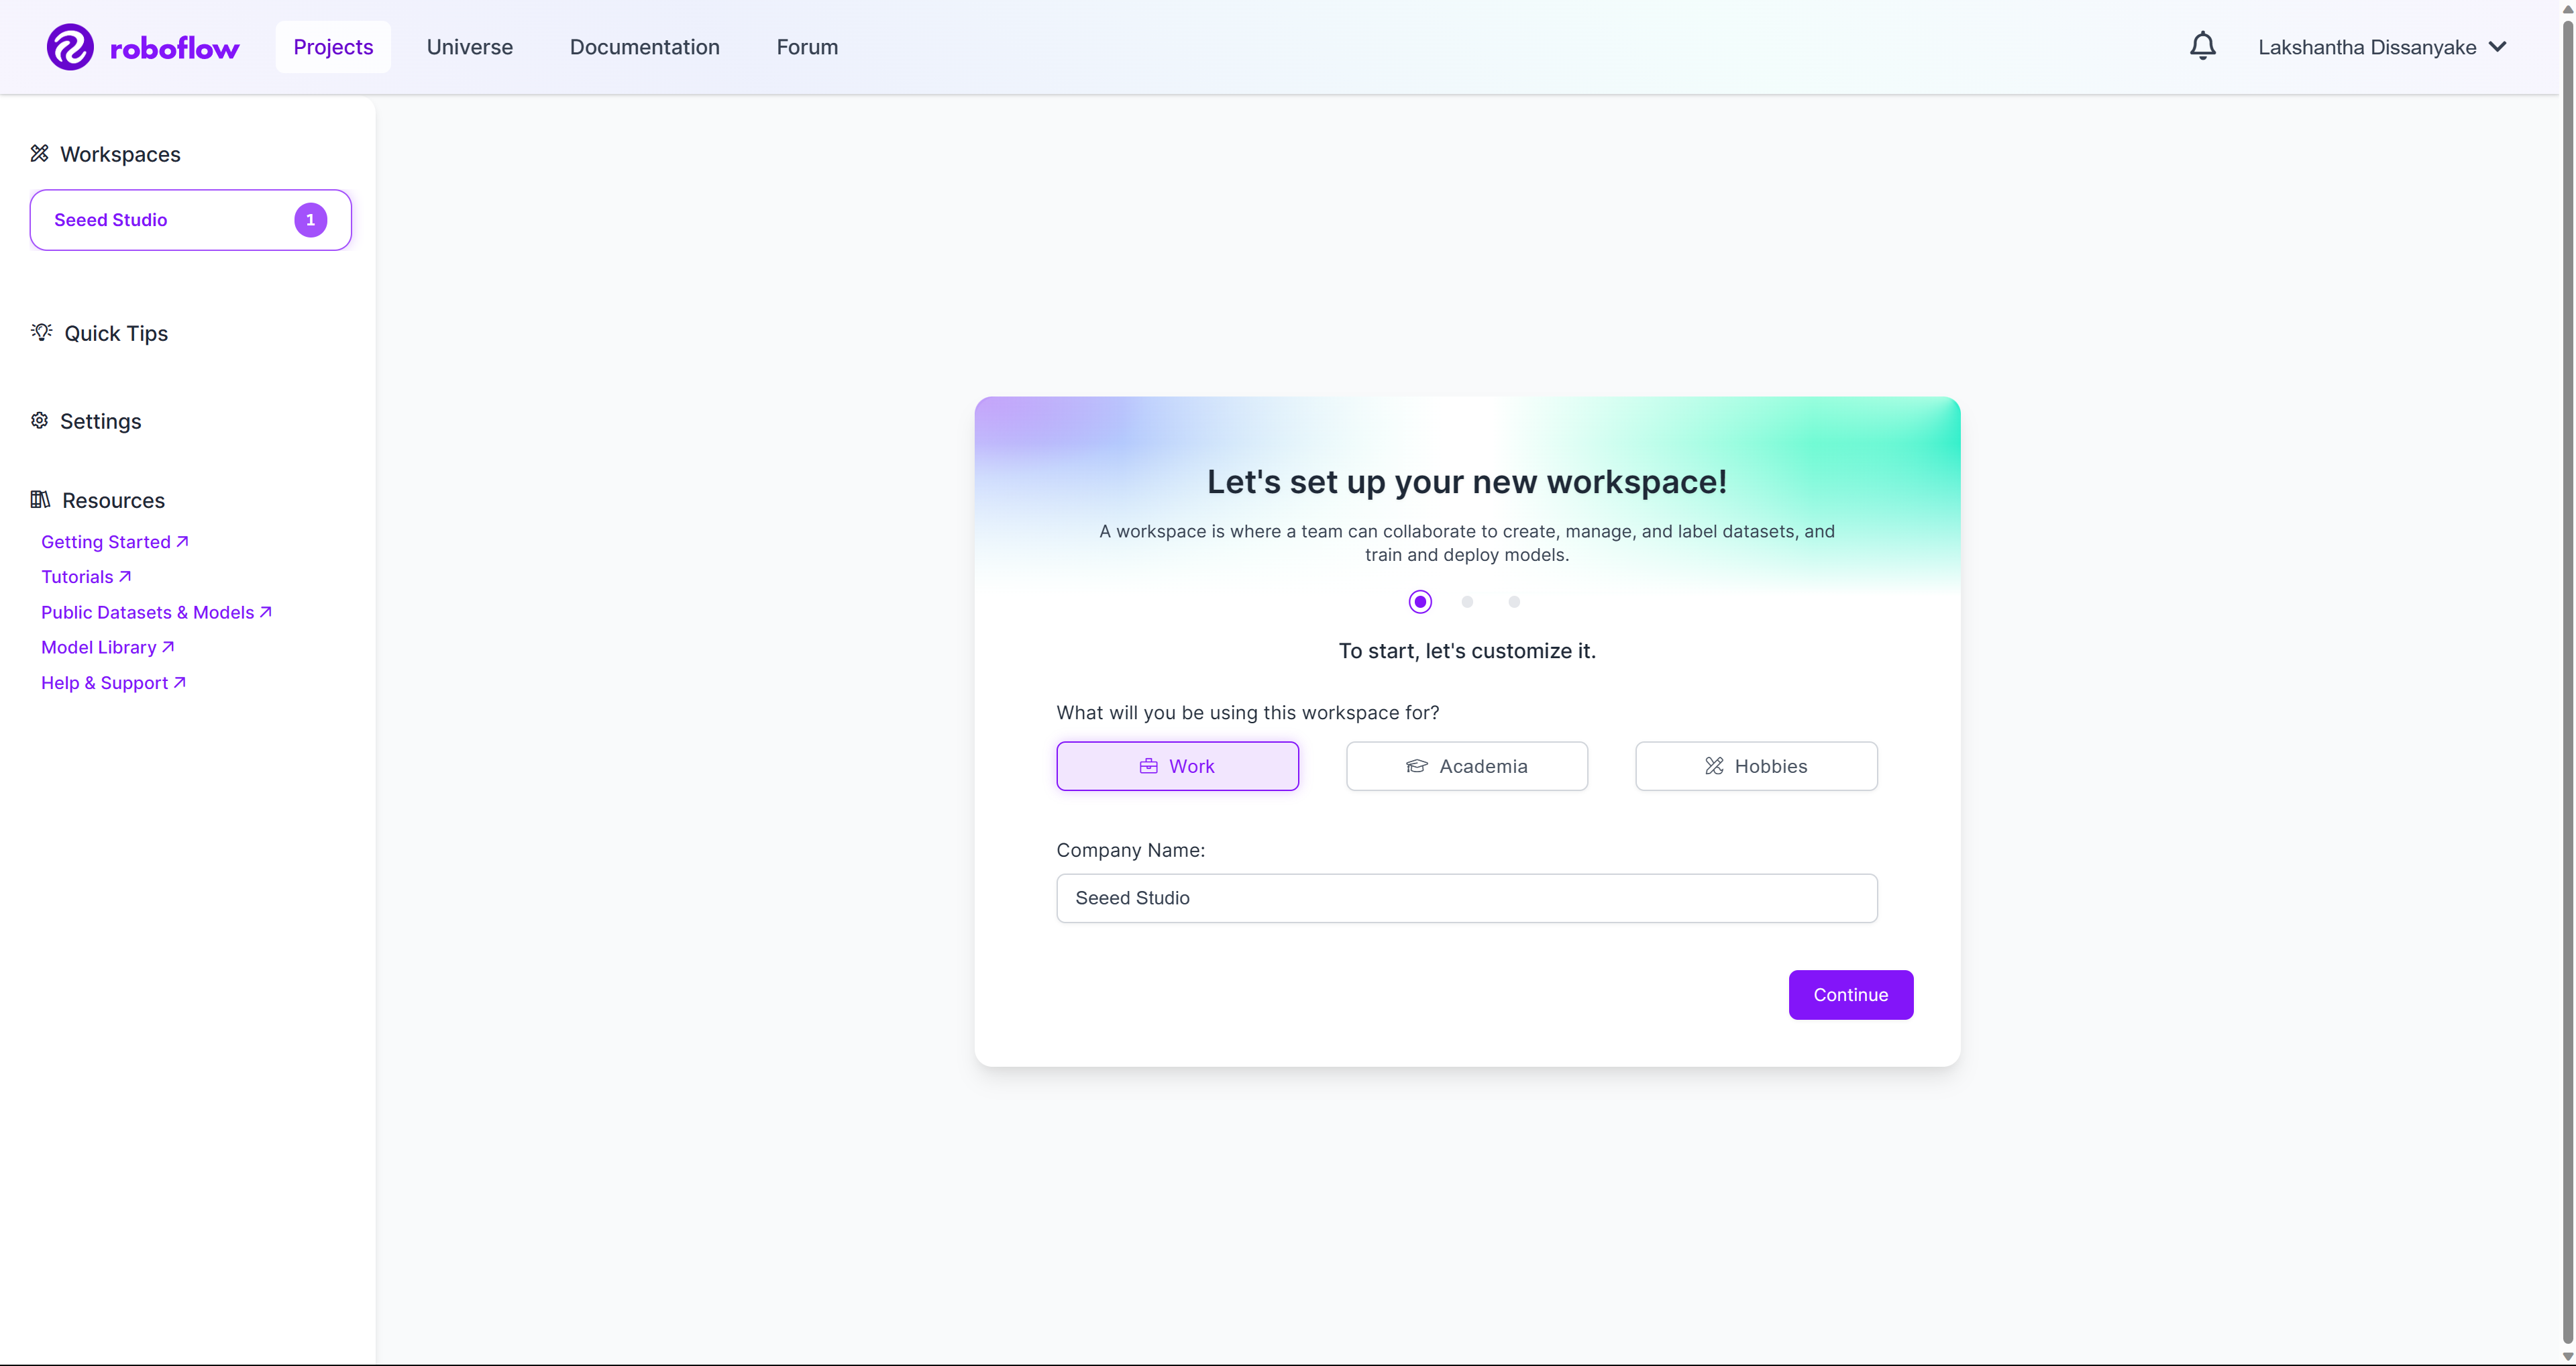
Step 4. Once you sign in with the newly created account, you will be greeted with the following dashboard
-
Step 5. Create a new workspace and create a new project under the workspace by following this wiki guide we have prepared. You can also check here to learn more from official Roboflow documentation.
-
Step 6. Once you have a couple of projects inside your workspace, it will look like below
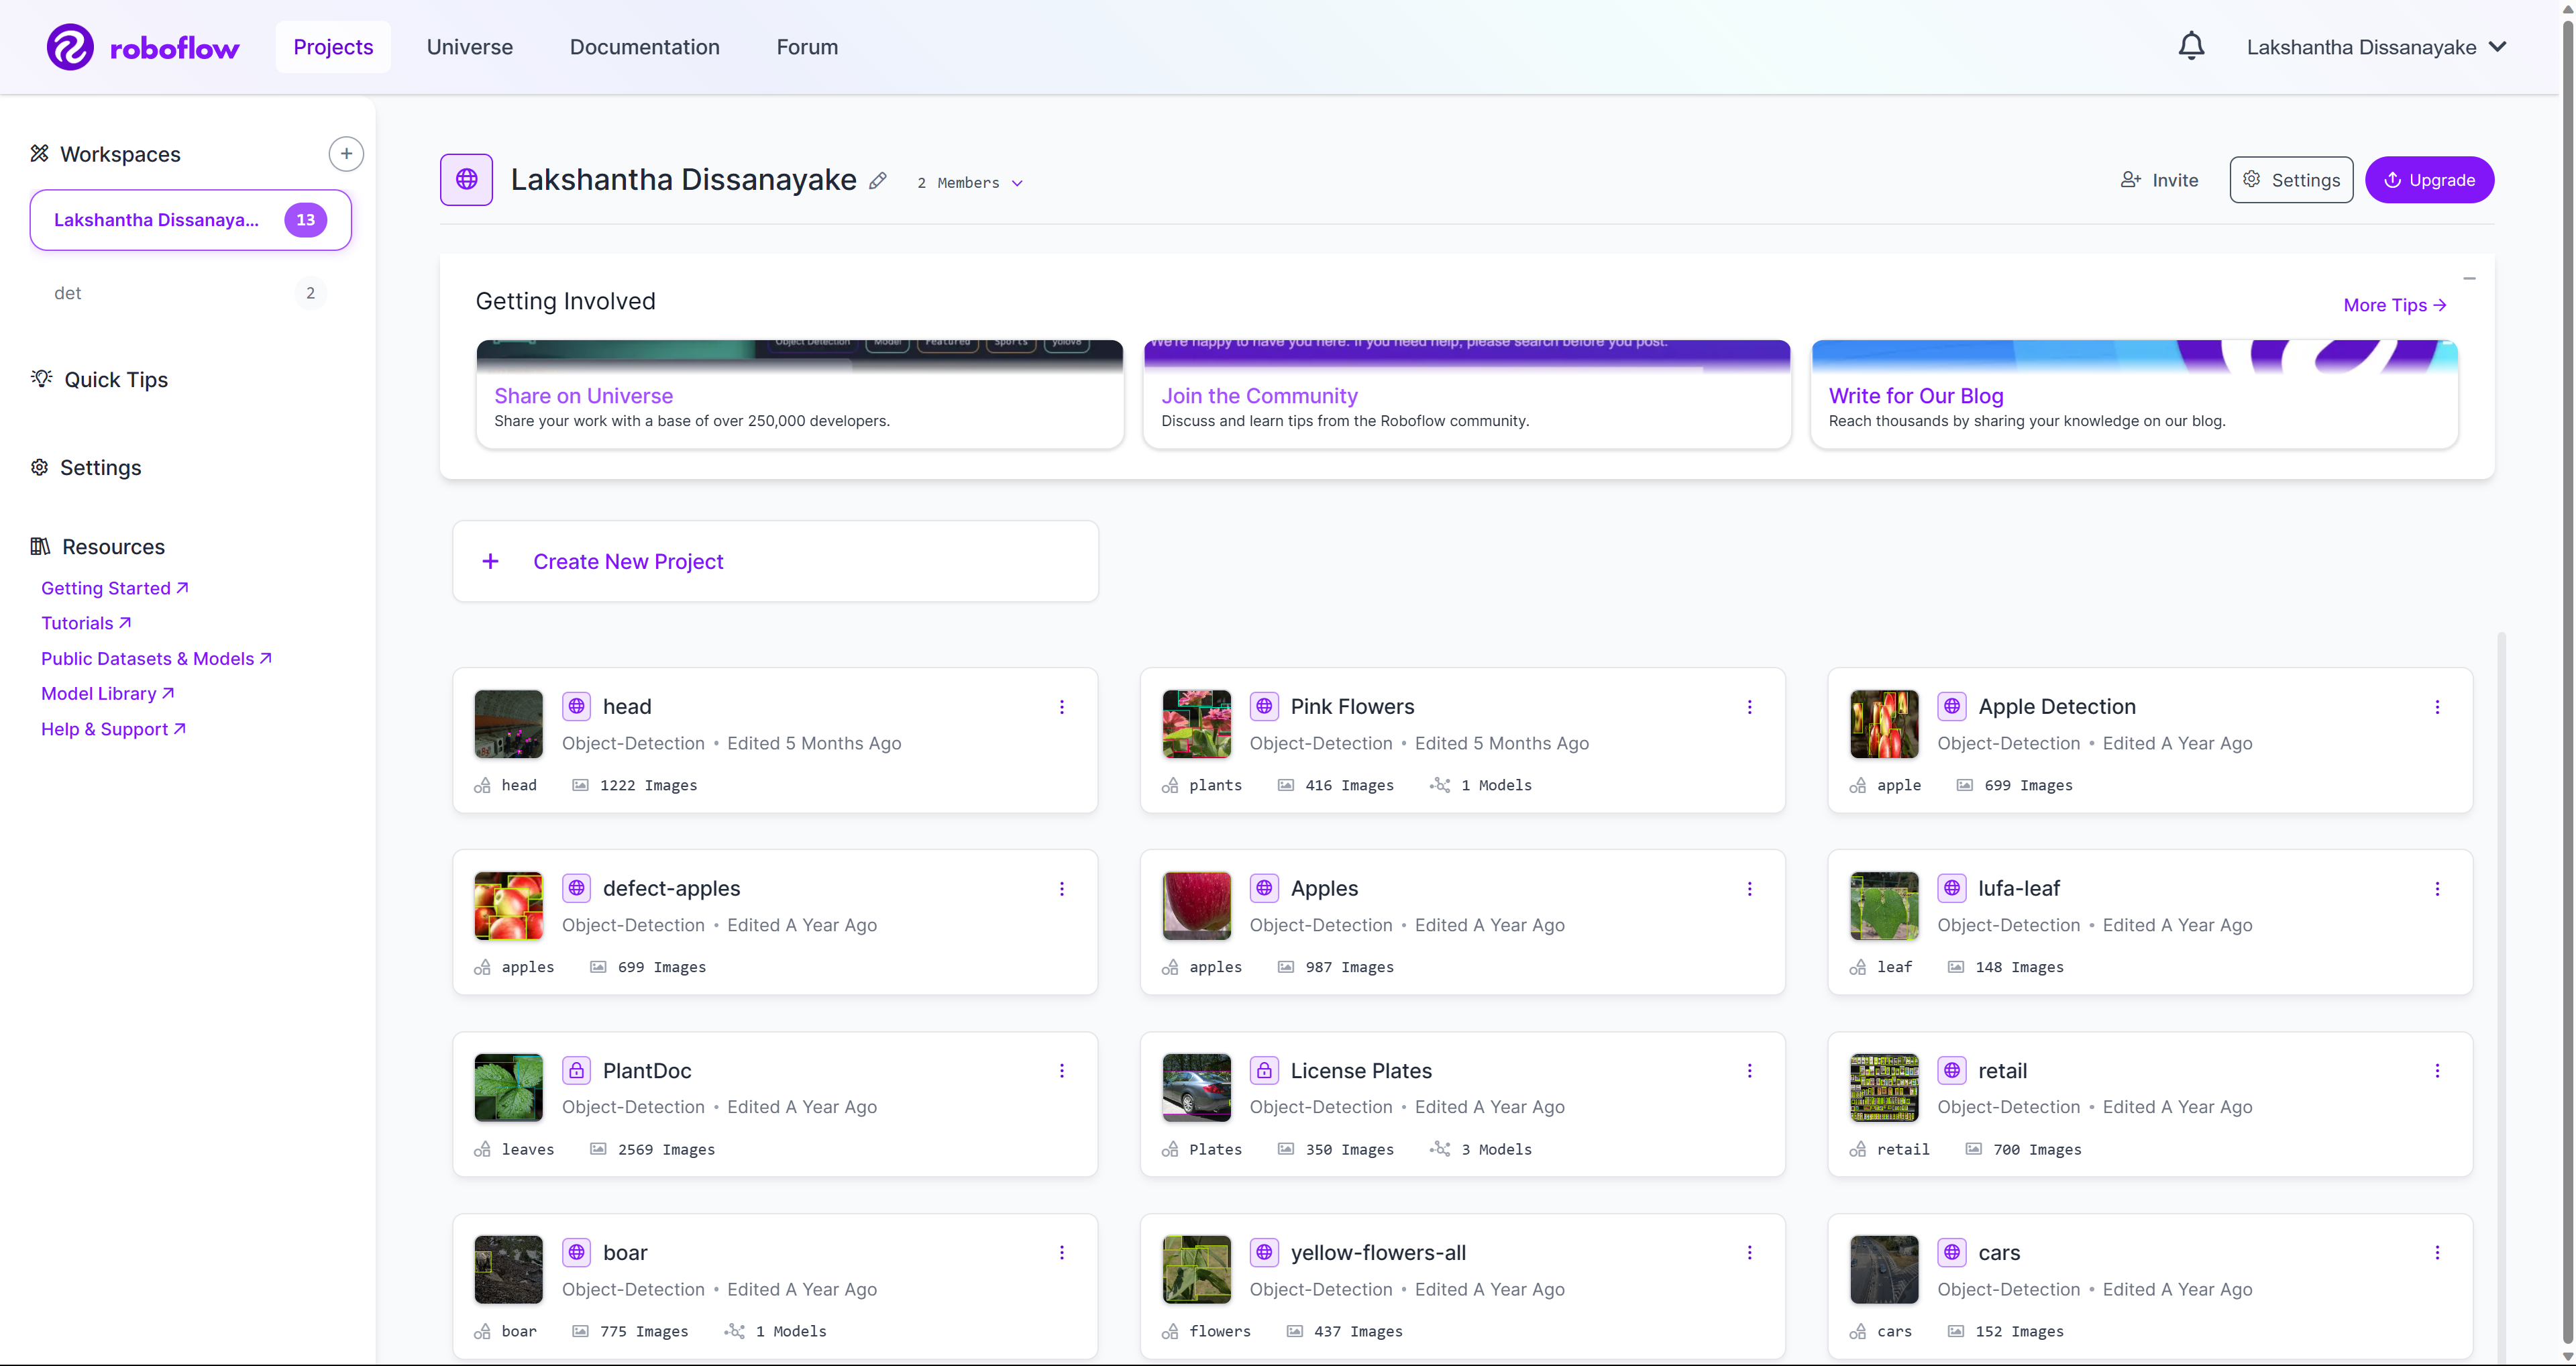
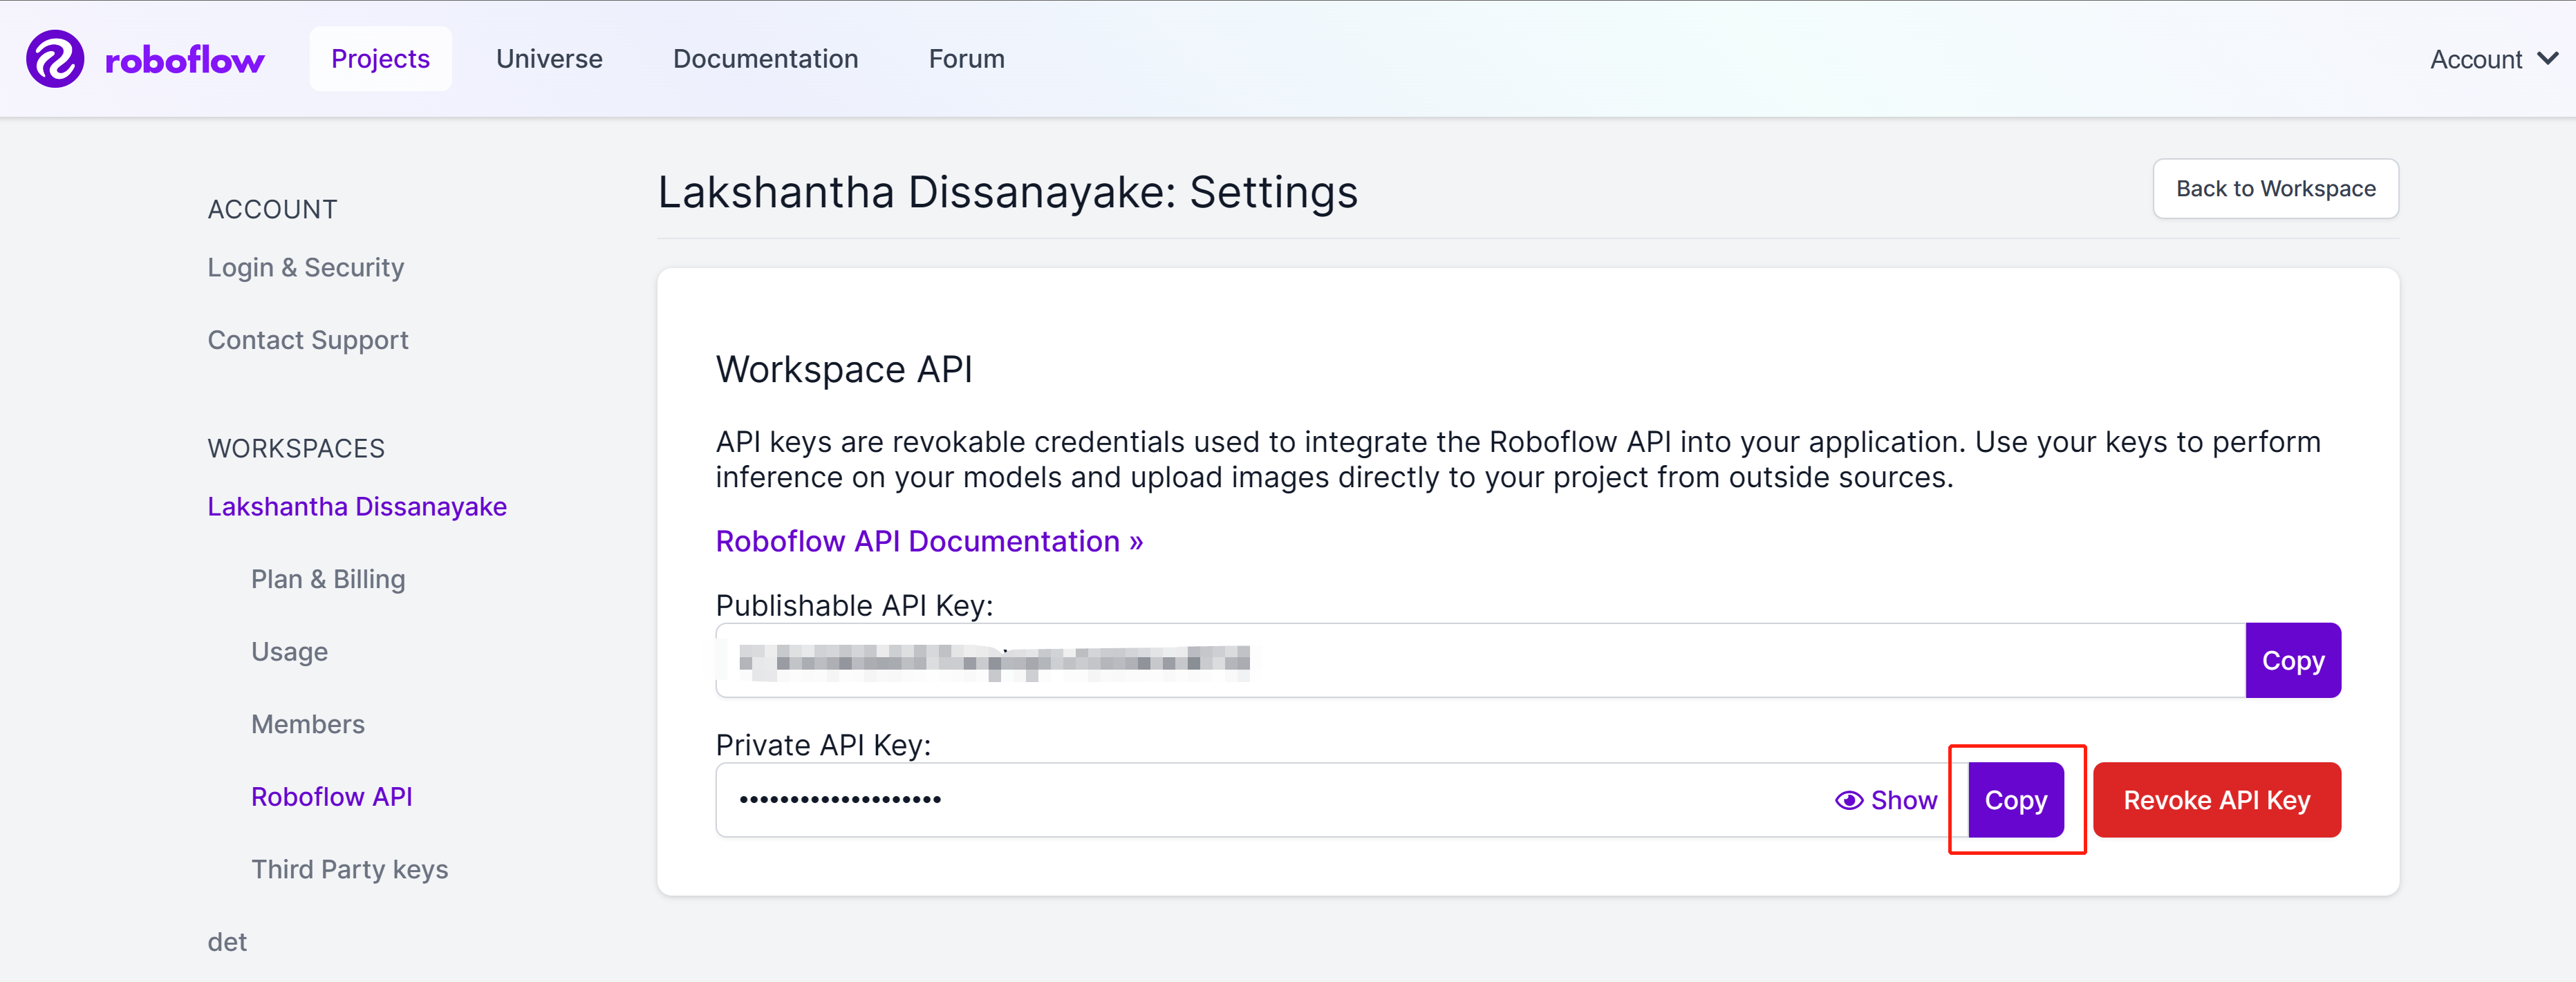
- Step 7. Go to Settings and click Roboflow API

- Step 8. Click the copy button to copy the Private API Key
- Step 9. Come back to Ultralytics HUB dashboard, click on Integrations, paste the API Key we copied before into the empty column and click Add
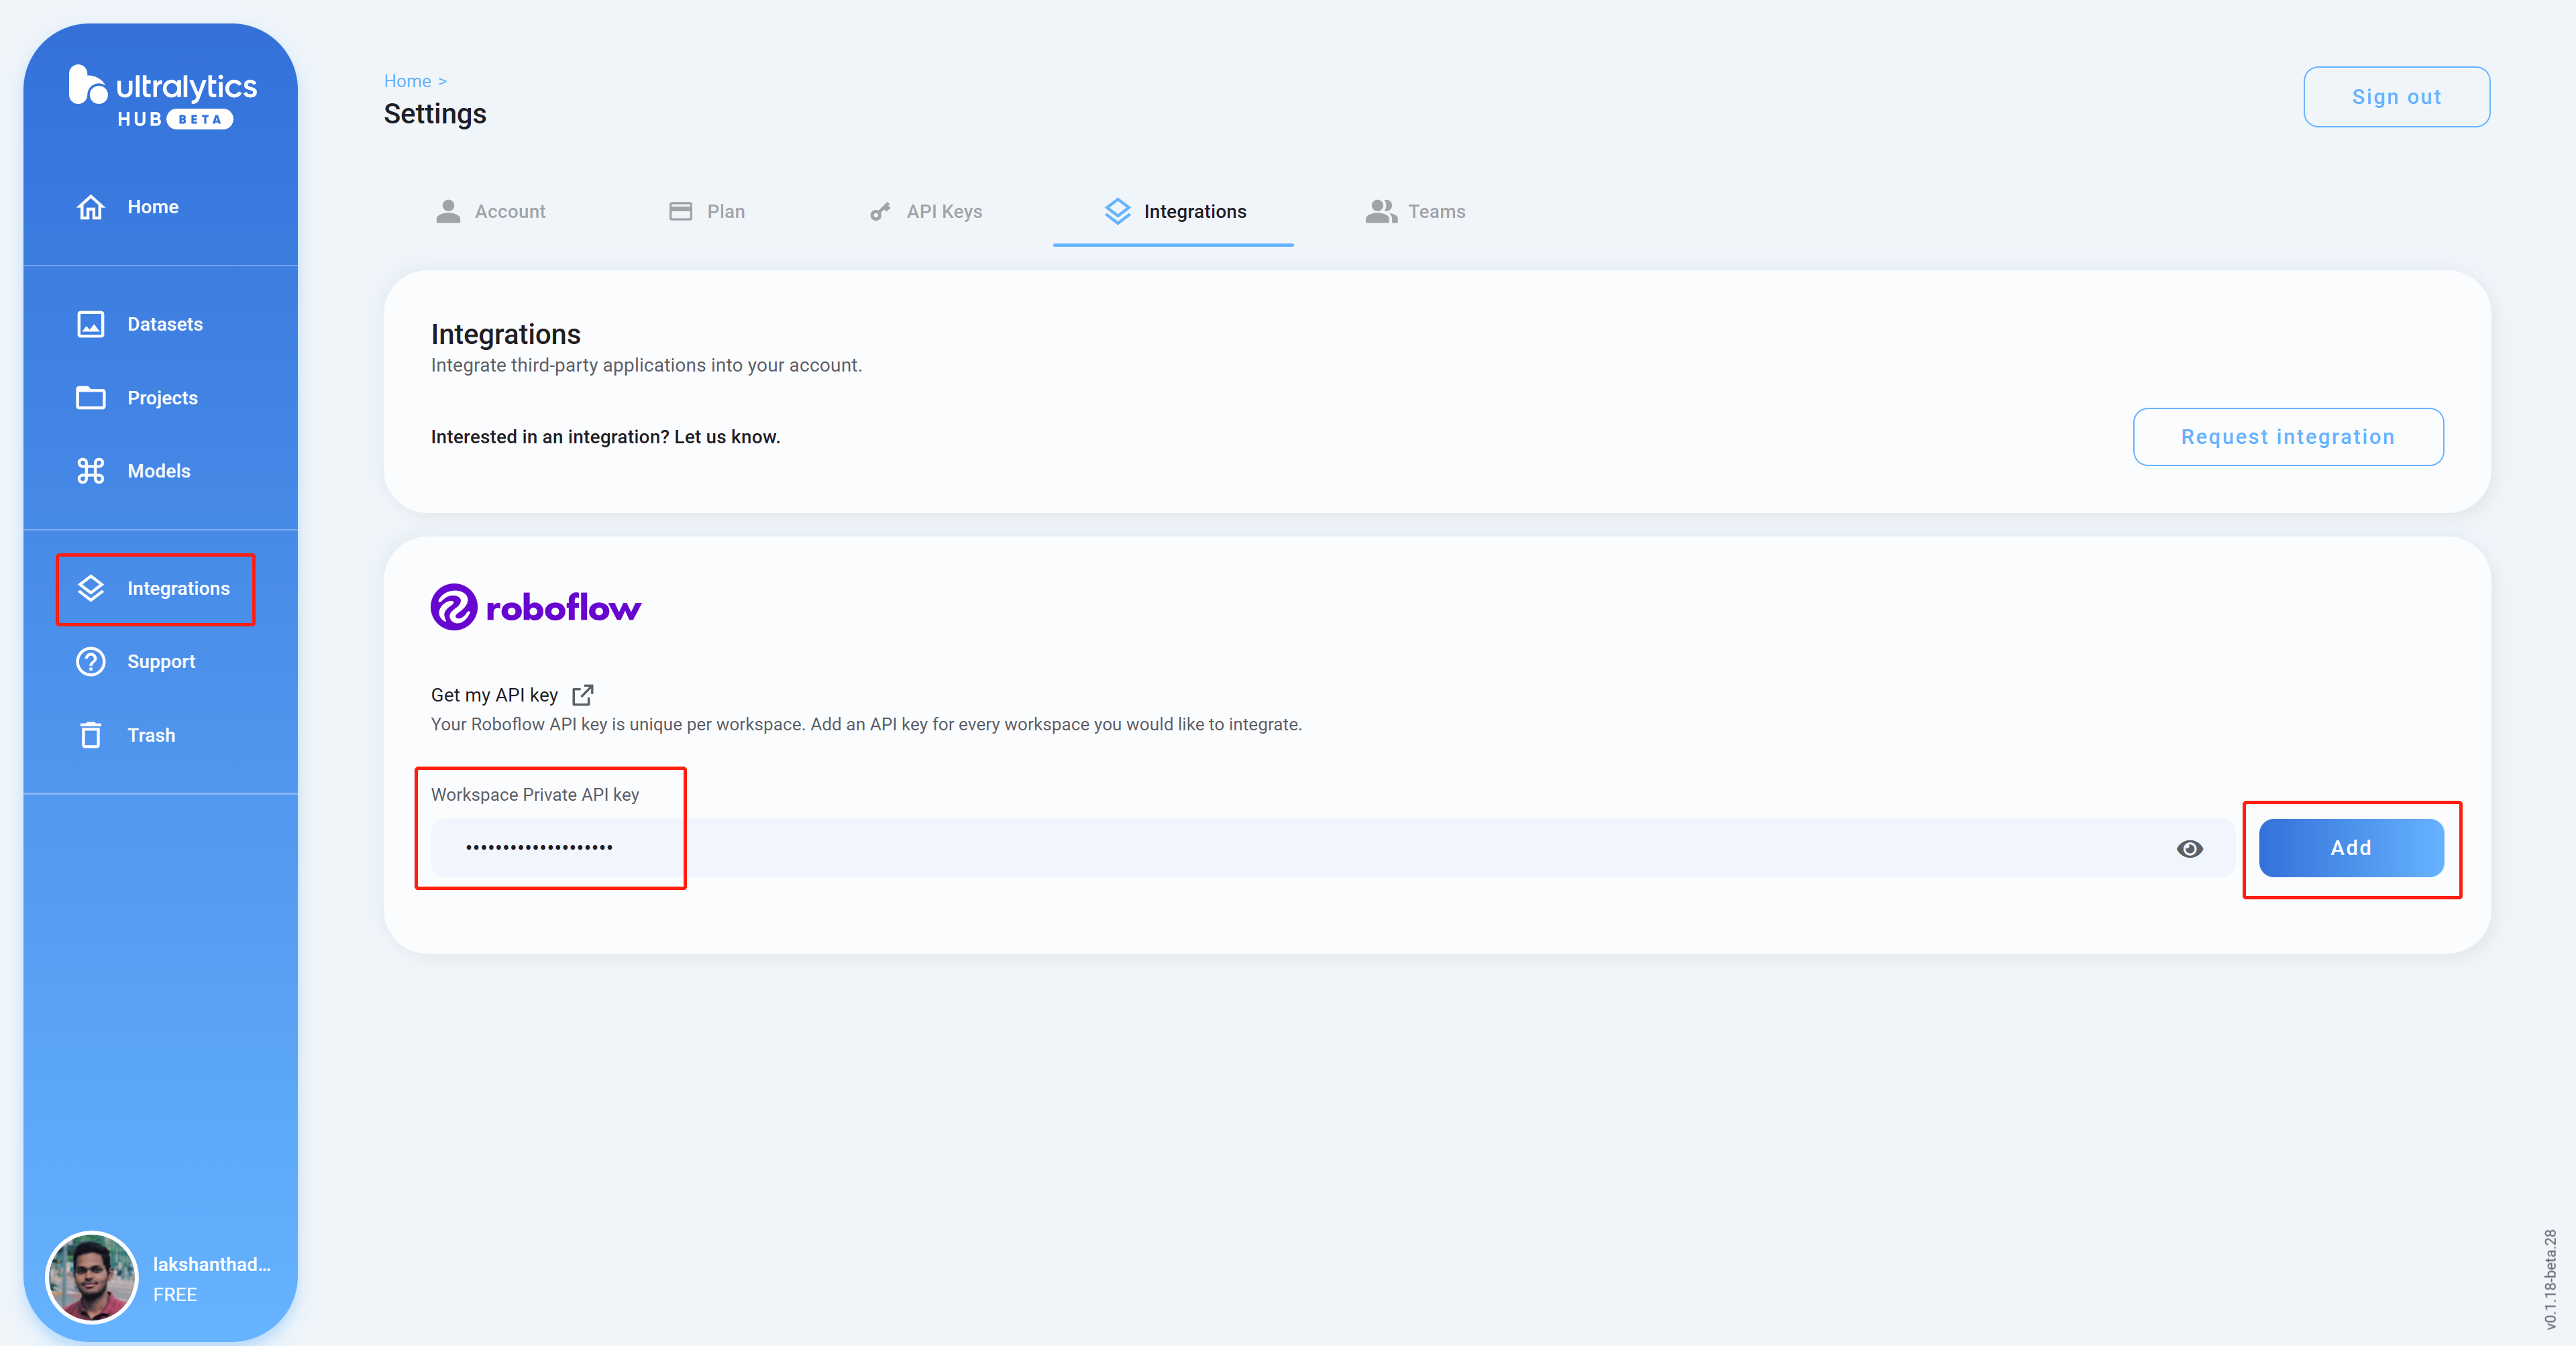
- Step 10 If you see your workspace name listed, that means the integration is successful

- Step 11 Navigate to Datasets and you will see all your Roboflow projects here
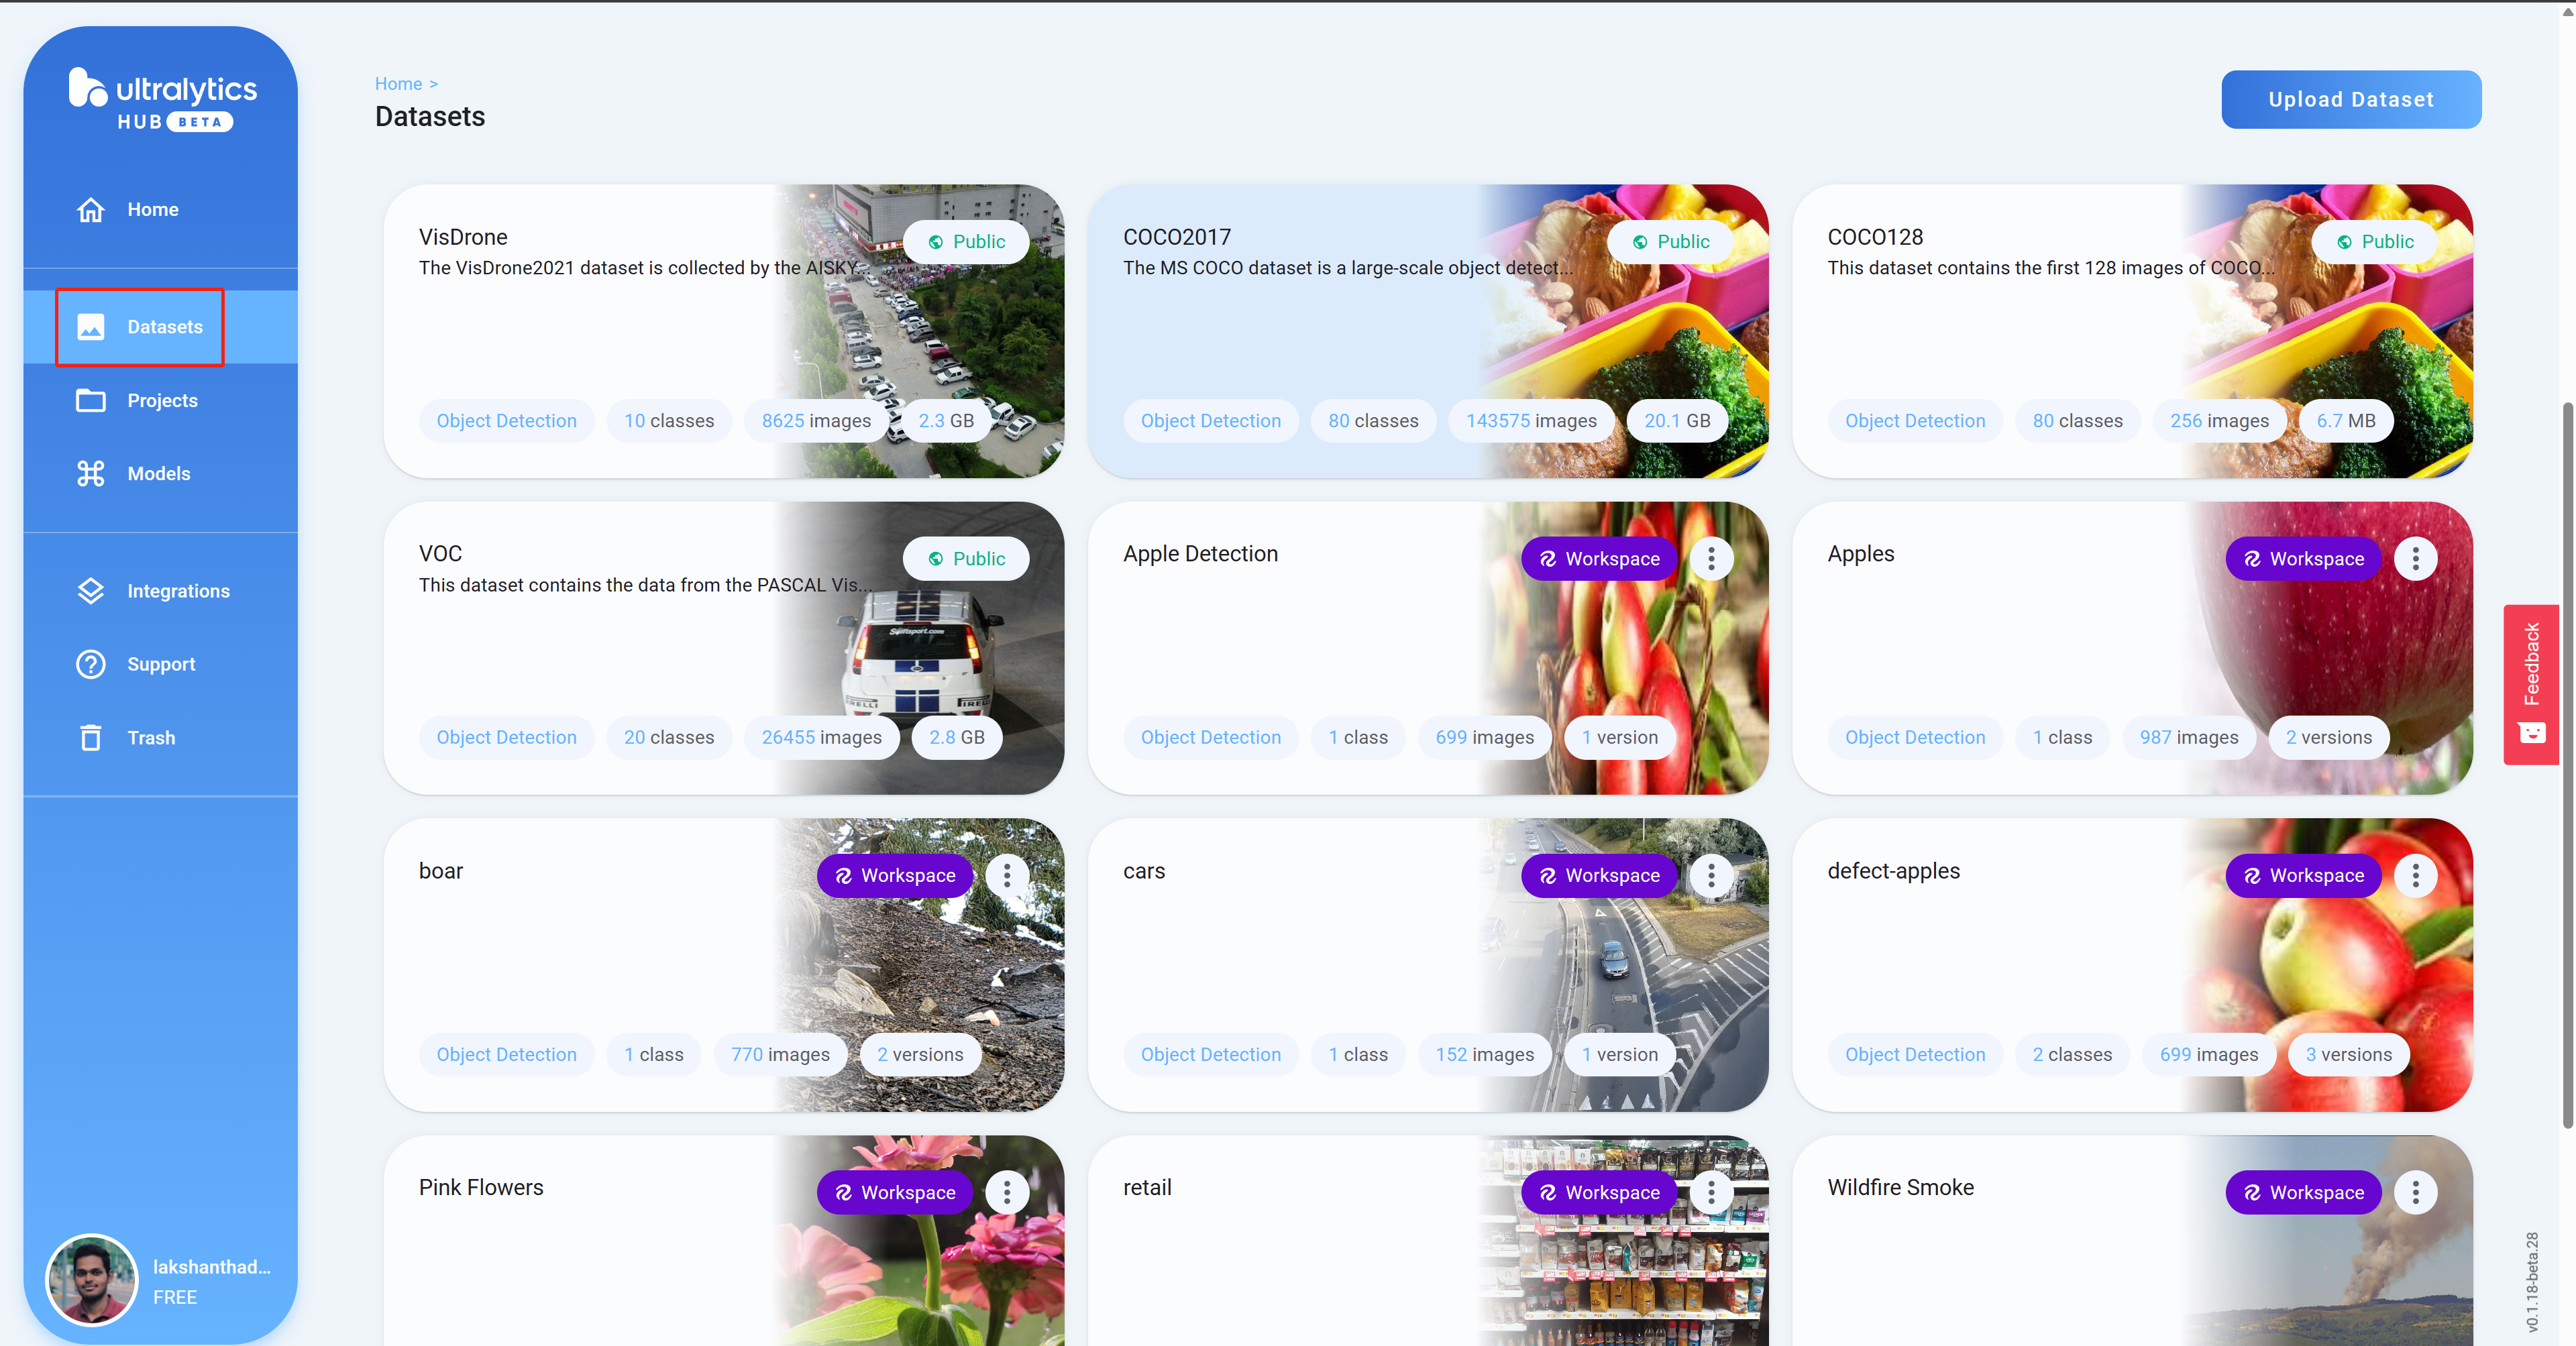
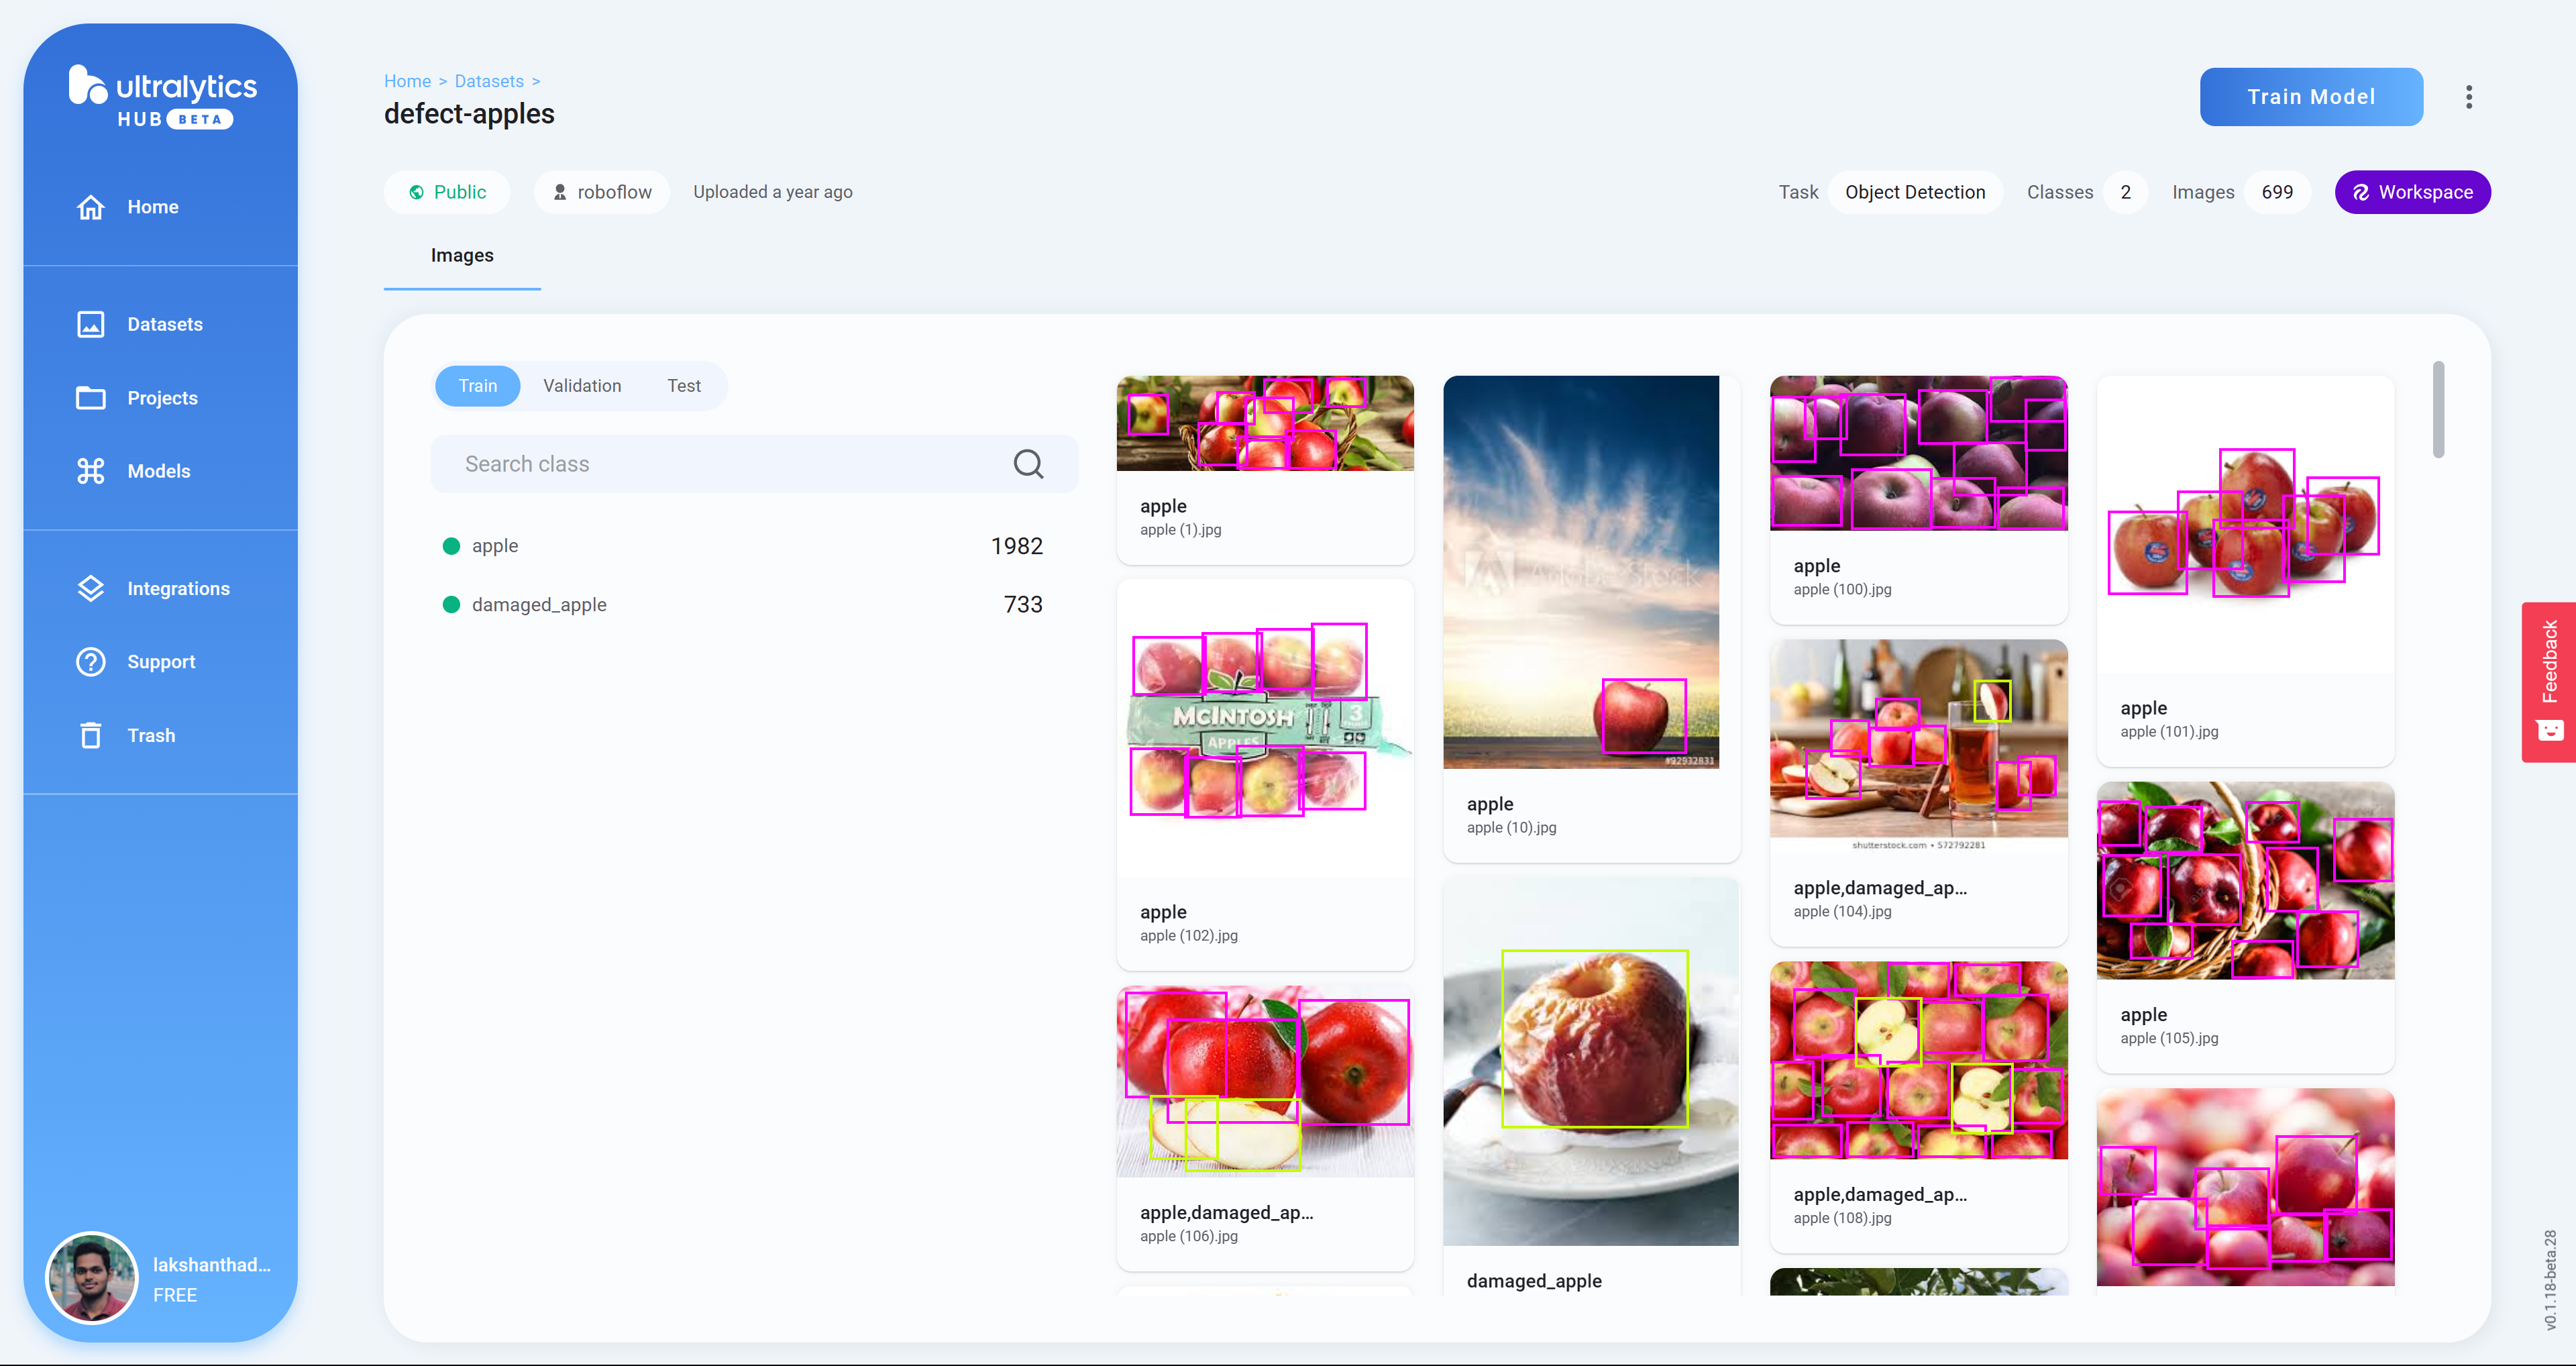
- Step 12 Click on a project to check more about the dataset. Here I have selected a dataset which can detect healthy and damaged apples
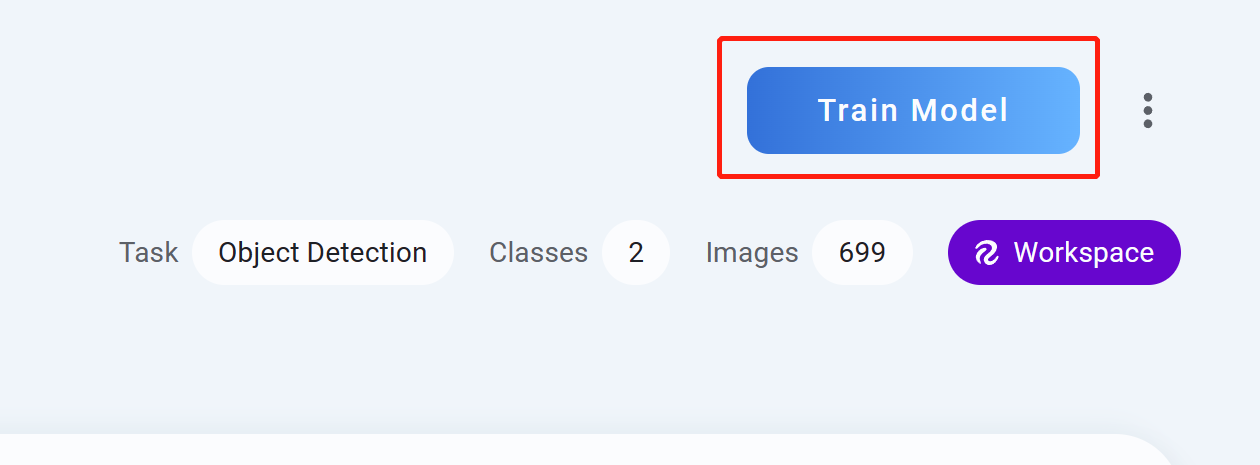
- Step 13 Click Train Model
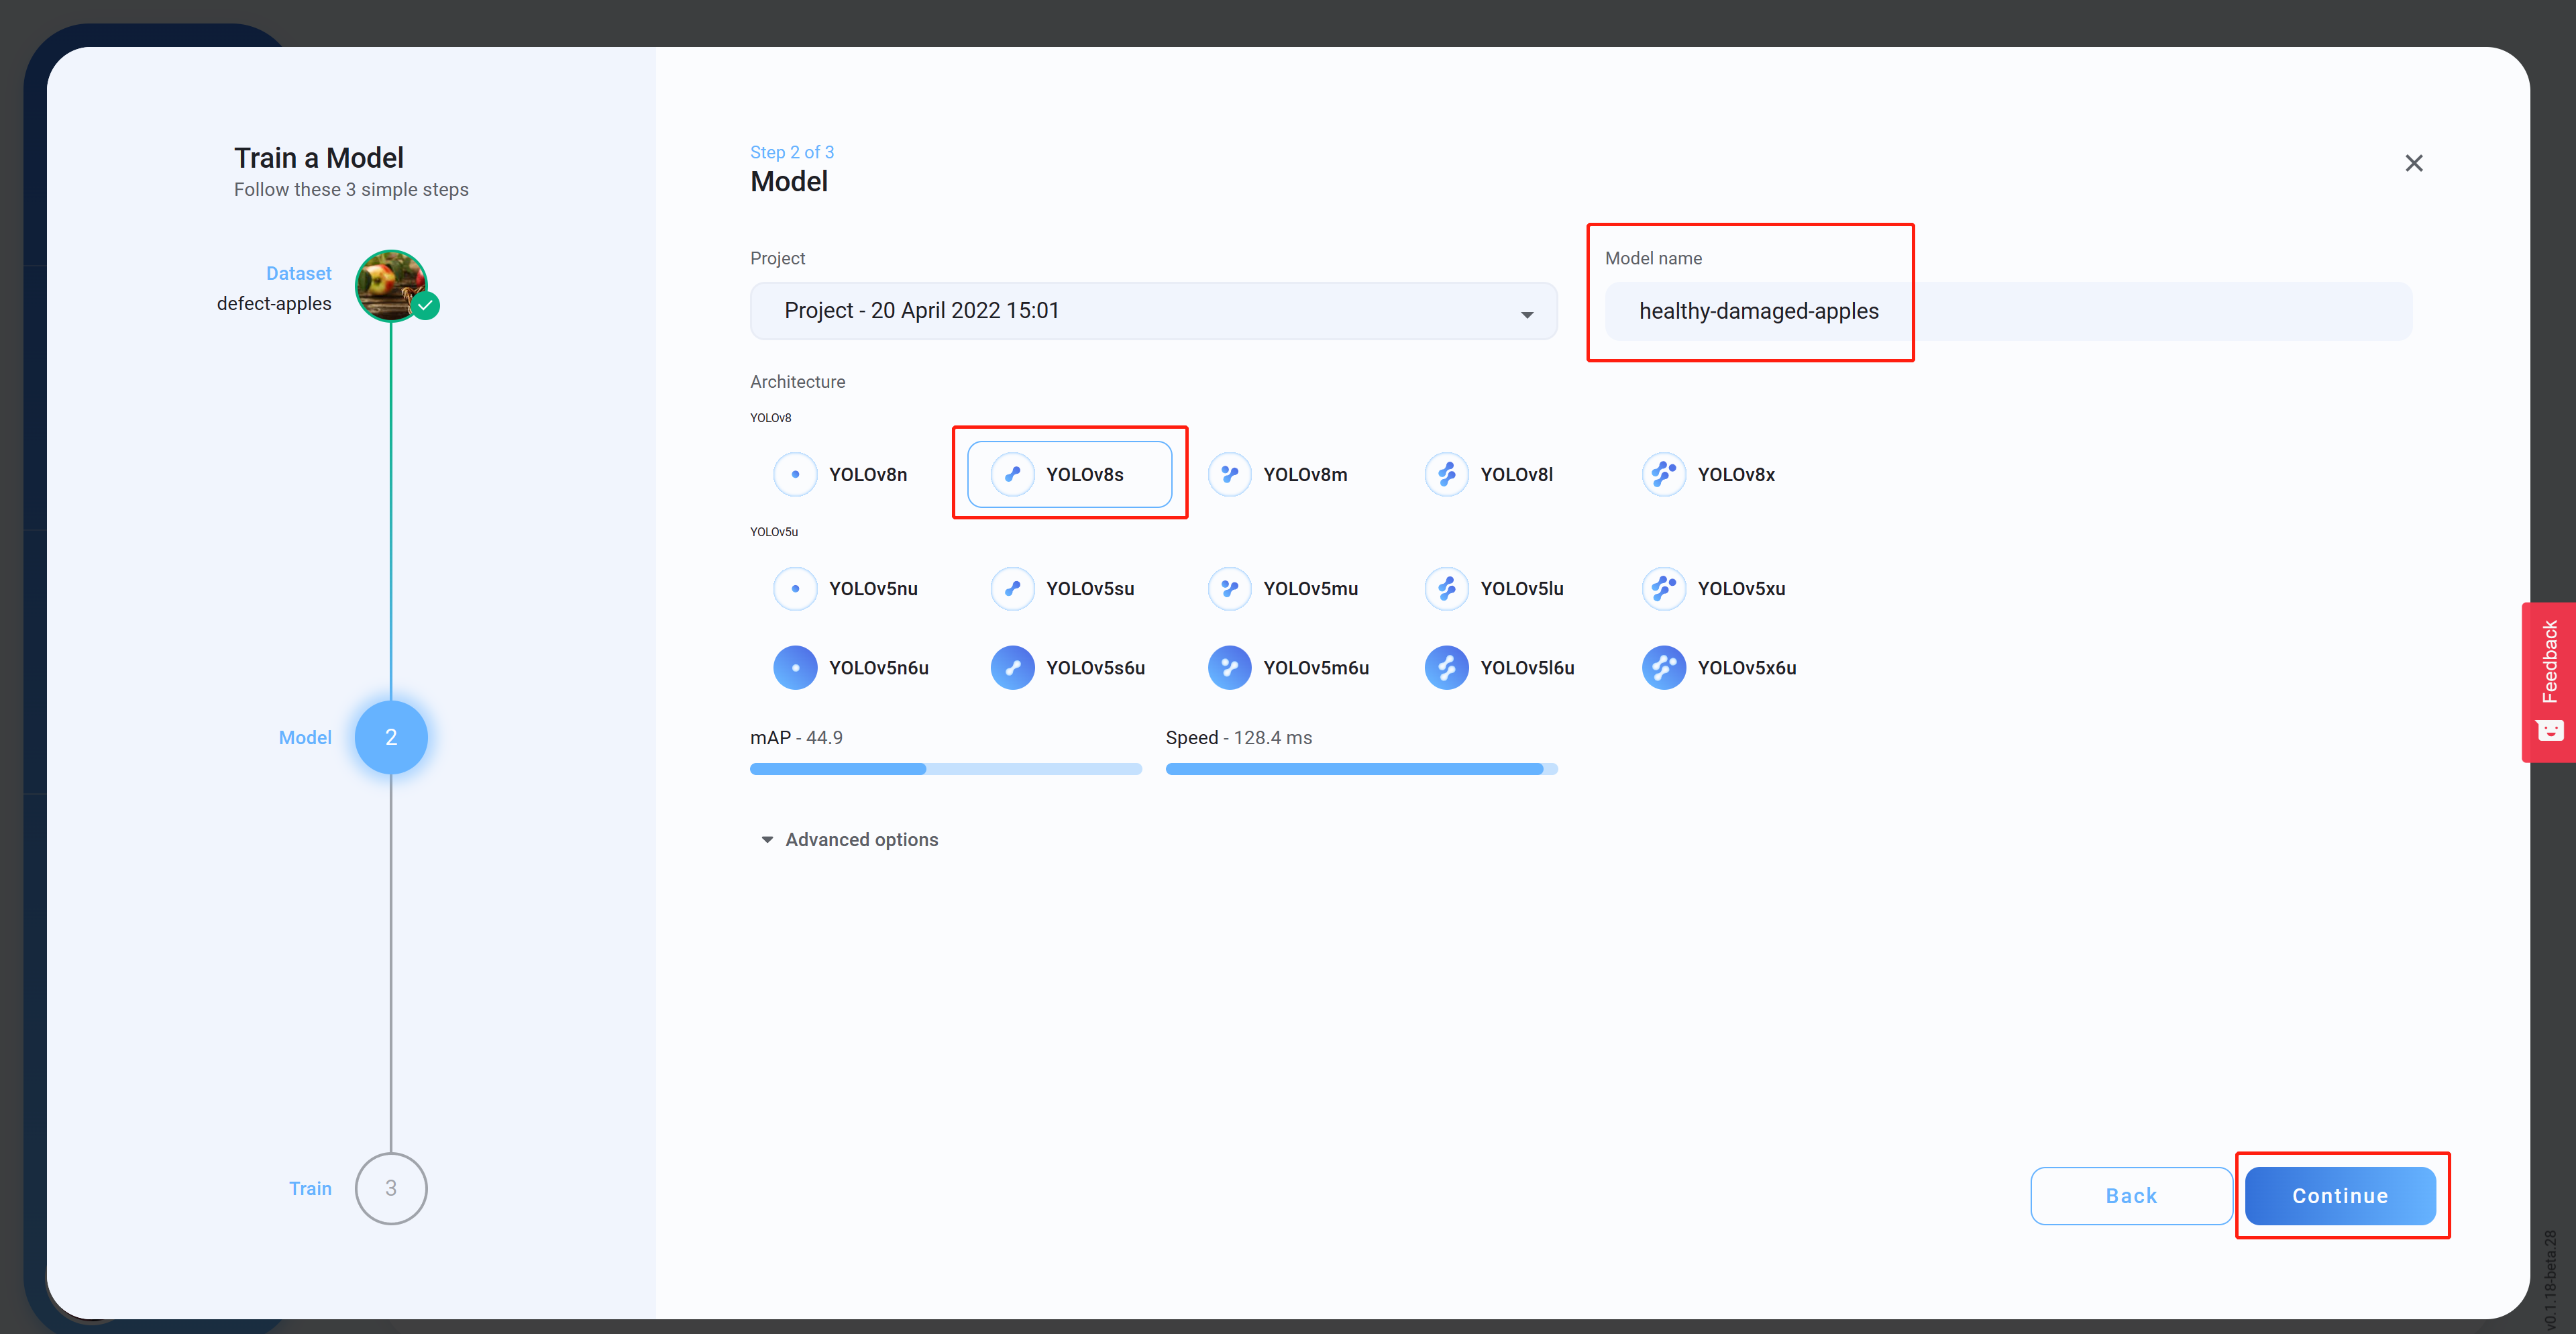
- Step 14 Select the Architecture, set a Model name (optional) and then click Continue. Here we have selected YOLOv8s as the model architecture
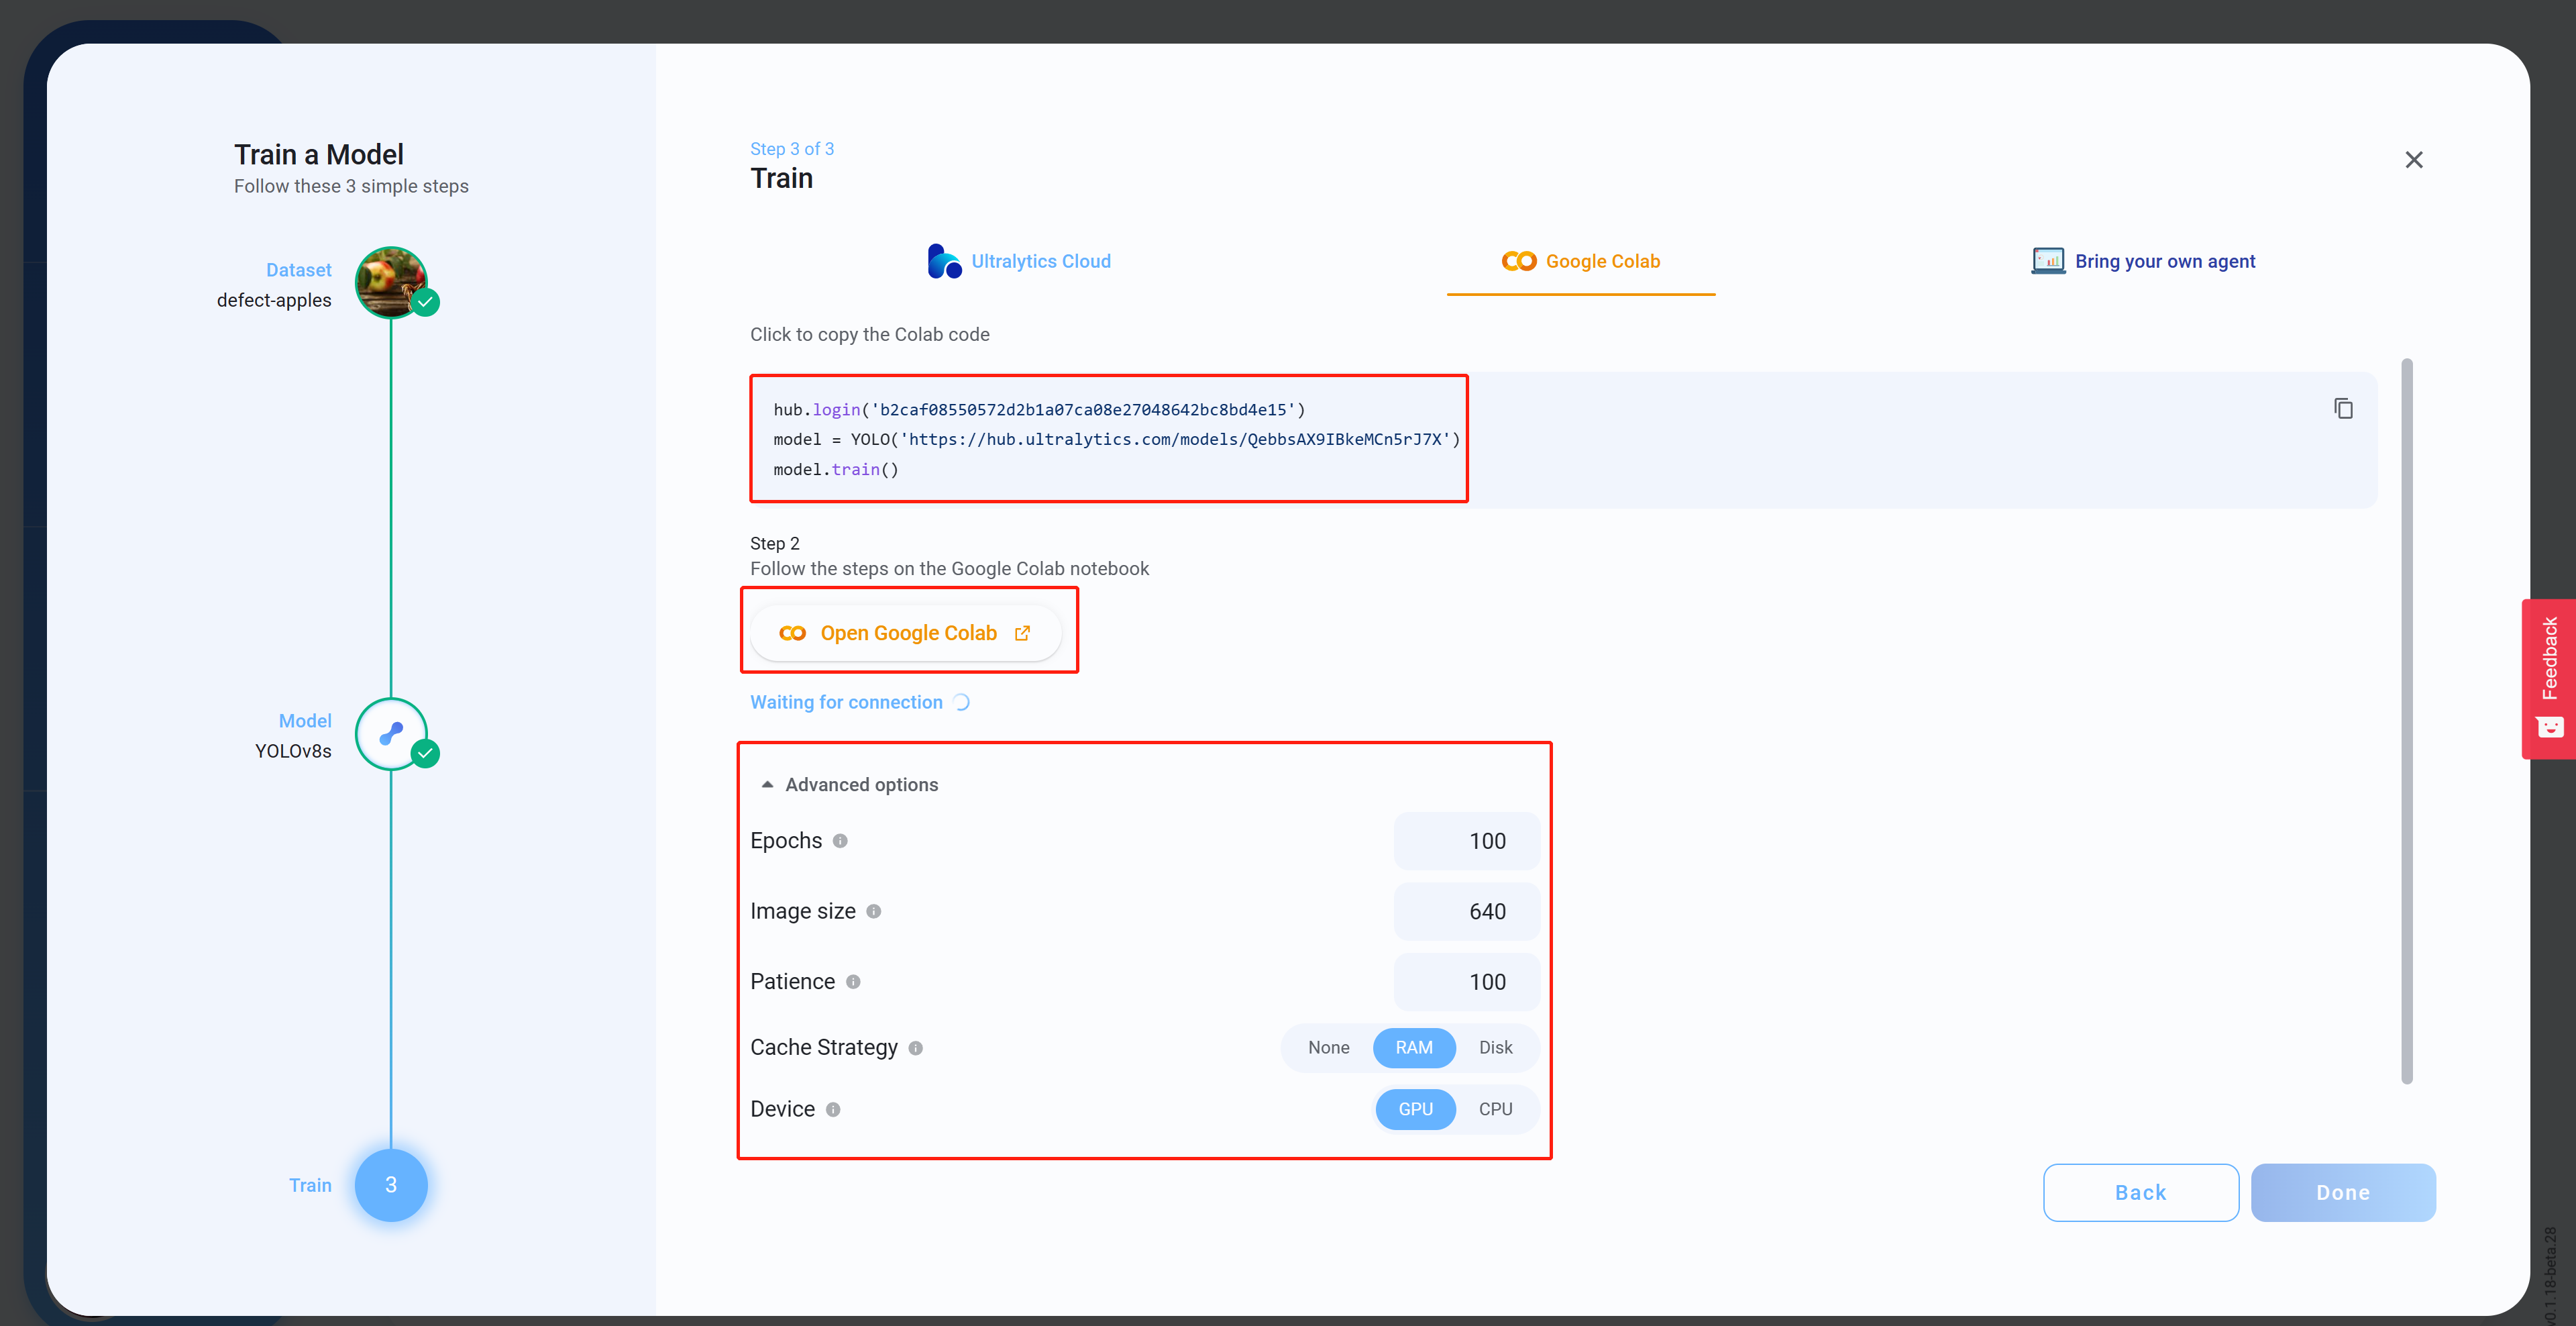
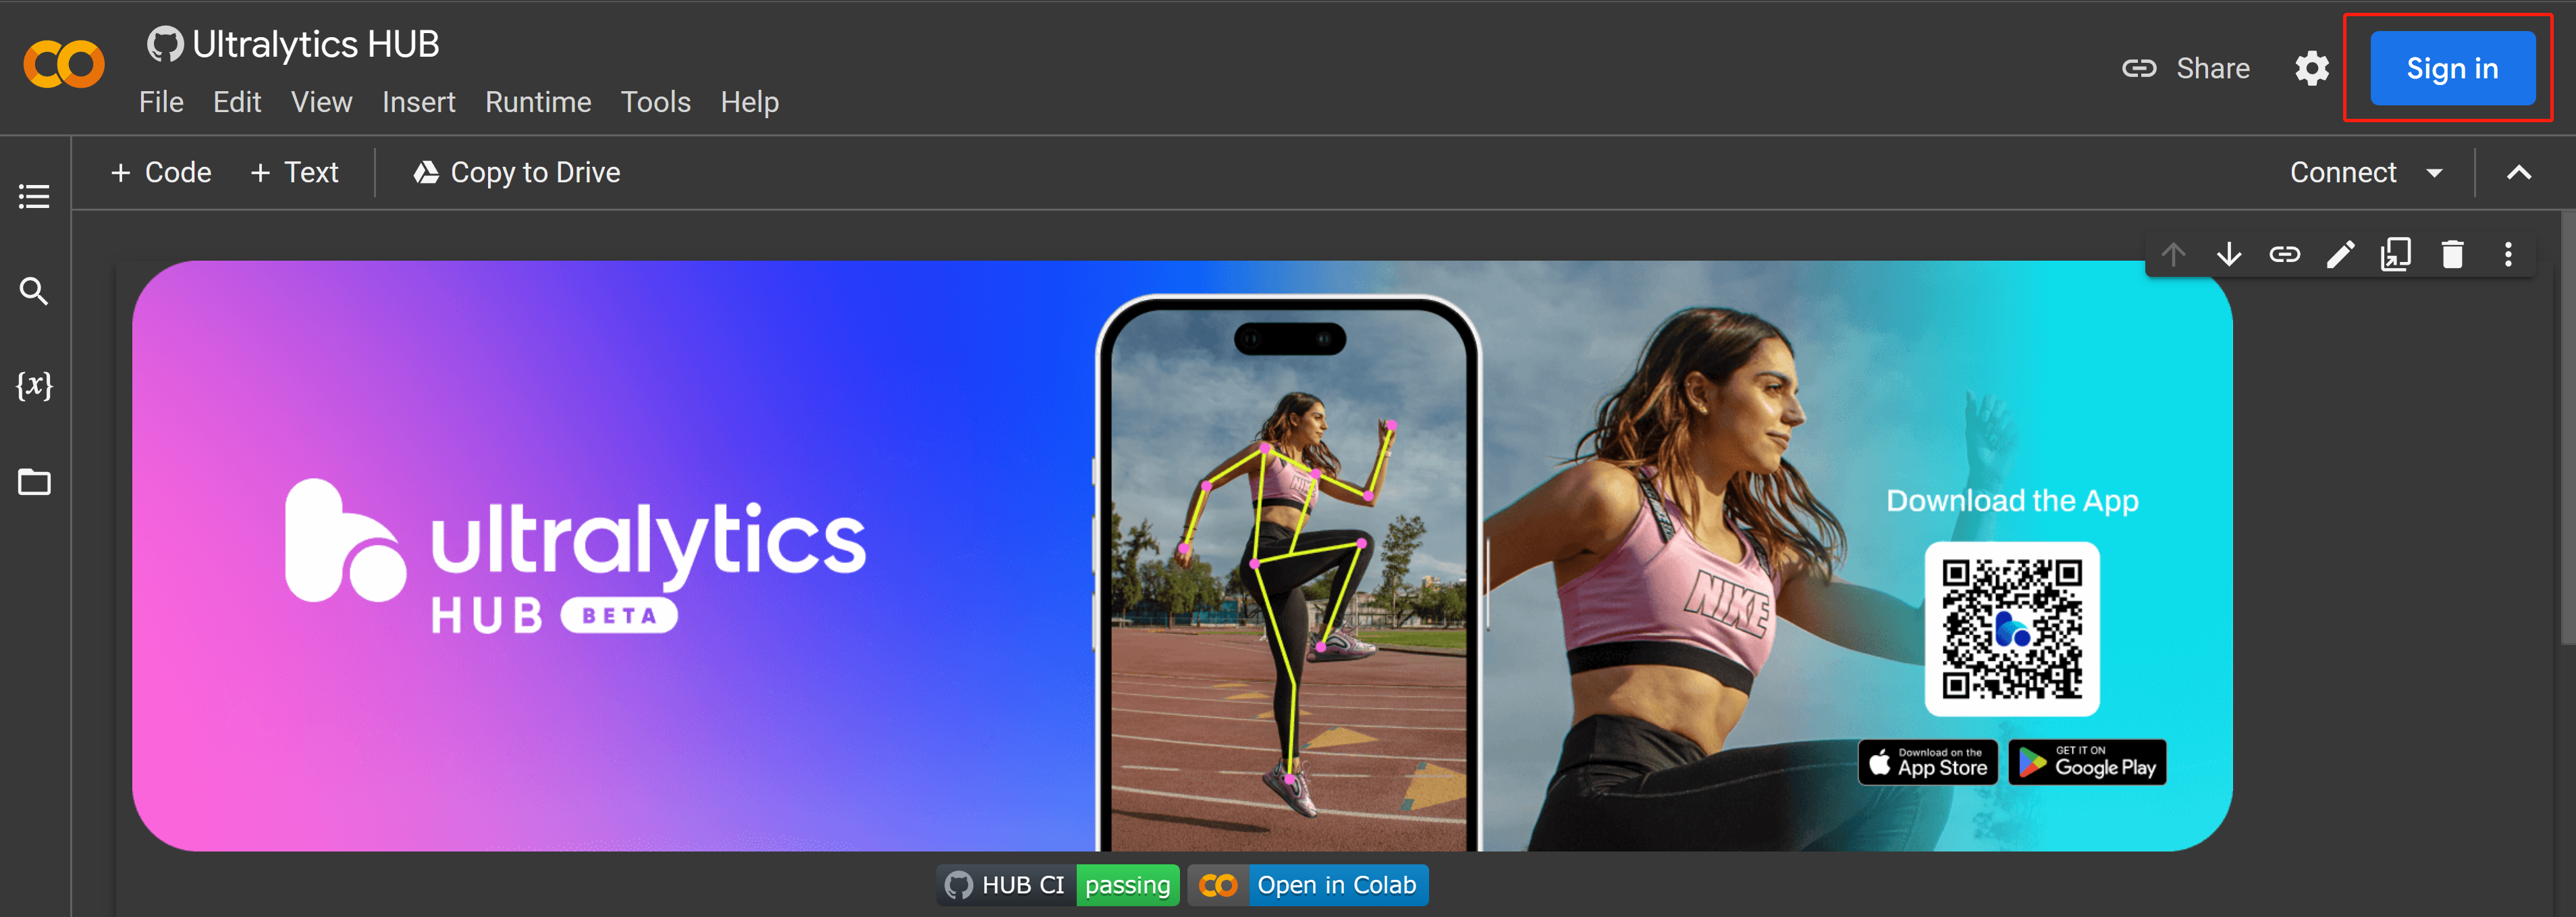
- Step 15 Under Advanced options, configure the settings as to your preference, copy and past the Colab code (this will be pasted late into Colab workspace) and then click Open Google Colab
- Step 16 Sign in to your Google account if you have not already signed in
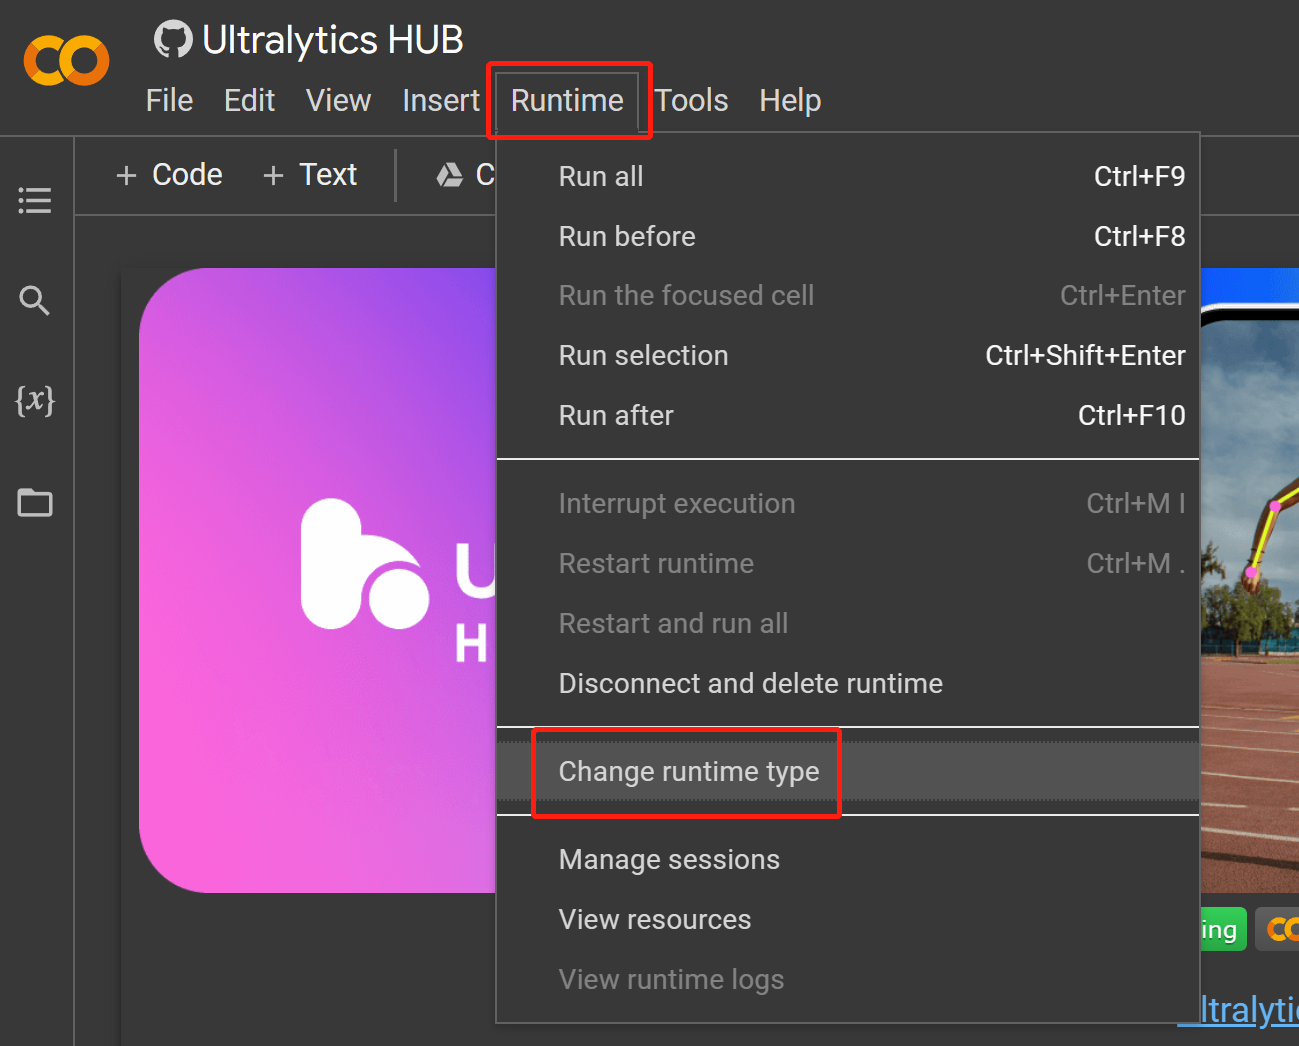
- Step 17 Navigate to
Runtime > Change runtime type
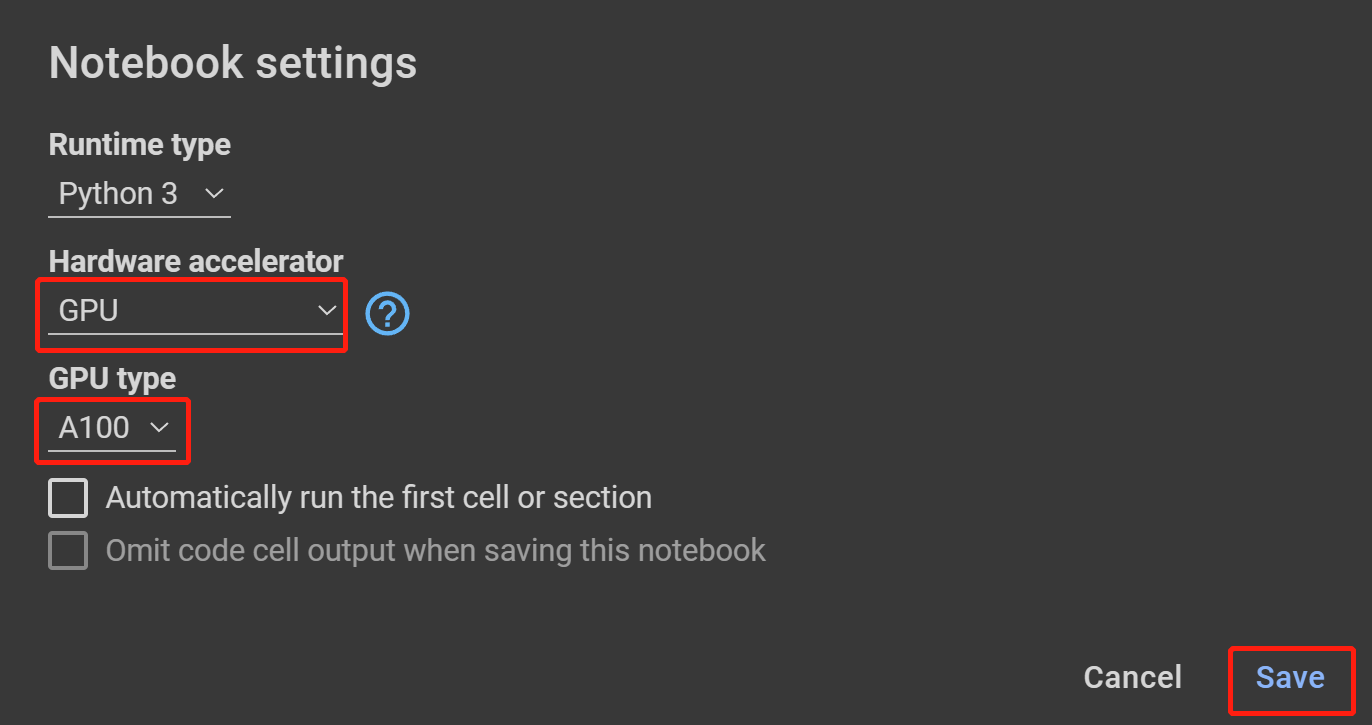
- Step 18 Select GPU under Hardware accelerator, the highest available under GPU type and click Save
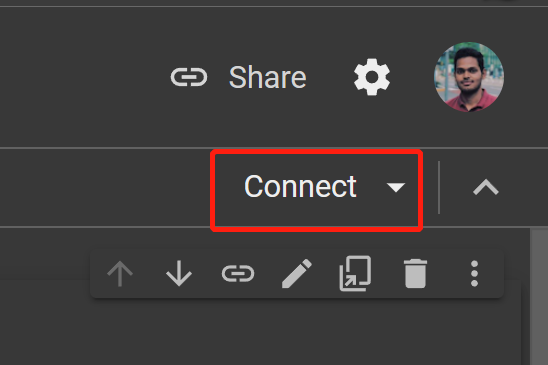
- Step 19 Click Connect
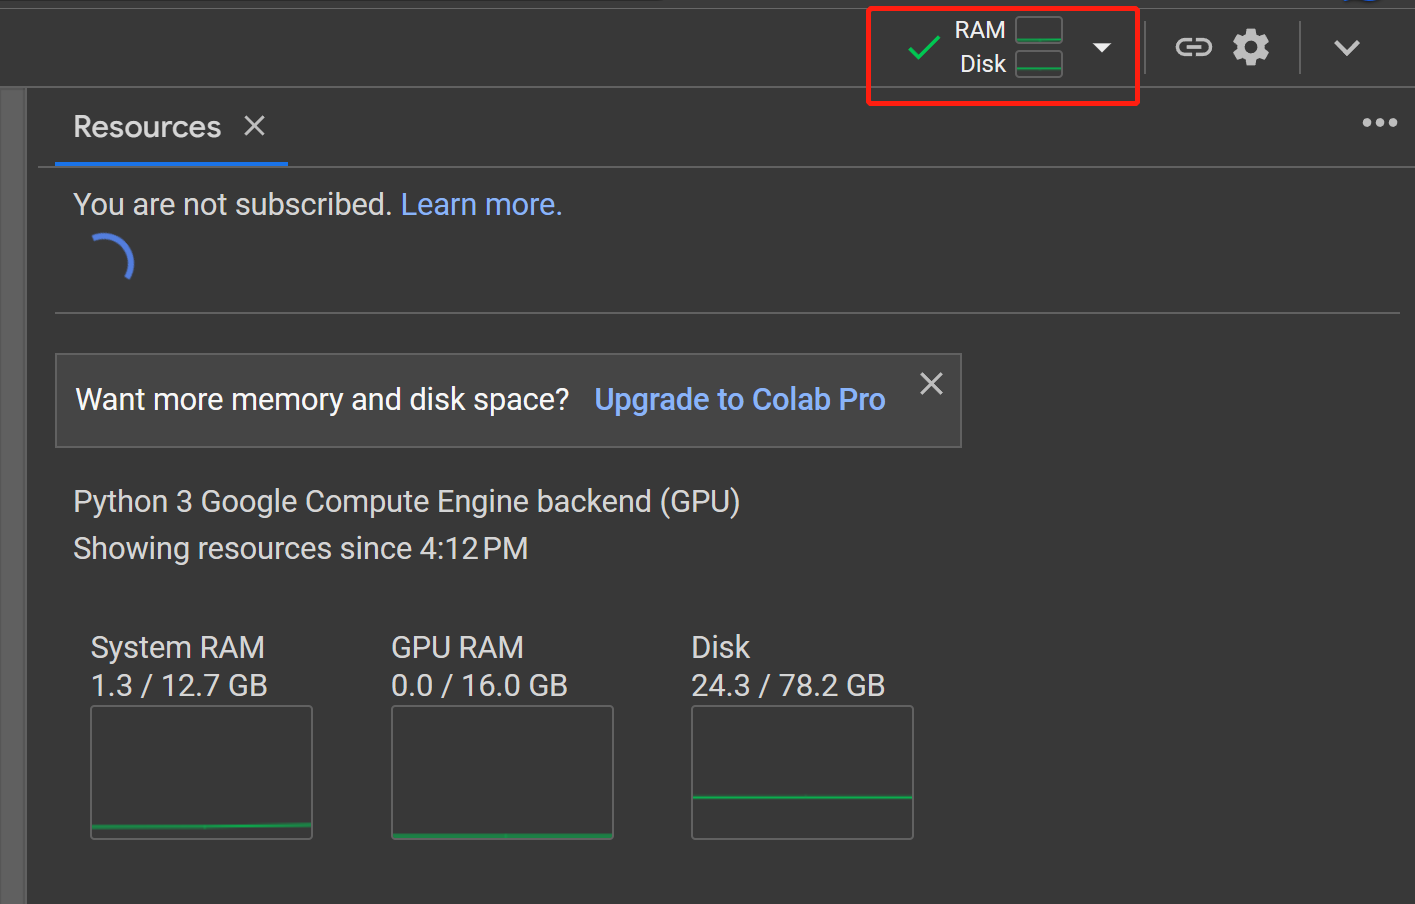
- Step 20 Click on RAM, Disk button to check the hardware resource usage
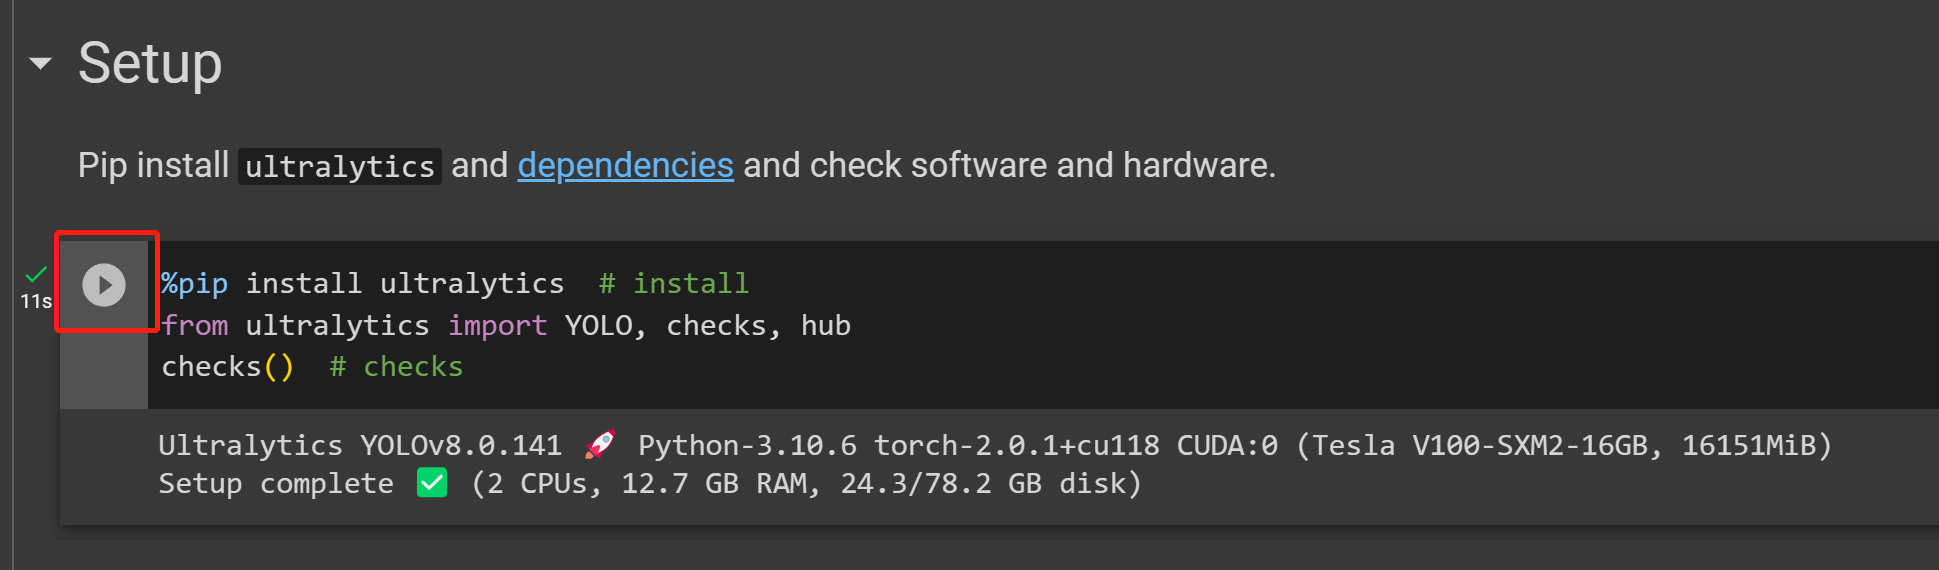
- Step 21 Click on the Play button to run the first code cell
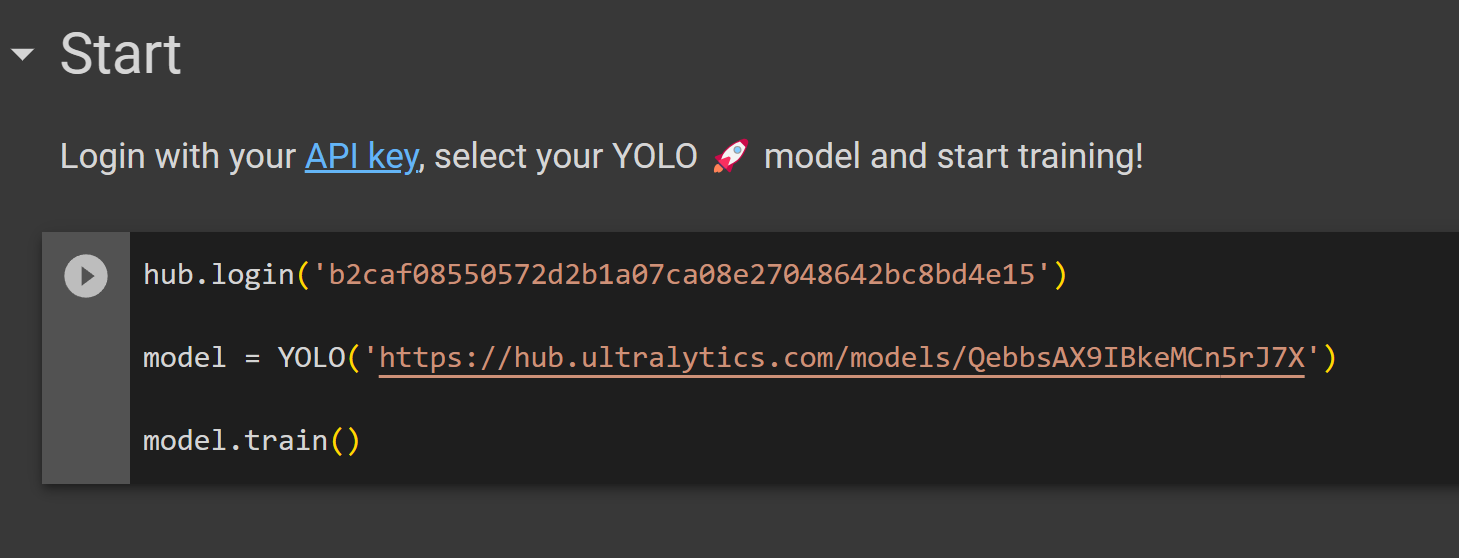
- Step 22 Paste the code cell we copied from Ultralytics HUB before under the Start section and run it to start training
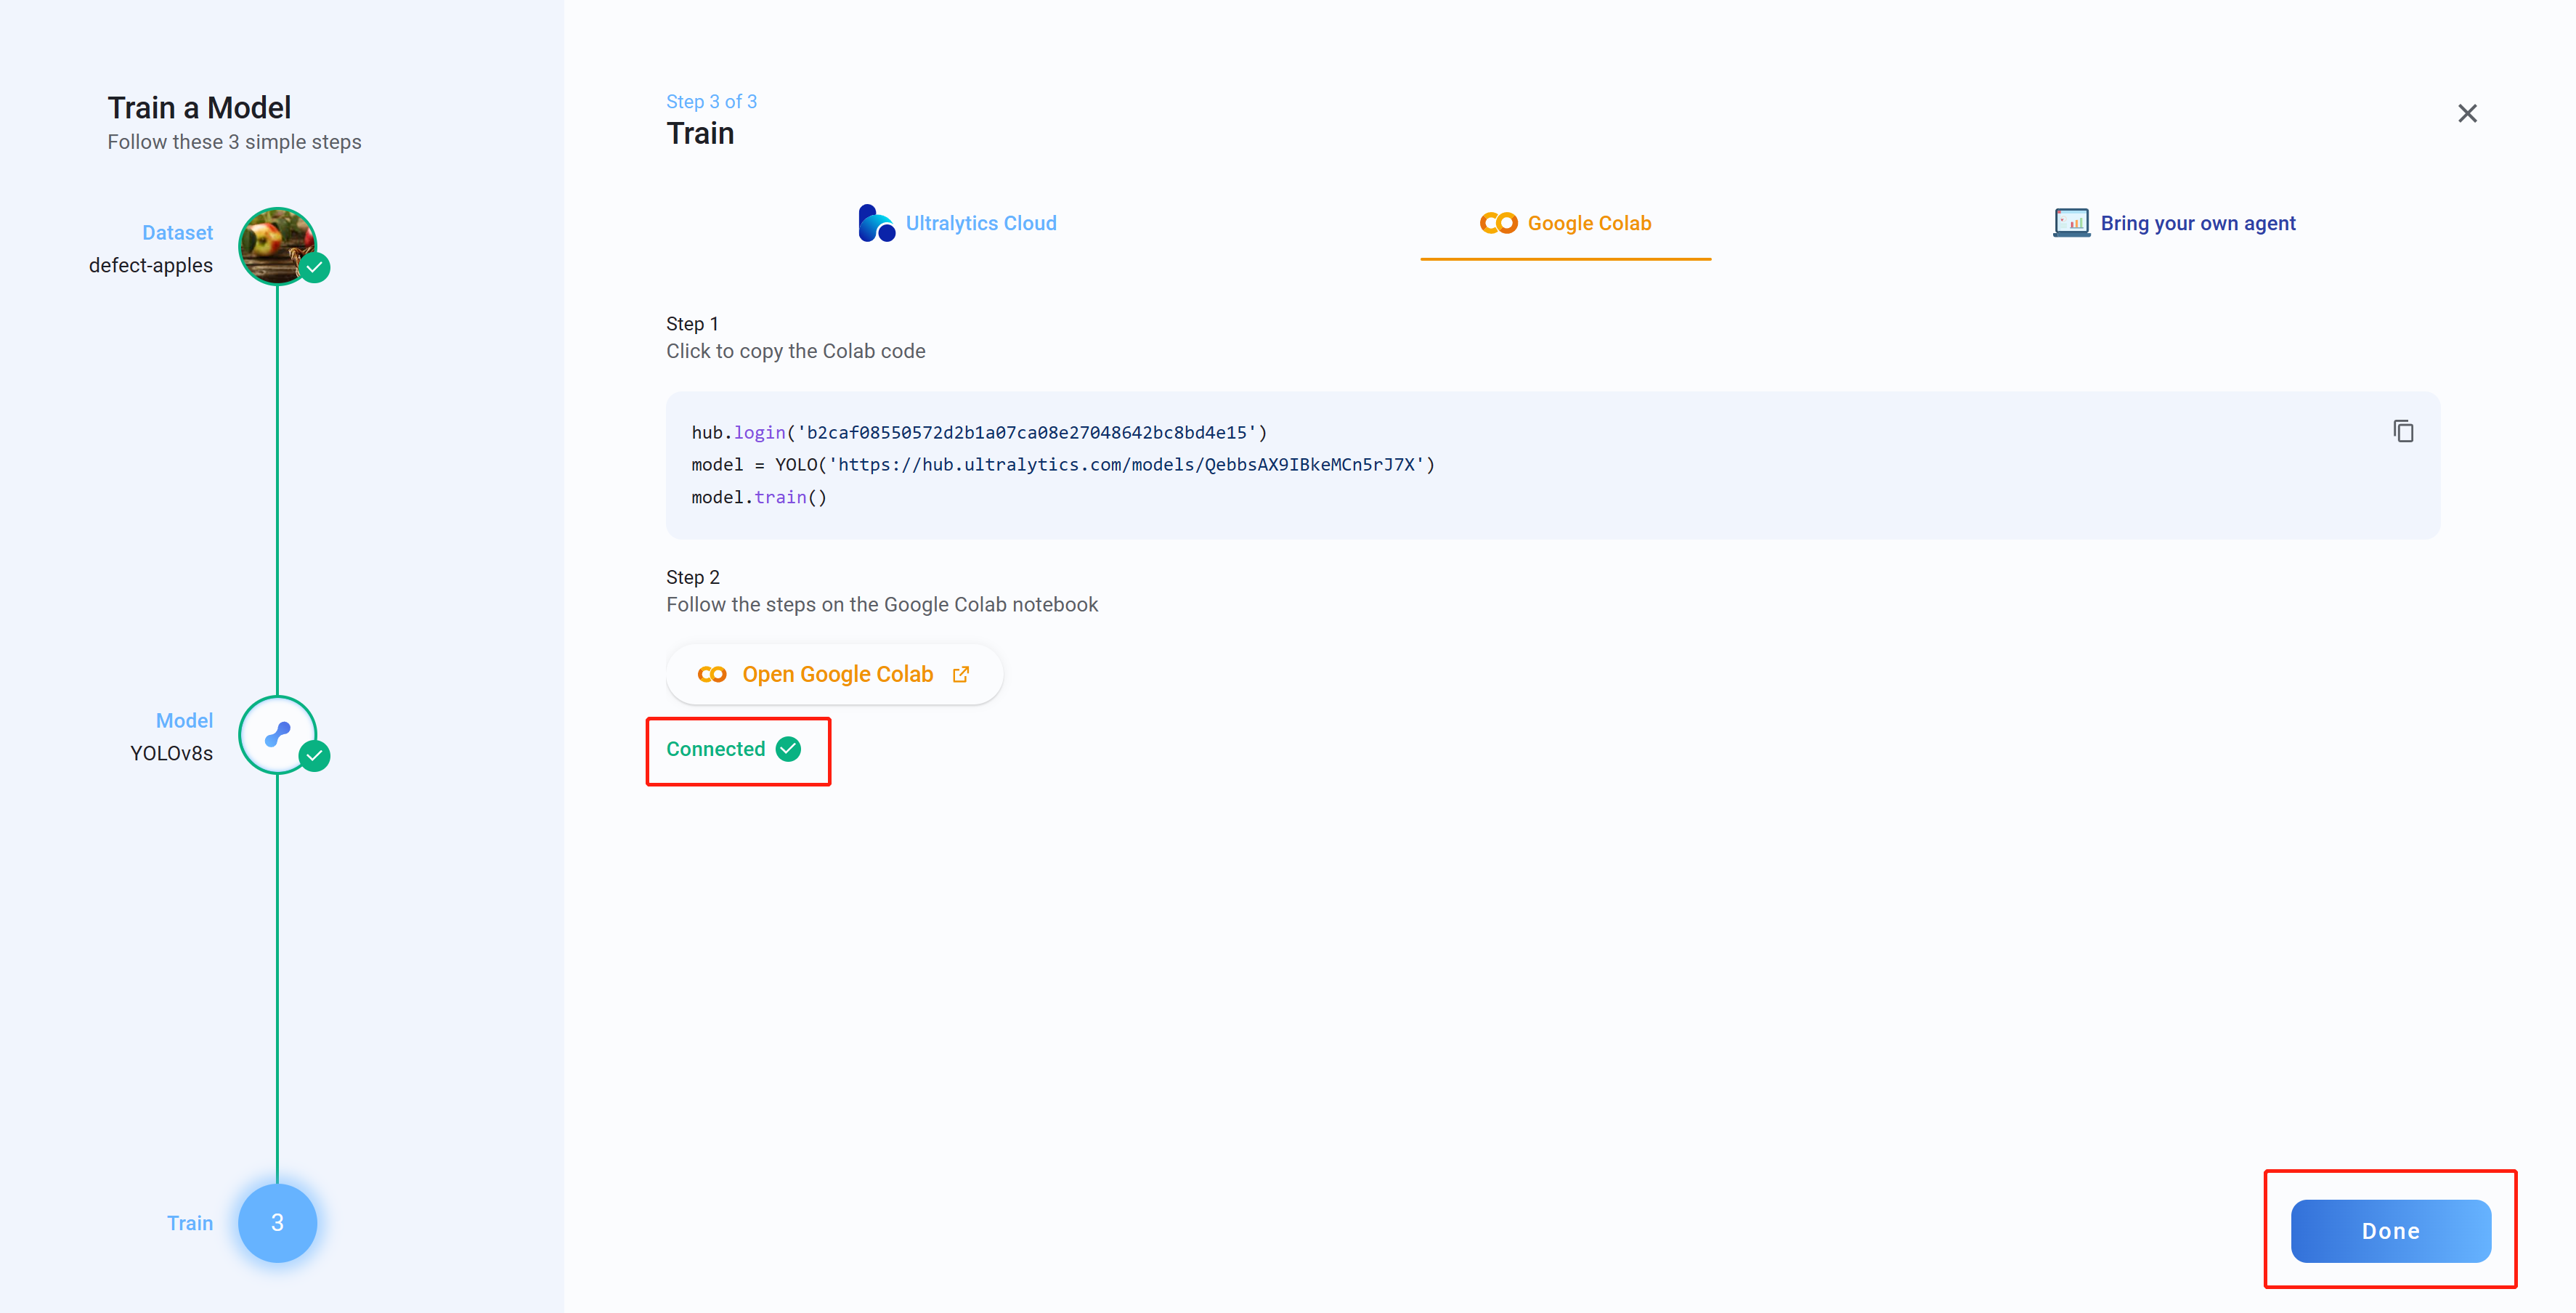
- Step 23 Now if you go back to Ultralytics HUB, you will see the message Connected. Click Done
- Step 24 Here you will see Box Loss, Class Loss and Object Loss in real-time as the model is training on Google Colab

- Step 25 After the training is finished, you will see the following output on Google Colab

- Step 26 Now go back to Ultralytics HUB, go to Preview tab and upload a test image to check how the trained model is performing
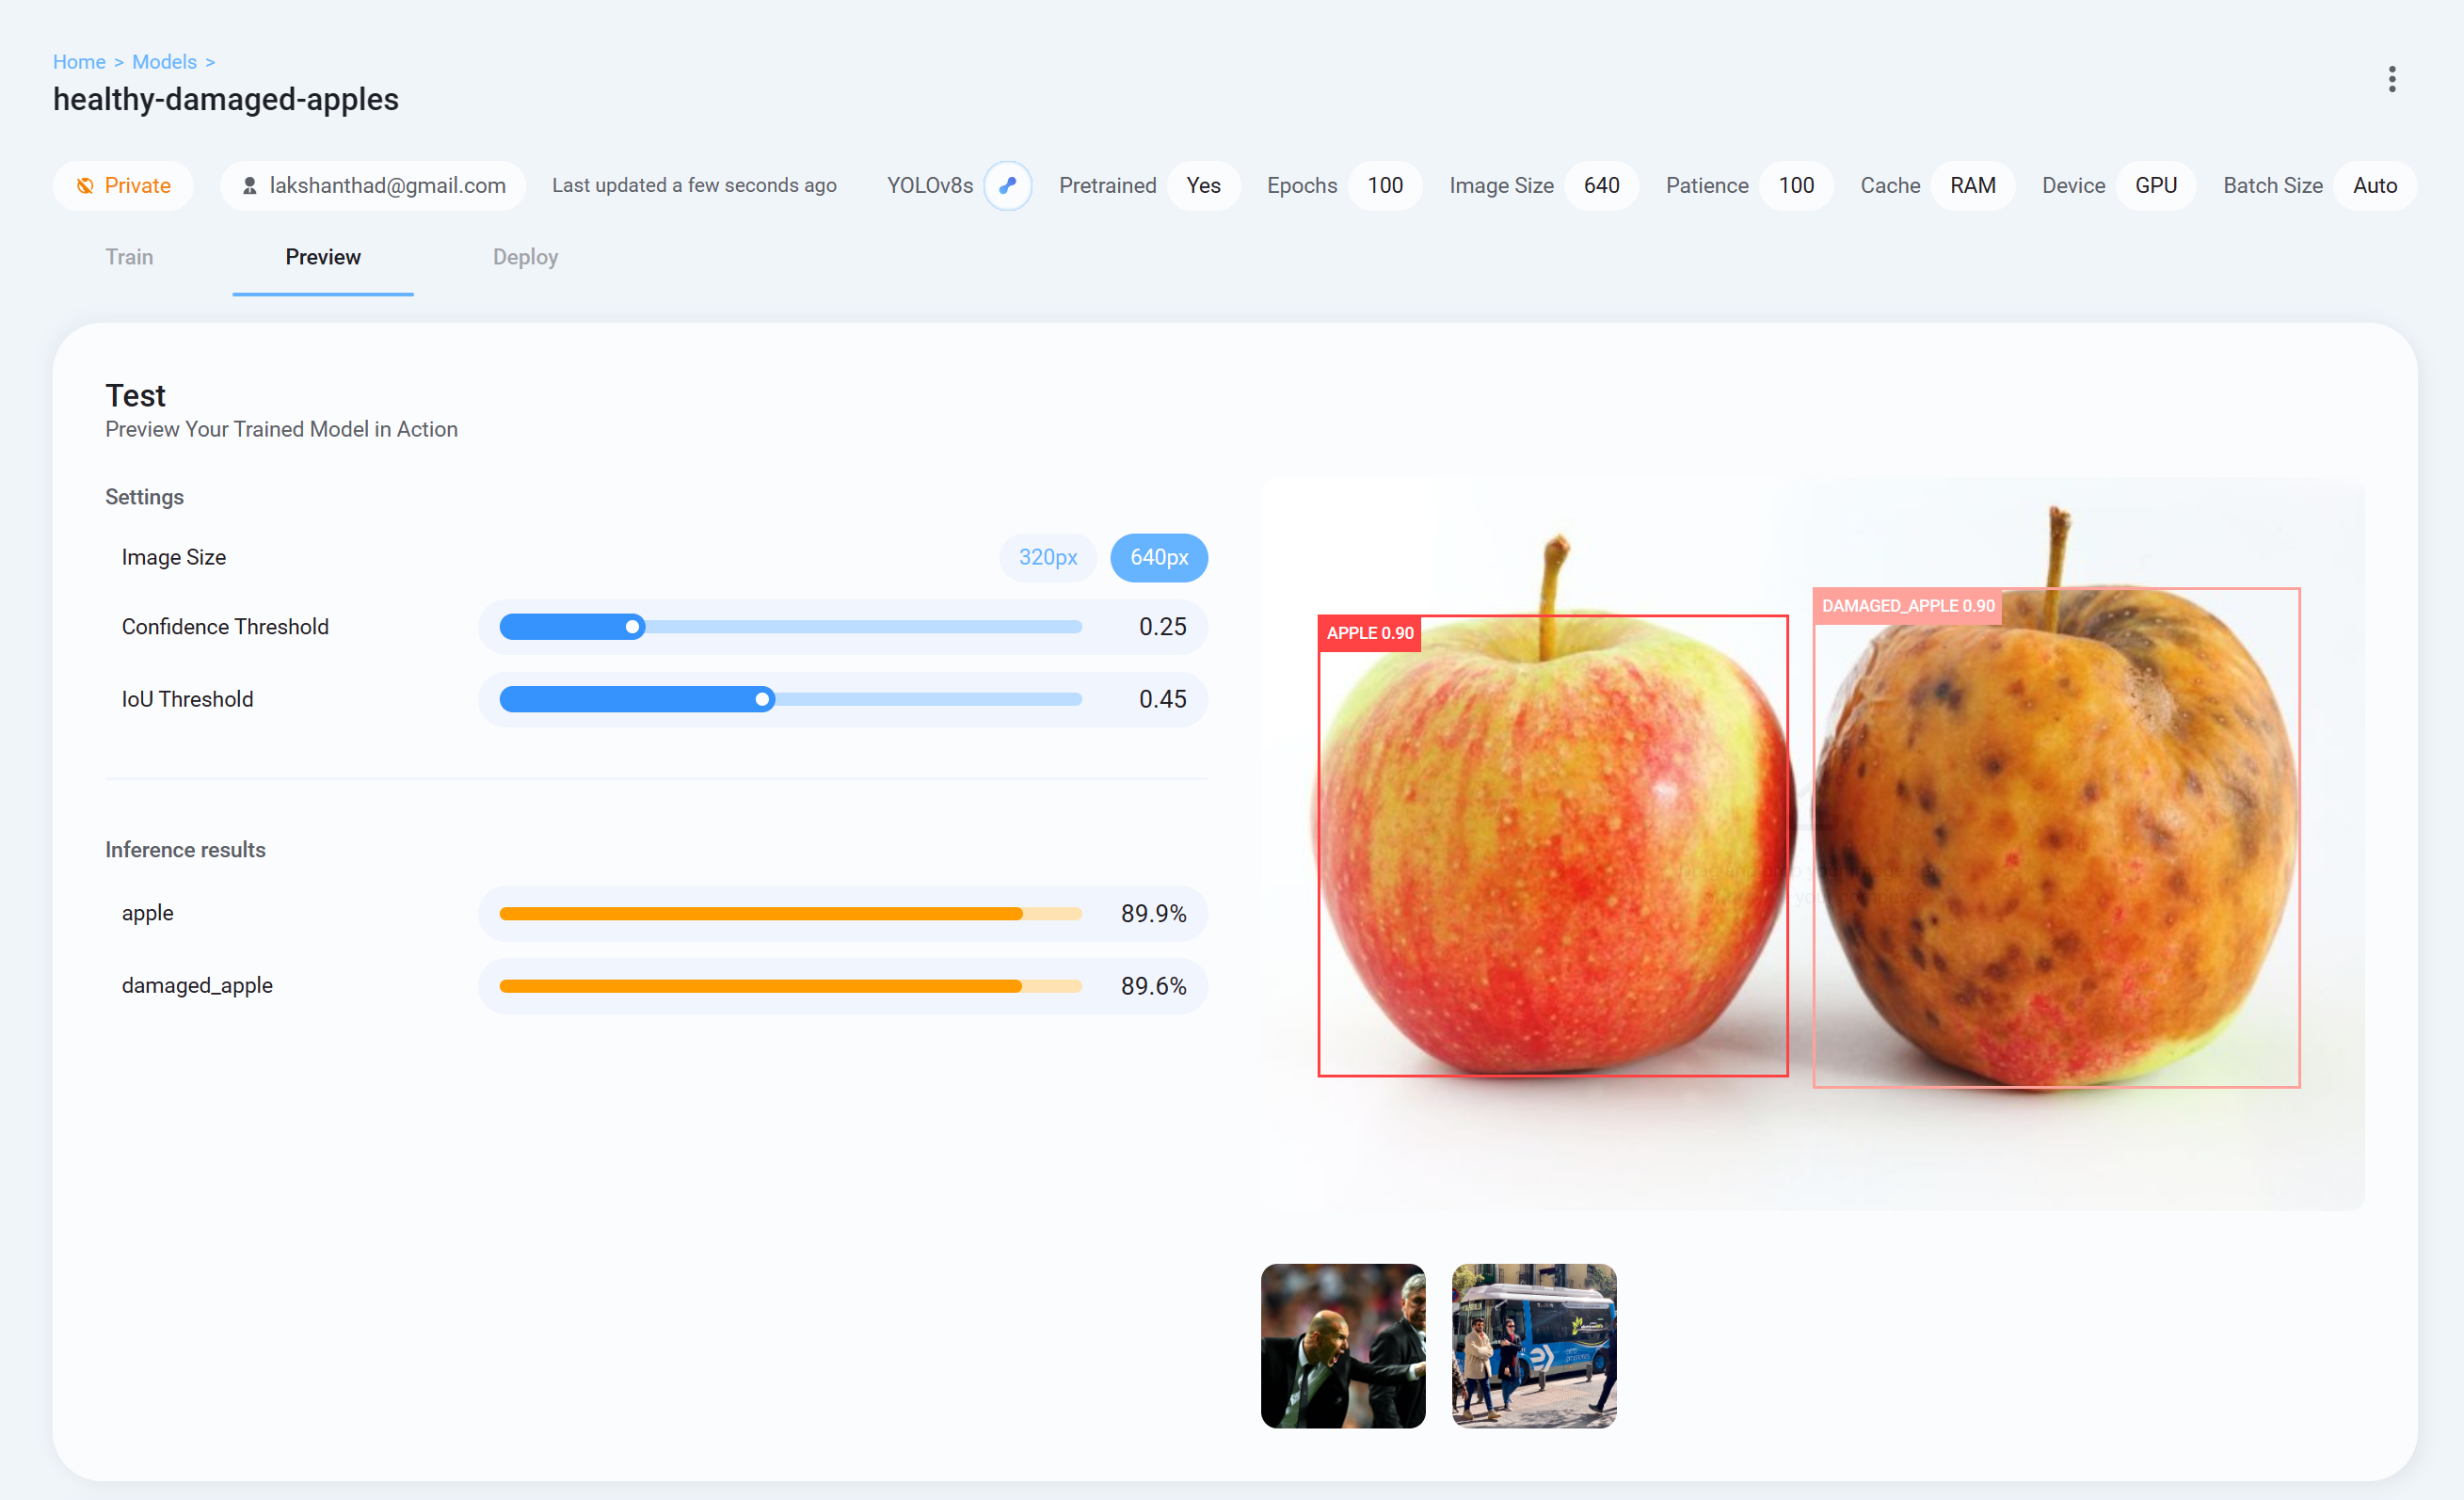
- Step 26 Finally go to Deploy tab and download the trained model in the format you prefer to inference with YOLOv8. Here we have chosen PyTorch.
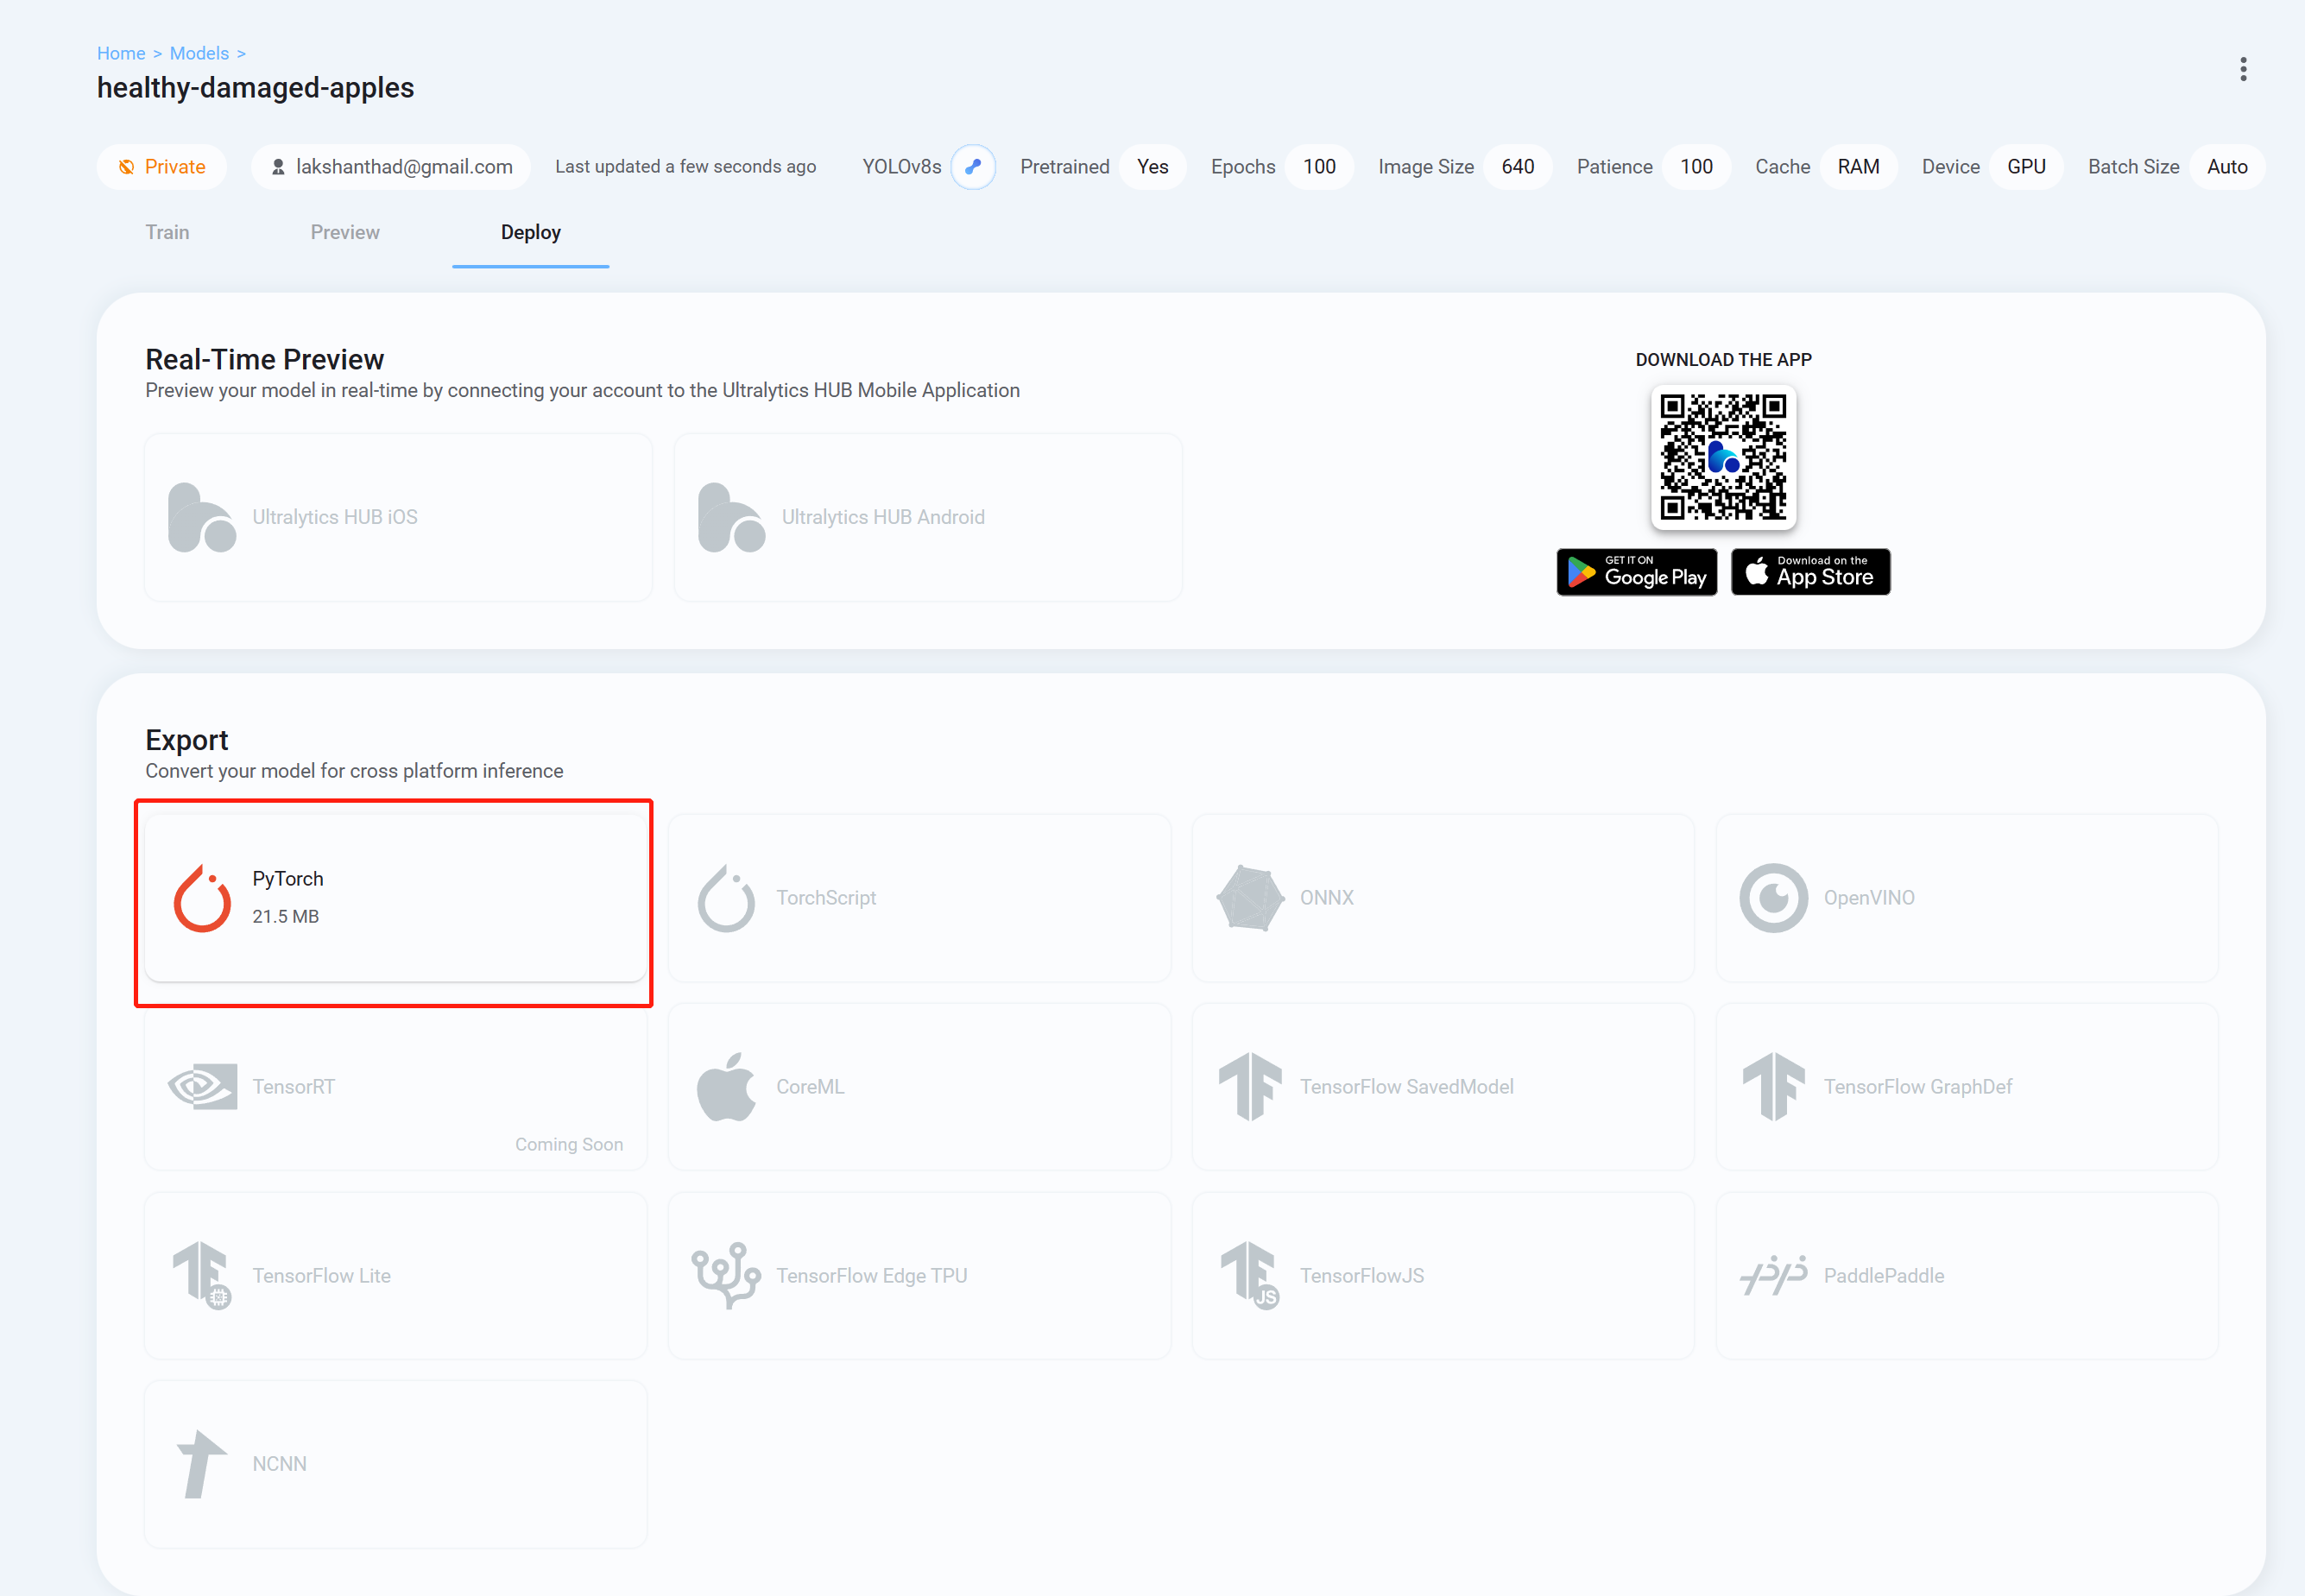
Now you can use this downloaded model with the tasks that we have explained in this wiki before. You just need to replace the model file with your model.
For example:
yolo detect predict model=<your_model.pt> source='0' show=True
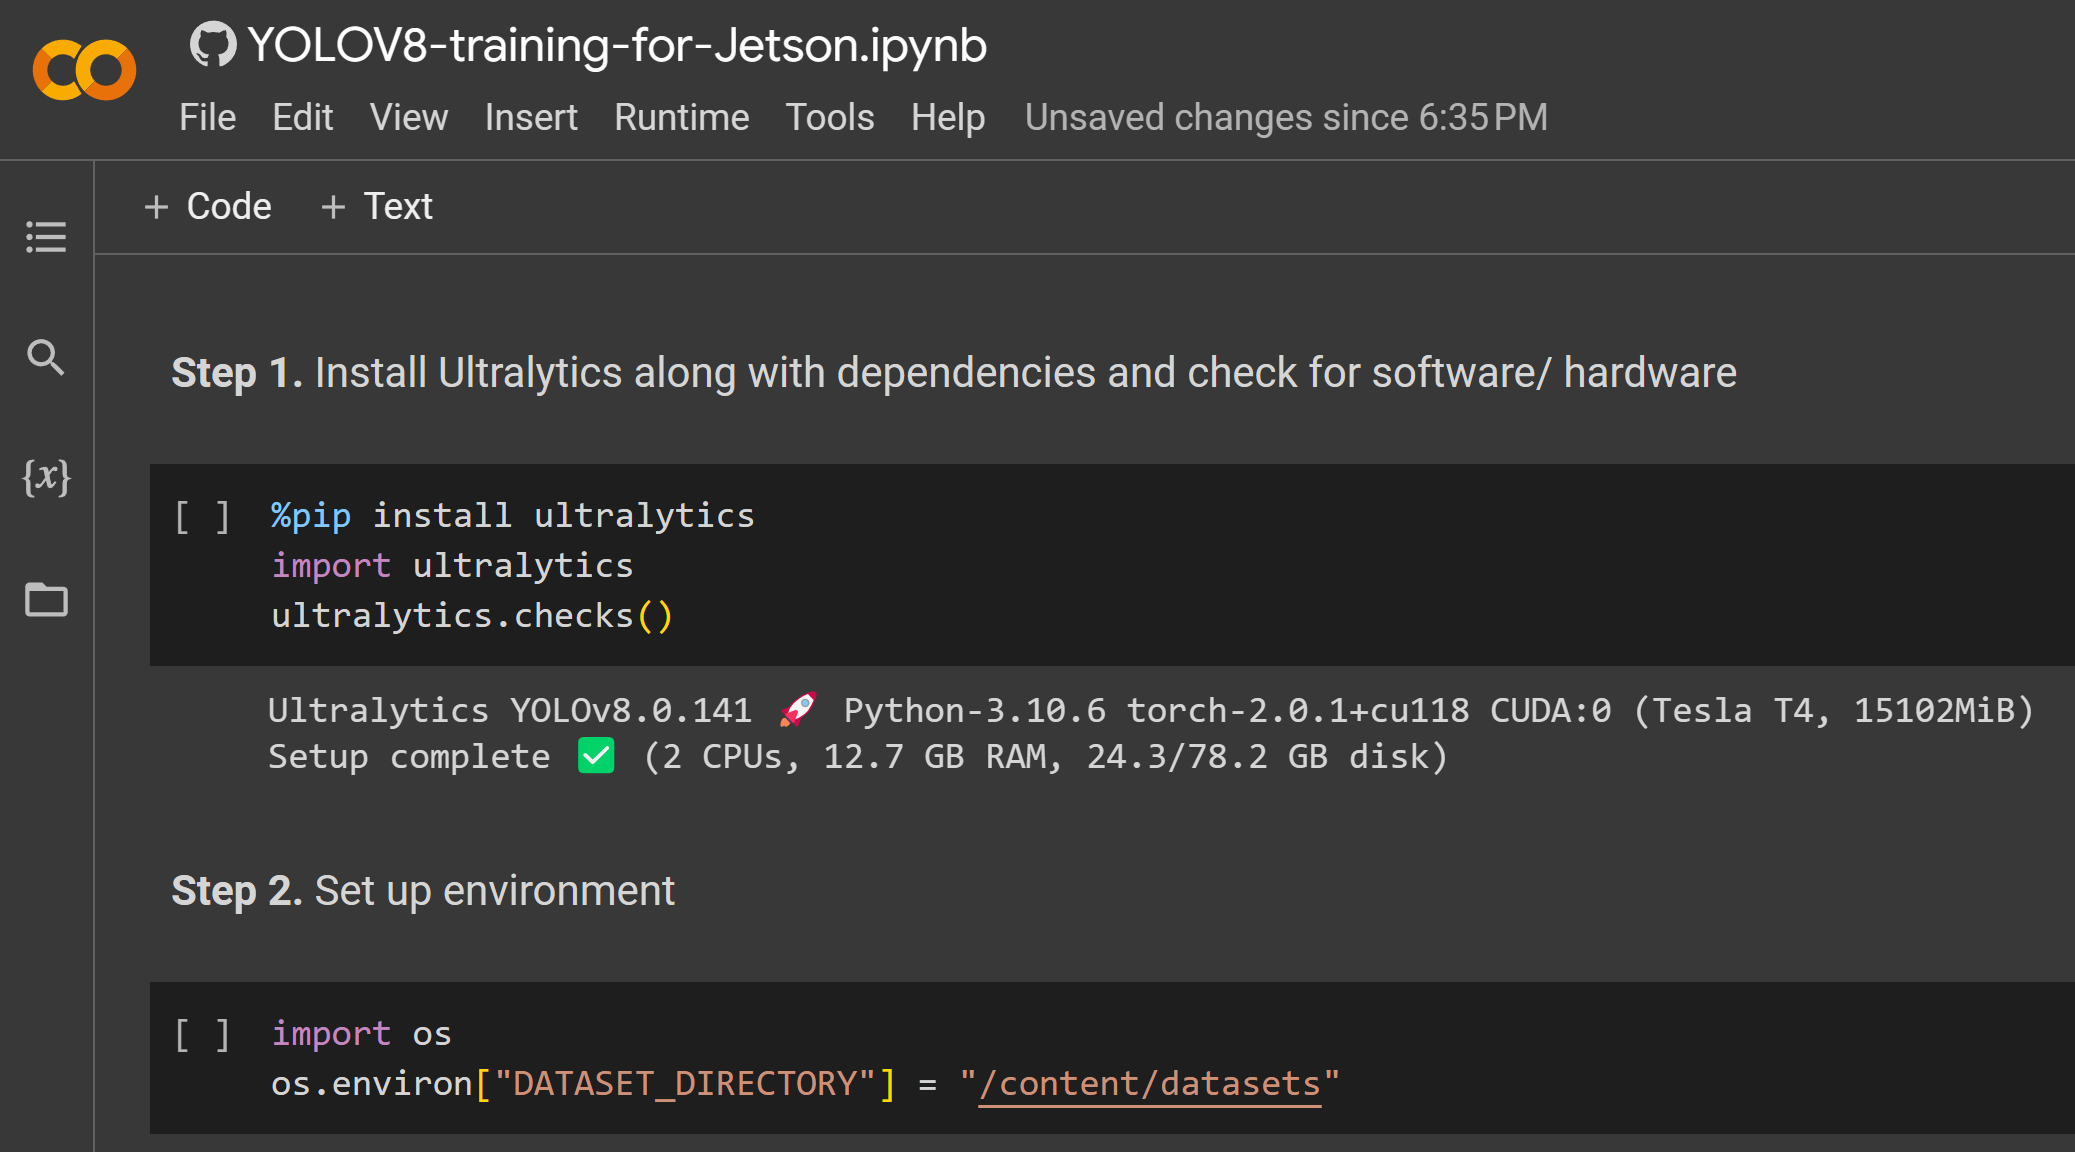
Here we use a Google Colaboratory environment to perform training on the cloud. Furthermore, we use Roboflow api within Colab to easily download our dataset.
- Step 1. Click here to open an already prepared Google Colab workspace and go through the steps mentioned in the workspace
After the training is done, you will see an output as follows:
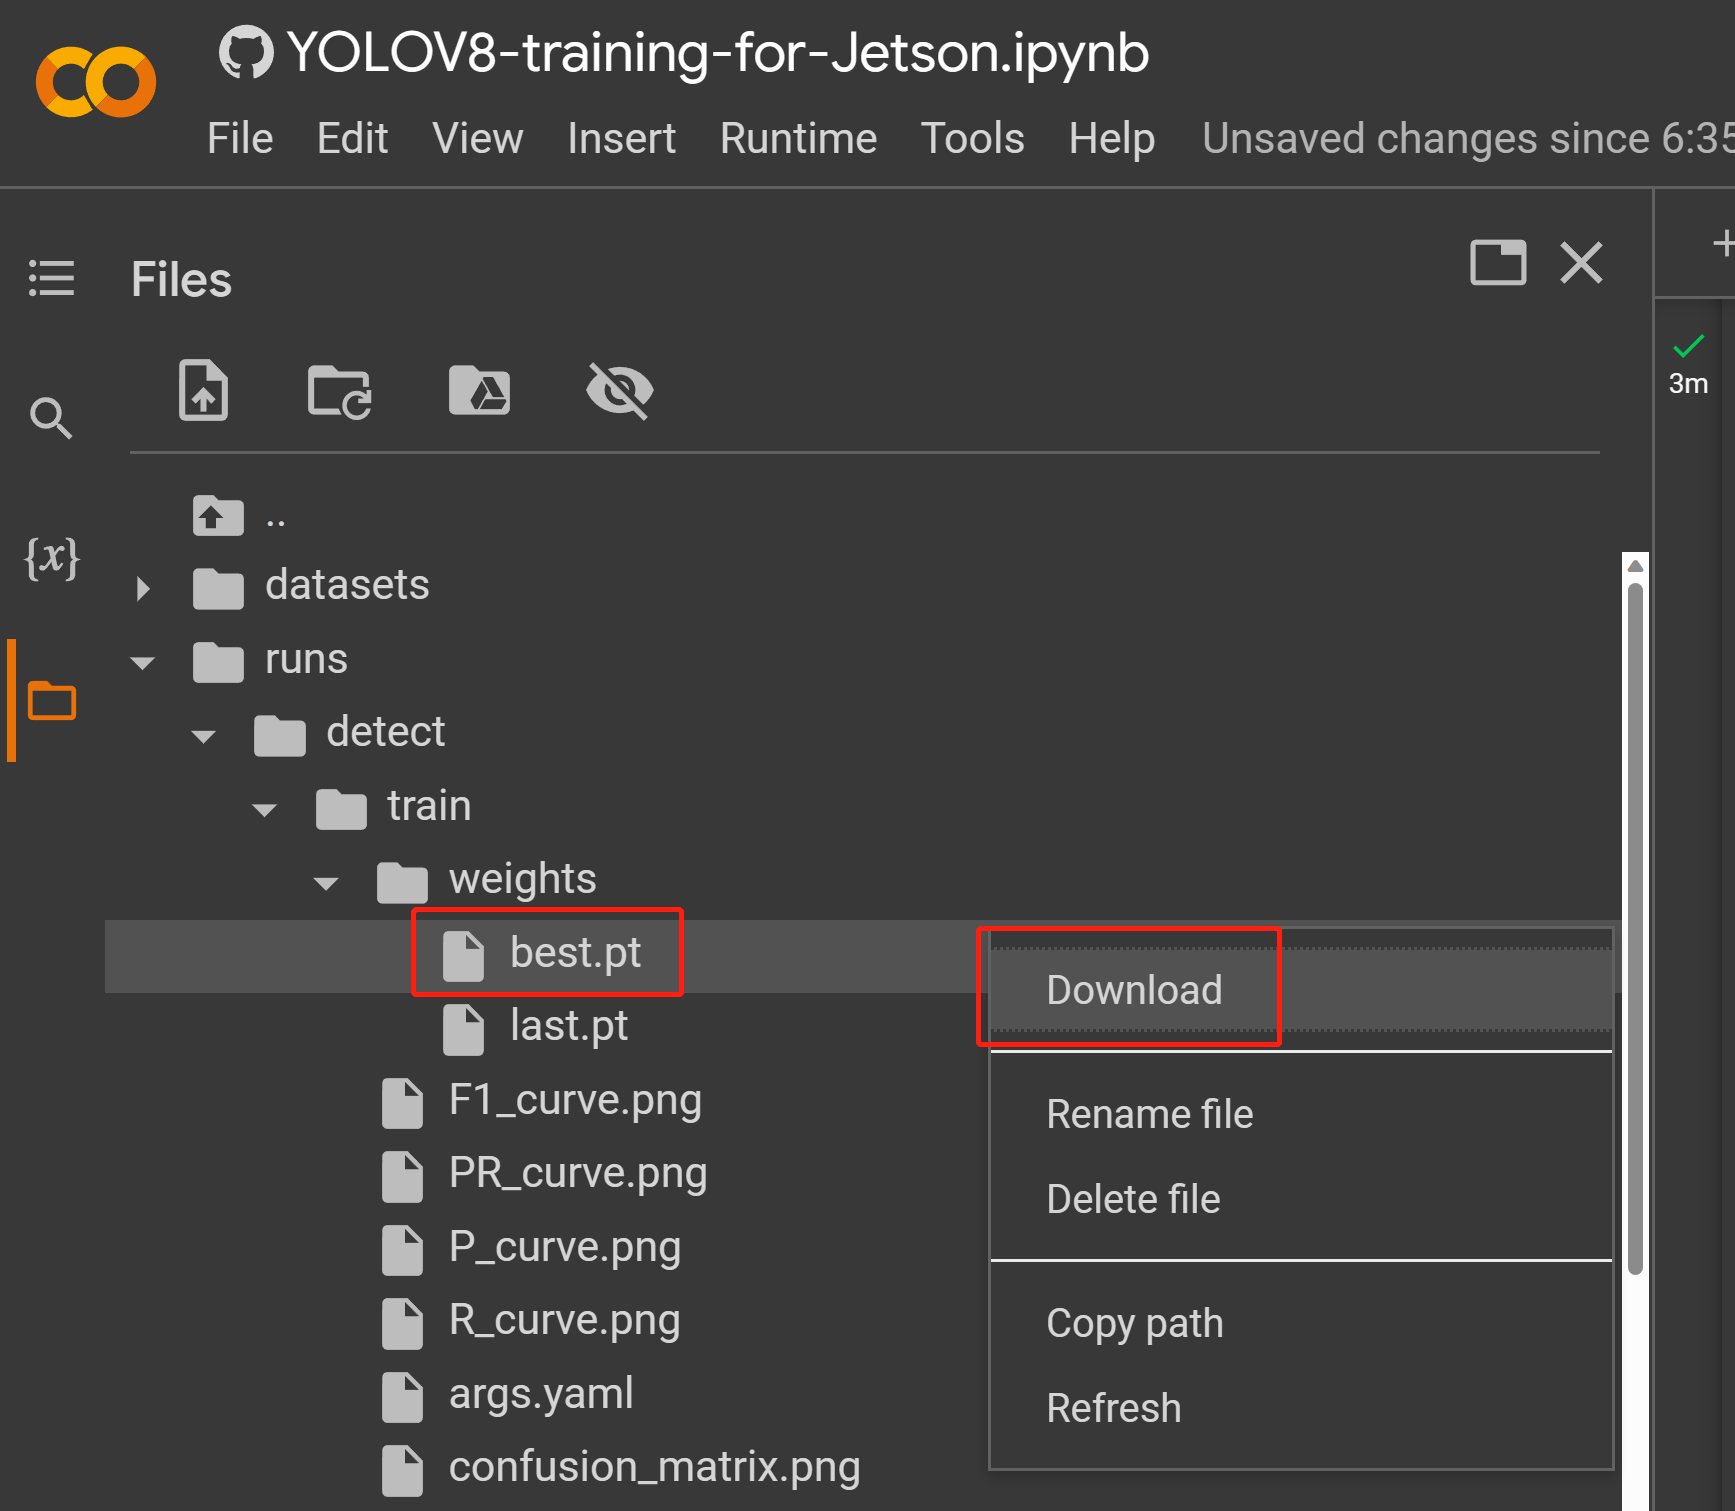
- Step 2. Under Files tab, if you navigate to
runs/train/exp/weights, you will see a file called best.pt. This is the generated model from training. Download this file and copy to your Jetson device because this is the model we are going to use later for inferencing on the Jetson device.
Now you can use this downloaded model with the tasks that we have explained in this wiki before. You just need to replace the model file with your model.
For example:
yolo detect predict model=<your_model.pt> source='0' show=True
Here you can use a PC with a Linux OS for training. We have used an Ubuntu 20.04 PC for this wiki.
- Step 1. Install pip if you do not have pip in your system
sudo apt install python3-pip -y
- Step 2. Install Ultralytics along with dependencies
pip install ultralytics
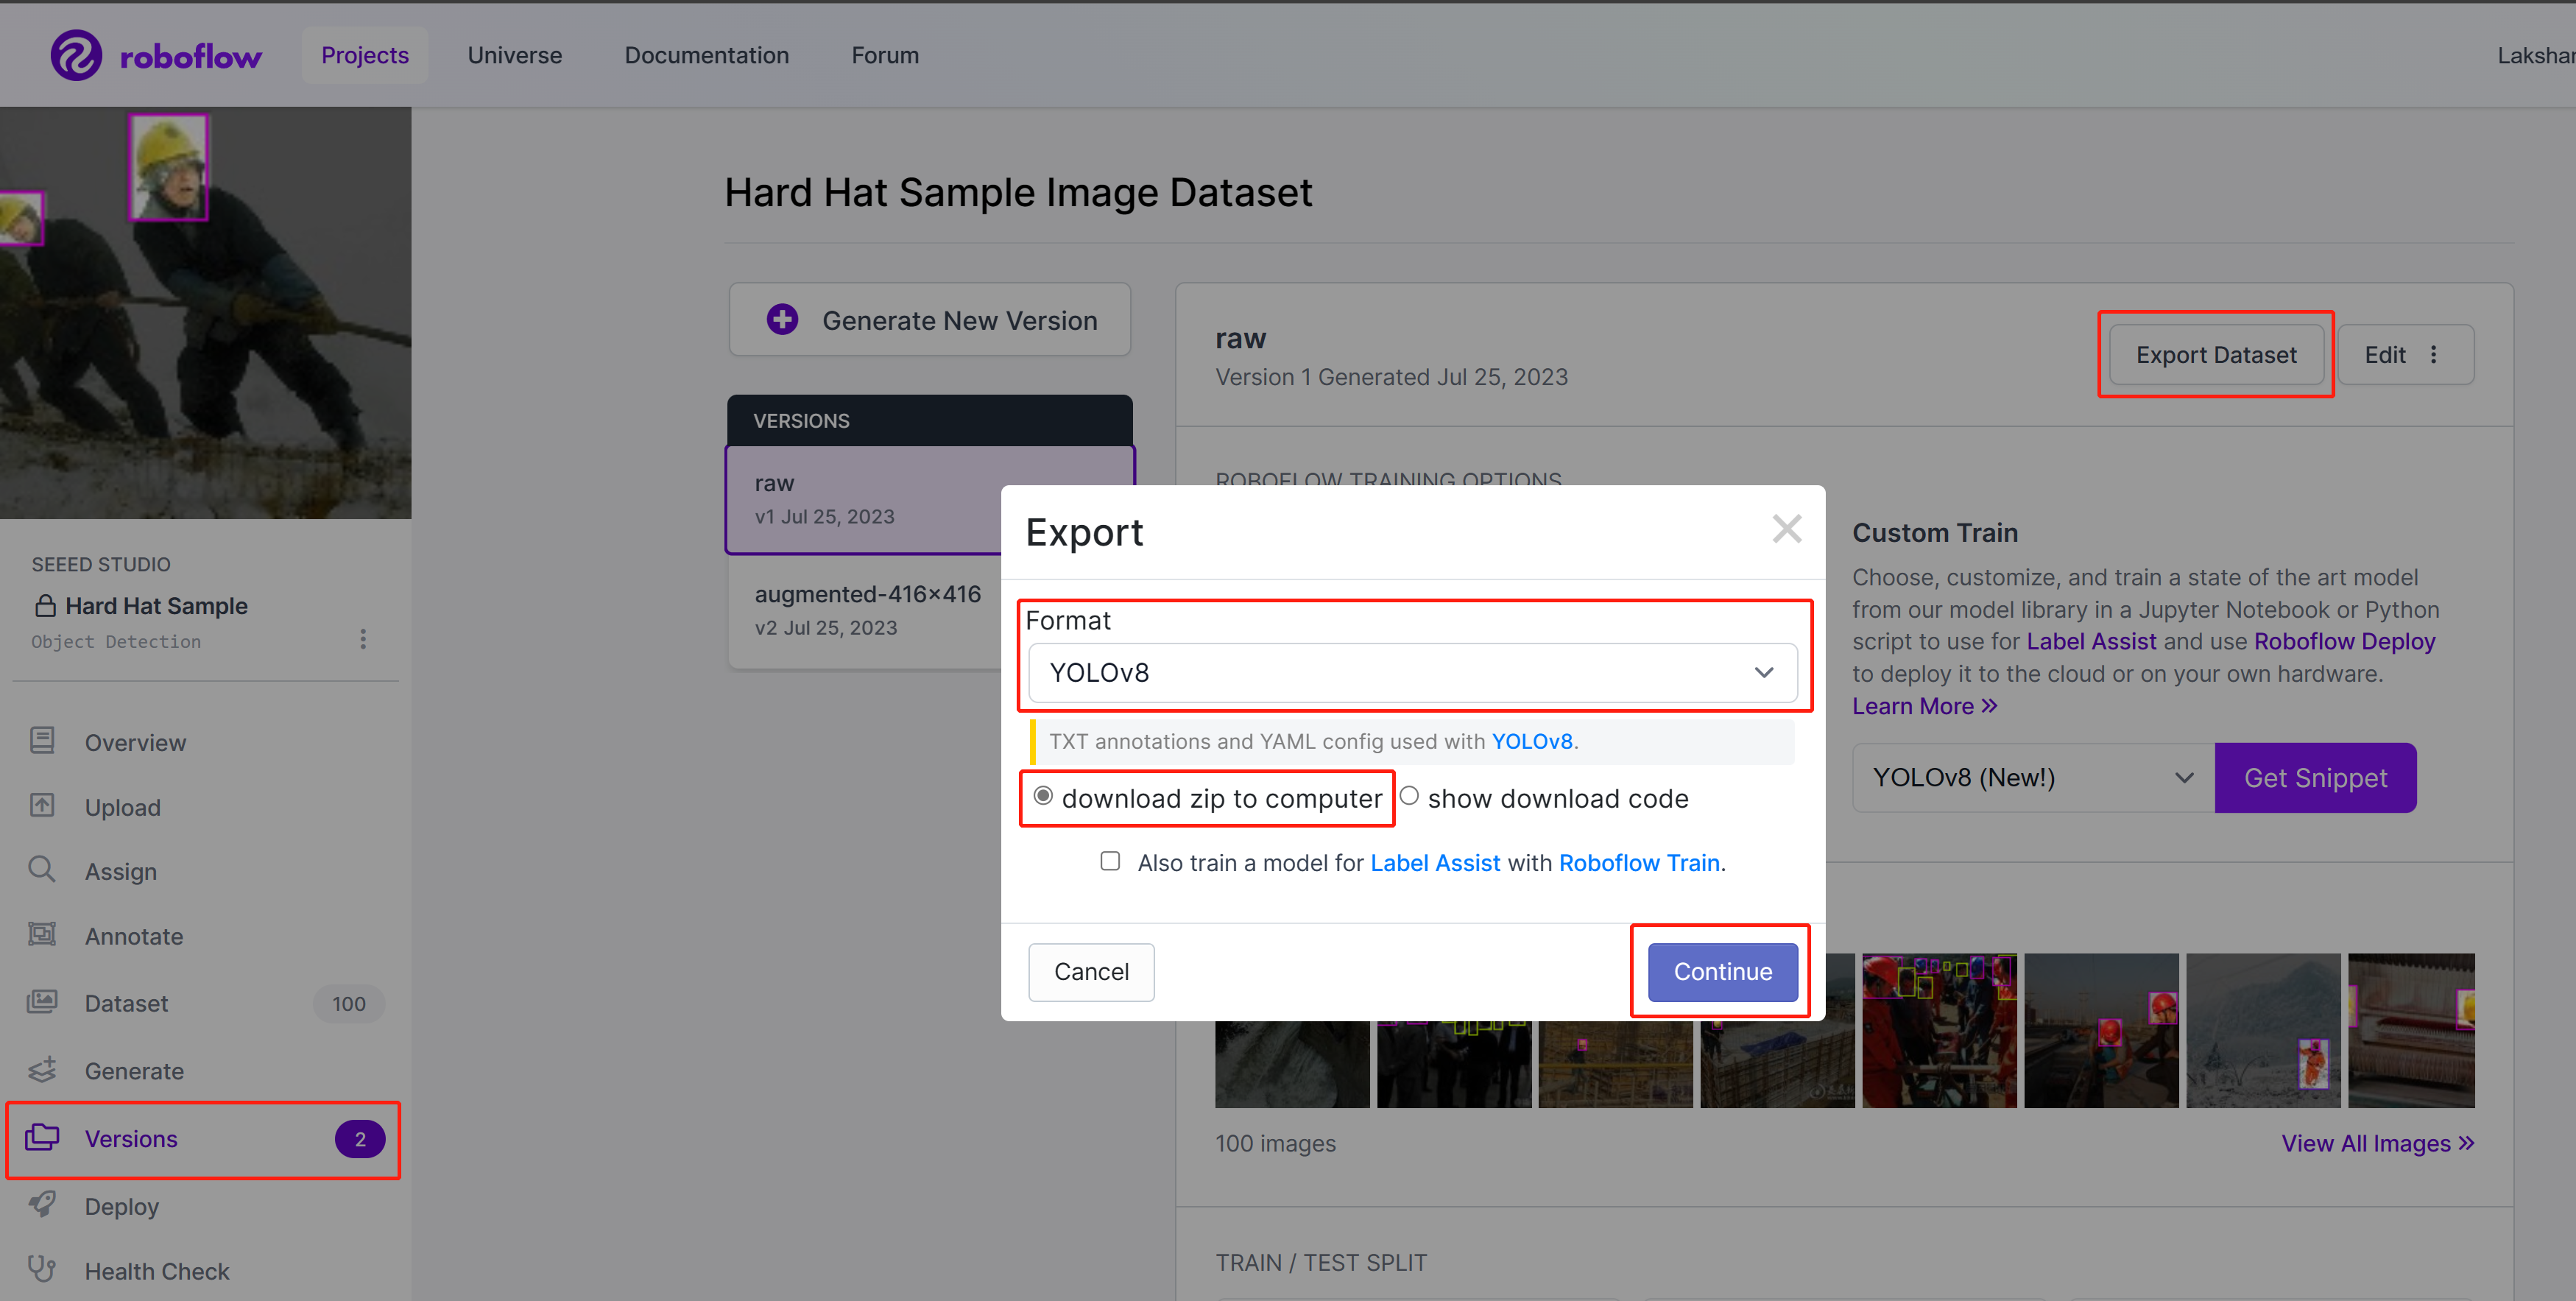
- Step 3. On Roboflow, inside your project, go to Versions, select Export Dataset, select Format as YOLOv8, choose download zip to computer and click Continue
-
Step 4. Extract the downloaded zip file
-
Step 5. Execute the following to start training. Here you need to replace path_to_yaml with the .yaml file location which is inside the extracted zip file before
yolo train data=<path_to_yaml> model=yolov8s.pt epochs=100 imgsz=640 batch=-1
Here the image size is set to 640x640. We use batch-size as -1 because that will automatically determine the best batch size. You can also change epoch according to your preference. Here you can change the pre-trained model to any detect, segment, classify, pose model.
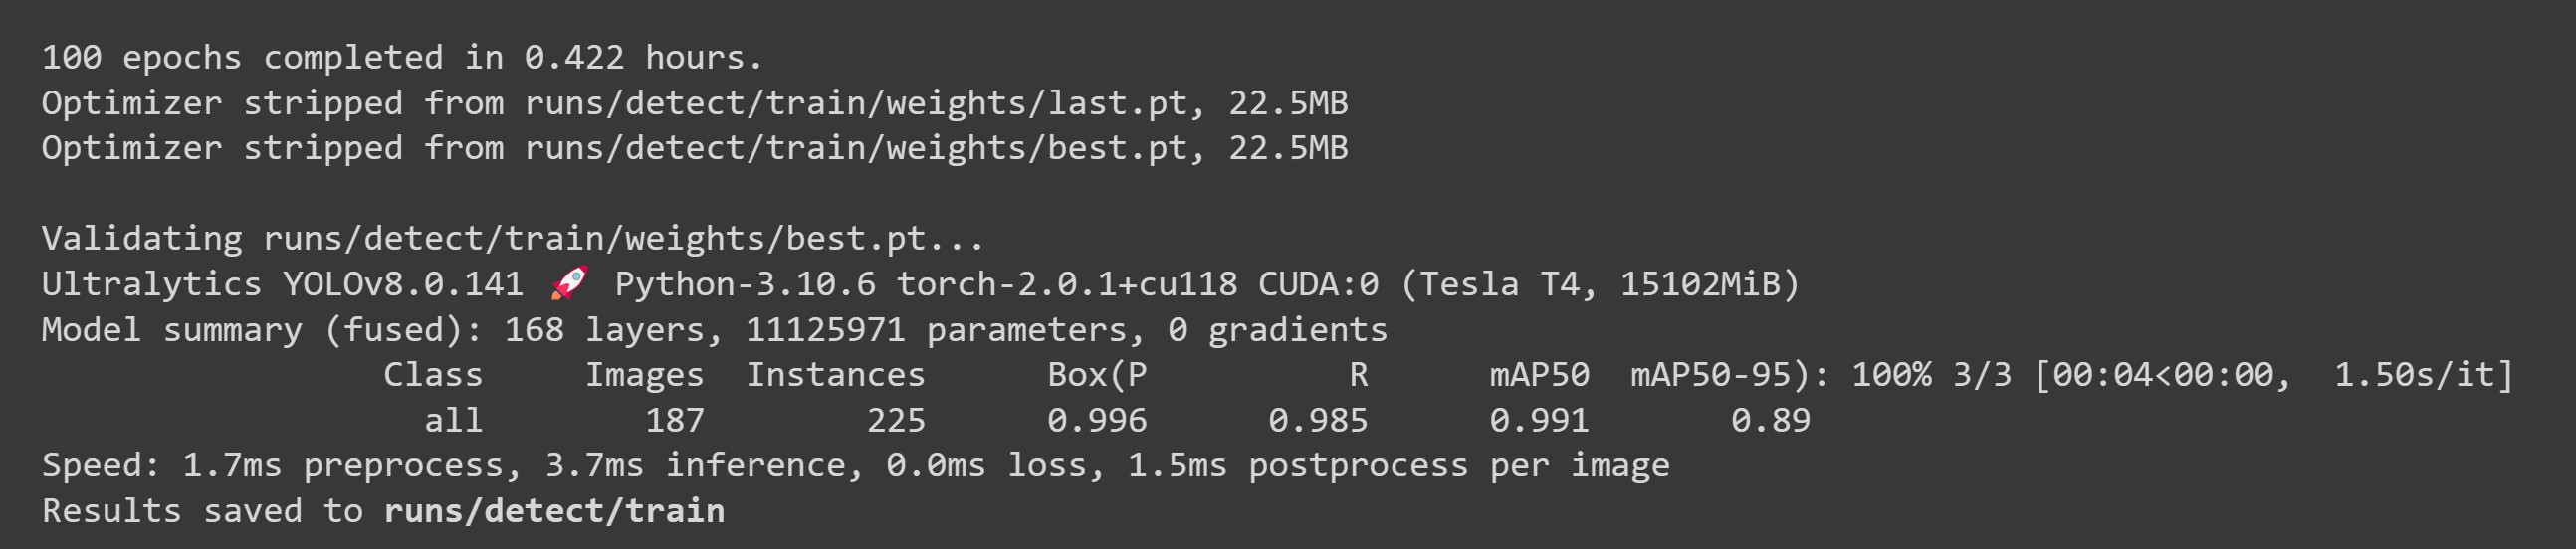
After the training is done, you will see an output as follows:
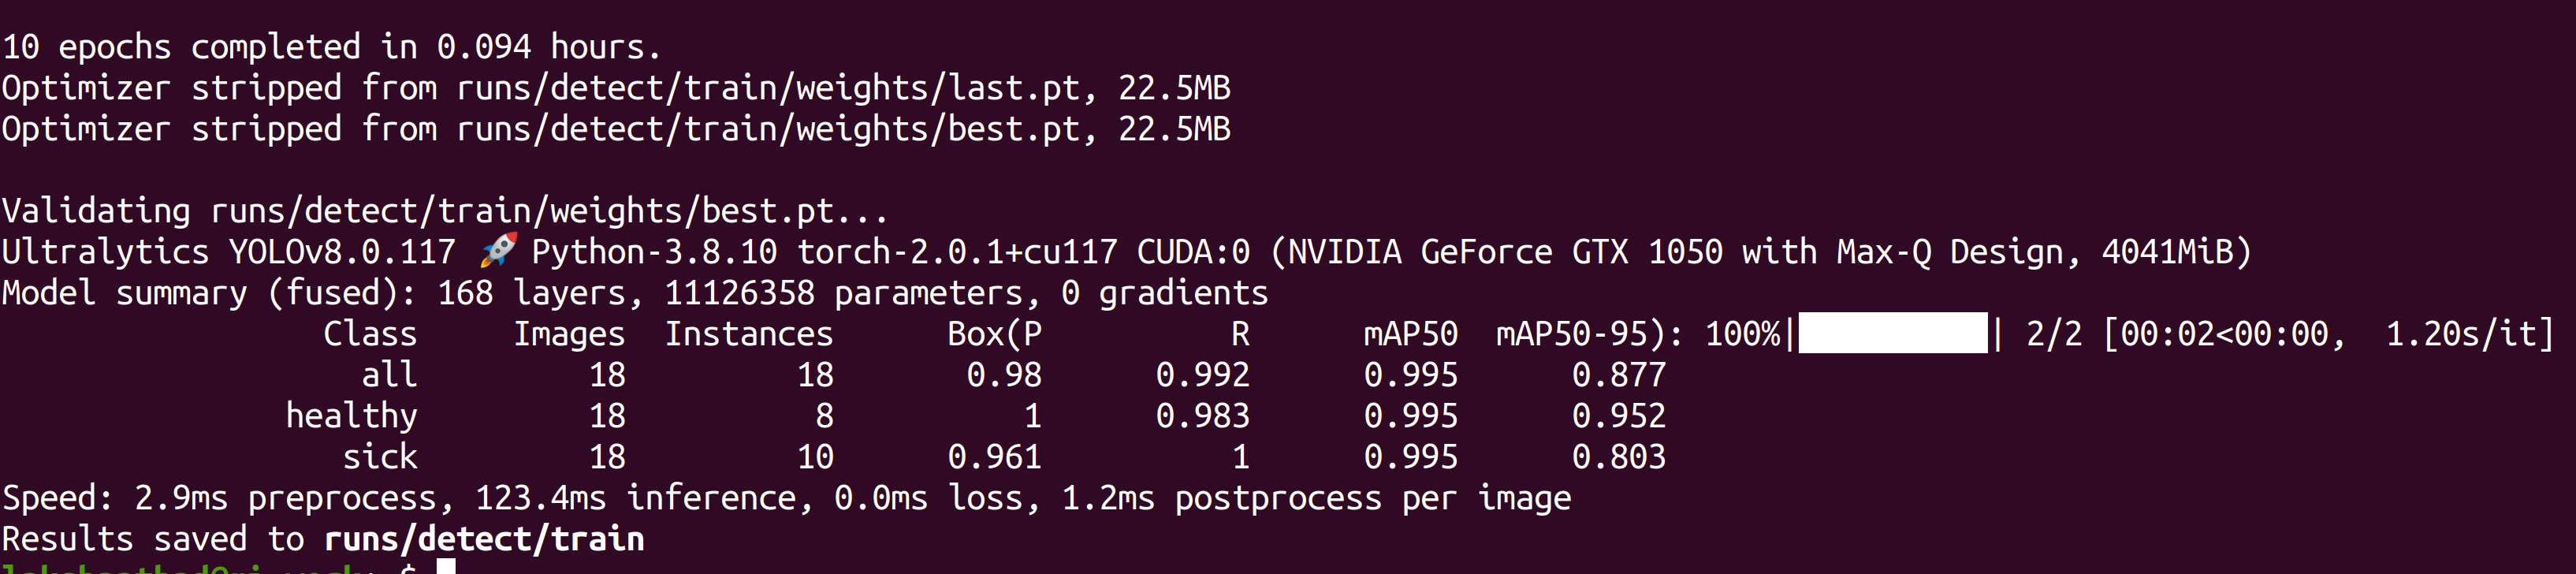
- Step 6. Under runs/detect/train/weights, you will see a file called best.pt. This is the generated model from training. Download this file and copy to your Jetson device because this is the model we are going to use later for inferencing on the Jetson device.

Now you can use this downloaded model with the tasks that we have explained in this wiki before. You just need to replace the model file with your model.
For example:
yolo detect predict model=<your_model.pt> source='0' show=True
Performance Benchmarks
Preparation
We have done performance benchmarks for all computer vision tasks supported by YOLOv8 running on reComputer J4012/ reComputer Industrial J4012 powered by NVIDIA Jetson Orin NX 16GB module.
Included in the samples directory is a command-line wrapper tool called trtexec. trtexec is a tool to use TensorRT without having to develop your own application. The trtexec tool has three main purposes:
- Benchmarking networks on random or user-provided input data.
- Generating serialized engines from models.
- Generating a serialized timing cache from the builder.
Here we can use trtexec tool to quickly benchmark the models with different parameter. But first of all, you need to have an onnx model and we can genrate this onnx model by using ultralytics yolov8.
- Step 1. Build ONNX using:
yolo mode=export model=yolov8s.pt format=onnx
- Step 2. Build engine file using trtexec as follows:
cd /usr/src/tensorrt/bin
./trtexec --onnx=<path_to_onnx_file> --saveEngine=<path_to_save_engine_file>
For example:
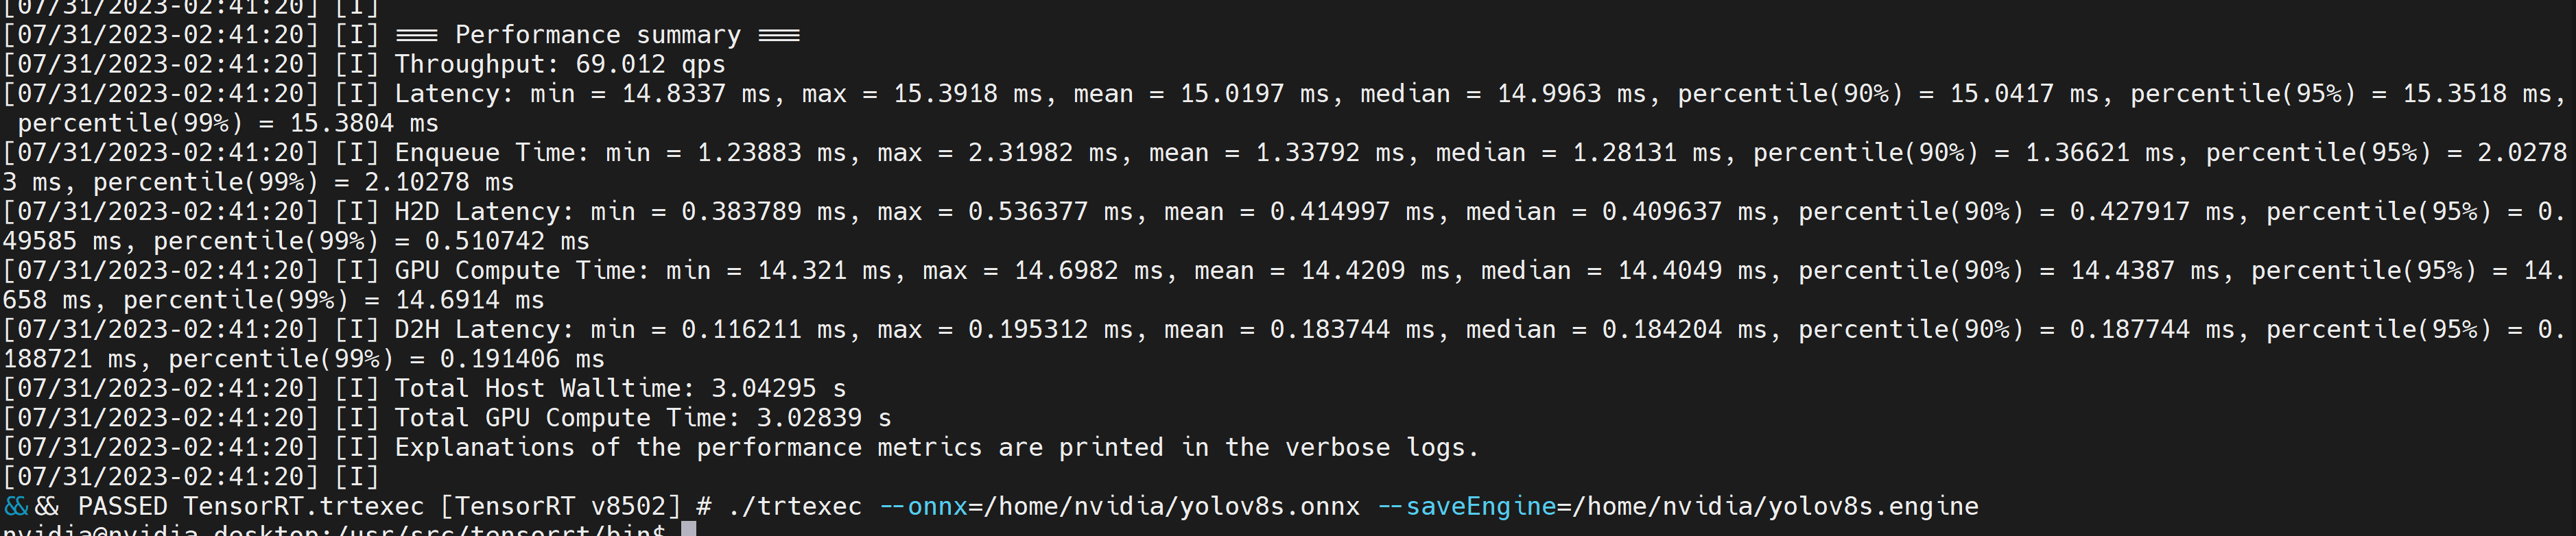
./trtexec --onnx=/home/nvidia/yolov8s.onnx --saveEngine=/home/nvidia/yolov8s.engine
This will output performance results as follows along with a generated .engine file. By default it will convert ONNX to an TensorRT optimized file in FP32 precision and you can see the output as follows
If you want FP16 precision which offers better performance than FP32, you can execute the above command as follows
./trtexec --onnx=/home/nvidia/yolov8s.onnx --fp16 --saveEngine=/home/nvidia/yolov8s.engine
However, if you want INT8 precision which offers better performance than FP16, you can execute the above command as follows
./trtexec --onnx=/home/nvidia/yolov8s.onnx --int8 --saveEngine=/home/nvidia/yolov8s.engine
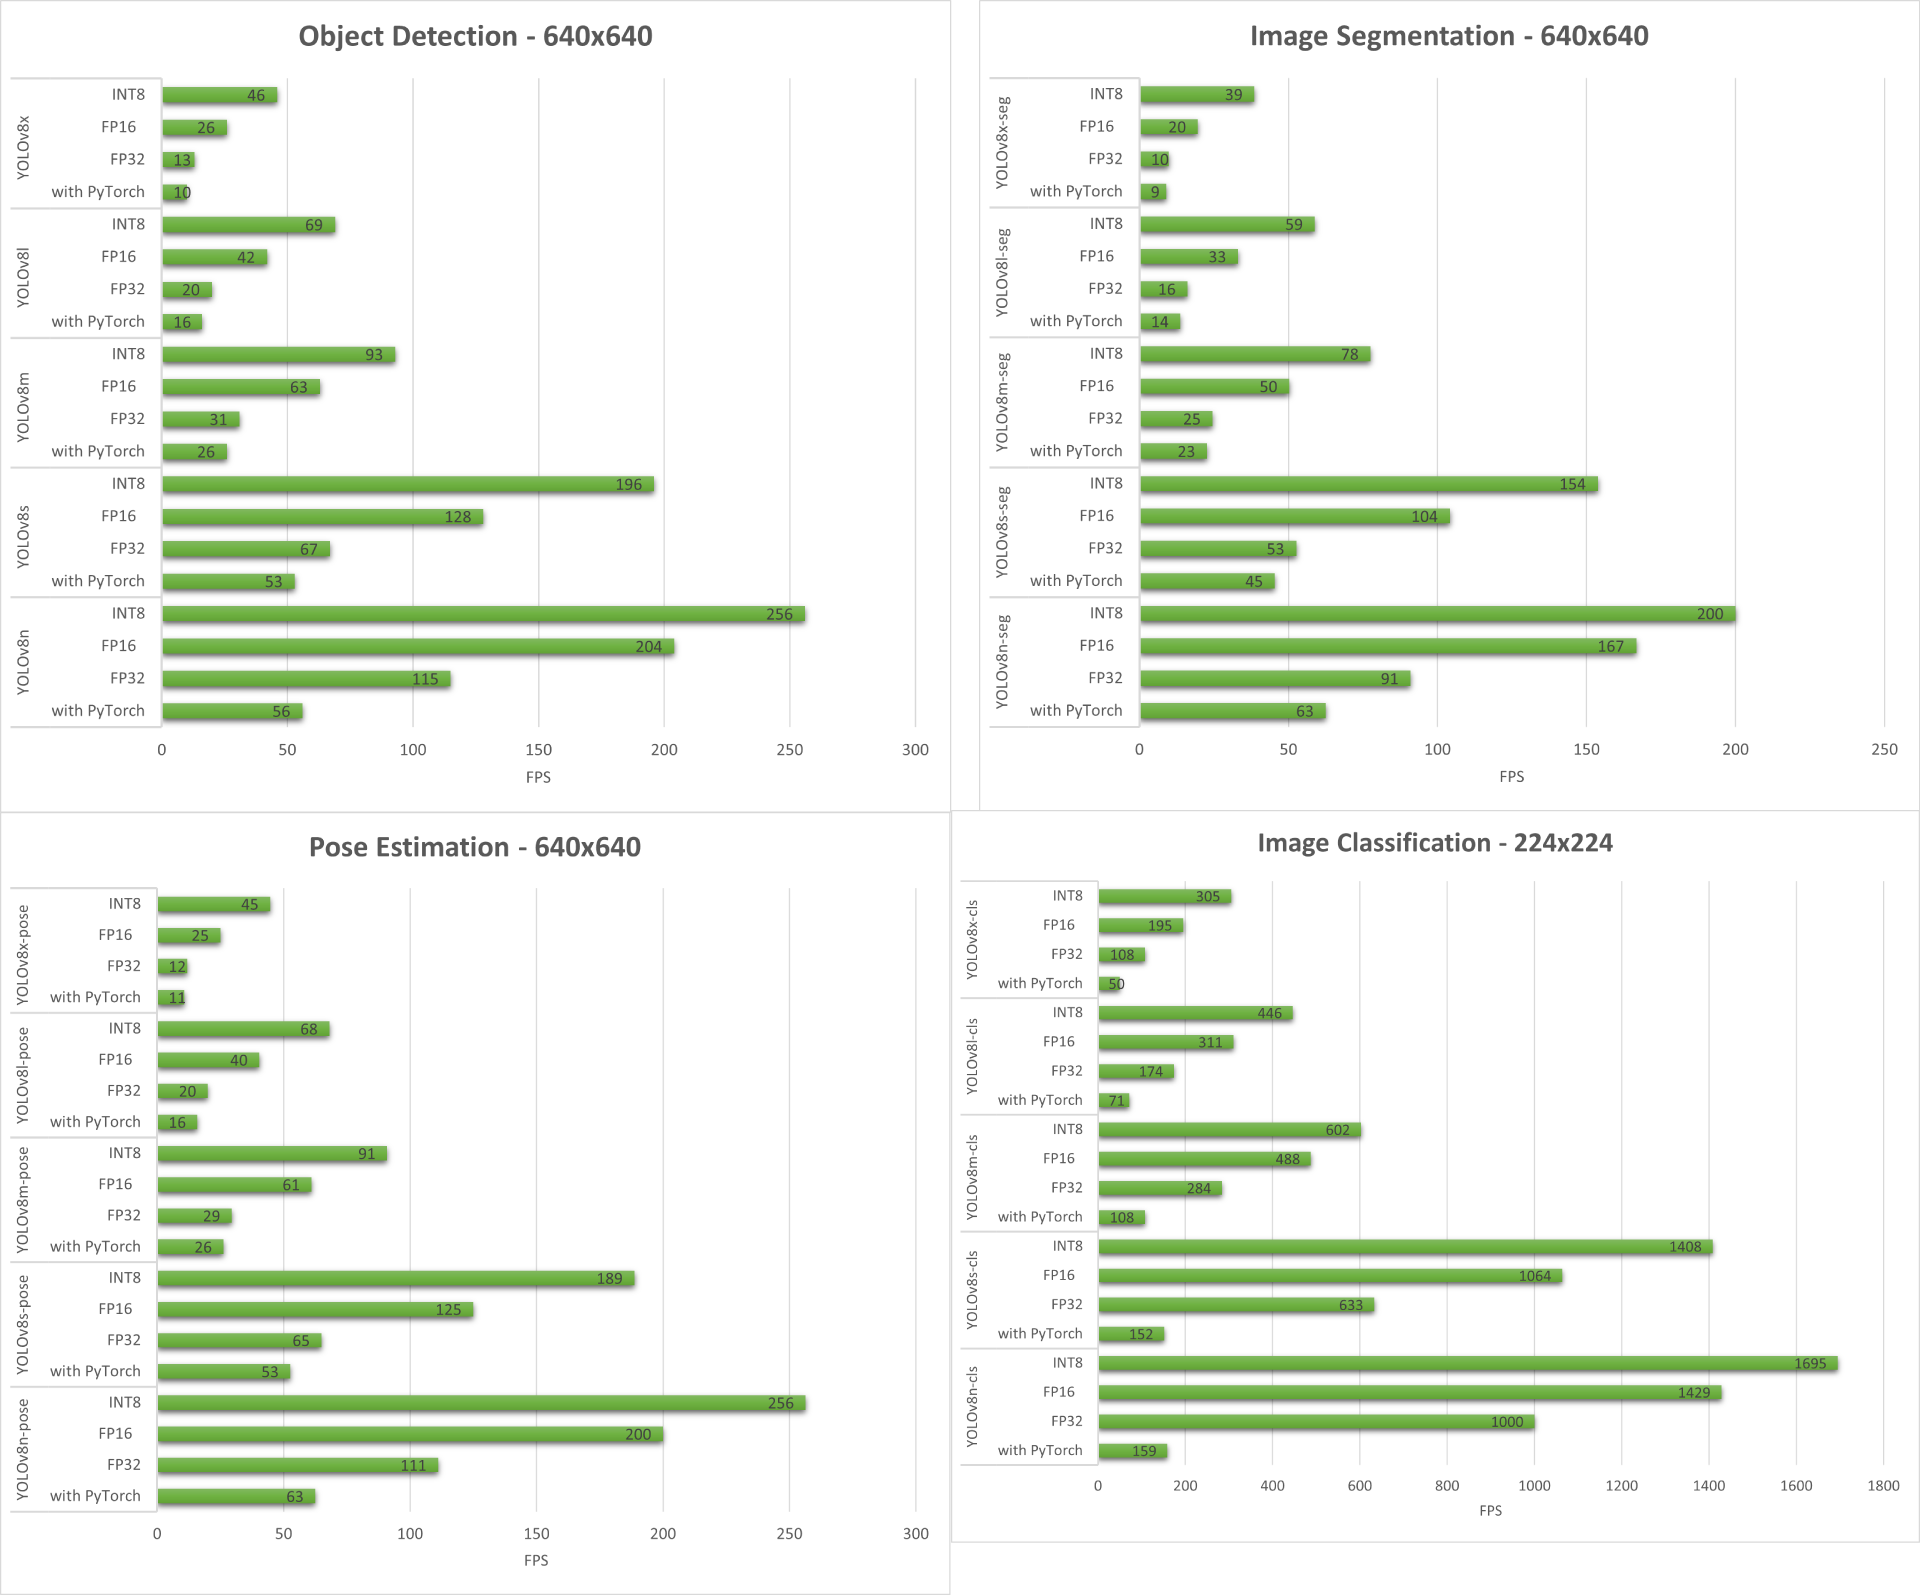
Results
Below we summarize the results that we get from all the four computer vision tasks running on reComputer J4012/ reComputer Industrial J4012.
Bonus Demo: Exercise Detector and Counter with YOLOv8
We have built a pose estimation demo application for exercise detection and counting with YOLOv8 using YOLOv8-Pose model. You can check the project here to learn more about this demo and deploy on your own Jetson device!

Manual Set Up of YOLOv8 for NVIDIA Jetson
If the one-line script we mentioned before has some errors, you can go through the below steps one-by-one to prepare the Jetson device with YOLOv8.
Install Ultralytics Package
- Step 1. Access the terminal of Jetson device, install pip and upgrade it
sudo apt update
sudo apt install -y python3-pip -y
pip3 install --upgrade pip
- Step 2. Install Ultralytics package
pip3 install ultralytics
- Step 3. Upgrade numpy version to latest
pip3 install numpy -U
- Step 4. Reboot the device
sudo reboot
Uninstall Torch and Torchvision
The above ultralytics installation will install Torch and Torchvision. However, these 2 packages installed via pip are not compatible to run on Jetson platform wwhich is based on ARM aarch64 architecture. Therefore we need to manually install pre-built PyTorch pip wheel and compile/ install Torchvision from source.
pip3 uninstall torch torchvision
Install PyTorch and Torchvision
Visit this page to access all the PyTorch and Torchvision links.
Here are some of the versions supported by JetPack 5.0 and above.
PyTorch v2.0.0
Supported by JetPack 5.1 (L4T R35.2.1) / JetPack 5.1.1 (L4T R35.3.1) with Python 3.8
file_name: torch-2.0.0+nv23.05-cp38-cp38-linux_aarch64.whl URL: https://nvidia.box.com/shared/static/i8pukc49h3lhak4kkn67tg9j4goqm0m7.whl
PyTorch v1.13.0
Supported by JetPack 5.0 (L4T R34.1) / JetPack 5.0.2 (L4T R35.1) / JetPack 5.1 (L4T R35.2.1) / JetPack 5.1.1 (L4T R35.3.1) with Python 3.8
file_name: torch-1.13.0a0+d0d6b1f2.nv22.10-cp38-cp38-linux_aarch64.whl URL: https://developer.download.nvidia.com/compute/redist/jp/v502/pytorch/torch-1.13.0a0+d0d6b1f2.nv22.10-cp38-cp38-linux_aarch64.whl
- Step 1. Install torch according to your JetPack version in the following format pip3
wget <URL> -O <file_name>
pip3 install <file_name>
For example, here we are running JP5.1.1 and therefore we choose PyTorch v2.0.0
sudo apt-get install -y libopenblas-base libopenmpi-dev
wget https://nvidia.box.com/shared/static/i8pukc49h3lhak4kkn67tg9j4goqm0m7.whl -O torch-2.0.0+nv23.05-cp38-cp38-linux_aarch64.whl
pip3 install torch-2.0.0+nv23.05-cp38-cp38-linux_aarch64.whl
- Step 2. Install torchvision depending on the version of PyTorch that you have installed. For example, we chose PyTorch v2.0.0, which means, we need to choose Torchvision v0.15.2
sudo apt install -y libjpeg-dev zlib1g-dev
git clone https://github.com/pytorch/vision torchvision
cd torchvision
git checkout v0.15.2
python3 setup.py install --user
Here is a list of the corresponding torchvision version that you need to install according to the PyTorch version:
- PyTorch v2.0.0 - torchvision v0.15
- PyTorch v1.13.0 - torchvision v0.14
If you want a more detailed list, please check this link.
Install ONNX and Downgrade Numpy
This is only needed if you want to convert the PyTorch models to TensorRT
- Step 1. Install ONNX which is a requirement
pip3 install onnx
- Step 2. Downgrade to lower version of Numpy to fix an error
pip3 install numpy==1.20.3
Resources
Tech Support & Product Discussion
Thank you for choosing our products! We are here to provide you with different support to ensure that your experience with our products is as smooth as possible. We offer several communication channels to cater to different preferences and needs.