The Future of Home Entertainment; LinkStar-H68K Router and Plex Media Server
Discover the groundbreaking idea of converting your router into a compact yet powerful entertainment media server. Envision a gateway to a boundless realm of entertainment options consolidated within a single device. This groundbreaking innovation transcends the conventional capabilities of a networking device, enriching your daily life and revolutionizing small establishments like cafes and restaurants, offering extraordinary customer experiences. Get ready to dive into a world of captivating possibilities, enhancing every moment and guaranteeing unmatched entertainment. Here are some potential applications and factors to consider if you're seeking such a remarkable router transformation.
What is Docker ?

Docker is an open-source platform that enables developers to automate the deployment and management of applications within lightweight, isolated containers. Containers are self-contained units that package an application along with its dependencies, libraries, and configuration files, allowing it to run consistently across different environments. Docker simplifies the process of creating, distributing, and running applications, making it easier to develop and deploy software in a consistent and reproducible manner. With Docker, developers can encapsulate their applications and ensure that they run smoothly across different operating systems and infrastructure setups, making it an invaluable tool for building portable and scalable applications, streamlining development workflows, and enabling efficient collaboration among team members.
What is Plex?
![]()
Plex Media Server is a powerful media management and streaming platform that allows users to organize, access, and stream their personal media library across various devices. With Plex Media Server, users can effortlessly centralize their collection of movies, TV shows, music, photos, and more, creating a unified media hub within their home network. Plex automatically organizes and indexes media files, fetching metadata like descriptions, artwork, and subtitles, to create a visually appealing and user-friendly interface. The server can be accessed through dedicated Plex apps on smartphones, tablets, smart TVs, and streaming devices, enabling seamless streaming of media content both at home and remotely. Plex Media Server also offers robust features such as parental controls, multi-user support, and transcoding capabilities, ensuring compatibility and optimal streaming quality on different devices and network conditions. Overall, Plex Media Server empowers users to enjoy their personal media collection anytime, anywhere, providing a comprehensive and immersive entertainment experience.
Set up the Docker environment on the LinkStar OpenWRT router
- Step 01 Installing OpenWRT on LinkStar
To begin the process of installing OpenWRT on your LinkStar device, refer to the comprehensive installation guide provided in the LinkStar Wiki. This tutorial focuses on utilizing the OpenWRT system and demonstrates how to install the Plex Container while ensuring that LinkStar functions as a soft router. Choose one of the following options based on your preference for installing OpenWRT on LinkStar:
- Flashing OpenWRT onto the TF card. Here is the tutorial
- Flashing OpenWRT onto the eMMC. Here is the tutorial
- Step 2: Configuring the LinkStar Network
To begin configuring the network settings on your LinkStar device, establish a connection by connecting it to your computer via a network cable. Access the OpenWRT operating backend by entering the IP address 192.168.100.1 into your web browser.The initial account password is:
Account: root
Password: password
Once logged in, the next step is to establish an internet connection for your LinkStar device. You have the option to connect either via a network cable or through WiFi. Choose the connection method that suits your setup and preferences. Here I used wireless method. After selecting the wireless network you can simply enter the passphrase and save and apply it.
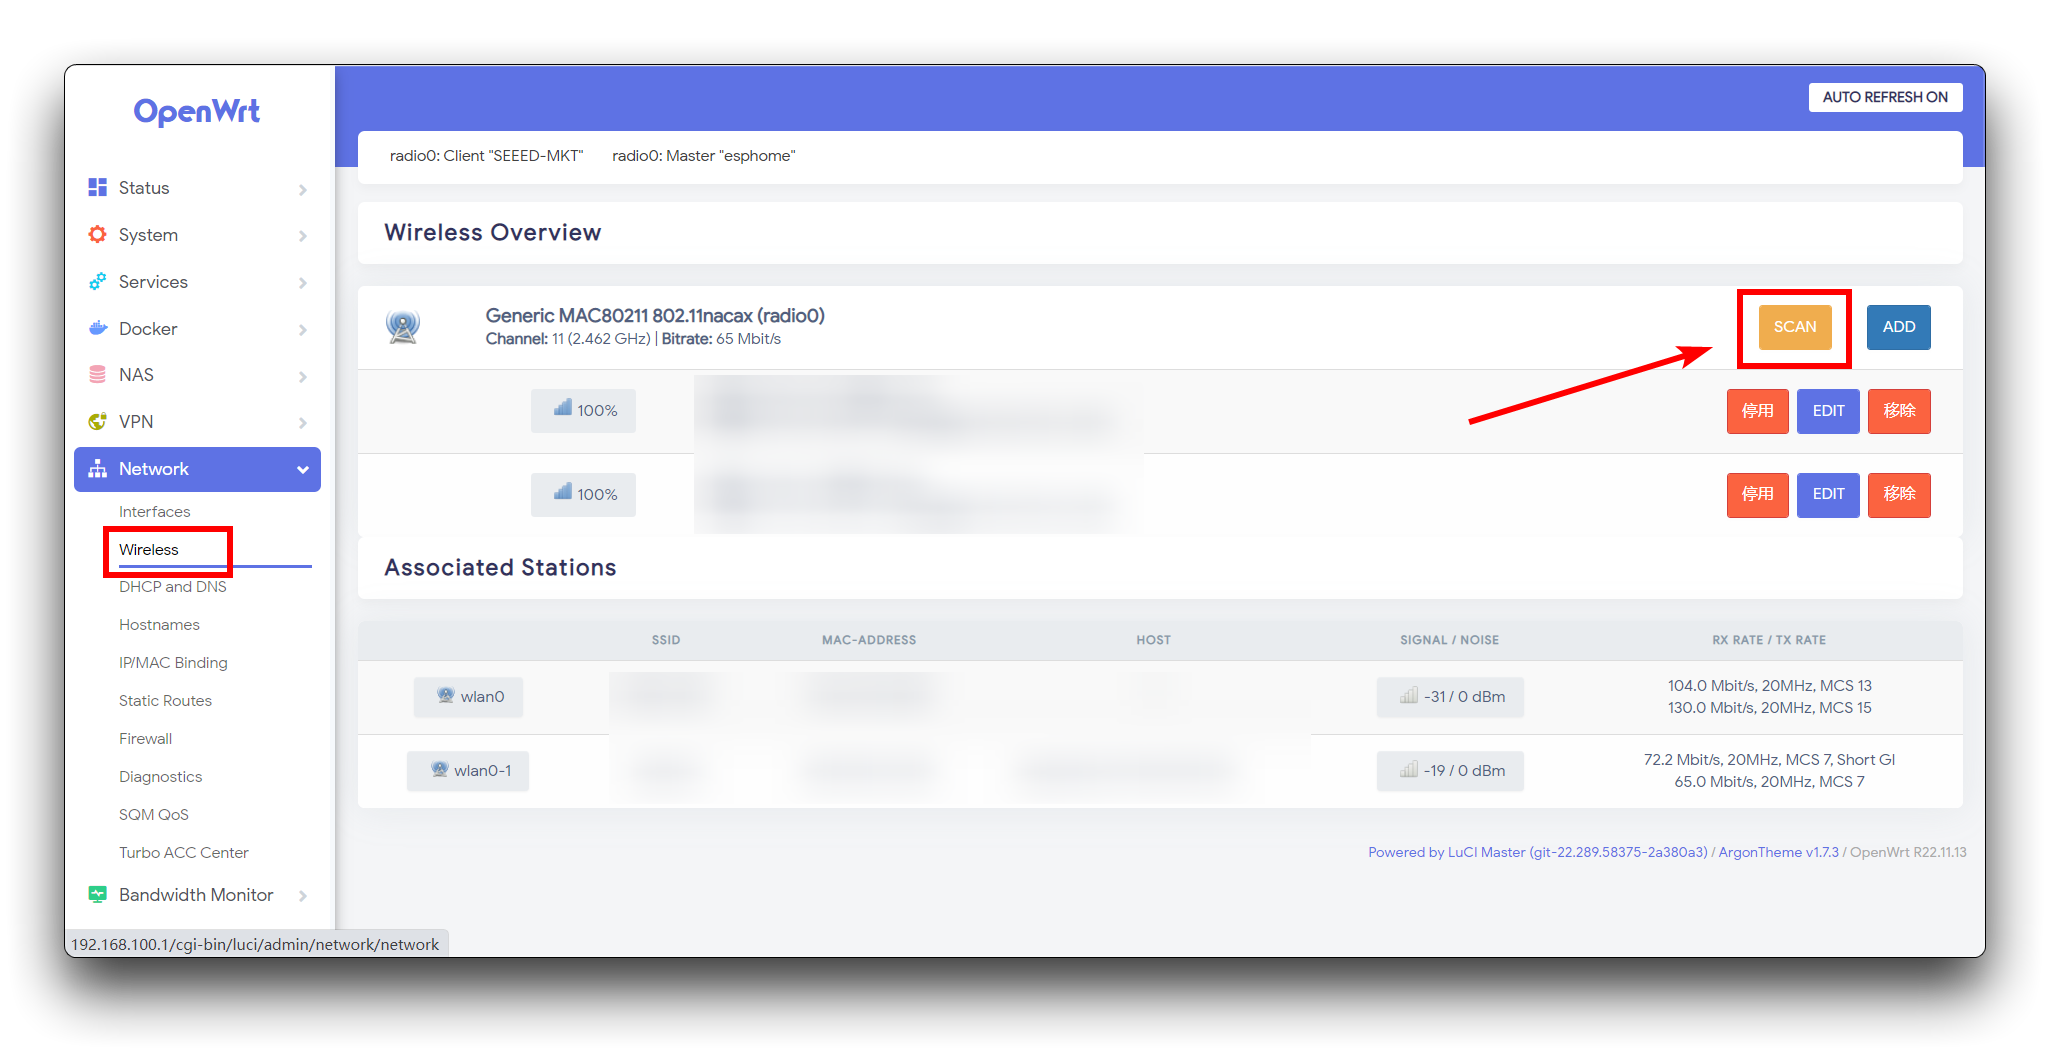
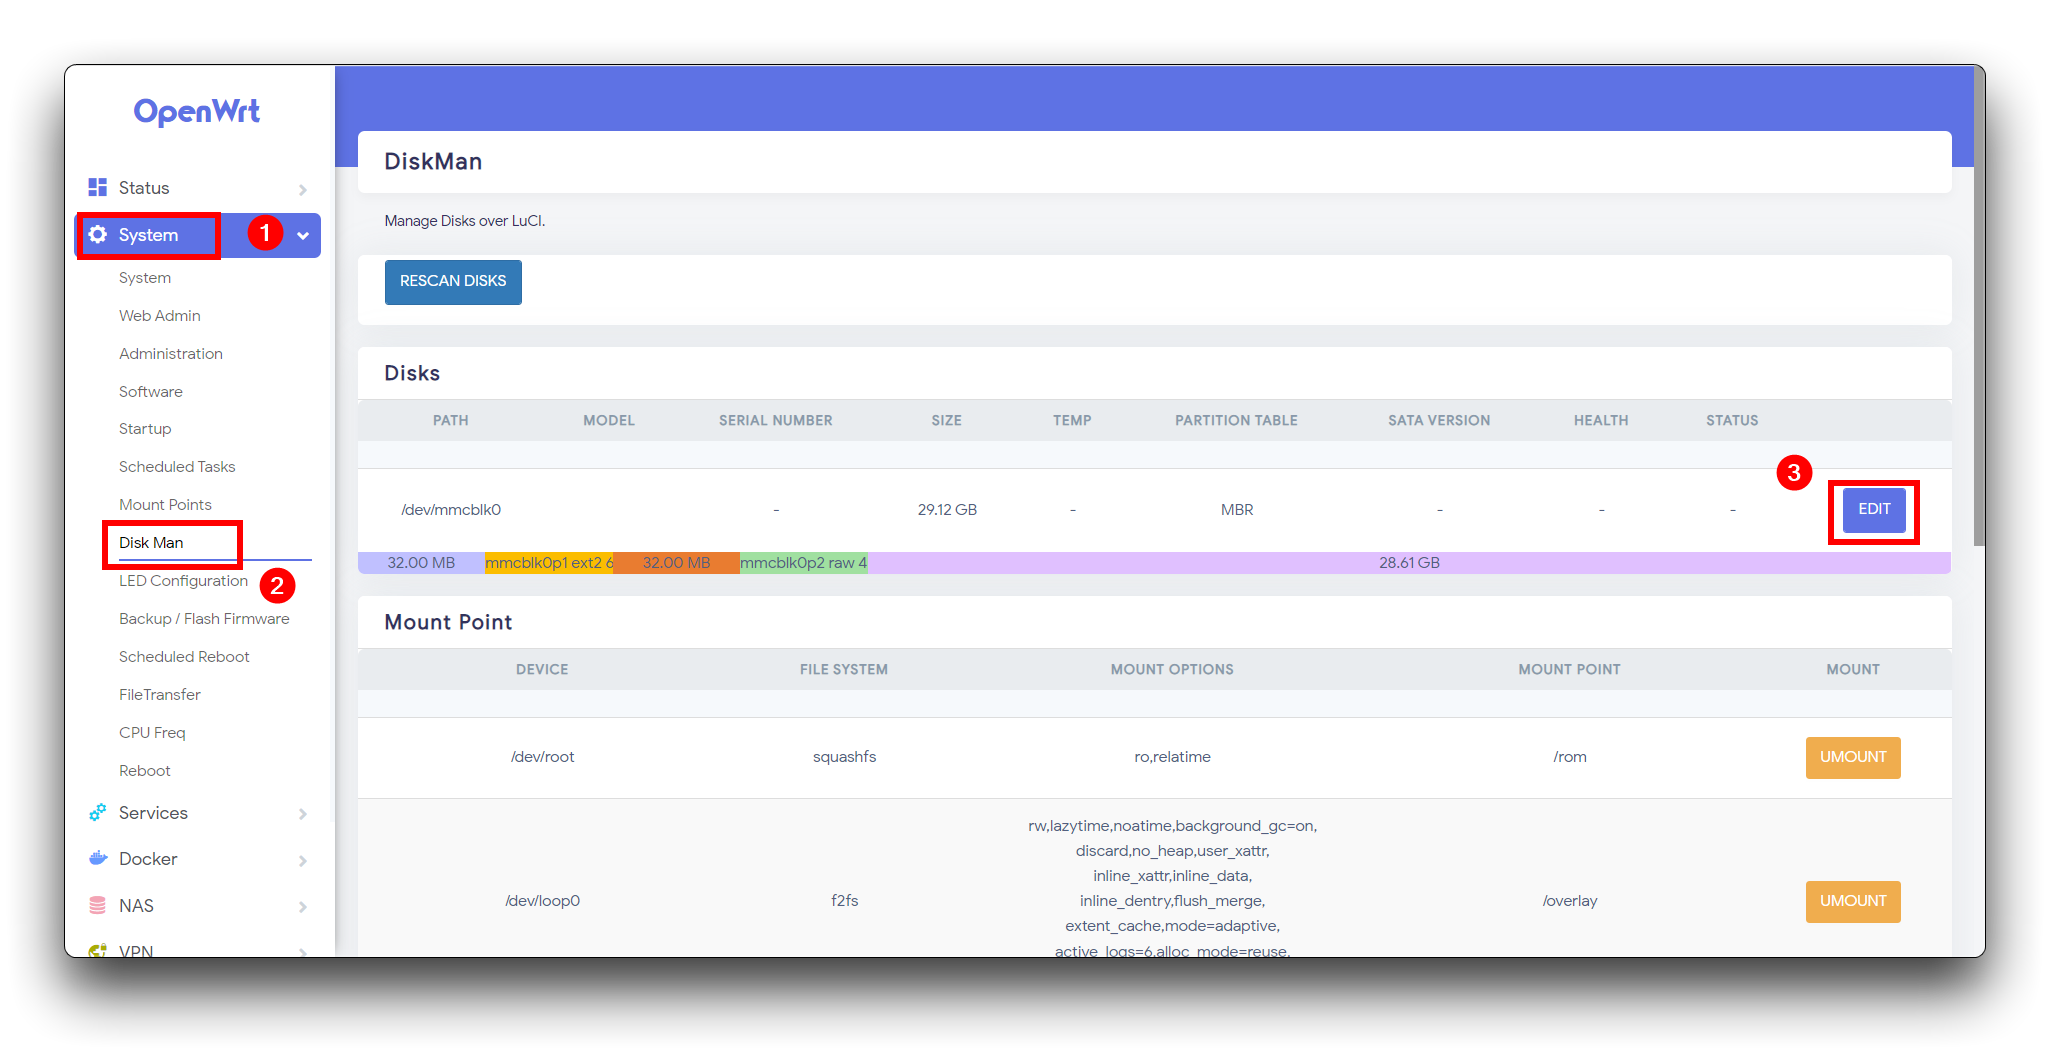
- Step 3 : Increasing Docker Storage Capacity
By default, the Docker installation on LinkStar has a storage capacity of around 250MB, which may not be sufficient for installing images. Therefore, we need to allocate more space to Docker to accommodate our requirements. To begin, navigate to the System section in the OpenWRT operating backend. Then, click on Disk Man and locate the EDIT option.
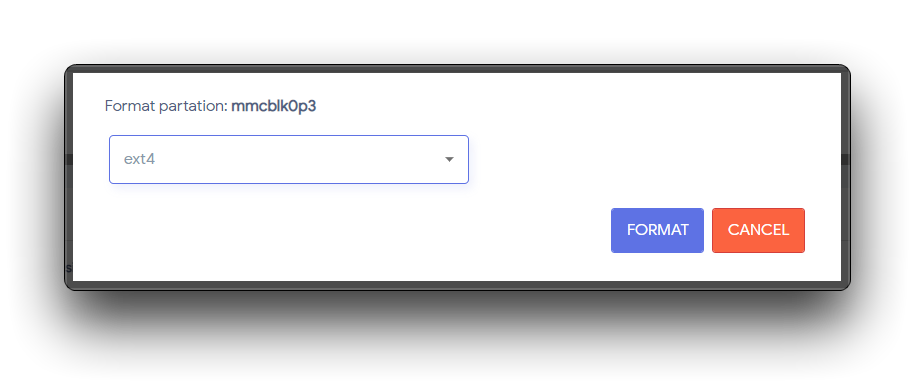
In the "END SECTOR" column, specify the desired size of the additional storage space to be allocated for Docker. In this example, we will add 20GB of storage. After entering the value, click on the "NEW" button to create the new storage allocation.
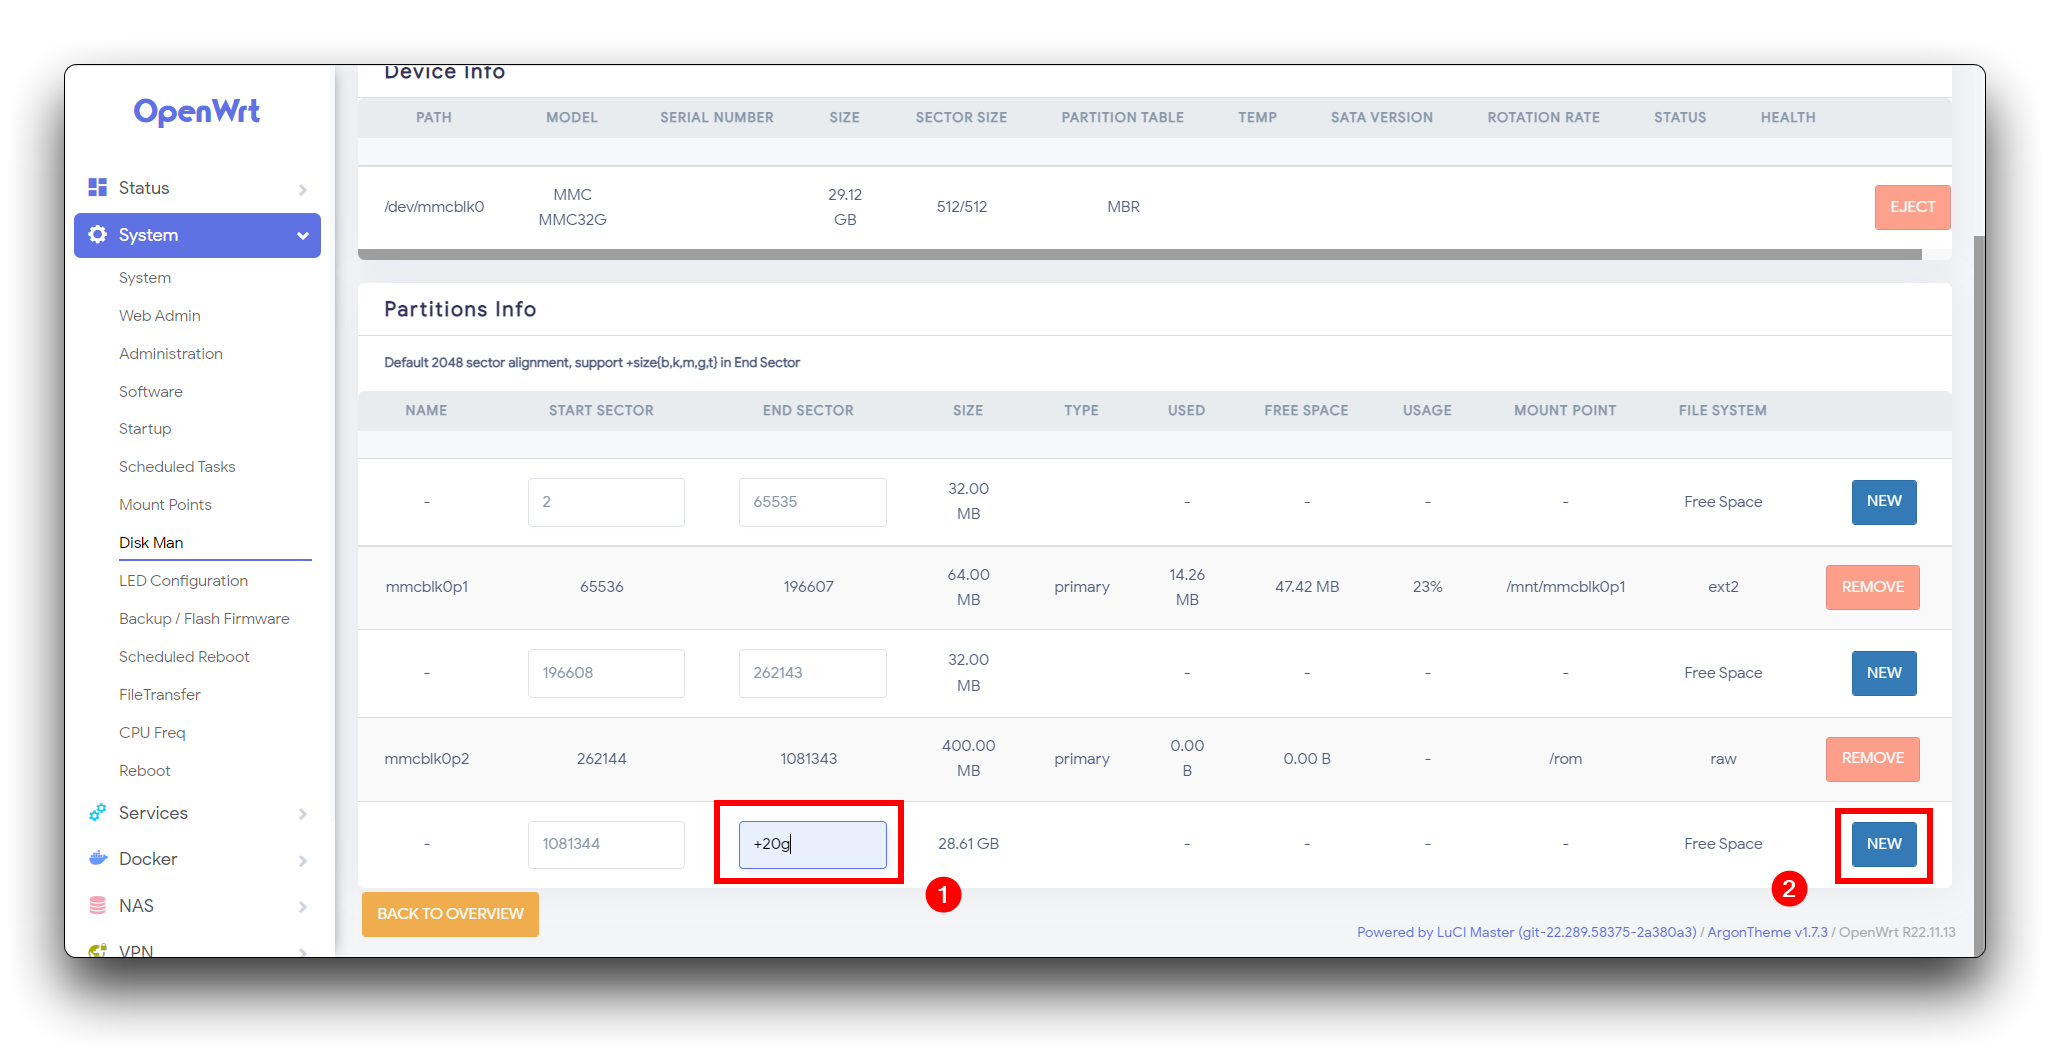
Choose the ext4 format, then click FORMAT button.
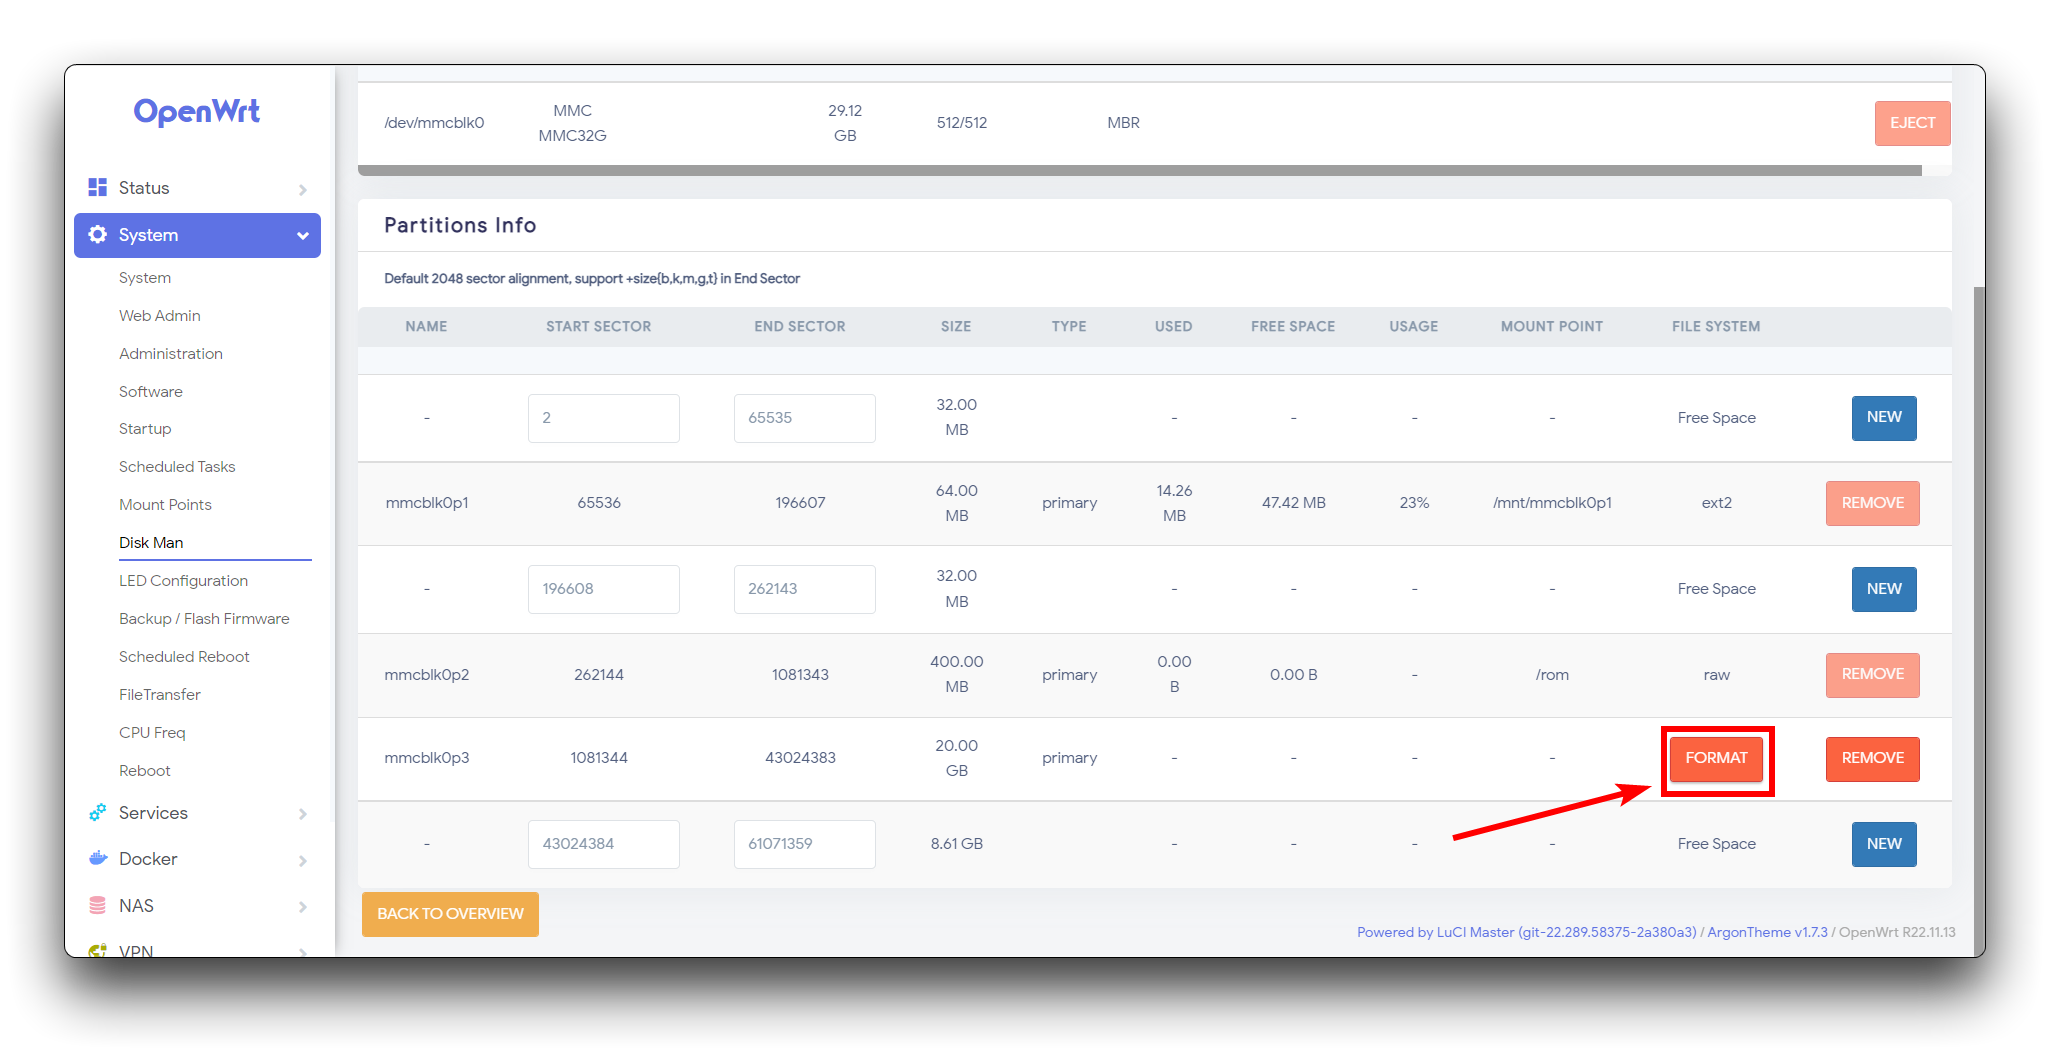
Once the allocation is complete, you will notice the addition of a new 20GB space. However, this space is currently unmounted and needs to be associated with Docker. To proceed, navigate to the System section in the OpenWRT operating backend and select Mount Points. Look for the Mount Point section and click on the "ADD" button.
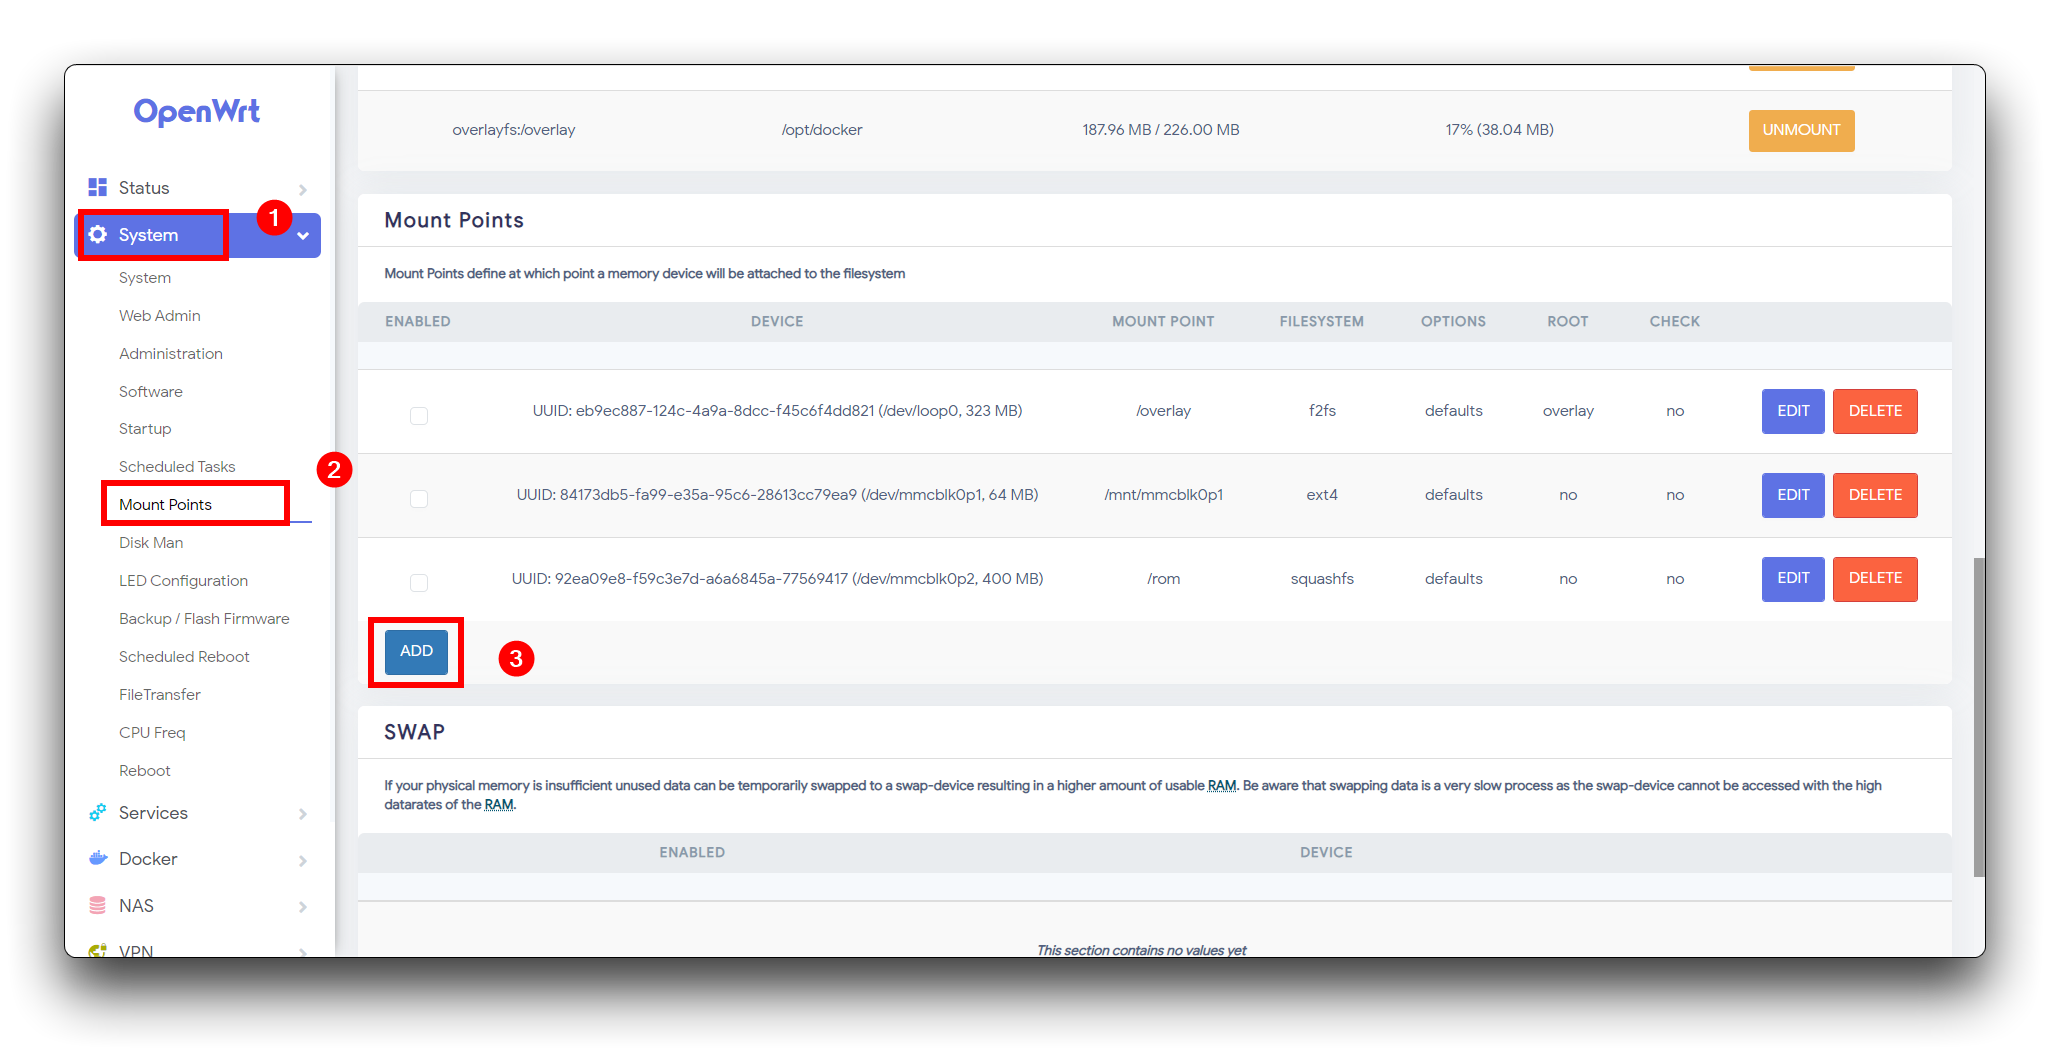
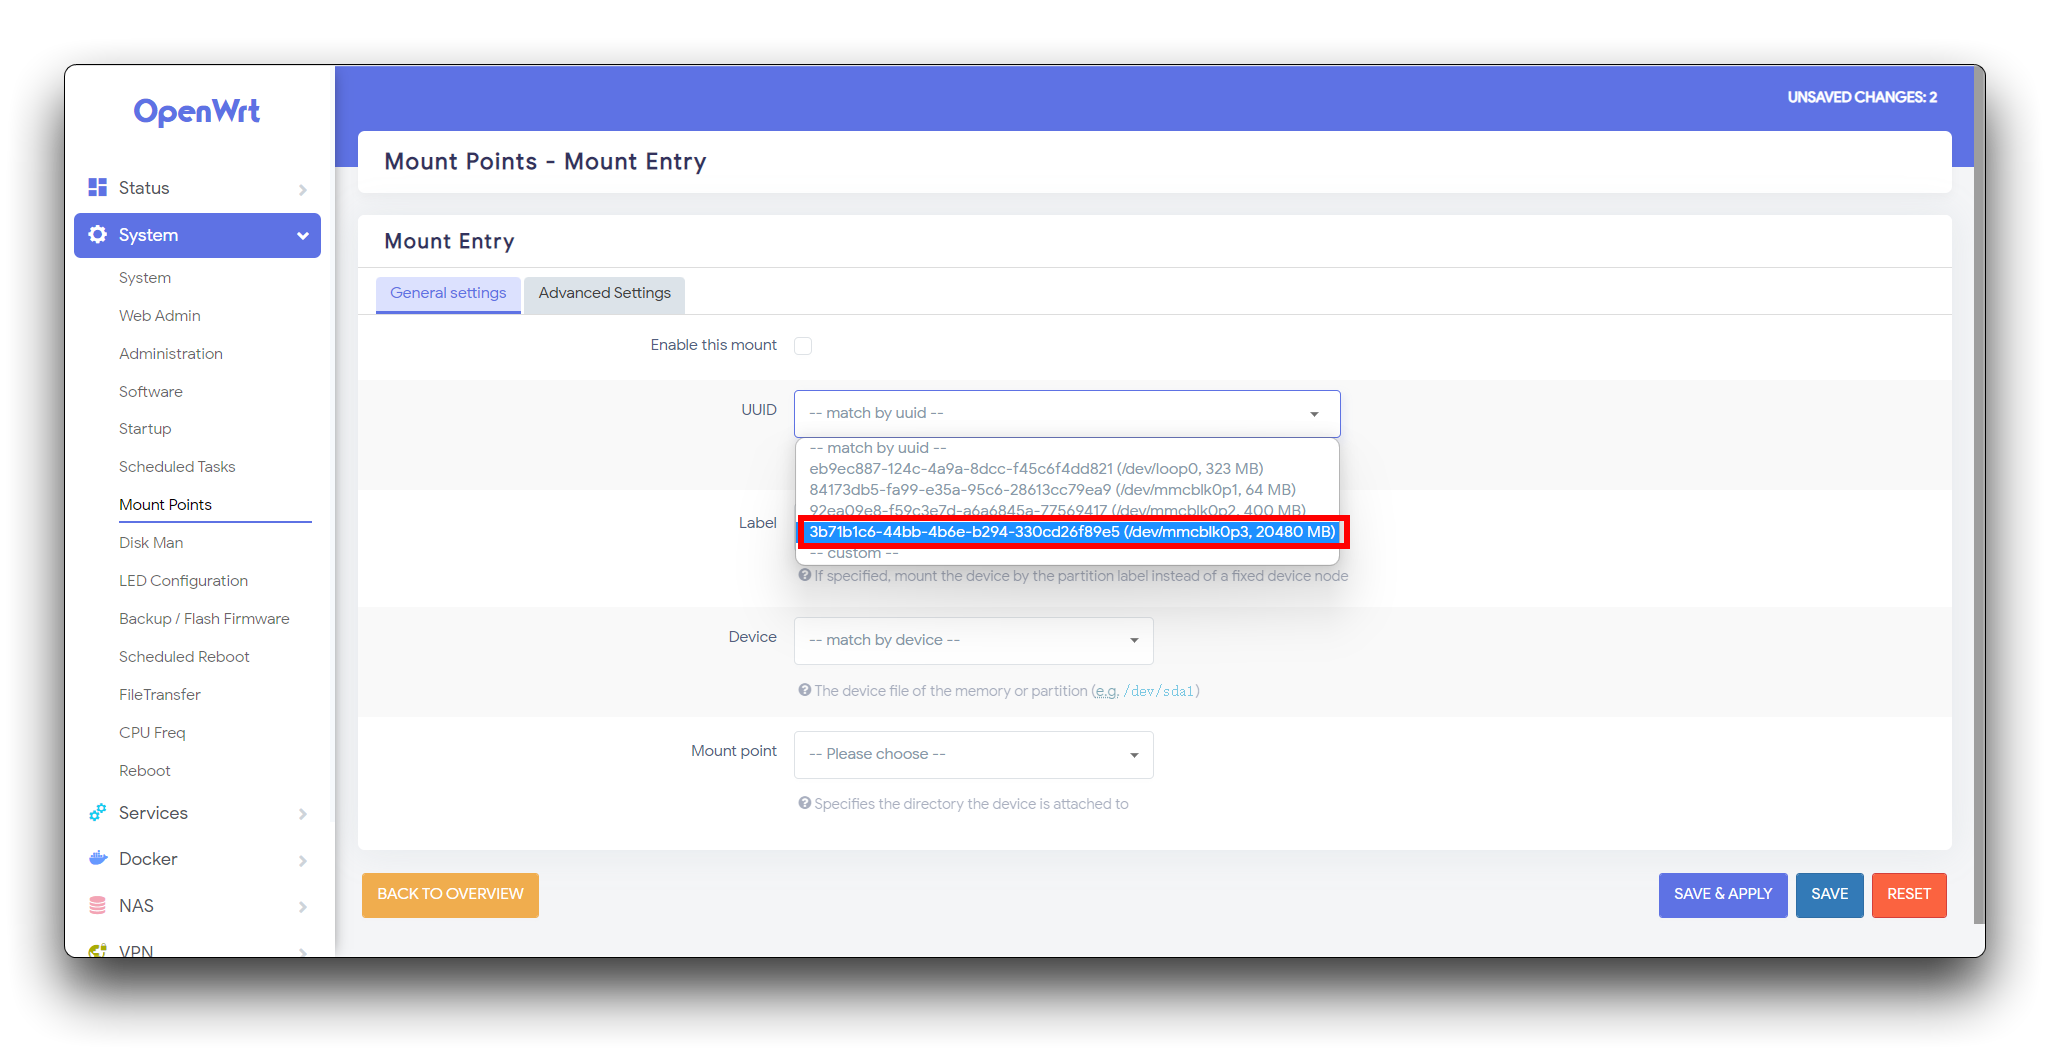
Choose the new space you've just created.
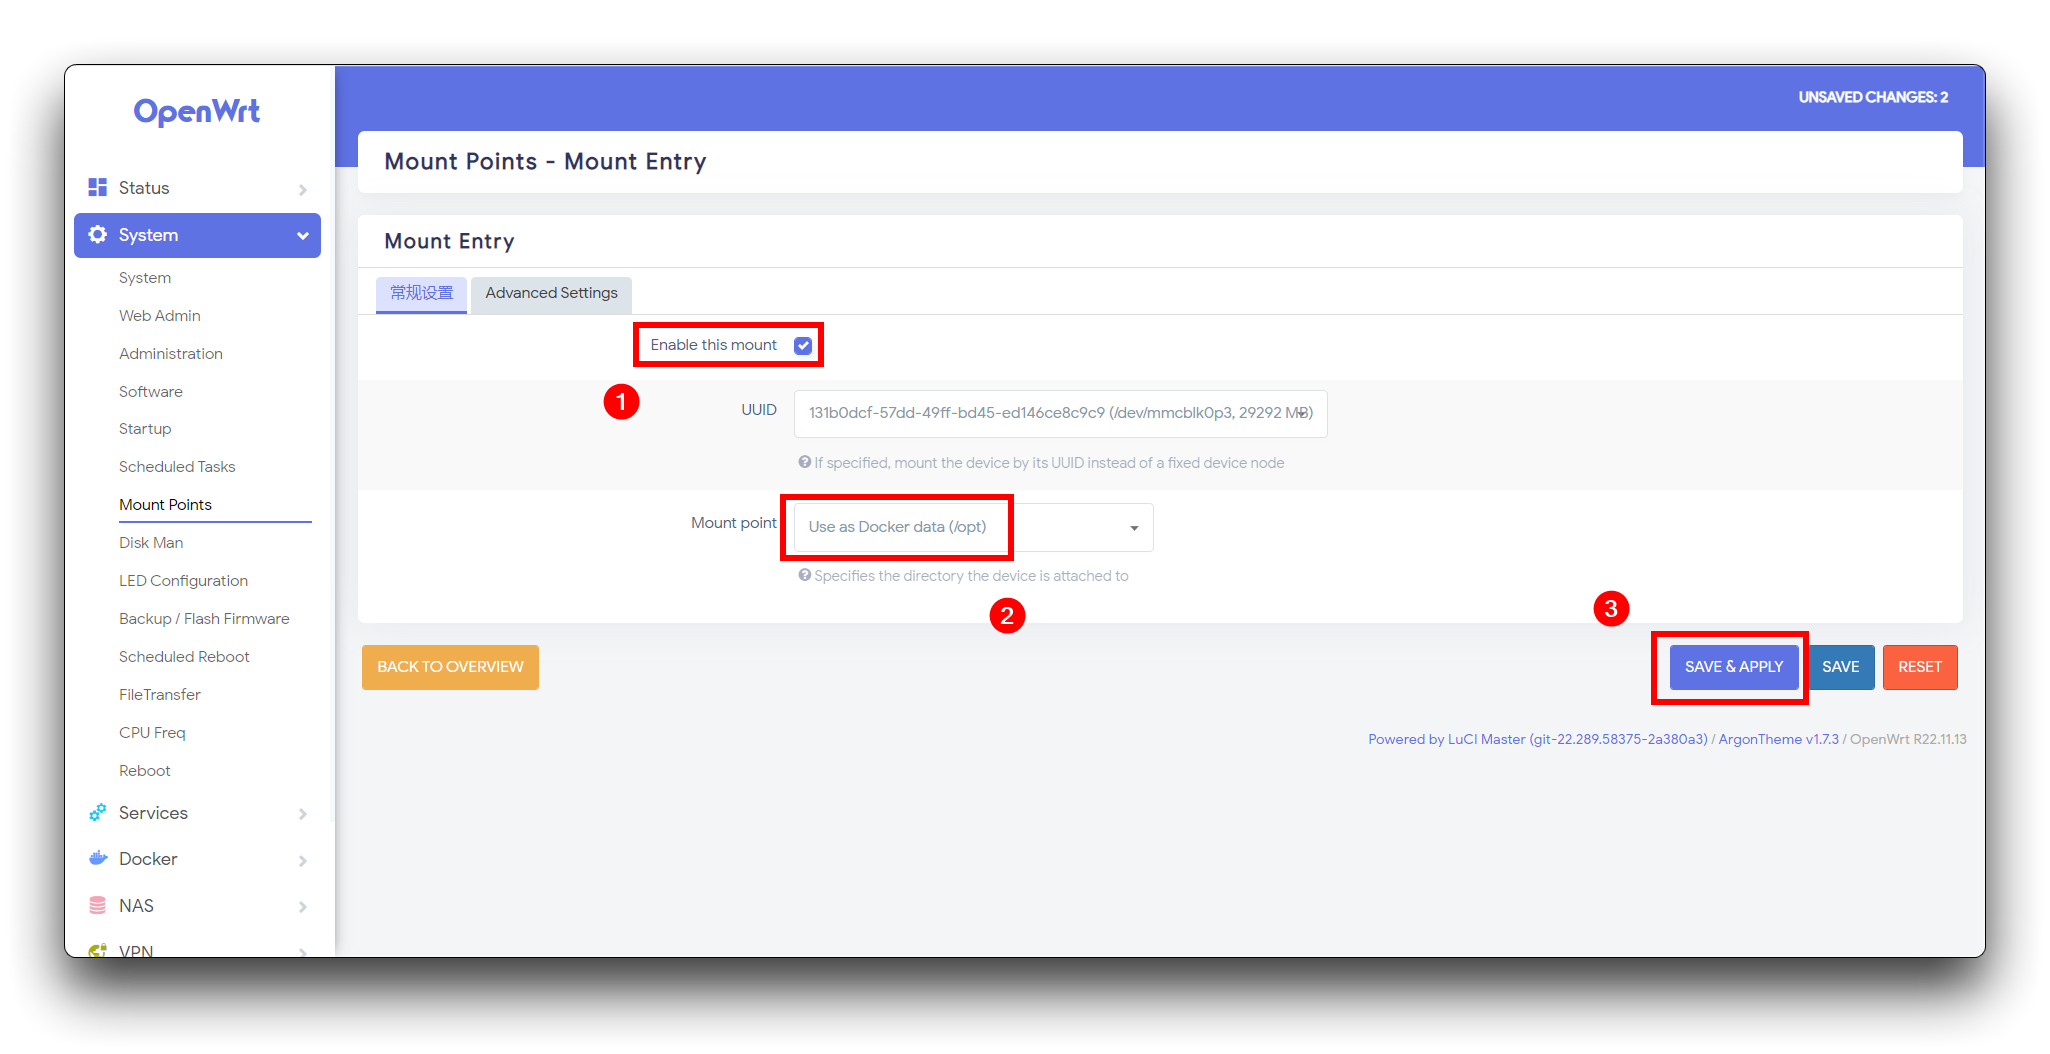
Choose the Mount Point Use as Docker data (/opt). Don't forget to check the checkbox Enable this mount, then click SAVE & APPLY button.
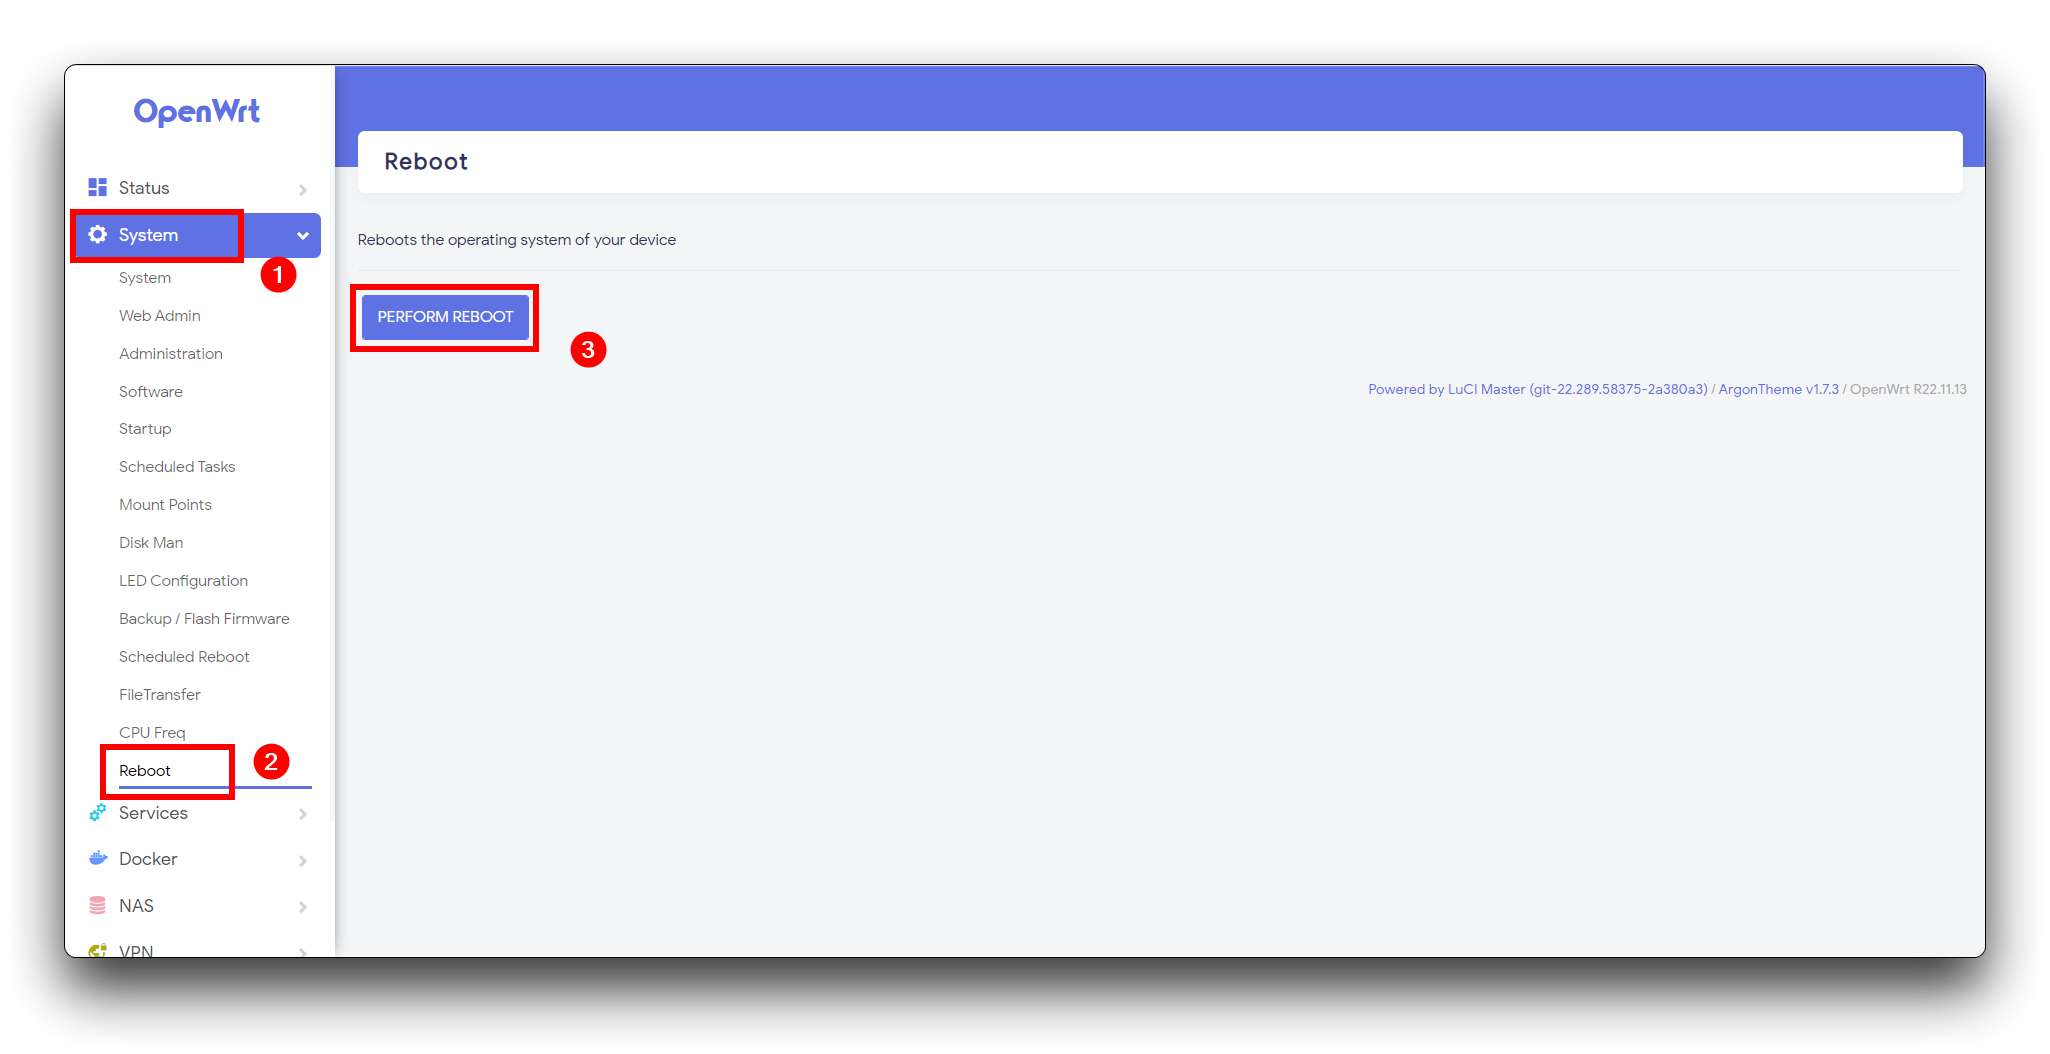
After completing the necessary settings for the storage expansion, the final step is to reboot the LinkStar device to apply the changes.
To initiate the reboot process, go to the System section in the OpenWRT operating backend and select Reboot. Click on the "PERFORM REBOOT" button to begin the reboot process. Wait for OpenWRT to restart, and then proceed to log in again once the system is ready.
Create Plex Media Server Docker Container
Next we need to get plex docker image. For that you have to visit this link for more details .

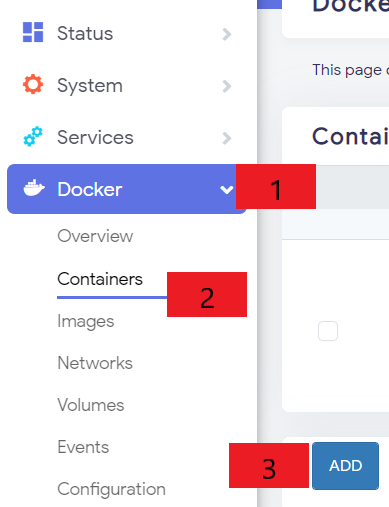
Next go to Containers tab and click add button
After that you can see a form to fill down.

-
Step 1: Set Container Name and Network
Set the container name as "plex". Choose the network mode as "host".
-
Step 2: Configure Environments
Obtain the timezone by visiting the provided link and copy the TZ database name. Set the timezone using the following format
TZ=[enter timezone]
Obtain the claimToken by visiting the provided link and copy/paste the token. Set the claimToken using the following format
PLEX_CLAIM=[enter claimToken]
-
Step 3 : Configure Bind Mounts
Under the bind mounts section, add the following lines one by one:
/plex/database:/config /plex/temp:/transcode /plex/media:/data
-
Step 4: Submit Configuration
After configuring the container name, network, environments, and bind mounts, click on the "Submit" button to save the changes.
By following these steps, you will successfully configure the Plex container with the specified settings.
Run and Set up Plex Media Server
-
Step 1:
Under the docker containers you can see the container information. Click on the check button and press start.

-
Step 2: Open the Plex Media Server Initial Setup
In your web browser, enter the address 192.168.2.1:32400/web. This will open the initial setup page for Plex Media Server. Please note that 32400 is the port where the Plex Docker container is running.
-
Step 3: Set a Server Name
Enter a desired server name in the provided field and click "NEXT" to proceed.
-
Step 4: Organize Media Library
To begin organizing your media library, click on the "ADD LIBRARY" button.
-
Step 5: Select Library Type
Choose the appropriate library type for your media, such as Movies, TV shows, Music, etc., and click "NEXT".
-
Step 6: Add Media Folder
Click on "BROWSE FOR MEDIA FOLDER" and select the data folder. By configuring the Plex container previously, this data folder is linked to the /plex/media folder on OpenWrt. Click "ADD LIBRARY" to confirm.
-
Step 7: Complete the Setup
Click "NEXT" and then "DONE" to finish the initial setup process.
Now you will be greeted with the Plex Media Server user interface, allowing you to access and manage your media collection seamlessly.

Mount Plex Directory on the PC and Transfer the Media
- Step 1. In OpenWrt Luci interface, navigate to
NAS > Network Shares > ADD

-
Step 2. Fill the row according to the following
- name: Plex
- Path: /plex
- Browse-able: ticked
- Allow guests: ticked
- Create mask: 0666
- Directory mask: 0777
-
Step 3 Press Save and apply:
-
Step 4 Go to windows explorer and click Map network drive and type //192.168.100.1/plex

- Step 5 Add your favourite movies, music to media folder.
- Step 6 Go to Plex media server again and click this on More

- Step 7 Next click on these three dots and click on Scan Library Files. Then you can see the movies or songs you recently added to your library.

By implementing a media server, whether at home or in a small-scale hotel or cafe, users can offer an exceptional entertainment experience to themselves, family members, guests, and customers. It's a cost-effective solution that centralizes media storage, reduces device clutter, and provides remote access and customization options.
Resources
-
[Web Page] Docker Offficial Documentation
-
[Web Page] Docker Hub
-
[Web Page] Plex Media Server
Tech Support & Product Discussion
Thank you for choosing our products! We are here to provide you with different support to ensure that your experience with our products is as smooth as possible. We offer several communication channels to cater to different preferences and needs.