Install Operating System
Introduction
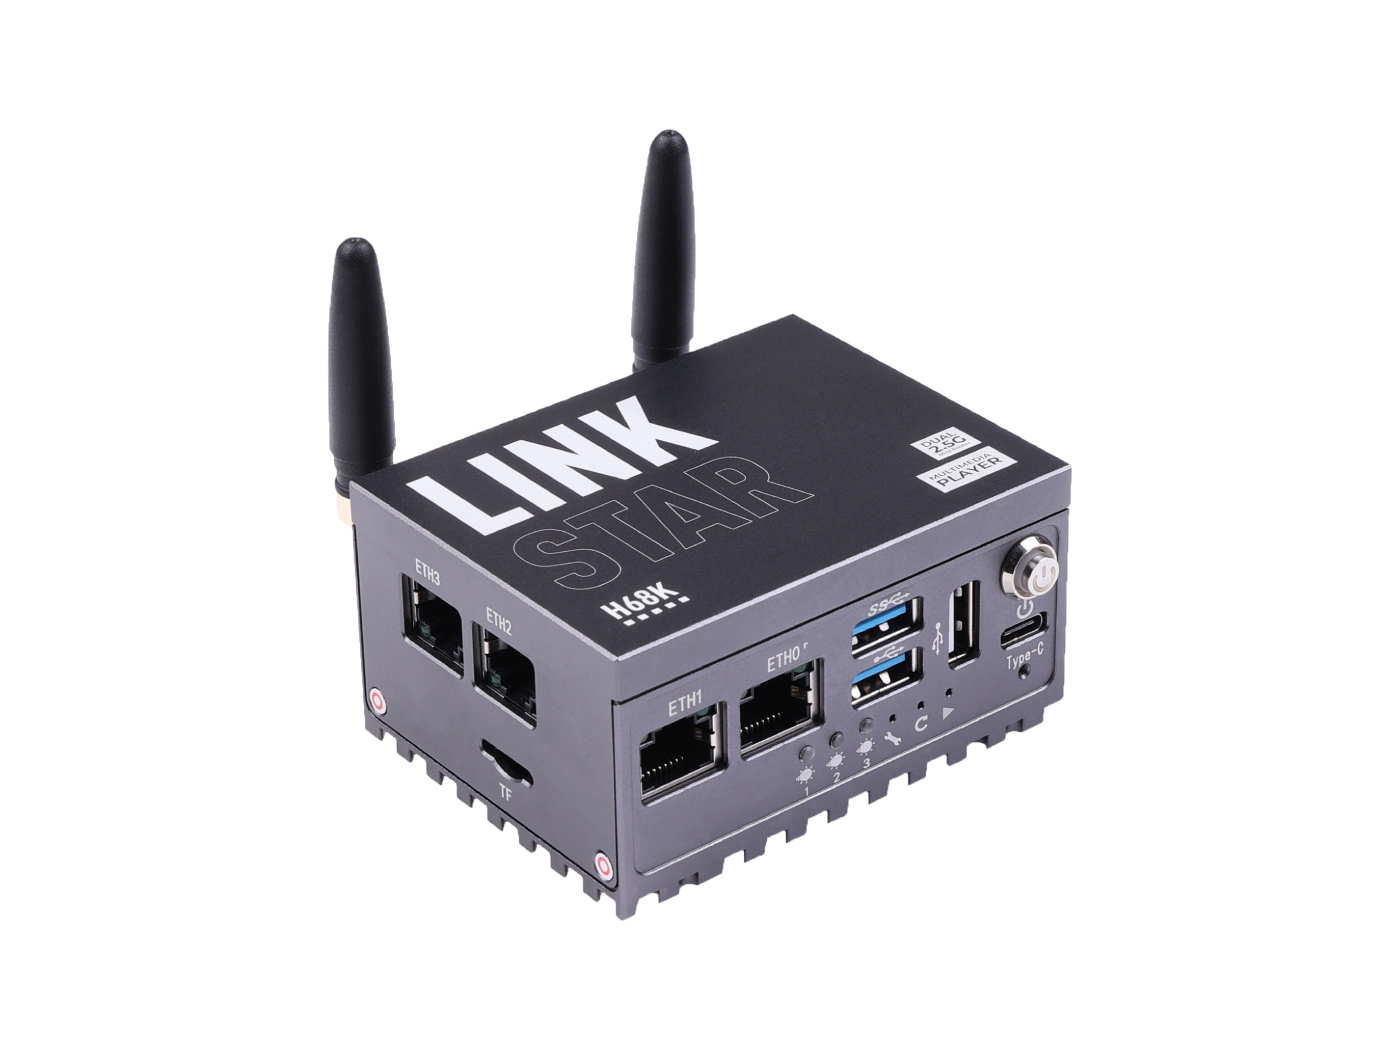
LinkStar-H68K router equips quad-core Cortex-A55 RK3568 chip, featuring 4 Ethernet interfaces for dual-2.5G and dual-1G, along with Wi-Fi 6 technology(optional), while providing high storage capacity and media player functionality. In this wiki we will show you how to install operating system with TF card or eMMC.
Select the system you need for LinkStar
The powerful LinkStar supports a wide range of operating systems such as Android, Ubuntu, OpenWRT, Debian and many more. In this section, we will bring you the installation methods for each system.
Notes & Instructions
LinkStar has two types of storage, one is TF card storage and the other is eMMC storage. Both memories are available for flash memory systems.
In this chapter, we can use the TF card with a card reader to flash the system to the TF card. Due to the read/write speed and stability, this way can only be flashed into the OpenWRT system.
We can also flash the system to the eMMC that comes with the LinkStar. This method currently supports all supported operating systems from LinkStar.
When a TF card is inserted in the LinkStar, the system in the TF card is the one that boots up when the system is turned on, as the TF has priority to boot.
Flash OpenWRT to the TF card
Preparation
- Windows/MacOS PC
- USB - C data cable
- A TF card
- A card reader
- balenaEtcher —— Please download and install balenaEtcher, we will use this software to flash the system to a TF card.
- OpenWRT package
Please prepare the equipment required above, firmware update packages can be downloaded by clicking the download button below.
| Version | Description | Download |
|---|---|---|
| balenaEtcher | - | Download |
| OpenWRT R22.11.18 | Add Docker support. | Download |
When using a TF card with LinkStar, it is important to note that it may be incompatible with some high-speed cards. If you are using a high speed card, you may experience data loading errors, boot-up errors or malfunctions during power-up and loading of the system due to the speed of the card.
The advantage of using a TF card is that different networks can be configured with different TF cards. It is also possible to have multiple systems - different systems can be used by replacing different TF cards.
Procedure
Step 1. Connect the TF to the PC
Please put the TF into your prepared card reader and connect it to your PC.
Step 2. Flash the system onto a TF card
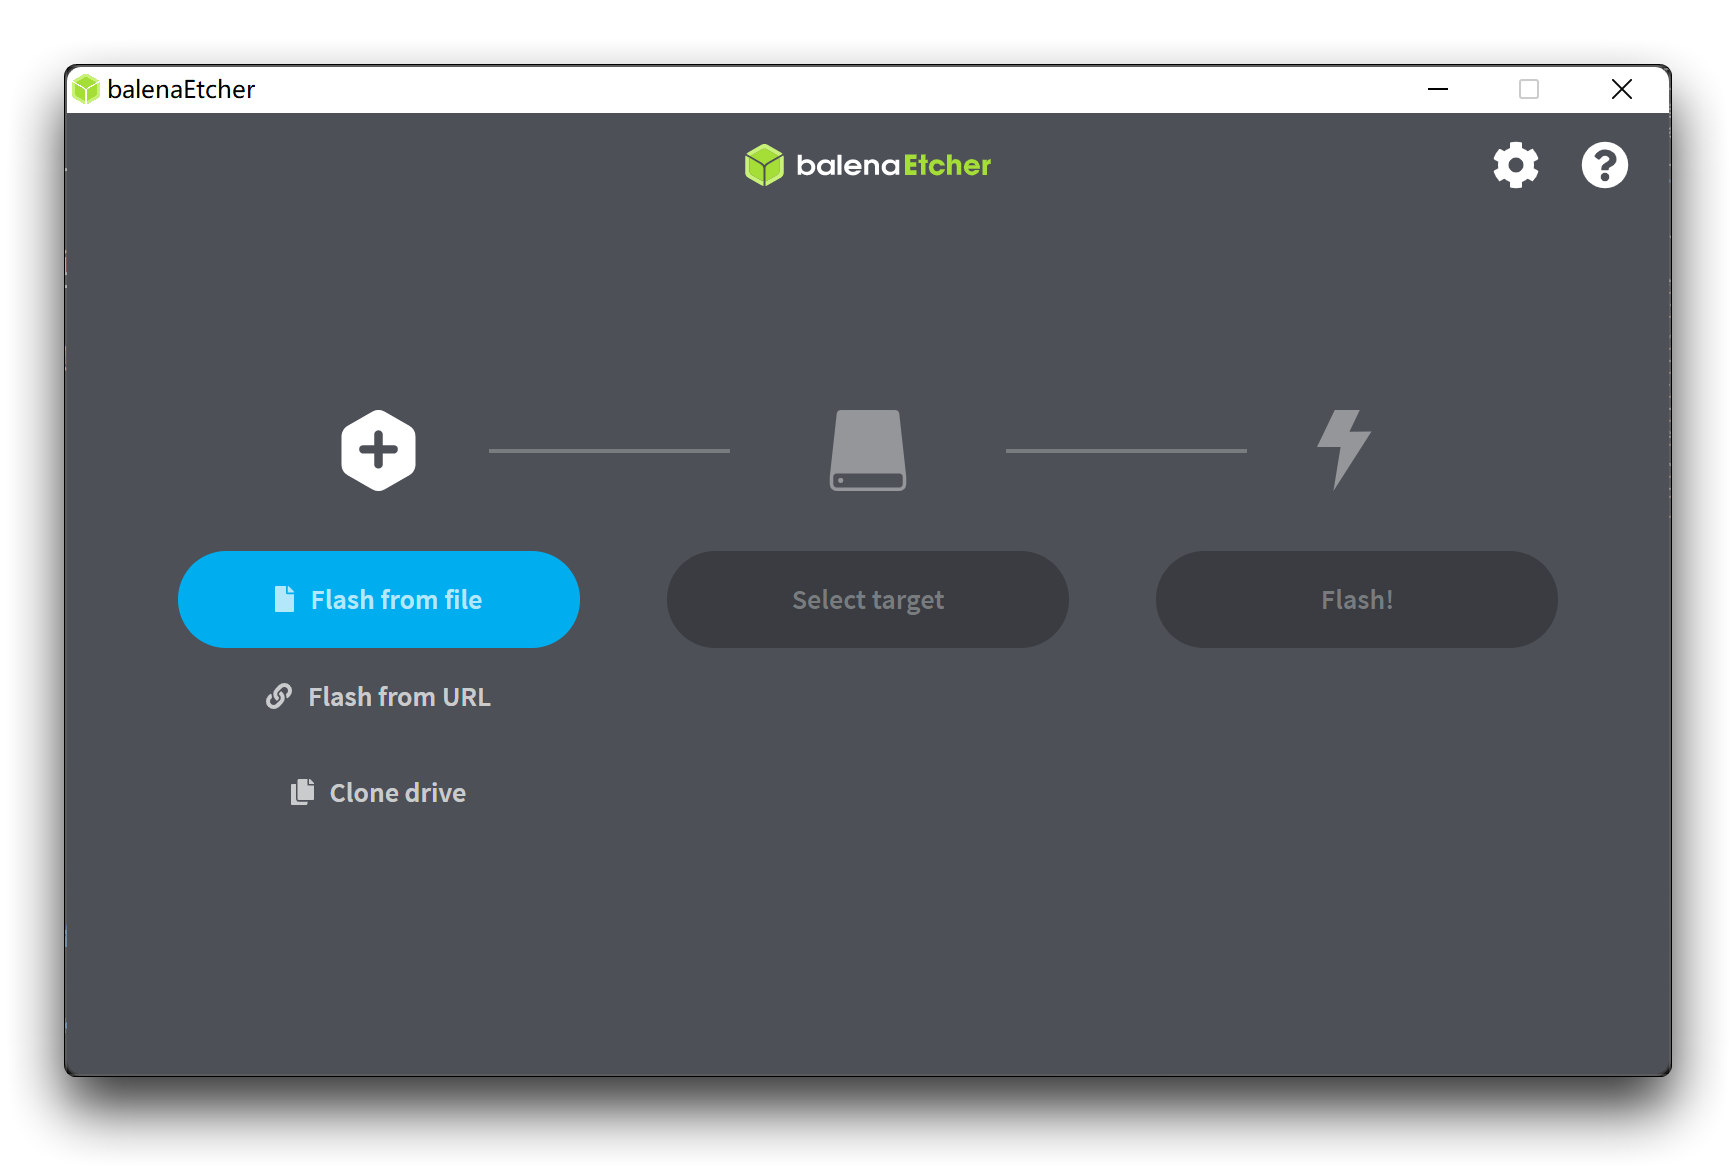
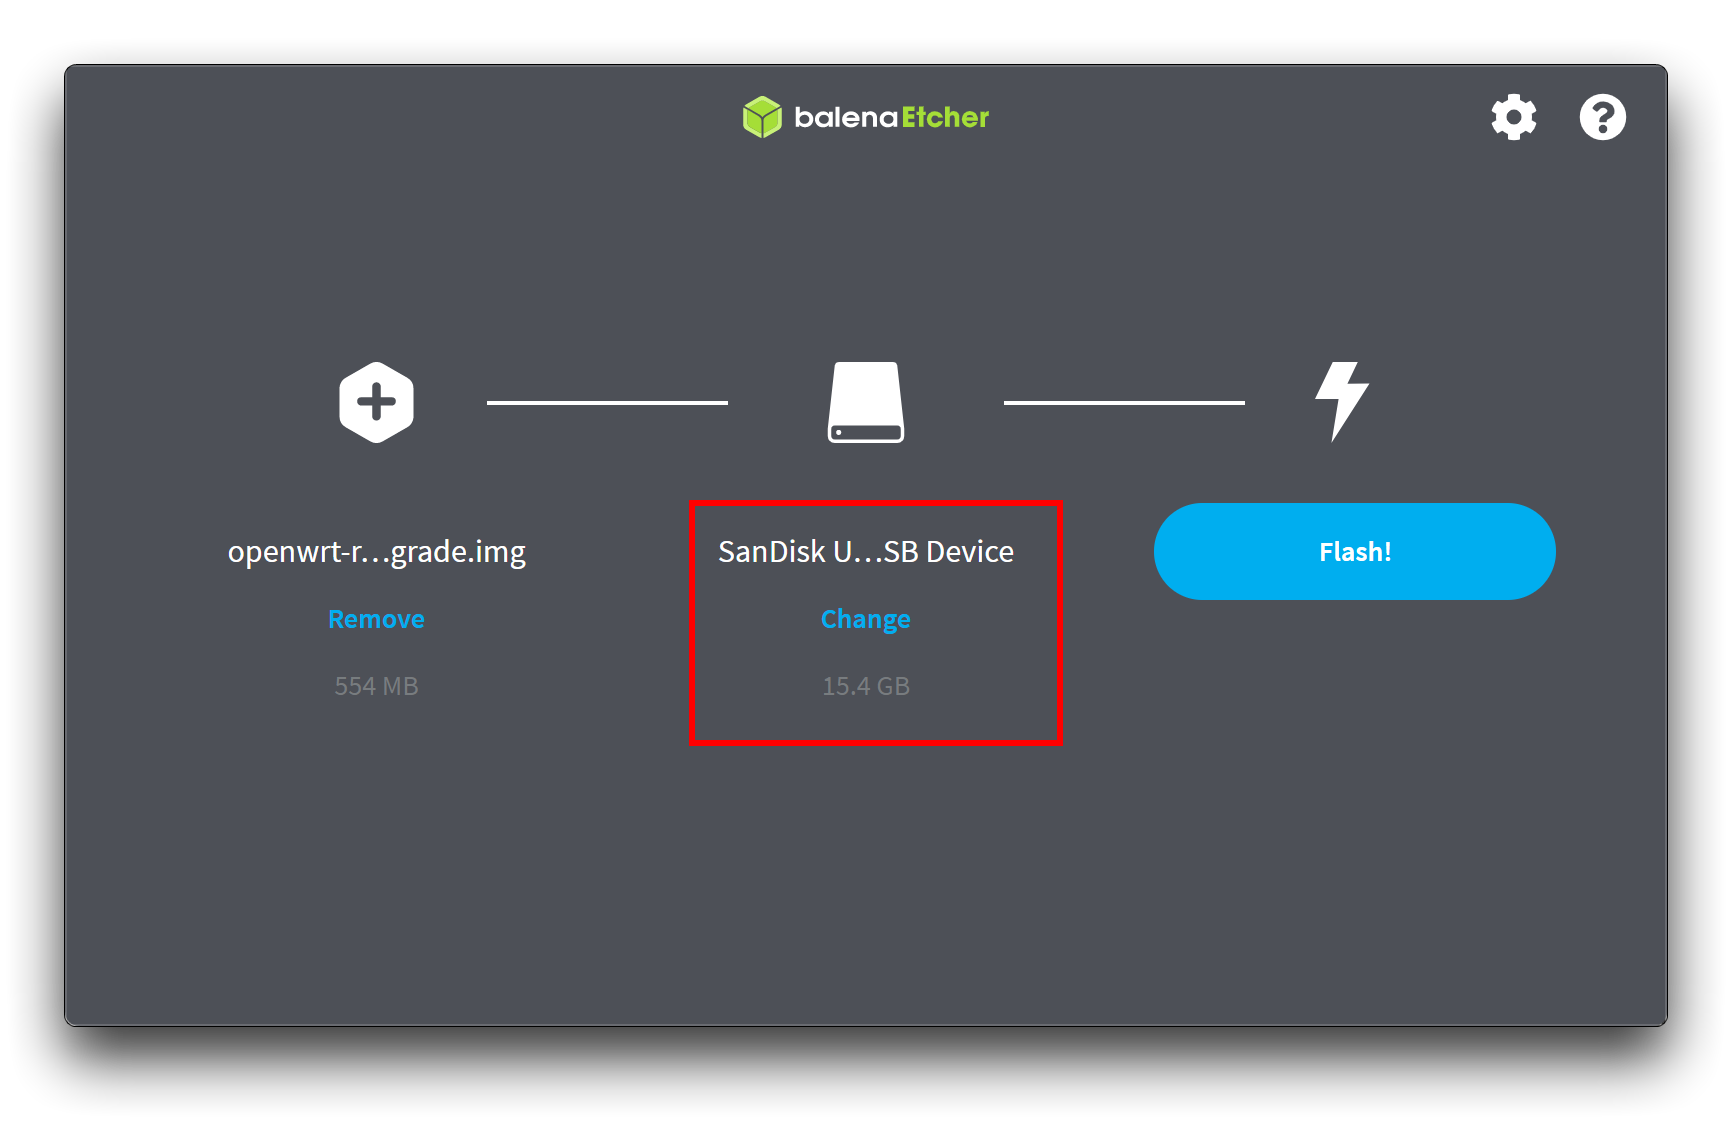
Open the balenaEtcher which has been installed in advance.
Select the OpenWRT firmware you downloaded, it should end in .img.
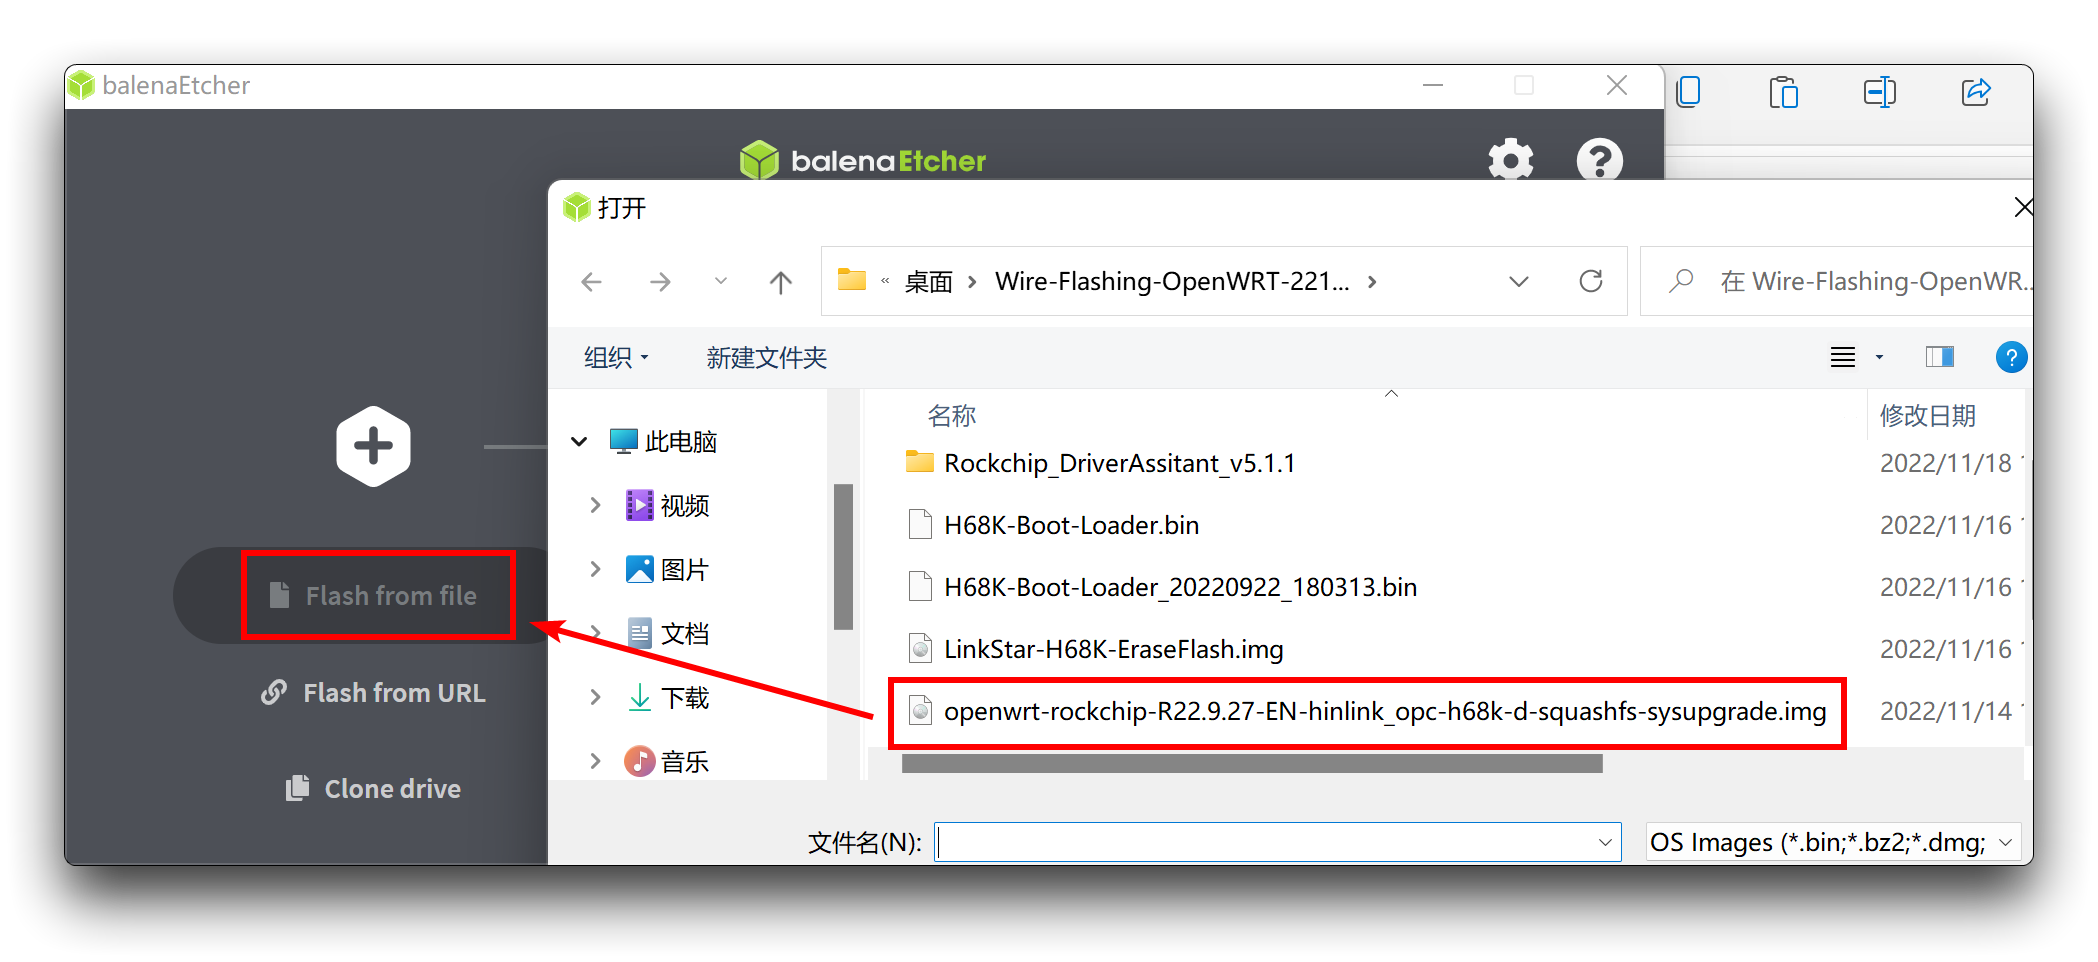
Select the drive you want to flash the system to.
Click the Flash button and the software will flash the system into your TF.
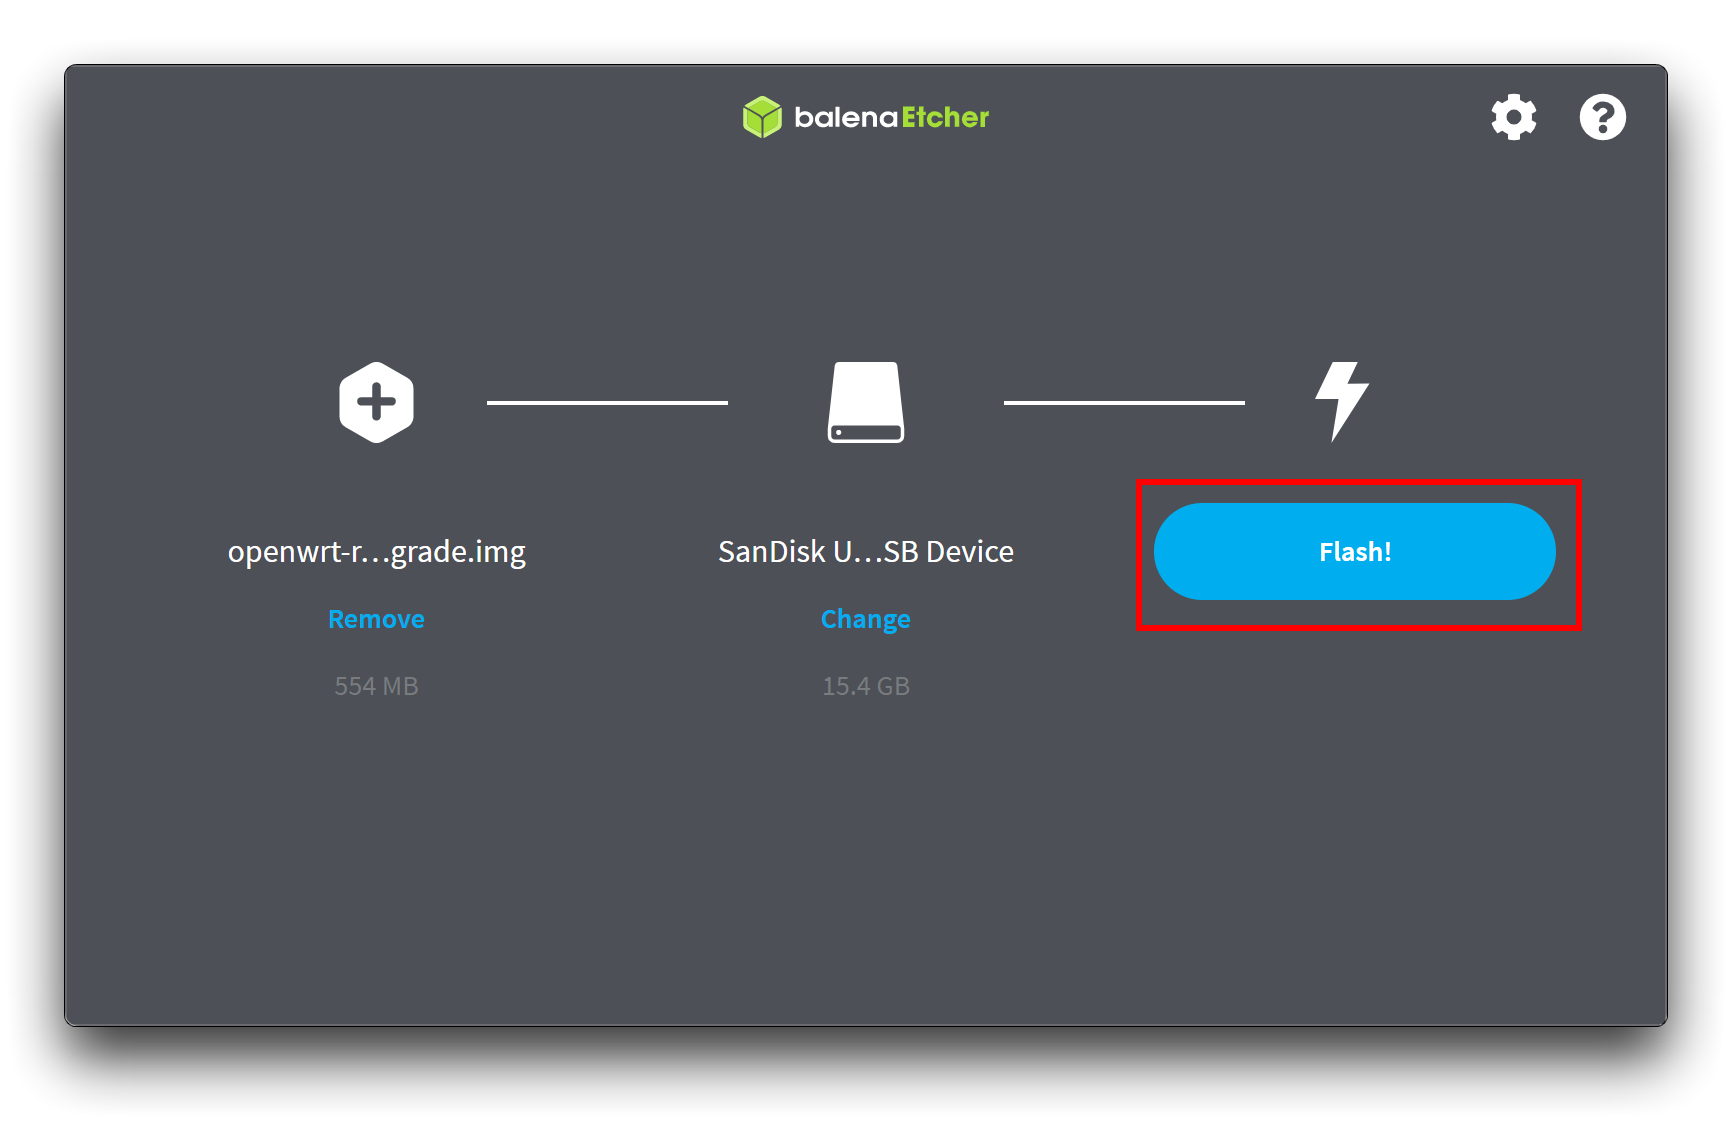
Some computers may prompt whether the USB device is not recognised after flashing the system and whether to format it, please do not reformat the card or the system inside will be erased.
Step 3. Boot OpenWRT from the TF card
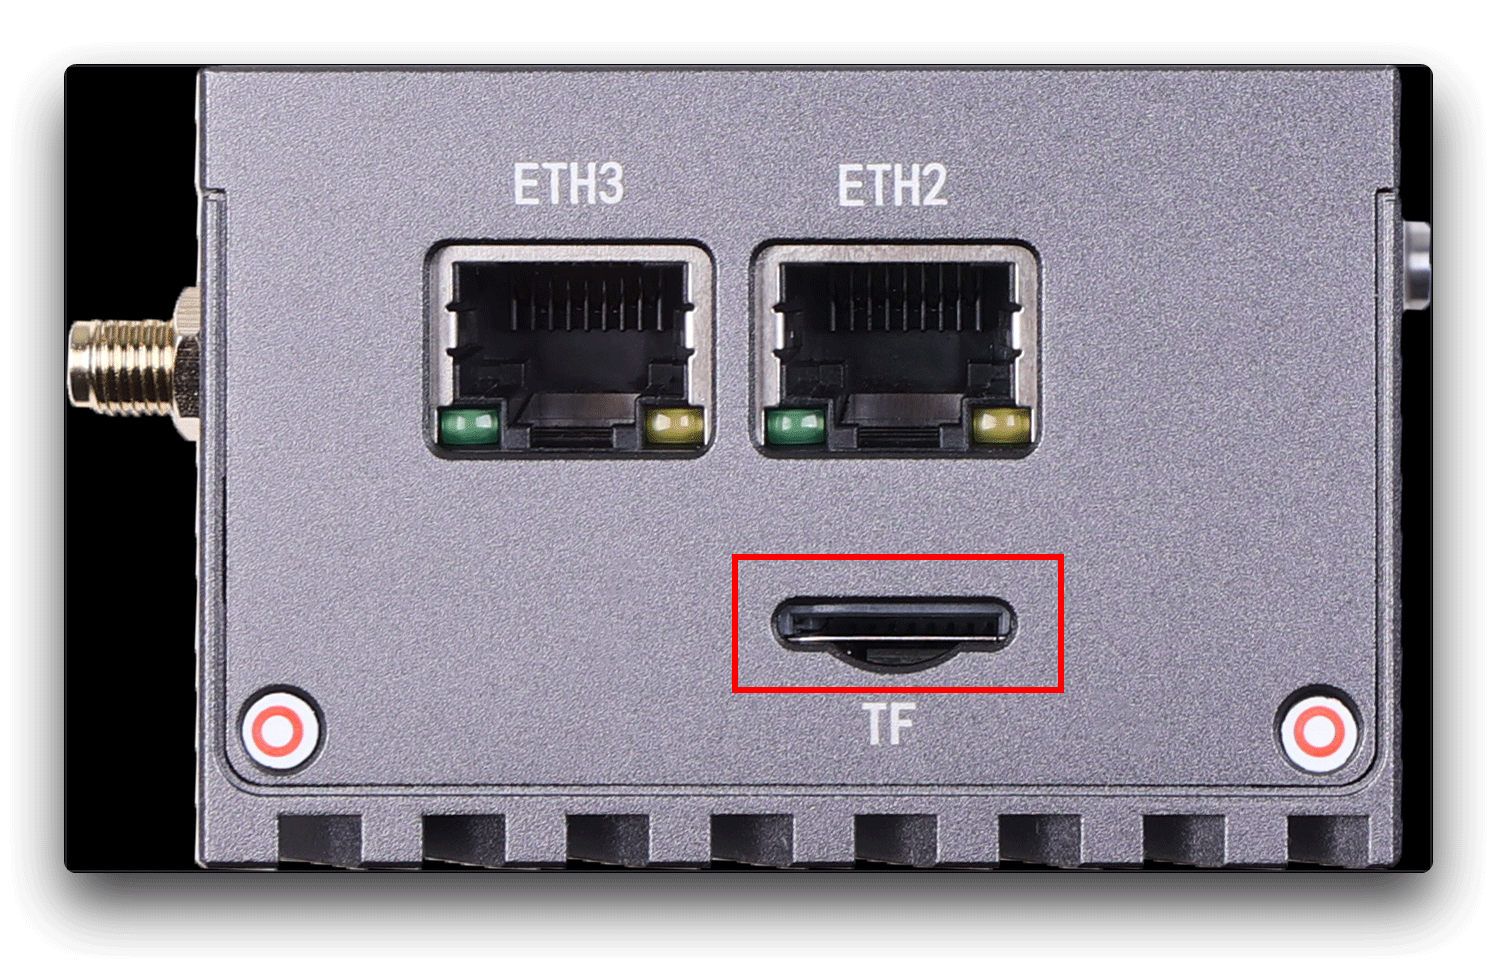
Remove the TF card from the card reader and insert it into the TF card slot of the LinkStar.
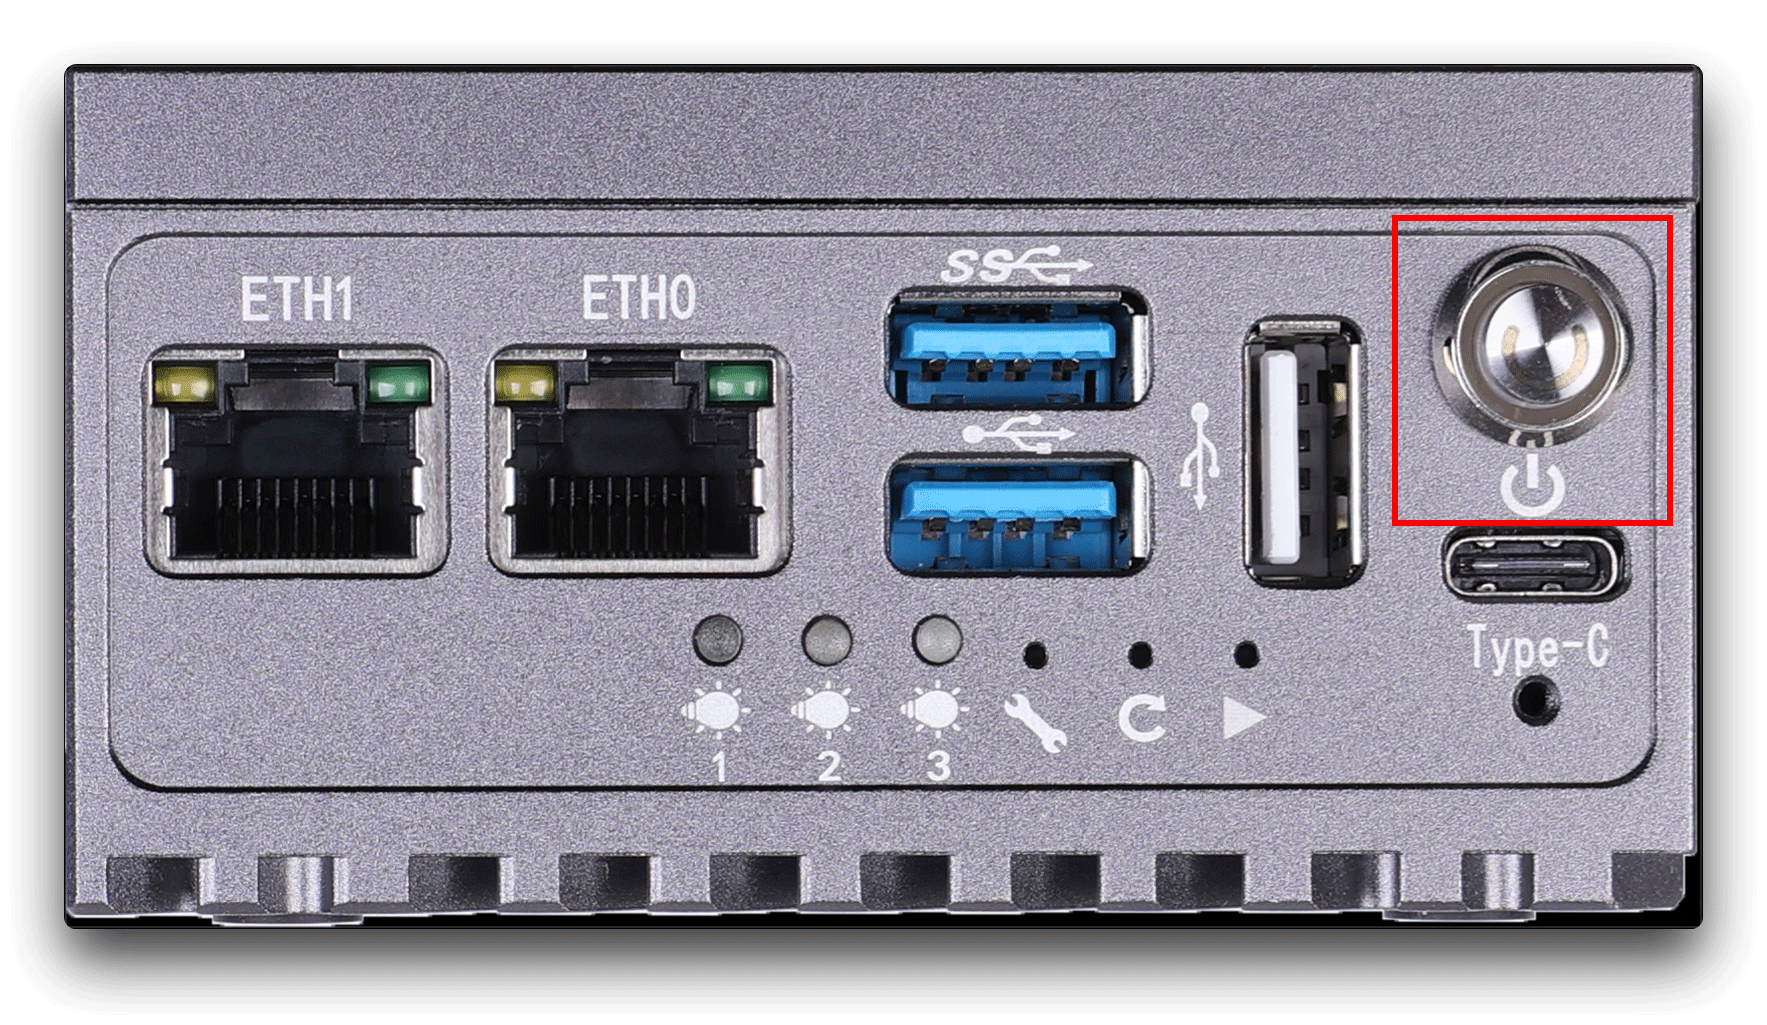
Then power up the LinkStar, you can choose to power it via USB-C-5V or via DC-12V.
When powered on, the LinkStar's power on button will light up in white. Press the power on button and the unit will power up and enter the system.
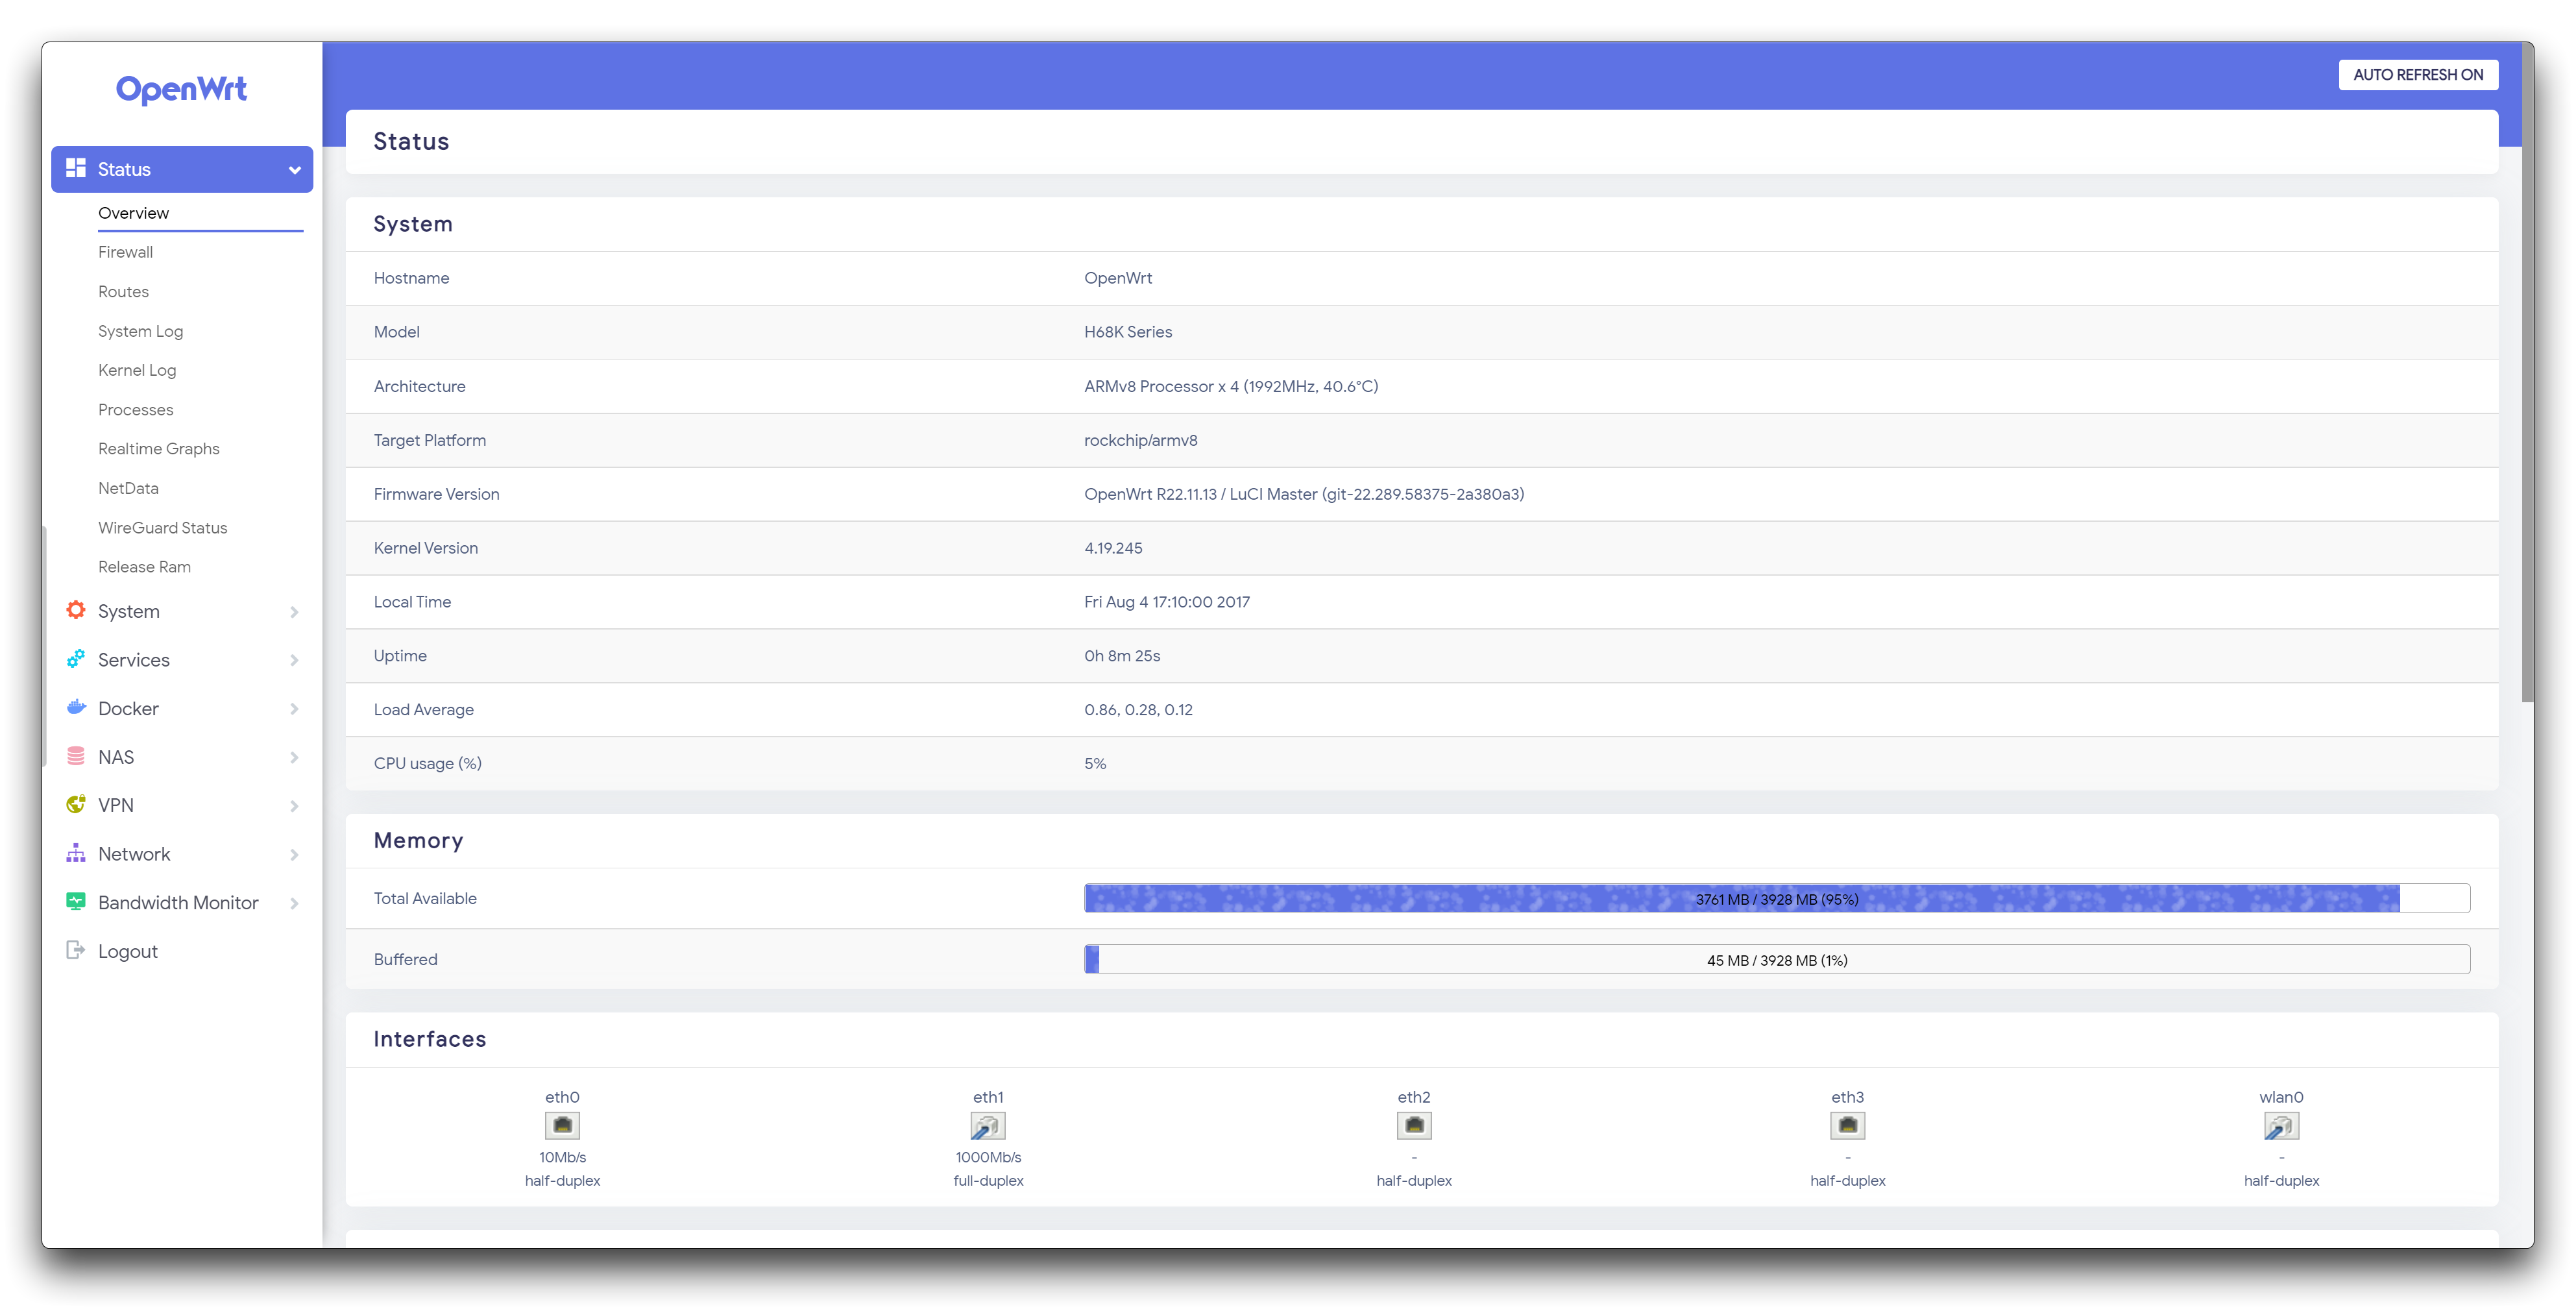
Step 4. Manage the OpenWRT backend
Use a network cable to connect to the ETH1/ETH2/ETH3 network port of the LinkStar. Then enter the address: 192.168.100.1 into your browser to access the admin backend.
ETH0 is the WAN port and the other network ports are LAN ports. If you want to manage LinkStar's OpenWRT via a network cable, then connect the network cable to a LAN port other than ETH0.

The initial account and password for the system are as follows.
account: root
password: password
Congratulations, you have now successfully installed OpenWRT via TF card.
Flash OpenWRT to eMMC
Preparation
- Windows PC
- USB - C data cable
- OpenWRT package
- Android package (Optional)
Please prepare the equipment required above, firmware update packages can be downloaded by clicking the download button below.
| Version | Description | Download |
|---|---|---|
| OpenWRT R22.11.18 | Add Docker support. | Download |
| Erase firware tool | - | Download |
| Flash to eMMC tool & driver | - | Download |
| Android TV R22.11.17 (Optional) | Remote control support (not for sale at this time) | Download |
If you are installing OpenWRT from another system, you will need to flash your Android system to eMMC before you can complete the OpenWRT installation, then you may need to download the Android package.
Procedure
Step 1. Install the driver
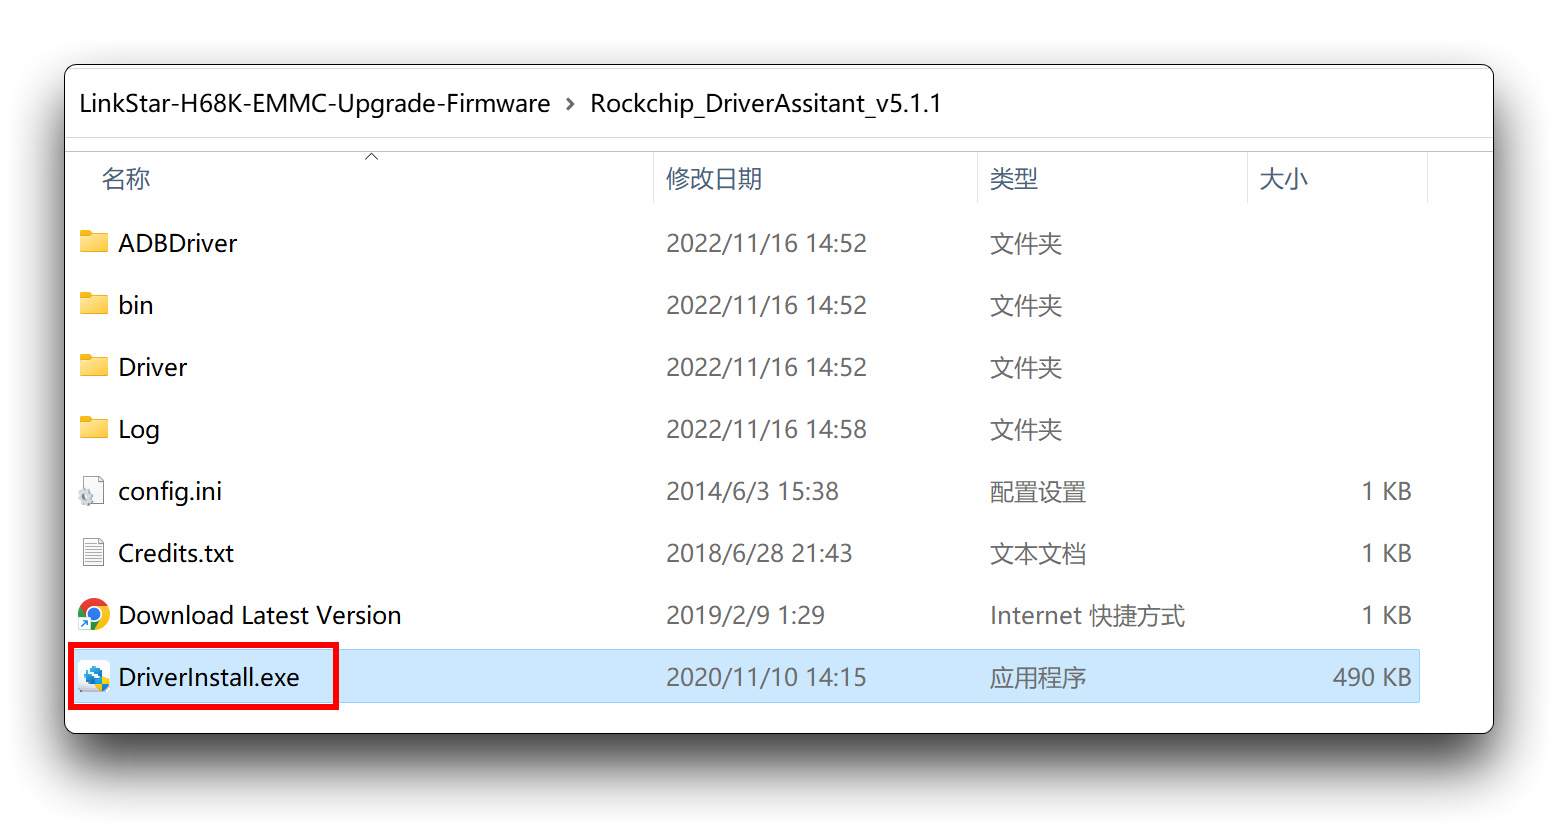
Go to the Rockchip_DriverAssitant_v5.1.1 folder and double click to open the DriverInstall.exe file to install the driver.
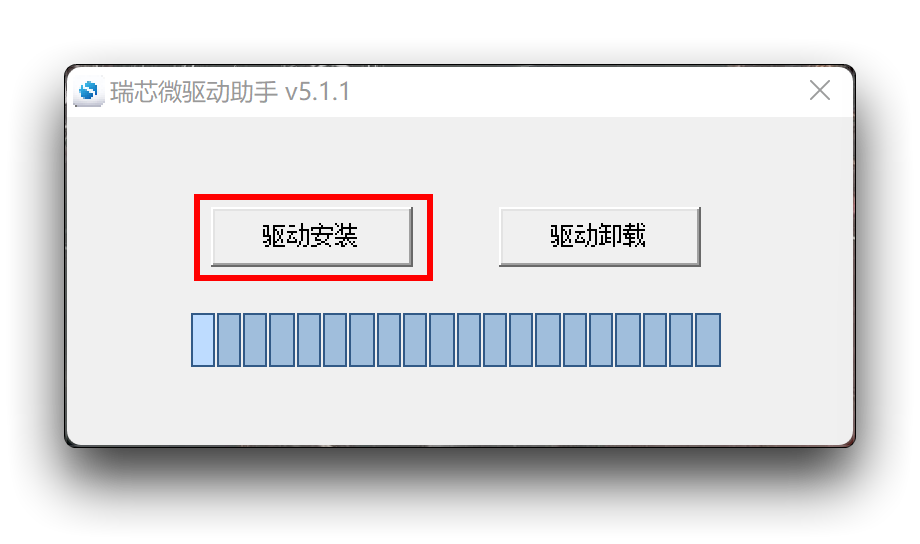
In the driver installation software that launches, click on "驱动安装" (Driver Installation).
Step 2. Put the device into Maskrom mode
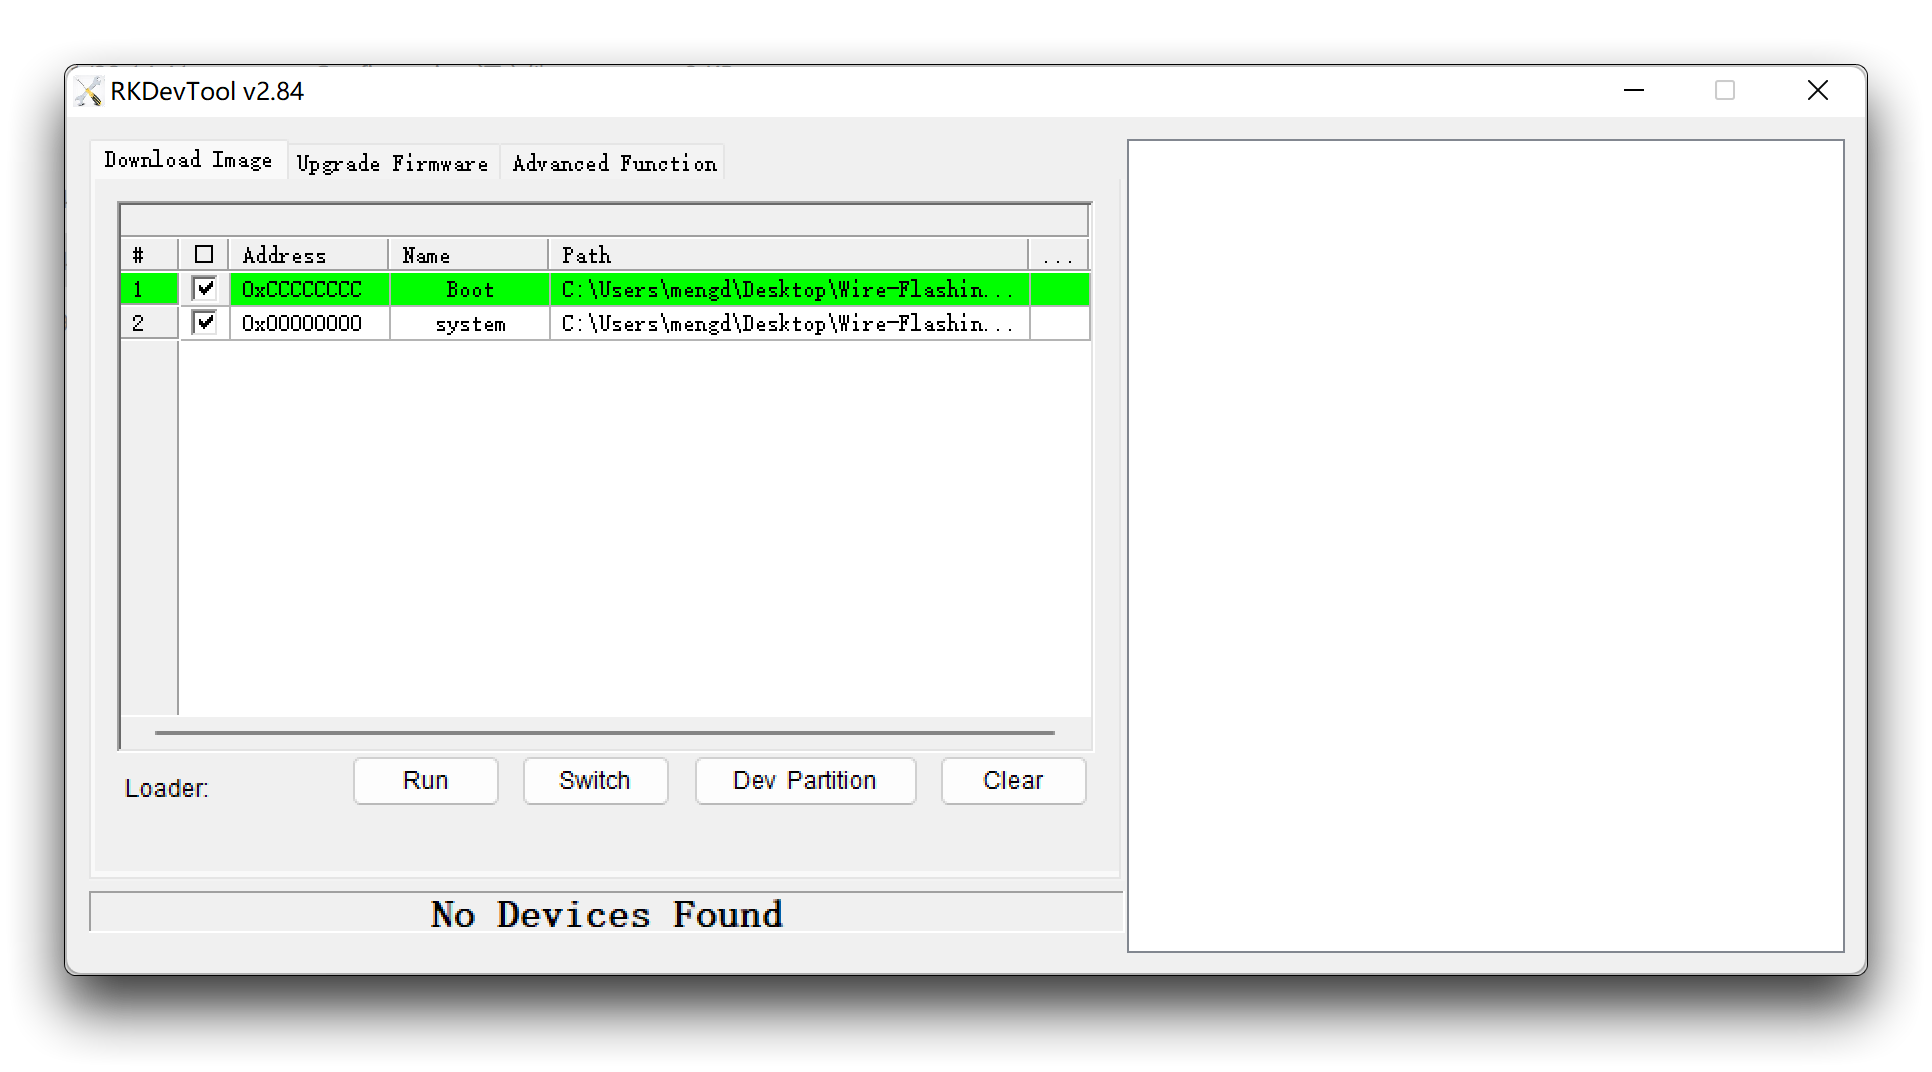
Go to the RKDevTool_Release_v2.84 folder and double click to open the RKDevTool.exe file.

At this point it should say "No Devices Found" at the bottom of the software.
Press the Update keyhole button continuously with the card pick-up pin and do not release it.
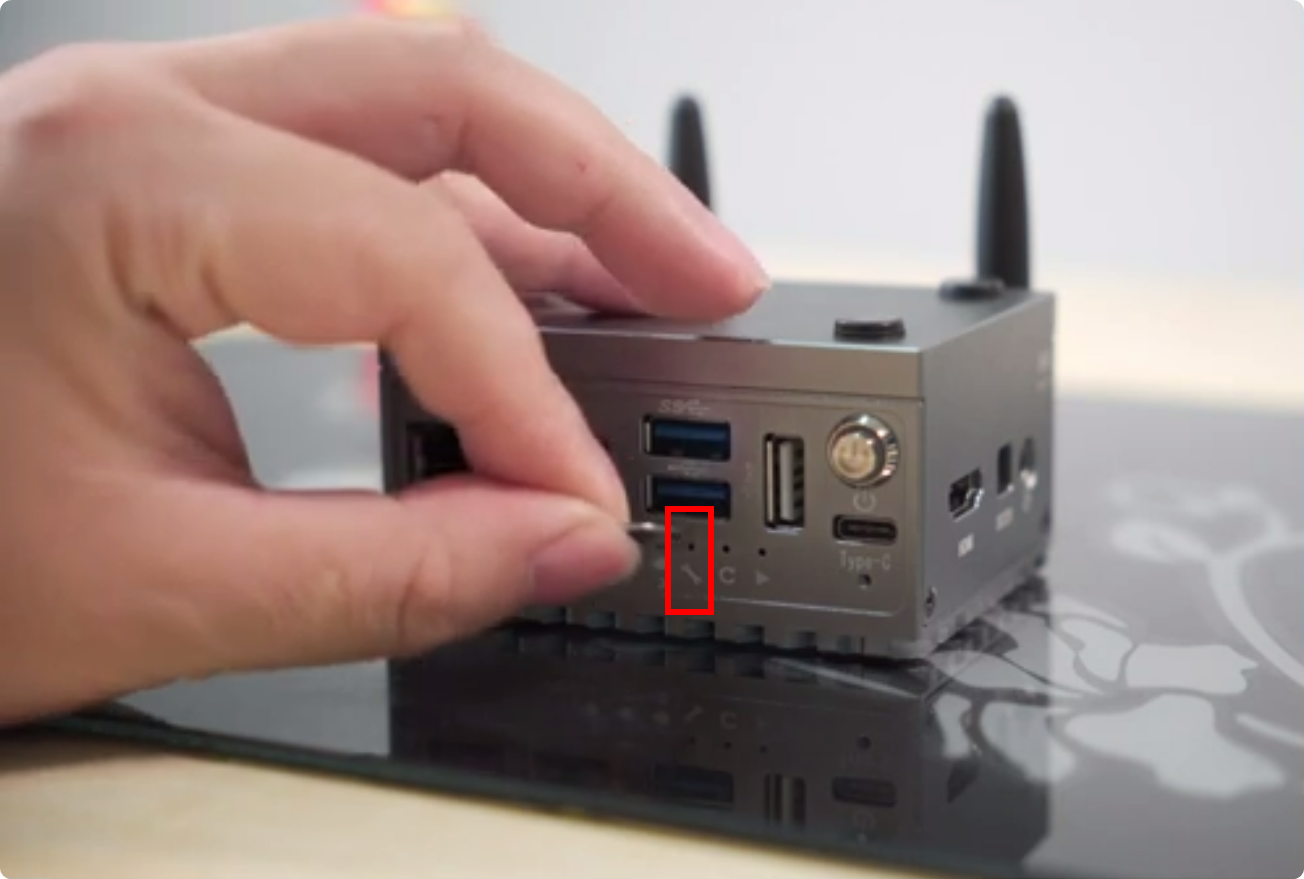
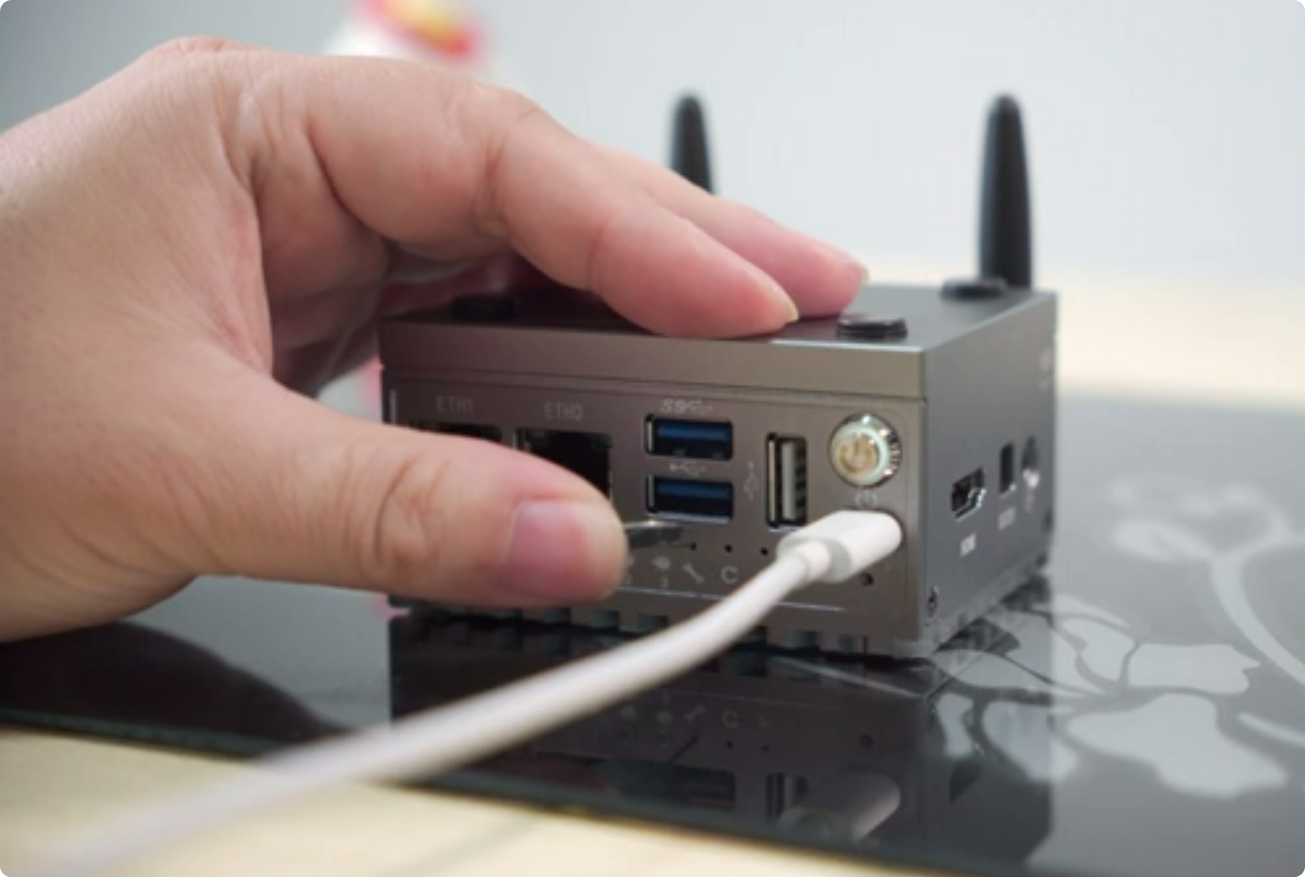
Keep your hands on the LinkStar and connect it to your computer using a USB-C type cable. Afterwards you can release the button.
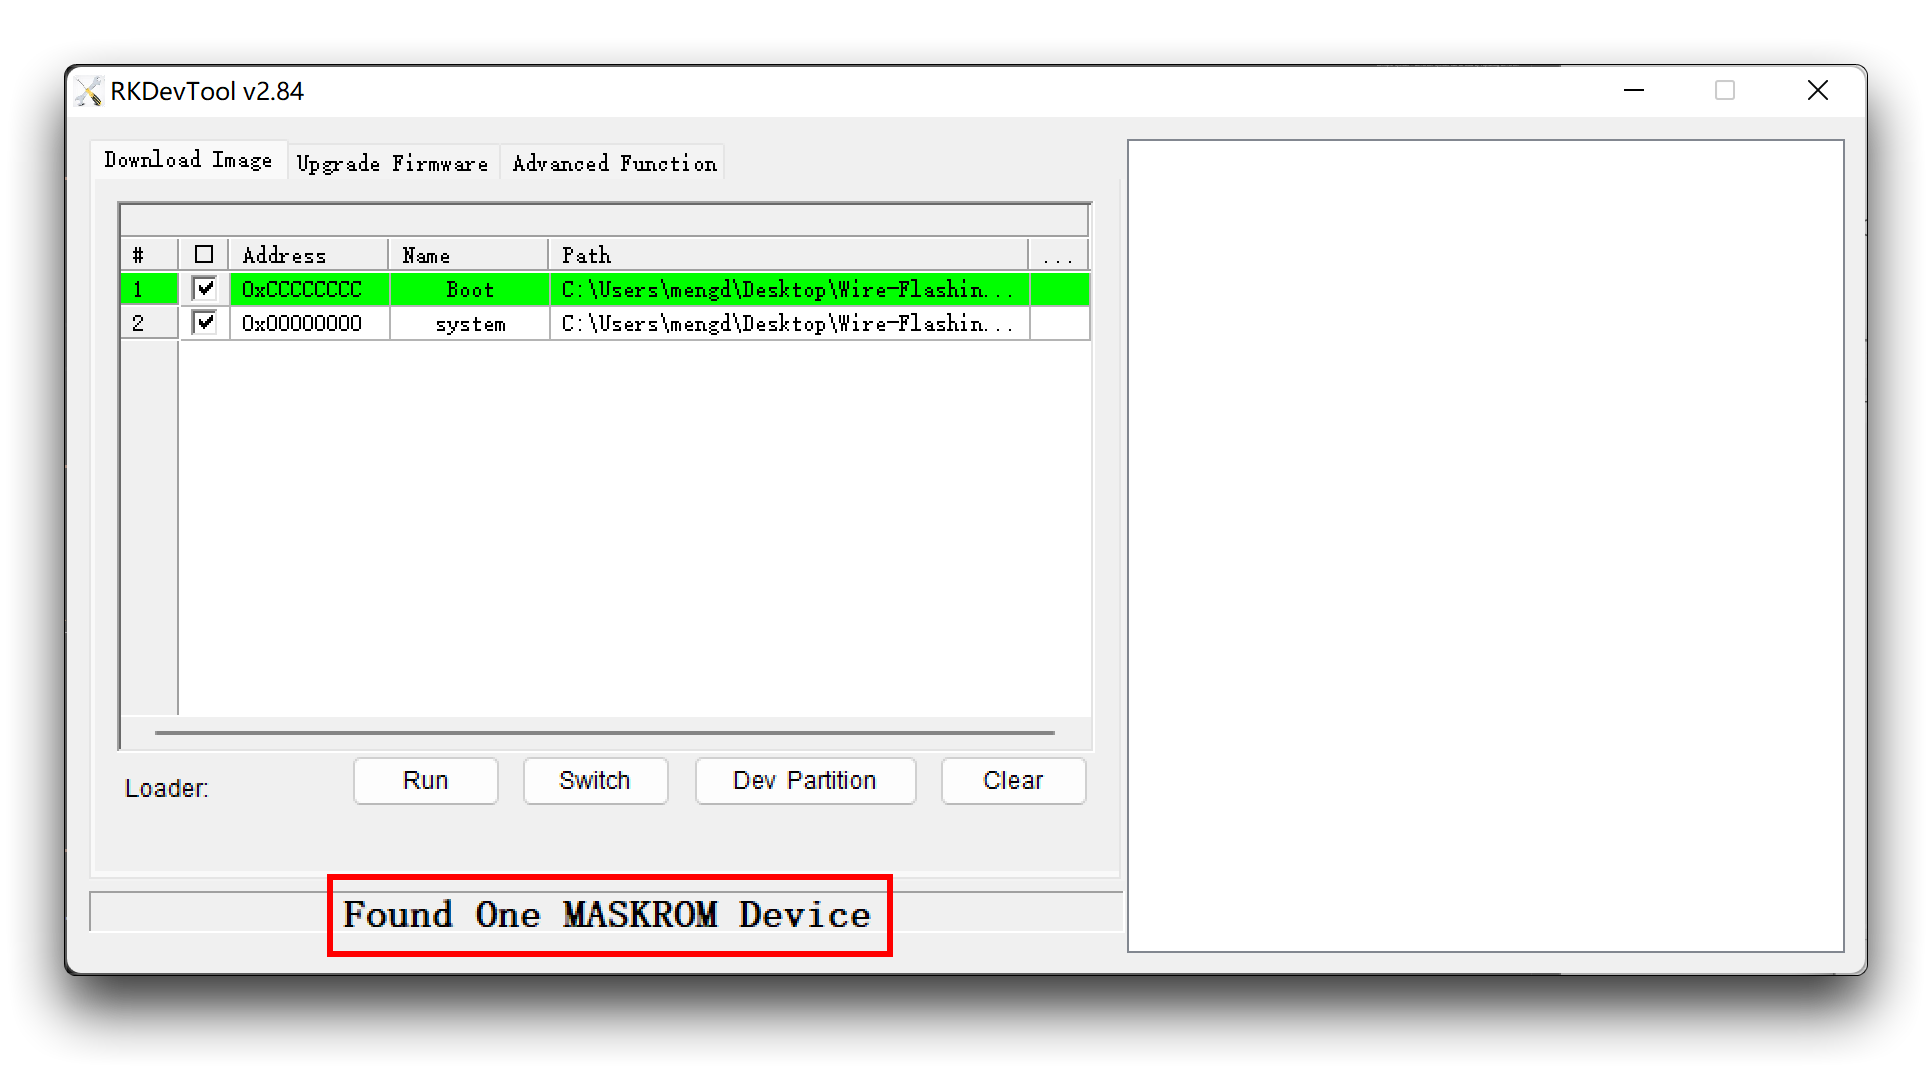
At this point watch the software again and it will show from "No Devices Found" to "Found One MASKROM Device".
Step 3. Erase firmware
Click on "Upgrade Firmware", then click on "Firmware" and select the LinkStar-H68K-EraseFlash.img file in the file directory.
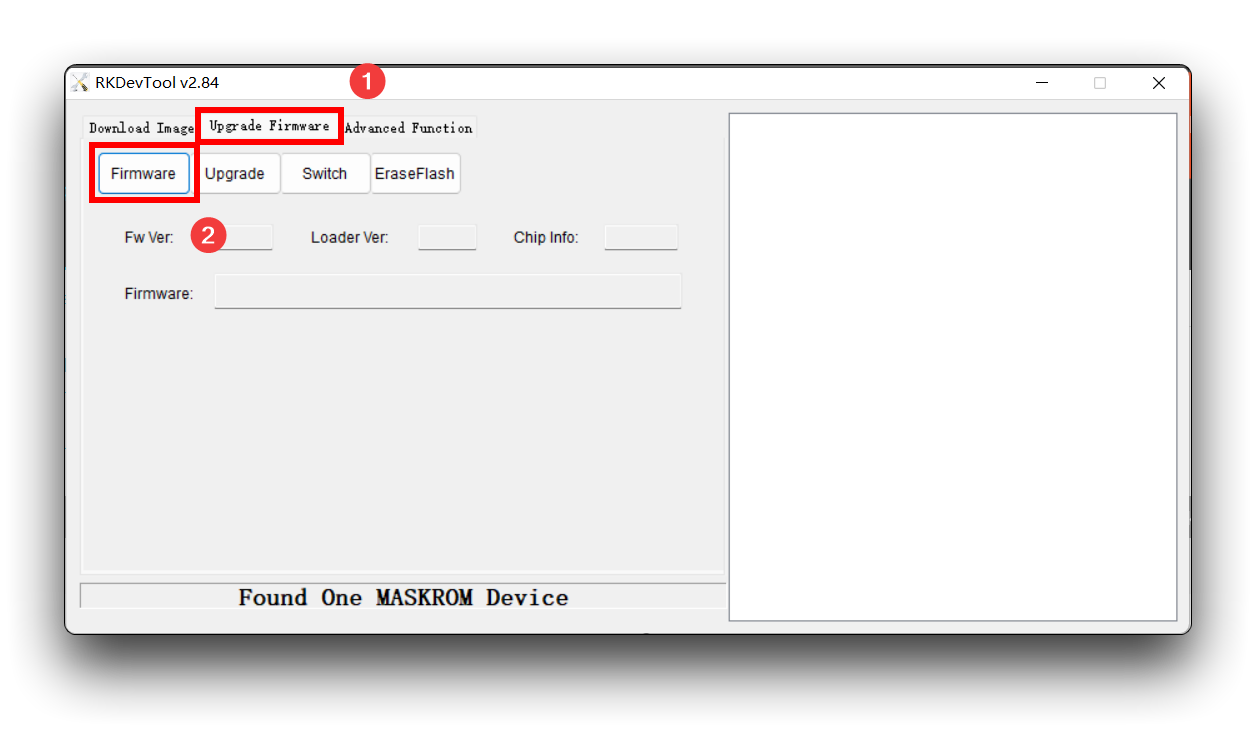
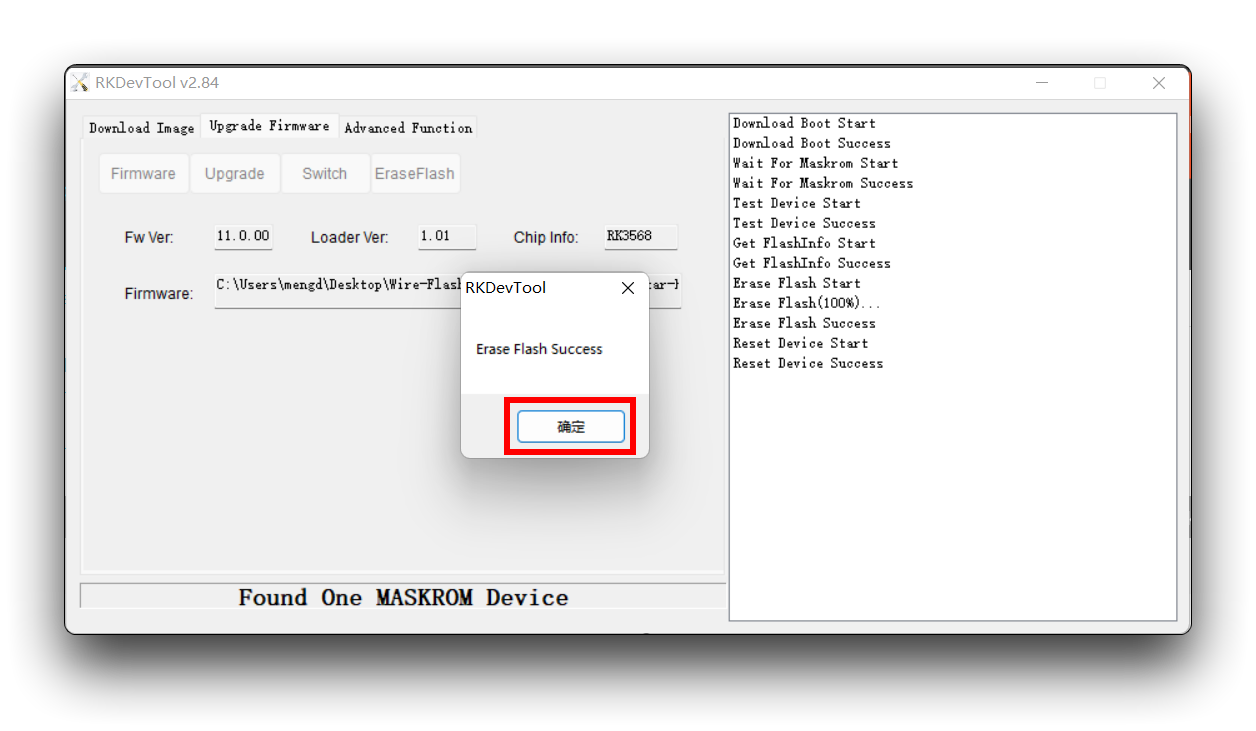
After importing the file, click on "EraseFlash".
Wait for the operation to complete and click "确定" (OK).
Step 4. Flash OpenWRT
if you follow along the steps from above your LinkStar H68K should be still in MASKROOM Mode, if not please repeat and follow along the steps from Step 2 again.
Click on "Download Image" in the top left corner of the software, then select the H68K-Boot-Loader_xxx.bin file for the first Boot option line.
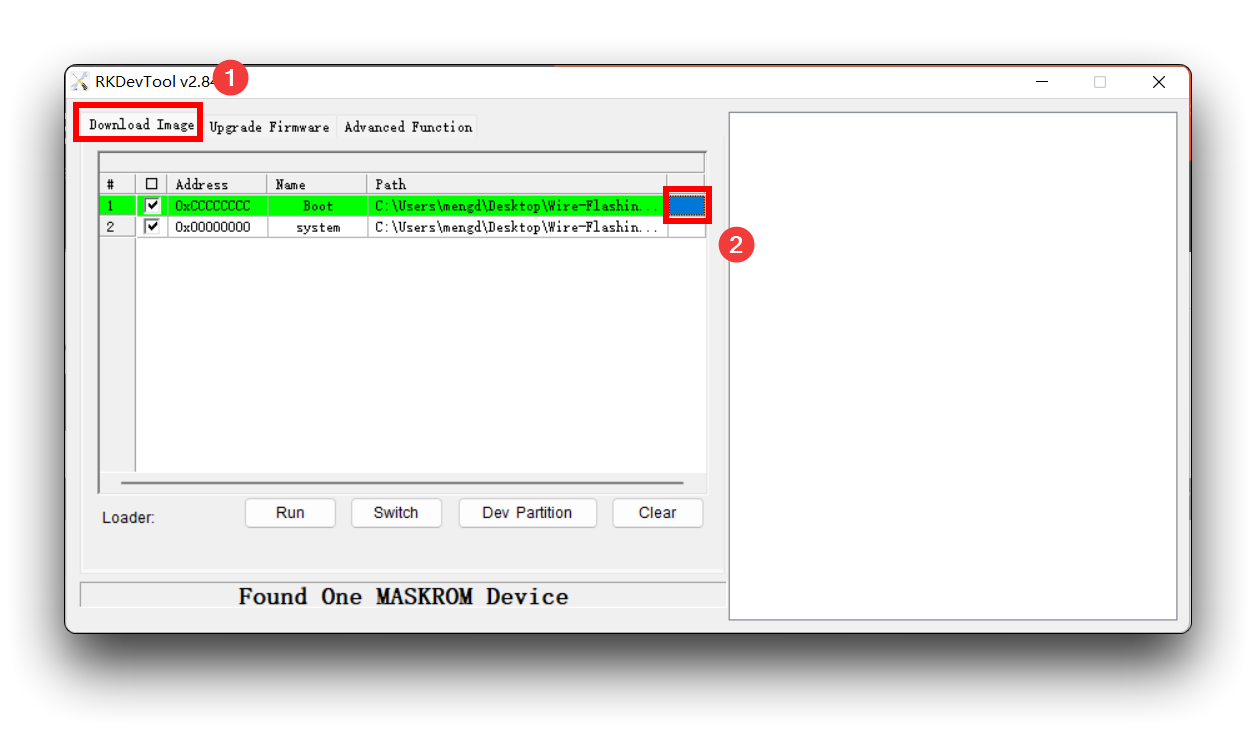

Then in the second line of system options, select the system image for OpenWRT. It should be a file ending in .img.

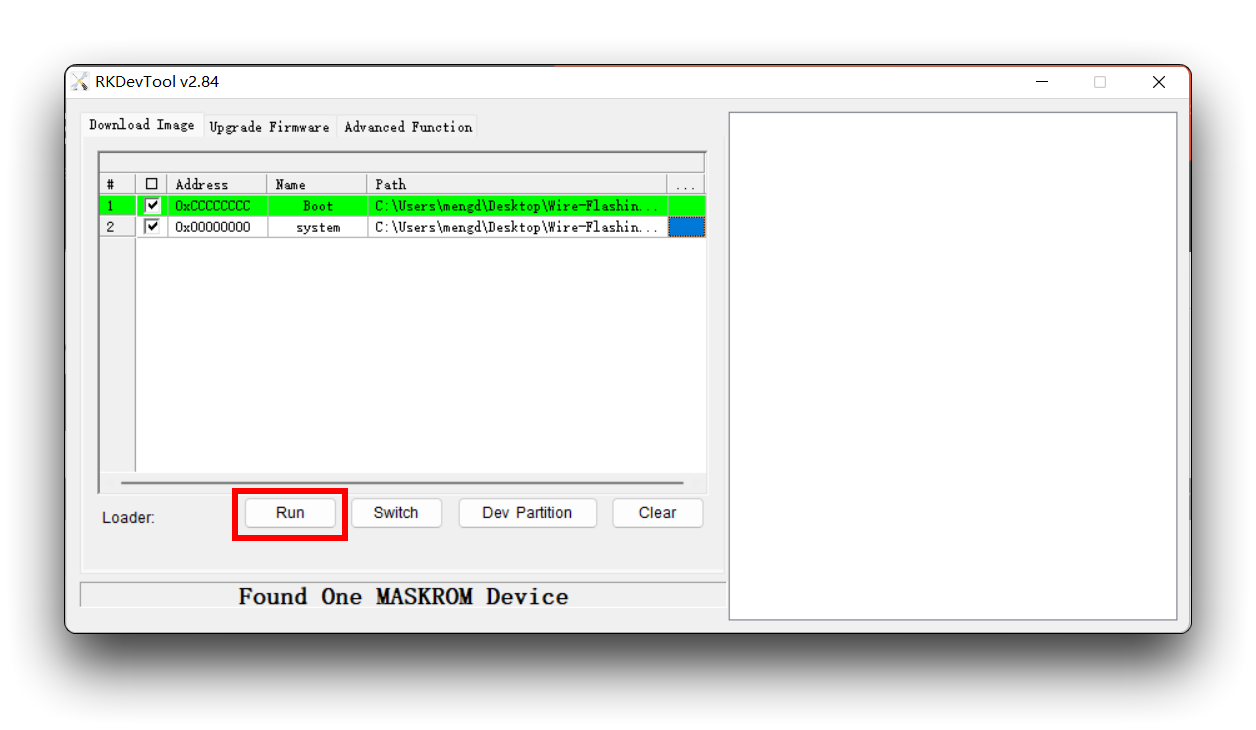
Then click on the "Run" button below.
Wait for the "Download image OK" prompt, then the system has been successfully installed into LInkStar's eMMC.
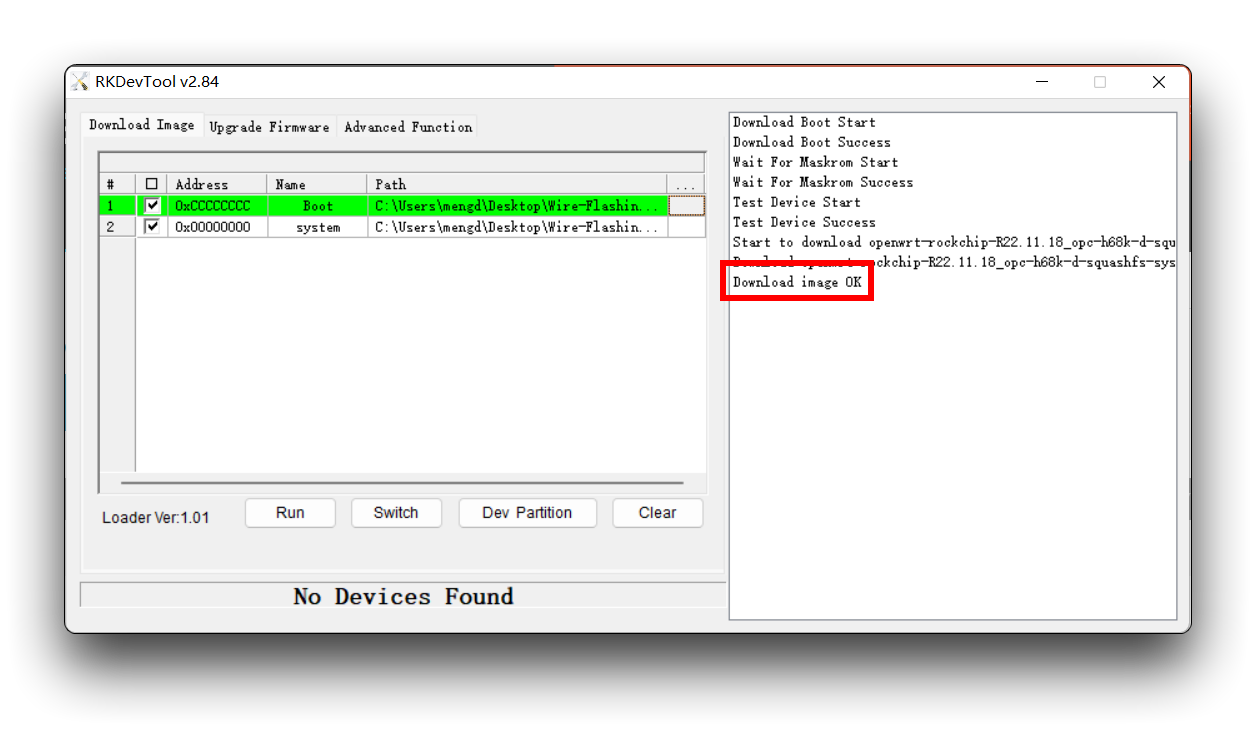
Once the system flash is complete, the LinkStar H68K should automatically reboot and once rebooted it will enter the OpenWRT system.
Step 5. Manage the OpenWRT backend
Use a network cable to connect to the ETH1/ETH2/ETH3 network port of the LinkStar. Then enter the address: 192.168.100.1 into your browser to access the admin backend.
ETH0 is the WAN port and the other network ports are LAN ports. If you want to manage LinkStar's OpenWRT via a network cable, then connect the network cable to a LAN port other than ETH0.
The initial account and password for the system are as follows.
account: root
password: password
Congratulations, you have now successfully installed OpenWRT into eMMC.
Flash Android / Ubuntu to eMMC
Preparation
- Windows PC
- USB - C data cable
- system package.
Please have the above devices and software ready, firmware update packages can be downloaded by clicking the download button below.
| Version | Description | Download |
|---|---|---|
| Flash to eMMC tool & driver | - | Download |
| Android Pad R22.11.17 | Fix working indicator; fix HDMI no sound problem; change right mouse button to return; change density to 240 | Download |
| Android TV R22.11.17 | Remote control support (not for sale at this time) | Download |
| Ubuntu 20.04 R22.01.15 | Add support for wifi AP256, default Username: linkstar, Password: linkstar, Root Username:root, Root Password:root | Download |
Due to the limited resources on the ARM based CPU core,of Linkstar the Ubuntu 20.04 is based on Lubuntu which is a lightweight Linux distribution of Ubuntu which uses LXDM or LXQt desktop environment.
The image provided here does not support Card-Flashing.
Procedure
The tutorial here takes the installation of Android TV as an example, the installation steps for other systems are more or less the same, just choose a different system image file.
Step 1. Install the driver
Go to the Rockchip_DriverAssitant_v5.1.1 folder and double click to open the DriverInstall.exe file to install the driver.
In the driver installation software that launches, click on "驱动安装" (Driver Installation).
Step 2. Put the device into Maskrom mode
Go to the RKDevTool_Release_v2.84 folder and double click to open the RKDevTool.exe file.
At this point it should say "No Devices Found" at the bottom of the software.
Press the Update keyhole button continuously with the card pick-up pin and do not release it.
Keep your hands on the LinkStar and connect it to your computer using a USB-C type cable. Afterwards you can release the button.
At this point watch the software again and it will show from "No Devices Found" to "Found One MASKROM Device".
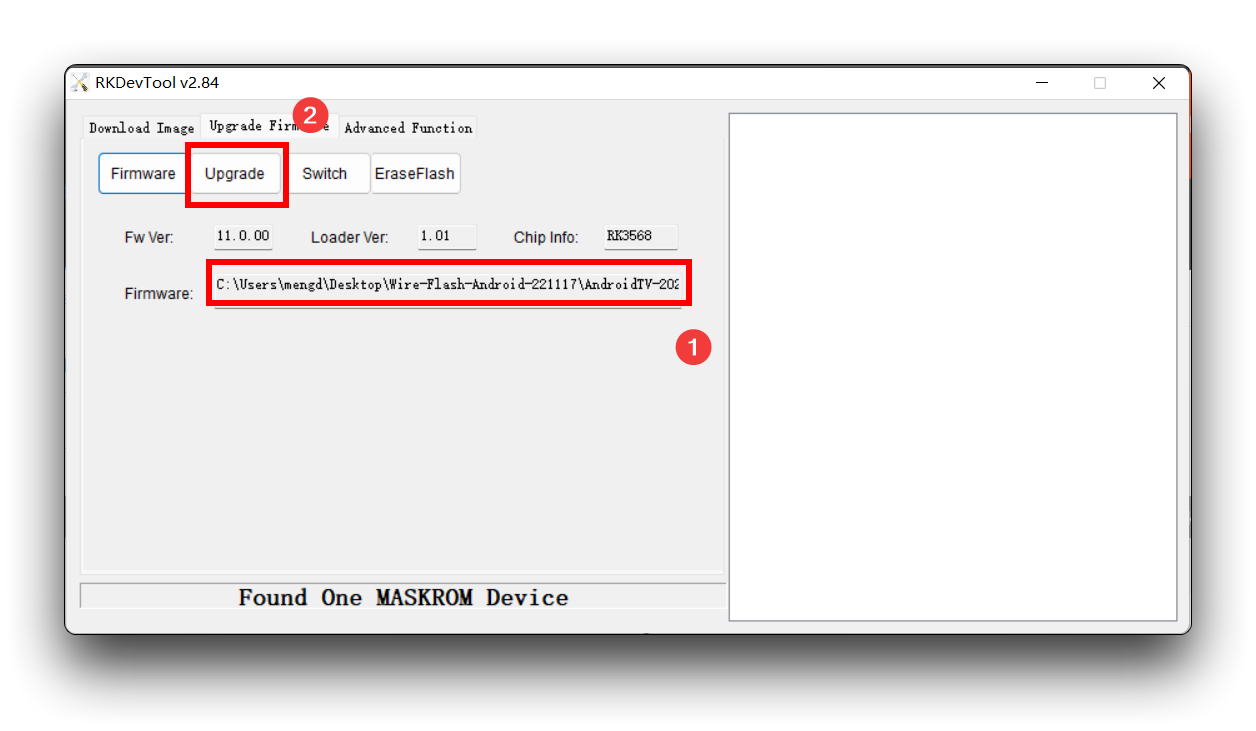
Step 3. Flash Firmware
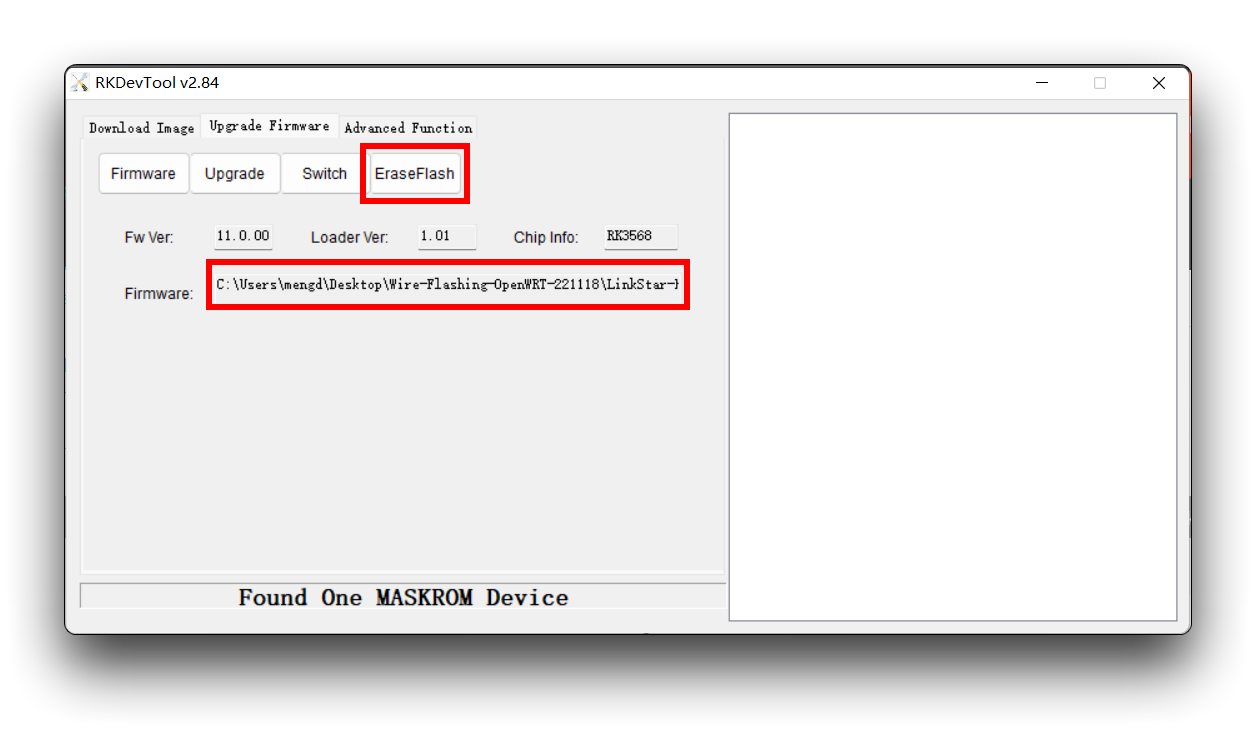
Click on "Upgrade Firmware", then click on "Firmware" and select the system image you want to install, this file ends with .img.
After importing the file, click on "Upgrade".
Wait for the prompt to appear that the "Reset Device Success", at which point the system has finished flashing.
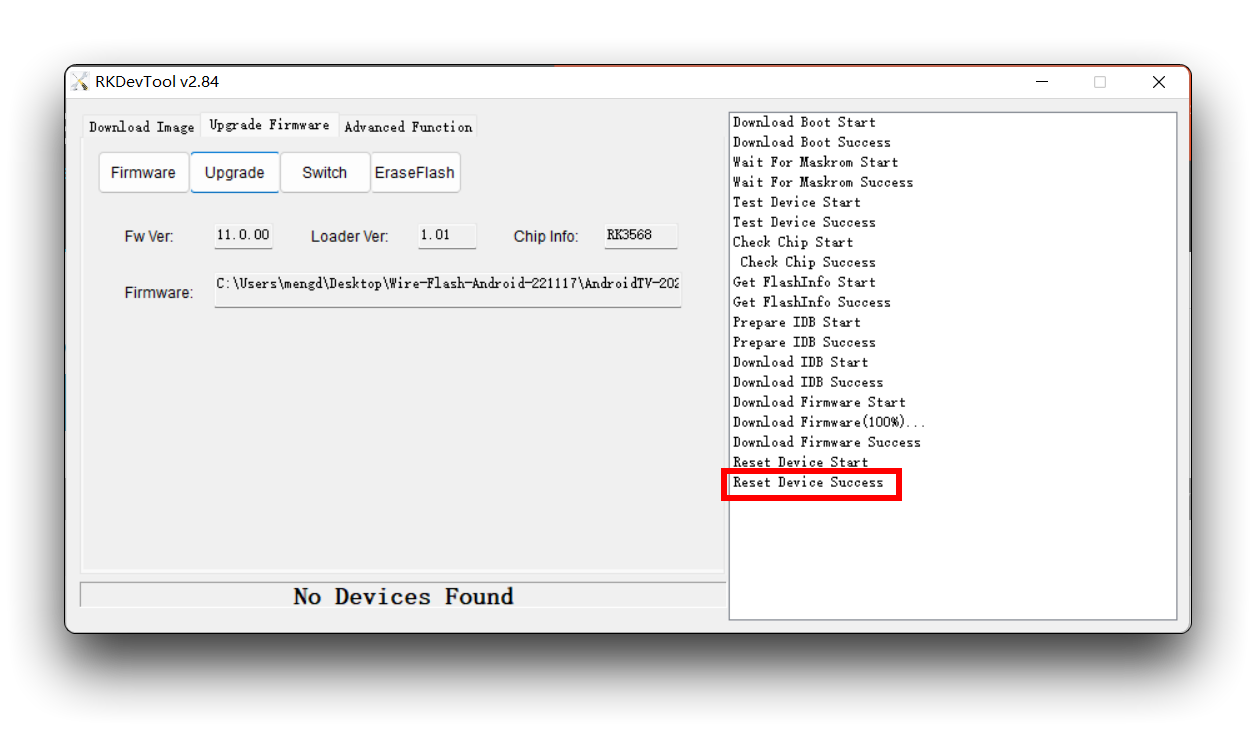
Once the system flash is complete, the LInkStar will automatically reboot and once rebooted it will enter the system.
Tech Support & Product Discussion
Thank you for choosing our products! We are here to provide you with different support to ensure that your experience with our products is as smooth as possible. We offer several communication channels to cater to different preferences and needs.