Getting Started with reTerminal
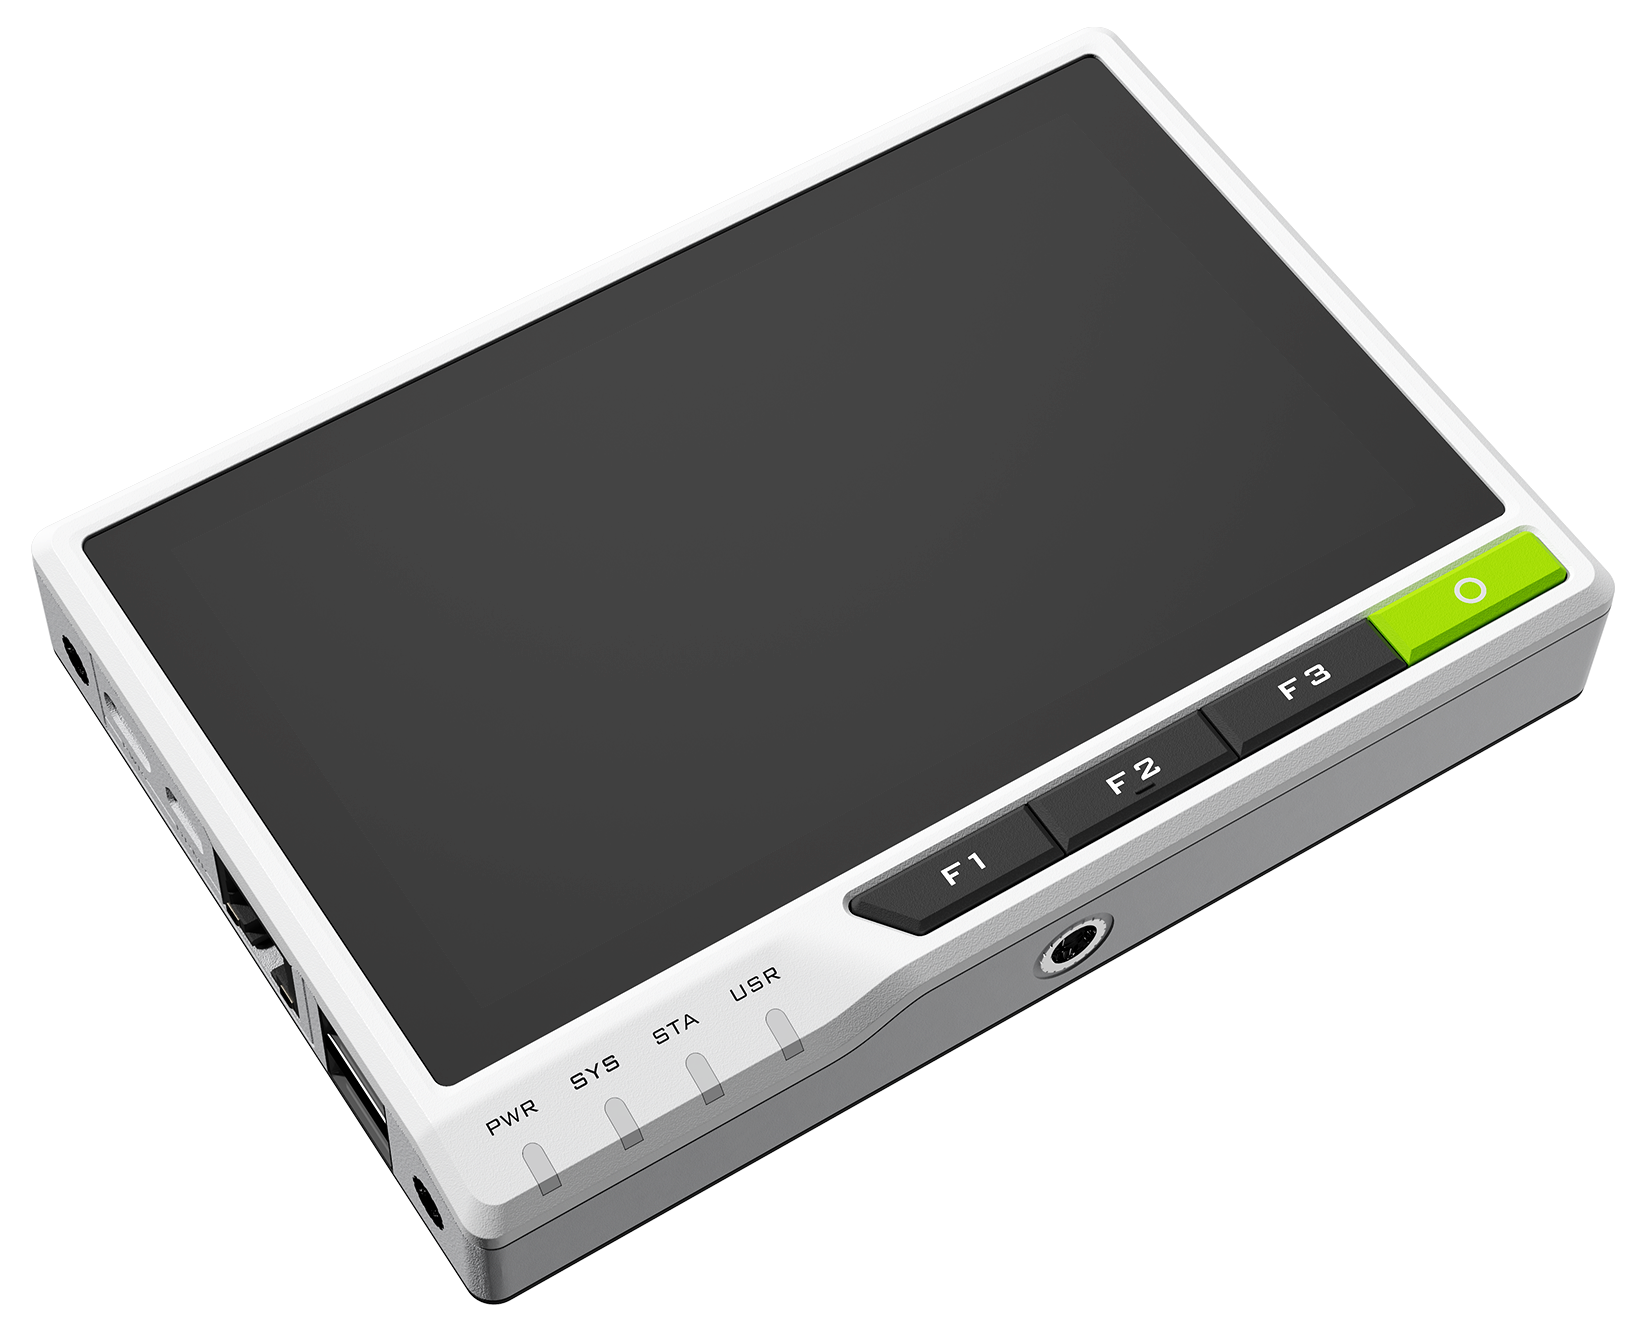
Introducing reTerminal, a new member of our reThings family. This future-ready Human-Machine Interface (HMI) device can easily and efficiently work with IoT and cloud systems to unlock endless scenarios at the edge.
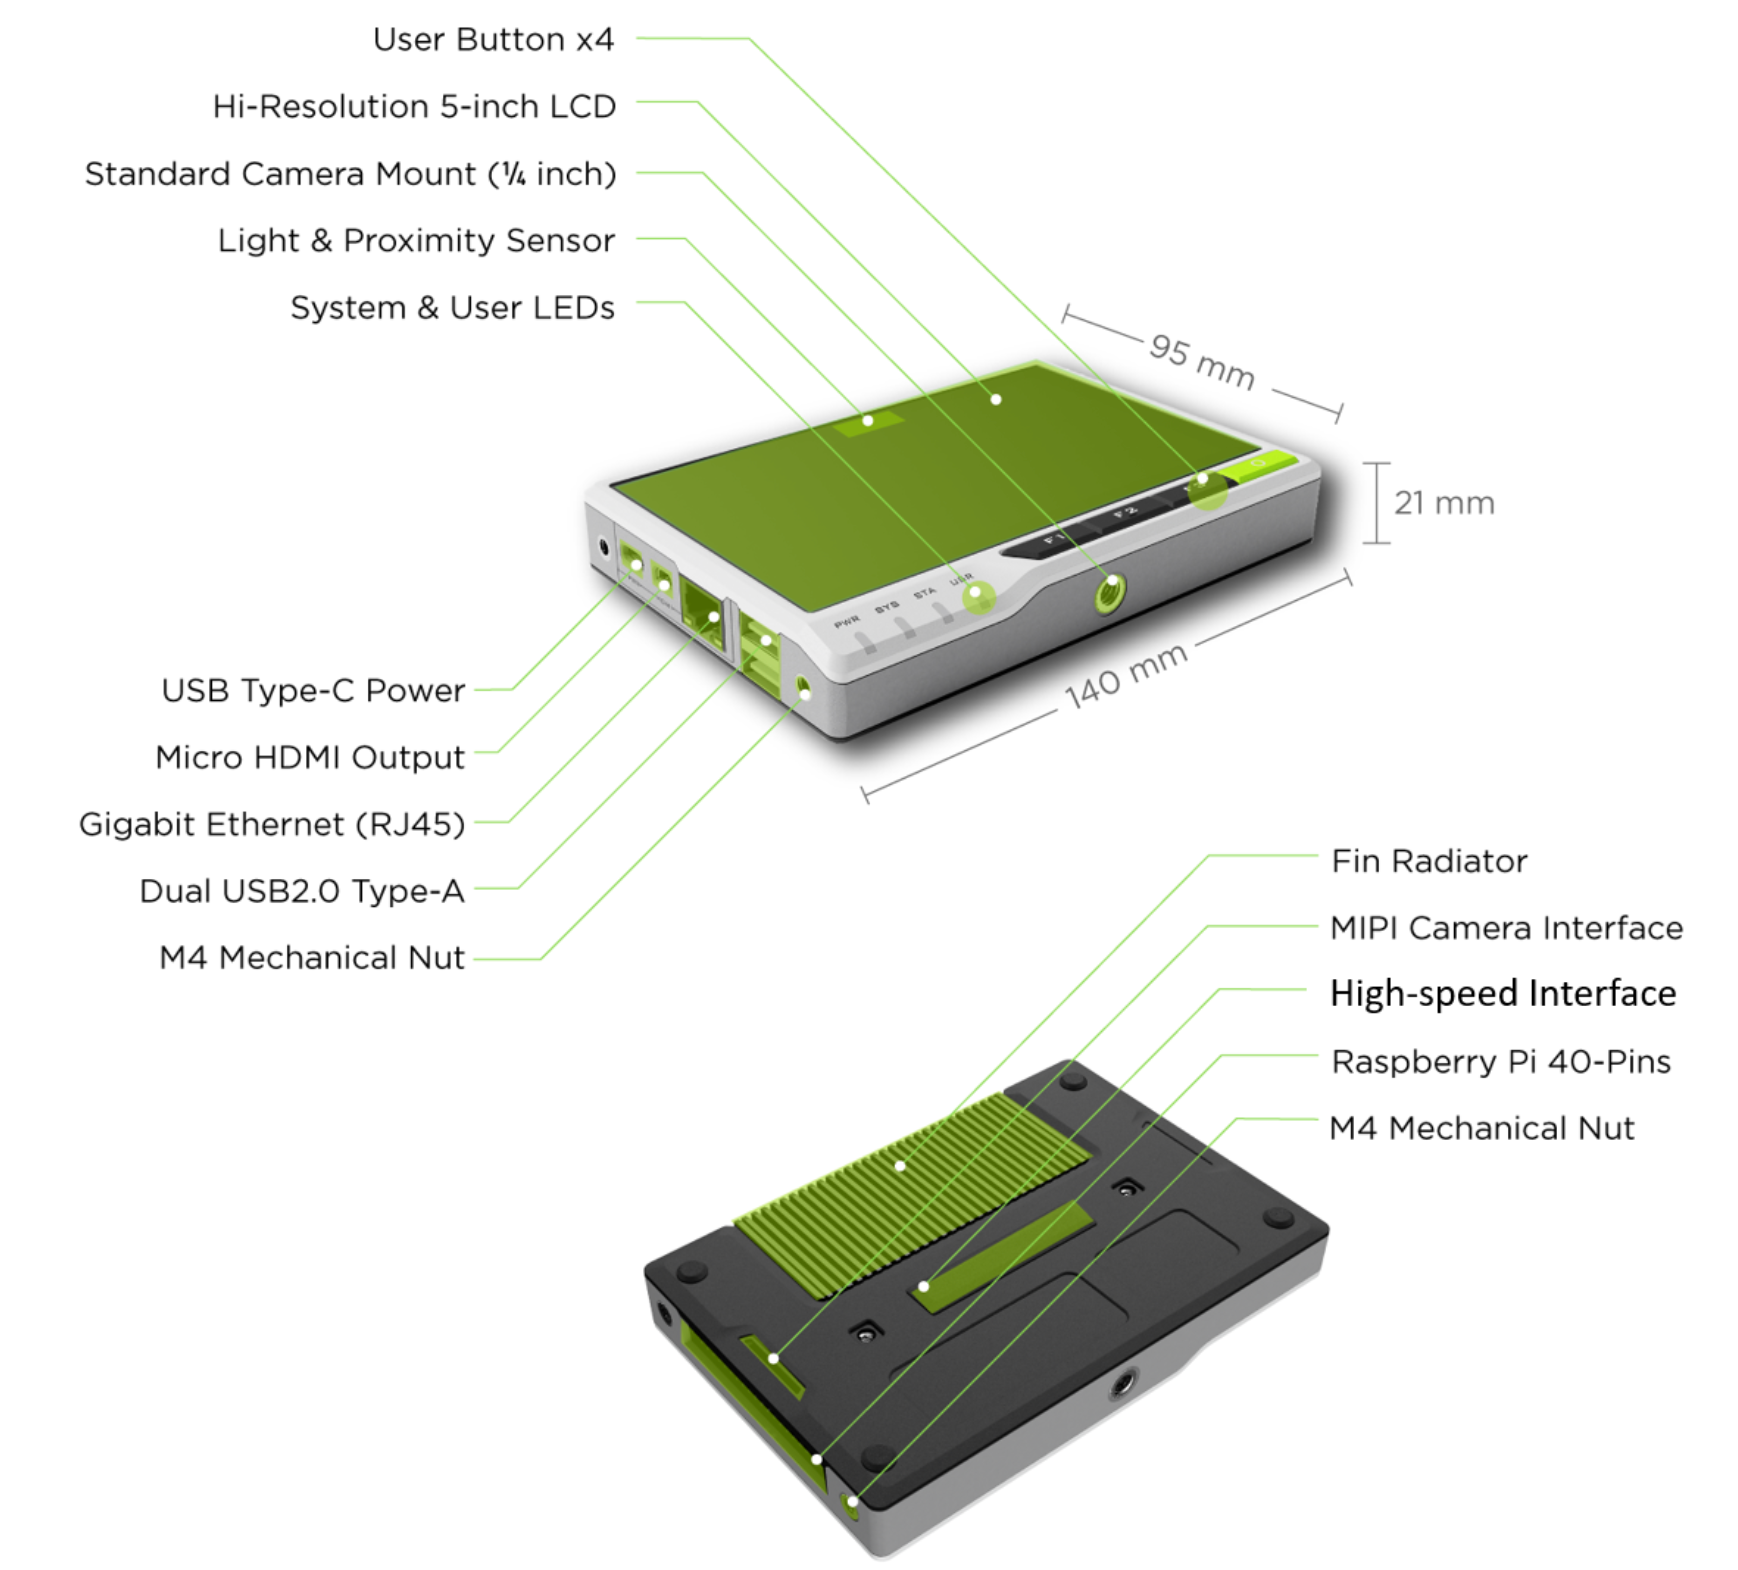
reTerminal is powered by a Raspberry Pi Compute Module 4 (CM4) which is a Quad-Core Cortex-A72 CPU running at 1.5GHz and a 5-inch IPS capacitive multi-touch screen with a resolution of 1280 x 720. It has sufficient amount of RAM (4GB) to perform multitasking and also has sufficient amount of eMMC storage (32GB) to install an operating system, enabling fast boot up times and smooth overall experience. It has wireless connectivity with dual-band 2.4GHz/5GHz Wi-Fi and Bluetooth 5.0 BLE.
reTerminal consists of a high-speed expansion interface and rich I/O for more expandability. This device has security features such as a cryptographic co-processor with secure hardware-based key storage. It also has built-in modules such as an accelerometer, light sensor and an RTC (Real-Time Clock). reTerminal has a Gigabit Ethernet Port for faster network connections and also has dual USB 2.0 Type-A ports. The 40-pin header on the reTerminal opens it for a wide range of IoT applications.
reTerminal is shipped with Raspberry Pi OS out-of-the-box. So, all you have to do is connect it to power and start building your maker projects , IoT and home automation builds to off-grid DIY experiments
| Released Date | Pre-Installed OS | Pre-Installed STM32 Firmware | Board Version | Additional Information |
|---|---|---|---|---|
| 06/15/2021 | 2021-06-02-Raspbian(modified)-32-bit | V1.0 | v1.3 | Initial |
| 08/03/2021 | 2021-06-02-Raspbian(modified)-32-bit | V1.1 | v1.4 | |
| 09/03/2021 | 2021-06-02-Raspbian(modified)-32-bit | V1.6 | v1.6 | Change IO Expansion Chip from MCP23008-E to PCA9554, Change Encryption Microchip from ATECC608A-SSHDA-B to ATECC608A-TNGTLSS-G More Info |
| 11/02/2021 | 2021-09-14-Raspbian(modified)-32-bit | V1.8 | v1.6 |
Features
- Integrated modular design with high stability and expandability
- Powered by Raspberry Pi Computer Module 4 with 4GB RAM & 32GB eMMC
- 5-Inch IPS capacitive multi-touch screen at 1280 x 720 and 293 PPI
- Wireless connectivity with dual-band 2.4GHz/5GHz Wi-Fi and Bluetooth 5.0 BLE
- High-speed expansion interface and rich I/O for more expandability
- Cryptographic co-processor with secure hardware-based key storage
- Built-in modules such as accelerometer, light sensor and RTC
- Gigabit Ethernet Port and Dual USB 2.0 Type-A ports
- 40-Pin header for IoT applications
Specifications
| Specification | Details | |
|---|---|---|
| Platform | Processor | Broadcom BCM2711 quad-core Cortex-A72 (ARM v8) |
| Frequency | 64-bit SoC @ 1.5GHz | |
| Memory | Capacity | 4GB |
| Technology | LPDDR4 with on-die ECC | |
| eMMC | Capacity | 32GB |
| Wireless | Wi-Fi | 2.4GHz and 5.0GHz IEEE 802.11b/g/n/ac |
| Bluetooth | Bluetooth 5.0, BLE | |
| Display | LCD | 5-inch 720x1280 LCD |
| Touch Panel | Capacitive touch panel (support multi-touch) | |
| Video | HDMI | 1 x Micro HDMI output (up to 4Kp60 supported) |
| CSI | 1 x 2-lane MIPI CSI camera interface | |
| Multimedia | H.265 (4Kp60 decode) | |
| H.264 (1080p60 decode,1080p30 encode) | ||
| OpenGL ES 3.0 graphics | ||
| Built-In Modules | Real-Time Clock | NXP Semiconductors PCF8563T |
| Low backup current; typical 0.25μA at VDD = 3.0 V and Temperature = 25 ℃ | ||
| Accelerometer | STMicroelectronics LIS3DHTR | |
| 16-bit, ±2g/±4g/±8g/±16g dynamically selectable full scale | ||
| Encryption | Microchip ATECC608A | |
| Secure Hardware-Based Key Storage, Asymmetric Sign, Verify, Key Agreement | ||
| Light Sensor | Levelek LTR-303ALS-01 | |
| Digital light sensor | ||
| Internal IO Expansion | Microchip MCP23008-E/ PCA9554 | |
| Buzzer | ≥85dB @10cm 2700±300Hz | |
| External I/O | GPIOs | Up to 5 × UART |
| Up to 5 × I2C | ||
| Up to 5 × SPI | ||
| 1 × SDIO interface | ||
| 1 × DPI (Parallel RGB Display) | ||
| 1 × PCM | ||
| 1 × PWM channel | ||
| Up to 3× GPCLK outputs | ||
| Vertical expansion interface | 1 × PCIe 1-lane Host, Gen 2 (5Gbps) | |
| 1 × USB 2.0 port (highspeed) | ||
| 26 x GPIOs | ||
| POE | ||
| Power | Voltage | 5V DC |
| Current | 3A(Minimum) | |
| Temperature | Operating Temperature | 0 - 70°C( For the LCD Screen: 0 - 60°C) |
| Mechanical | Dimensions | 140mm x 95mm x 21mm |
| Weight | 285g | |
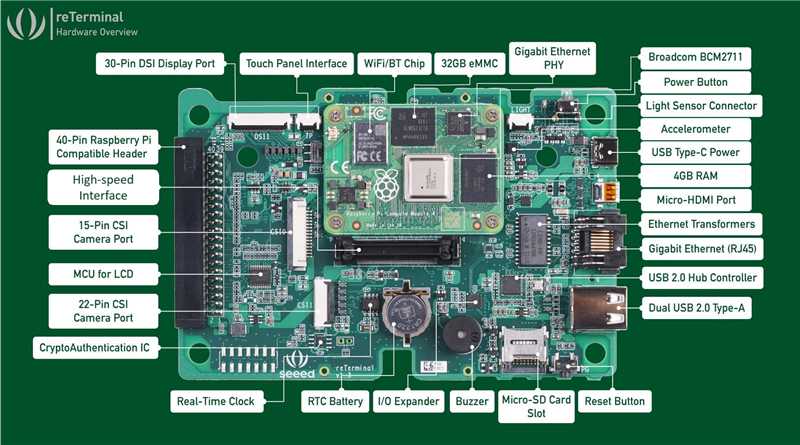
Hardware Overview
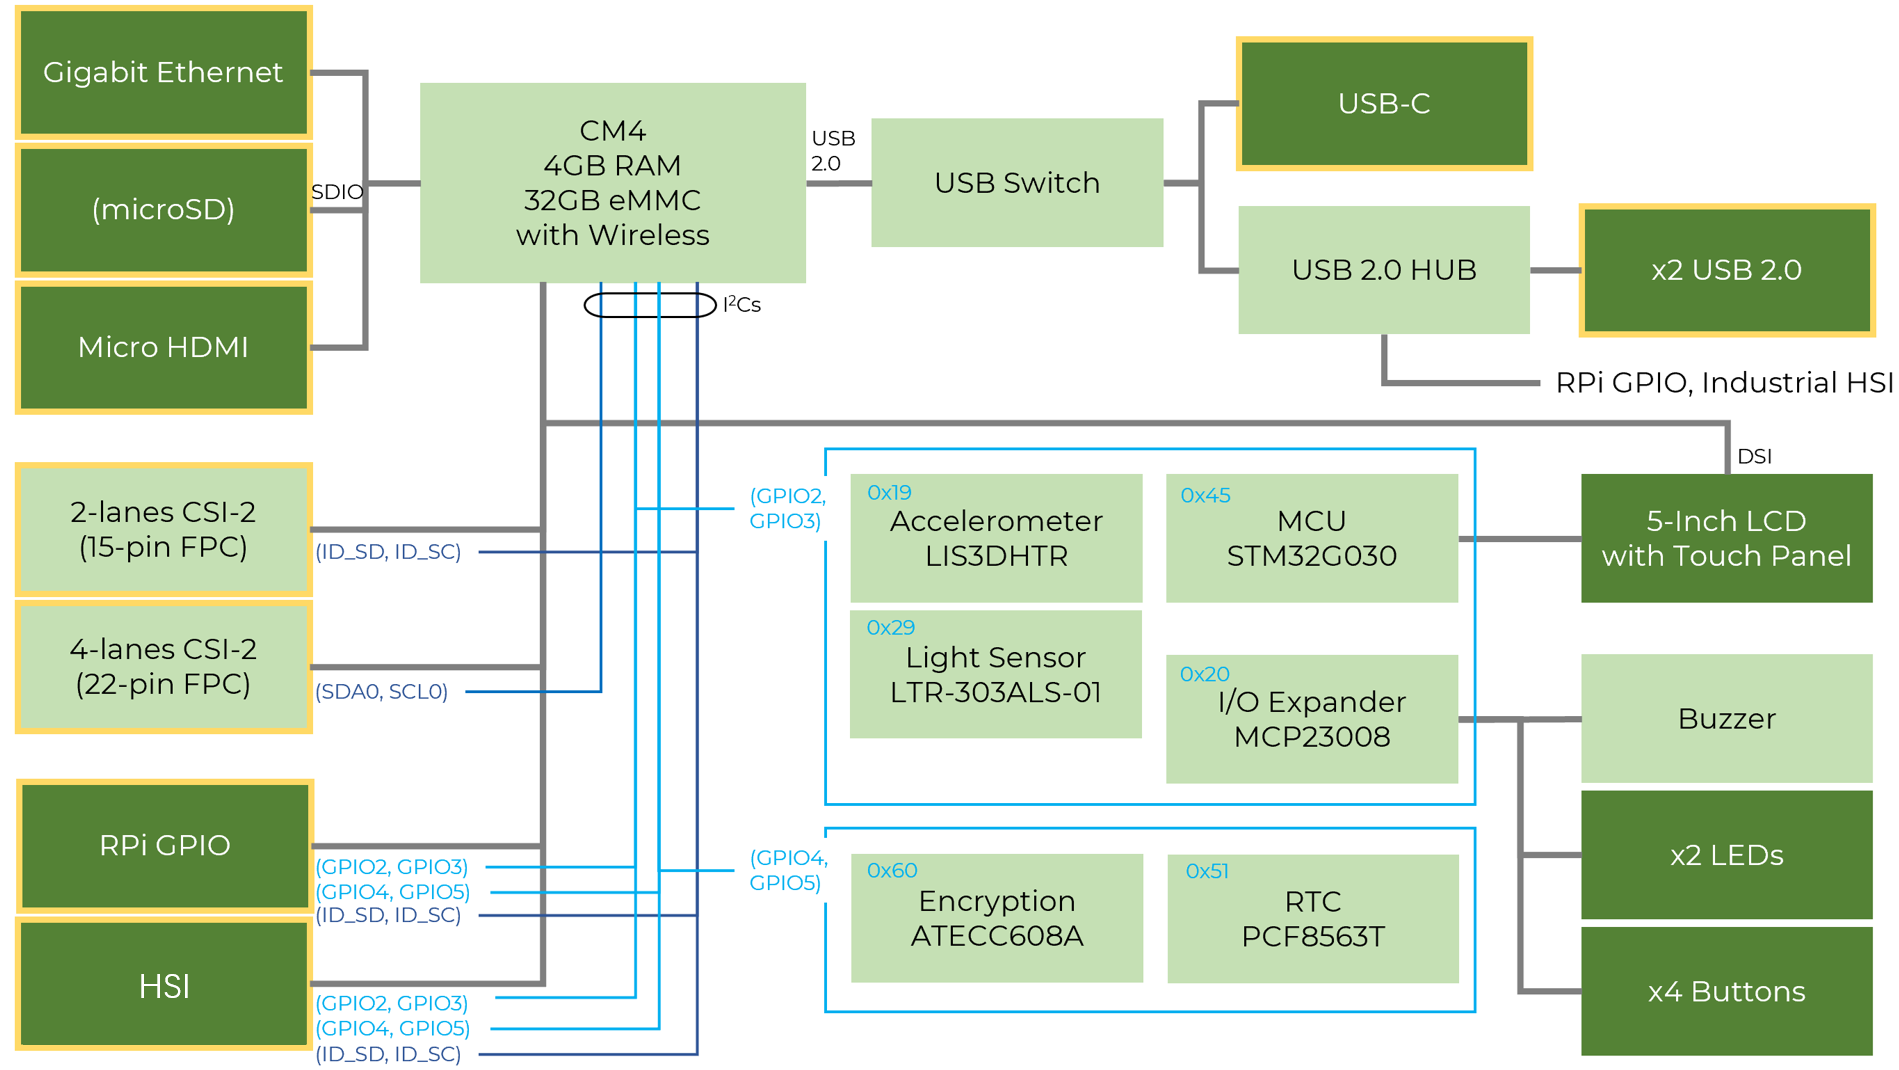
Block Diagram
Pinout Diagram
Note: Please make sure to keep the reTerminal in the orientation as illustrated below. Here the LCD is facing right side and the back is facing left side.

Please carefully pay attention to the orientation of the reTerminal in the above diagram. The LCD and the onboard buttons are on the right side whereas the back of reTerminal is on the left side. Also the whole device is flipped upside down.
Quick Start with reTerminal
If you want to get started with the reTerminal in the most fastest and easiest way, you can follow the guide below.
Hardware Required
You need to prepare the following hardware before getting started with reTerminal
- reTerminal
- Ethernet cable or Wi-Fi connection
- Power adapter (5V/3A)
- USB Type-C cable
Software Set Up
Log in to Raspberry Pi OS
reTerminal comes with Raspberry Pi OS pre-installed out-of-the-box. So we can turn on the reTerminal and log in to Raspberry Pi OS straight away!
-
Step 1. Connect one end of a USB Type-C cable to the reTerminal and the other end to a power adapter (5V/4A)
-
Step 2. Once the Raspberry Pi OS is booted up, press OK for the Warning window

- Step 3. In the Welcome to Raspberry Pi window, press Next to get started with the initial set up

- Step 4. Choose your country, language, timezone and press Next

- Step 5. To change the password, first click on Raspberry Pi icon, navigate to
Universal Access > Onboardto open the on-screen keyboard

- Step 6. Enter your desired password and click Next

Note: If you want to keep the default password as raspberry, you can leave this blank and click Next
- Step 7. Click Next for the following

- Step 8. If you want to connect to a WiFi network, you can choose a network, connect to it and press Next. However, if you want to set it later, you can press Skip

- Step 9. This step is very important. You should make sure to press Skip to skip updating the software. However, if you want to update the software, you can follow this wiki

- Step 10. Finally press Done to finish the set up

Note: The button on the top left corner can be used to turn on the reTerminal after shutting down using software

Tip: If you want to experience the Raspberry Pi OS on a bigger screen, you can connect a display to the micro-HDMI port of the reTerminal and also connect a keyboard and a mouse to the USB ports of the reTerminal.
Getting Started with reTerminal (Extended)
If you want to install Raspberry Pi OS by yourself, install other OS such as 64-bit Ubuntu, log in to reTerminal via SSH over WiFi, SSH over Ethernet and USB to Serial Adapter, you can follow the guide below!
Hardware Required
You need to prepare the following hardware
- reTerminal
- Computer (Windows/Mac/Linux)
- 8GB (or more) micro-SD card (optional)
- Micro-SD card reader (optional)
- USB to serial converter (optional)
- Ethernet cable (optional)
- Wi-Fi connection (optional)
- Power adapter (5V/3A)
- USB Type-C cable
Flash Raspberry Pi OS/ 64-bit Ubuntu OS or Other OS to eMMC
We can flash Raspberry Pi OS/ 64-bit Ubuntu OS or other OS on to the eMMC storage of the CM4 on the reTerminal. Once the necessary drivers are installed, you just have to connect the USB Type-C port of the reTerminal to your PC, and it will show as an external drive. Start by removing the reTerminal back shell.
Note: The latest system image packaged by Seeed, including the appropriate drivers: pi-gen-expand
- Step 1. Remove the 4 rubber covers and open the reTerminal back shell unscrewing the 4 screws underneath

- Step 2. Remove the 2 screws to disassemble the heatsink

- Step 3. Flip down the boot mode switch according to the below diagram

Now let's move on to software set up. Follow the steps according to your desired operating system
For Windows
-
Step 1. Download the rpiboot setup installer by click this link to install the necessary drivers and the boot tool
-
Step 2. Connect reTerminal to the PC via USB Type-C cable
Windows will now find the hardware and install the necessary drivers
-
Step 3. Search for rpiboot tool that we installed before and open it
-
Step 4. Open file explorer and you will see the eMMC of the Computer Module 4 shown as a USB mass storage device
-
Step 5. Download Raspberry Pi Imager software by visiting this link
-
Step 6. Open Raspberry Pi Imager software

- Step 7. Press CTRL + SHIFT + X on the keyboard to open Advanced options window

Here you can set a hostname, enable SSH, set a password, configure wifi, set locale settings and more
- Step 8. Click CHOOSE OS and select your preferred OS
If you are attempting to install Raspbian OS, we have conducted tests and found that both the 32-bit and 64-bit versions of Bullseye work well with reTerminal without encountering any black screen issue. Additionally, we have also tested the new Bookworm 64-bit version, and it functions smoothly on reTerminal.

NOTE: You can select other OS such as 64-bit Ubuntu by navigating into Other general purpose OS

-
Step 9. Click CHOOSE STORAGE and select the connected eMMC drive
-
Step 10. Finally, click WRITE

Please wait a few minutes until the flashing process is complete.
- Step 11. Flip the Boot Mode switch back to the original position and assemble the reTerminal shell
Now you can skip to here
For MAC
You need to install homebrew before proceed the following steps.
Please open a terminal and type brew -V to check if you have setup the correct homebrew environment, you should see the version of the homebrew environment you have installed.
- Step 1. Clone the usbboot repository
git clone --depth=1 https://github.com/raspberrypi/usbboot
cd usbboot
- Step 2. Install libusb
brew install libusb
- Step 3. Install pkg-config
brew install pkg-config
- Step 4. Build using make
make
- Step 5. Run the binary
sudo ./rpiboot
-
Step 6. Connect reTerminal to the your Mac computer via USB Type-C cable
-
Step 7. Download and Install Raspberry Pi Imager Application by visiting this link
-
Step 8. Open the Raspberry Pi Imager Application
- Step 9. Press CTRL + SHIFT + X on the keyboard to open Advanced options window
Here you can set a hostname, enable SSH, set a password, configure wifi, set locale settings and more
- Step 10. Click CHOOSE OS and select your preferred OS
NOTE: You can select OS such as 64-bit Ubuntu by navigating into Other general purpose OS
-
Step 11. Click CHOOSE STORAGE and select the connected eMMC drive
-
Step 12. Finally, click WRITE
Please wait a few minutes until the flashing process is complete.
- Step 13. Flip the Boot Mode switch back to the original postion and assemble the reTerminal shell
Now you can skip to here
For Linux
We will use Git to obtain the rpiboot source code, so make sure Git is installed
- Step 1. Open a Terminal window and type the following to update the packages list
sudo apt-get update
- Step 2. Install Git by the following command
sudo apt install git pkg-config make gcc libusb-1.0-0-dev
- Step 3. Git might produce an error if the date is not set properly. Type the following to correct this
sudo date MMDDhhmm
NOTE: Where MM is the month, DD is the date, and hh and mm are hours and minutes respectively.
- Step 4. Clone the usbboot tool repository
git clone --depth=1 https://github.com/raspberrypi/usbboot
cd usbboot
- Step 5. Build and install the usbboot tool
make
- Step 6. Run the usbboot tool and it will wait for a connection
sudo ./rpiboot
-
Step 7. Connect reTerminal to the PC via USB Type-C cable
-
Step 8. Download Raspberry Pi Imager software by visiting this link
-
Step 9. Open Raspberry Pi Imager software
- Step 10. Press CTRL + SHIFT + X on the keyboard to open Advanced options window
Here you can set a hostname, enable SSH, set a password, configure wifi, set locale settings and more
- Step 11. Click CHOOSE OS and select your preferred OS
NOTE: You can select OS such as 64-bit Ubuntu by navigating into Other general purpose OS
-
Step 12. Click CHOOSE STORAGE and select the connected eMMC drive
-
Step 13. Finally, click WRITE
Please wait a few minutes until the flashing process is complete.
- Step 14. Flip the Boot Mode switch back to the original postion and assemble the reTerminal shell
Log in to Raspberry Pi OS/ Ubuntu OS or Other OS using SSH over Wi-Fi/ Ethernet
If you want to log in to the Raspberry Pi OS using SSH over Wi-Fi/ Ethernet, you can follow the steps below. First set up Wi-Fi/Ethernet on the reTerminal and then SSH using Windows/Mac/Linux.
Note: If you have configured WiFi and enabled SSH using Raspberry Pi Imager, you can skip steps 1 - 4
- Step 1. If you have a Wi-Fi connection, click the Wi-Fi icon on the top right corner of the Raspberry Pi OS Desktop, select your Wi-Fi network and enter the password using the on-screen virtual keyboard
Note: The location of the Wi-Fi setting might be different for other OS
- Step 2. If you don't have a Wi-Fi connection, you can connect an ethernet cable from your router to the ethernet port of the reTerminal
Note: Make sure the reTerminal and your computer is connected to the same network
-
Step 3. Touch on the Raspberry Pi icon at the top left corner and navigate to
Preferences > Raspberry Pi Configurationand click on Interfaces tab -
Step 4. Select Enable which is next to SSH and click OK

Now let's configure the software on the computer. Please follow according to your operating system
For Windows
- Step 1. Open Command Prompt and type the following
- Step 2. Type yes for the prompt

- Step 3. Enter the password as follows
raspberry
- Step 4. If you have sucessfully logged into the Raspberry Pi OS, you will see the following output

For Mac/Linux
- Step 1. Open Terminal on the computer and type the following
- Step 2. Type yes for the following message
ECDSA key fingerprint is SHA256:XXXXXXX.
Are you sure you want to continue connecting (yes/no/[fingerprint])?
- Step 3. When it asks for the password, type the following
raspberry
- Step 4. If you have sucessfully logged into the Raspberry Pi OS, you will see the following output

Install reTerminal drivers after flashing new Raspberry Pi OS/ Ubuntu OS or Other OS
reTerminal comes with the necessary drivers pre-installed out-of-the-box so you don't need to install any additional drivers. However, if you flash new OS by yourself, you need to install the necessary drivers separately. The hardware that need drivers include the 5-inch LCD, touch panel, accelerometer, light sensor, user LEDs, user buttons, RTC, buzzer, cryptographic co-processor.
For 32bit OS you will need to add following step before execute sudo ./scripts/reTerminal.sh.After completing the installation, remember to reboot reTerminal for the changes to take effect.
echo arm_64bit=0 | sudo tee -a /boot/config.txt
sudo reboot
Meanwhile, if you are using the latest official 32-bit Raspberry Pi OS, its new kernel is incompatible with this product, which will result in failed driver updates and a blank screen. If you do need a 32-bit OS image for development, we recommend using an older 32-bit image version.
- Step 1. Clone the following repo
sudo apt install git -y
git clone --depth 1 https://github.com/Seeed-Studio/seeed-linux-dtoverlays
- Step 2. Enter the repo
cd seeed-linux-dtoverlays
For 32bit OS you will need to add following step before execute sudo ./scripts/reTerminal.sh.After completing the installation, remember to reboot reTerminal for the changes to take effect.
echo arm_64bit=0 | sudo tee -a /boot/config.txt
sudo reboot
- Step 3. Type the following to install the drivers
sudo ./scripts/reTerminal.sh
Type the following if you don't want to upgrade the kernel at the same time:
sudo ./scripts/reTerminal.sh --keep-kernel
You will see the following output if you have successfully installed the drivers

- Step 4. Reboot the reTerminal
sudo reboot
Flash Raspberry Pi OS with drivers from seeed to eMMC
- Step 1. As with normal mirror burning steps, you need to select the device model first:

-
Step 2. When choosing an operating system, you need to download the system you need, unzip it in the local folder, and then select it.
-
Download the Raspberry Pi OS by visiting the links below
| Version | Description | TAG |
|---|---|---|
| 2024-03-14-Raspbian-reTerminal-arm64 | 64bit Debian12(bookworm) Linux version 6.6.20 | lastest |
| 2024-03-14-Raspbian-reTerminal-armhf | 32bit Debian12(bookworm) Linux version 6.6.20 | lastest |
| 2022-07-21-Raspbian-reTerminal-arm64 | 64bit Debian11(Bullseye) Linux version 5.15.32-v7+ | release |
| 2022-07-21-Raspbian-reTerminal-armhf | 32bit Debian11(Bullseye) Linux version 5.15.32-v7+ | release |

Select the OS you downloaded, it should end in .img.

If you install the latest bookworm version of the image. Do not going to configure by clicking the advance option button. Do not enter this interface for any initial configuration. Otherwise, unexpected driver error situations may occur!!!

If you accidentally make an advanced configuration and get a screen flip error, you'll need to reinstall the driver to fix the problem.
- Step 3. For other operations, refer to the preceding steps. After the image is installed, you do not need to install the driver to use it. (The image we provide includes the driver file)

reTerminal Disassemble Guide
Please check the video below on how to disassemble reTerminal:
FAQ
For Frequently Asked Questions, click here to visit the FAQs for reTerminal Usage wiki
Resources
-
[STP] reTerminal 3D Model
-
[Web Page] Raspberry Pi Official Documentation
Tech Support & Product Discussion
Thank you for choosing our products! We are here to provide you with different support to ensure that your experience with our products is as smooth as possible. We offer several communication channels to cater to different preferences and needs.