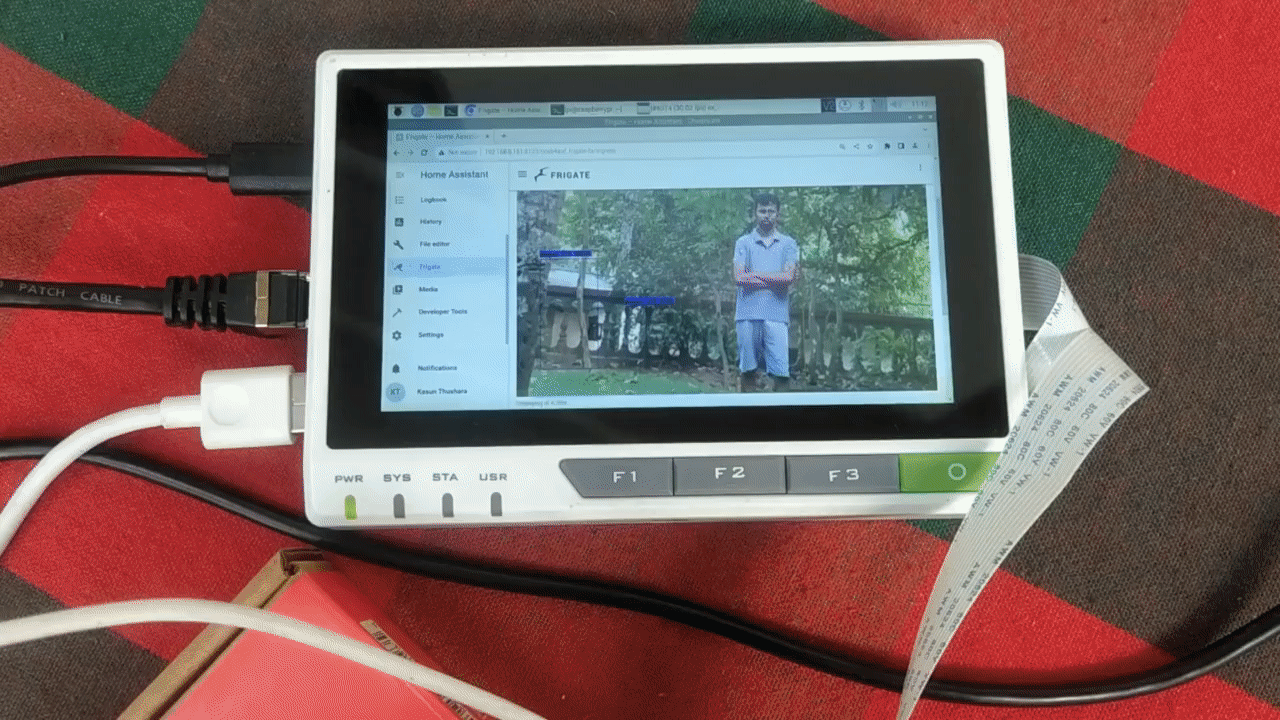
Frigate intergrating with reTerminal
Introduction
In the current era of seamless integration of smart technology into our daily lives, the demand for intelligent and secure home automation is stronger than ever. Imagine a scenario where your home not only meets your needs but also promptly detects and alerts you about suspicious activities in your backyard. This is where the combination of advanced hardware and open-source software takes center stage. In this article, we'll explore the synergy between Seeed Studio reTerminal, Home Assistant OS, and the Frigate add-on with Coral AI USB TPU. This trio offers a unique opportunity for a centralized, privacy-conscious, and AI-driven home automation setup that enhances your lifestyle while ensuring safety. Join us to delve into the advantages and limitless potential of this fusion at the forefront of modern smart living.
Frigate

Frigate emerges as a remarkable open-source Network Video Recorder (NVR) tailored for real-time AI-driven object detection. The distinctive feature of Frigate lies in its localized processing, ensuring that all computations take place on your personal hardware. This approach guarantees the utmost privacy, as your camera feeds never traverse outside the boundaries of your home. With Frigate, you gain a powerful tool that empowers you to enhance security and monitoring through advanced object recognition technology while maintaining complete control over your data.
Home assistant

Home Assistant OS is an operating system designed specifically for running Home Assistant, an open-source home automation platform. Home Assistant allows you to control and automate various smart devices and services in your home. Home Assistant OS provides a streamlined and optimized environment for running Home Assistant. It comes pre-installed with the necessary components to set up and manage your smart home devices, integrate with different protocols and platforms, and create automation routines.
Getting Started
Before you start this project, you may need to prepare your hardware and software in advance as described here. And also you need IP cameras which support for this project. You can view those supported cameras from Frigate official site.
Hardware preparation
| reTerminal | Coral USB Accelerator |
|---|---|
 |  |
Considering the power requirements of the USB Coral accelerator, we strongly recommend investing in a high-quality USB-powered hub. This hub will provide sufficient power to accommodate the needs of the Coral accelerator, ensuring stable and optimal performance.
Software preparation
We recommend installing the latest version of Raspberry Pi 64 bit OS from their official website. If you prefer to install a new Raspbian OS, please follow the steps outlined in this guide.
Install Home Assistant Supervised OS to Raspberry pi
Installing Home Assistant Supervised on your Raspberry Pi 4 is a comprehensive process that amalgamates several critical steps to ensure a successful setup.
In some steps, if you are connected through Wi-Fi, you may lose connection. It is recommended to use a LAN connection instead.
Step 1: Enhance Your System
- Commence by executing a system update log by using the following command:
sudo apt update
- Following this, proceed to install the following dependencies:
sudo apt-get install \
apparmor \
jq \
wget \
curl \
udisks2 \
libglib2.0-bin \
network-manager \
dbus \
systemd-journal-remote -y
- Fix broken installations
sudo apt --fix-broken install
- Restart reTerminal
sudo reboot
Step 2: Integrate Docker
Installing Docker is pivotal. It's vital to avoid installing Portainer, as it might negatively impact the overall installation process. Execute the following commands:
curl -fsSL https://get.docker.com -o get-docker.sh
sudo sh get-docker.sh
- Add Docker user to the system
sudo usermod -aG docker pi
- Check whether Docker is working properly
docker --version
Step 3: Addressing CGroup Version
- Home Assistant Supervisor's compatibility hinges on a specific Docker CGroup v1. To ensure this compatibility, the following changes need to be made:
sudo nano /etc/default/grub
- Add this line and save it.
systemd.unified_cgroup_hierarchy=false
- Open this file
sudo nano /boot/cmdline.txt
- Add this line end of the phrase and save it.
systemd.unified_cgroup_hierarchy=false apparmor=1 security=apparmor
Step 4: Install OS-Agent (ver. 1.3)
Download the suitable OS-Agent based on your CPU architecture, and then proceed to install it: For Raspberry pi 64 bit OS is linux aarch64.
wget https://github.com/home-assistant/os-agent/releases/download/1.3.0/os-agent_1.3.0_linux_aarch64.deb
- Install Home Asssitant OS Agent
sudo dpkg -i os-agent_1.3.0_linux_aarch64.deb
- Ensure the installation was successful by running
gdbus introspect --system --dest io.hass.os --object-path /io/hass/os
Step 5: Acquire Home Assistant Supervised
- Download the latest Home Assistant Supervised package:
wget https://github.com/home-assistant/supervised-installer/releases/download/1.3.0/homeassistant-supervised.deb
Step 6: Home Assistant Supervised Installation
Important: This step necessitates a LAN connection, as Wi-Fi might be disrupted during the process:
sudo dpkg -i homeassistant-supervised.deb
Step 7: Address Installation Errors
In case of installation errors, rectify them by running:
sudo apt --fix-broken install
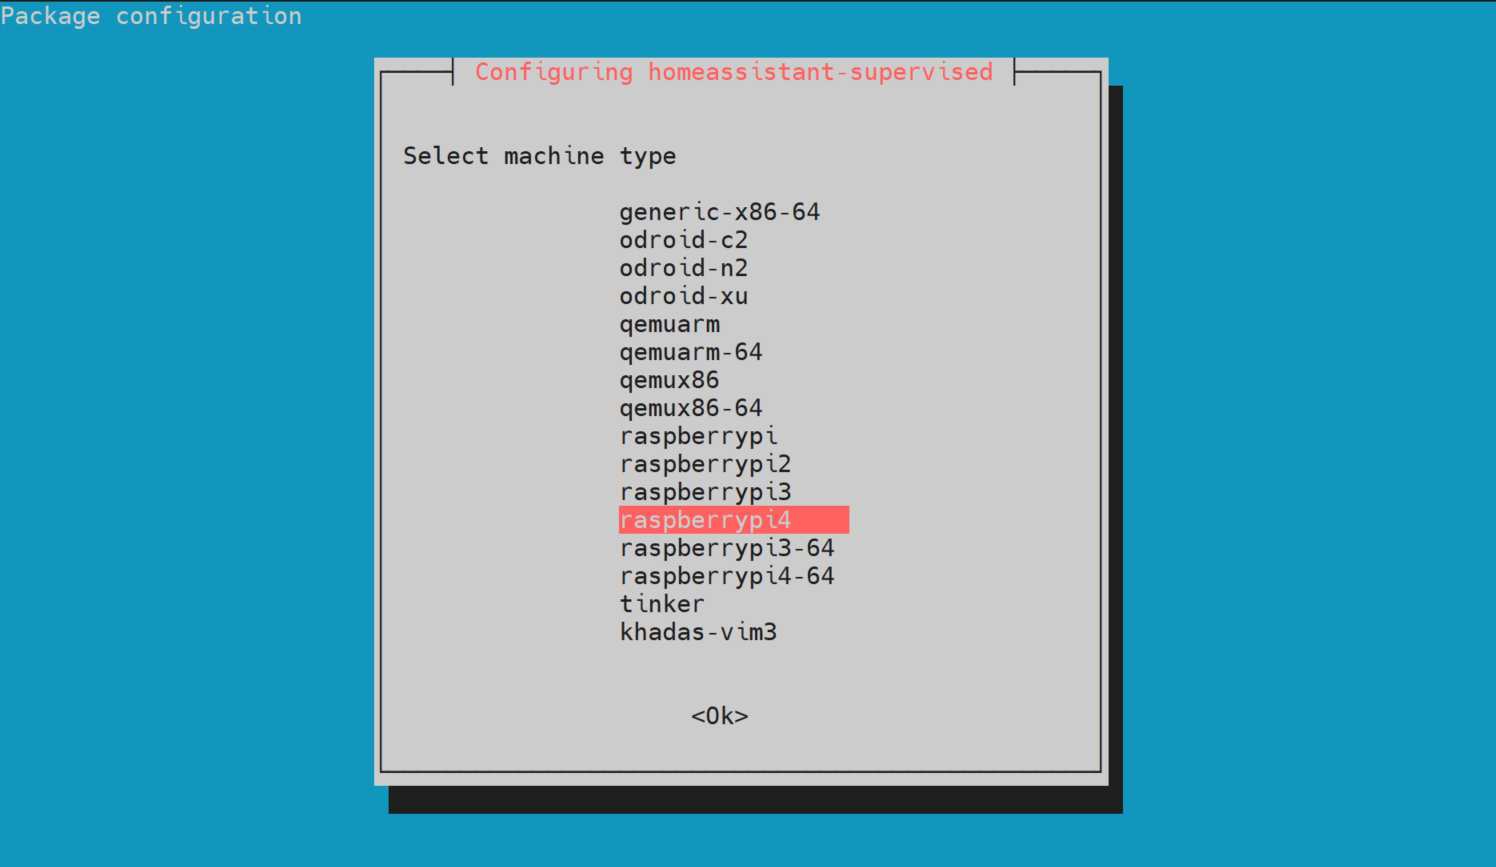
Upon successful correction, a blue screen will appear, allowing you to select Raspberry Pi4 64 model.
Step 8: Finalize Installation and Wi-Fi Setup
Allow a few minutes for Home Assistant to become accessible at http://[your_raspberry_IP]:8123.
If you encounter Wi-Fi connectivity issues after rebooting, follow these steps
- To enable 'dhcpcd', execute the following command:
sudo systemctl enable dhcpcd
- Disable the networking service with the command:
sudo systemctl disable networking
- Reboot the Raspberry Pi to apply the changes:
sudo reboot
To resolve the "Network Manager issues,"(find in settings) you can rectify the situation by initiating and subsequently enabling the Network Manager. Utilize the following command to accomplish this:
sudo systemctl enable NetworkManager
Install MQTT Broker
- Navigate to Settings > Add-on > Click on MQTT Broker.
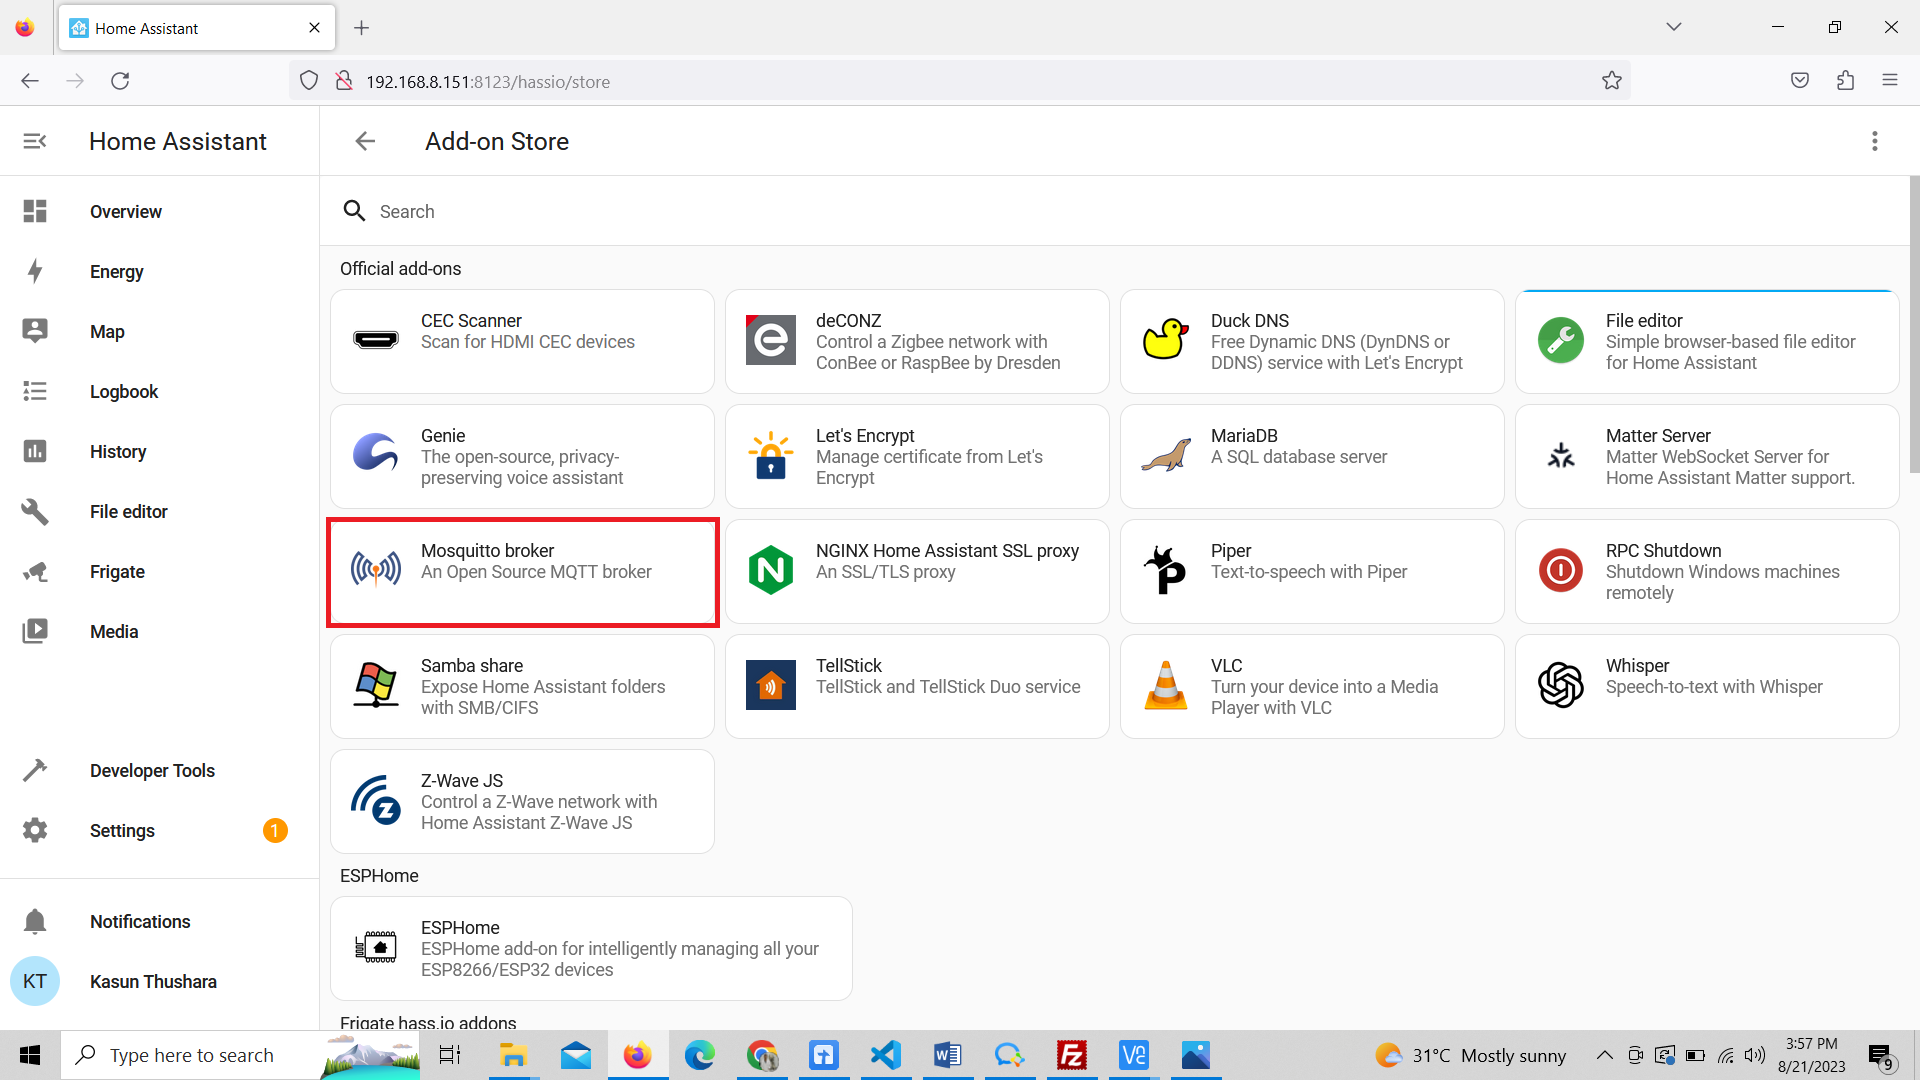
- Press install and after the installation enable start on the boot

- Navigate to Settings > Devices and Services > Configure MQTT Broker.
Install Frigate (Full Access)
Step 1: Clone Repository
- Navigate to Settings > Add-on > Add on Store > Menu > repositories

- Add the repository URL: https://github.com/blakeblackshear/frigate-hass-addons. Then you can see the Frigate add on in the Add on Store.
Step 2: Install the Full Access Frigate NVR Addon

Step 3: Create frigate.yml
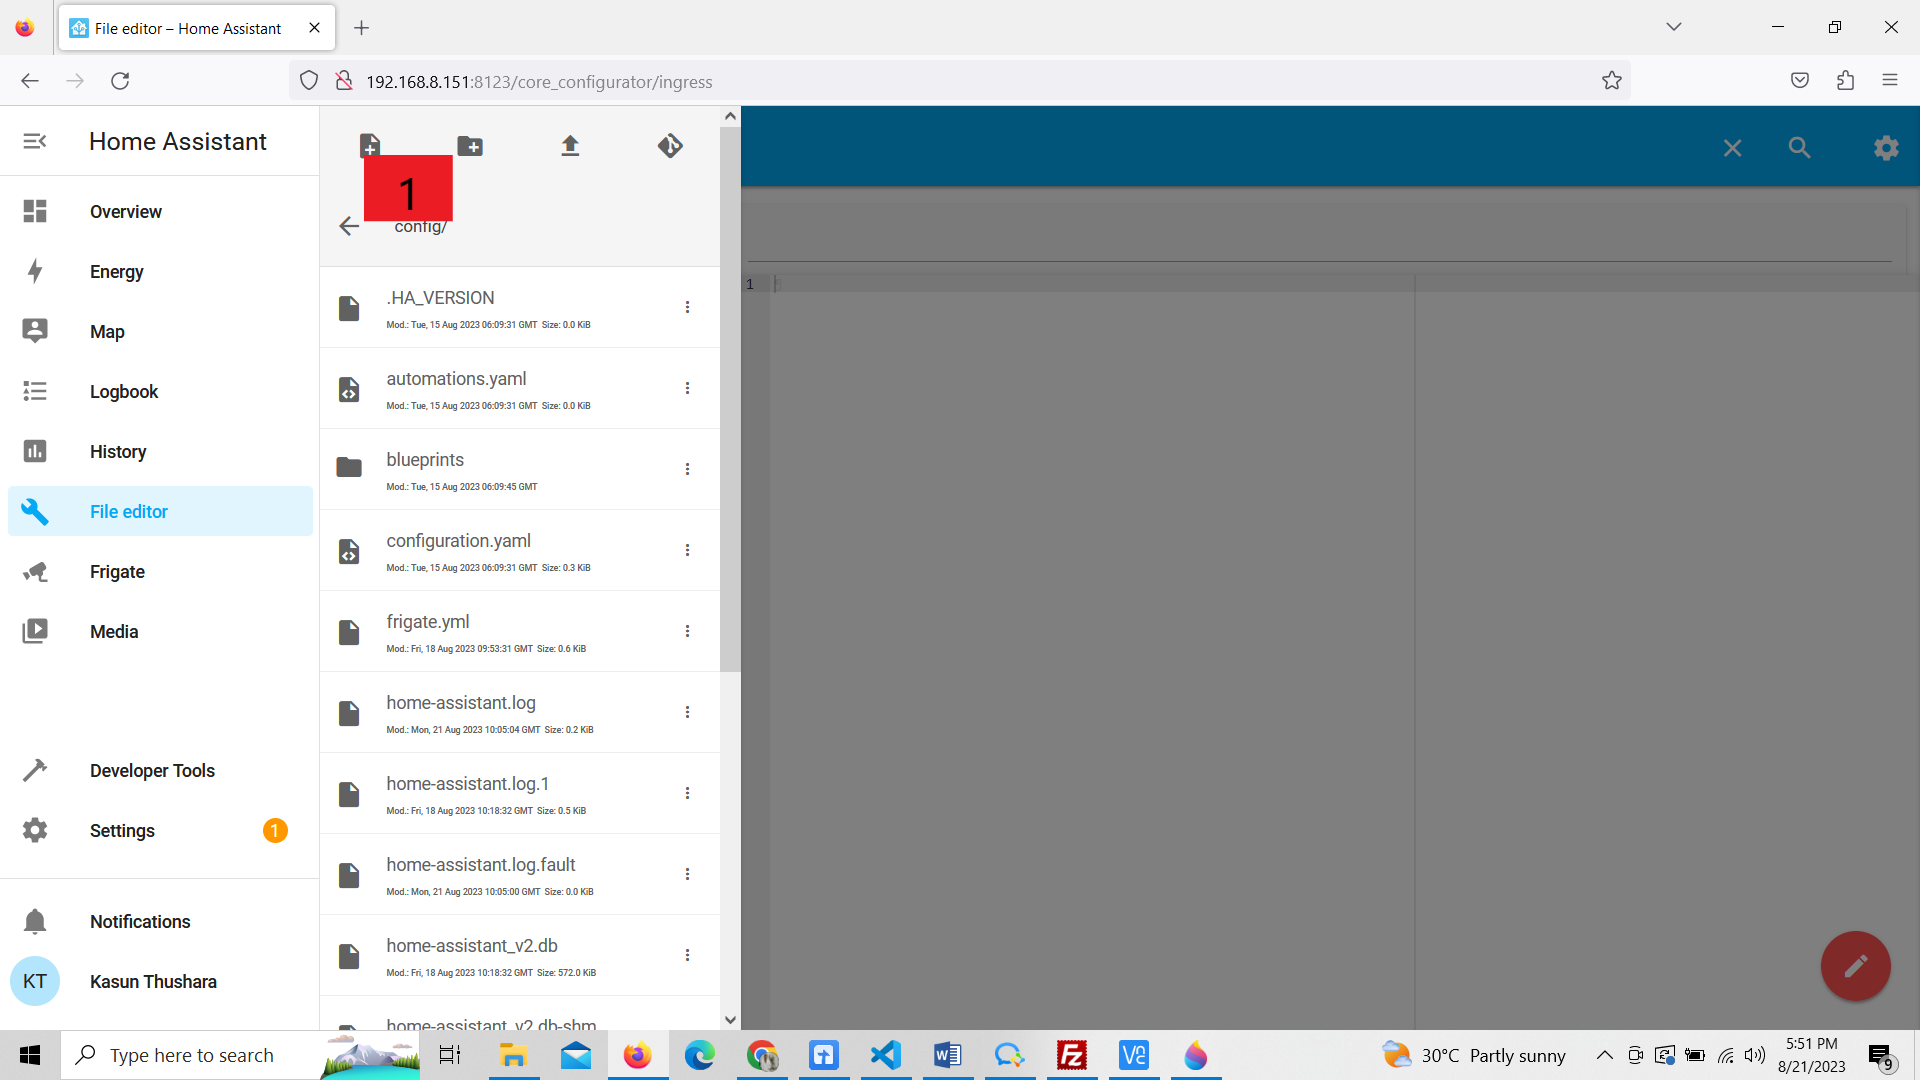
- To proceed with this step, you'll require a file editor. Access the "Browse File System" option located in the upper left corner of the file editor.
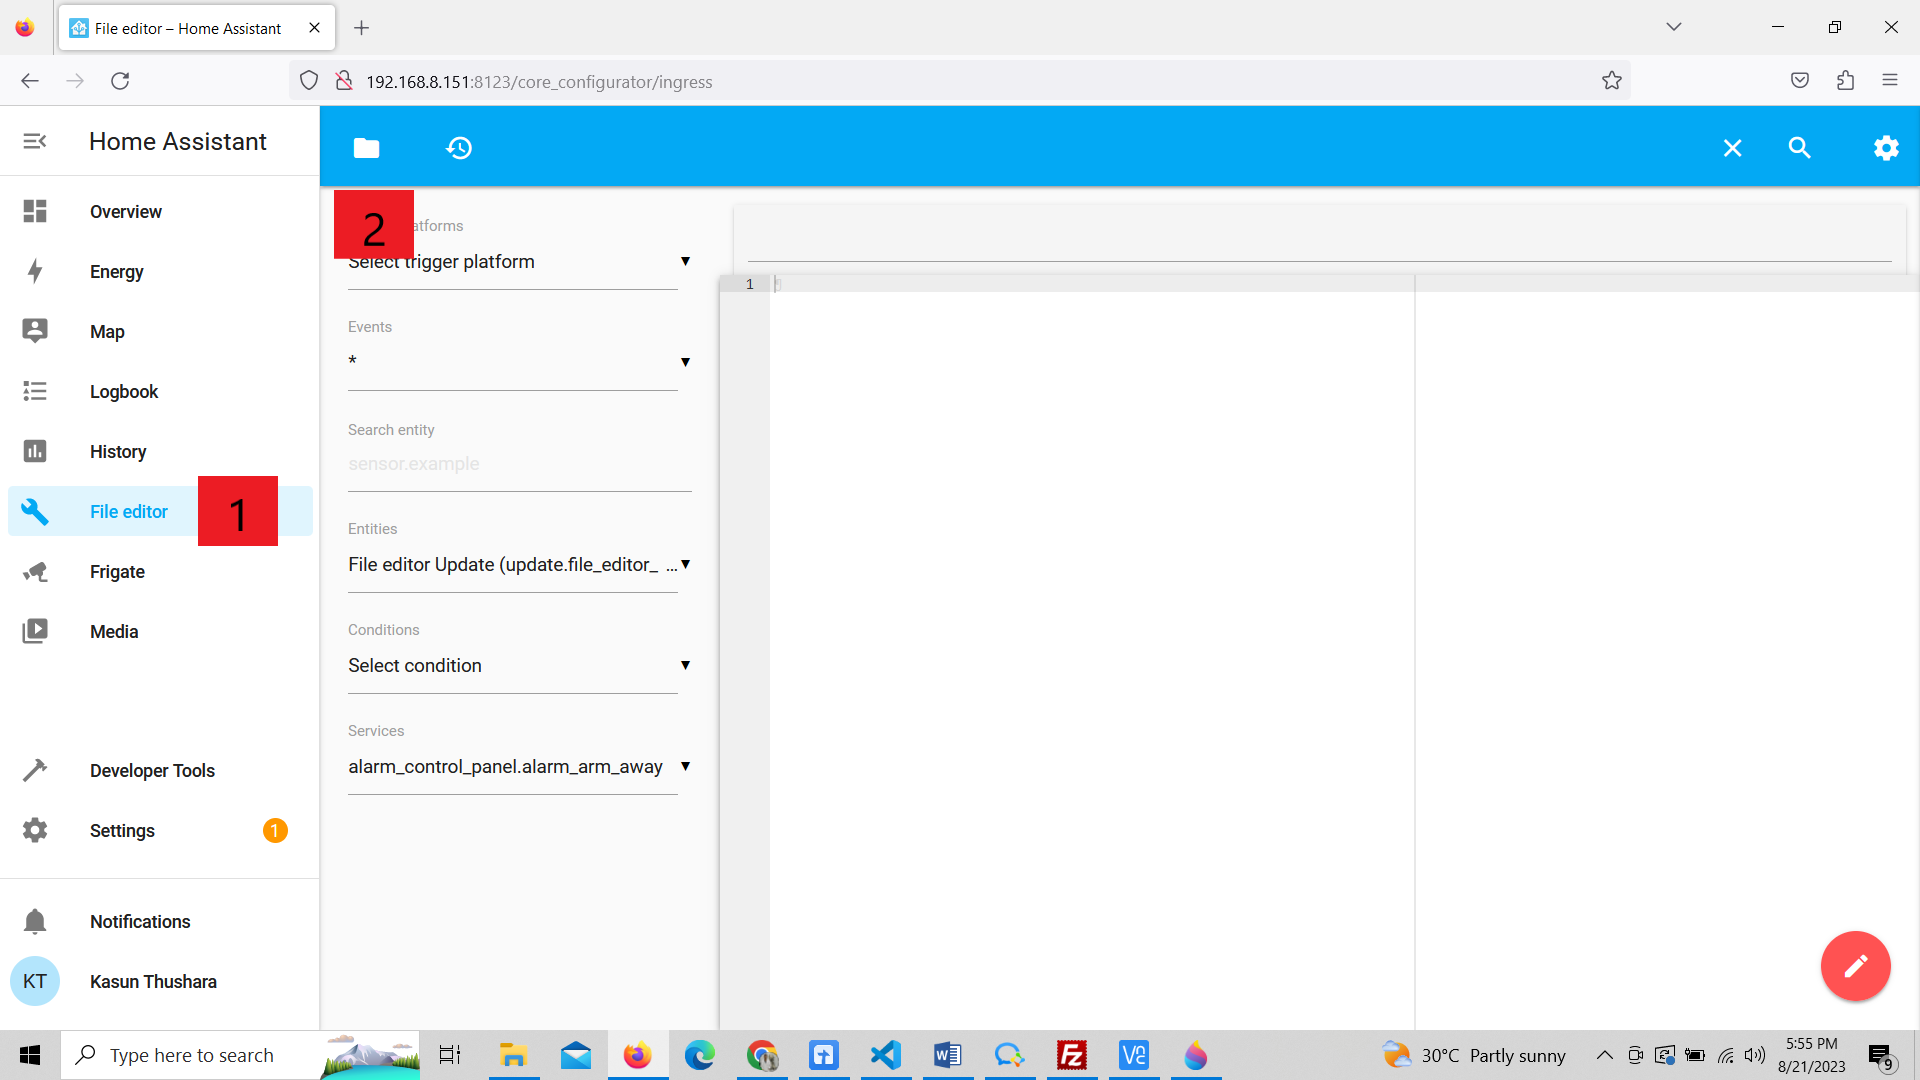
- Create a new file named frigate.yml
- Next, you can utilize the following code snippet to assess whether you can successfully retrieve RTSP video feeds from your IP cameras. Copy the provided code and paste it into your
frigate.ymlfile. It is strongly advised to adhere to the guidelines provided on the Frigate official site for comprehensive instructions. Remember to replace the placeholders with your specific camera name, resolution, and camera stream IP. This customization will ensure accurate integration with your camera setup.
mqtt:
  enabled: False


cameras:
  RPIcam: # <------ Name the camera
    ffmpeg:
      inputs:
        - path: rtsp://192.168.8.151:8554/stream # <----- The stream you want to use for detection
          roles:
            - detect
    detect:
      enabled: False # <---- disable detection until you have a working camera feed
      width: 1280 # <---- update for your camera's resolution
      height: 720 # <---- update for your camera's resolution
      fps: 5
Step 4: Start frigate
- Before initiating Frigate, ensure that the protection mode is disabled.

- Once you initiate Frigate, it's important to monitor the log closely for any potential issues that may arise. If no issues have arisen, proceed to click on the Frigate icon located in the sidebar. This action will grant you access to Frigate's interface and functionalities.
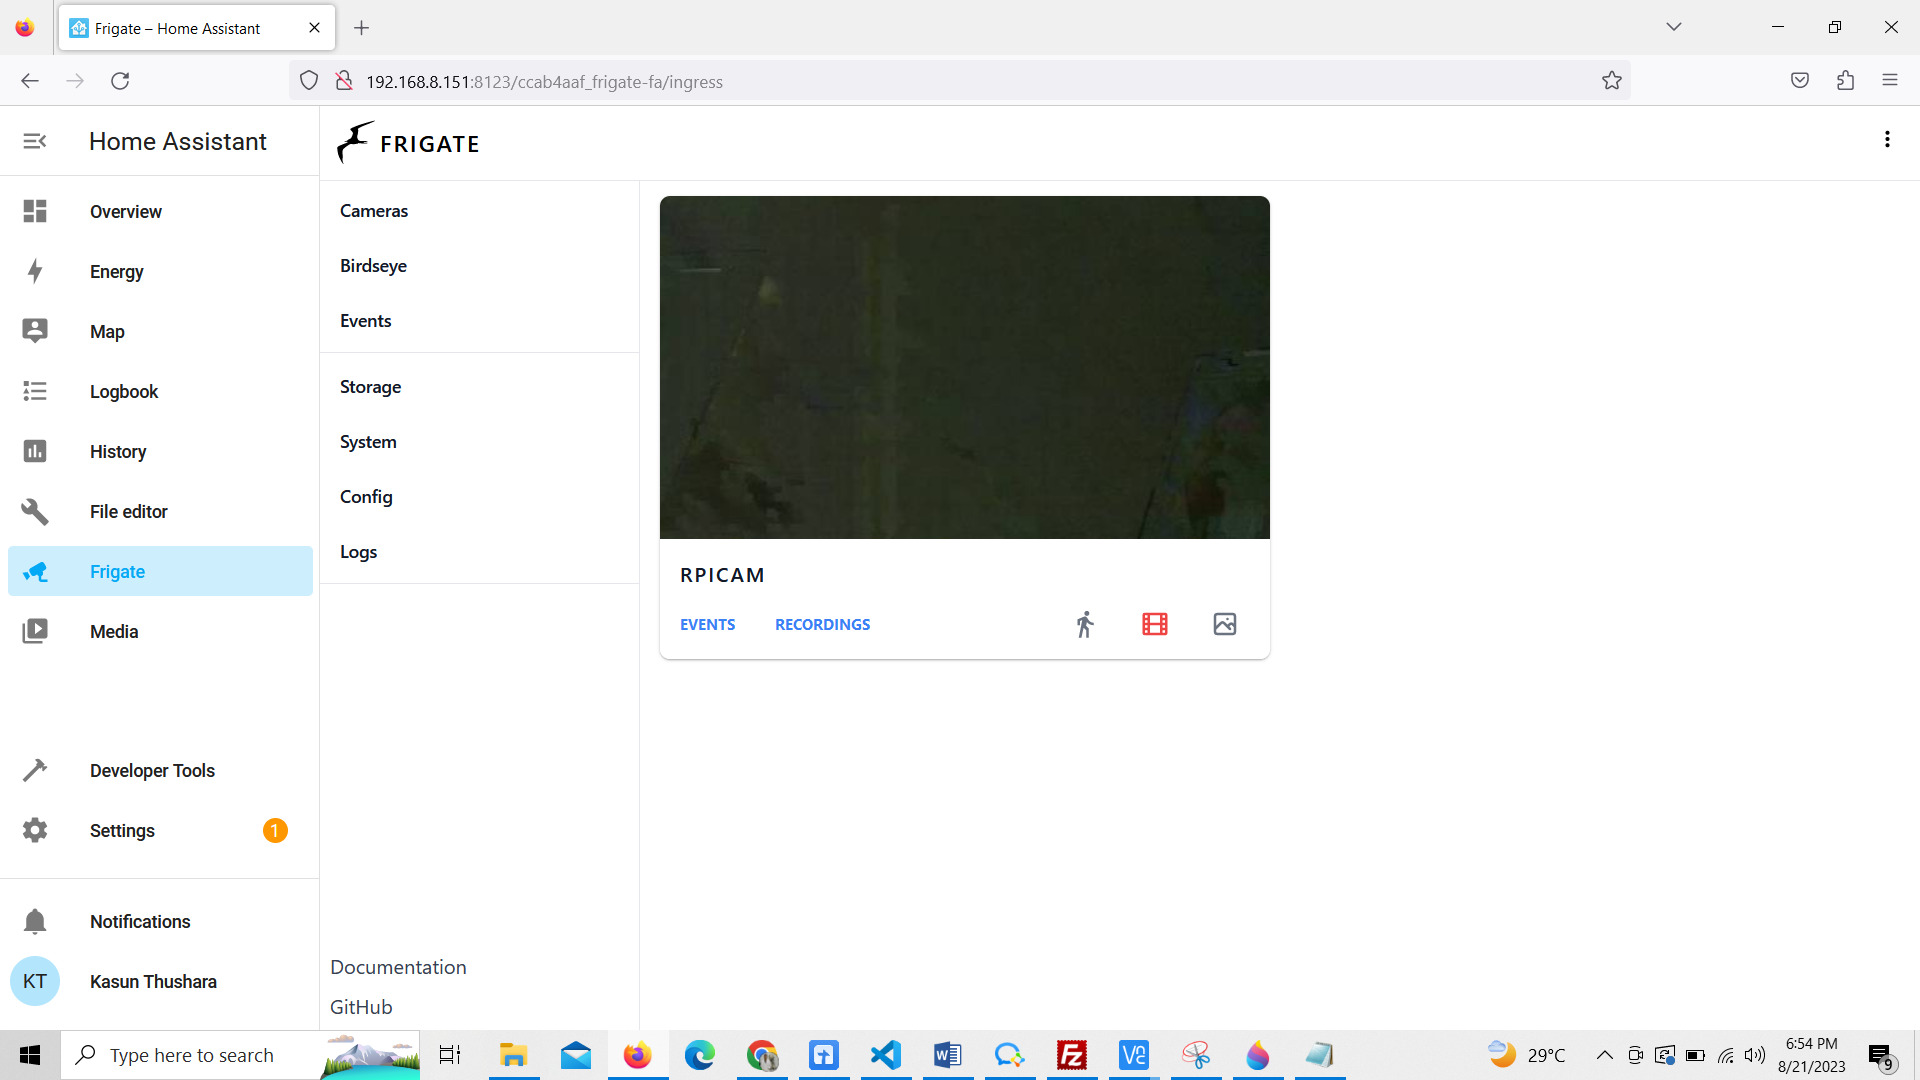
Step 5: Check the Stream
If all the stuff work correctly you will get the stream.
Step 6: Enable object detection
To achieve this, the Coral USB Accelerator Edge TPU is essential. While you can directly plug it into a USB port, there might be instances where it doesn't function as expected due to its higher power requirements. Therefore, we highly recommend utilizing a reliable USB-powered hub. This will ensure stable power delivery and optimal performance for the Coral USB Accelerator, enhancing its compatibility and effectiveness.
- Change frigate.yml file with below source code
mqtt:
  enabled: False

detectors: # <---- add detectors
  coral:
    type: edgetpu
    device: usb

cameras:
  RPIcam: # <------ Name the camera
    ffmpeg:
      input_args: preset-rtsp-udp
      inputs:
        - path: rtsp://192.168.8.151:8554/stream # <----- The stream you want to use for detection
          roles:
            - detect
    detect:
      enabled: True # <---- disable detection until you have a working camera feed
      width: 1280 # <---- update for your camera's resolution
      height: 720 # <---- update for your camera's resolution
      fps: 5
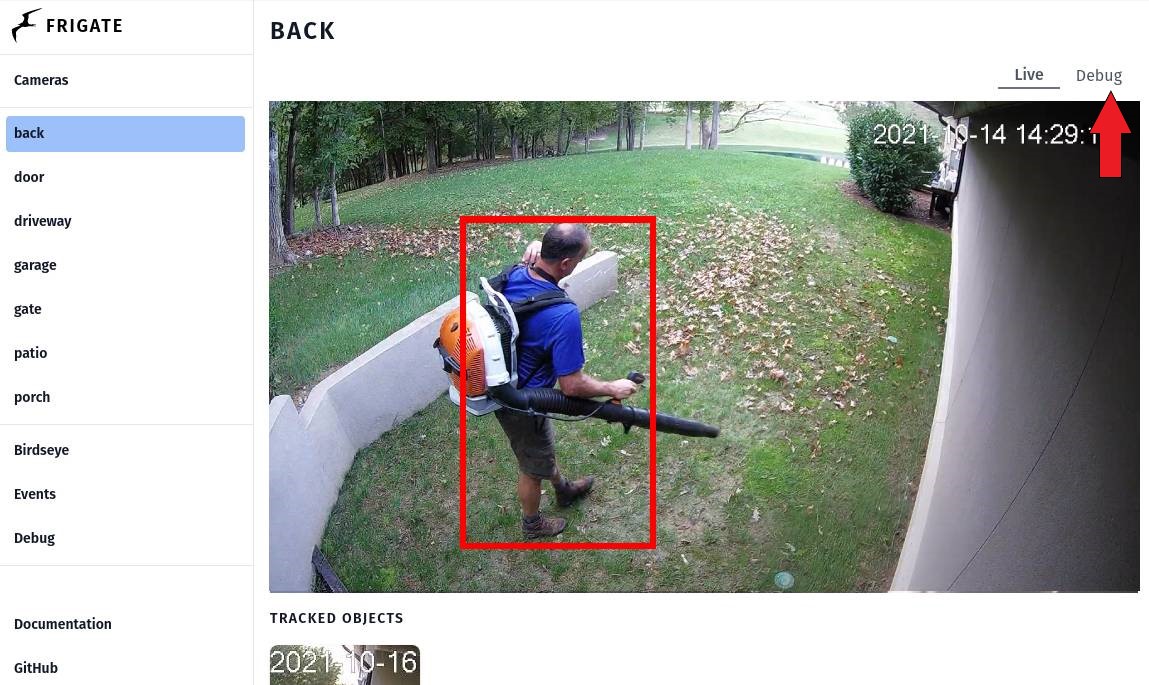
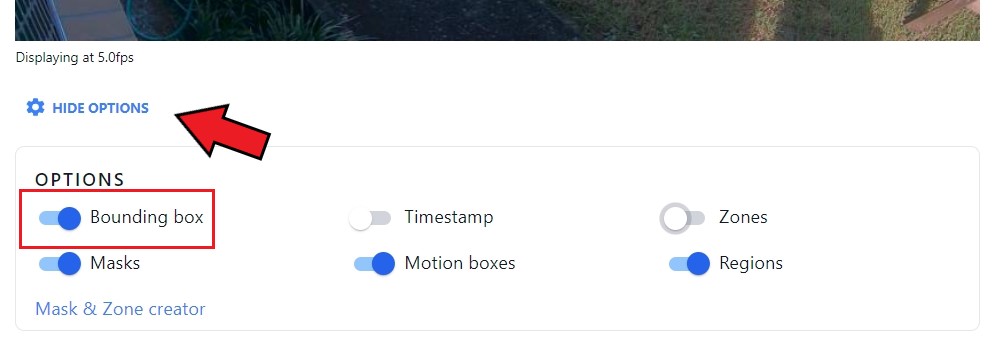
- Restart the Frigate addon . Then click on Frigate icon on the side bar. Next click on the stream and you will be have full view of the stream. By default you can detect person and you can draw a bounding box.
And here is the demo
You can detect many different objects and send notifation to your mobile phone also.For that you need to change the frigate.yml . So we highly reccomend you to go for quick look at following guides.
Resources
-
[Web Page] Frigate Offficial Documentation
-
[Web Page] Home assistant Forum
Tech Support
Thank you for choosing our products! We are here to provide you with different support to ensure that your experience with our products is as smooth as possible. We offer several communication channels to cater to different preferences and needs.