How to Bridge Mosiquitto MQTT Broker to AWS IoT with Arduino Boards
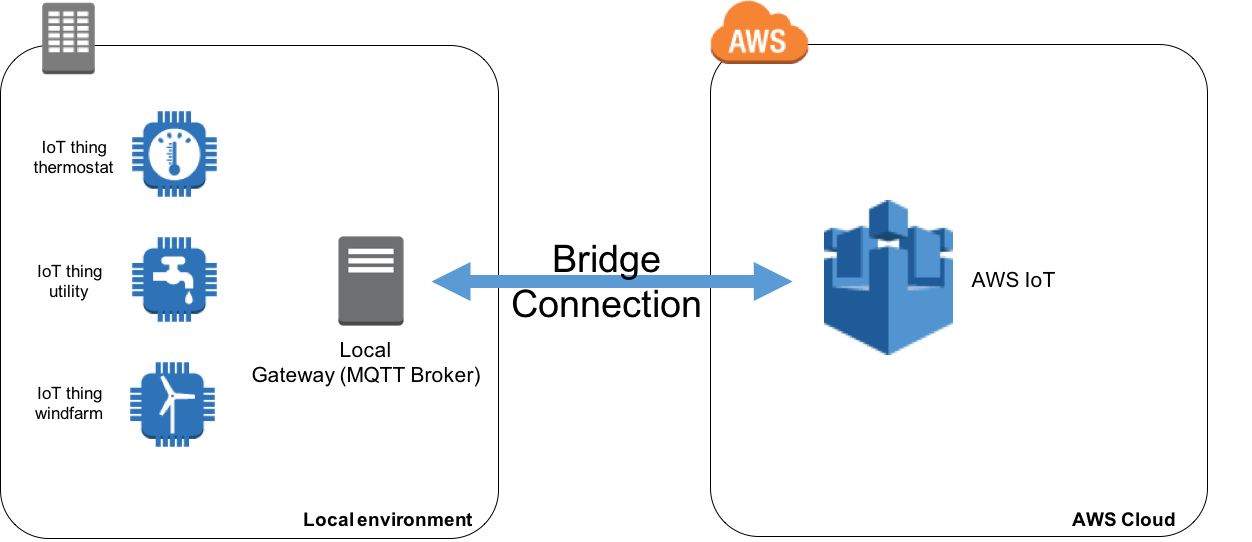
Gateways are present in most architectural discussions, both in industrial IoT environments and in the connected home. Today, we'll show you how to implement the Mosquitto Agent Bridge feature to enable the use of gateways through the MQTT messaging sets up bi-directional data exchange with AWS IoT Core. This will allow your device to communicate locally with the Mosquitto Agent and AWS IoT Core to Benefit from the power of AWS Cloud.
In this tutorial, Wio Terminal will be used as example to walk through how to bridge Mosquitto MQTT Broker to AWS IoT.
Why Bridge MQTT Broker to AWS IoT
If you have older IoT deployments, you may already have devices connected to an MQTT broker, such as Mosquitto. In this case, your MQTT agent can be very close to the location of the deployed sensor (local MQTT broker), or in a remote location like the Cloud. You can configure the local gateway to communicate with AWS IoT Core as the following diagram.
Getting Started
Building AWS Mosquitto Broker Using Docker
Step 1: Setup AWS Account
Navigate to AWS and setup the account.
Navigate to User -> My Security Credentials, and obtain Access Key ID and Access Key.
Step 2: Clone the Repository
Clone this repository to a location in your drive.
Step 3: Install and Setup AWS CLI
Install AWS CLI from here.
Run aws configure in terminal and type in your Region, your Access ID and Keys, as followed:
aws configure
AWS Access Key ID [None]: AKIAIOSFODNN7EXAMPLE
AWS Secret Access Key [None]: wJalrXUtnFEMI/K7MDENG/bPxRfiCYEXAMPLEKEY
Default region name [None]: eu-central-1
Default output format [None]: json
Step 3: Create an IAM policy for the bridge
Run the following command to create policy for the bridge:
aws iot create-policy --policy-name bridge --policy-document '{"Version": "2012-10-17","Statement": [{"Effect": "Allow","Action": "iot:*","Resource": "*"}]}'
Step 4: Create Certificates
Go into the aws_mosquitto_broker/config/certs directory and run the following to create certificates:
cd aws_mosquitto_broker/config/certs

sudo aws iot create-keys-and-certificate --set-as-active --certificate-pem-outfile cert.crt --private-key-outfile private.key --public-key-outfile public.key --region eu-central-1
Then you can run the aws iot list-certificates to check the created certificates. Copy the ARN in the form of arn:aws:iot:eu-central-1:0123456789:cert/xyzxyz:
aws iot list-certificates
Attach the policy to your certificate. Replace the {REPLACE_ARN_CERT} with your copied ARN arn:aws:iot:eu-central-1:0123456789:cert/xyzxyz:
aws iot attach-principal-policy --policy-name bridge --principal {REPLACE_ARN_CERT}
Add read permissions to private key, public key and client cert (inside certs folder):
sudo chmod 644 private.key && sudo chmod 644 public.key && sudo chmod 644 cert.crt
Download the root Amazon CA certificate also in the certs directory:
sudo curl https://www.websecurity.digicert.com/content/dam/websitesecurity/digitalassets/desktop/pdfs/roots/VeriSign-Class%203-Public-Primary-Certification-Authority-G5.pem -o rootCA.pem
Step 5: Edit mosquitto custom config file
Rename awsbridge.conf.sample to awsbridge.conf:
mv awsbridge.conf.sample awsbridge.conf
Edit config/conf.d/awsbridge.conf and follow the awsbridge.conf instructions:
nano config/conf.d/awsbridge.conf
Note: Run aws iot describe-endpoint to get the AWS IoT endpoint.
Step 6: Build Docker File
Go back to the root location aws_mosquitto_broker and run the following:
docker build -t aws_mqtt_broker .
Note: Make sure you have installed docker on your PC first.
Step 7: Run Docker Image
docker run -ti -p 1883:1883 -p 9001:9001 --name mqtt aws_mqtt_broker
Console / Log output:
1592301141: mosquitto version 1.4.15 (build date 2018-03-04 15:19:39+0000) starting
1592301141: Config loaded from /mosquitto/config/mosquitto.conf.
1592301141: Opening ipv4 listen socket on port 1883.
1592301141: Opening ipv6 listen socket on port 1883.
1592301141: Bridge local.bridgeawsiot doing local SUBSCRIBE on topic localgateway_to_awsiot
1592301141: Bridge local.bridgeawsiot doing local SUBSCRIBE on topic both_directions
1592301141: Connecting bridge awsiot (aq53tian3vbby.iot.eu-central-1.amazonaws.com:8883)
1592301141: Bridge bridgeawsiot sending CONNECT
1592301144: Received CONNACK on connection local.bridgeawsiot.
1592301144: Bridge local.bridgeawsiot sending SUBSCRIBE (Mid: 1, Topic: awsiot_to_localgateway, QoS: 1)
1592301144: Bridge local.bridgeawsiot sending UNSUBSCRIBE (Mid: 2, Topic: localgateway_to_awsiot)
1592301144: Bridge local.bridgeawsiot sending SUBSCRIBE (Mid: 3, Topic: both_directions, QoS: 1)
1592301144: Received SUBACK from local.bridgeawsiot
1592301144: Received UNSUBACK from local.bridgeawsiot
1592301145: Received SUBACK from local.bridgeawsiot

Step 8: Testing the Local Broker
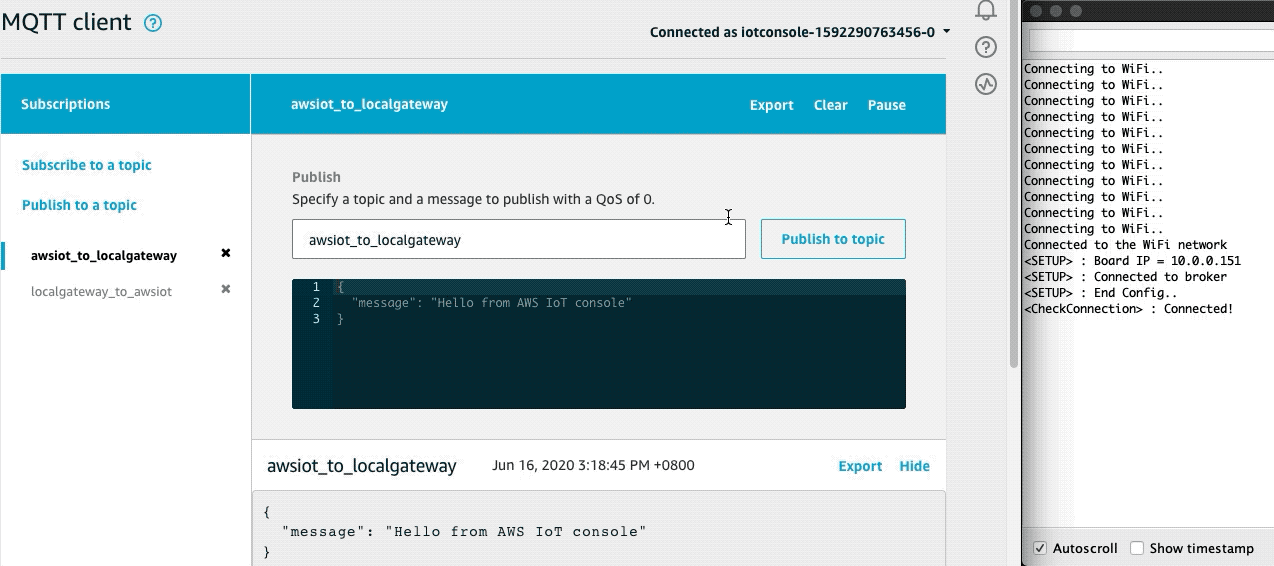
Publish from AWS IoT console
1.- From AWS Management Console go to AWS IoT Services -> Test
2.- Subscribe to topics mentioned in our config file awsiot_to_localgateway, localgateway_to_awsiot and both_directions.
3.- Publish to awsiot_to_localgateway topic (hello world).
4.- Review log or console output in our local broker for something like this:
1493564128: Received PUBLISH from local.bridgeawsiot (d0, q0, r0, m0, 'awsiot_to_localgateway', ... (45 bytes))
Note: Make sure that it is selected the eu-central-1 as the region.
Publish from Host
Workflow: Local Broker(Host PC) -> Docker Gateway -> AWS IoT.
Run the following in terminal to publish from host to AWS IoT:
mosquitto_pub -h localhost -p 1883 -q 1 -d -t localgateway_to_awsiot -i clientid1 -m "{\"key\": \"helloFromLocalGateway\"}"
Make sure that you have mosquitto installed on your PC.
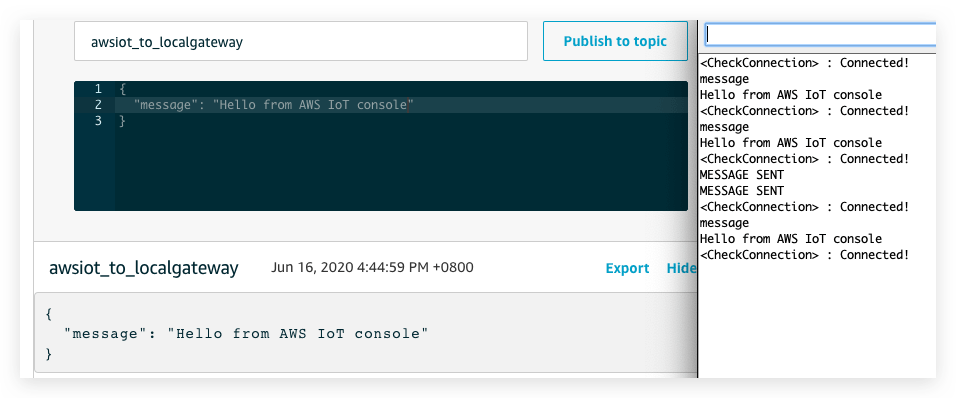
Publishing Messages From Wio Terminal
Now, we can use Wio Terminal as one of the end device to publish or subscribe to topics!
Installing the Dependent Libraries
This demo relies on the Wio Terminal's Wi-Fi core, please follow this wiki first.
STEP.1 Install the Pubsubclient library
-
Visit the pubsubclient repositories and download the entire repo to your local drive.
-
Now, the FS library can be installed to the Arduino IDE. Open the Arduino IDE, and click
sketch->Include Library->Add .ZIP Library, and choose thepubsubclientfile that you've have just downloaded.

STEP.2 Install the ArduinoJson Library
-
Visit the ArduinoJson repositories and download the entire repo to your local drive.
-
Now, the ArduinoJson library can be installed to the Arduino IDE. Open the Arduino IDE, and click
sketch->Include Library->Add .ZIP Library, and choose theArduinoJsonfile that you've have just downloaded.
Upload the Arduino Sketch
Download the Arduino Sketch from here.
- Configure the Wi-Fi settings
ssidandpassword. - Change the
mqttserverto the IP Address of your MQTT Broker (Your PC's IP Address).
Upload the code and open Serial Monitor to check! Now, if you press the button on Wio Terminal will publish a message to the AWS IoT and you can also see incoming messages from the AWS IoT Console.
Make sure that the local broker docker is up and running the whole time.
Resources
Tech Support & Product Discussion
Thank you for choosing our products! We are here to provide you with different support to ensure that your experience with our products is as smooth as possible. We offer several communication channels to cater to different preferences and needs.