Overview
This wiki introduces how to update the latest firmware for the Wireless Core Realtek RTL8720 on the Wio Terminal, as well as installing all the dependent libraries for Wio Terminal to enable wireless connectivity.
We have moved the Wi-Fi Software to the new eRPC Structure which is more stable and can work with Bluetooth at the same time! Please follow through to update to eRPC Wi-Fi firmware and related libraries!
Update the Wireless Core Firmware
First, we need to update the firmware for the Realtek RTL8720 Wireless core on the Wio Terminal. This is essential and must update to the latest firmware before proceeding to examples.
Attention
Please update the Wi-Fi Core before usage!
Step 1 - Erase the Initial Factory Firmware
When you get your hands on the Wio Terminal for the very first time, you need to erase the initial RTL8720 firmware and flash the latest firmware. We have prepared a tool for this called ambd_flash_tool, and when you run this tool, it first enables a serial connection from SAMD51 to RTL8720 in order for the firmware to install on the RTL8720. This is done because you cannot directly communicate with RTL8720. After that, this tool can be used to erase the existing firmware on the RTL8720 and also flash the latest firmware.
NOTE: You only need to erase the factory firmware for the very first time. Afterwards, you can flash new firmware to overwrite the existing firmware
For Windows
- STEP 1: Open Windows PowerShell on your PC and execute the below commands to download the flashing tool
cd ~
git clone https://github.com/Seeed-Studio/ambd_flash_tool
NOTE: Here cd ~ command directs you to your home directory and git clone command downloads the repo from GitHub
- STEP 2: Navigate to ambd_flash_tool directory
cd ambd_flash_tool
-
STEP 3: Connect Wio Terminal to PC and turn it on
-
STEP 4: Execute the following command to erase the initial firmware
.\ambd_flash_tool.exe erase
NOTE: The initial erase process may take a while. Please be patient and do not close the window
The connected serial port of the Wio Terminal will be automatically detected!
NOTE: If you want to open the help usage, execute .\ambd_flash_tool.exe

For Mac/ Linux
- STEP 1: Open Terminal on your Mac/Linux and execute the below commands to download the flashing tool
cd ~
git clone https://github.com/Seeed-Studio/ambd_flash_tool
NOTE: Here cd ~ command directs you to your home directory and git clone command downloads the repo from GitHub
- STEP 2: Navigate to ambd_flash_tool directory
cd ambd_flash_tool
-
STEP 3: Connect Wio Terminal to PC and turn it on
-
STEP 4: Execute the following command to erase the initial firmware
python3 ambd_flash_tool.py erase
NOTE: Make sure you have Python 3 installed on your Mac/ Linux, and the script will auto-download all the dependent libraries
In some cases, you may only have Python 3 on your PC, then replace
python3 ambd_flash_tool.pywithpython ambd_flash_tool.py
NOTE: The initial erase process may take a while. Please be patient and do not close the window
The connected serial port of the Wio Terminal will be automatically detected!
NOTE: If you want to open the help usage, execute python3 ambd_flash_tool.py

Step 2 - Flash the Latest Firmware
For Windows
- While you are inside the ambd_flash_tool directory, execute the following command to flash the latest firmware to RTL8720
.\ambd_flash_tool.exe flash
For Mac/ Linux
- While you are inside the ambd_flash_tool directory, execute the following command to flash the latest firmware to RTL8720
python3 ambd_flash_tool.py flash
Flash an Old Firmware (Extra - Can Skip)
If you want to test your code with an old firmware release, you can do so by following the steps below. However, if you want to get started with the latest firmware, you might stick to the above step (Step 2) and skip this step
For Windows
-
STEP 1: Visit RTL8720 Firmware repo on GitHub
-
STEP 2: Choose a release version of your choice and click on xxx-seeed-ambd-firmware-rpc-vxxx.zip to download it as a .zip file
-
STEP 3: Navigate to ambd_flash_tool directory using Windows PowerShell as mentioned before and execute the following command
.\ambd_flash_tool.exe flash -d [RTL8720-firmware-path]
NOTE: Replace [RTL8720-firmware-path] with the path you downloaded the RTL8720 from above. This folder should contain all these 3 files: km0_boot_all.bin, km0_km4_image2.bin and km4_boot_all.bin
If everything goes well, you should see all a successful message. Now you have flashed the RTL8720 firmware into the RTL8720 core!
For Mac/ Linux
-
STEP 1: Visit RTL8720 Firmware repo on GitHub
-
STEP 2: Choose a release version of your choice and click on xxx-seeed-ambd-firmware-rpc-vxxx.zip to download it as a .zip file
-
STEP 3: Navigate to ambd_flash_tool directory using terminal as mentioned before and execute the following command
python3 ambd_flash_tool.py flash -d [RTL8720-firmware-path]
NOTE: Replace [RTL8720-firmware-path] with the path you downloaded the RTL8720 from above. This folder should contain all these 3 files: km0_boot_all.bin, km0_km4_image2.bin and km4_boot_all.bin
If everything goes well, you should see all a successful message. Now you have flashed the RTL8720 firmware into the RTL8720 core!
Check RTL8720 Firmware Version from Arduino IDE
After installing the above firmware, you can check whether the firmware is installed correctly, by uploading the following code to the Wio Terminal via Arduino IDE
#include "rpcWiFi.h"
#include <erpc/erpc_port.h>

void setup() {
    Serial.begin(115200);
    while(!Serial); // Wait to open Serial Monitor
    char* version = rpc_system_version();
    Serial.print("RTL8720 Firmware Version: ");
    Serial.println(version);
    erpc_free(version);
}

void loop() {
}
Once you open Serial Monitor, you should see the firmware version printed
Update Seeed SAMD ArduinoCore
Please update the Seeed SAMD ArduinoCore to the latest version (1.8.1)!
-
STEP 1: Open the Arduino IDE, and click
Tools->Board->Boards Manager, and search Wio Terminal in the search box -
STEP 2: Make sure the latest version (1.8.1) is installed. If not, click on the
Select versiondrop-down menu, select the latest version and clickInstall

You can also find the source code of Seeed SAMD ArduinoCore here.
Libraries Installation
There are a few Arduino Libraries that are needed for Wireless connectivity. We have included all the wireless-related libraries for the Wio Terminal in the Arduino Library Manager. So you simply have to open Arduino Library Manager within Arduino IDE and search for the libraries that you need and easily install them!
How to Install a Library from Arduino Library Manager
-
STEP 1: Open the Arduino IDE, and click
Sketch->Include Library->Manage Libraries... -
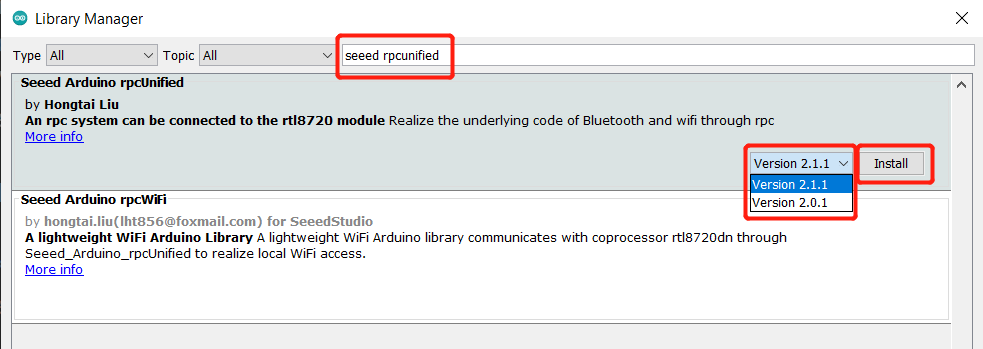
STEP 2: Type the name of the library that we need and select the latest version from the drop-down menu (if available)
-
STEP 3: Click Install
Needed Libraries for Wi-Fi
We need the following libraries to get started with Wi-Fi on the Wio Terminal. You can search for these libraries by typing the library name in the search box of Arduino Library Manager.
For your convenience, we have assembled all the libraries together. Hence, for the future docs and update current docs, you only need to install rpcwifi and then it will install all the wifi dependent libraries for you.
-
Seeed_Arduino_rpcWiFi - search for
"seeed rpcwifi" -
Seeed_Arduino_rpcUnified - search for
"seeed rpcunified" -
Seeed_Arduino_mbedtls - search for
"seeed mbedtls" -
Seeed_Arduino_FS - search for
"seeed fs" -
Seeed_Arduino_SFUD - search for
"seeed sfud"

Release
| Updated Date | Writer | Detail |
| 10.12 | BILL and LAKSHANTHA | Assemble all the required libraries together |
Tech Support & Product Discussion
if you have any technical issue. submit the issue into our forum. Thank you for choosing our products! We are here to provide you with different support to ensure that your experience with our products is as smooth as possible. We offer several communication channels to cater to different preferences and needs.