Flash JetPack OS to A607 Carrier Board (NVIDIA Jetson Orin NX/Nano supported)
In this wiki, we will show you how to flash Jetpack to an NVMe SSD connected to the A607 Carrier Board which supports both NVIDIA Jetson Orin NX module and NVIDIA Jetson Orin Nano module
Prerequisites
- Ubuntu Host PC (native or VM using VMware Workstation Player)
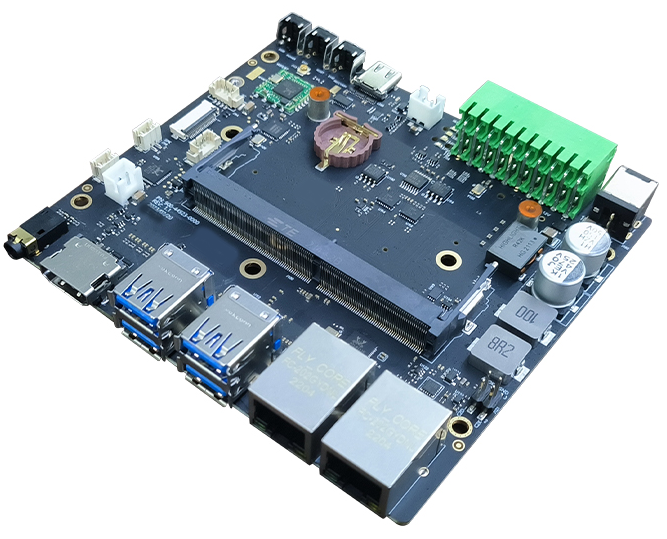
- A607 Carrier Board with Jetson Orin NX or Jetson Orin Nano module
- USB Type-C data transmission cable
Enter Force Recovery Mode
Before we can move on to the installation steps, we need to make sure that the board is in force recovery mode.
Step 1. Connect a USB cable between the Type-C connector on the board and the Linux host PC
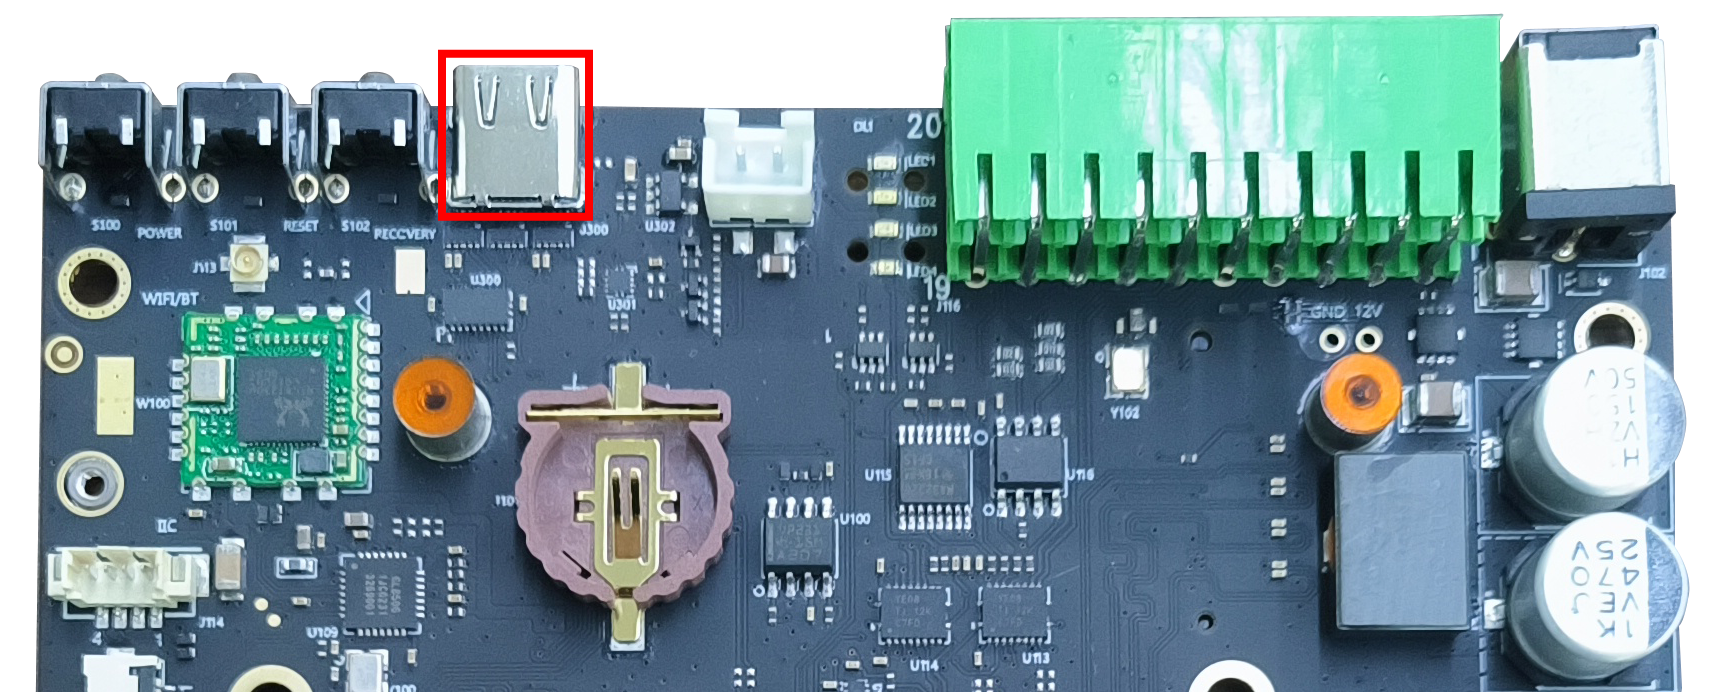
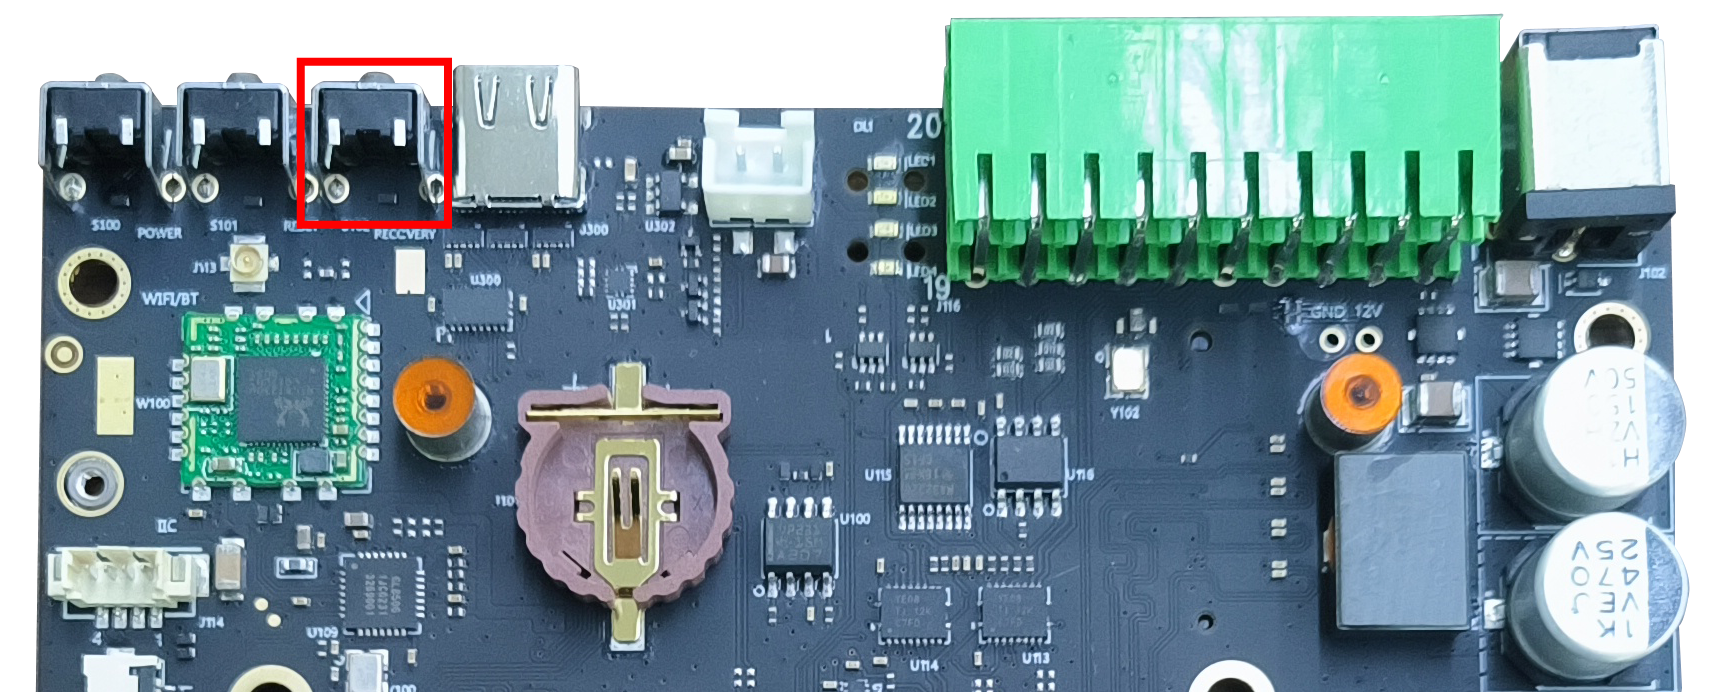
Step 2. Press the RECOVERY button and while holding down that button, connect power adapter to the DC JACK on the board to power on the board
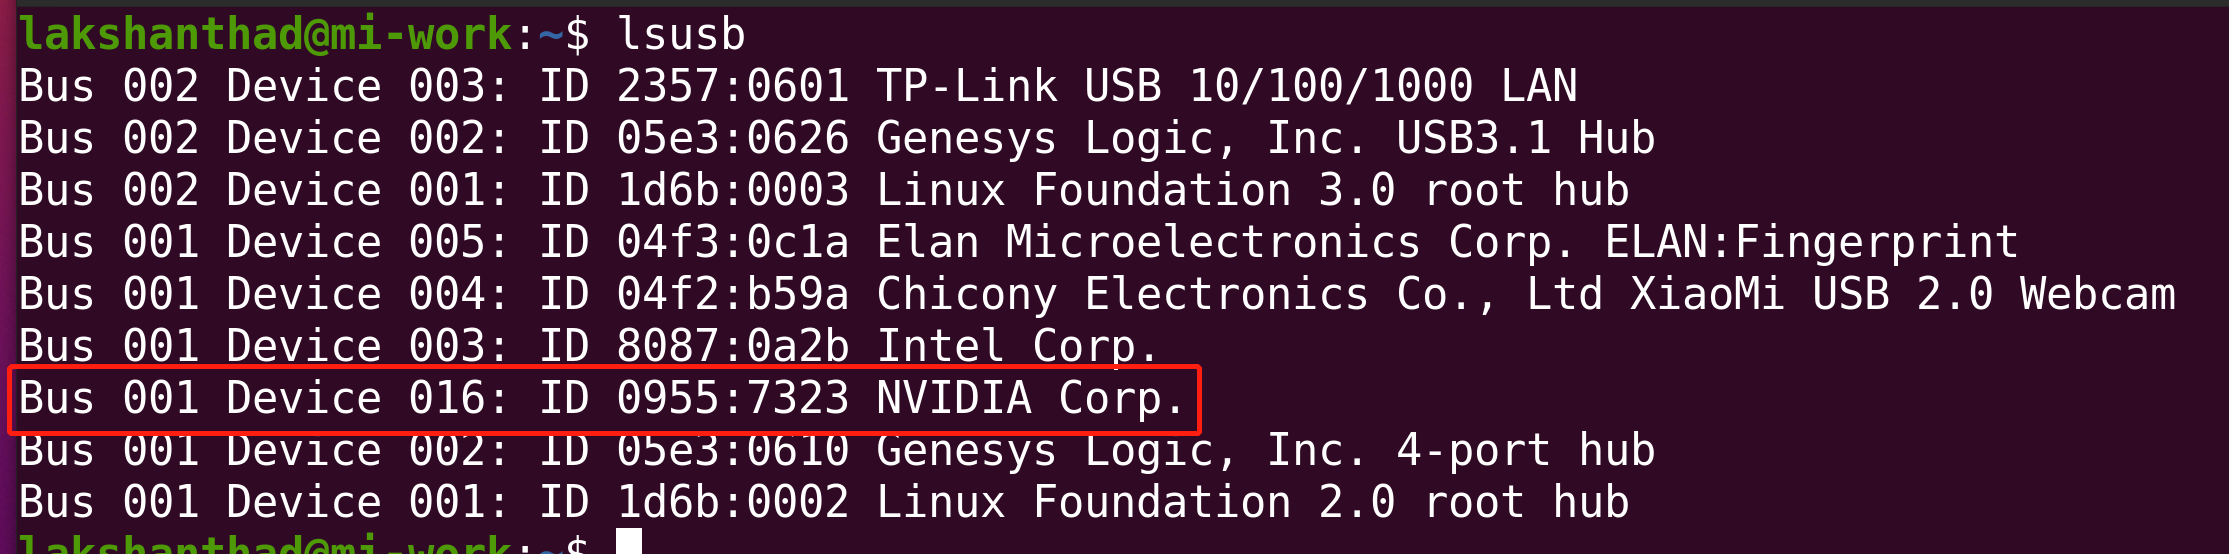
Step 3. On the Linux host PC, open a Terminal window and enter the command lsusb. If the returned content has one of the following outputs according to the Jetson SoM you use, then the board is in force recovery mode.
- For Orin NX 16GB: 0955:7323 NVidia Corp
- For Orin NX 8GB: 0955:7423 NVidia Corp
- For Orin Nano 8GB: 0955:7523 NVidia Corp
- For Orin Nano 4GB: 0955:7623 NVidia Corp
The below image is for Orin NX 16GB
Step 4. Remove the jumper wire
Download the peripheral drivers
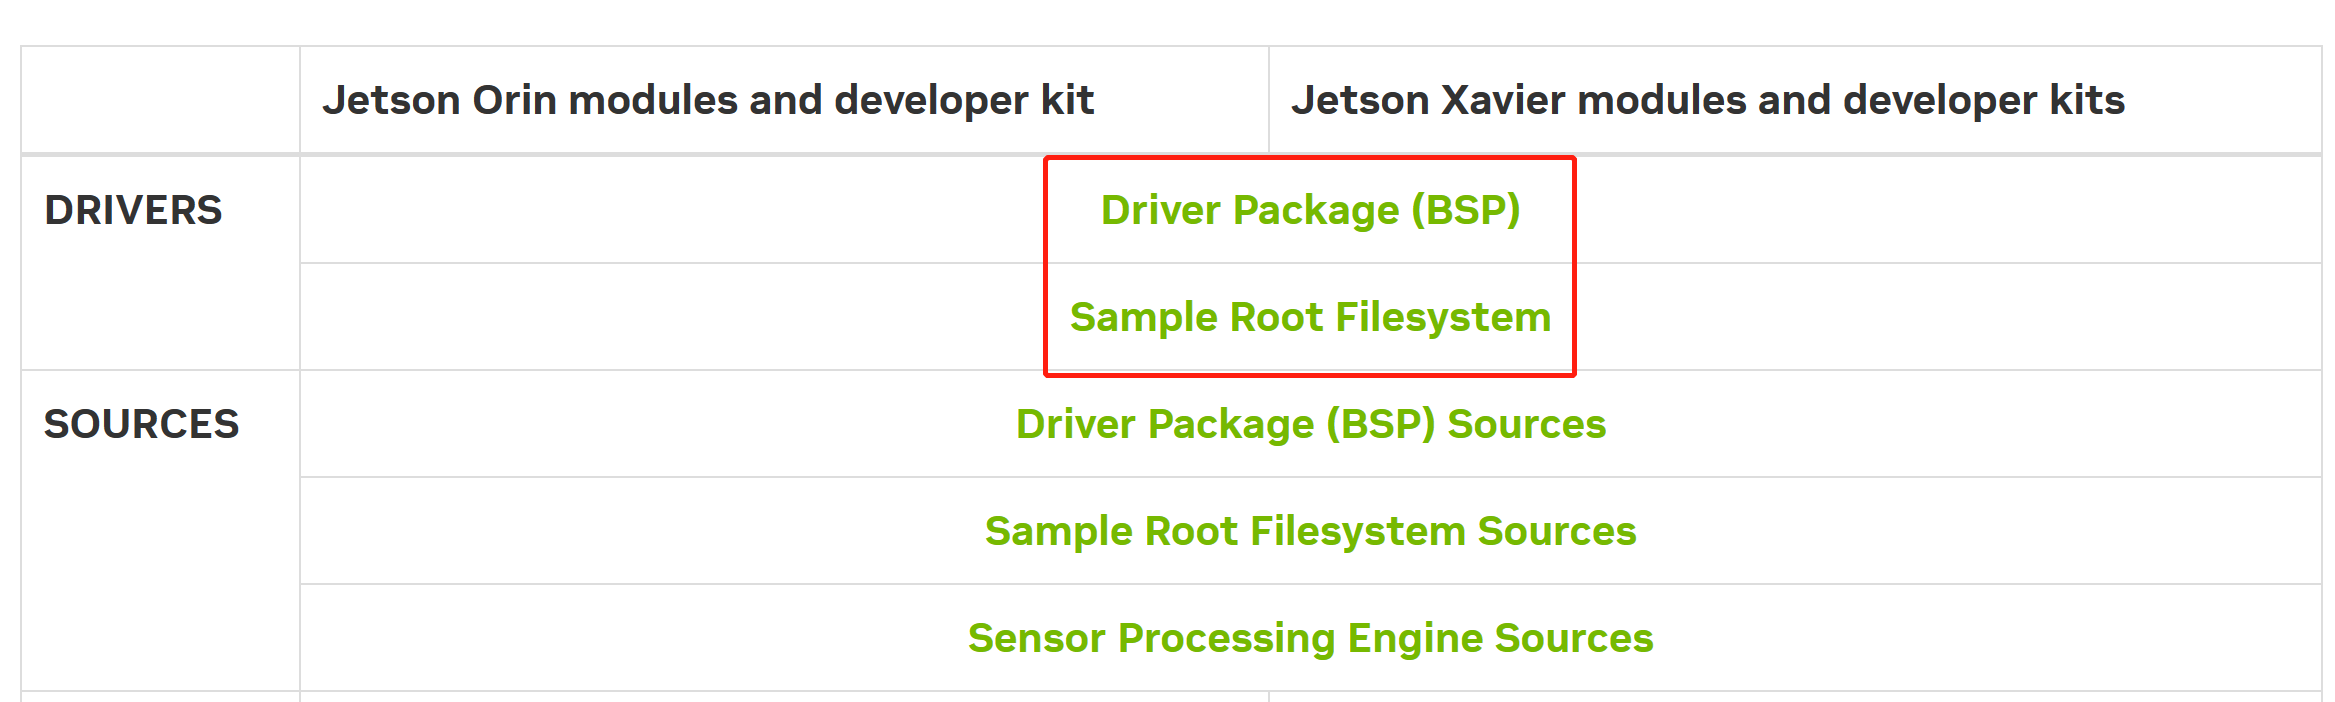
First of all, you need to install the peripheral drivers for this board. These are needed for some hardware peripherals to function on the board. Click the below links to download the drivers according to the Jetson module.
| Jetson Module | JetPack Version | L4T Version | Download Link |
|---|---|---|---|
| Jetson Orin NX 8GB/ 16GB | 5.1 | 35.2.1 | Download |
| 5.1.1 | 35.3.1 | Download | |
| 6.0 | 36.3 | Download | |
| 6.1 | 36.4 | Download | |
| Jetson Orin Nano 4GB | 5.1.1 | 35.3.1 | Download |
| 6.0 | 36.3 | Download | |
| 6.1 | 36.4 | Download | |
| Jetson Orin Nano 8GB | 5.1.1 | 35.3.1 | Download |
| 6.0 | 36.3 | Download | |
| 6.1 | 36.4 | Download |
Note: Currently we provide the above drivers. We will keep updating the drivers in the future with the release of new JetPack versions.
Flash to Jetson
Before moving onto flashing, it should be noted that Jetson Orin NX module only supports JetPack 5.1 and above, while Jetson Orin Nano module only supports JetPack 5.1.1 and above.
- JP5.1/JP5.1.1
- JP6.0
- JP6.1
Jetson Orin NX
Here we will use NVIDIA L4T 35.3.1 to install Jetpack 5.1.1 on the A607 Carrier Board with Jetson Orin NX module
Step 1: Download the NVIDIA drivers on the host PC. The required drivers are shown below:
Step 2: Move the downloaded peripheral drivers from before into the same folder with NVIDIA drivers. Now you will see three compressed files in the same folder.
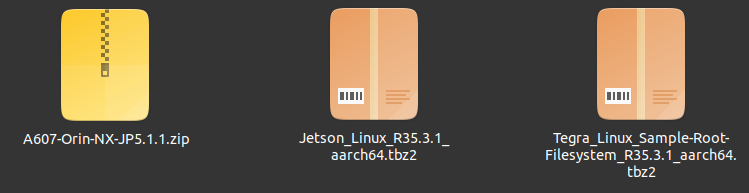
Step 3: Extract Jetson_Linux_R35.3.1_aarch64.tbz2 and Tegra_Linux_Sample-Root-Filesystem_R35.3.1_aarch64.tbz2 by navigating to the folder containing these files, apply the changes and install the necessary prerequisites
tar xf Jetson_Linux_R35.3.1_aarch64.tbz2
sudo tar xpf Tegra_Linux_Sample-Root-Filesystem_R35.3.1_aarch64.tbz2 -C Linux_for_Tegra/rootfs/
cd Linux_for_Tegra/
sudo ./apply_binaries.sh
sudo ./tools/l4t_flash_prerequisites.sh
Step 4: Extract A607-Orin-NX-JP5.1.1.zip. Here we additionally install the unzip package which is needed to decompress the .zip file
cd ..
sudo apt install unzip
unzip A607-Orin-NX-JP5.1.1.zip
Here it will ask whether to replace the files. Type A and press ENTER to replace the necessary files

Step 5: Configure your username, password & hostname so that you do not need to enter the Ubuntu installation wizard after the device finishes booting
sudo tools/l4t_create_default_user.sh -u {USERNAME} -p {PASSWORD} -a -n {HOSTNAME} --accept-license
For example (username:"nvidia", password:"nvidia", device-name:"nvidia-desktop"):
sudo tools/l4t_create_default_user.sh -u nvidia -p nvidia -a -n nvidia-desktop --accept-license
Step 6: Flash the system to either NVMe SSD or USB Flash drive
NVMe SSD
cd Linux_for_Tegra
sudo ./tools/kernel_flash/l4t_initrd_flash.sh --external-device nvme0n1p1 \
  -c tools/kernel_flash/flash_l4t_external.xml -p "-c bootloader/t186ref/cfg/flash_t234_qspi.xml" \
  --showlogs --network usb0 p3509-a02+p3767-0000 internal
USB Flash drive
cd Linux_for_Tegra
sudo ./tools/kernel_flash/l4t_initrd_flash.sh --external-device sda1 \
  -c tools/kernel_flash/flash_l4t_external.xml -p "-c bootloader/t186ref/cfg/flash_t234_qspi.xml" \
  --showlogs --network usb0 p3509-a02+p3767-0000 internal
You will see the following output if the flashing process is successful

Jetson Orin Nano
Here we will use NVIDIA L4T 35.3.1 to install Jetpack 5.1.1 on the A607 Carrier Board with Jetson Orin Nano module. Note that 4GB and 8GB Orin Nano modules use different driver files and the instructions are a little different.
Step 1: Download the NVIDIA drivers on the host PC. The required drivers are shown below:
Step 2: Move the downloaded peripheral drivers from before into the same folder with NVIDIA drivers. Now you will see three compressed files in the same folder.
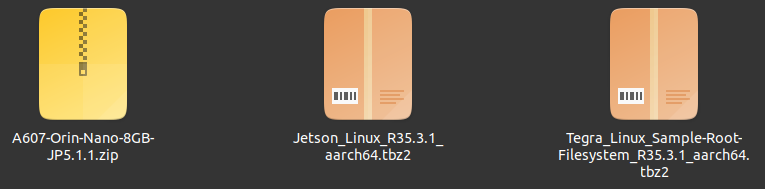
Step 3: Extract Jetson_Linux_R35.3.1_aarch64.tbz2 and Tegra_Linux_Sample-Root-Filesystem_R35.3.1_aarch64.tbz2 by navigating to the folder containing these files, apply the changes and install the necessary prerequisites
tar xf Jetson_Linux_R35.3.1_aarch64.tbz2
sudo tar xpf Tegra_Linux_Sample-Root-Filesystem_R35.3.1_aarch64.tbz2 -C Linux_for_Tegra/rootfs/
cd Linux_for_Tegra/
sudo ./apply_binaries.sh
sudo ./tools/l4t_flash_prerequisites.sh
Step 4: Extract A607-Orin-Nano-8GB-JP5.1.1.zip for 8GB version and A607-Orin-Nano-4GB-JP5.1.1.zip for 4GB version. Here we additionally install the unzip package which is needed to decompress the .zip file.
cd ..
sudo apt install unzip
# for 8GB version
unzip A607-Orin-Nano-8GB-JP5.1.1.zip
# for 4GB version
unzip A607-Orin-Nano-4GB-JP5.1.1.zip
Here it will ask whether to replace the files. Type A and press ENTER to replace the necessary files

Step 5: Configure your username, password & hostname so that you do not need to enter the Ubuntu installation wizard after the device finishes booting
sudo tools/l4t_create_default_user.sh -u {USERNAME} -p {PASSWORD} -a -n {HOSTNAME} --accept-license
For example (username:"nvidia", password:"nvidia", device-name:"nvidia-desktop"):
sudo tools/l4t_create_default_user.sh -u nvidia -p nvidia -a -n nvidia-desktop --accept-license
Step 6: Flash the system to either NVMe SSD or USB Flash drive
NVMe SSD
cd Linux_for_Tegra
sudo ./tools/kernel_flash/l4t_initrd_flash.sh --external-device nvme0n1p1 \
  -c tools/kernel_flash/flash_l4t_external.xml -p "-c bootloader/t186ref/cfg/flash_t234_qspi.xml" \
  --showlogs --network usb0 jetson-orin-nano-devkit internal
USB Flash drive
cd Linux_for_Tegra
sudo ./tools/kernel_flash/l4t_initrd_flash.sh --external-device sda1 \
  -c tools/kernel_flash/flash_l4t_external.xml -p "-c bootloader/t186ref/cfg/flash_t234_qspi.xml" \
  --showlogs --network usb0 jetson-orin-nano-devkit internal
You will see the following output if the flashing process is successful
Here we will use NVIDIA L4T 36.3 to install Jetpack 6.0 on the A607 Carrier Board with Jetson Orin NX module.
Step 1: Download the NVIDIA drivers on the host PC. The required drivers are shown below:
Step 2: Move the downloaded peripheral drivers from before into the same folder with NVIDIA drivers. Now you will see three compressed files in the same folder.
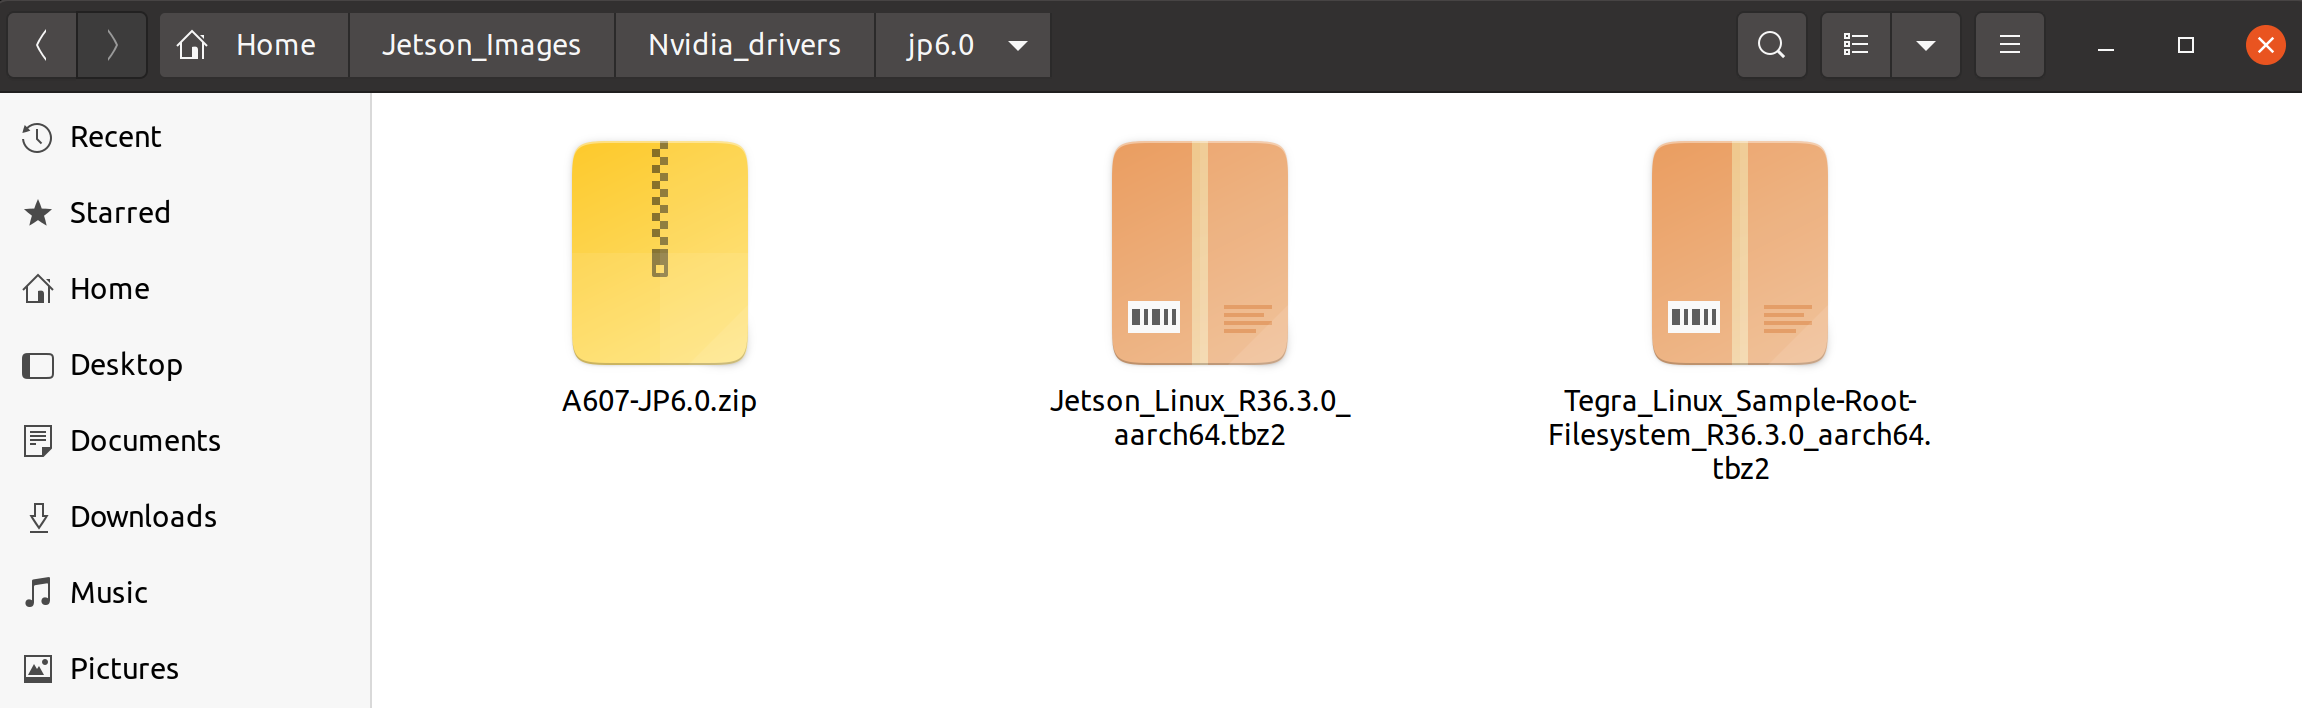
Step 3: Extract Jetson_Linux_R36.3.0_aarch64.tbz2 and Tegra_Linux_Sample-Root-Filesystem_R36.3.0_aarch64.tbz2 by navigating to the folder containing these files, apply the changes and install the necessary prerequisites
tar xf Jetson_Linux_R36.3.0_aarch64.tbz2
sudo tar xpf Tegra_Linux_Sample-Root-Filesystem_R36.3.0_aarch64.tbz2 -C Linux_for_Tegra/rootfs/
cd Linux_for_Tegra/
sudo ./apply_binaries.sh
sudo ./tools/l4t_flash_prerequisites.sh
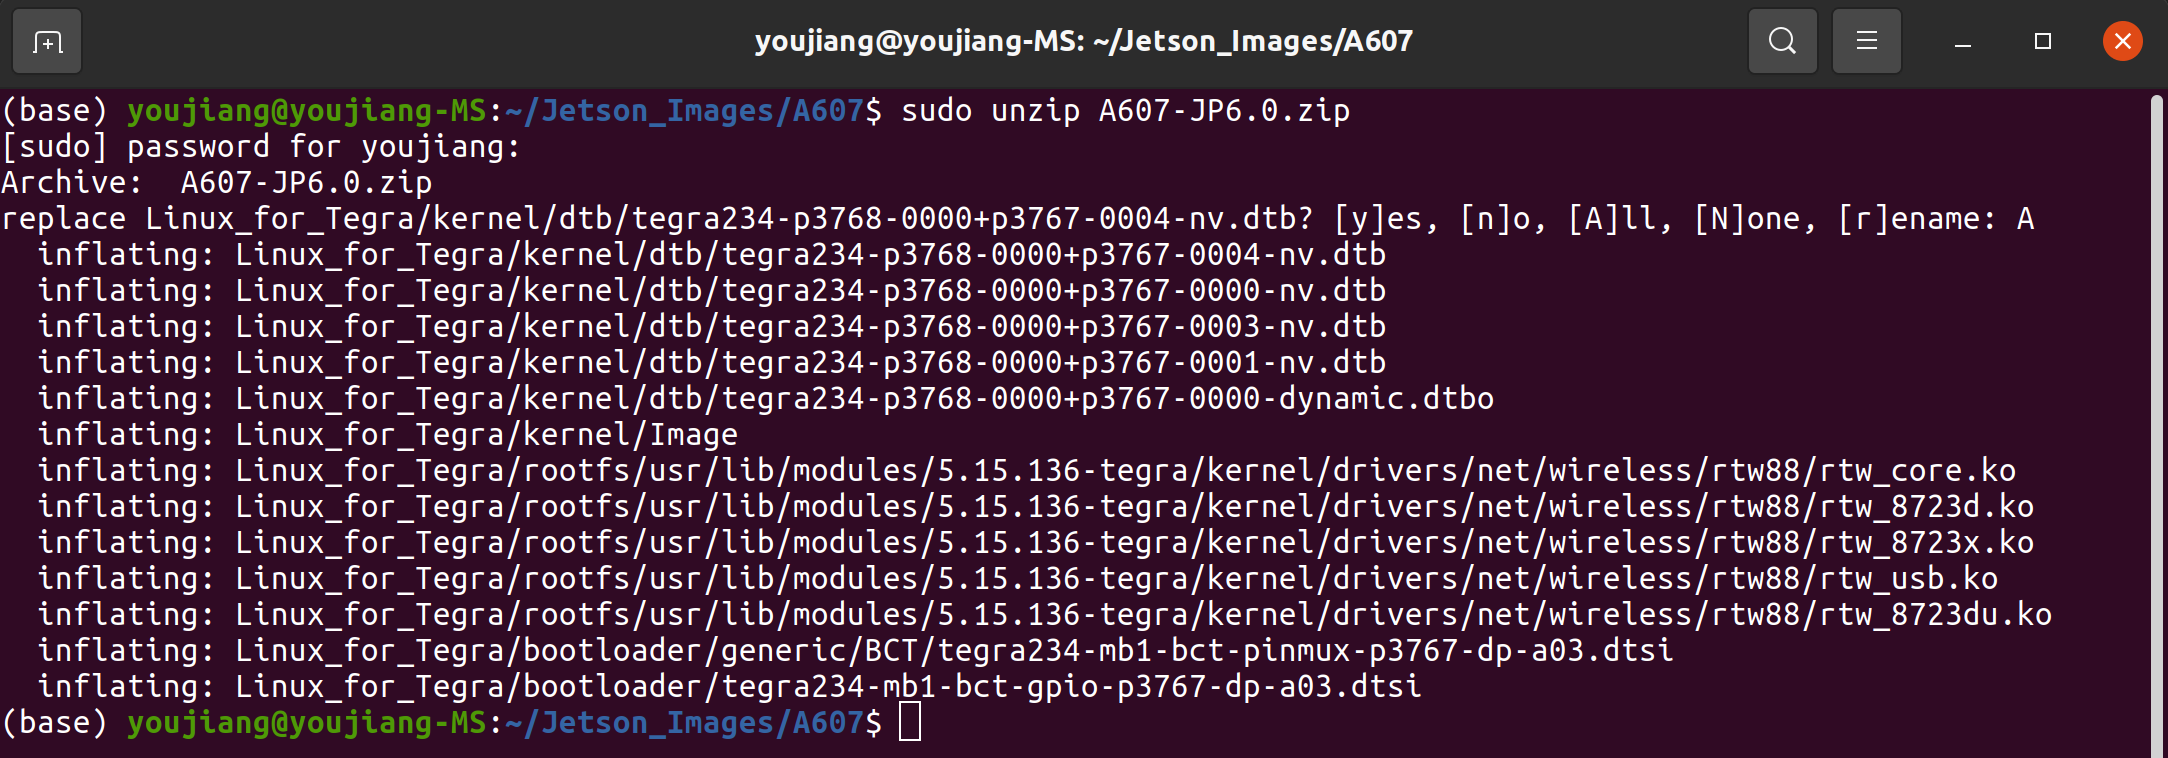
Step 4: Extract A607-JP6.0.zip. Here we additionally install the unzip package which is needed to decompress the .zip file
cd ..
sudo apt install unzip
sudo unzip A607-JP6.0.zip
Here it will ask whether to replace the files. Type A and press ENTER to replace the necessary files:
Step 5: Flash the system to either NVMe SSD:
cd Linux_for_Tegra
sudo ./tools/kernel_flash/l4t_initrd_flash.sh --external-device nvme0n1p1 -c tools/kernel_flash/flash_l4t_t234_nvme.xml -p "-c bootloader/generic/cfg/flash_t234_qspi.xml" --showlogs --network usb0 jetson-orin-nano-devkit internal
You will see the following output if the flashing process is successful:
Here we will use NVIDIA L4T 36.4 to install Jetpack 6.1 on the A607 Carrier Board with Jetson Orin NX module.
Step 1: Download the NVIDIA drivers on the host PC. The required drivers are shown below:
Step 2: Move the downloaded peripheral drivers from before into the same folder with NVIDIA drivers. Now you will see three compressed files in the same folder.
You can use the following command to verify that the downloaded file is complete.

Step 3: Extract Jetson_Linux_R36.4.0_aarch64.tbz2 and Tegra_Linux_Sample-Root-Filesystem_R36.4.0_aarch64.tbz2 by navigating to the folder containing these files and apply the changes:
cd <path_to_files>
tar xf Jetson_Linux_R36.4.0_aarch64.tbz2
sudo tar xfp Tegra_Linux_Sample-Root-Filesystem_R36.4.0_aarch64.tbz2 -C Linux_for_tegra/rootfs
cd Linux_for_tegra
sudo ./tools/l4t_flash_prerequisites.sh
sudo ./apply_binaries.sh
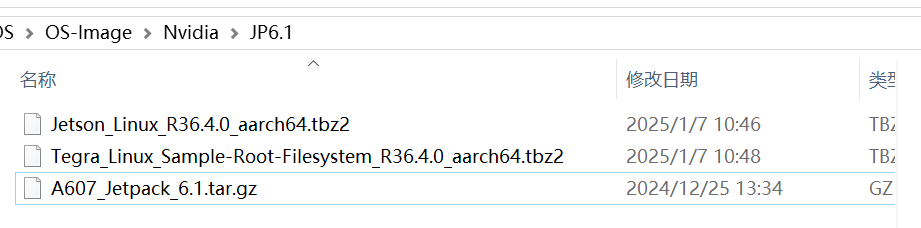
Step 4: Extract A607_Jetpack_6.1.tar.gz:
cd ..
tar xf A607_Jetpack_6.1.tar.gz
sudo cp -r 607_jetpack6.1/Linux_for_Tegra/* Linux_for_Tegra/
Step 5: Flash the system to either NVMe SSD:
cd Linux_for_Tegra
sudo ./tools/kernel_flash/l4t_initrd_flash.sh --external-device nvme0n1p1 -c tools/kernel_flash/flash_l4t_t234_nvme.xml -p "-c bootloader/generic/cfg/flash_t234_qspi.xml" --showlogs --network usb0 jetson-orin-nano-devkit internal
You will see the following output if the flashing process is successful:
Configure WiFi and Bluetooth
After flashing is successful, the Jetson will boot into the OS. Now you need to additionally configure WiFi and Bluetooth.
Step 1: Visit this page and click on 8723du.ko to download the WiFi/ Bluetooth driver file needed and copy them to the device
Step 2: Create a new directory for the driver
cd /lib/modules/5.10.104-tegra/kernel/drivers/net/wireless/realtek/
sudo mkdir rtl8723du
Step 3: Copy the previously downloaded 8723du.ko file to the newly created directory
cd ~
sudo cp 8723du.ko /lib/modules/5.10.104-tegra/kernel/drivers/net/wireless/realtek/rtl8723du
Step 4: Enable the driver
sudo modprobe cfg80211
sudo insmod /lib/modules/5.10.104-tegra/kernel/drivers/net/wireless/realtek/rtl8723du/8723du.ko
sudo depmod -a
sudo modprobe 8723du
sudo echo 8723du >> /etc/modules
Step 5: Reboot the device
sudo reboot
Tech Support & Product Discussion
Thank you for choosing our products! We are here to provide you with different support to ensure that your experience with our products is as smooth as possible. We offer several communication channels to cater to different preferences and needs.