Flash JetPack OS to J401 Carrier Board

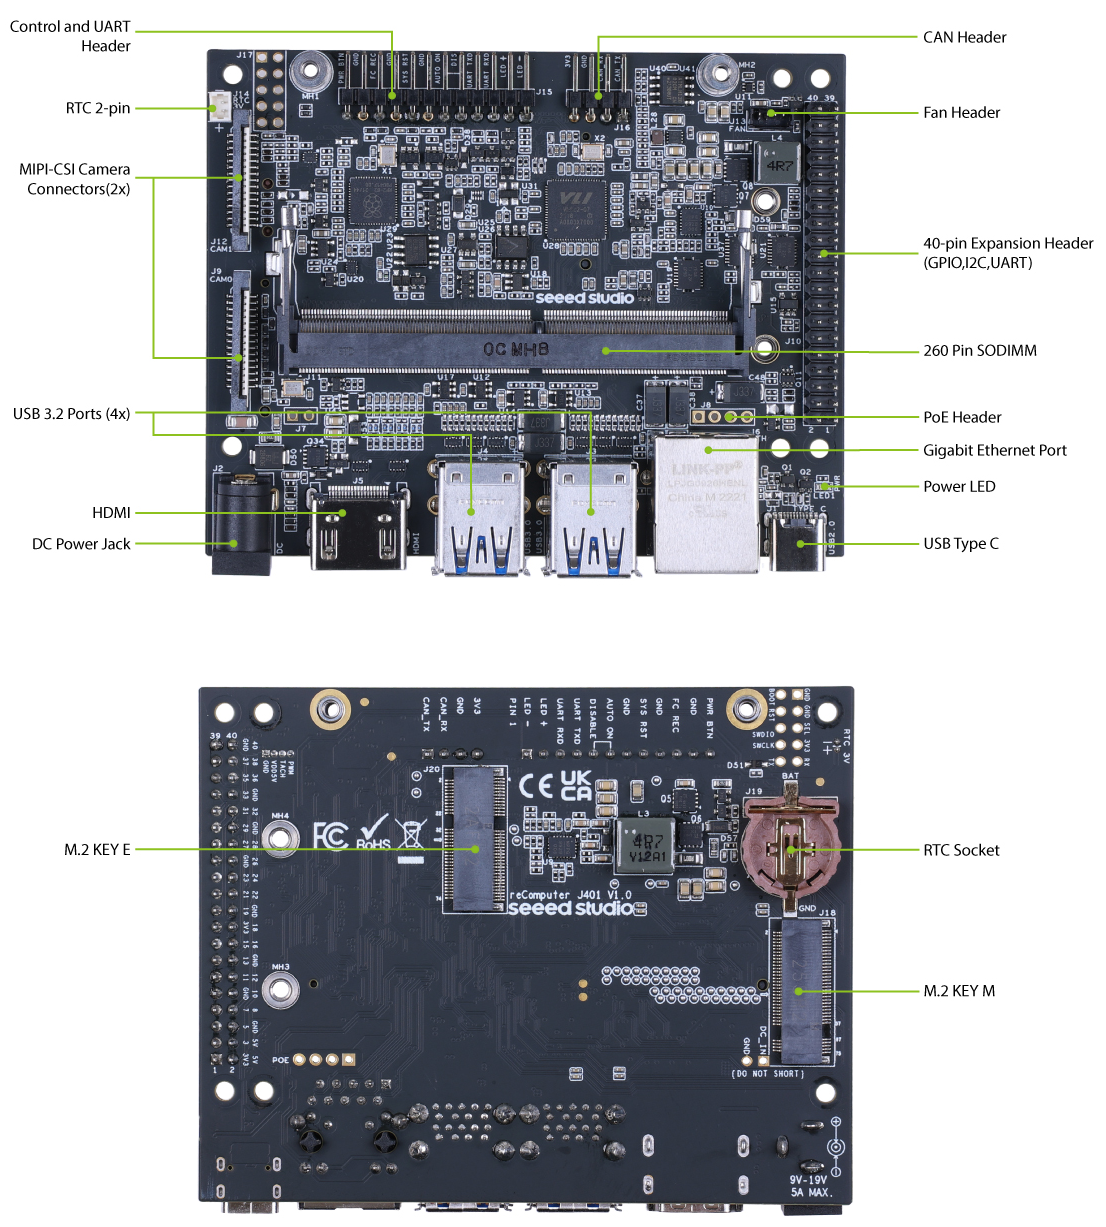
The J401 carrier board is a powerful extension board that supports NVIDIA Jetson Orin NX/Nano modules. It features 1xGbE port, 1x CAN for data transfer, M.2 Key M for SSD, M.2 Key E for WiFi/BlueTooth, 2 CSI, and 1 HDMI for high-quality video capture and display. It also contains 4x USB 3.2 ports, a fan, RTC, and a flexible 9-19V power supply. All of these make it reliable for a variety of industrial automation systems, building powerful AI applications.
Features
- Exceptional Performance Carrier Board: Support the NVIDIA Jetson Orin NX/Nano module, leveraging powerful computing power to take on tough tasks with ease
- Versatile Connectivity: Offer 1x Gigabit Ethernet port for networking, 4x USB 3.2 Type-A (10Gbps) ports,1x USB2.0 Type-C port, 1x CAN connector for fast data transfer
- Flexible Storage and Wireless Expansion: Mount with 1x M.2 Key M 2280 and 1x M.2 Key E slots, offering ample space for flexible storage and wireless connectivity expansion
- Advanced Peripherals Supported: Assemble 2x 15 pins CSI camera connector, 1x HDMI 2.1, 1x fan, 1x RTC for multiple peripherals
- Wide Range of Input Voltages: From 9-19V DC, providing flexibility in power supply options
Specifications
| Specifications | reComputer J3010 | reComputer J3011 | reComputer J4011 | reComputer J4012 |
|---|---|---|---|---|
| Module | Jetson Orin Nano 4GB | Jetson Orin Nano 8GB | Jetson Orin NX 8GB | Jetson Orin NX 16GB |
| AI Performance | 20 TOPS | 40 TOPS | 70 TOPS | 100 TOPS |
| GPU | 512-core NVIDIA Ampere architecture GPU with 16 Tensor Cores | 1024-core NVIDIA Ampere architecture GPU with 32 Tensor Cores | 1024-core NVIDIA Ampere architecture GPU with 32 Tensor Cores | |
| GPU Max Frequency | 625 MHz | 765 MHz | 918 MHz | |
| CPU | 6-core Arm® Cortex®-A78AE v8.2 64-bit CPU 1.5MB L2 + 4MB L3 | 6-core Arm® Cortex®-A78AE v8.2 64-bit CPU 1.5MB L2 + 4MB L3 | 8-core Arm® Cortex®-A78AE v8.2 64-bit CPU 2MB L2 + 4MB L3 | |
| CPU Max Frequency | 1.5 GHz | 2 GHz | ||
| Memory | 4GB 64-bit LPDDR5 34 GB/s | 8GB 128-bit LPDDR5 68 GB/s | 8GB 128-bit LPDDR5 102.4GB/s | 16GB 128-bit LPDDR5 102.4GB/s |
| DL Accelerator | / | 1x NVDLA v2 | 2x NVDLA v2 | |
| DLA Max Frequency | / | 614 MHz | ||
| Vision Accelerator | / | 1x PVA v2 | ||
| Storage | 128GB NVMe SSD | |||
| Video Encoder | 1080p30 supported by 1-2 CPU cores | 1x 4K60 (H.265) | 3x 4K30 (H.265) 6x 1080p60 (H.265) | 12x 1080p30 (H.265) | ||
| Video Decoder | 1x 4K60 (H.265) 2x 4K30 (H.265) 5x 1080p60 (H.265) 11x 1080p30 (H.265) | 1x 8K30 (H.265) | 2x 4K60 (H.265) | 4x 4K30 (H.265) 9x 1080p60 (H.265) | 18x 1080p30 (H.265) | ||
| Display | 1* HDMI 2.1 | |||
| CSI Camera | 2* CSI (2-lane 15pin) | |||
| Networking | 1* Gigabit Ethernet (10/100/1000M) | |||
| USB | 4* USB 3.2 Type-A (10Gbps); 1* USB2.0 Type-C (Device Mode) | |||
| M.2 Key M | 1* M.2 Key M | |||
| M.2 Key E | 1* M.2 Key E | |||
| Fan | 1* 4 pin Fan Connector(5V PWM) | |||
| CAN | 1* CAN | |||
| Multifunctional Port | 1* 40-Pin Expansion header,1* 12-Pin Control and UART header | |||
| RTC | RTC 2-pin, RTC socket (supports CR1220 but not included) | |||
| Power | 9-19V | |||
| Power Supply | Power adapter not included | |||
| Temperature | -10℃~60℃ | |||
| Mechanical | 130mm x120mm x 58.5mm | |||
Hardware Overview
Flash JetPack
Here, we will show you how to flash Jetpack to an NVMe SSD connected to the reComputer J4012/ J4011/ J3010 and J3011. All these devices come with J401 carrier board inside and the flashing procedure is the same for all.
reComputer J40/ J30 series comes with JetPack 5.1.3 pre-installed on the included NVMe SSD, so that you do not need to flash it. However, if you want to flash it again with JetPack, you can follow this guide.
Supported Module
- NVIDIA® Jetson Orin™ Nano Module 4GB
- NVIDIA® Jetson Orin™ Nano Module 8GB
- NVIDIA® Jetson Orin™ NX Module 8GB
- NVIDIA® Jetson Orin™ NX Module 16GB
Prerequisites
- Ubuntu Host Computer
- reComputer J4012/ J4011/ J3010 or J3011
- USB Type-C data transmission cable
We recommend that you use physical ubuntu host devices instead of virtual machines. Please refer to the table below to prepare the host machine.
| JetPack Version | Ubuntu Version (Host Computer) | |||
| 18.04 | 20.04 | 22.04 | 24.04 | |
| JetPack 5.x | ✅ | ✅ | ||
| JetPack 6.x | ✅ | ✅ | ||
| JetPack 7.2 | ✅ | ✅ | ✅ | |
Note: For JetPack 7.2, Ubuntu 24.04 is supported for flashing and target-side component installation only. Use Ubuntu 20.04 or 22.04 if you need host development components.
Enter Force Recovery Mode
- We do not recommend using virtual machines and ARM architecture Ubuntu for flashing.
- Before we can move on to the installation steps, we need to make sure that the board is in force recovery mode.
Step-by-Step
Step 1. Use a jumper wire to connect the FC REC pin and the GND pin.
| Button Header | Description | Button Header | Description | |
|---|---|---|---|---|
 | 1 | PWR BTN | 7 | AUTO ON |
| 2 | GND | 8 | DIS | |
| 3 | FC REC | 9 | UART TXD | |
| 4 | GND | 10 | UART RXD | |
| 5 | SYS RET | 11 | LED + | |
| 6 | GND | 12 | LED - |
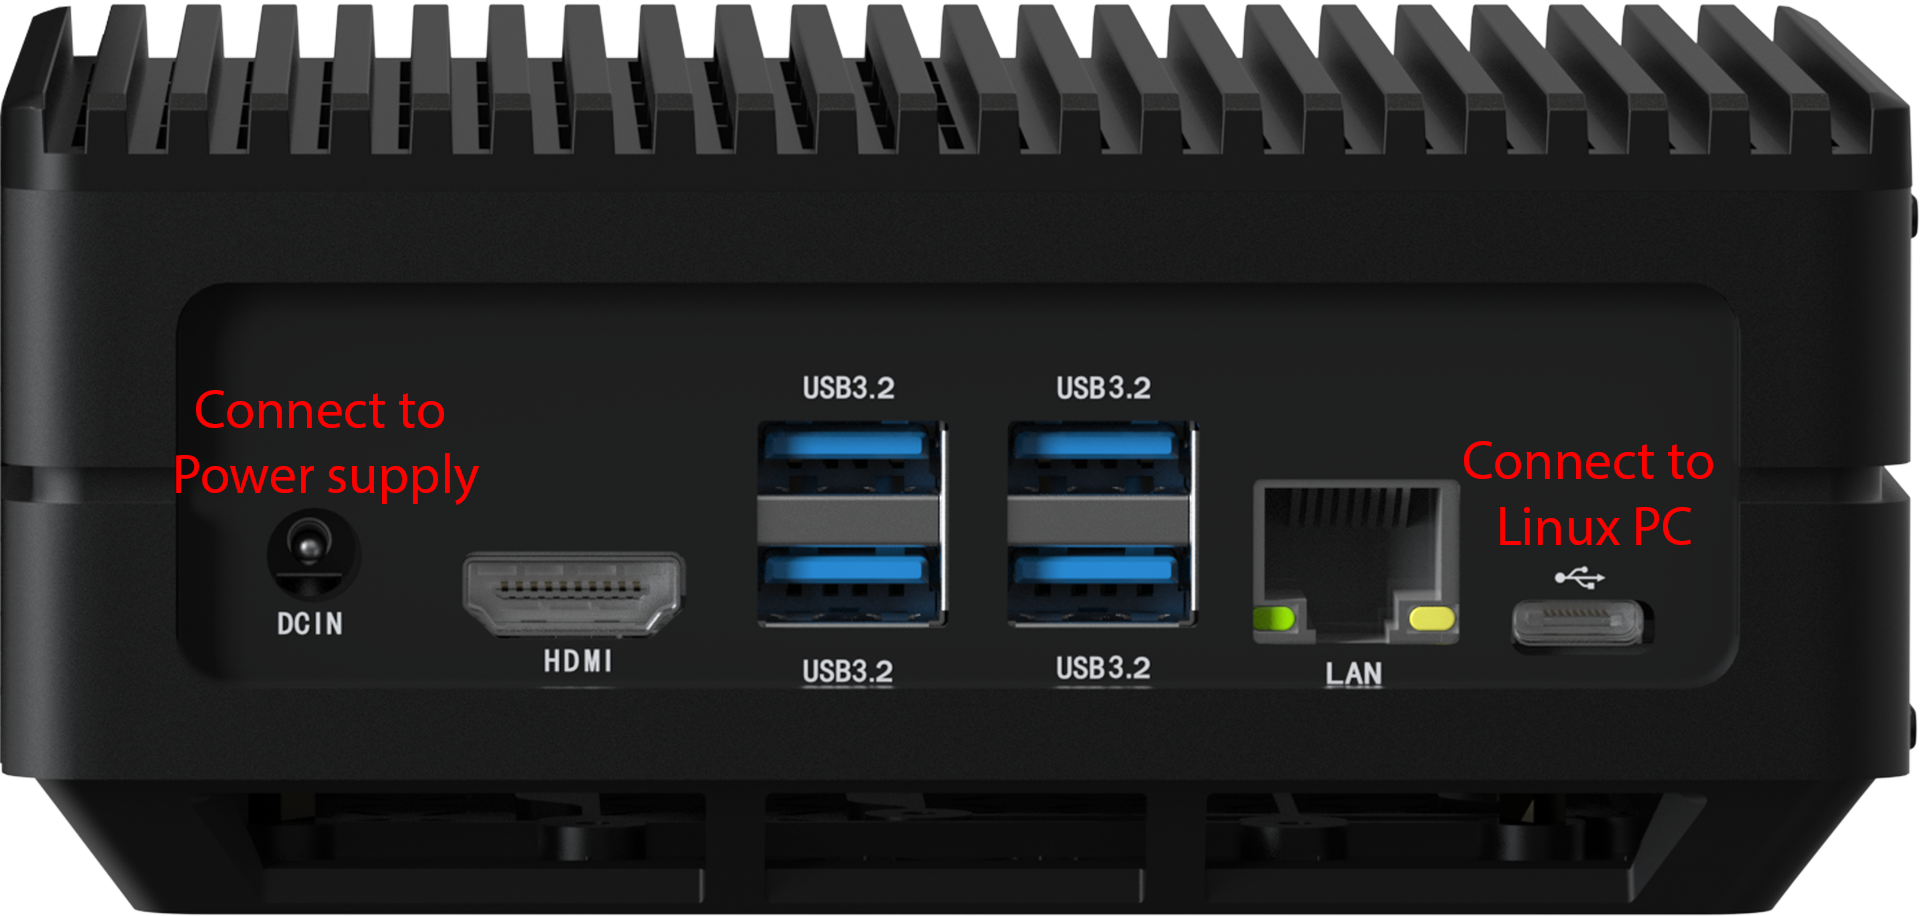
Step 2. Power up the reComputer by connecting the included cable from the power adapter and connect the board with the Ubuntu host PC with a USB Type-C data transmission cable
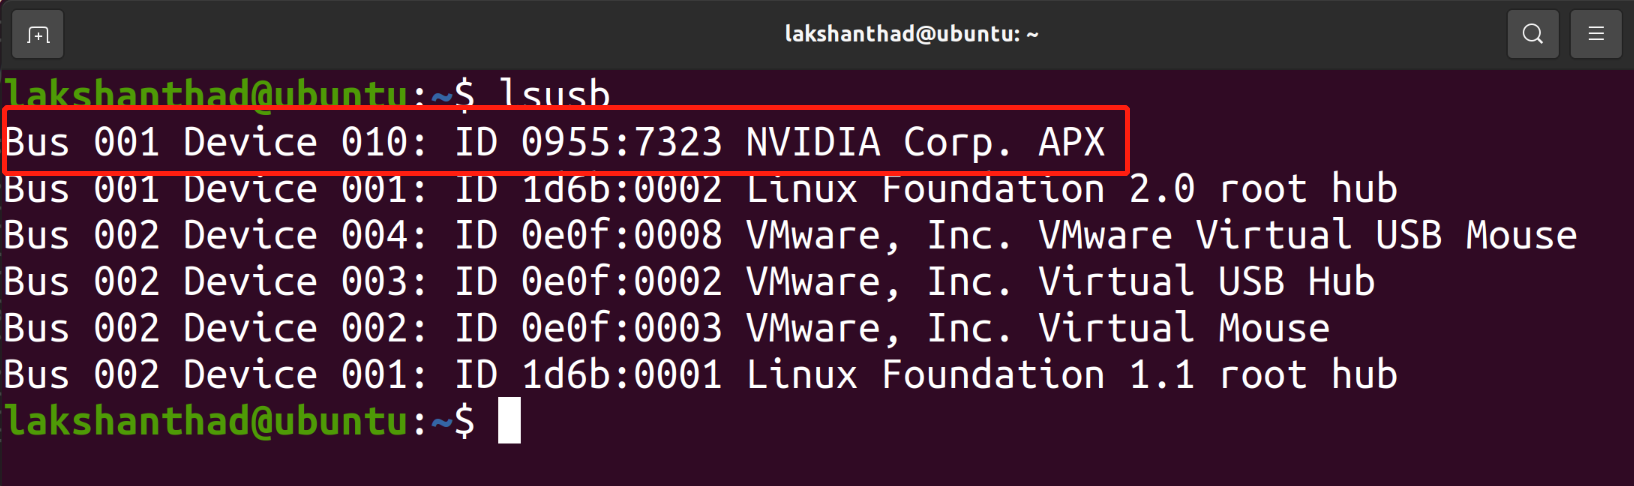
Step 3. On the Linux host PC, open a Terminal window and enter the command lsusb. If the returned content has one of the following outputs according to the Jetson SoM you use, then the board is in force recovery mode.
- For Orin NX 16GB: 0955:7323 NVidia Corp
- For Orin NX 8GB: 0955:7423 NVidia Corp
- For Orin Nano 8GB: 0955:7523 NVidia Corp
- For Orin Nano 4GB: 0955:7623 NVidia Corp
The below image is for Orin NX 16GB
Step 4. Remove the jumper wire
Flash the device step by step
Before moving onto flashing, it should be noted that Jetson Orin NX module only supports JetPack 5.1 and above, while Jetson Orin Nano module only supports JetPack 5.1.1 and above.
First of all, install the below required dependencies on the Ubuntu Host PC before moving onto flashing JetPack.
sudo apt install qemu-user-static sshpass abootimg nfs-kernel-server libxml2-utils binutils -y
NVIDIA has updated the DRAM used in its modules. To ensure compatibility with the new modules, we have updated JetPack accordingly. The currently stable and supported version is JetPack 5.1.3.
If the DRAM on your module is from Hynix (this can be identified from the markings on the chip package), it is recommended to flash JetPack 5.1.3.
- JP5.1.1
- JP5.1.2
- JP5.1.3
- JP6.0
- JP6.1
- JP6.2
- JP7.2
Here we will use NVIDIA L4T 35.3.1 to install Jetpack 5.1.1 on the reComputer
Step 1: Download the NVIDIA drivers on the host PC. The required drivers are shown below:
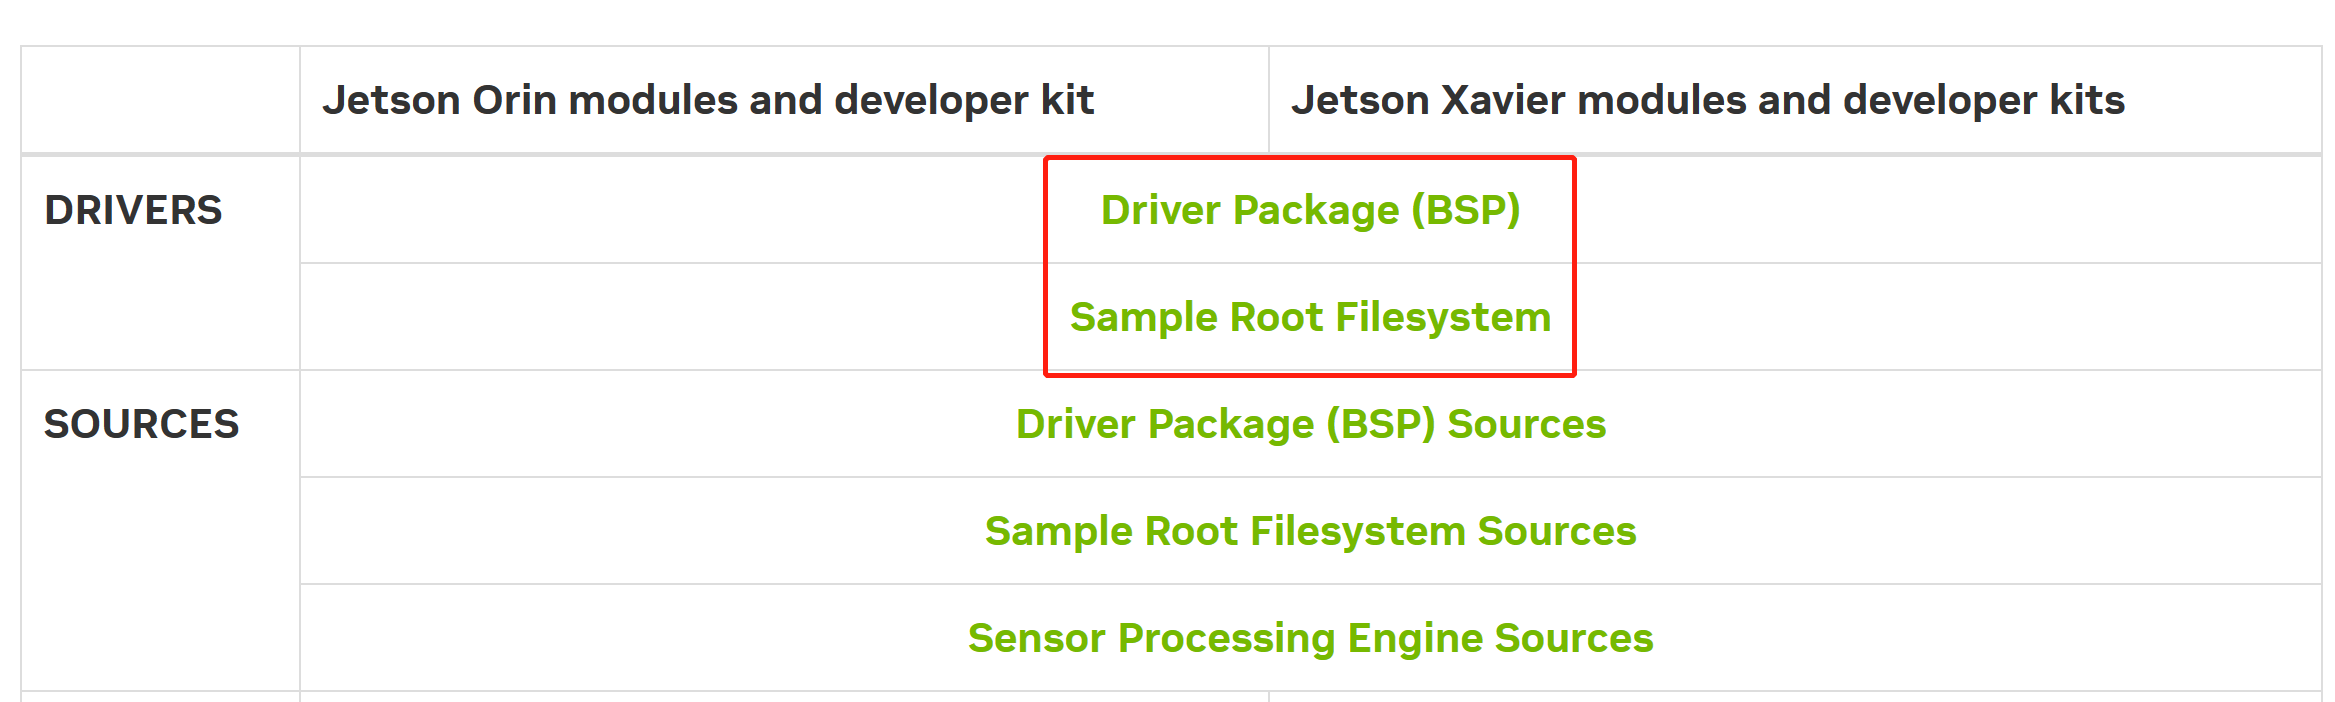
Step 2: Extract Jetson_Linux_R35.3.1_aarch64 and Tegra_Linux_Sample-Root-Filesystem_R35.3.1_aarch64 by navigating to the folder containing these files, apply the changes and install the necessary prerequisites
tar xf Jetson_Linux_R35.3.1_aarch64
sudo tar xpf Tegra_Linux_Sample-Root-Filesystem_R35.3.1_aarch64 -C Linux_for_Tegra/rootfs/
cd Linux_for_Tegra/
sudo ./apply_binaries.sh
sudo ./tools/l4t_flash_prerequisites.sh
Step 3 (Optional): Configure your username, password & hostname so that you do not need to enter the Ubuntu installation wizard after the device finishes booting
sudo tools/l4t_create_default_user.sh -u {USERNAME} -p {PASSWORD} -a -n {HOSTNAME} --accept-license
For example (username:"nvidia", password:"nvidia", device-name:"nvidia-desktop"):
sudo tools/l4t_create_default_user.sh -u nvidia -p nvidia -a -n nvidia-desktop --accept-license
Step 4: Flash the system to the NVMe SSD
sudo ./tools/kernel_flash/l4t_initrd_flash.sh --external-device nvme0n1p1 \
  -c tools/kernel_flash/flash_l4t_external.xml -p "-c bootloader/t186ref/cfg/flash_t234_qspi.xml" \
  --showlogs --network usb0 p3509-a02+p3767-0000 internal
You will see the following output if the flashing process is successful

Now, you can connect the mouse, keyboard, and monitor to the Jetson device. It will be ready to use!
If your Jetson device takes a long time to open the desktop, please reconnect the power supply.
Step 5 (Optional): Install Nvidia Jetpack SDK
Please open the terminal on the Jetson device and execute the following commands:
sudo apt update
sudo apt install nvidia-jetpack
Here we will use NVIDIA L4T 35.4.1 to install Jetpack 5.1.2 on the reComputer
Step 1: Download the NVIDIA drivers on the host PC. The required drivers are shown below:
Step 2: Extract Jetson_Linux_R35.4.1_aarch64 and Tegra_Linux_Sample-Root-Filesystem_R35.4.1_aarch64 by navigating to the folder containing these files, apply the changes and install the necessary prerequisites
tar xf Jetson_Linux_R35.4.1_aarch64.tbz2
sudo tar xpf Tegra_Linux_Sample-Root-Filesystem_R35.4.1_aarch64.tbz2 -C Linux_for_Tegra/rootfs/
cd Linux_for_Tegra/
sudo ./apply_binaries.sh
sudo ./tools/l4t_flash_prerequisites.sh
Now we need to apply a patch from NVIDIA which is needed for JP5.1.2 and explained here in section 4.2.3 of the official NVIDIA JetPack Release Notes.
Step 3: Navigate to the following directory
cd Linux_for_Tegra/bootloader/t186ref/BCT
Step 4: Open the file "tegra234-mb2-bct-scr-p3767-0000.dts" and add the following lines under tfc section
tfc {
    reg@322 { /* GPIO_M_SCR_00_0 */
    exclusion-info = <2>;
    value = <0x38008080>;
    };
Step 5 (Optional): Navigate to "Linux_for_Tegra" directory, and enter the below command to configure your username, password & hostname so that you do not need to enter the Ubuntu installation wizard after the device finishes booting
cd Linux_for_Tegra
sudo tools/l4t_create_default_user.sh -u {USERNAME} -p {PASSWORD} -a -n {HOSTNAME} --accept-license
For example (username:"nvidia", password:"nvidia", device-name:"nvidia-desktop"):
sudo tools/l4t_create_default_user.sh -u nvidia -p nvidia -a -n nvidia-desktop --accept-license
Step 6: Flash the system to the NVMe SSD
cp p3509-a02+p3767-0000.conf p3509-a02-p3767-0000.conf
sudo ./tools/kernel_flash/l4t_initrd_flash.sh --external-device nvme0n1p1   -c tools/kernel_flash/flash_l4t_nvme.xml -p "-c bootloader/t186ref/cfg/flash_t234_qspi.xml --no-systemimg"   --showlogs --network usb0 p3509-a02-p3767-0000 external
You will see the following output if the flashing process is successful
Now, you can connect the mouse, keyboard, and monitor to the Jetson device. It will be ready to use!
If your Jetson device takes a long time to open the desktop, please reconnect the power supply.
Step 7 (Optional): Install Nvidia Jetpack SDK
Please open the terminal on the Jetson device and execute the following commands:
sudo apt update
sudo apt install nvidia-jetpack
Here we will install Jetpack 5.1.3 on the reComputer.
Step 1: Download the system image to your Ubuntu PC corresponding to the Jetson module you are using:
| Jetson Module | Download Link | SHA256 |
|---|---|---|
| Orin NX 16GB | Download | 37F99E90A746D07242EE17E2A74A3336490E997457DE0E9FC15A1E35D347543B |
| Orin NX 8GB | Download | 4FDD5F05EE83F425AD1D8E2768BDF35FA68D3F1143B09C2FB9537CBFD1A9D5EC |
| Orin Nano 8GB | Download | 6A002620B6E40673A39710F0ECC1C56CB5750480B799F97BB7DE4A5B6F49C527 |
| Orin Nano 4GB | Download | 63A3D59185BDB286452CA7774DD528F5087249B8065D902C9181703010B7836A |
To verify the integrity of the downloaded firmware, you can compare the SHA256 hash value.
On an Ubuntu host machine, open the terminal and run the command sha256sum <File> to obtain the SHA256 hash value of the downloaded file. If the resulting hash matches the SHA256 hash provided in the wiki, it confirms that the firmware you downloaded is complete and intact.
Step 2: Extract the downloaded image file:
sudo tar xpf mfi_xxxx.tar.gz
# For example: sudo tar xpf mfi_recomputer-orin-nano-8g-j401-6.0-36.3.0-2024-06-07.tar.gz
Step 3: Navigate to the unzipped directory and execute the following command to flash jetpack system to the NVMe SSD:
cd mfi_xxxx
# For example: cd mfi_recomputer-orin-j401
sudo ./tools/kernel_flash/l4t_initrd_flash.sh --flash-only --massflash 1 --network usb0  --showlogs
You will see the following output if the flashing process is successful
The flash command may run for 2-10 minutes.
Step 4: Connect the J401 to a display using the HDMI connector on the board and finish the initial configuration setup.
Please complete the System Configuration according to your needs.
Here we will use NVIDIA L4T 36.3 to install Jetpack 6.0 on the reComputer
Step 1: Download the system image to your Ubuntu PC corresponding to the Jetson module you are using:
| Jetson Module | Download Link1 | Download Link2 | SHA256 |
|---|---|---|---|
| Orin NX 16GB | Download | Download | 20b38d9524327fd714c37cb293036006e070b5335d6b4f6978a862be51c3db52 |
| Orin NX 8GB | Download | Download | da966e7616ed86b45e184b6db9c3eb81e779a5f4524f6c3c5610e56c53532fe1 |
| Orin Nano 8GB | Download | Download | e0fa101c5df6f507d123c2332e9fedea0ac54f8a5253cb28e71fdff01147fa68 |
| Orin Nano 4GB | Download | Download | 80ebeac0a843baa2c3104ee6341d44f39a2cfab1c9c725e176c7b2a219b79dfc |
To verify the integrity of the downloaded firmware, you can compare the SHA256 hash value.
On an Ubuntu host machine, open the terminal and run the command sha256sum <File> to obtain the SHA256 hash value of the downloaded file. If the resulting hash matches the SHA256 hash provided in the wiki, it confirms that the firmware you downloaded is complete and intact.
Step 2: Extract the downloaded image file:
sudo tar xpf mfi_xxxx.tar.gz
# For example: sudo tar xpf mfi_recomputer-orin-nano-8g-j401-6.0-36.3.0-2024-06-07.tar.gz
Step 3: Navigate to the unzipped directory and execute the following command to flash jetpack system to the NVMe SSD:
cd mfi_xxxx
# For example: cd mfi_recomputer-orin-j401
sudo ./tools/kernel_flash/l4t_initrd_flash.sh --flash-only --massflash 1 --network usb0  --showlogs
You will see the following output if the flashing process is successful
The flash command may run for 2-10 minutes.
Step 4: Connect the J401 to a display using the HDMI connector on the board and finish the initial configuration setup:

Please complete the System Configuration according to your needs.
Step 5: After starting the system, you need to execute the following command to reactivate the wireless network card driver:
sudo rm /lib/modules/5.15.136-tegra/build
sudo ln -s /usr/src/linux-headers-5.15.136-tegra-ubuntu22.04_aarch64/3rdparty/canonical/linux-jammy/kernel-source/ /lib/modules/5.15.136-tegra/build
sudo apt install -y iwlwifi-modules
Here we will use NVIDIA L4T 36.4 to install Jetpack 6.1 on the reComputer
Step 1: Download the system image to your Ubuntu PC corresponding to the Jetson module you are using:
| Jetson Module | Download Link | SHA256 |
|---|---|---|
| Orin NX 16GB | Download | b848e327b87c408565b899a11c52022b42df6de4f3dce1e5470cb2a7baccc898 |
| Orin NX 8GB | Download | 3839c99fc9e2da1f35de824c42b7bb56f9660d8f4a6ce68b196c6cb50d5d4fb4 |
| Orin Nano 8GB | Download | a0863e7209351f9165cf6bd2d756a6a726b2e8fc1fa54b5d66279d5b136a3a33 |
| Orin Nano 4GB | Download | a40edfbcda9a7a07fbf72ca4e3149d171236f5ede2c4e3a5e243da77562f9b13 |
To verify the integrity of the downloaded firmware, you can compare the SHA256 hash value.
On an Ubuntu host machine, open the terminal and run the command sha256sum <File> to obtain the SHA256 hash value of the downloaded file. If the resulting hash matches the SHA256 hash provided in the wiki, it confirms that the firmware you downloaded is complete and intact.
Step 2: Extract the downloaded image file:
sudo tar xpf mfi_xxxx.tar.gz
# For example: sudo tar xpf mfi_recomputer-orin-nx-16g-j401-6.1-36.4.0-2026-02-07.tar.gz
Step 3: Navigate to the unzipped directory and execute the following command to flash jetpack system to the NVMe SSD:
cd mfi_xxxx
# For example: cd mfi_recomputer-orin-j401
sudo ./tools/kernel_flash/l4t_initrd_flash.sh --flash-only --massflash 1 --network usb0  --showlogs
You will see the following output if the flashing process is successful
The flash command may run for 2-10 minutes.
Step 4: Connect the J401 to a display using the HDMI connector on the board and finish the initial configuration setup:
Please complete the System Configuration according to your needs.
Here we will use NVIDIA L4T 36.4.3 to install Jetpack 6.2 on the reComputer
If you are using an Orin NX 16GB/8GB module, do not enable MAXN SUPER mode. The cooling capacity of the reComputer J401 carrier board is insufficient to support it, and forcing this mode may result in permanent damage to the module.
Step 1: Download the system image to your Ubuntu PC corresponding to the Jetson module you are using:
| Jetson Module | Download Link | SHA256 |
|---|---|---|
| Orin NX 16GB | Download | b9529f008cf9a65460db3ee17736db971b8d110049f9f6ea8ecc8fe4d1691869 |
| Orin NX 8GB | Download | b7106b4f8c5835011040c071dd14e1144b5298af300f920e44517b99c183ed05 |
| Orin Nano 8GB | Download | c2247262dec1379fd4494def6a6ed2d4414605a8dcb902c6d6afbb94a5e48499 |
| Orin Nano 4GB | Download | 1d570b54853bba4ecc115789d1b03c5ba07b34344f7616dfa3c3772c9ff37e64 |
To verify the integrity of the downloaded firmware, you can compare the SHA256 hash value.
On an Ubuntu host machine, open the terminal and run the command sha256sum <File> to obtain the SHA256 hash value of the downloaded file. If the resulting hash matches the SHA256 hash provided in the wiki, it confirms that the firmware you downloaded is complete and intact.
Please note that due to the increased power consumption and heat generation after enabling super mode, the reComputer J4011 and reComputer J4012 cannot operate stably in the highest mode. Therefore, this update does not include these two products.
We are currently designing a new version of reComputer. Stay tuned!
Step 2: Extract the downloaded image file:
sudo tar xpf mfi_xxxx.tar.gz
# For example: sudo tar xpf mfi_recomputer-orin-nano-8g-j401-6.2-36.4.3-2025-04-07.tar.gz
Step 3: Navigate to the unzipped directory and execute the following command to flash jetpack system to the NVMe SSD:
cd mfi_xxxx
# For example: cd mfi_recomputer-orin-j401
sudo ./tools/kernel_flash/l4t_initrd_flash.sh --flash-only --massflash 1 --network usb0  --showlogs
You will see the following output if the flashing process is successful
The flash command may run for 2-10 minutes.
Step 4: Connect the J401 to a display using the HDMI connector on the board and finish the initial configuration setup:
Please complete the System Configuration according to your needs.
Here we will use NVIDIA L4T 39.2.0 to install JetPack 7.2 on the reComputer Classic series.
If you are using an Orin NX 16GB/8GB module, do not enable MAXN SUPER mode. The cooling capacity of the reComputer J401 carrier board is insufficient to support it, and forcing this mode may result in permanent damage to the module.
Step 1: Download the system image to your Ubuntu PC corresponding to the Jetson module you are using:
| Jetson Module | Download Link | SHA256 |
|---|---|---|
| Orin NX 16GB | Download | bbaae572ddcfb745a9ce519ade817bf238a9cd9be8c0177bbef6ada353f89878 |
| Orin NX 8GB | Download | bbaae572ddcfb745a9ce519ade817bf238a9cd9be8c0177bbef6ada353f89878 |
| Orin Nano 8GB | Download | 35c75bf18416287b4ae2e450f3207b3fd33d765832cd6f1ed86d62d354775a81 |
| Orin Nano 4GB | Download | ee0959c32df50ed41ed7d2940344c69d93b5212b6222fb6451af7b71bad7749e |
To verify the integrity of the downloaded firmware, you can compare the SHA256 hash value.
On an Ubuntu host machine, open the terminal and run the command sha256sum <File> to obtain the SHA256 hash value of the downloaded file. If the resulting hash matches the SHA256 hash provided in the wiki, it confirms that the firmware you downloaded is complete and intact.
Step 2: Extract the downloaded image file:
sudo tar xpf mfi_xxxx.tar.gz
# For example: sudo tar xpf mfi_recomputer-orin-nx-16g-j401-7.2.0-39.2.0-2026-06-18.tar.gz
Step 3: Navigate to the unzipped directory and execute the following command to flash jetpack system to the NVMe SSD:
cd mfi_xxxx
# For example: cd mfi_recomputer-orin
sudo ./tools/kernel_flash/l4t_initrd_flash.sh --flash-only --massflash 1 --network usb0  --showlogs
You will see the following output if the flashing process is successful
The flash command may run for 2-10 minutes.
Step 4: Connect the J401 to a display using the HDMI connector on the board and finish the initial configuration setup:
Please complete the System Configuration according to your needs.
Resources
- reComputer J30x Datasheet
- reComputer J40x Datasheet
- reComputer J30/J40 Schematic
- reComputer J30/J40 3D File
- Seeed Jetson Serials Catalog
- Seeed Studio Edge AI Success Stories
- Seeed Jetson Serials Comparision
- Seeed Jetson Devices One Page
- Jetson examples
- reComputer-Jetson-for-Beginners
Tech Support & Product Discussion
Thank you for choosing our products! We are here to provide you with different support to ensure that your experience with our products is as smooth as possible. We offer several communication channels to cater to different preferences and needs.