Getting Started with reComputer J202
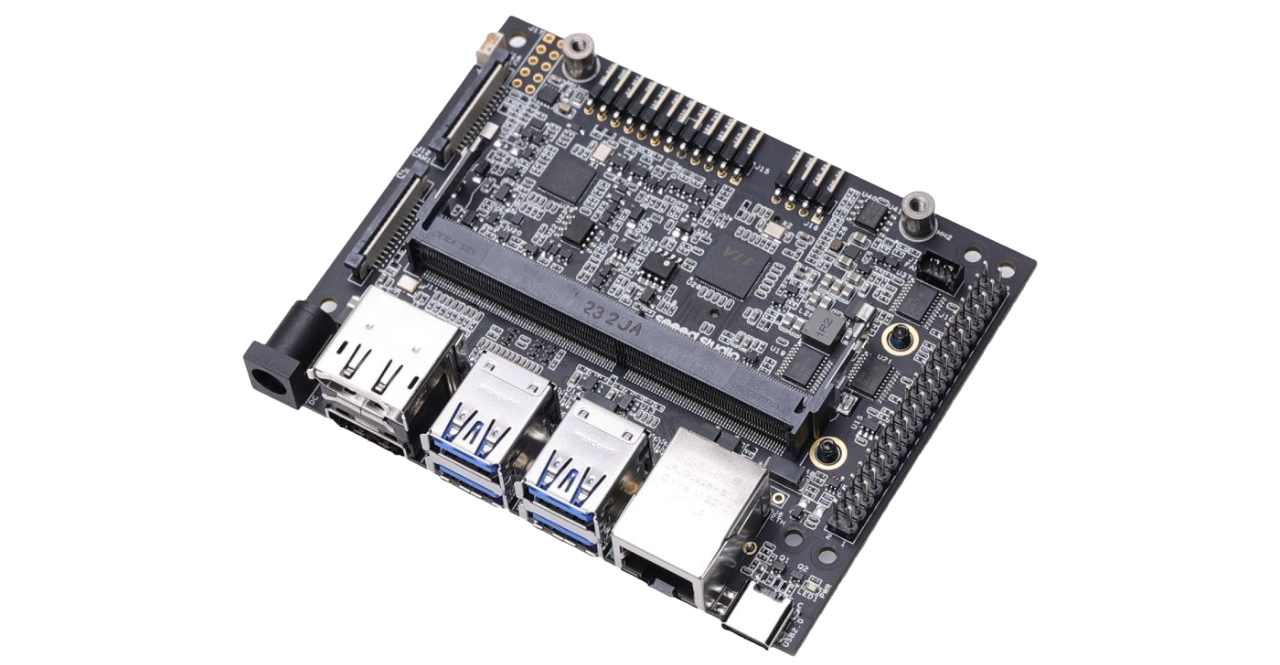
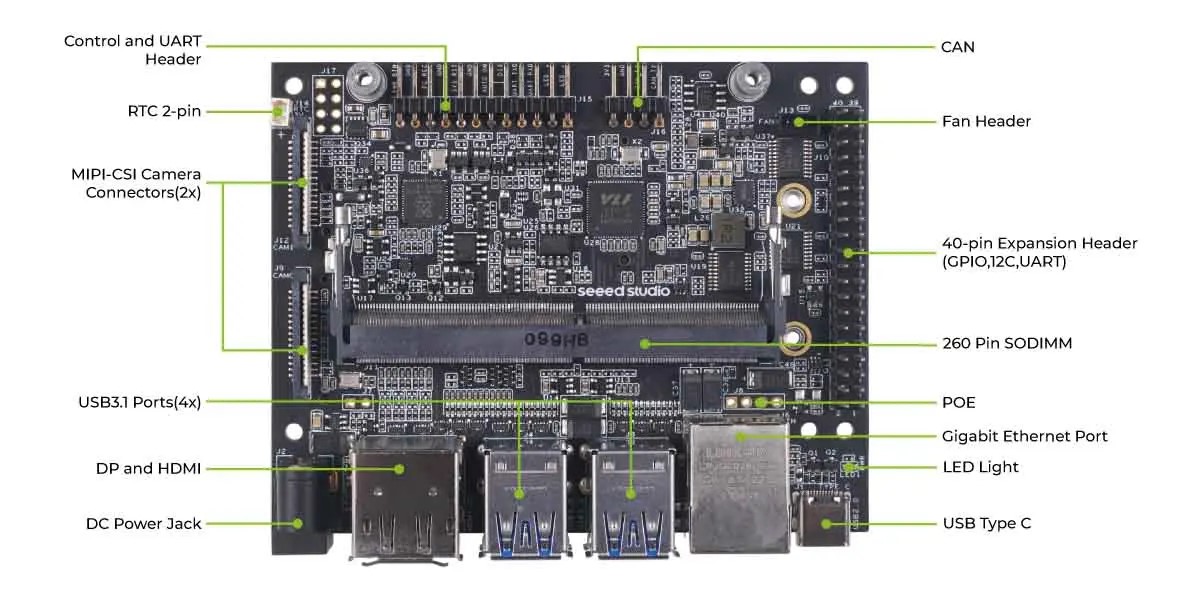
reComputer J202 has nearly the same design and function as NVIDIA® Jetson Xavier NX™ carrier board, perfectly works with Jetson Nano/Xavier NX/TX2 NX module, and consists of 4x USB 3.2 gen 2 ports, M.2 key E for WIFI, M.2 Key M for SSD, RTC, CAN, Raspberry Pi GPIO 40-pin, and so on.
Features
- Perfectly Suited: Design for Jetson Nano/Xavier NX/TX2 NX (260-pin SODIMM).
- Rich Peripherals: Higher performance stability consists of USB 3.1 ports(4x), M.2 key E for WIFI, M.2 Key M for SSD, RTC, CAN, Raspberry Pi GPIO 40-pin, and so on.
- High Versatility: Suitable for complicated AI graphical applications.
- Comprehensive Certificates: includes FCC, CE, RoHS.
- Flexible Customization: provides changing accessories modules, logo, and hardware interfaces modification services based on J202 original design.
Since the Jetson Nano has only one PCIe lane, if the module uses the Jetson Nano to connect to the J202 carrier board, it can only select the M.2 Key M for SSD.
Specifications
| Storage | 1x M.2 Key M | |
| Networking | Ethernet | 1x RJ-45 Gigabit Ethernet (10/100/1000M) |
| M.2 KEY E | 1x M.2 Key E for WiFi/Bluetooth module | |
| I/O | USB | 4x USB 3.1 Type-A (10Gbps for Xavier NX, 5Gbps for Nano) 1x USB2.0 Type-C (Device Mode) |
| Camera | 2x CSI | |
| Display | 1x HDMI 2.1, 1x DP | |
| Fan | 1x Fan Connector | |
| CAN | 1x CAN (Just for Nvidia Xavier Series) | |
| Multifunctional Port | 1x 40-Pin Expansion header 1x 12-Pin Control and UART header | |
| RTC | 1x RTC 2-pin | |
| Power | DC 12V/5A | |
| Mechanical | Dimensions (W x D) | 100mm x 80mm |
| Installation | Desk, wall-mounting | |
| Operating Temperature | 10℃~60℃ | |
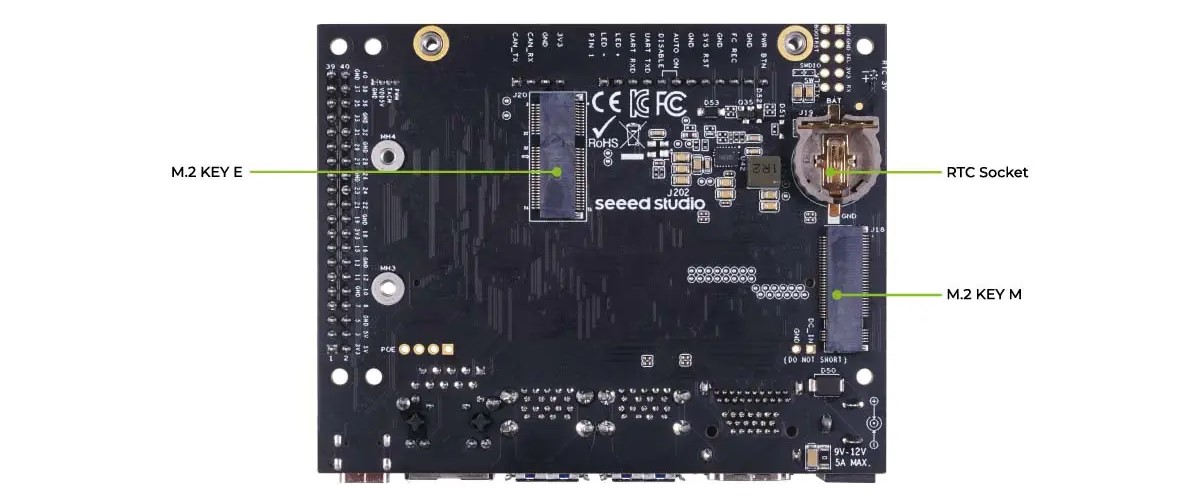
Hardware Overview
Supported Module
Flash JetPack
Flashing JetPack will erase all data on the device. Please proceed with caution.
If you purchased the complete system rather than just the carrier board, it will come pre-installed with the JetPack operating system, allowing you to start it up and use it directly. However, you can also follow the tutorial below to install a new operating system if you prefer.
The following content will demonstrate how to flash the JetPack 4.6.1 system onto the J2021. You can refer to this process to flash your desired JetPack version onto other device.
Refer here to determine the supported system versions for different Jetson modules.
Prerequisite
- Host Computer with Ubuntu 18.04 OS or Ubuntu 20.04 OS
- reComputer J1020/J2021/J2022 or J202 carrier board + Nvidia Jetson module
- 9V-12V/5A Power Supply
- USB Type-C cable
- Jumper pin or Female-to-Female Dupont wire
EnterForce Recovery Mode
Before we can move on to the installation steps, we need to make sure that our reComputer is in the force recovery mode.
Step 1. Before you start, you need to disconnect power of the reComputer.
Step 2. To enter recovery mode, you need to connect FC REC and GND using jumpers.
| Button Header | Description | Button Header | Description | |
|---|---|---|---|---|
 | 1 | PWR BTN | 7 | AUTO ON |
| 2 | GND | 8 | DISABLE | |
| 3 | FC REC | 9 | UART TXD | |
| 4 | GND | 10 | UART RXD | |
| 5 | SYS RET | 11 | LED + | |
| 6 | GND | 12 | LED - |
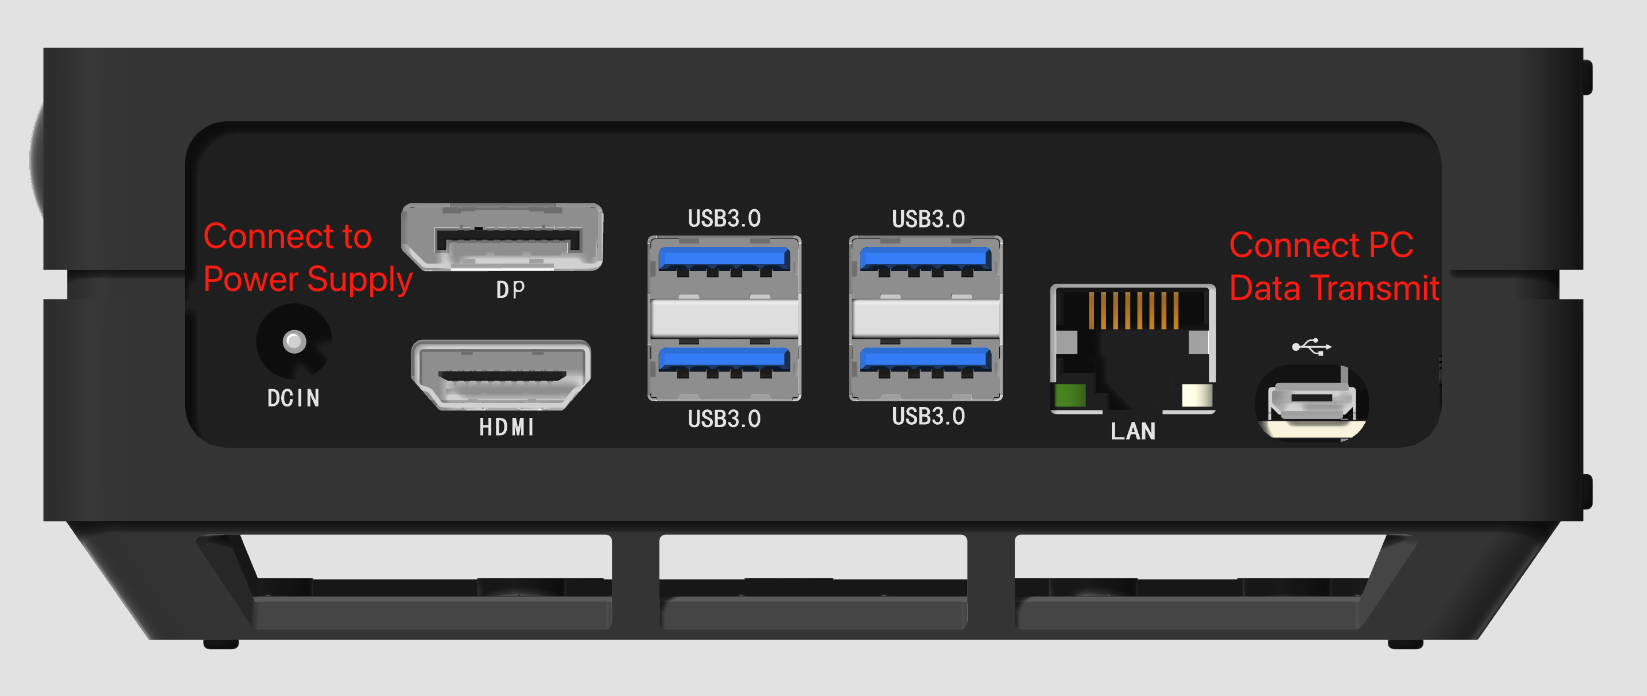
Step 3. Power up the reComputer with 12V/5A DC cable on the left of the reComputer and use a Type-C cable to connect the Linux Host PC on the right of the reComputer.
Step 4. On the Linux host PC screen, we can right click the mouse to open a Terminal and enter the command lsusb. When the returned content has the ID 0955:xxxx NVidia Corp. in it, it means that your J202 Carrier Board is in force recovery mode and you can proceed to the subsequent operations.
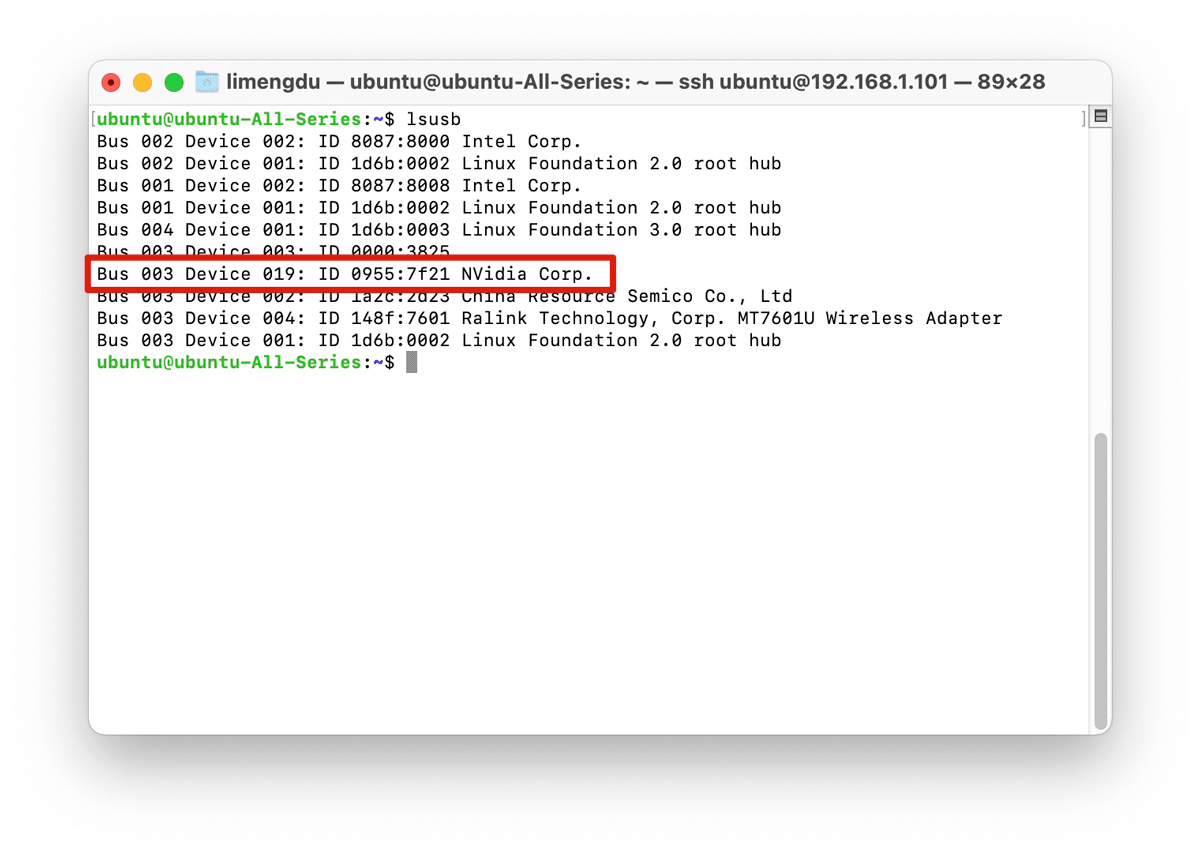
- For NVIDIA® Jetson Nano™: 0955:7f21 NVidia Corp
- For NVIDIA® Jetson Xavier™ NX: 0955:7e19 NVidia Corp
The SPI interface on the Jetson-Nano is multiplexed with GPIO by default and is not enabled. Please refer to this guide for instructions on how to enable it.
Flash to Jetson
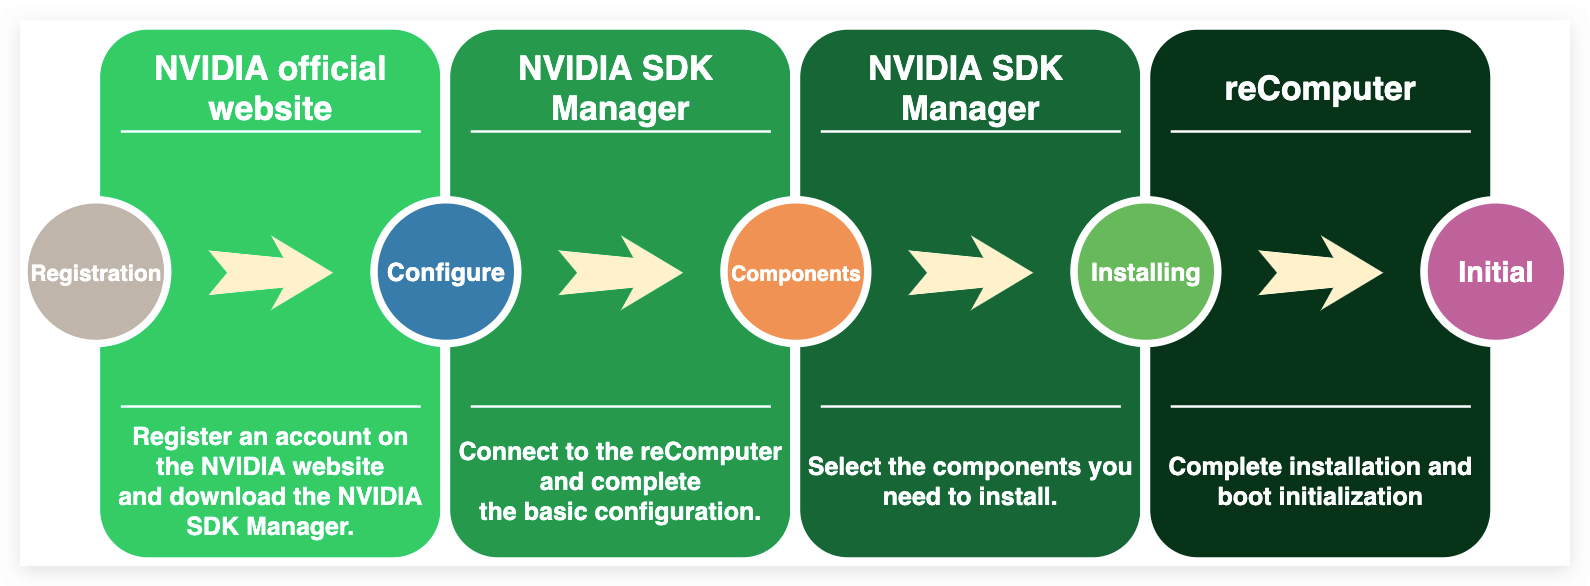
There are two optional ways of flash JetPack OS into the reComputer J2021, For the beginners to NVIDIA Jetson, we highly recommand NVIDIA SDK Manager:
- SDK Manager
- Command Line
- With Seeed BSP (nano)
- With Seeed BSP (Xavier NX)
The NVIDIA SDK Manager is an all-in-one tool that bundles developer software and provides an end-to-end development environment setup solution for NVIDIA SDKs. Thus, it is recommended for the beginners.
In this tutorial, we will use Ubuntu 18.04 LTS operating system on the host computer and the Jetpack Verison to be install is 4.6.1 in this guide.
Step 1. Install NVIDIA SDK Manager on the Linux Host PC
First of all you need to create a NVIDIA account in order to use sdkmanager. Then on the Linux Host PC download the NVIDIA SDK Manager from the NVIDIA official website.
Step 2. Open NVIDIA SDK Manager and login
On the Linux host PC screen, we can right click the mouse and open a Terminal. Then we can type the command below to start the SDK Manager:
sdkmanager
The first time you use NVIDIA SDK Manager, a web page will pop up prompting you to log in with your previously registered NVIDIA account.
Step 3. Select the target device
Since we have already connected the reComputer J2021, there will be a window pop up to let you select the hardware device.
The reComputer J2021 has equipped with NVIDIA Jetson Xavier 8GB module, so we can choose Jetson Xavier NX(The first option).
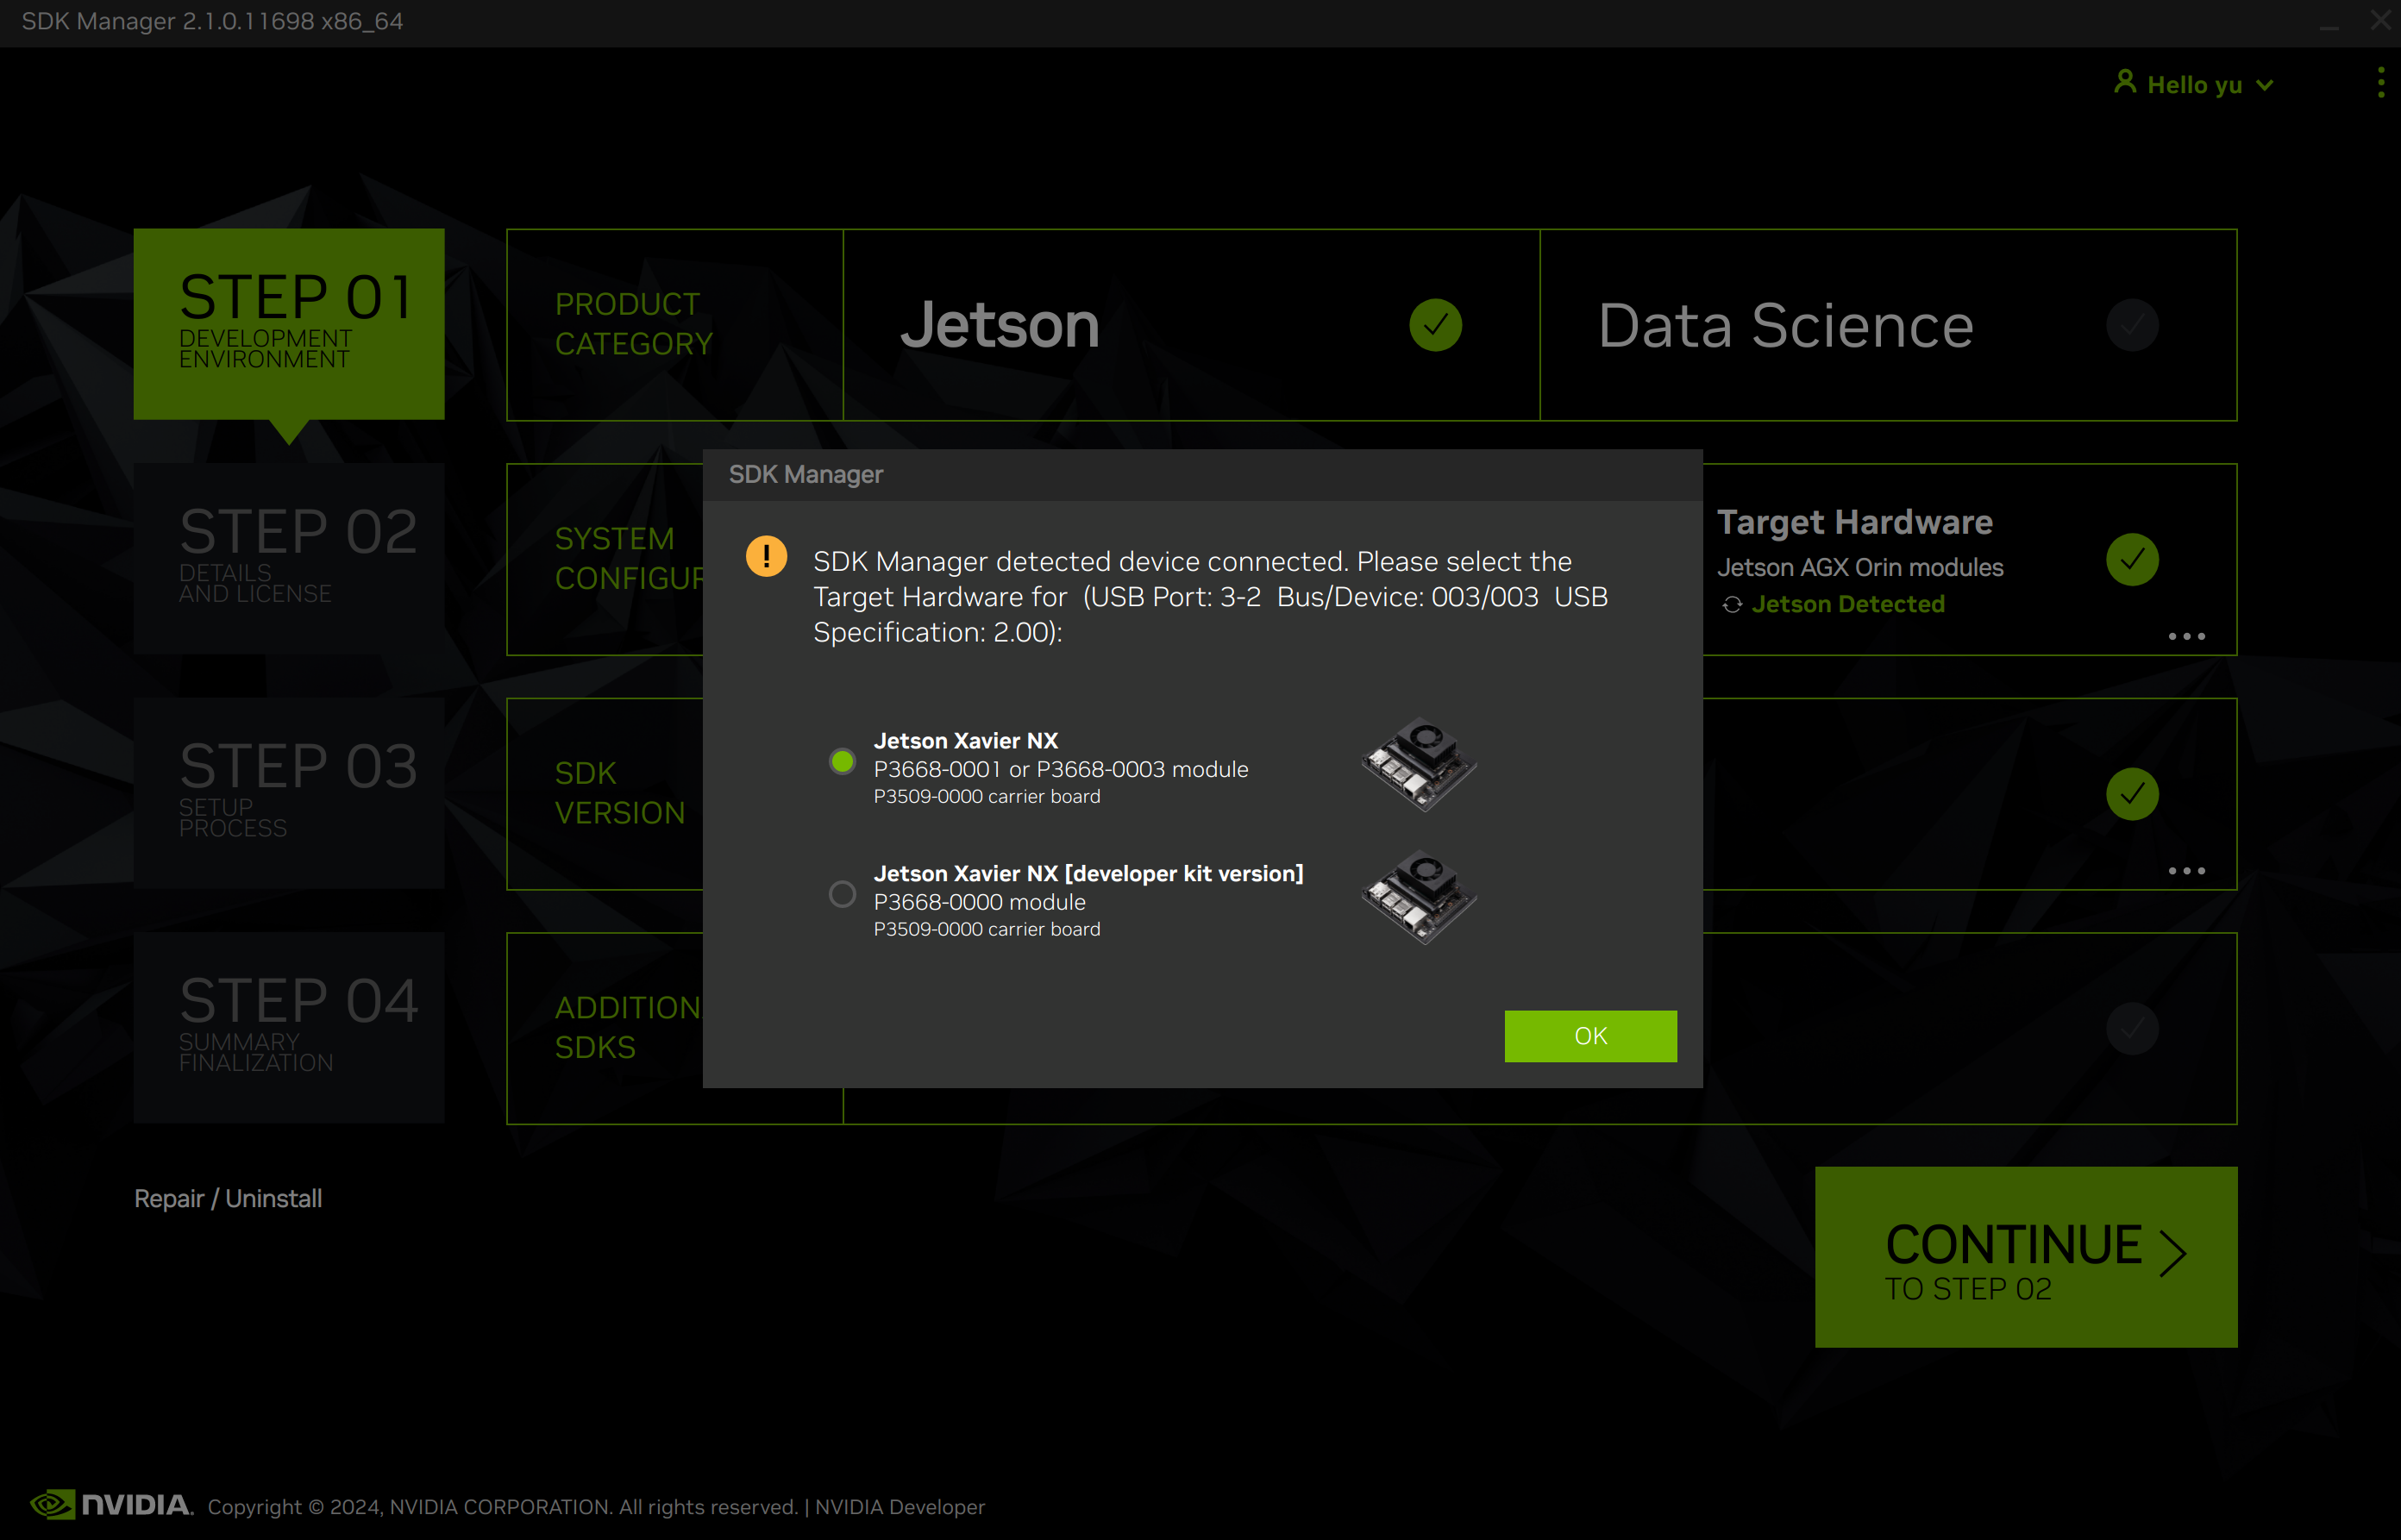
Please note that the interface of different versions of SDK Manager may vary slightly. Choose the appropriate options based on your actual situation.
There are more selections for you to choose in the first screen:
- The Jetson in the Product Category panel need to be selected.
- In the Hardware Configuration panel, we recommend that you do not select Host Machine. This will take more time to install the NVIDIA components for your current Ubuntu host. You can choose it if you need.
- In the Target Operating System panel, we can select different operating system and JetPack version. But be careful the version of JetPack, different modules may support different type of JetPack such as
JetPack 4.6.1,JetPack 5.1.xand so on. We recommand JetPack 4.6.1 here. - In the Additional SDKs, since the storage space of eMMC is only 16GB, it will be out of memory if we install DeepStream here.
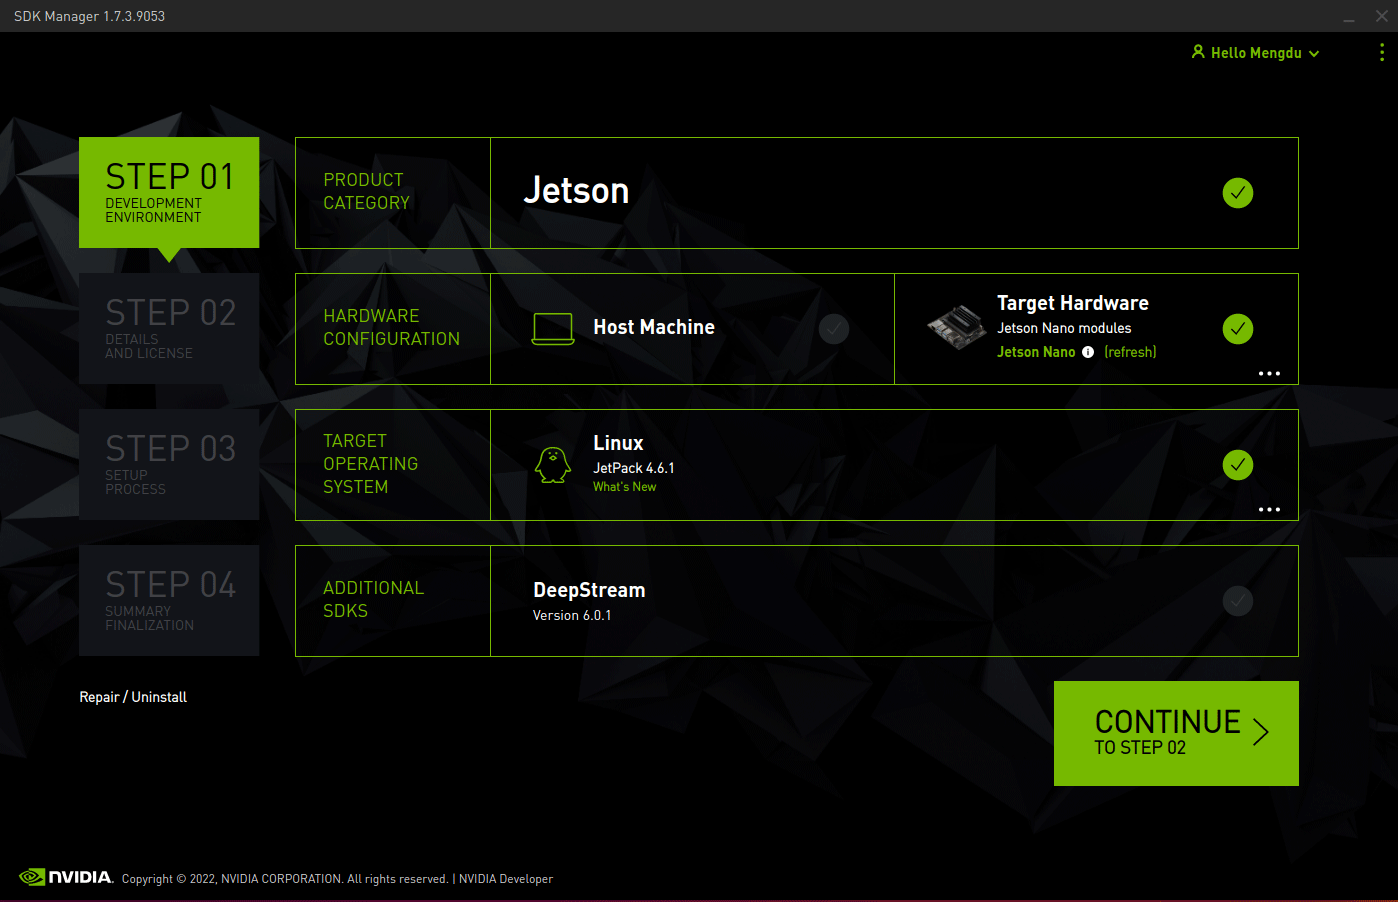
Click Continue to proceed to the next step.
Step 4. Review wanted components
From Details and License, you can expand the host components and target components panels to review the components that will be installed on your system.
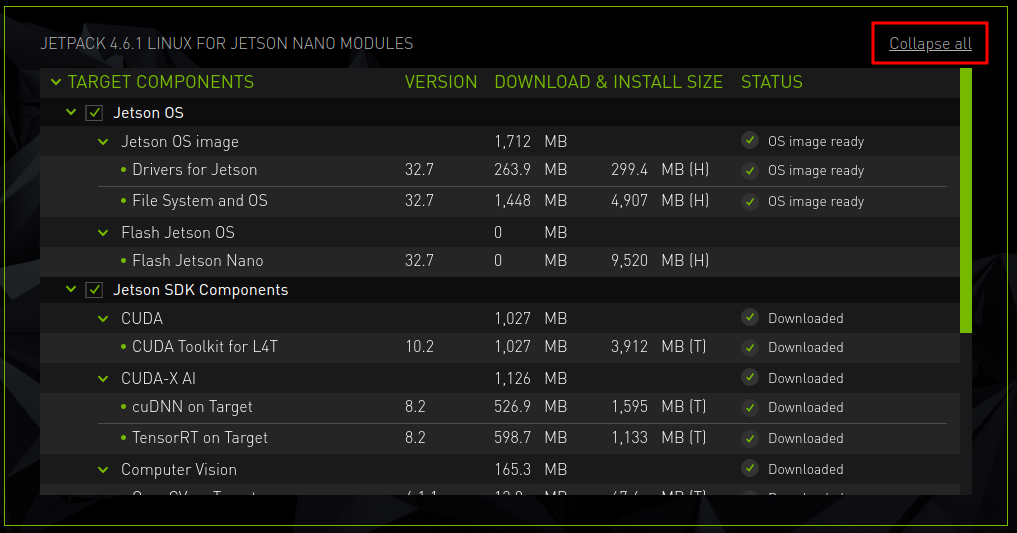
If you only need to install the system, you can uncheck the SDK component.
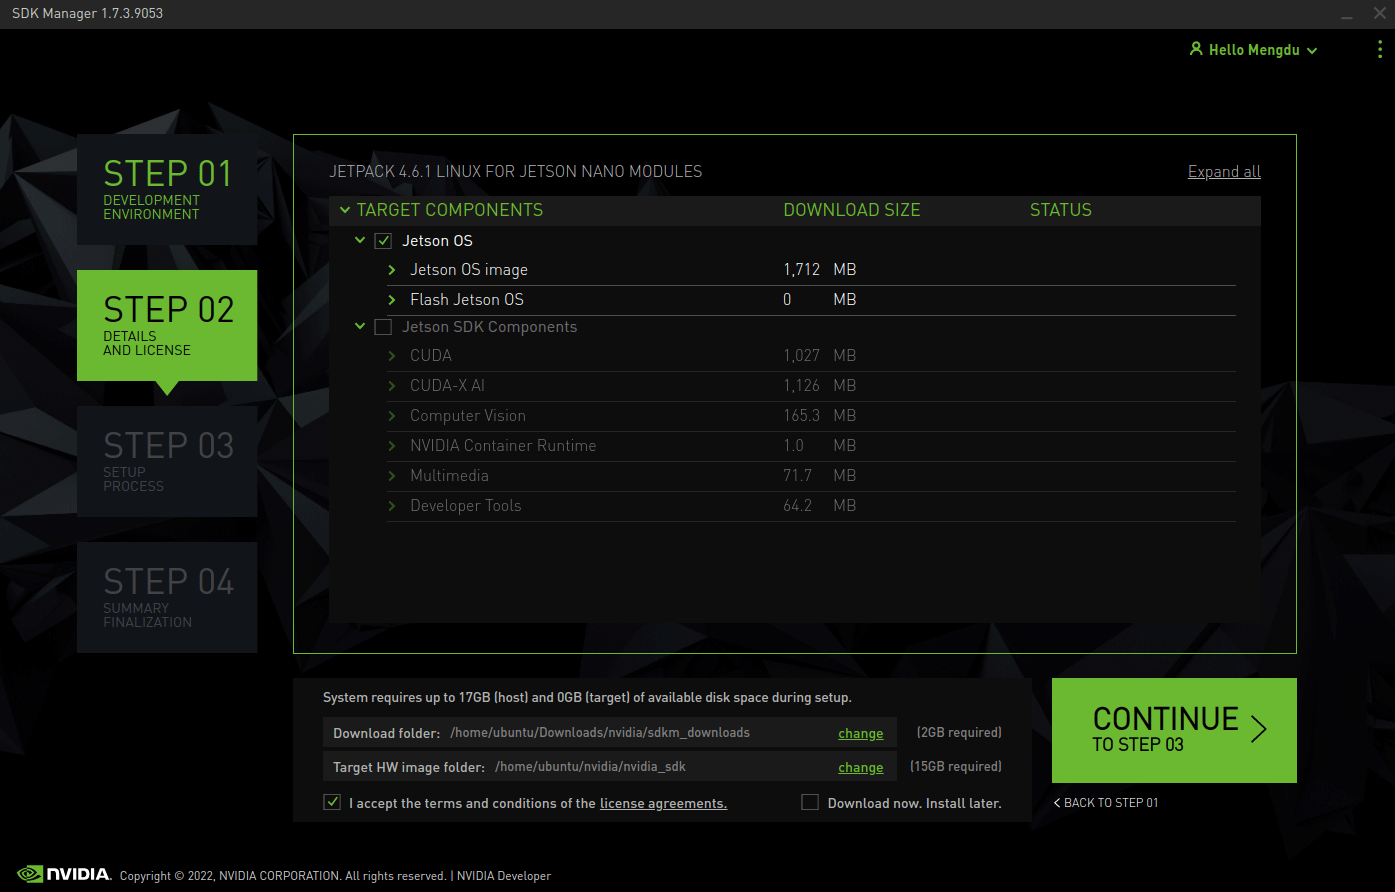
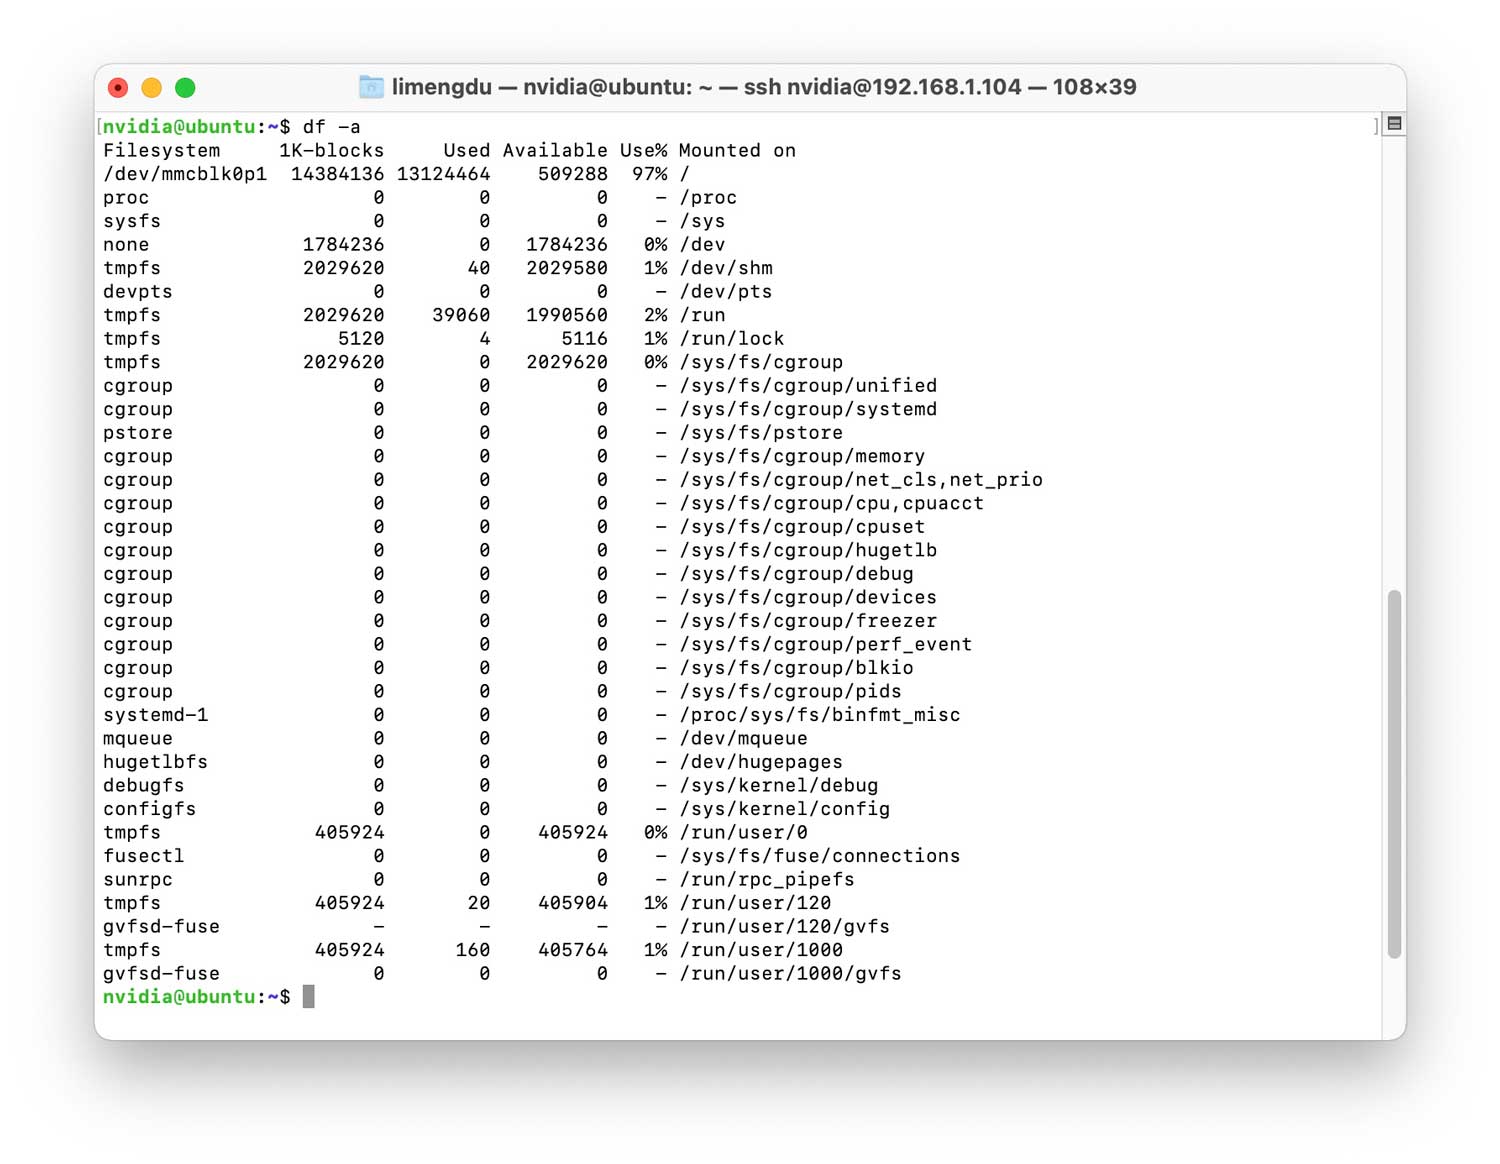
When choosing which components to install, you may want to keep an eye on the capacity used. The built-in eMMC size is only 16GB, please allocate and use this space wisely according to your actual needs.

After actual testing, there is only about 500MB of eMMC space left after installing the full set of SDK components.
If you want to check how to solve the problem of insufficient capacity, please refer to:
If you want SDK Manager to download all the files to a location other than the default path, go to the Download & Install Options located at the bottom of the screen, then select the path you wish to use.
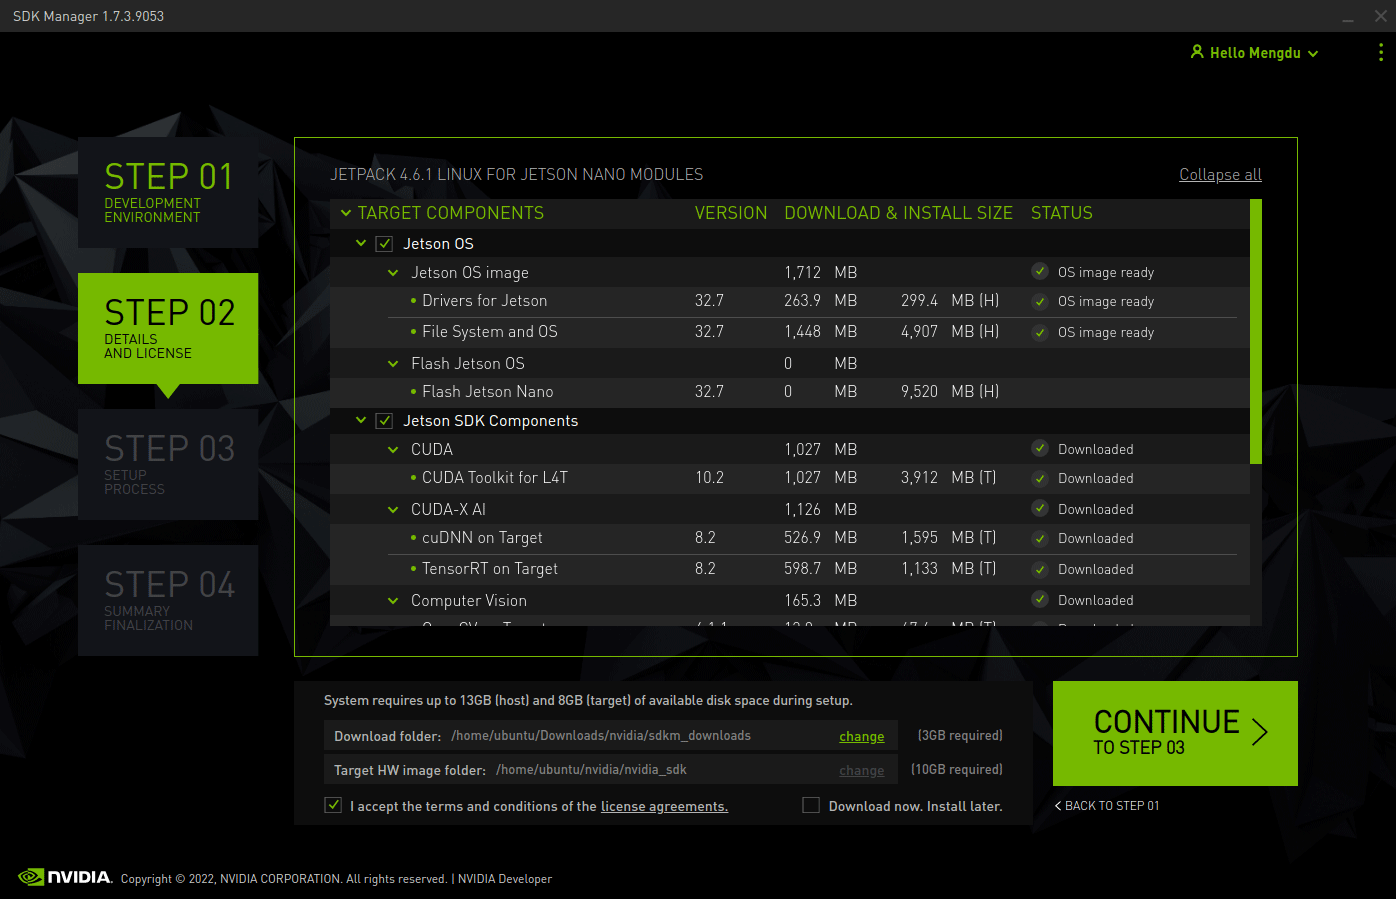
Select Continue to proceed to the next step.
Step 5. Install the system
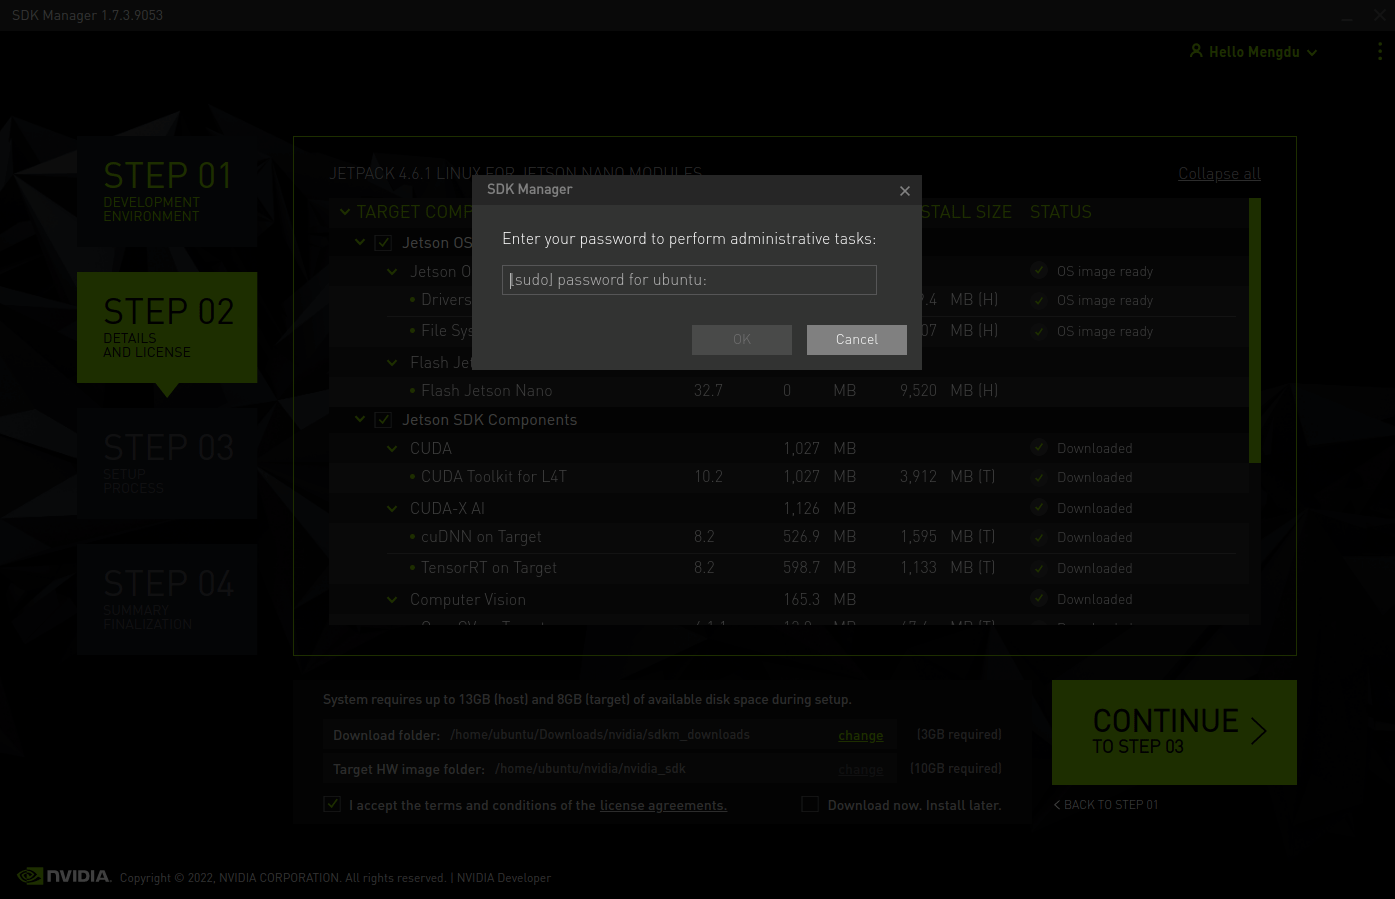
Before the installation begins, SDK Manager prompts you to enter your sudo password.
After a while, we will be asked to set up the new system for our reComputer. Since we manually force into recovery mode, we select Manual setup: set the target to Force Recovery Mode via manual operations here. Meanwhile, we choose the default Pre-Config.
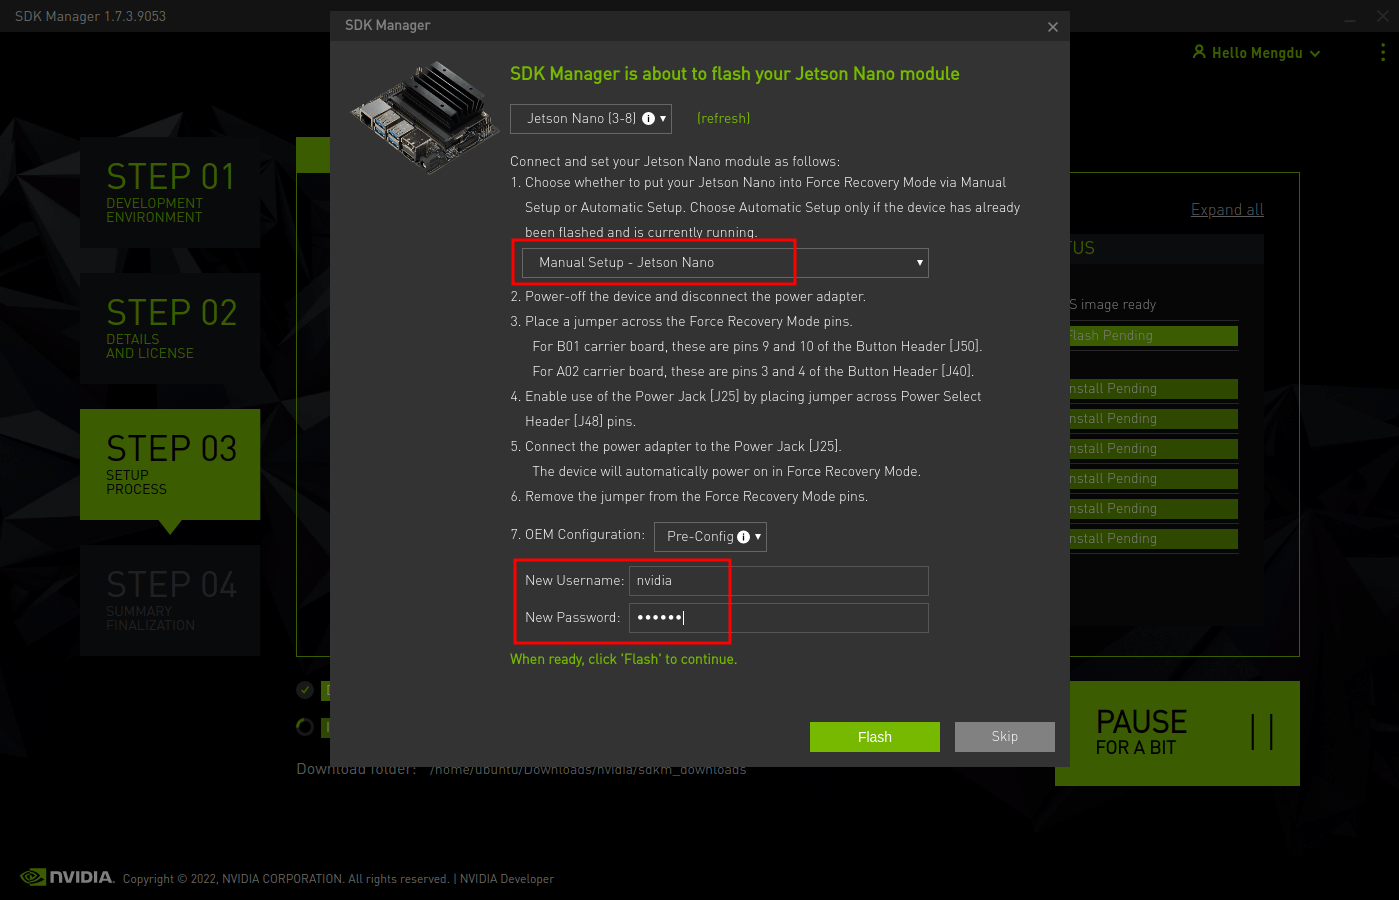
After that, we need to enter the name and password of our new Jetson system to our reComputer, it is set by yourself.
When ready, click Flash to continue.
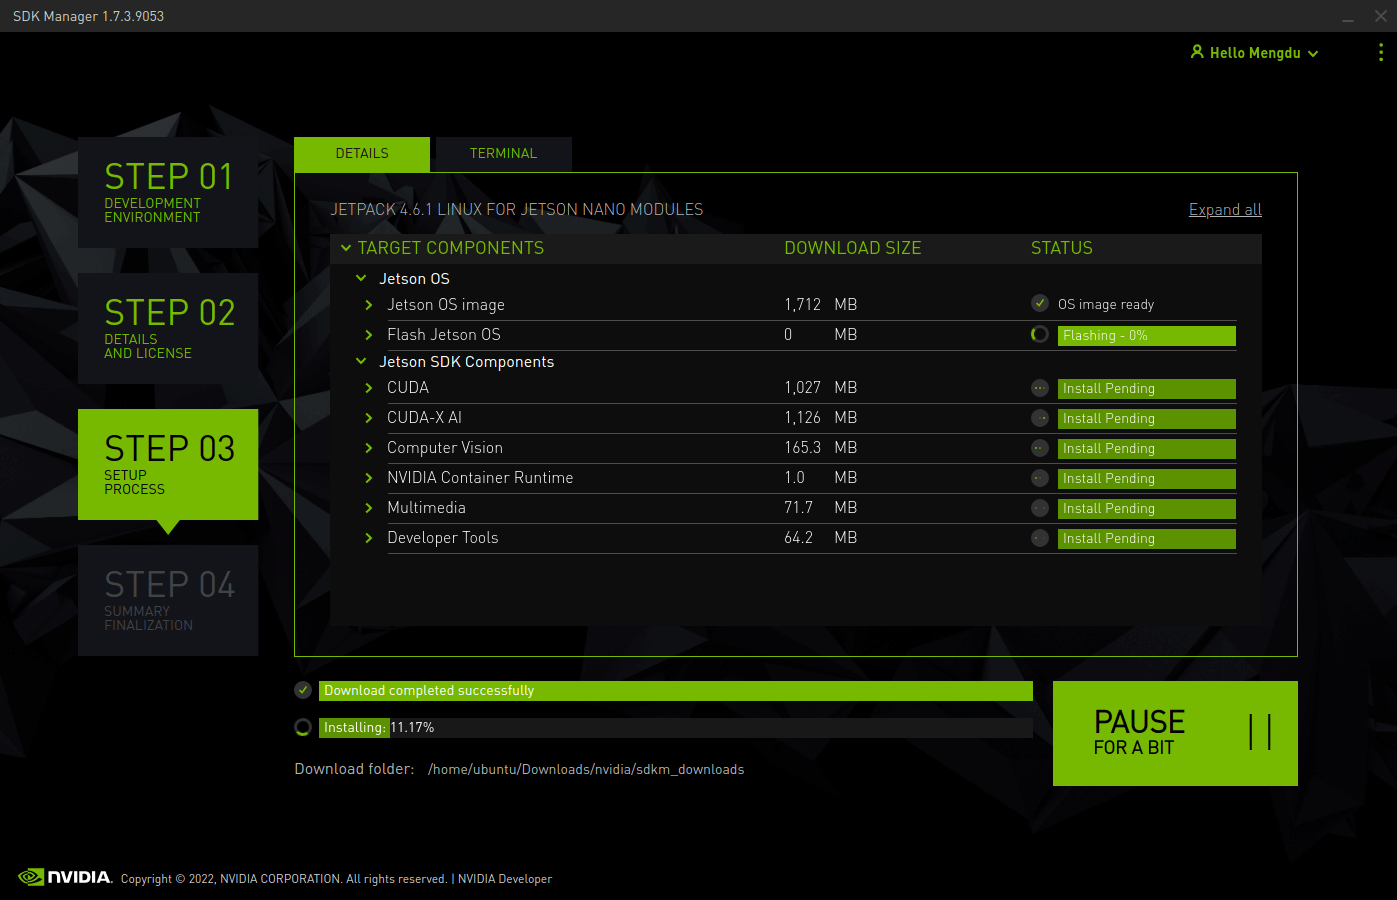
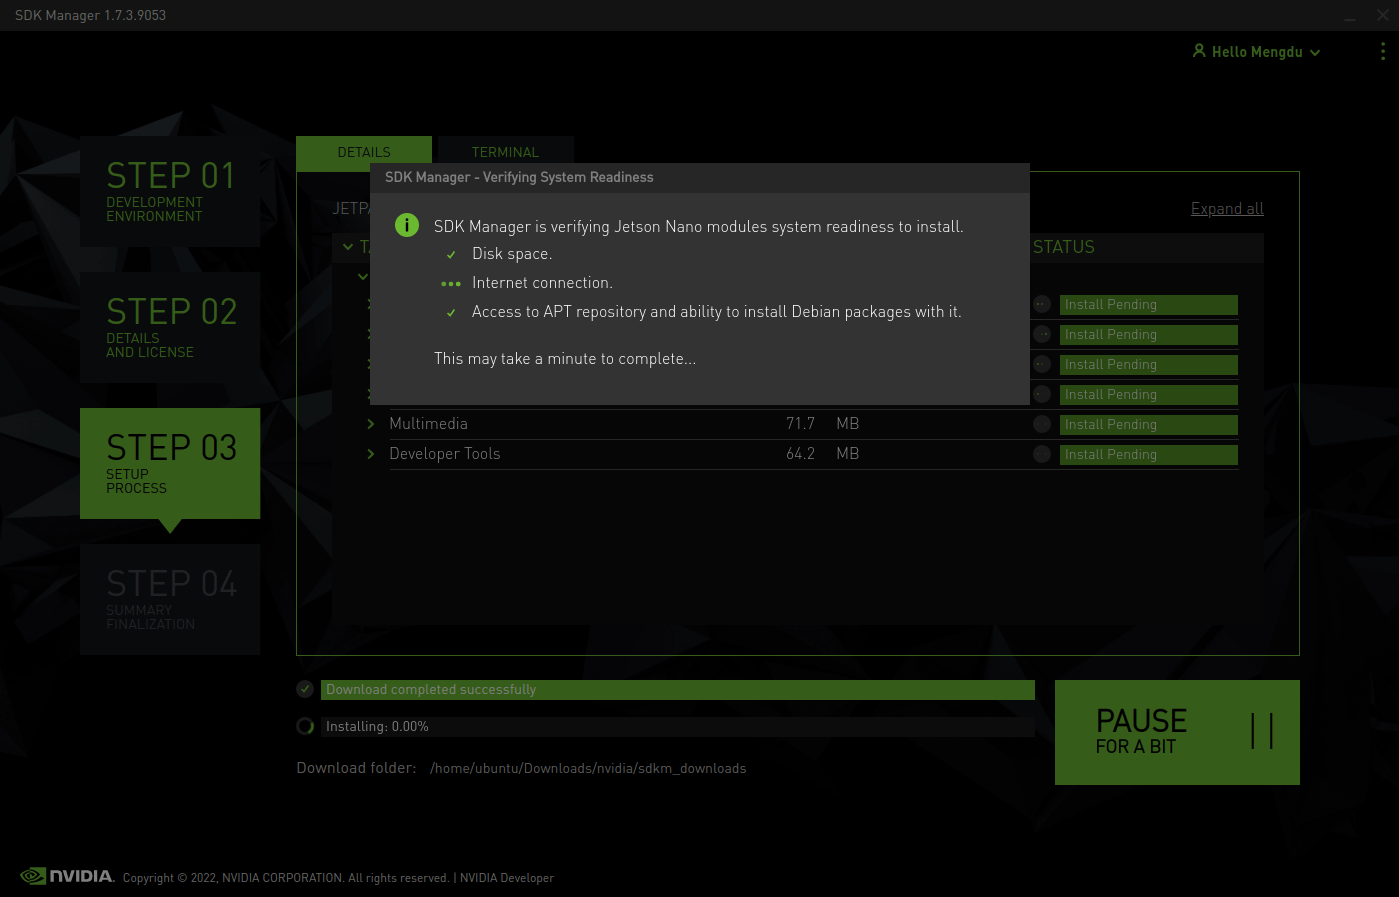
The display shows the progress of the download and installation of the software. Please wait patiently for the installation to complete.
(Optional)Step 6. Install the SDK components
If you checked the installation of the component in the previous step 4, you will need to go through this step.
After a moment, you will be able to see a new window pop up in the NVIDIA SDK Manager, prompting you that you need to connect to your device via IP address. It means the system has been alreadly installed and the components installing will be proceeded.
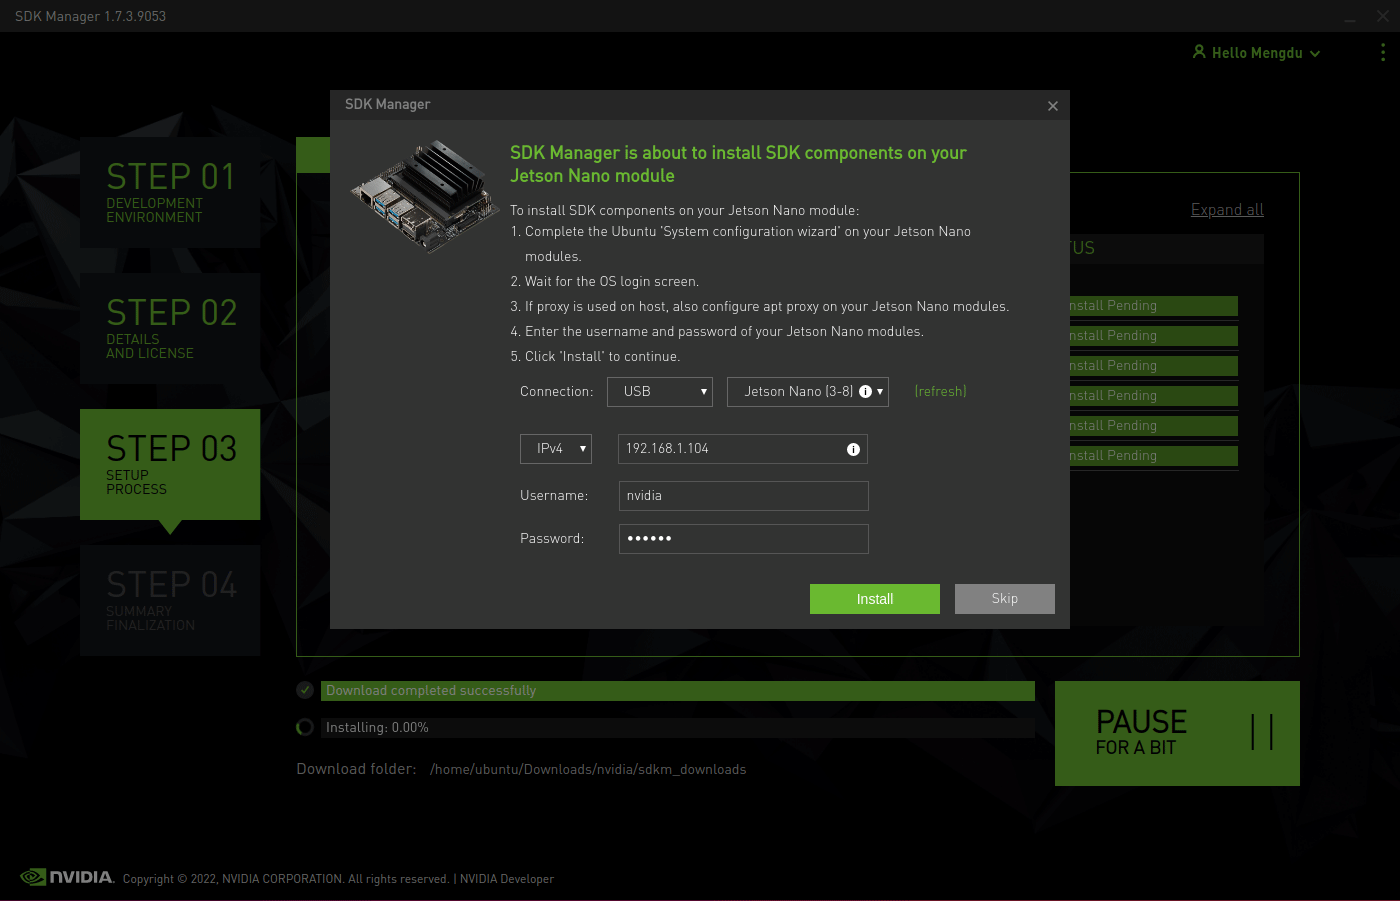
In this case, we can pull out the jumper and restart the reComputer. Then we need to connect the reComputer to a monitor via HDMI, enter the password you entered in step 4, and log in to the main interface.
At this point you need to connect the reComputer to the same LAN as the Linux host PC and determine the IP address of the Jetson by using the command ifconfig.
Go back to the Linux host PC and enter the IP address you just obtained. NVIDIA SDK Manager will try to connect to the Jetson device and proceed to complete the installation of the next SDK components.
When you see the following window appear, the installation has been done. You can start using Jetson or continue to follow the steps below to complete some basic configuration of your new system.

Be sure to unplug the jumper and exit force recovery mode before re-powering into the system.
Thanks to the freedom to customize the BSP(NVIDIA Linux Driver Package), flashing JetPack OS via command line can be very easy for the Linux knowledge base users.
Step 1. Download the proper NVIDIA Linux Driver Package
On the Linux host PC, we need to open a browser and go the Jetson Linux Archive. First we should check if the version of Jetson Linux is supported our reComputer Jetson module.
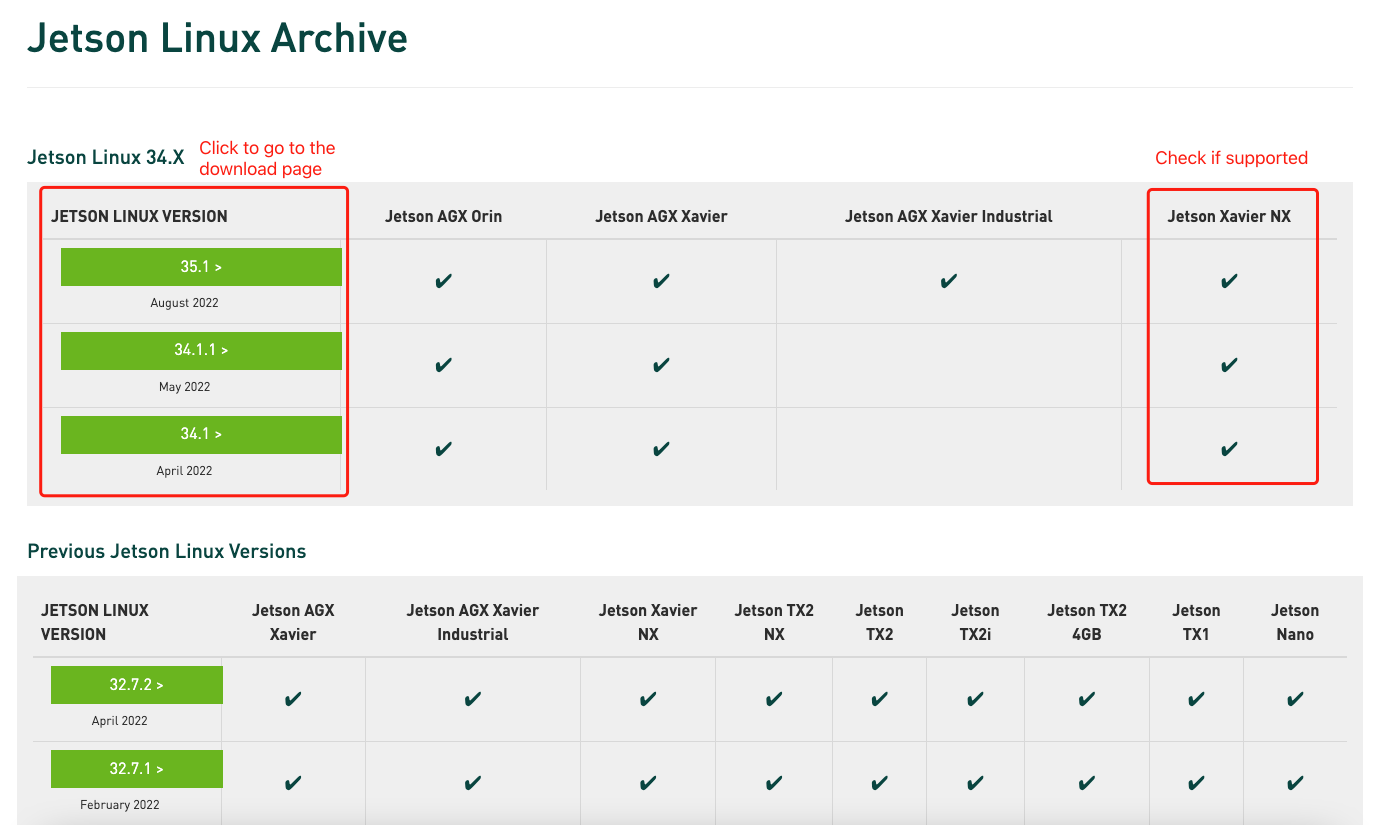
Once you find the proper version, click to go to the downloaded page. Find and click the "L4T Driver Package (BSP)" and "Sample Root Filesystem" to download the driver files. The names of the files are like Tegra_Linux_Sample-Root-Filesystem_Rxx.x.x_aarch64.tbz2 and Jetson-210_Linux_Rxx.x.x_aarch64.tbz2.
As the example, we choose the NVIDIA L4T 35.1 version since it is included as part of JetPack 5.0.2 and supports the Jetson Xavier NX module. The names of the files:
- Tegra_Linux_Sample-Root-Filesystem_R35.1.0_aarch64.tbz2
- Jetson_Linux_R35.1.0_aarch64.tbz2
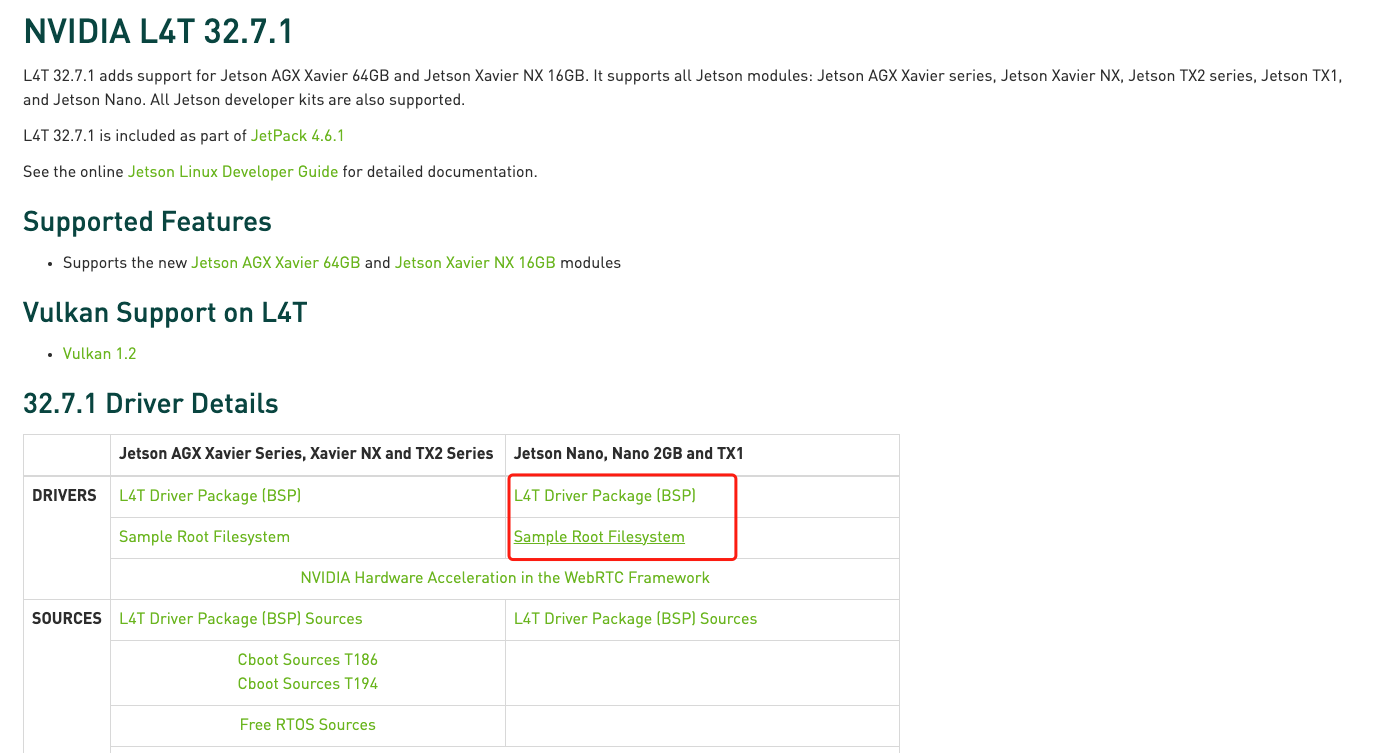
You can also choose other version like NVIDIA L4T 32.7.2 which supports Jetpack 4.6.2.
Step 2. Unzip Package Files and Assemble the Rootfs via Command Line
On the Linux host PC, we should find a folder and store the package files we download before. Then open a command line window(Terminal) at the folder and use the command line below to unzip the files and assemble the rootfs:
tar xf ${L4T_RELEASE_PACKAGE}
cd Linux_for_Tegra/rootfs/
sudo tar xpf ../../${SAMPLE_FS_PACKAGE}
cd ..
sudo ./apply_binaries.sh
${} is where you put the names of the files.
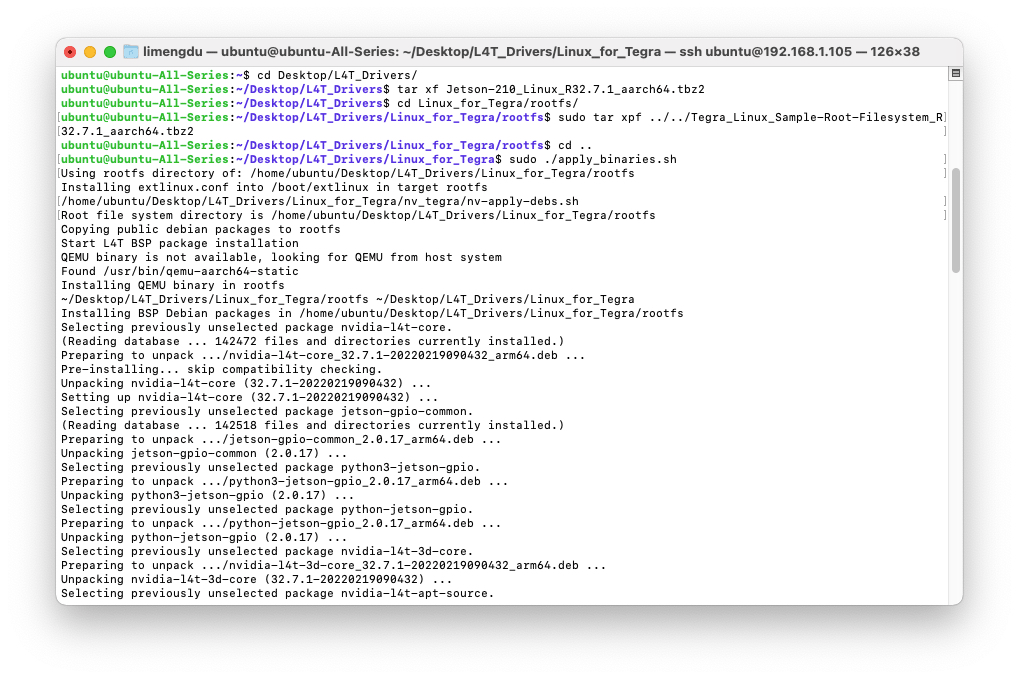
As the example of NVIDIA L4T 35.1, the downloaded files are stored in /Desktop/L4T_Drivers, so under the '/Desktop/L4T_Drivers' path we open the command line window(Terminal) and execute the following command.
tar xf Jetson_Linux_R35.1.0_aarch64.tbz2
cd Linux_for_Tegra/rootfs/
sudo tar xpf ../../Tegra_Linux_Sample-Root-Filesystem_R35.1.0_aarch64.tbz2
cd ..
sudo ./apply_binaries.sh
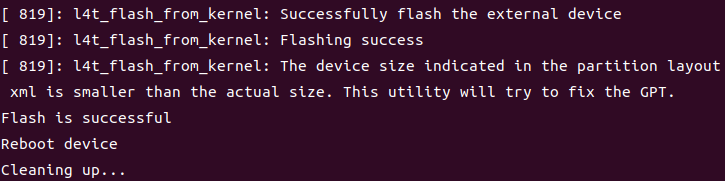
The output should be like:
Step 3. Flash the System to reComputer
Since we alreadly force the reComputer J2021 into the recovery mode and the module is Jetson Xavier NX. We can directly flash the system into the reComputer execute following command:
sudo ./flash.sh jetson-xavier-nx-devkit-emmc mmcblk0p1
If you use the Jetson nano module, the flash command follow:
sudo ./flash.sh jetson-nano-emmc mmcblk0p1

Flashing L4T takes about 10 minutes, or more under a slow host computer.
At this moment, we can unplug the jumper and then power up the reComputer again to use it.
Recently, NVIDIA has updated the DRAM model, and Seeed has currently released a new firmware that is compatible with this module update.
If, during the process of flashing the official NVIDIA image, the system freezes due to the DP signal (manifested as an inability to flash and getting stuck on the NVIDIA interface), it proves that you have purchased the updated module. In this case, you need to flash the factory image we currently provide.
The current differences between this factory image and the original one are as follows:
- The DP configuration has been modified (to prevent the system from freezing due to the DP signal on some modules).
- The SD card slot is set to the available state by default, and there is no need to additionally modify the device tree to enable the SD card slot function.
- The image contains Jetpack4.6.6.
- The latest PCN has been incorporated.
Step 1. Download the proper NVIDIA Linux Driver Package
| JetPack Version | Download Link | SHA265 |
|---|---|---|
| 4.6.6 | Download | 138547DF526D19F737DEC27856C078217D15FE9160F2669DF57823916BAA260E |
Step 2. Unzip Package Files and Assemble the Rootfs via Command Line
On the Linux host PC, we should find a folder and store the package files we download before. Then open a command line window(Terminal) at the folder and use the command line below to unzip the files and assemble the rootfs:
tar xpf  mfi_recomputer-nano-4g-4.6.6-32.7.6-2024-12-23.tbz2
cd mfi_jetson-nano-devkit-emmc
Step 3. Flash the System to reComputer
Since we alreadly force the reComputer J1010 into the recovery mode and the module is Jetson Nano. We can directly flash the system into the reComputer execute following command:
sudo ./nvmflash.sh --showlogs
Here we will install Jetpack 5.1.3 on the reComputer.
Step 1: Download the system image to your Ubuntu PC corresponding to the Jetson module you are using:
| Jetson Module | Download Link | SHA256 |
|---|---|---|
| Xavier NX 16GB | Download | 0cded5b093da648e5371c880037601d1593132780bb869c814ac21b11f2aae5c |
| Xavier NX 8GB | Download | db960d3f0e31909aa443e3d4317c737de6cec4de9a7df7c09801fcb1574f4595 |
To verify the integrity of the downloaded firmware, you can compare the SHA256 hash value.
On an Ubuntu host machine, open the terminal and run the command sha256sum <File> to obtain the SHA256 hash value of the downloaded file. If the resulting hash matches the SHA256 hash provided in the wiki, it confirms that the firmware you downloaded is complete and intact.
Step 2: Extract the downloaded image file:
sudo tar xpf mfi_xxxx.tar.gz
# For example: sudo tar xpf mfi_recomputer-orin-nano-8g-j401-6.0-36.3.0-2024-06-07.tar.gz
Step 3: Navigate to the unzipped directory and execute the following command to flash jetpack system to the NVMe SSD:
cd mfi_xxxx
# For example: cd mfi_recomputer-orin-j401
sudo ./tools/kernel_flash/l4t_initrd_flash.sh --flash-only --massflash 1 --network usb0  --showlogs
You will see the following output if the flashing process is successful
The flash command may run for 2-10 minutes.
Step 4: Connect the J20 to a display using the HDMI connector on the board and finish the initial configuration setup:

Please complete the System Configuration according to your needs.
Troubleshooting
Troubleshooting Installation with NVIDIA SDK Manager
There are many causes of various installation errors. Below is a checklist of common installation issues, which may help you recover from a broken installation.
-
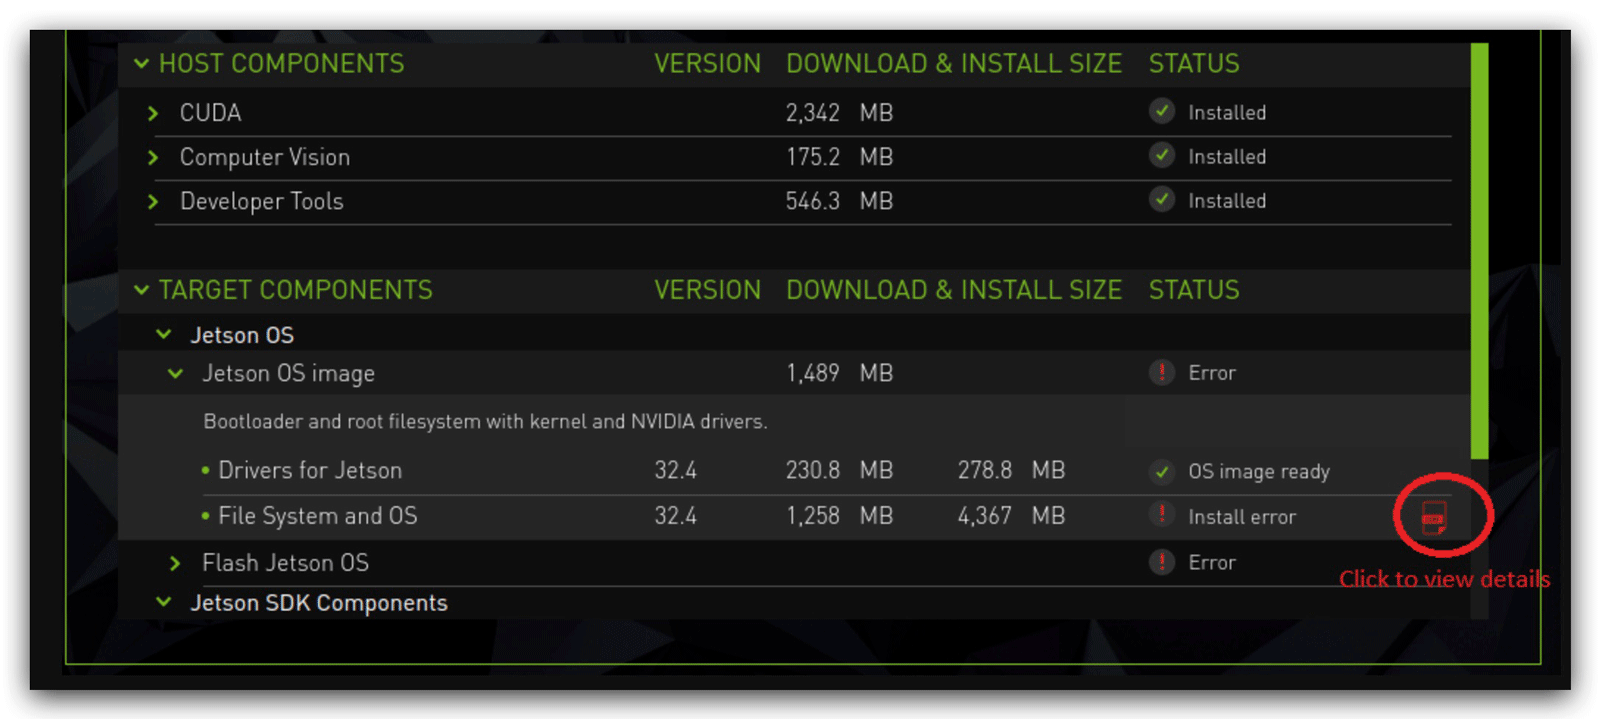
Review the summary table to identify which component failed.
a. Expand the group with the "Error" status.
b. When you find the failed component, click the details icon to the right of Install Error to be redirected to the Terminal tab, which will display the exact error.
- If the error is related to an environment issue, such as a broken apt repository or missing prerequisite, try to fix it manually, then click the Retry Failed Items button.

-
Retrying the installation is also available in two other ways:
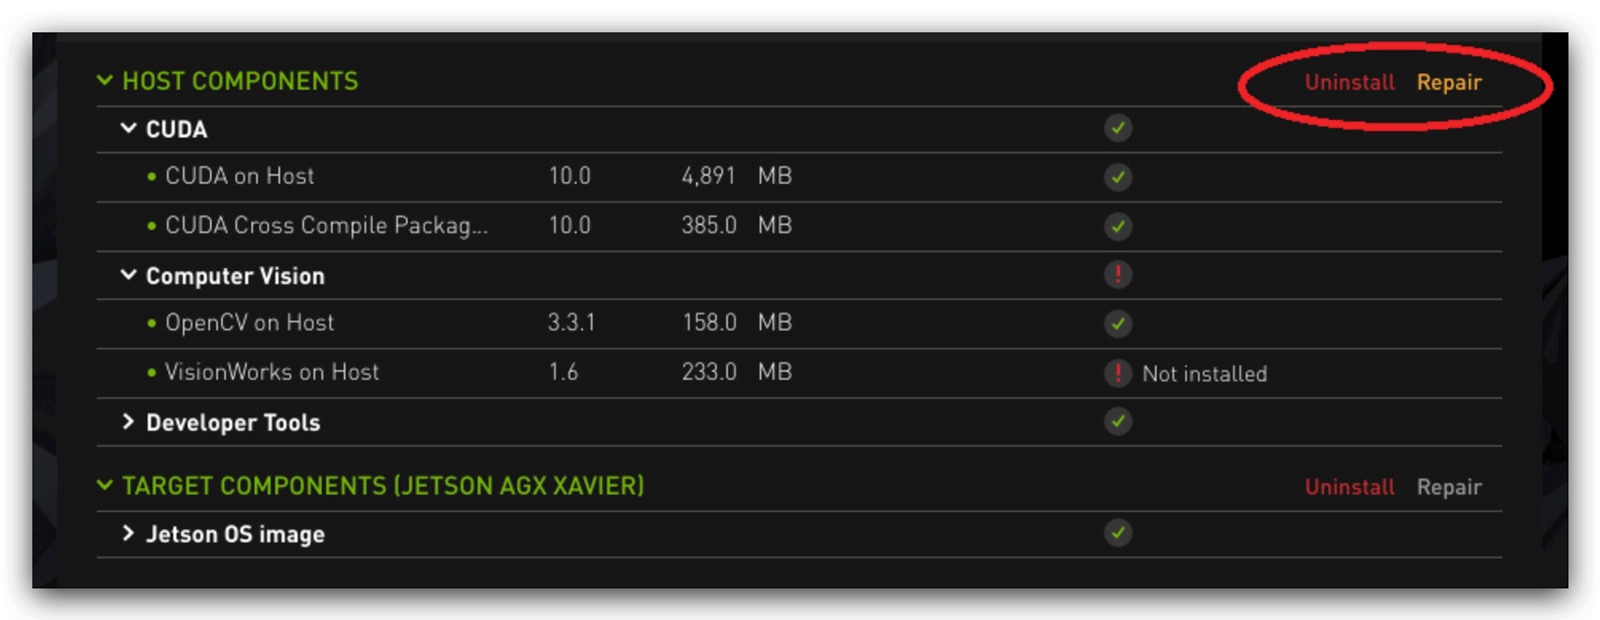
a. From Flashing to eMMC with SDK Manager -- Step 3, use the Repair/Uninstall button to get to the Manage NVIDIA SDKs page. If needed, expand the SDK that has the "Broken" status, then click Repair for the relevant part (Host or Target).
-
At Flashing to eMMC with SDK Manager -- Step 3, select the required SDK and run through the installation again.
-
Finally, try to uninstall and reinstall the relevant SDK.
Troubleshooting installation using the command line
The command line installation method is relatively simple, and is often prone to error in scenarios where force recovery mode is used.
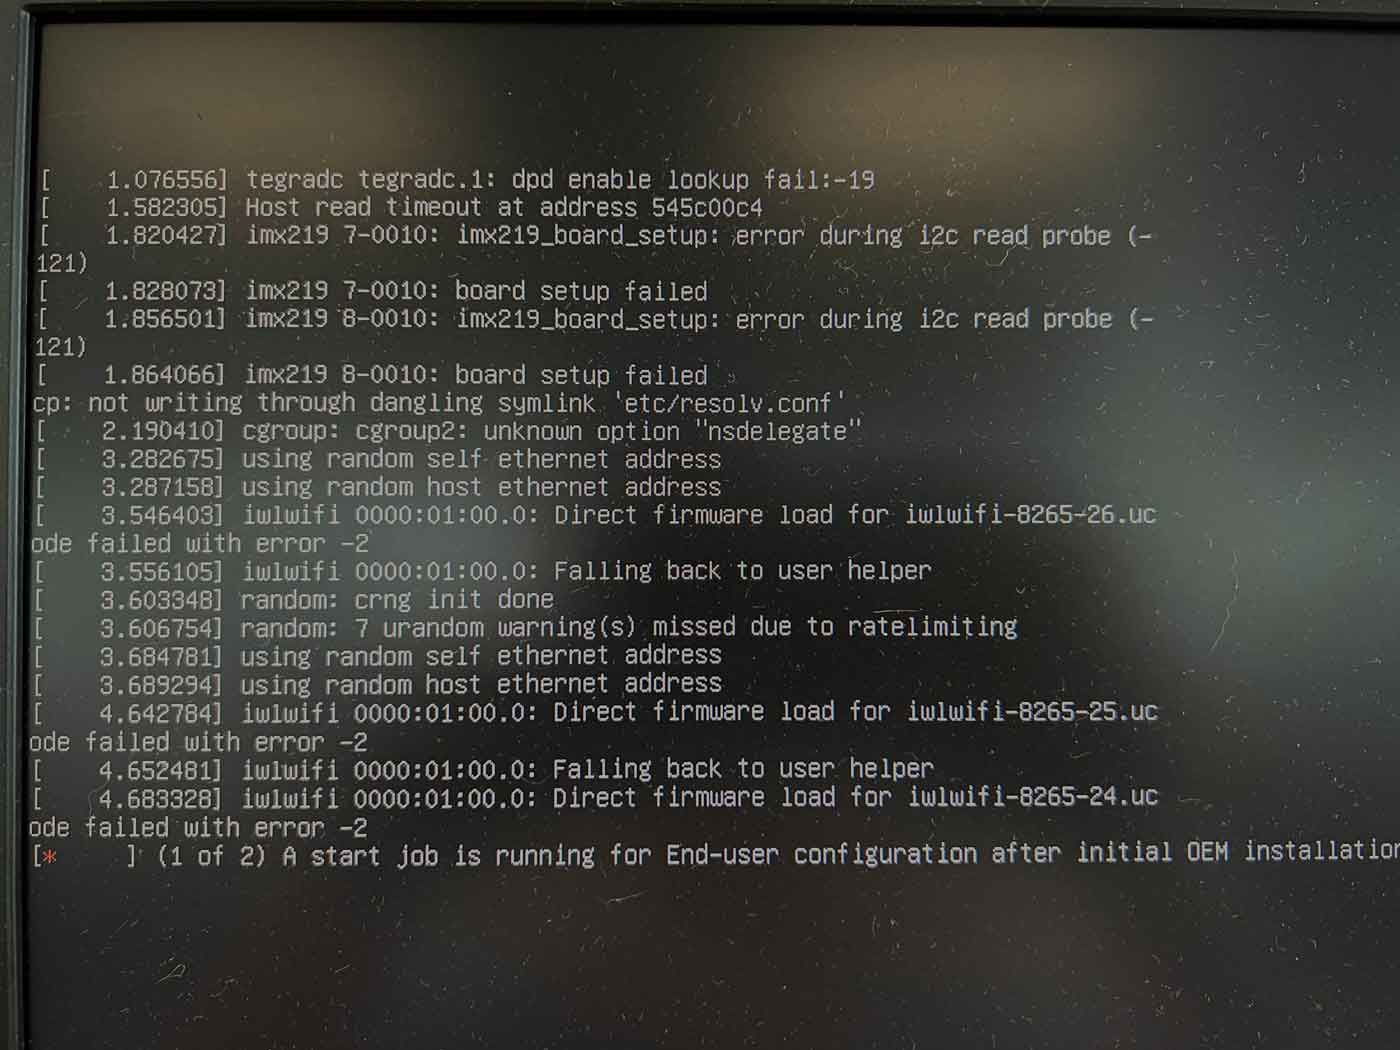
If you encounter the error shown below in Flashing to eMMC with command-line -- Step 2, you probably did not succeed in getting the Jetson-202 Carrier Board into force recovery mode. Please pay special attention, do not enter force recovery mode with the Jetson-202 Carrier Board powered on, as this is not valid.

If you can't get into the system in Flashing to eMMC with command-line -- Step 3 and are stuck on the boot up display command line, you probably did not exit force recovery mode. Likewise, it is not valid for you to unplug the jumper to exit force recovery mode while the Jetson-202 Carrier Board is powered up, this all needs to be done while you are powered down.
If more storage space is needed, we can use SD card to expand the capacity, or burn the system on SD card, you can refer to our recommended solution Flash System on SD card
Resources
Seeed Studio Edge AI Success Stories
Seeed Jetson Serials Comparision
Tech Support & Product Discussion
Thank you for choosing our products! We are here to provide you with different support to ensure that your experience with our products is as smooth as possible. We offer several communication channels to cater to different preferences and needs.