Connecting to TTN
In this chapter, we will go over the basic use of the TTN platform and how to relay sensor data out through the TTN platform.
Upgradable to Industrial Sensors
With the SenseCAP S2110 controller and S2100 data logger, you can easily turn the Grove into a LoRaWAN® sensor. Seeed not only helps you with prototyping but also offers you the possibility to expand your project with the SenseCAP series of robust industrial sensors.
The IP66 housing, Bluetooth configuration, compatibility with the global LoRaWAN® network, built-in 19 Ah battery, and powerful support from APP make the SenseCAP S210x the best choice for industrial applications. The series includes sensors for soil moisture, air temperature and humidity, light intensity, CO2, EC, and an 8-in-1 weather station. Try the latest SenseCAP S210x for your next successful industrial project.


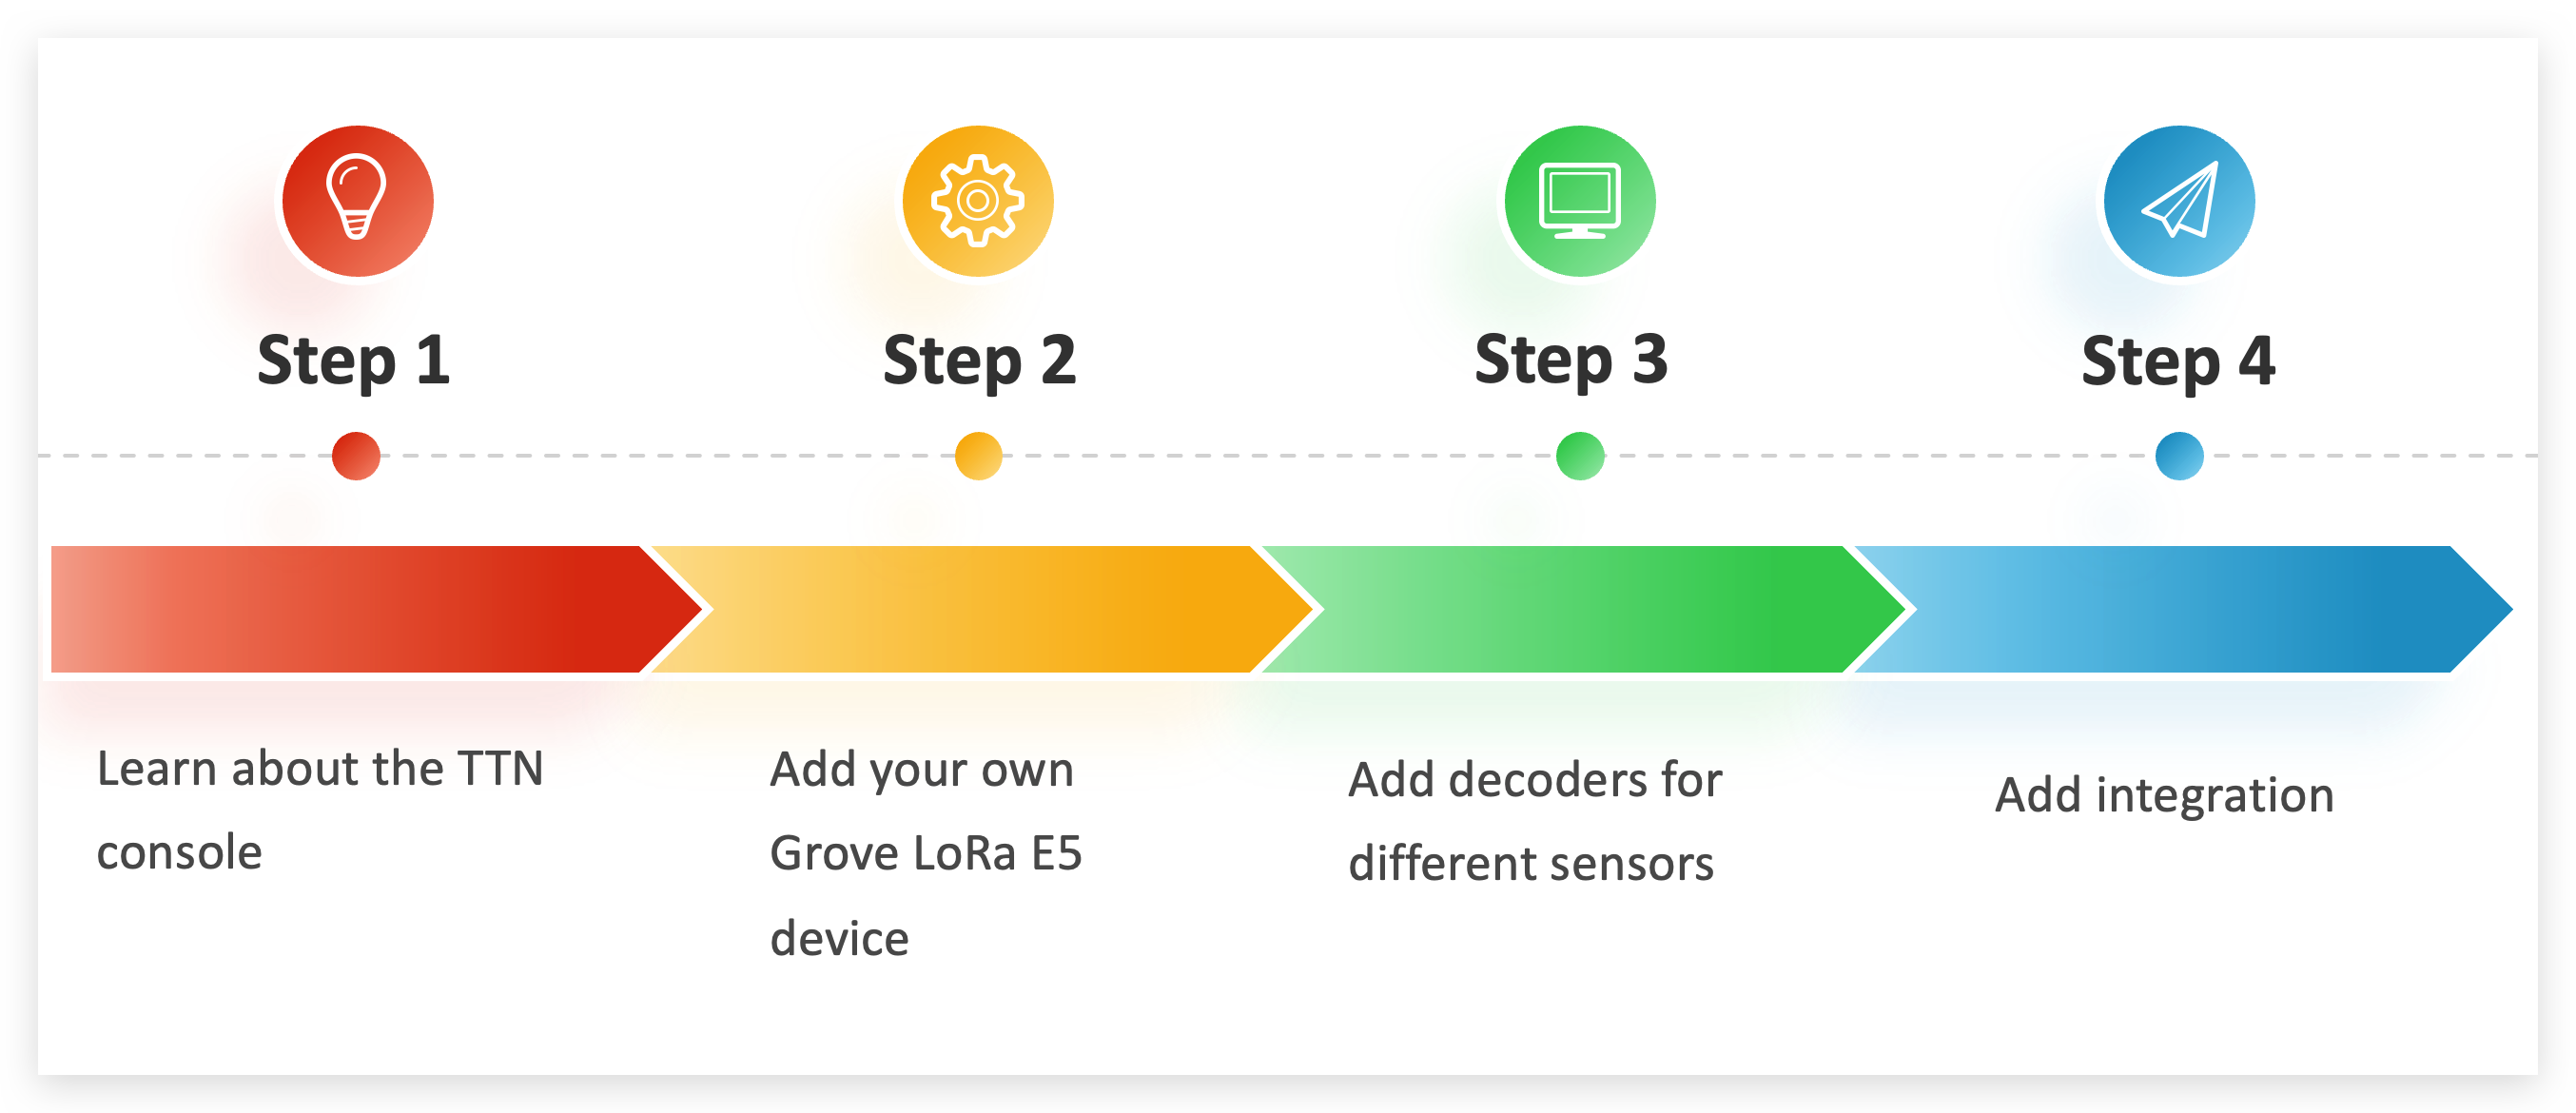
If you are completely inexperienced with TTN, we recommend that you read about the TTN console first.
| TTN Introduction In this chapter, we will introduce the TTN console controls that we use to get a first impression of the TTN console. Let's get started > |

Before starting this section, make sure you have TTN LoRaWAN® coverage around your deployment environment, otherwise you will not be able to add devices to TTN via LoRa®. For more details, please read TTN LoRaWAN®.
Adding Grove - Wio-E5 devices to the TTN console
To relay sensor data out of TTN, first step we need to add Grove - Wio-E5 to the TTN Application to build the connection between the local device and the TTN platform.
Step 1. Get the DevEUI, AppEUI for Grove - Wio-E5.
Please download the necessary environment for Arduino and Wio Terminal in pre-approved content.
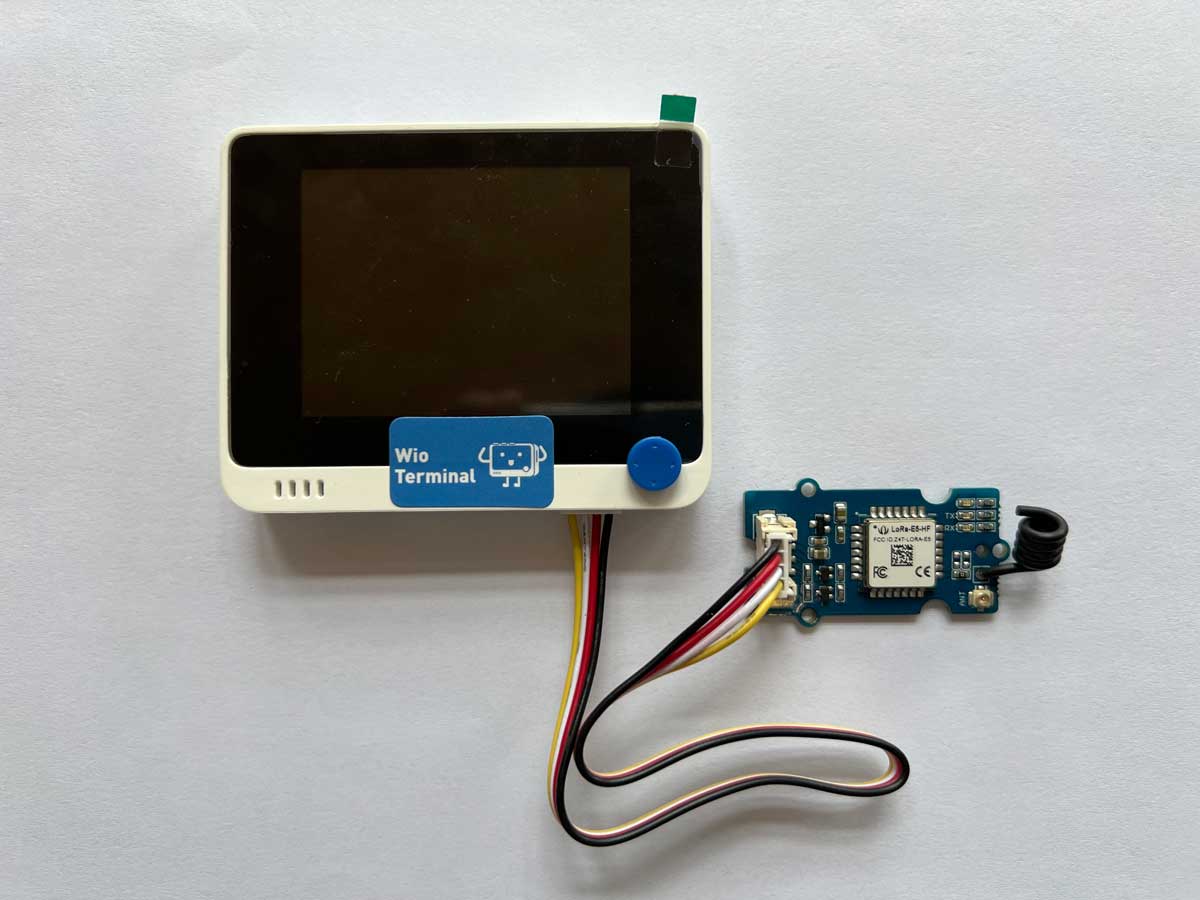
Click here to download the code for the DevEUI, AppEUI that comes with Grove - Wio-E5 and upload it to Wio Terminal.
#include <Arduino.h>
#include "disk91_LoRaE5.h"

Disk91_LoRaE5 lorae5(&Serial); // Where the AT command and debut traces are printed

void setup() {
  Serial.begin(9600);
  uint32_t start = millis();
  while ( !Serial && (millis() - start) < 3000 );  // Open the Serial Monitor to get started or wait for 3.0"

  // init the library, search the Wio-E5 over the different WIO port available
  if ( ! lorae5.begin(DSKLORAE5_SEARCH_WIO) ) {
    Serial.println("Wio-E5 Init Failed");
    while(1);
  }
}

void loop() {
  //Grove - Wio-E5 allows querying DevEUI, AppEUI, but not AppKey.
  lorae5.sendATCommand("AT+ID=DevEui","","+ID: ERROR","",1000,false,NULL);
  lorae5.sendATCommand("AT+ID=AppEUI","","+ID: ERROR","",1000,false,NULL);
  delay(30000);
}
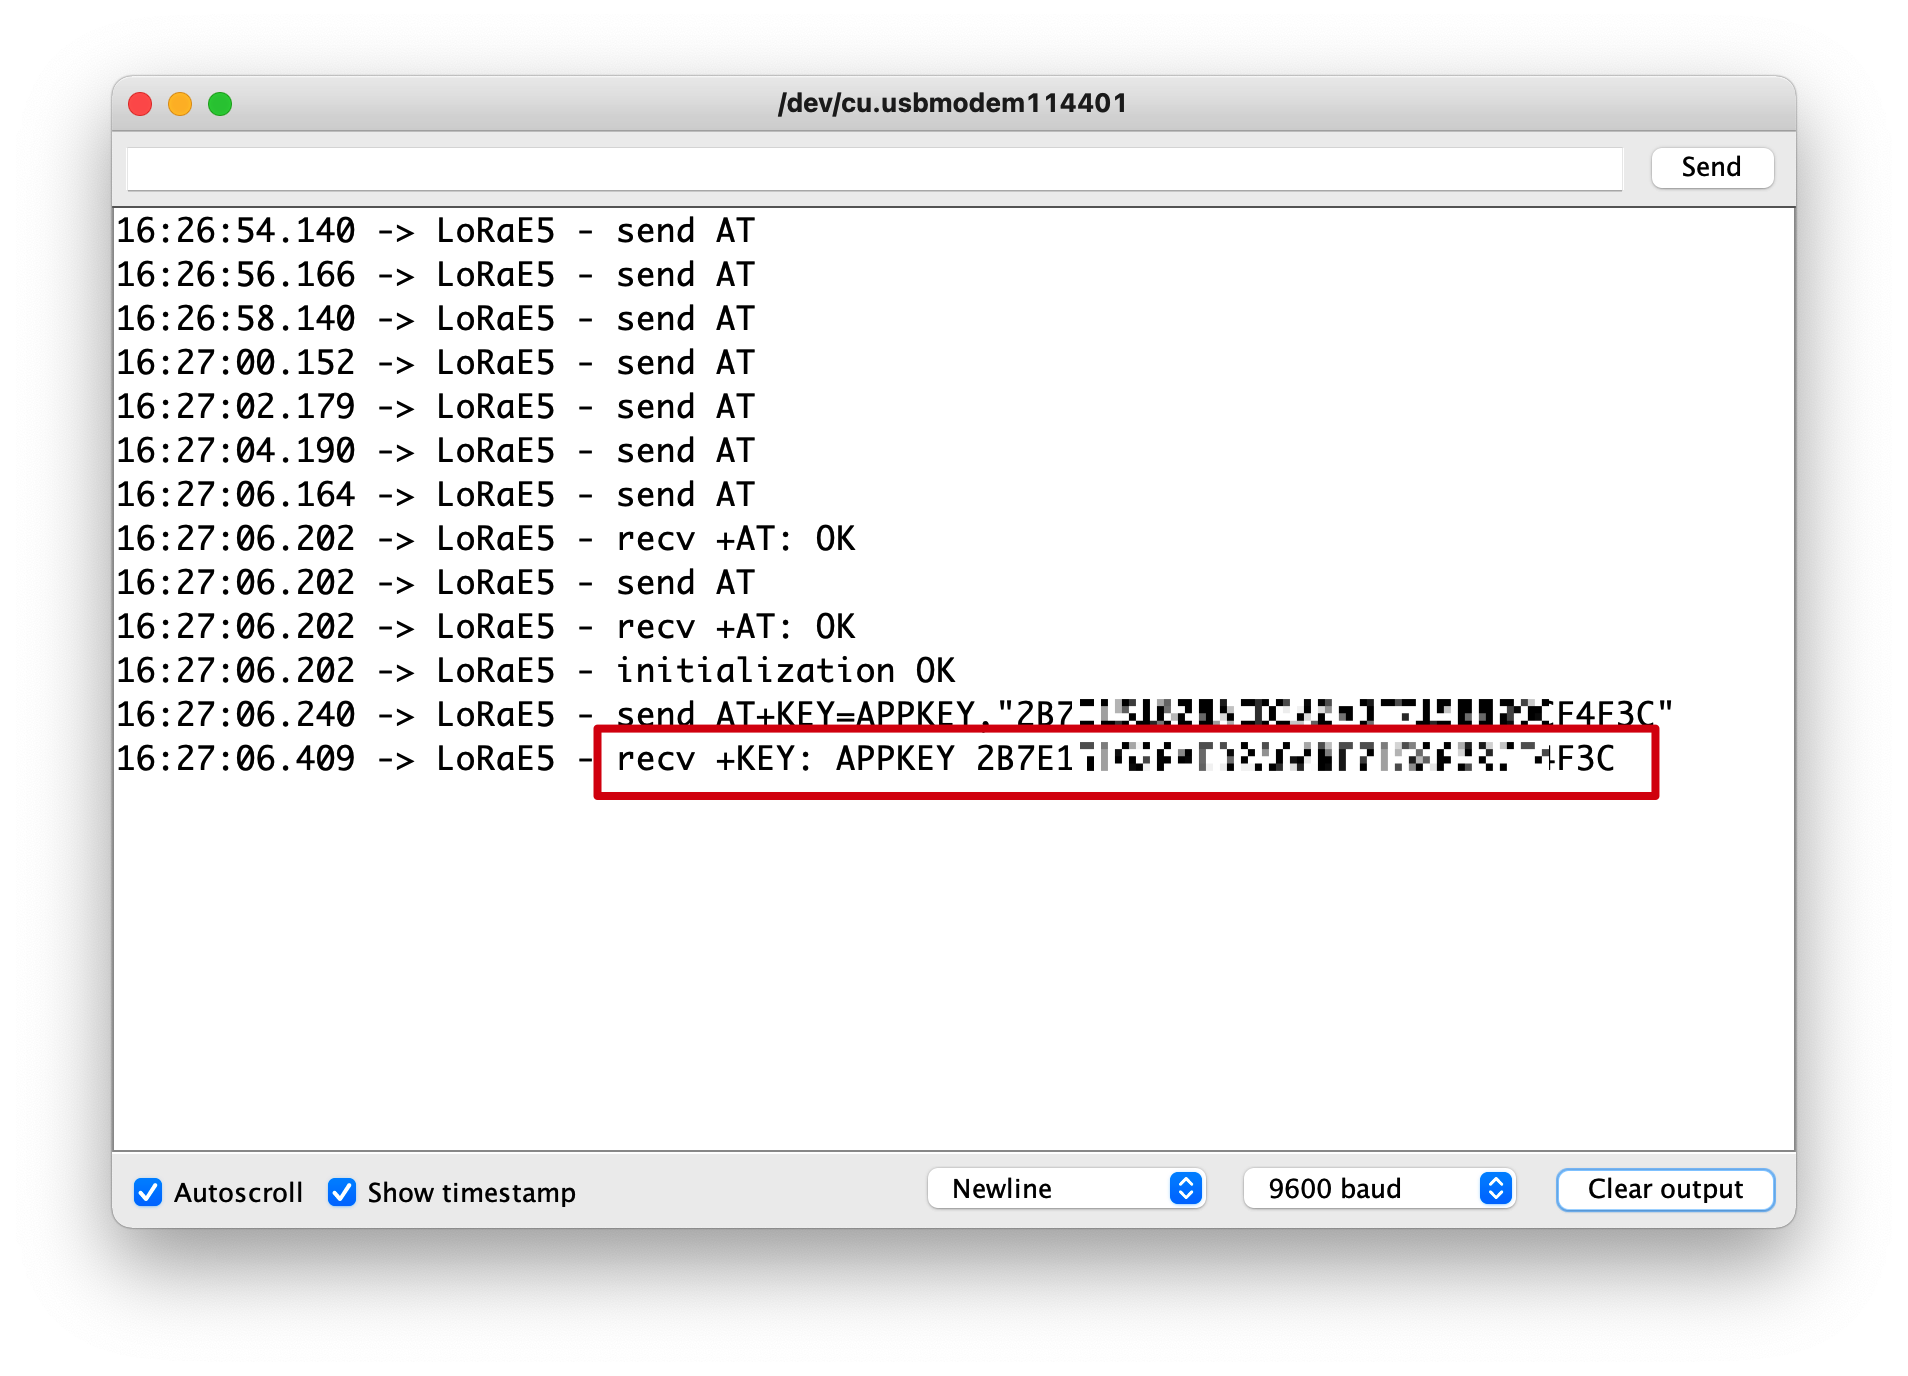
Open the serial port monitor of Arduino IDE, set the baud rate to 9600 and observe the setting.
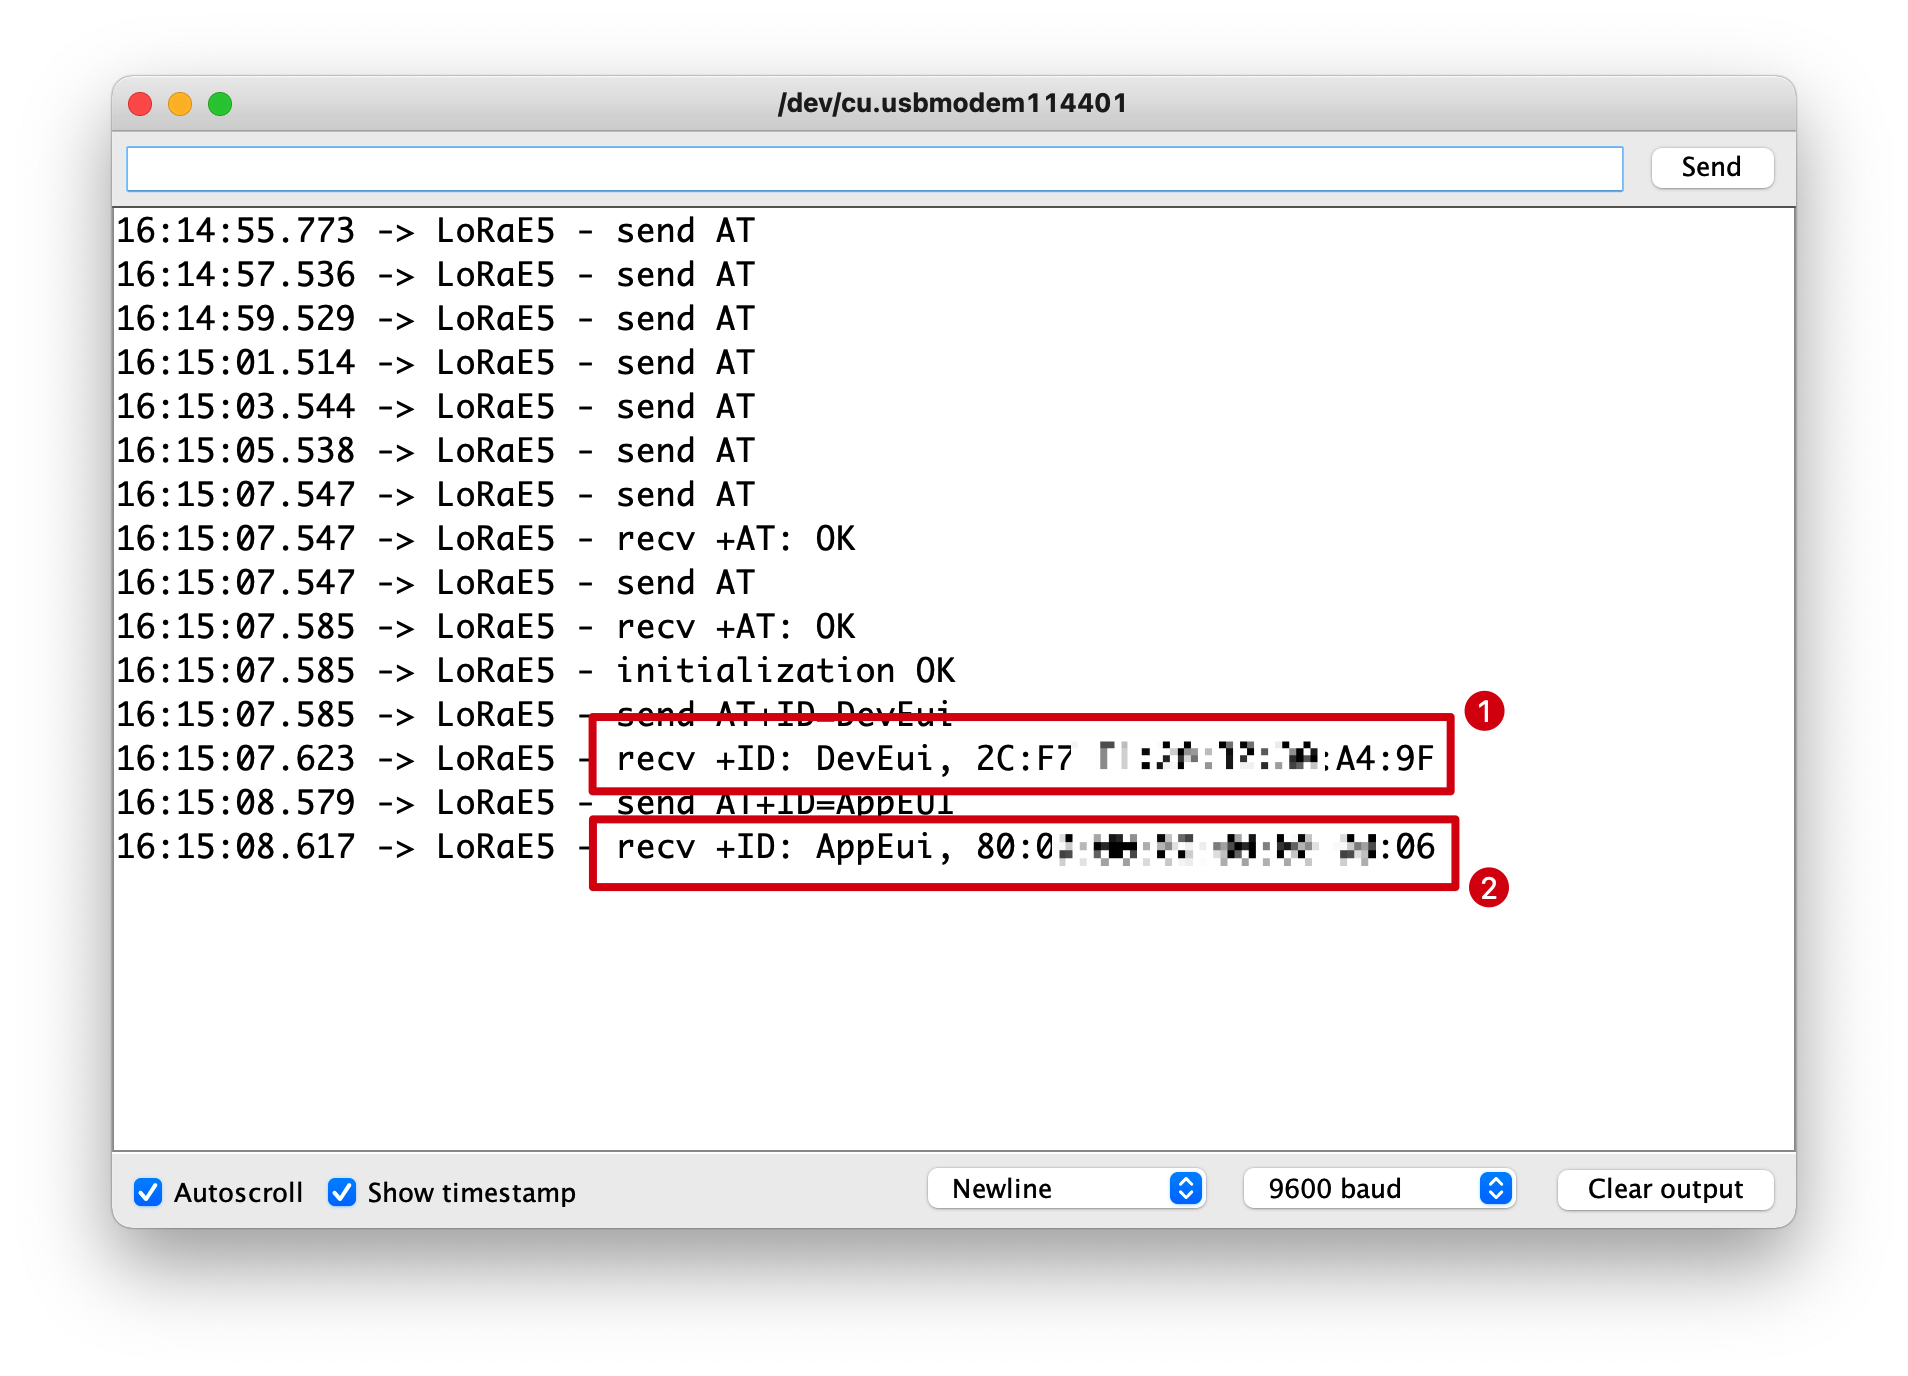
Please note down the 16 digits after DevEUI and AppEUI, which will be used in the TTN add device session.
Step 2. Add an application
Click the Add application button on the top right.
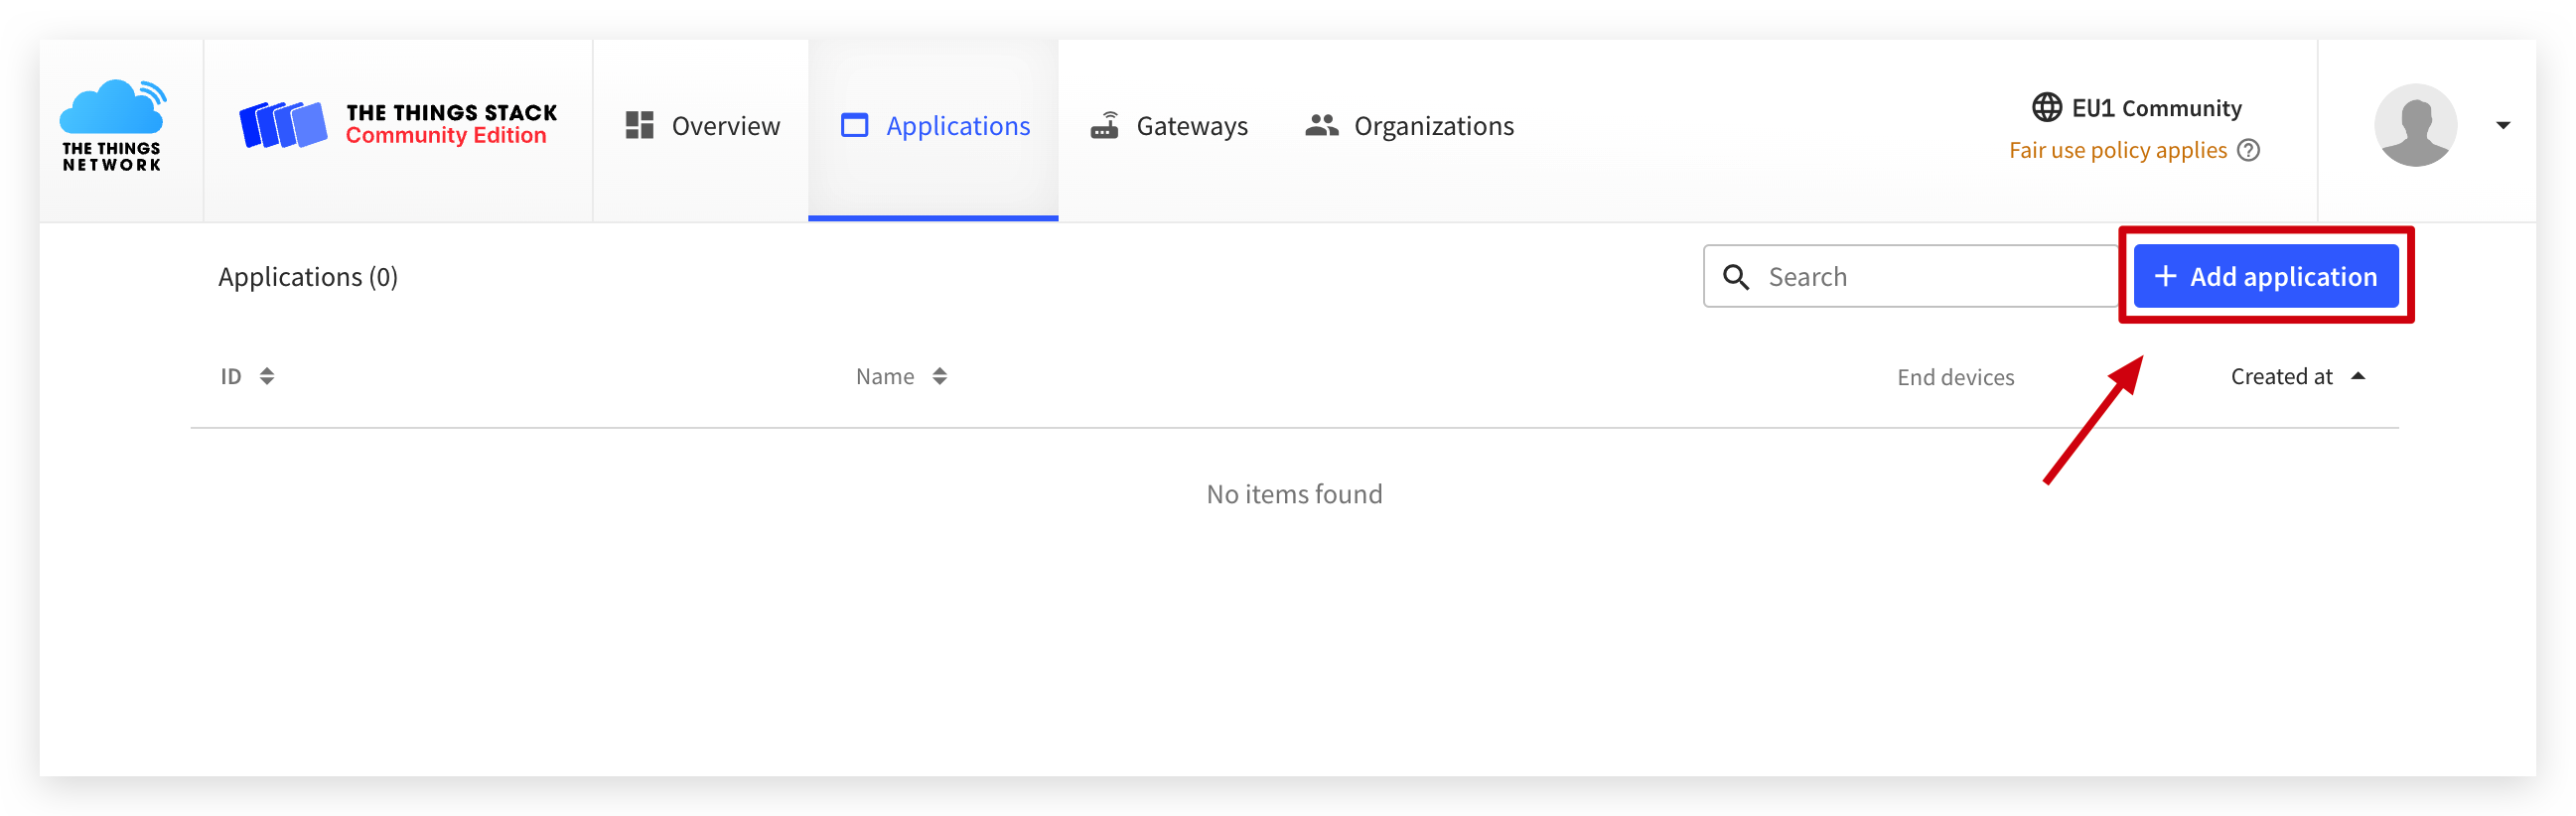
Fill in the ones with an asterisk and ask for the content according to your preference.
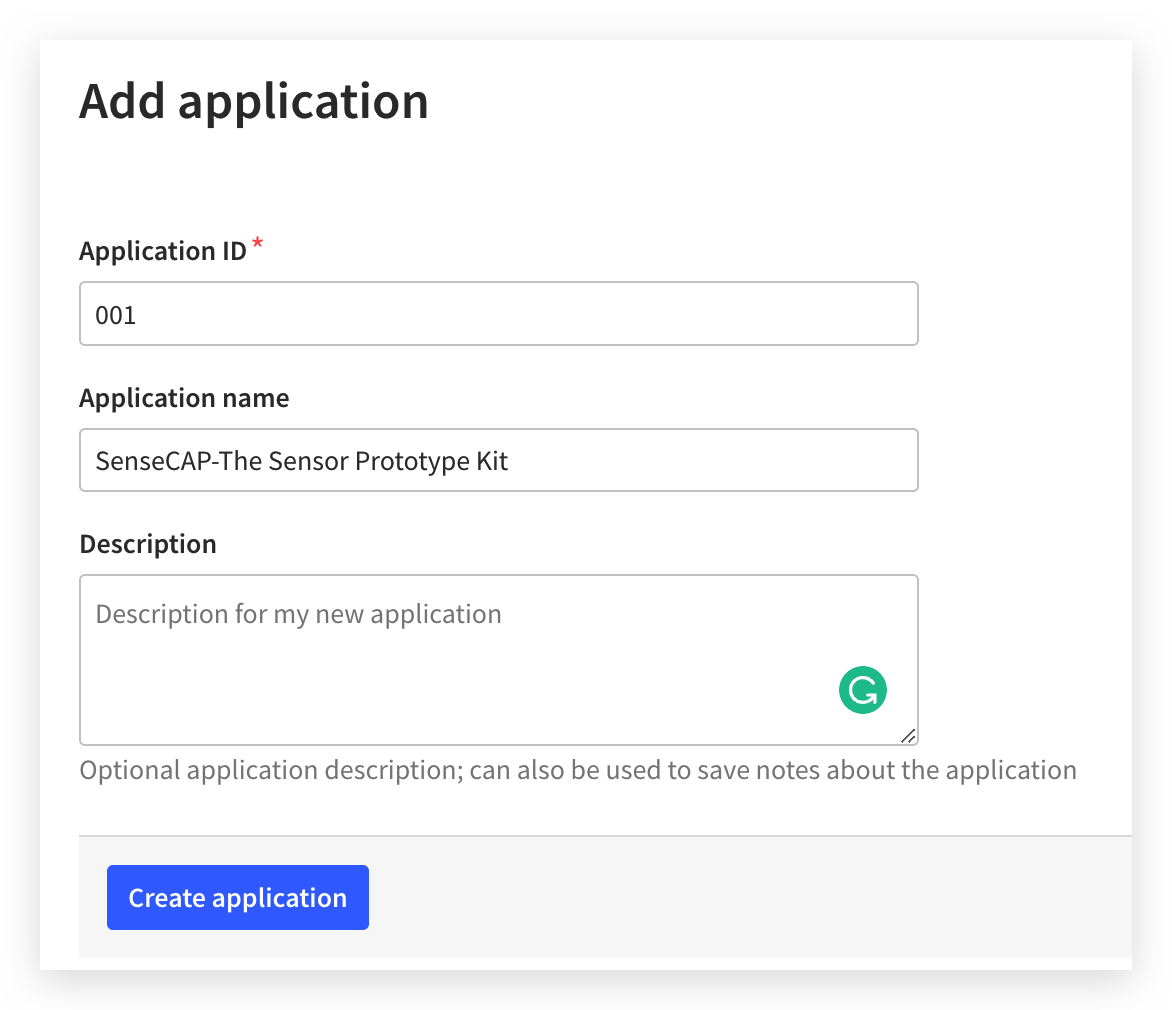
Then click Create Application.
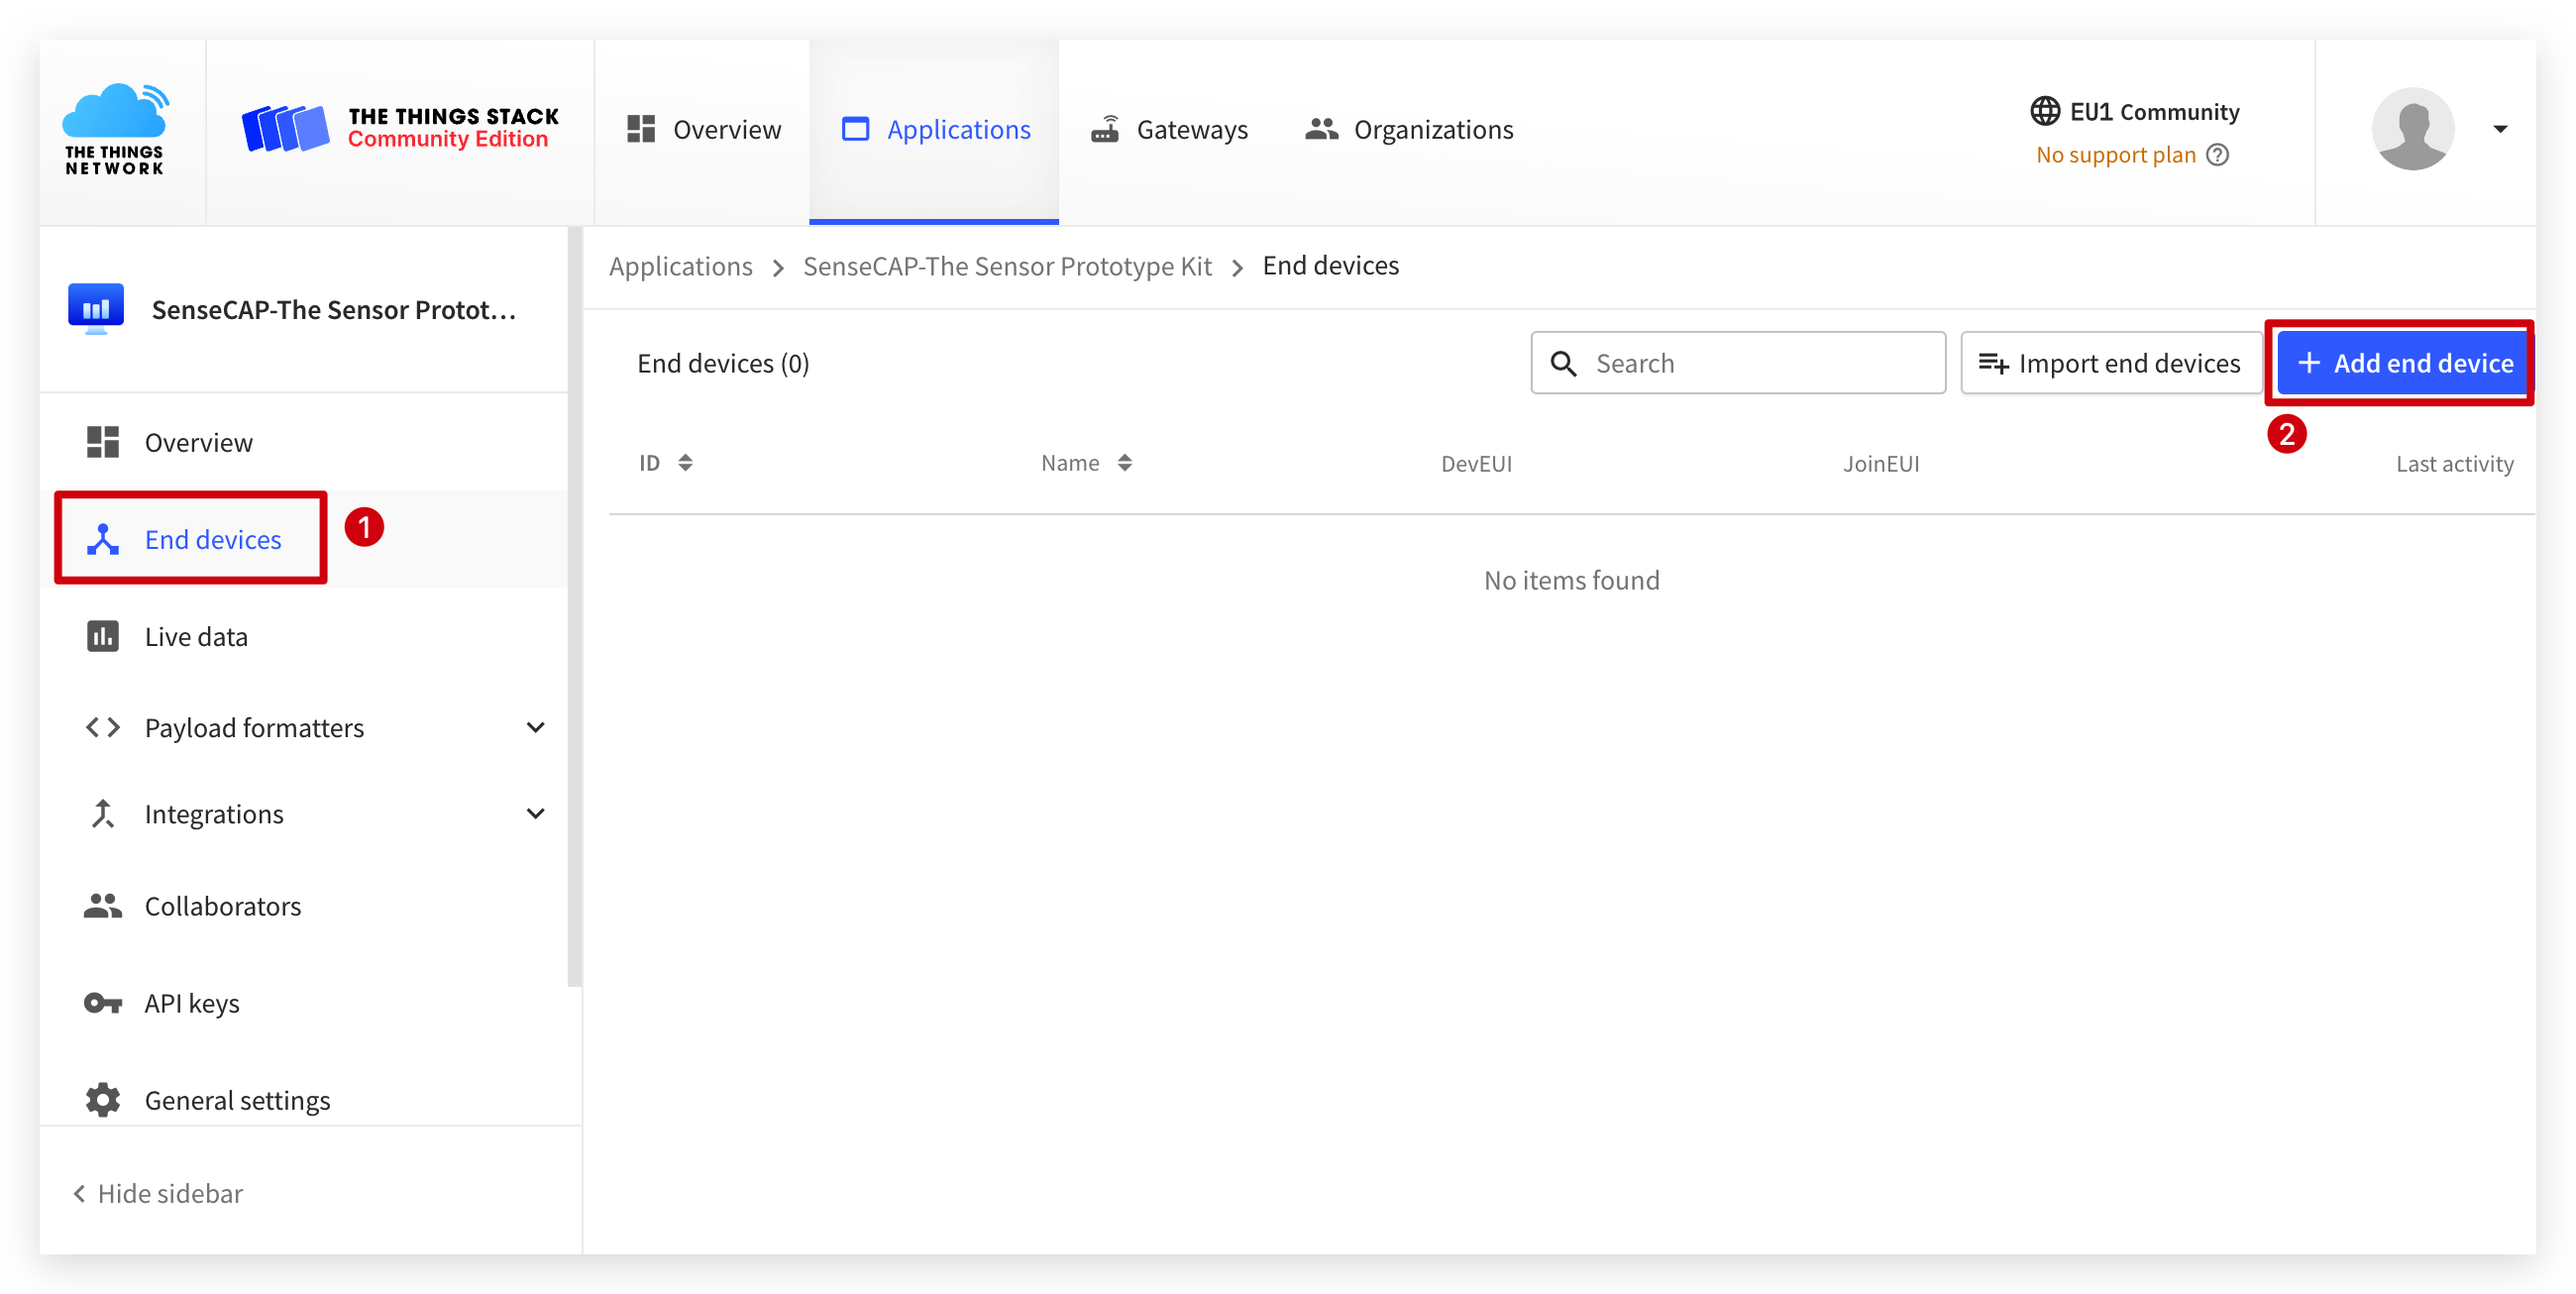
Step 3. Adding devices
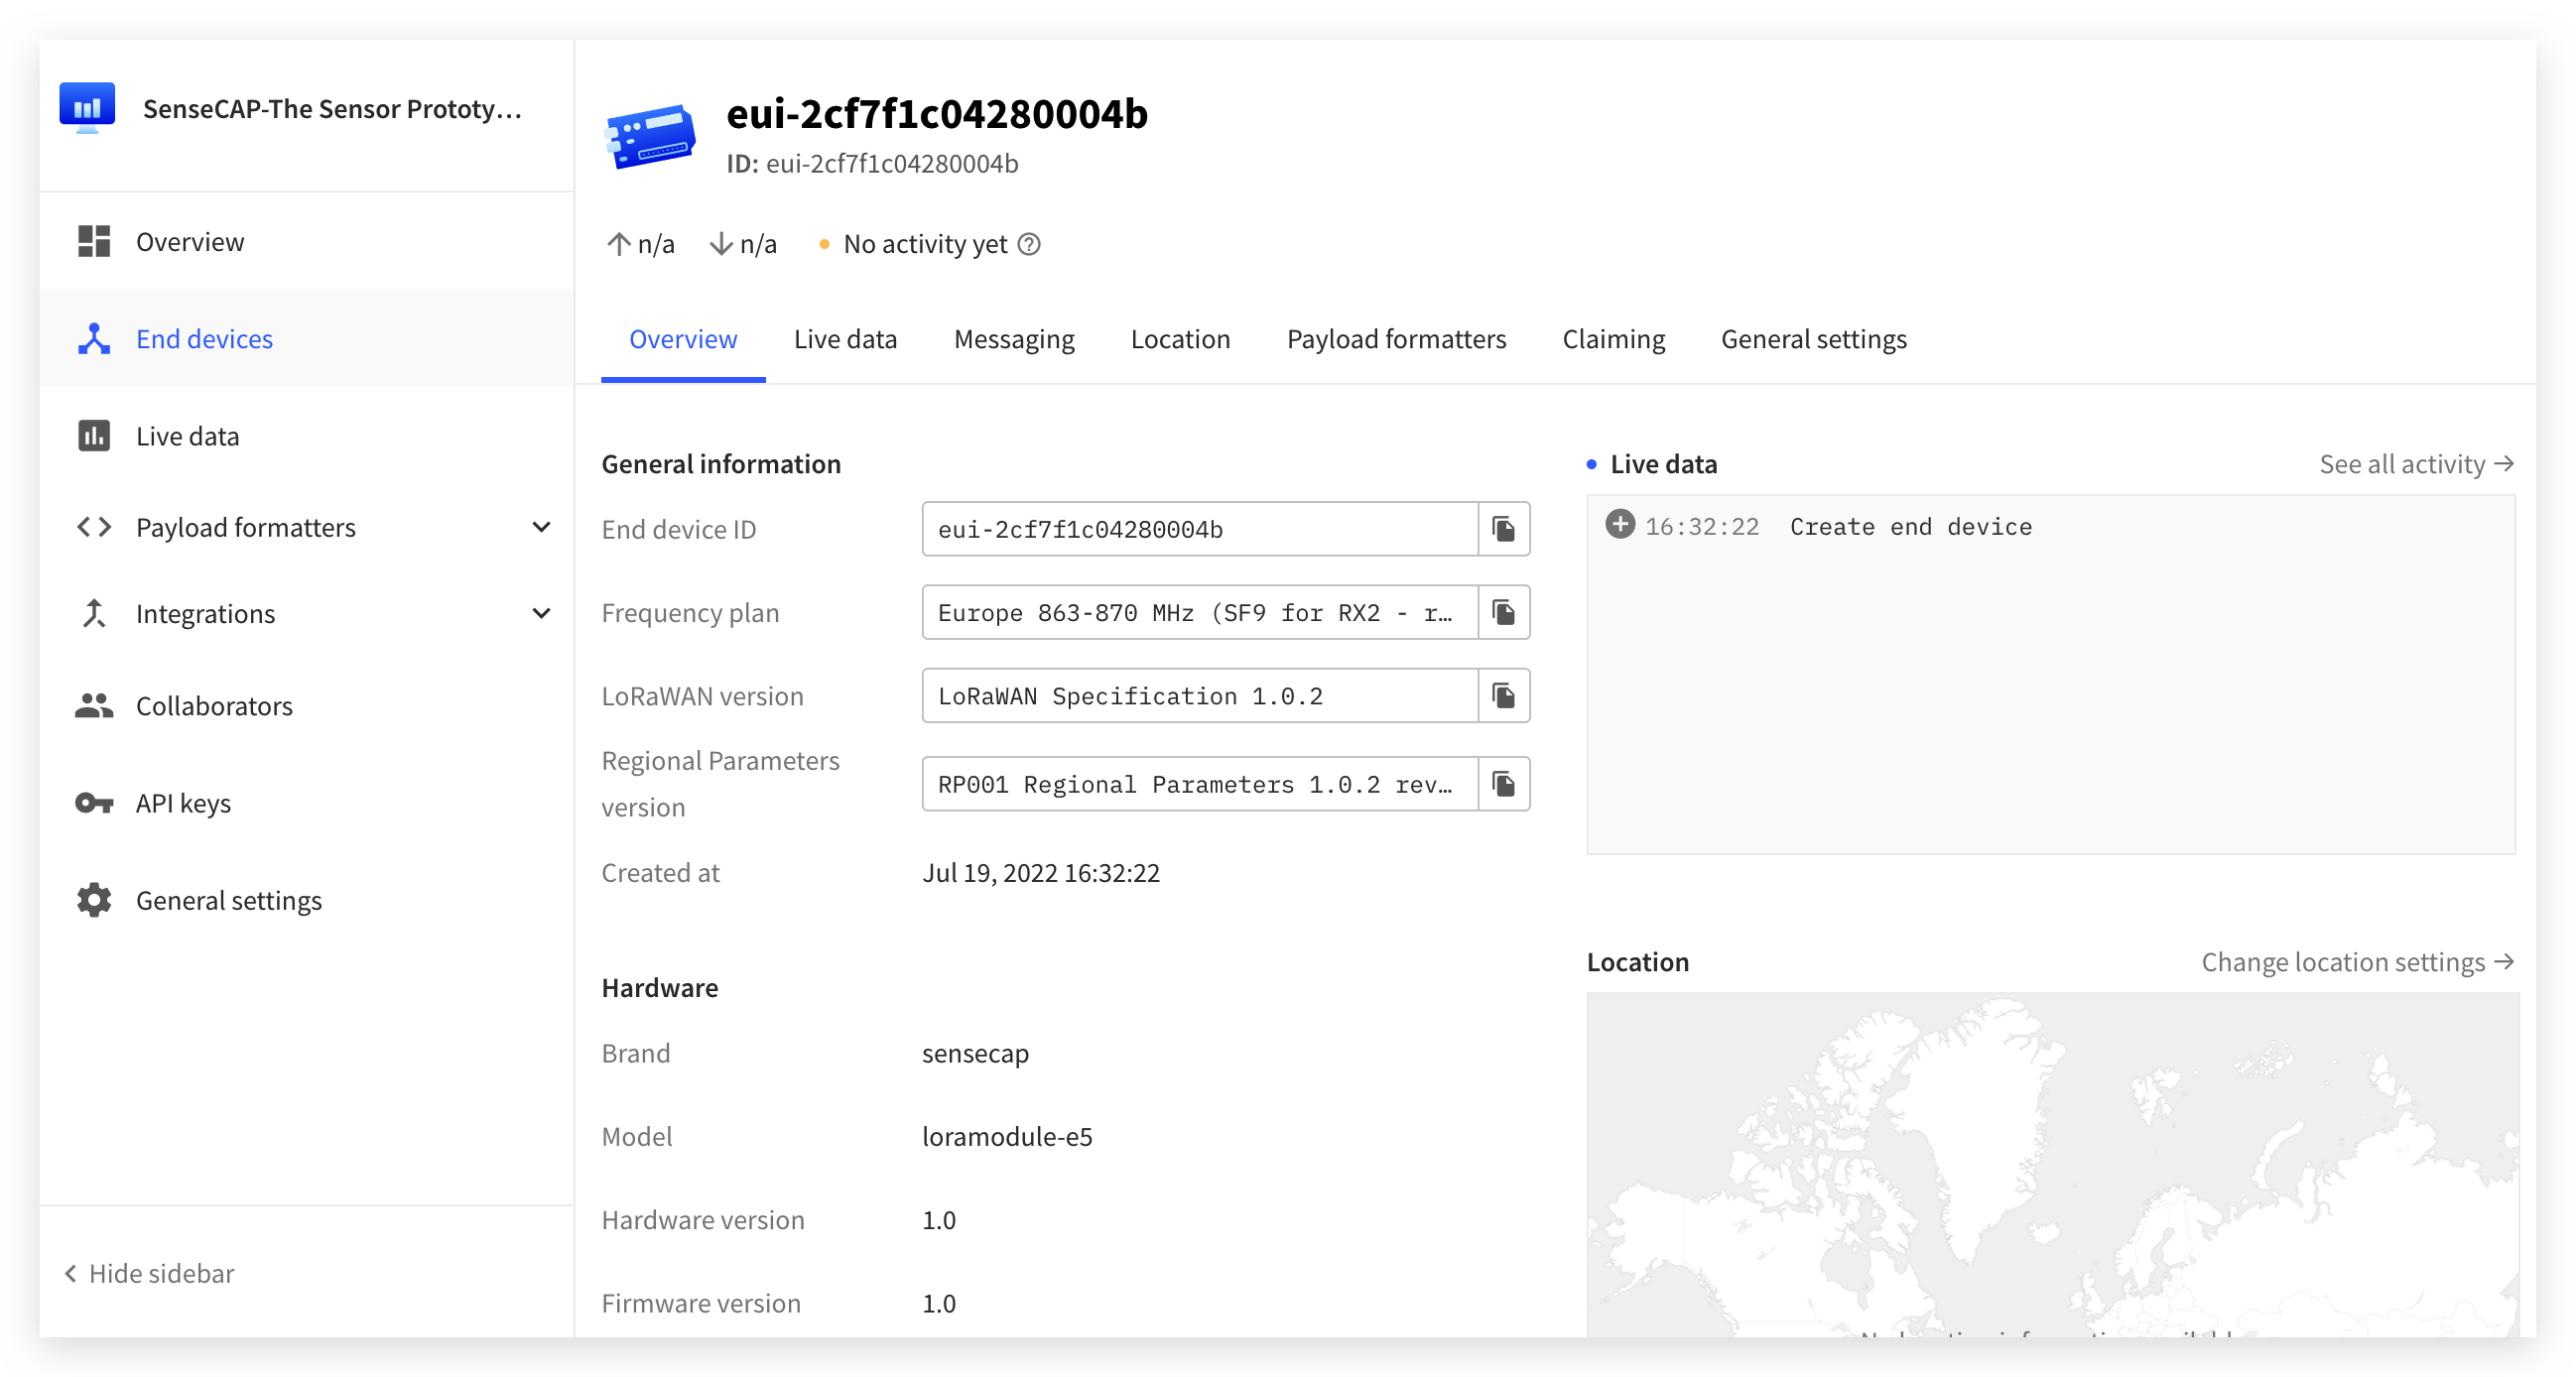
Go to End devices in the left menu and click on + Add end device to reach the end device registration page.
To use the Grove - Wio-E5 in device repository, make sure the From the LoRaWAN® Device Repository tab is selected.
Then, Please click the following options to select.
- Brand -- SenseCAP
- Model -- LoRa-E5 STM32WLE5JC Module
- Hardware Ver. -- 1.0
- Firmware Ver. -- 1.0
- Profile (Region) -- Choose a Frequency plan appropriate for your region.
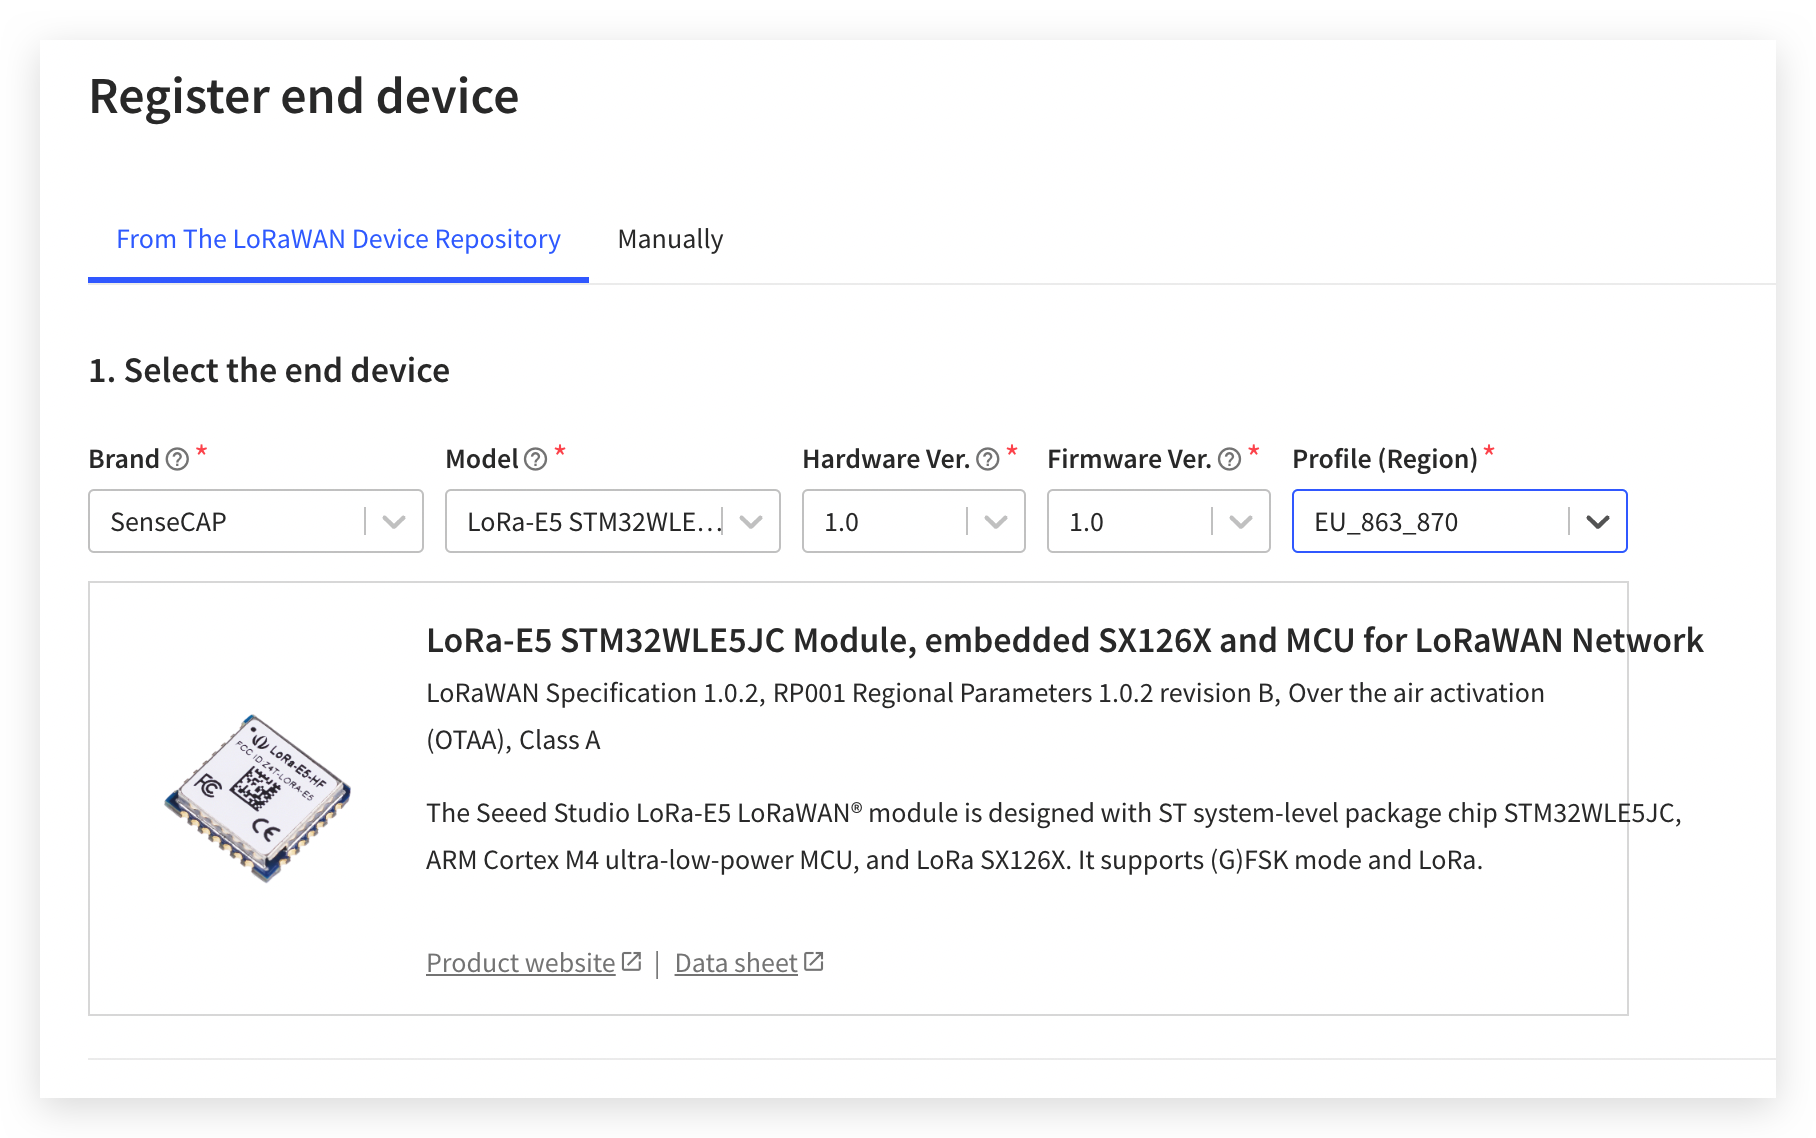
Choose a Frequency plan appropriate for your region. Your device and gateway must use the same frequency plan to communicate. Different world regions use different frequency plans, e.g. 863-870 MHz for Europe, 902-928 MHz for North America, etc.
Here, I will choose the TTN gateway band I use, EU868.
Then, please fill in the DevEUI and AppEUI you just obtained into the corresponding fields of TTN.
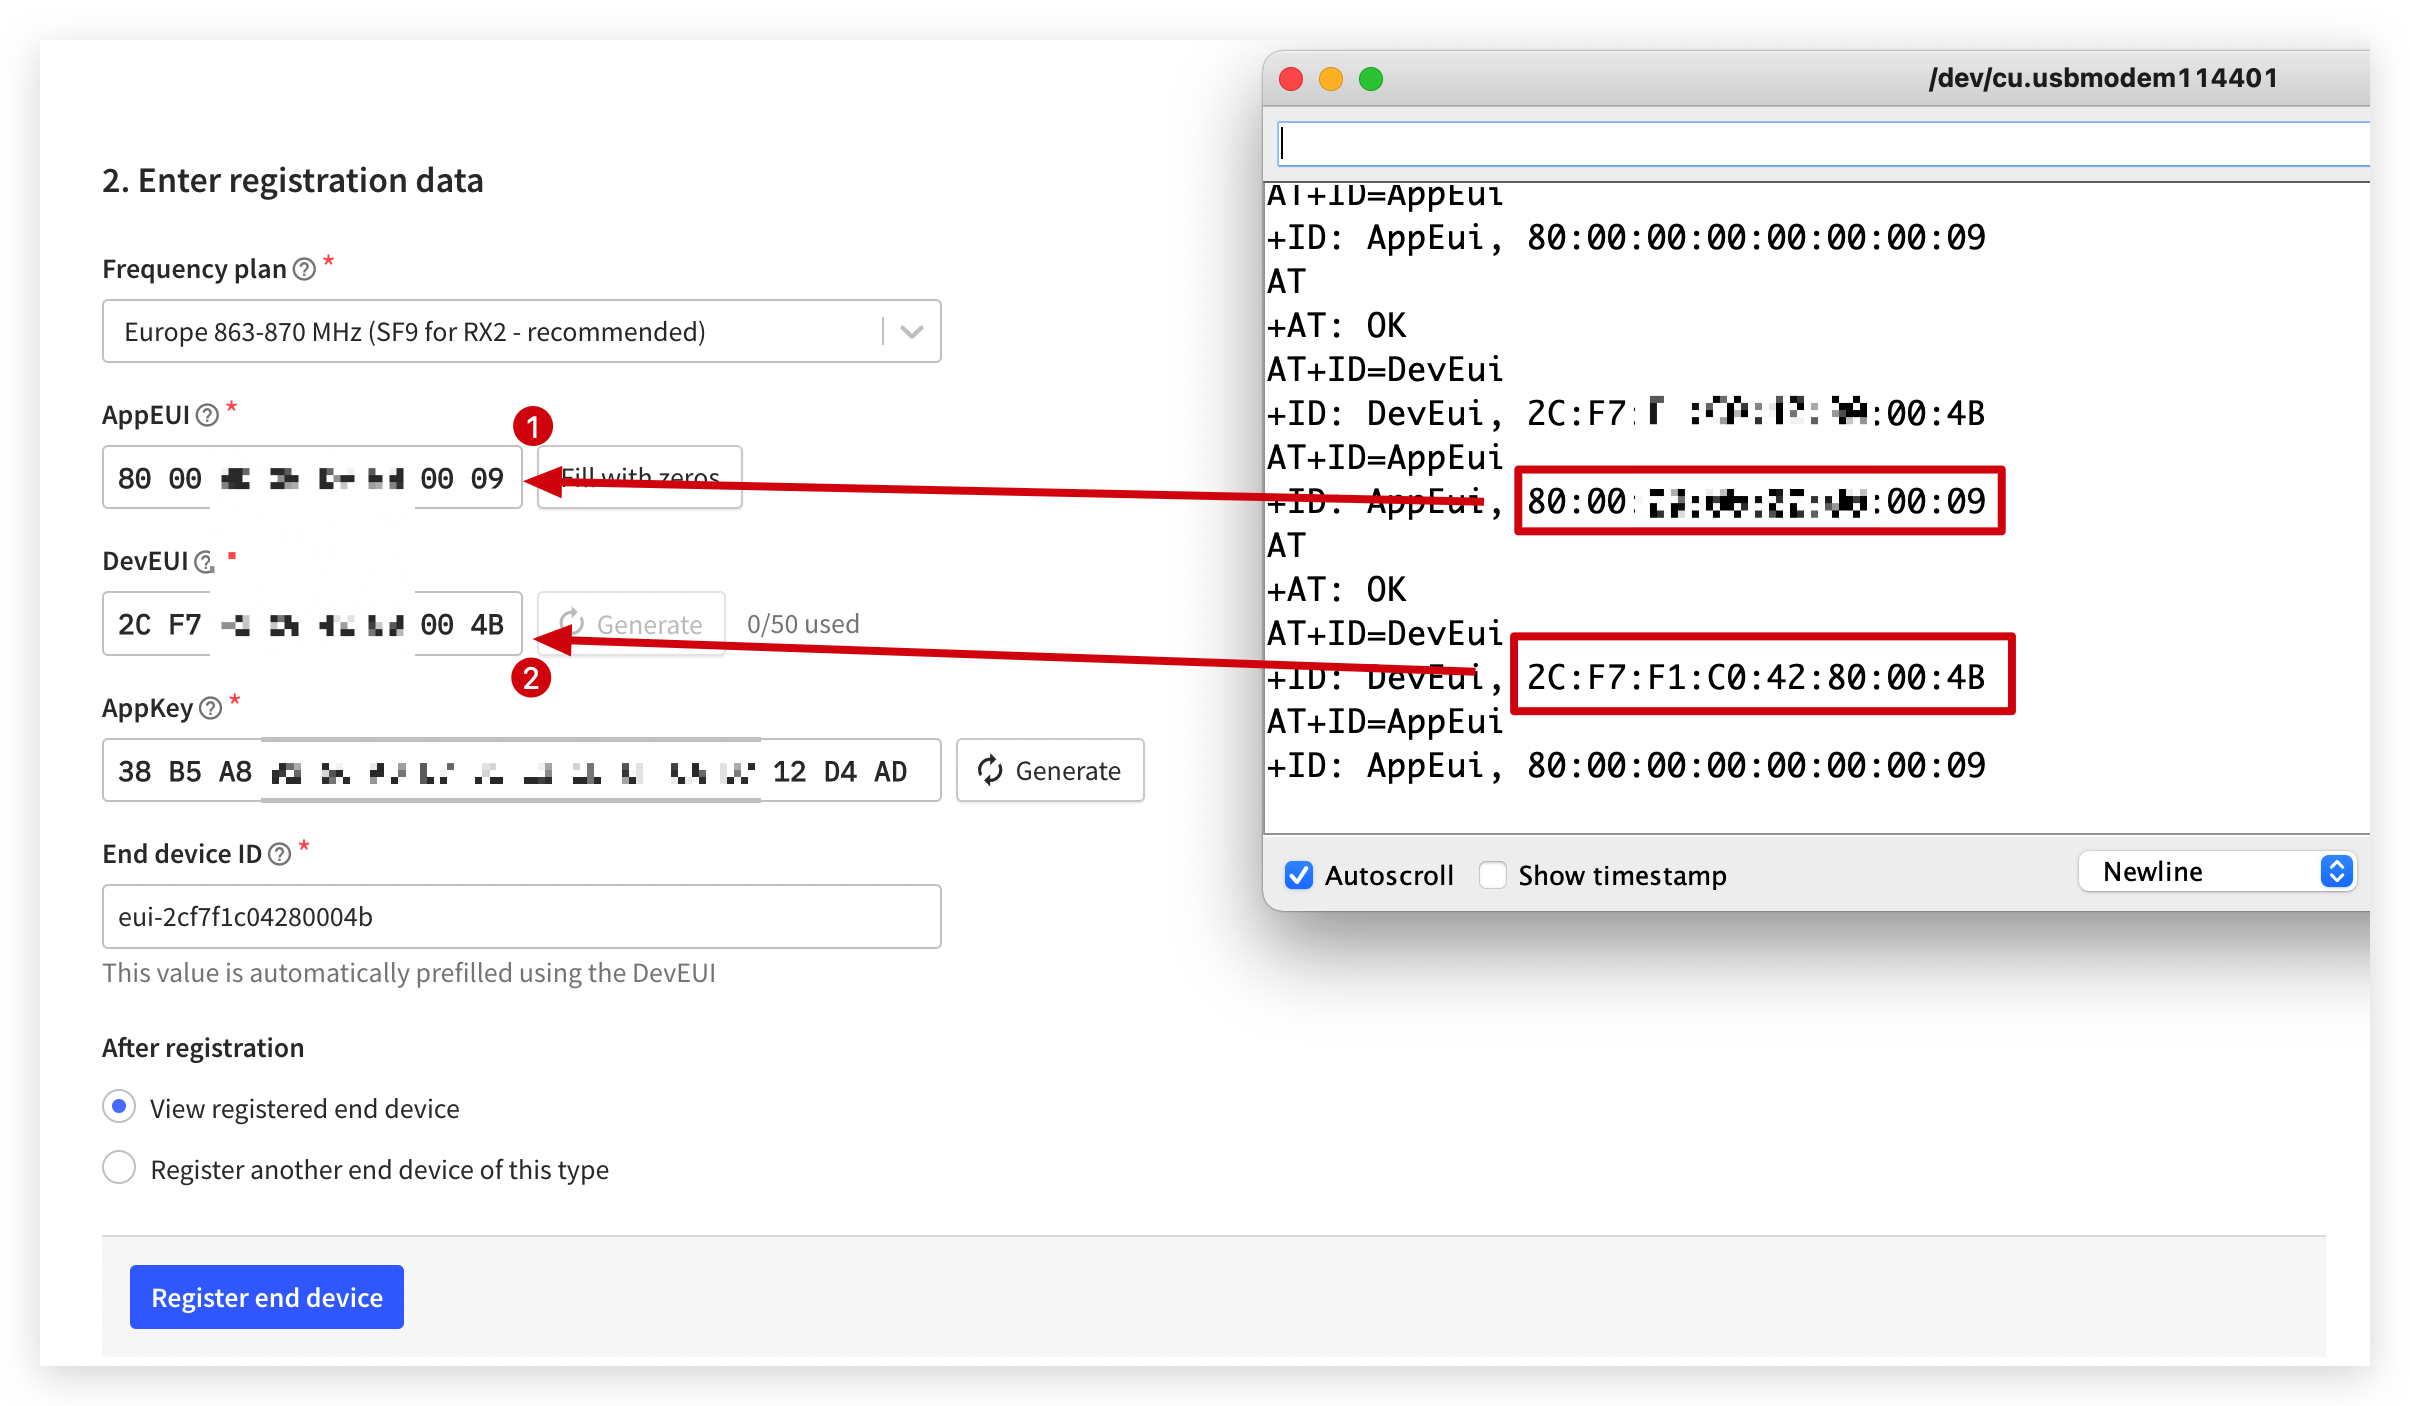
As for the AppKey, click the Generate button and then upload it to Wio Terminal using the following code to enable Grove - Wio-E5.
Note that the 32-bit AppKey generated by TTN is replaced by the content in the code.
lorae5.sendATCommand("AT+KEY=APPKEY,\"2B7E151628XXXXXXXXXX158809CF4F3C\"","","+KEY: ERROR","",1000,false,NULL);
Here is the complete code.
#include <Arduino.h>
#include "disk91_LoRaE5.h"

Disk91_LoRaE5 lorae5(&Serial); // Where the AT command and debut traces are printed

void setup() {
  Serial.begin(9600);
  uint32_t start = millis();
  while ( !Serial && (millis() - start) < 3000 );  // Open the Serial Monitor to get started or wait for 3.0"

  // init the library, search the Wio-E5 over the different WIO port available
  if ( ! lorae5.begin(DSKLORAE5_SEARCH_WIO) ) {
    Serial.println("Wio-E5 Init Failed");
    while(1);
  }
}

void loop() {
  //Grove - Wio-E5 allows querying DevEUI, AppEUI, but not AppKey.
  lorae5.sendATCommand("AT+KEY=APPKEY,\"2B7E151628XXXXXXXXXX158809CF4F3C\"","","+KEY: ERROR","",1000,false,NULL);
  delay(30000);
}
At this point, the three codes for Grove - Wio-E5 and TTN have been configured. Just click to Register end device.
Write decoders function for different sensors
In the previous sections, we instructed you on how to use the Wio Terminal to read the values of the individual sensors in the kit. To send the sensor values to TTN via Grove - Wio-E5, it is necessary to use AT commands to do so. The sent data is received by TTN and needs to be decoded before it becomes real data that we can read. This is the reason why we wrote the decoder.
Also, since the data format sent is not uniform, with sensors having integer, float, positive and negative data, etc., the decoder code required for each sensor is different.
| Sensor Type | Download Address |
|---|---|
| Wio Terminal built-in light sensor | Download |
| Wio Terminal built-in IMU sensor | Download |
| Soil Moisture Sensor | Download |
| VOC and eCO2 Gas Sensor (SGP30) | Download |
| Temp&Humi Sensor (SHT40) | Download |
| Vision AI Module | Download |
Option 1. Wio Terminal Light Sensor data decoder
In the previous section Wio Terminal Light Sensor, we used an integer variable light to store the light value read by the light sensor and sent that value out using the send_sync() function. So, the goal of the decoder we wrote in TTN is to be able to parse this integer data.
The configuration code of its decoder is as follows. Please paste the following code into the code section of TTN. Click the Save Function to save this decoder.
function Decoder(bytes, port) {

  var decoded = {};
  if (port == 8) {
    decoded.light = bytes[0]<<8 | bytes[1];
  }

  return decoded;
}
Please click on the Payload formatters --> Uplink --> Custom Javascript formatter of the device in turn.
Then just paste the code of the above decoder into the Formatter code.
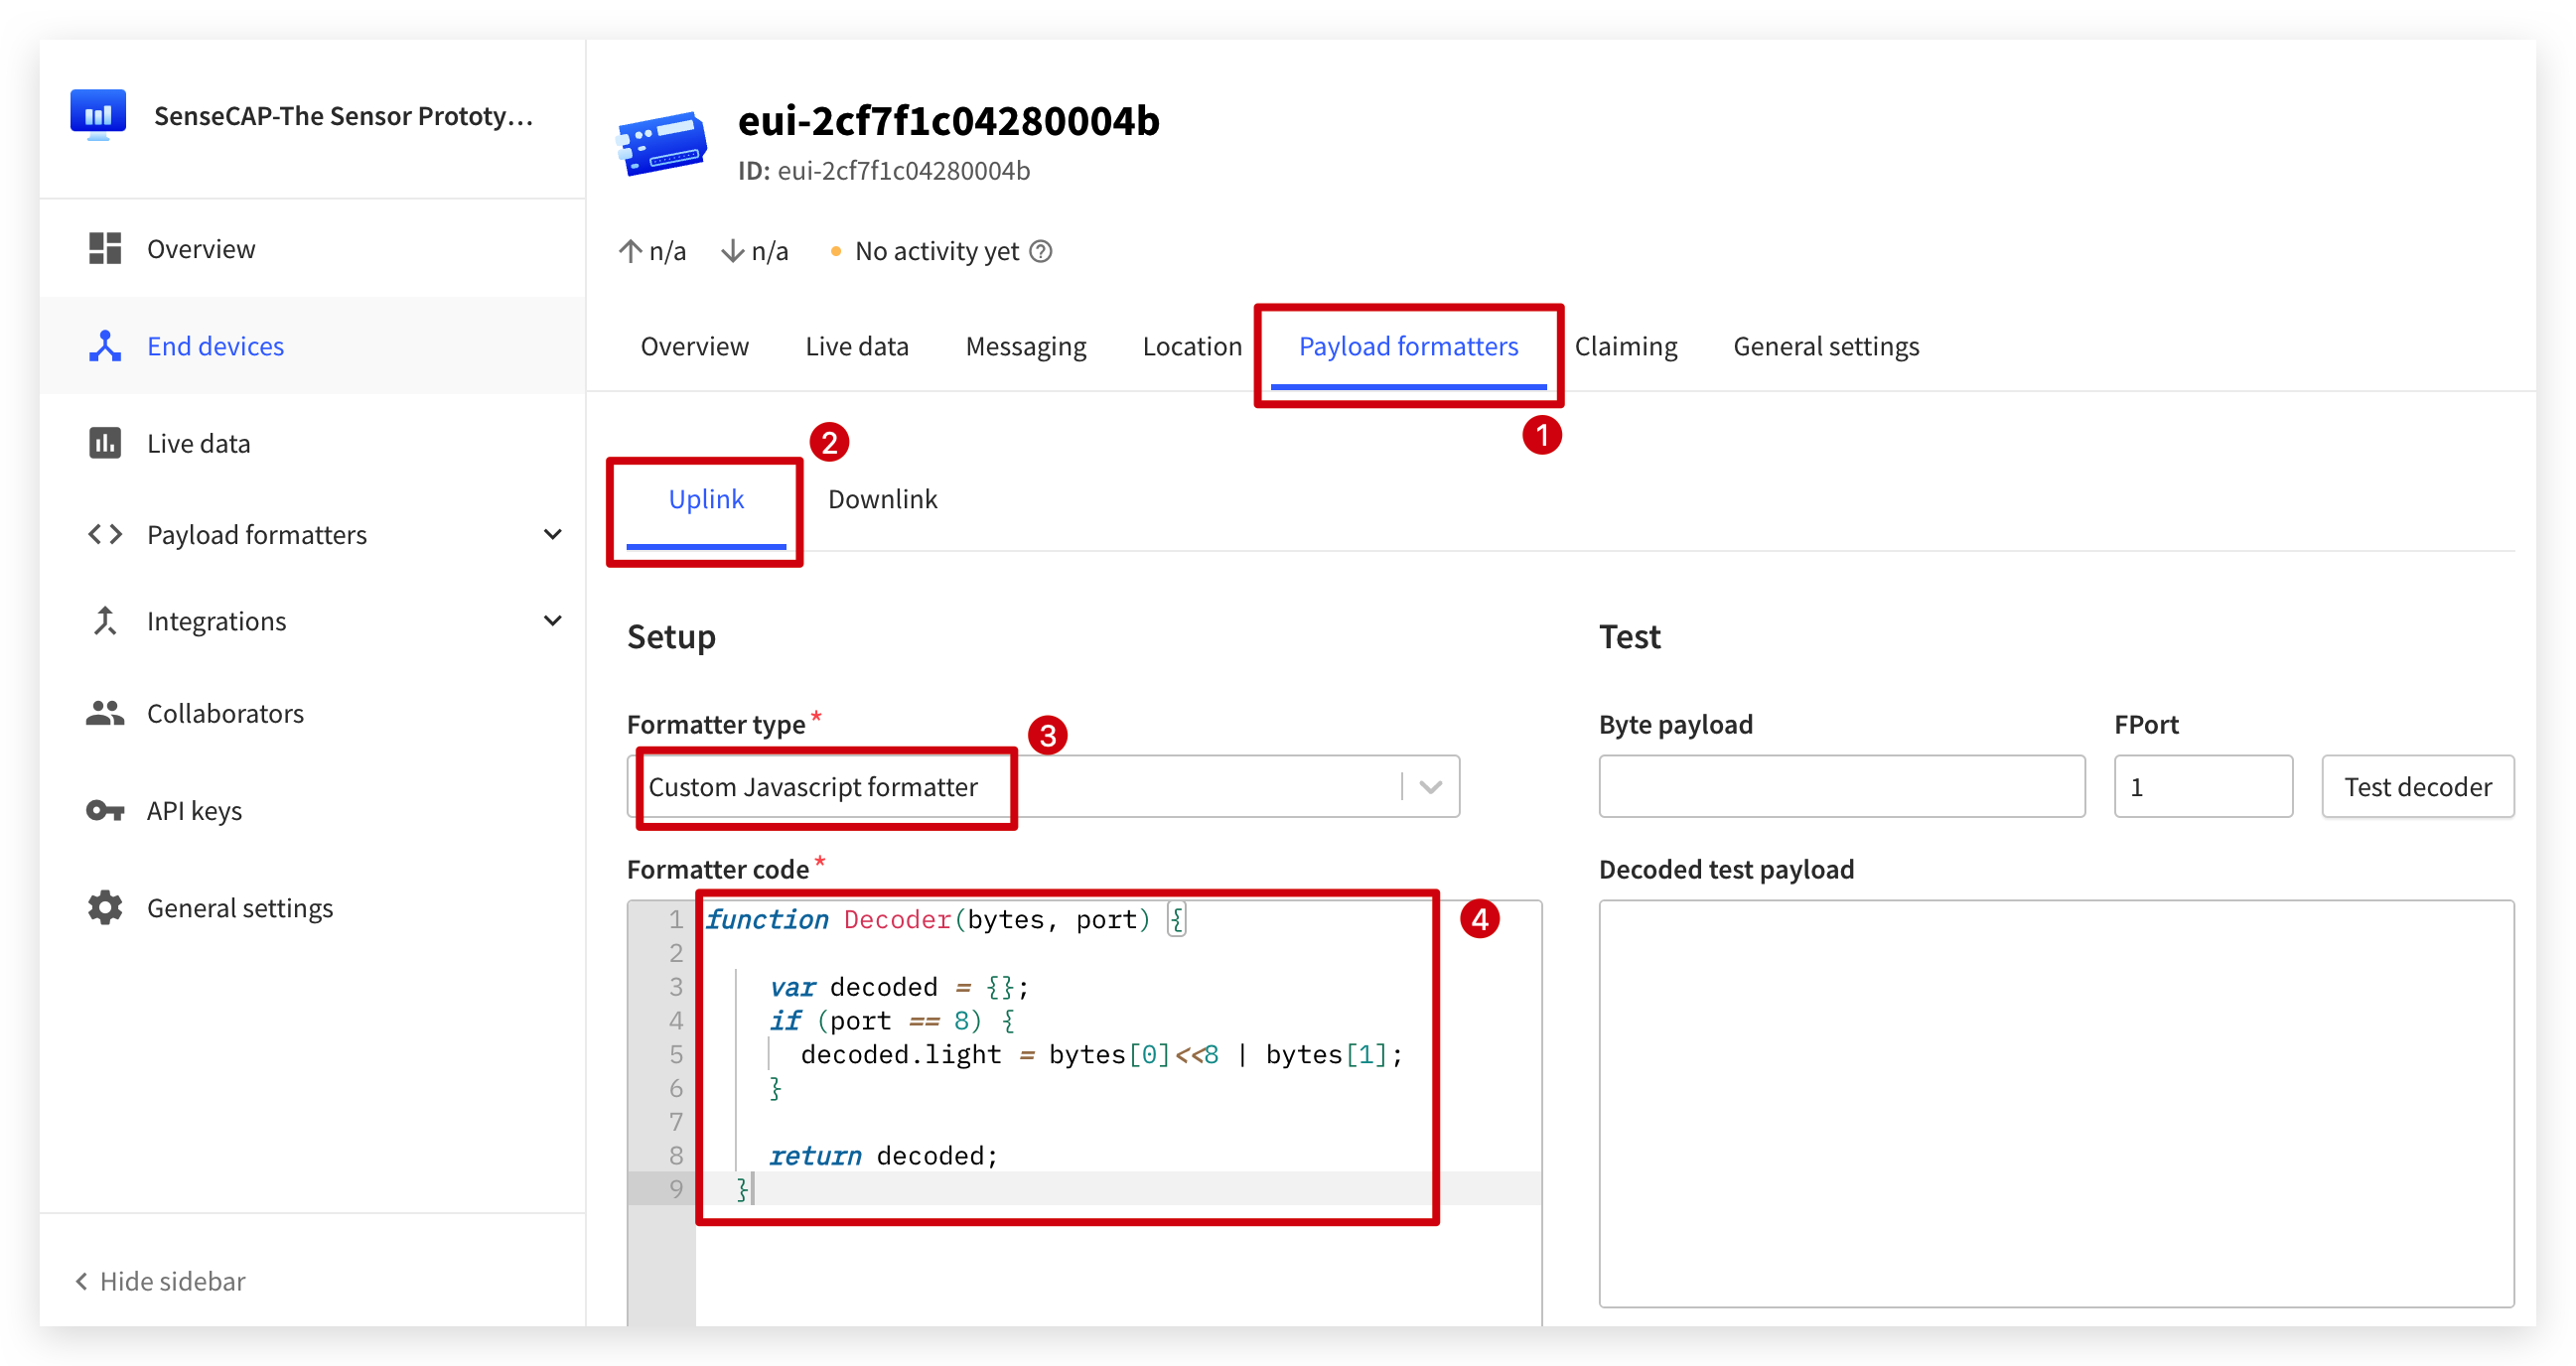
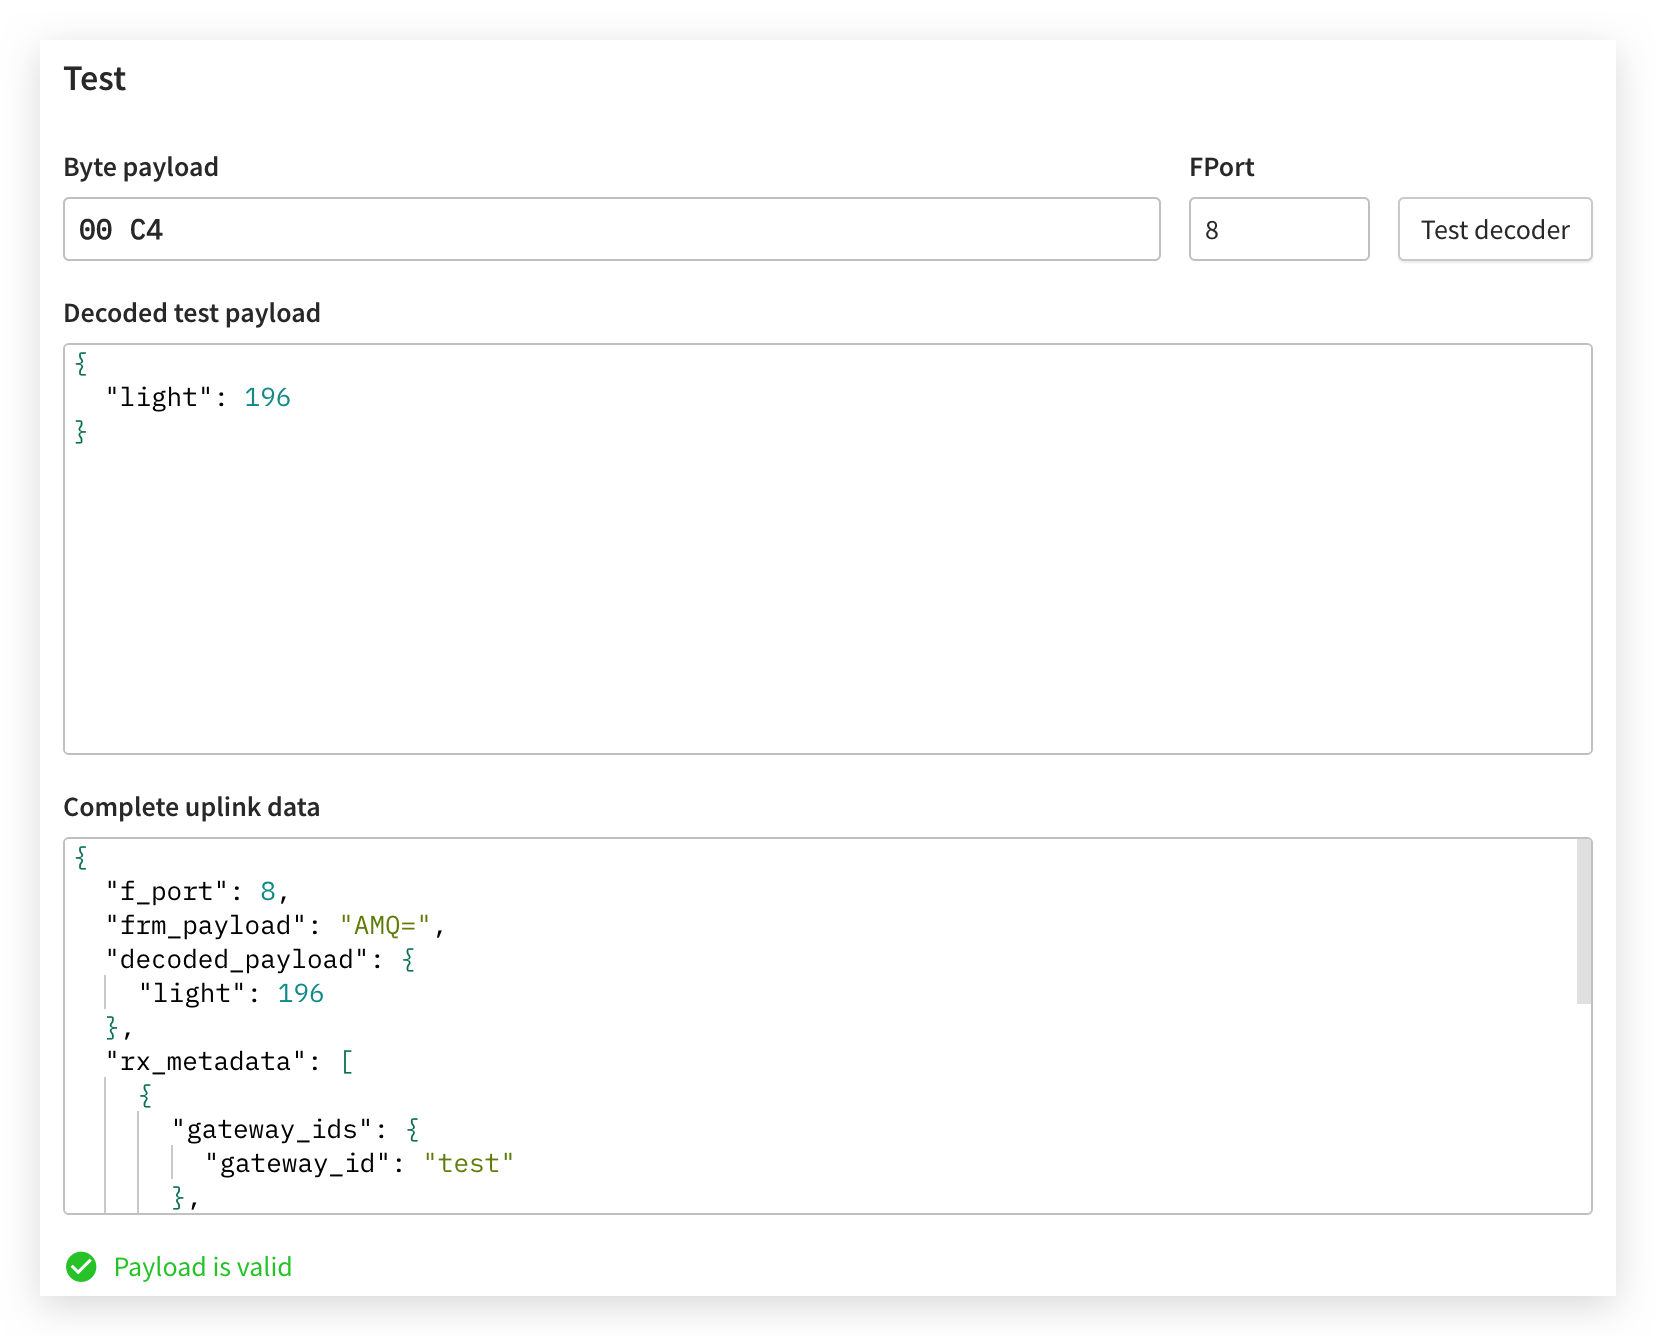
We can input the data of 8-bit light sensor in Test window on the right side to check whether the decoder parses correctly.
Option 2. Wio Terminal IMU Sensor data decoder
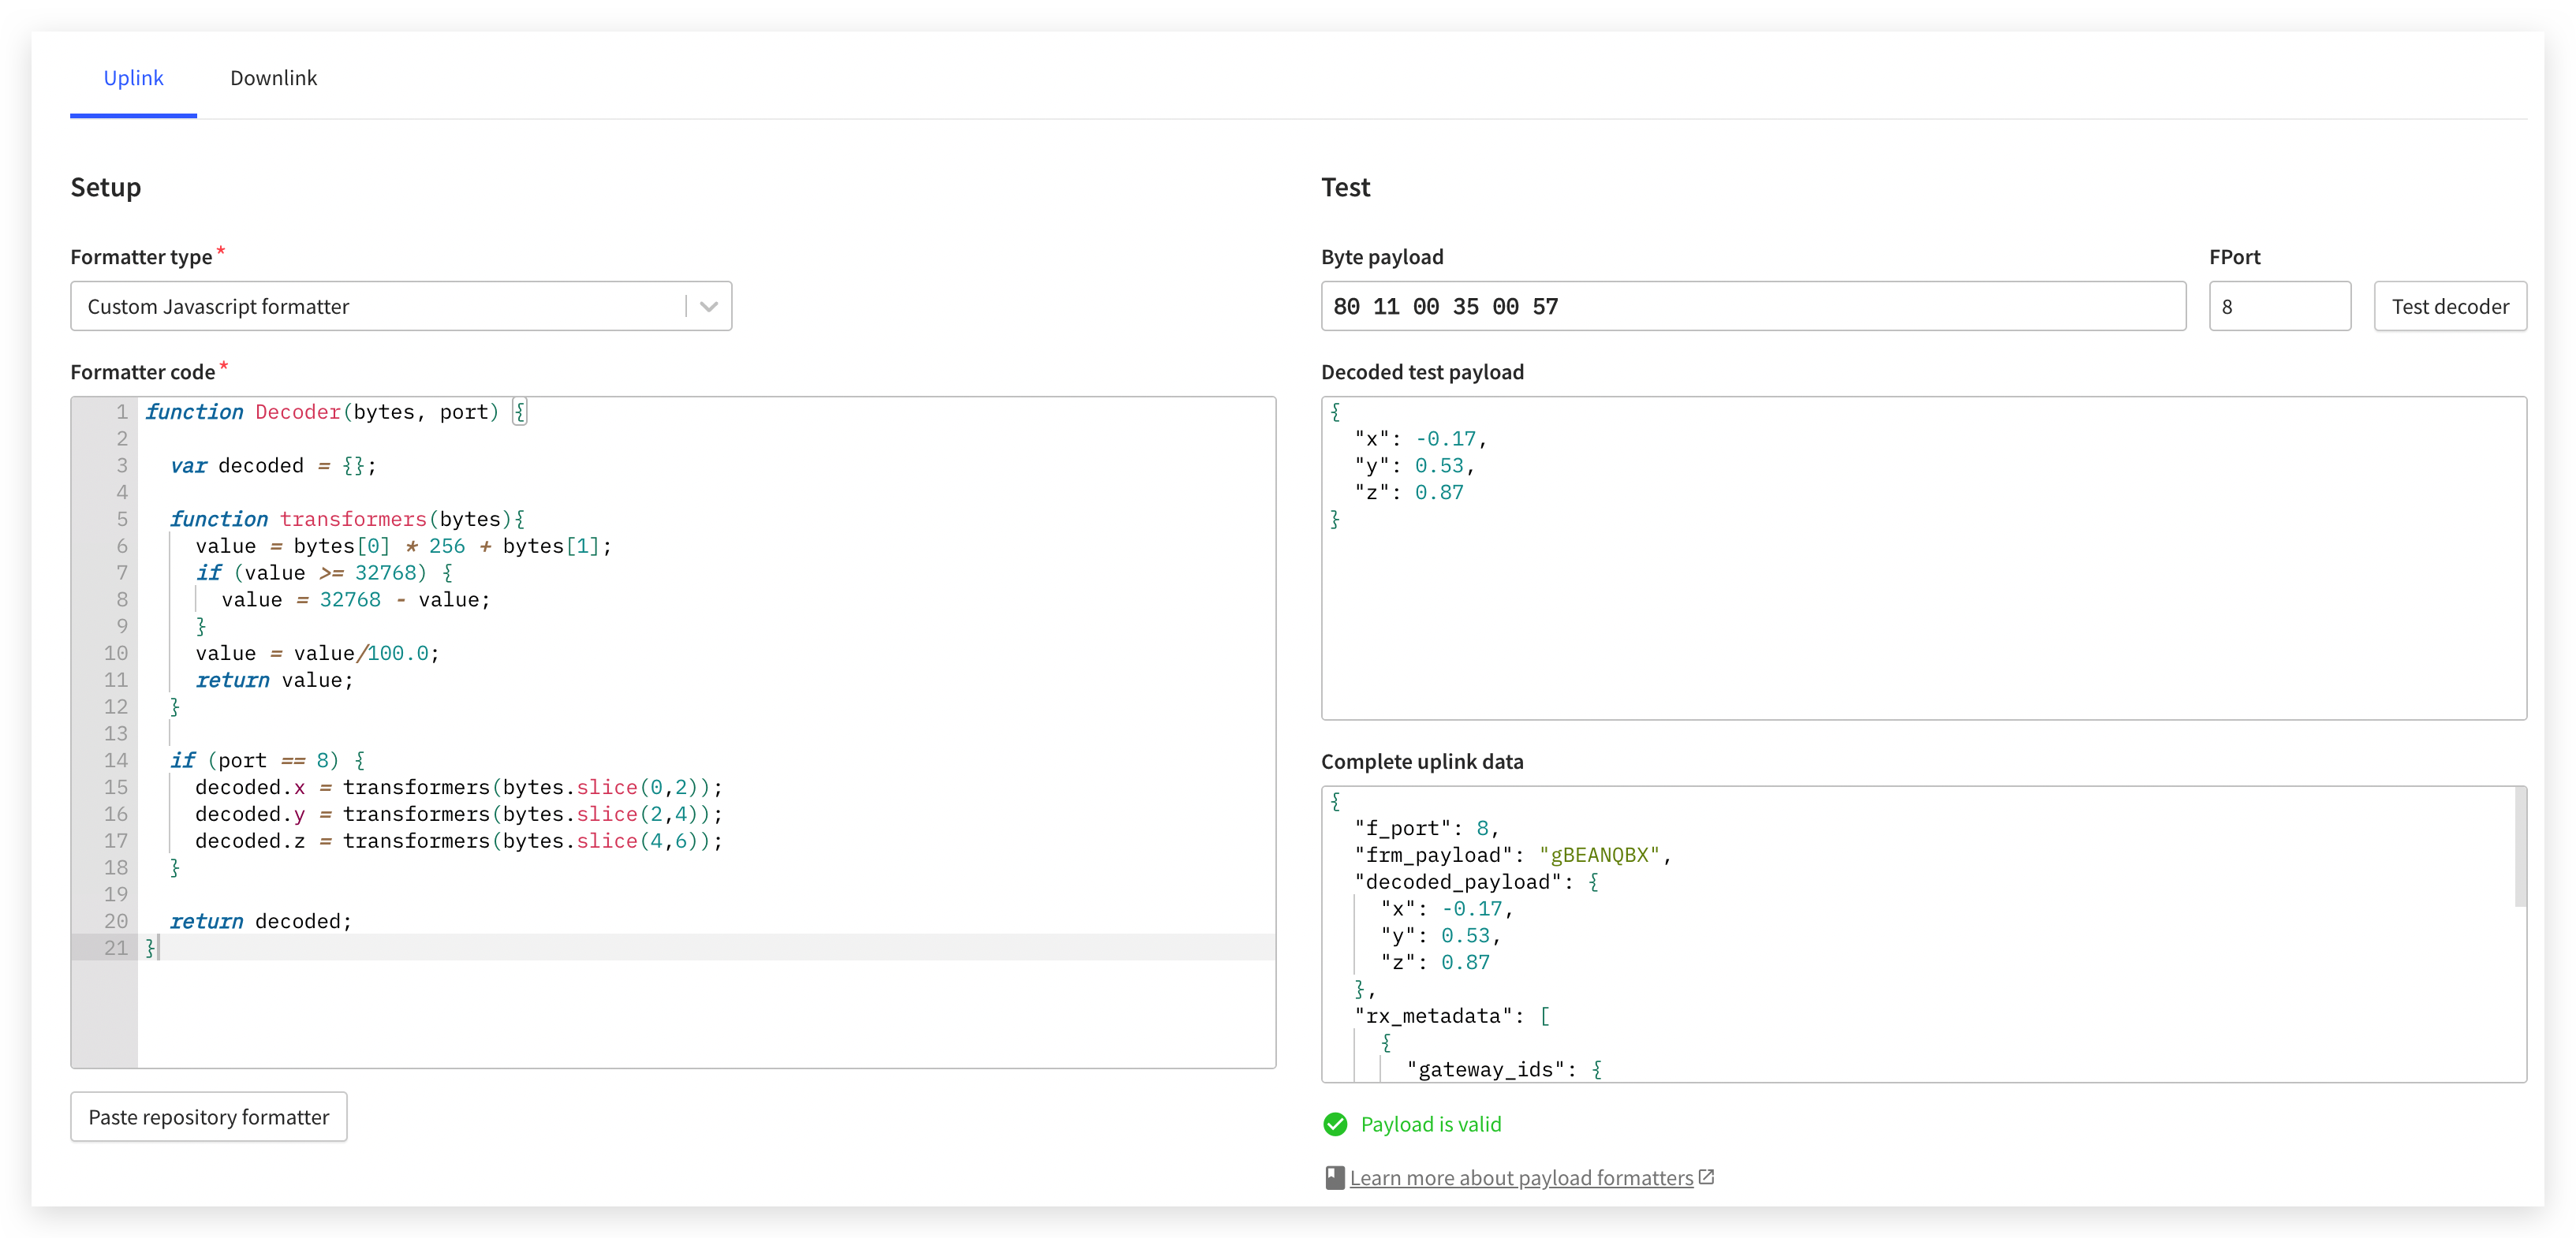
In the previous section Wio Terminal IMU Sensor, We use float numbers x_values, y_values, z_values to store the three axes of data returned by IMU, and multiply these three sets of data by 100 to convert them to integers and then send them together.
In particular, it is important to note that these data can be both positive and negative, so we also need to parse this and restore it to a float number.
The configuration code of its decoder is as follows. Please paste the following code into the code section of TTN. Click the Save changes to save this decoder.
function Decoder(bytes, port) {

  var decoded = {};

  function transformers(bytes){
    value = bytes[0] * 256 + bytes[1];
    if (value >= 32768) {
      value = 32768 - value;
    }
    value = value/100.0;
    return value;
  }

  if (port == 8) {
    decoded.x = transformers(bytes.slice(0,2));
    decoded.y = transformers(bytes.slice(2,4));
    decoded.z = transformers(bytes.slice(4,6));
  }

  return decoded;
}
We can input the data of 48-bit IMU sensor in Test on the right side to check whether the decoder parses correctly.
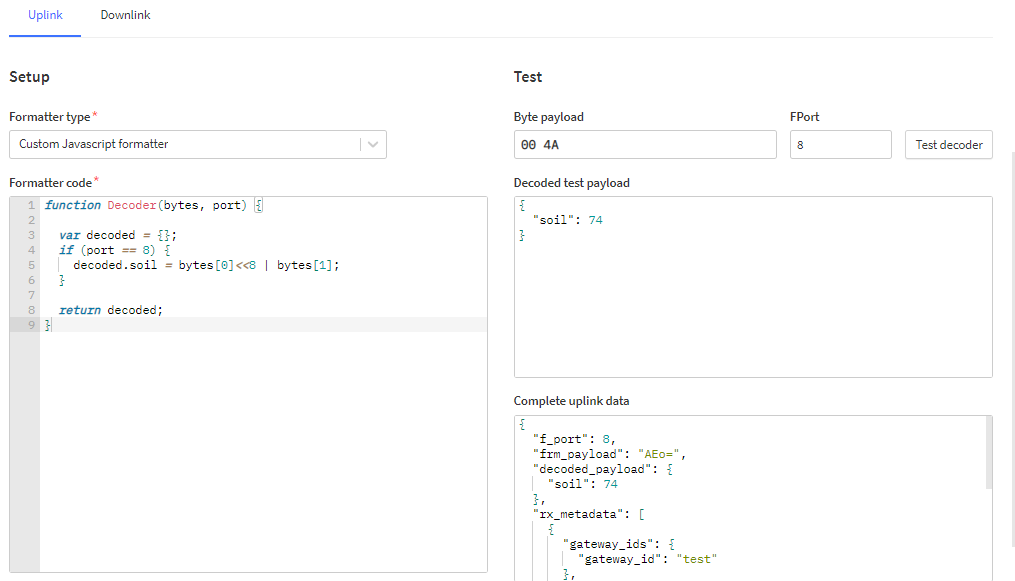
Option 3. Grove Soil Moisture Sensor data decoder
In the previous section Grove Soil Moisture Sensor, we used an integer variable sensorValue to store the soil moisture value read by the soil moisture sensor and sent that value out using the send_sync() function. So, the goal of the decoder we wrote in TTN is to be able to parse this integer data.
The configuration code of its decoder is as follows. Please paste the following code into the code section of TTN. Click the Save changes to save this decoder.
function Decoder(bytes, port) {

  var decoded = {};
  if (port == 8) {
    decoded.soil = bytes[0]<<8 | bytes[1];
  }

  return decoded;
}
We can input the data of 8-bit soil moisture sensor in Test on the right side to check whether the decoder parses correctly.
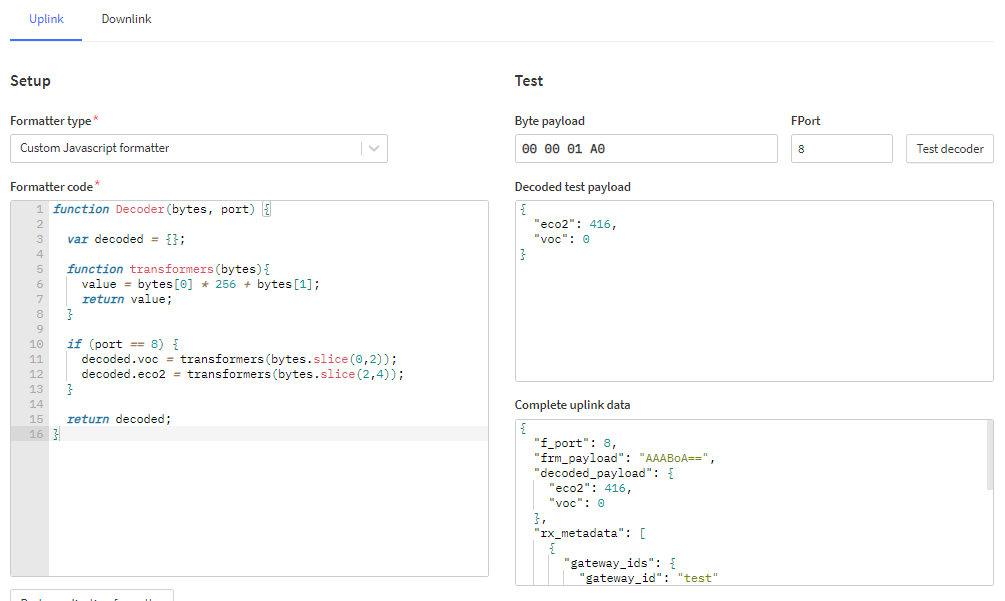
Option 4. Grove VOC and eCO2 Gas Sensor (SGP30) data decoder
In the previous section Grove VOC and eCO2 Gas Sensor (SGP30), We use integer variable tvoc_ppb and co2_eq_ppm to store the VOC and eCO2 values.
The configuration code of its decoder is as follows. Please paste the following code into the code section of TTN. Click the Save changes to save this decoder.
function Decoder(bytes, port) {

  var decoded = {};

  function transformers(bytes){
    value = bytes[0] * 256 + bytes[1];
    return value;
  }

  if (port == 8) {
    decoded.voc = transformers(bytes.slice(0,2));
    decoded.eco2 = transformers(bytes.slice(2,4));
  }

  return decoded;
}
We can input the data of 16-bit SGP30 in Test on the right side to check whether the decoder parses correctly.
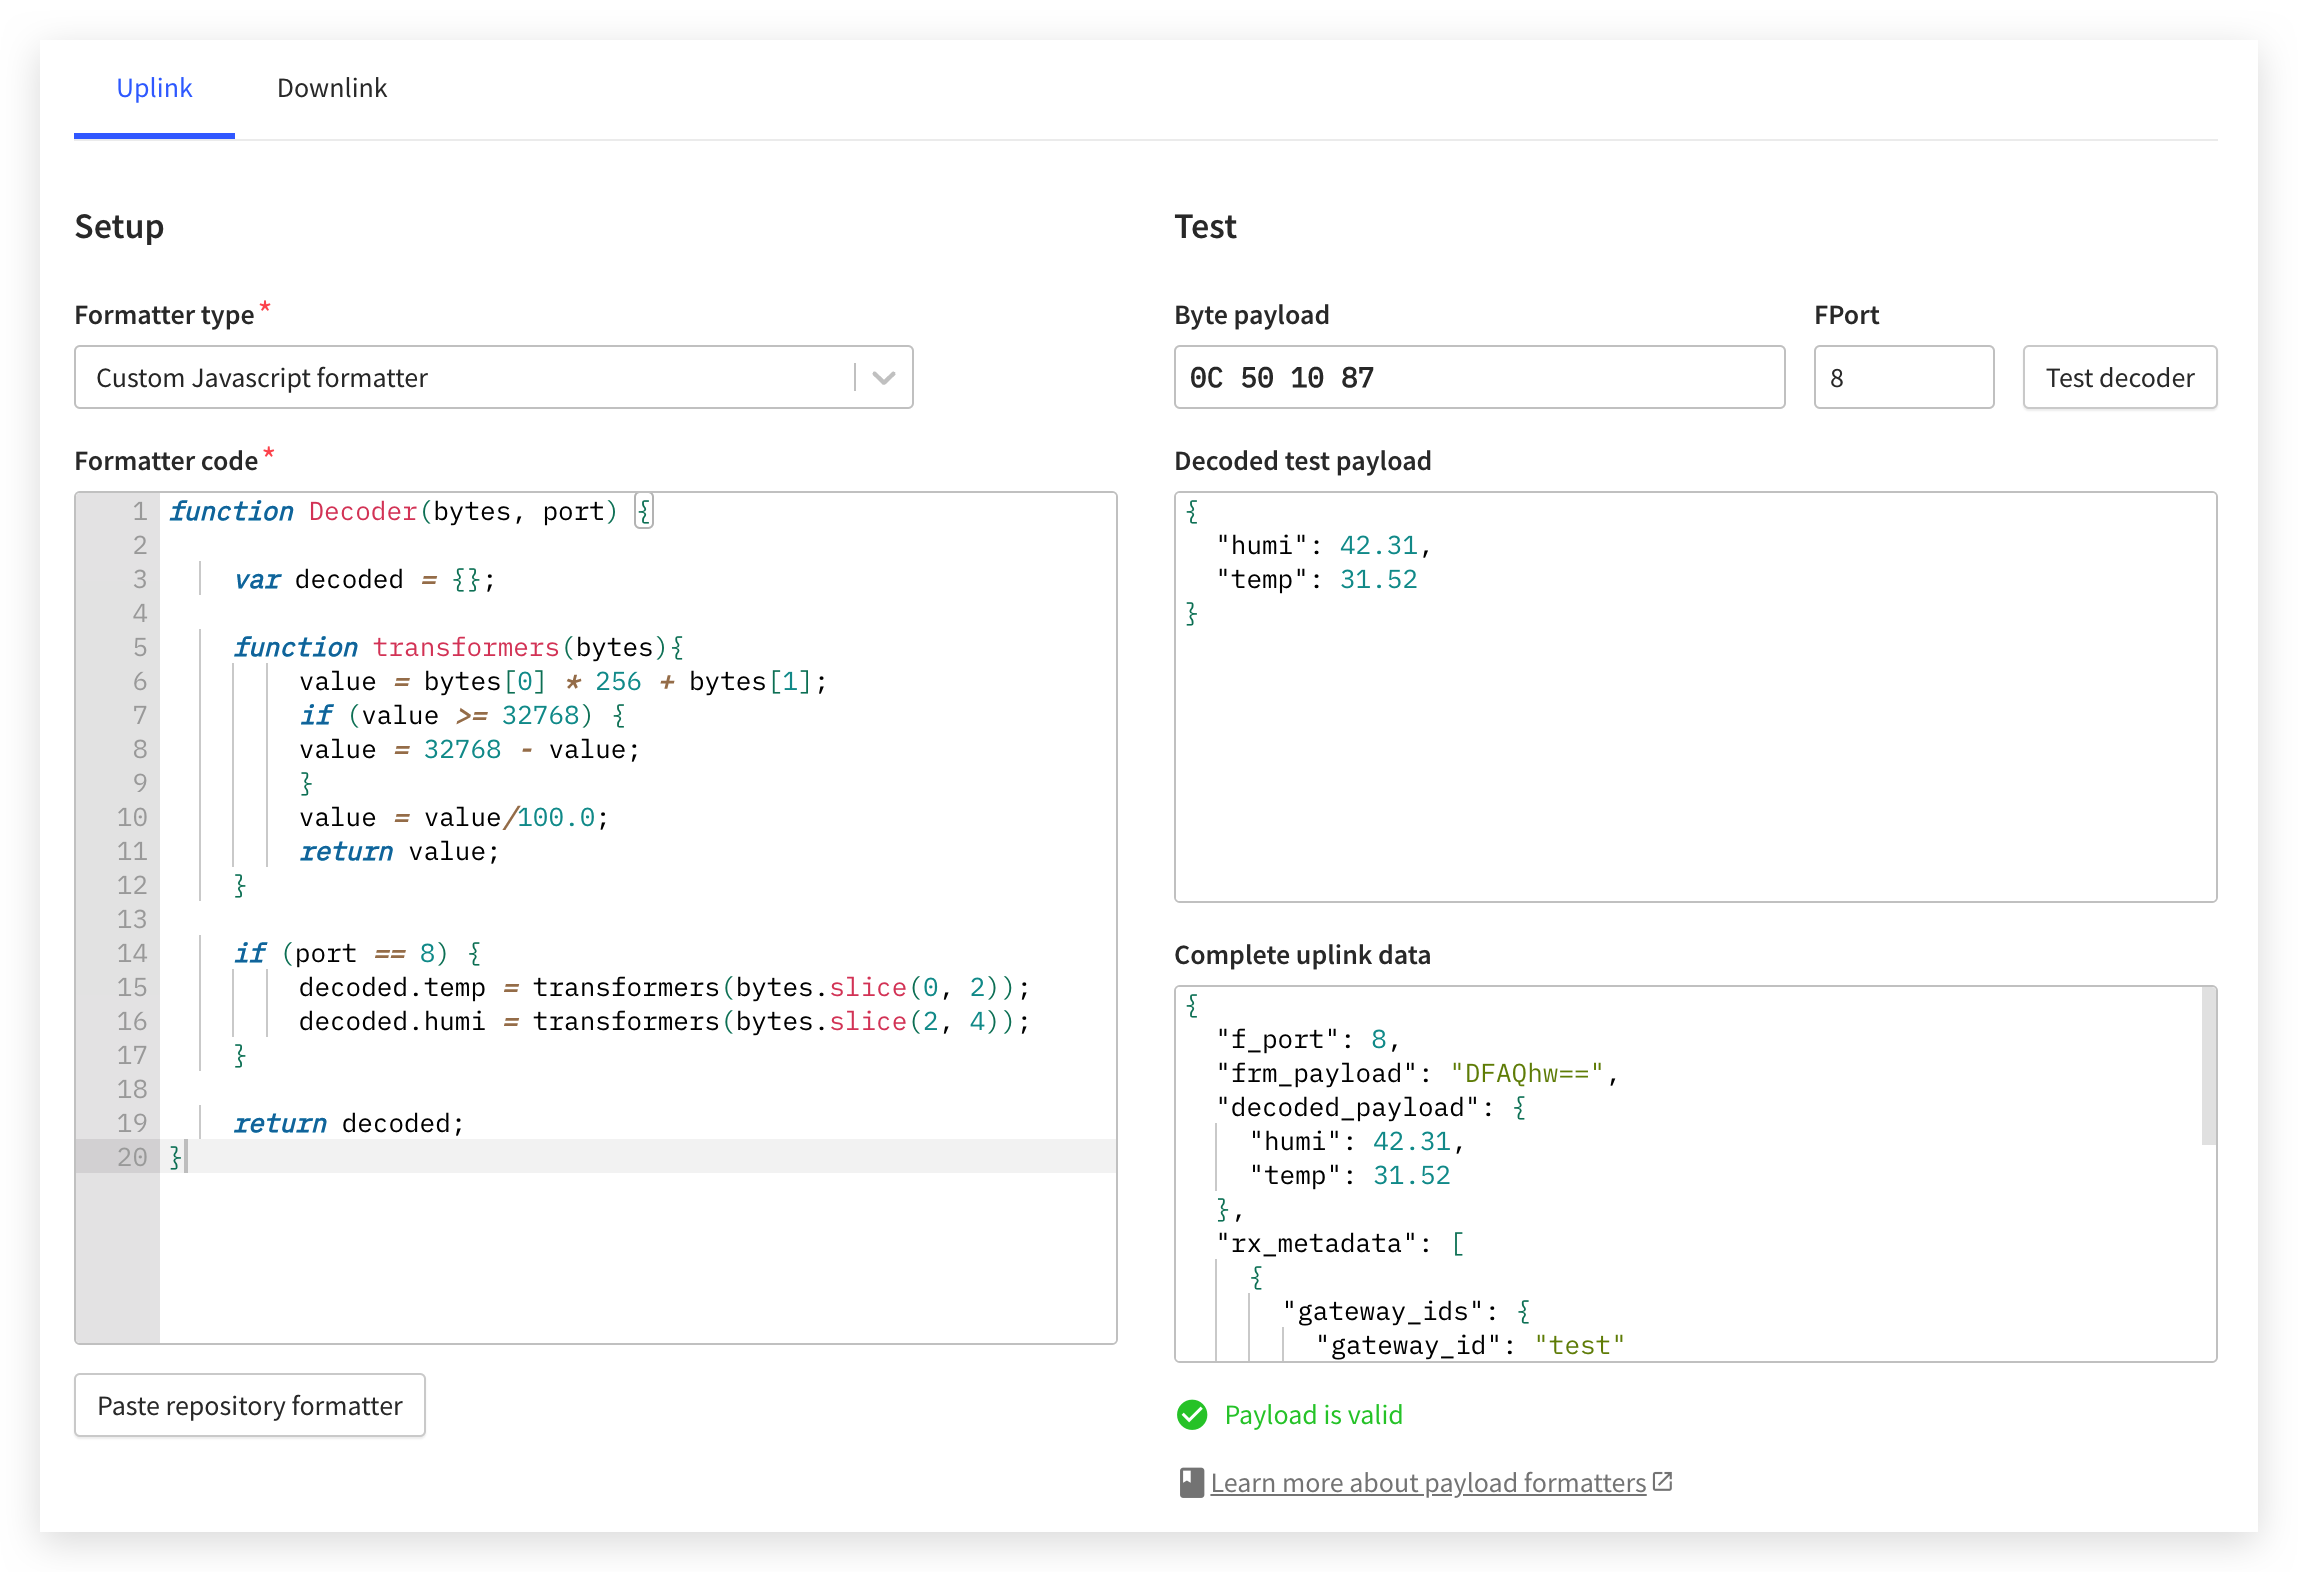
Option 5. Grove Temp&Humi Sensor (SHT40) data decoder
In the previous section Grove Temp&Humi Sensor (SHT40), We use float variables temperature and humidity to store the temperature and humidity values. And send the two values after they have been enlarged a hundred times into integers.
The configuration code of its decoder is as follows. Please paste the following code into the code section of TTN. Click the Save changes to save this decoder.
function Decoder(bytes, port) {

    var decoded = {};

    function transformers(bytes){
        value = bytes[0] * 256 + bytes[1];
        if (value >= 32768) {
        value = 32768 - value;
        }
        value = value/100.0;
        return value;
    }

    if (port == 8) {
        decoded.temp = transformers(bytes.slice(0, 2));
        decoded.humi = transformers(bytes.slice(2, 4));
    }

    return decoded;
}
We can input the data of 32-bit SHT40 in Test on the right side to check whether the decoder parses correctly.
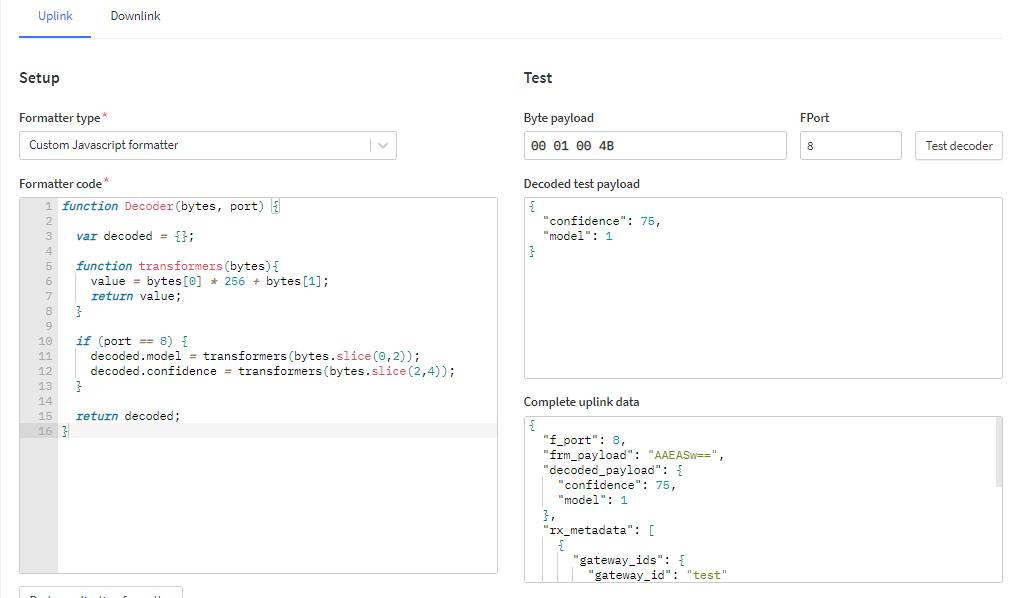
Option 6. Grove Vision AI Module data decoder
In the previous section Grove Vision AI Module, We use int variables model and confi to store the type of model identified and its confidence level.
The configuration code of its decoder is as follows. Please paste the following code into the code section of TTN. Click the Save changes to save this decoder.
function Decoder(bytes, port) {

  var decoded = {};

  function transformers(bytes){
    value = bytes[0] * 256 + bytes[1];
    return value;
  }

  if (port == 8) {
    decoded.model = transformers(bytes.slice(0,2));
    decoded.confidence = transformers(bytes.slice(2,4));
  }

  return decoded;
}
We can input the data of 16-bit Vision AI in Test on the right side to check whether the decoder parses correctly.
Upload code send data to TTN
On the different sensor pages we provide detailed codes for uploading data. You can also find the sensor code you want to use in the list below.
Before using the code provided in this section, please note that the Device EUI, App EUI and App Key in the code are consistent with the device information added by TTN. And check if the frequency band configured for Grove - Wio-E5 is the same as the gateway band in your area or TTN. Failure to do so may result in network access failure.
The code to set the LoRaWAN® band is as follows, and the default setting is EU868 band. (The EU868 band is commonly used in the European region.)
#define Frequency DSKLORAE5_ZONE_EU868
US915 band (The US915 band is commonly used in North America.)
#define Frequency DSKLORAE5_ZONE_US915
AU915 band (The AU915 band is commonly used in Australia Region.)
#define Frequency DSKLORAE5_ZONE_AU915
| Sensor Type | Download Address |
|---|---|
| Wio Terminal built-in light sensor | Download |
| Wio Terminal built-in IMU sensor | Download |
| Soil Moisture Sensor | Download |
| VOC and eCO2 Gas Sensor (SGP30) | Download |
| Temp&Humi Sensor (SHT40) | Download |
| Vision AI Module | Download |
The above code for sending sensor data can be uploaded directly to the Wio Terminal from the Arduino IDE and run. At that time, please turn on the serial monitor and adjust the baud rate to 9600 to observe the data transmission in real time.
For more details, please return to the section on the use of individual sensors in the reference catalog.
Real-time data
In the Application tab, we can click on the Live data to see the information about the data received by TTN.
We can directly see the data information after decoding by the decoder.

Source Code Analysis
If you want to apply the content of this tutorial to your own project development, learning to understand the meaning of the code is essential. Here we will use the code of SHT40 sensor as an example to explain the logic of code implementation.
At the beginning of the program, we need to prepare the necessary triad information to connect to TTN and to set the frequency of the Wio-E5.
#define Frequency DSKLORAE5_ZONE_EU868
/*
Select your frequency band here.
DSKLORAE5_ZONE_EU868
DSKLORAE5_ZONE_US915
DSKLORAE5_ZONE_AS923_1
DSKLORAE5_ZONE_AS923_2
DSKLORAE5_ZONE_AS923_3
DSKLORAE5_ZONE_AS923_4
DSKLORAE5_ZONE_KR920
DSKLORAE5_ZONE_IN865
DSKLORAE5_ZONE_AU915
 */

char deveui[] = "2CF7FXXXXXX0A49F";
char appeui[] = "80000XXXXXX00009";
char appkey[] = "2B7E151628XXXXXXXXXX158809CF4F3C";
Next, a data_decord() function is defined. This function converts the sensor values into data frames that can be parsed by the TTN decoder and also comply with the LoRaWAN® protocol, and stores them in the array data[].
In general, to prevent data overflow, we need to consider the maximum and minimum values that the sensor may read. And split into hexadecimal numbers that will not overflow.
void data_decord(int val_1, int val_2, uint8_t data[4])
{
  int val[] = {val_1, val_2};

  for(int i = 0, j = 0; i < 2; i++, j += 2)
  {
    if(val[i] < 0)
    {
      val[i] = ~val[i] + 1;
      data[j] = val[i] >> 8 | 0x80;
      data[j+1] = val[i] & 0xFF;
    }
    else
    {
      data[j] = val[i] >> 8 & 0xFF;
      data[j+1] = val[i] & 0xFF;
    }
  }
}
For the SHT40 sensor, he will have two data, one is temperature data and one is humidity data, and there are positive and negative values, so the negative numbers need to be processed, and also the decimal places need to be processed.
int_temp = temperature*100;
int_humi = humidity*100;
The next step is the initialization of the SHT40 and the initial setup of the Wio-E5. These will all be executed in the setup() function.
lorae5.begin(DSKLORAE5_SWSERIAL_WIO_P2)
In the initialization code, DSKLORAE5_SWSERIAL_WIO_P2 represents the Grove interface on the right side of the Wio Terminal, while DSKLORAE5_SWSERIAL_WIO_P1 represents the Grove interface on the left side. For other projects without external sensors, you can also use DSKLORAE5_SEARCH_WIO , which will automatically search for the Grove interface your Wio-E5 is connected to.
lorae5.send_sync(              //Sending the sensor values out
        8,                     // LoRaWan Port
        data,                  // data array
        sizeof(data),          // size of the data
        false,                 // we are not expecting a ack
        7,                     // Spread Factor
        14                     // Tx Power in dBm
       )
The important role of the send_sync() function is to send the sensor values over the LoRaWAN®. The first parameter indicates the channel number to send the data, the second parameter indicates the content of the data sent, and the third parameter indicates the length of the data sent. In general, we only need to focus on the content of the first three parameters.
delay(15000);
The delay at the end of the program determines how often you want to send data. We do not recommend sending at a rate of less than 10 seconds, as sending at such a high frequency may cause the Wio-E5 to work abnormally, and may be recognized by TTN as an abnormal device and blocked because of the high frequency.
To learn more about the code and features of Grove - Wio-E5, please refer to the GitHub link of the repository. A special thanks to Paul Pinault (disk91) for writing the library for Grove - Wio-E5.
Stay tuned for more content!
Tech Support & Product Discussion
Thank you for choosing our products! We are here to provide you with different support to ensure that your experience with our products is as smooth as possible. We offer several communication channels to cater to different preferences and needs.
Statement
- The LoRa® Mark is a trademark of Semtech Corporation or its subsidiaries.
- LoRaWAN® is a mark used under license from the LoRa Alliance®.