5 Minutes to Develop an Industrial LoRaWAN Sensor
Let's quickly build an industrial-grade LoRaWAN wireless sensor for direct commercial use in 5 minutes.

When prototyping for a commercial data acquisition project, it takes a lot of time and cost to prototype. For example, we need to make a wireless pH sensor for an agricultural project. We need to 1) Find the development board and sensor probe. 2) Write code. 3) 3D print the shell. 4) Final assembly test. By the time we complete the prototype, it can take days or even weeks.
Today, we can use a wireless LoRa collector, set up sensors to connect to an app via Bluetooth and build a product in five minutes, directly into a commercial project.
Preparation
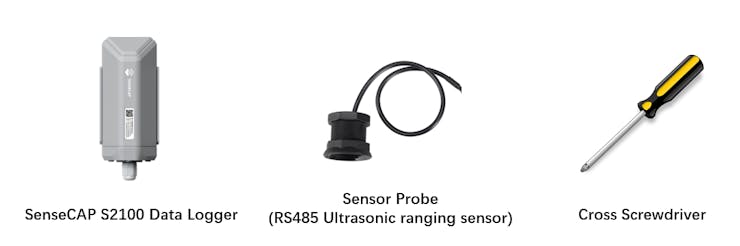
Prepare data logger, sensor probe, gateway, and tools.
-
Data logger: It is a LoRaWAN converter that converts MODBUS RS485/Analog/GPIO sensors into LoRa-enabled sensors and therefore transfers data through the LoRaWAN protocol.
-
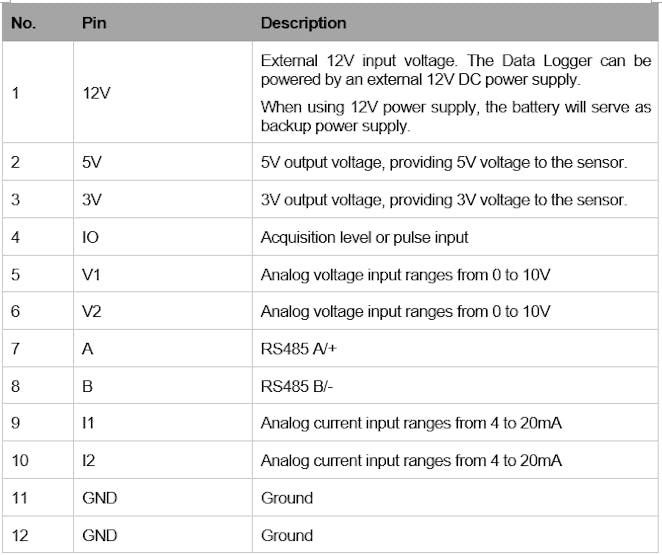
Sensor probe: prepare a sensor probe with a cable and output one of the signals of RS485 / 4-20mA /0-10V / pulse/level. The tutorial uses an RS485 ultrasonic sensor for liquid-level measurement.
-
Cross screwdriver: Used to assemble the sensor probe.
- Gateway: The LoRaWAN sensor transmits data to a LoRaWAN gateway, which then transmits it to the cloud server. If you don't have a gateway, there are two options:
Option 1: Sensors work in areas covered by Helium Network(Check on Helium Explorer). Wherever the helium network is available, you can use sensors to transfer data without purchasing a gateway. Option 2: Buy a gateway. 5) Download the SenseCAP Mate App for configuration:

The preparation is done. Let's get started!
Network Architecture
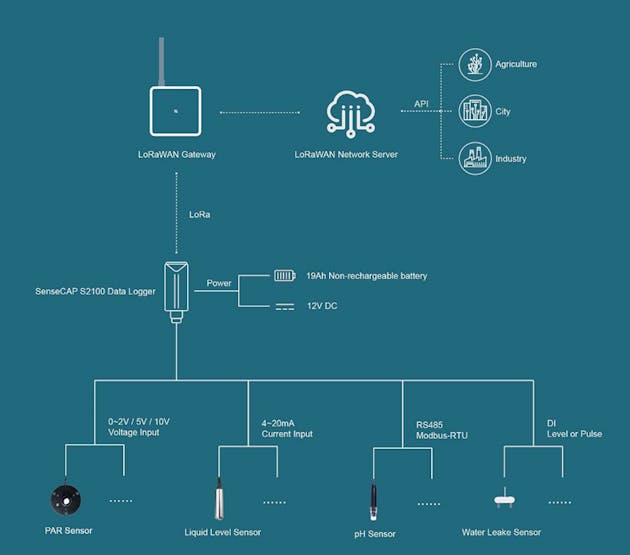
Let's start with LoRaWAN network.
The data logger converts sensor data into LoRa data and uploads the data to the gateway. The gateway uploads the data to the server.
Hook up the Sensor
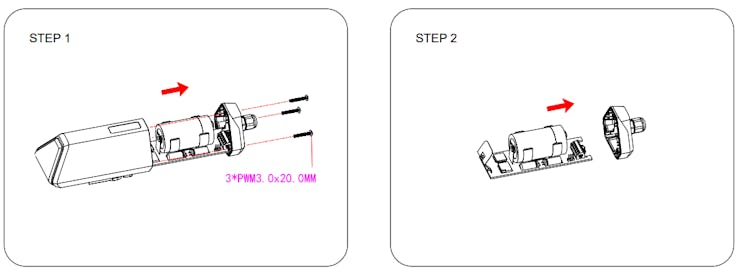
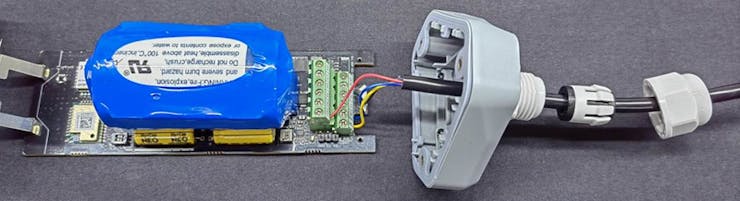
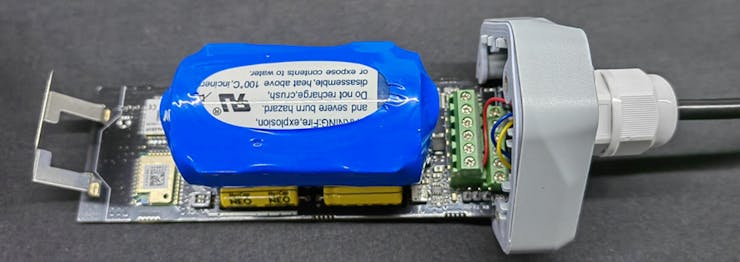
- Disassemble the Data Logger.
- Connect the sensor to the terminal, and power the sensor via a built-in battery.
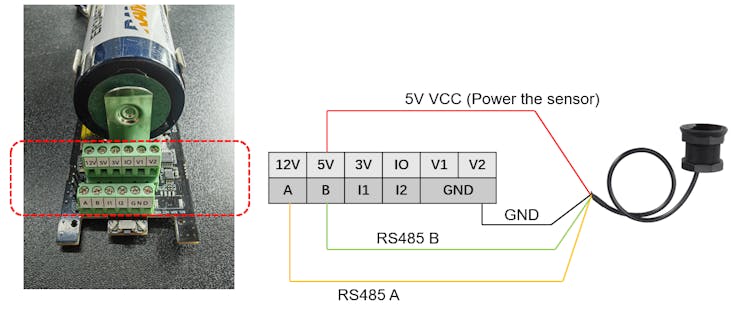
If you are using another protocol, such as 4-20mA, please refer to the pin table:
- Assemble the sensor.

Configure the sensor via App
-
Open and log in to the SenseCAP App.
-
Select "S2100 Data Logger" and Click “Setup” on the config page.
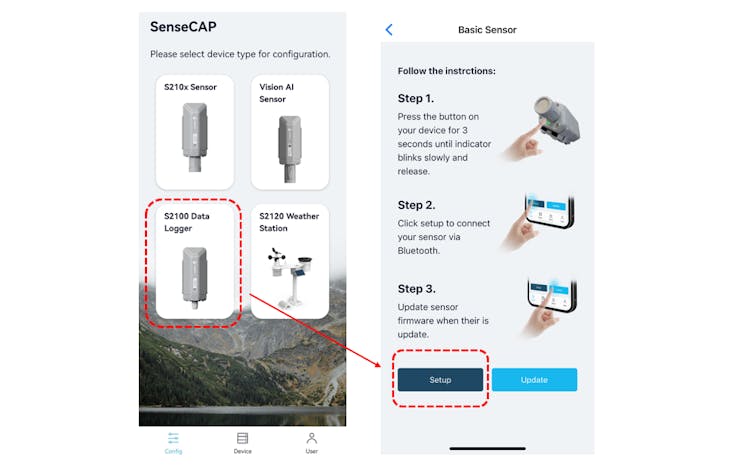
- Press the button and hold for 3 seconds, the green LED will flash at 1s frequency. Then click “Scan” to start scanning the data logger's Bluetooth.
- Configure the lorawan and sensor parameters(includes RS485 Modbus-RTU command).

#########Basic Setting#############
Platform:
    -SenseCAP for helium (use helium network)
    -SenseCAP for The Things Network (use SenseCAP gateway)
Frequency Plan: EU868 (Select this based on the frequency or region of the gateway)
Uplink Interval: 5 min
Packet Policy: 2C+1N (use the default parameter)

#########Sensor Setting#############
Protocol: RS485 Modbus RTU
Baud Rate: 9600
Modbus Address: 128 (Sensor's modbus address)
Power Type: Periodic power (Power the sensor before data collection, and power off the sensor after data collection)
Power Voltage: 5V
Sensor Warm-up Time: 100ms
Response Timeout: 100ms
Startup Time: 100ms
Measurement Number: 2 (distance and temperature)

#########Measurement1#############
Register Address: 256 (DEC)
Function code: 03
Data Type: Unsigned 16bit integer,0xAB
Precision: 0,# (No decimal number)
FactoryA: 1 (Y=Ax+B, “Y”: It is the value of Data Logger will upload.
“x”: It is the original current value.If only raw values are uploaded, set A=1 and B=0.)
FactoryB: 0
Write Strategy: None

#########Measurement2#############
Register Address: 258 (DEC)
Function code: 03
Data Type: Unsigned 16bit integer,0xAB
Precision: 0,# (No decimal number)
FactoryA: 0.1 (The final value is divided by 10)
FactoryB: 0
Write Strategy: None
- Click Send and Test the sensor by clicking "Measure"
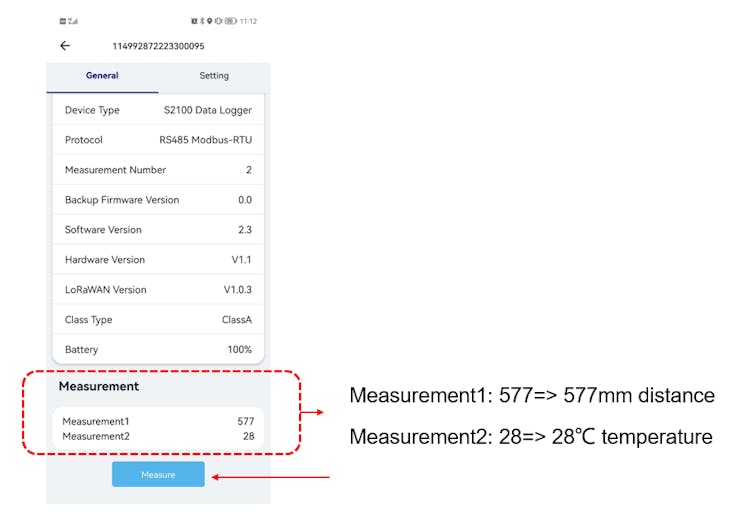
The distance and temperature of the sensor are obtained successfully!
Upload the data to SenseCAP Portal and Mate App
Before uploading data, make sure the gateway is working properly or has helium network coverage.
- The App returns to the home page and disconnects the Bluetooth connection. The data logger will try to join the LoRaWAN network.
Waiting to join LoRa network: red breathing light flashing Join LoRa network success: green LED flashes fast for 2s
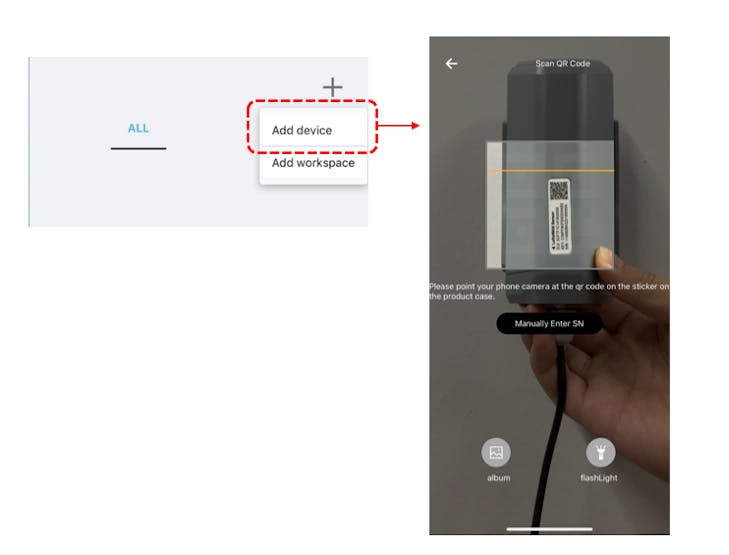
- Binding the data logger via scanning the QR code.
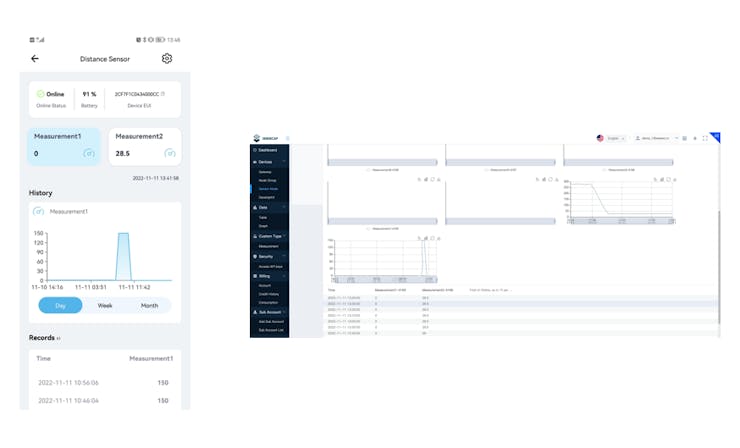
- Check the data on App and Portal (https://sensecap.seeed.cc/).
Test the sensor in a real environment
Fast application to the outdoor real scene for long-term monitoring.

At present, a LoRaWAN sensor has been developed.
Come and try new solutions for your project!