Seeed Studio 24GHz mmWave for XIAO
Introduction
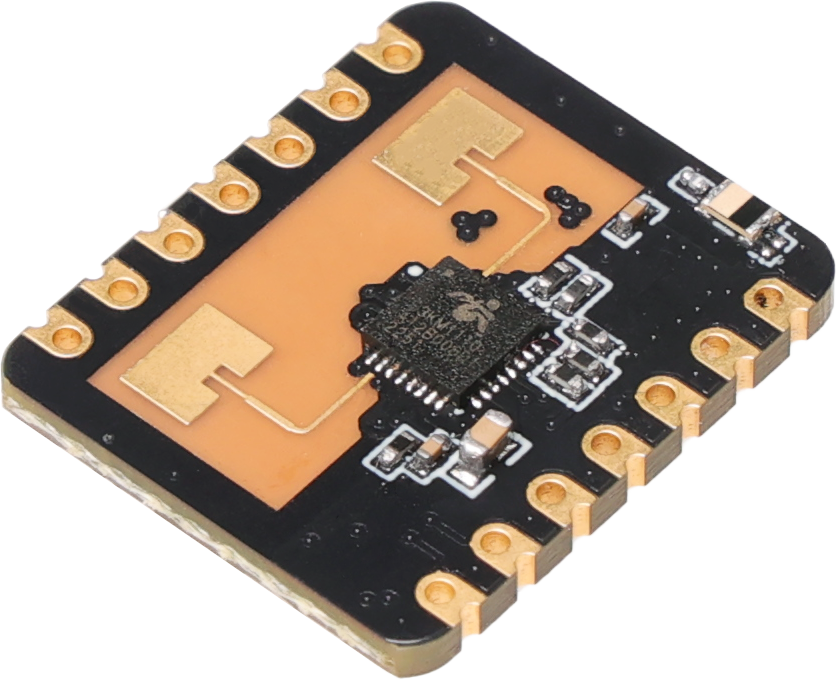
24GHz mmWave Sensor for XIAO - Human Static Presence is a expansion board for Seeed Studio XIAO series. It is an antenna-integrated, high-sensitivity mmwave radar sensor that is based on the FMCW principle. Combined with radar signal processing and accurate human body sensing algorithms, it can identify human bodies in motion and stationary states.
Feature
- Based on the FMCW principle: highly sensitive and immune to environmental interferences
- Comprehensive Human Body Detection: The sensor not only detects moving human bodies with high sensitivity but also exhibits sensitivity to static individuals, micro-movements, as well as individuals in sitting or lying positions.
- Multi-Level Intelligent Parameter Adjustment: Adjusted using Bluetooth or a serial port, providing flexibility to meet varying environmental conditions and scene changes. Additionally, it supports direct parameter configuration through an app, eliminating the need for a serial port connection.
- Wide Detection Angle and Long Sensing Distance: With a field of vision of up to 60 degrees, the sensor can detect movement from a wide angle. Furthermore, it can detect things up to 5 meters away.
- Excellent Shell Penetration and Aesthetics Enhancement: Has good shell penetration, allowing it to work discreetly inside the product's casing without the need for surface perforations.
Application
- Human body sensor light control
- Life safety protection
- Smart home appliances
- Intelligent security
Specification
| Parameter | Value |
|---|---|
| Operating frequency | 24GHz ~ 24.25GHz |
| Operating voltage | DC 5V |
| Power supply capacity | >200mA |
| Average operating current | 79mA |
| Modulation | FMCW |
| Interface | GPIO (IO level 3.3V), UART |
| Target application | Human presence sensor |
| Detection distance | 0.75m ~ 6m (adjustable) |
| Detection angle | ±60° |
| Distance resolution | 0.75m |
| Sweep Bandwidth | 250MHz |
| Ambient temperature | -40℃ ~ 85℃ |
| Dimensions | 18mm x 22mm |
Hardware Overview
This mmwave sensor is compatible with the full range of XIAO, so the pin definitions follow the XIAO pin definitions. However, considering the widespread use of serial ports, we have designed a soft serial connection for the mmwave sensor.

The sensor relies heavily on the soft serial ports (D2 - TX, D3 - RX) and a 3.3V power supply. Other than that, none of the other pins will be used.
Getting Started
This sensor module supports both direct software viewing (via Bluetooth) and secondary development (using XIAO and UART). If you want to observe the sensor values as soon as possible, you can refer to the Getting Started steps to use the software we provide.
Hardware Connections
The sensor is designed for XIAO compatibility, so in general, if you want to use this sensor, you need to prepare an XIAO and install the female header row pin for the sensor. When connecting to the XIAO, please pay special attention to the installation direction of the sensor, please do not plug it in backwards, otherwise it is likely to burn the sensor or the XIAO.
The correct direction to follow is that the antenna of the sensor should face outwards.

After confirming that the connection direction is correct, you can connect the USB-C type cable to the computer or power supply, and the sensor will start to work.
mmwave Sensor Software
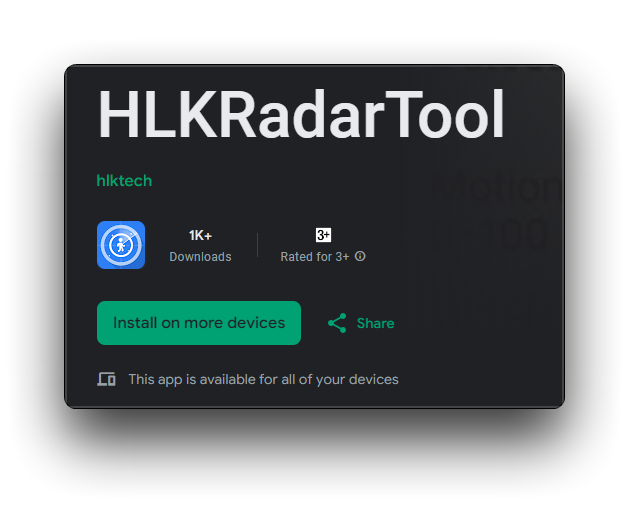
The software HLKRadarTool can be used to observe the sensor values of the radar directly. The software currently supports IOS, Android and Windows systems.
Below, we describe how to use these software in conjunction with the sensor.
Mobile Software Operation Guide
If you wish to observe the sensor's values on your mobile phone, then you will need to communicate with your mobile phone using the sensor's Bluetooth, meaning you will also need a Bluetooth-enabled mobile phone. And download the above software in advance.
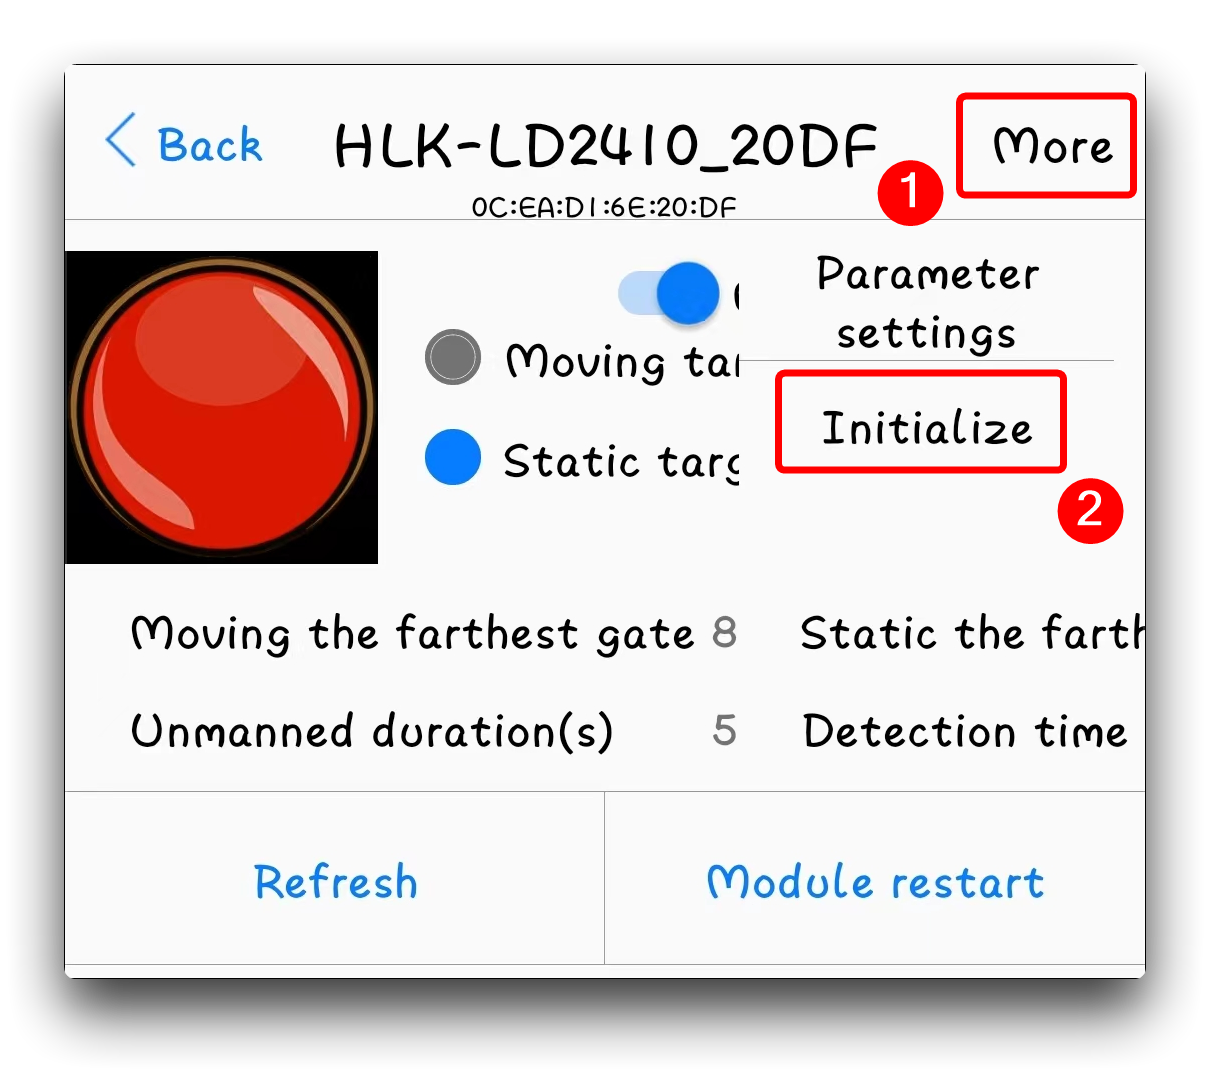
Step 1. Open the app, and the app searches for nearby radar devices. The broadcast name of the device is HLK-LD2410_xxxx (xxxx is the last four digits of the mac address).
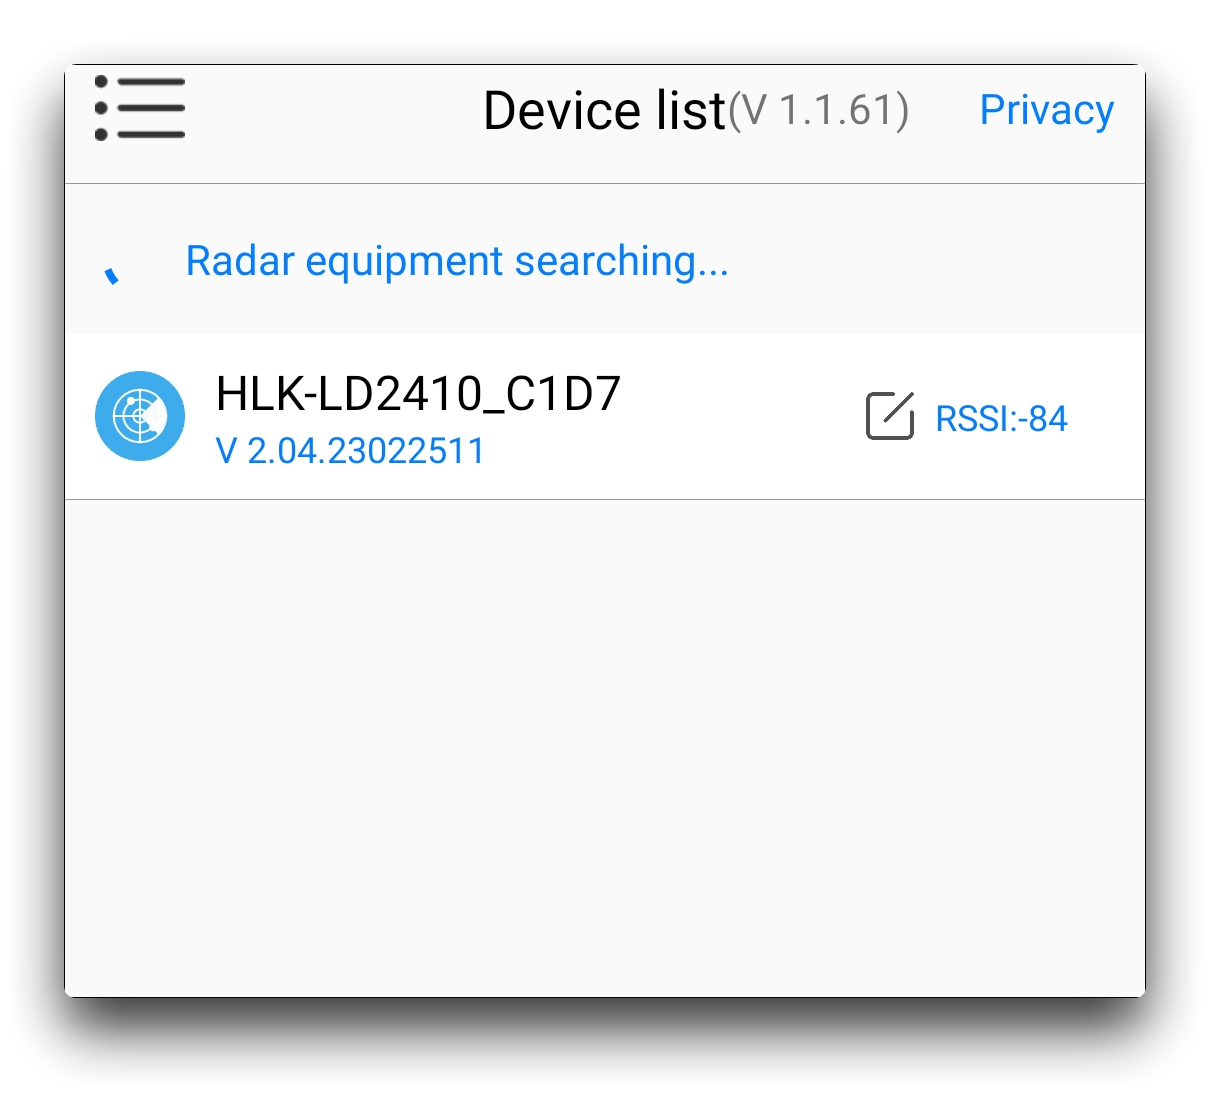
The use distance of the APP should not exceed the Bluetooth signal range (within 4 meters).
Step 2. After the module is successfully connected, you can view the radar information, or debug and save the parameters.
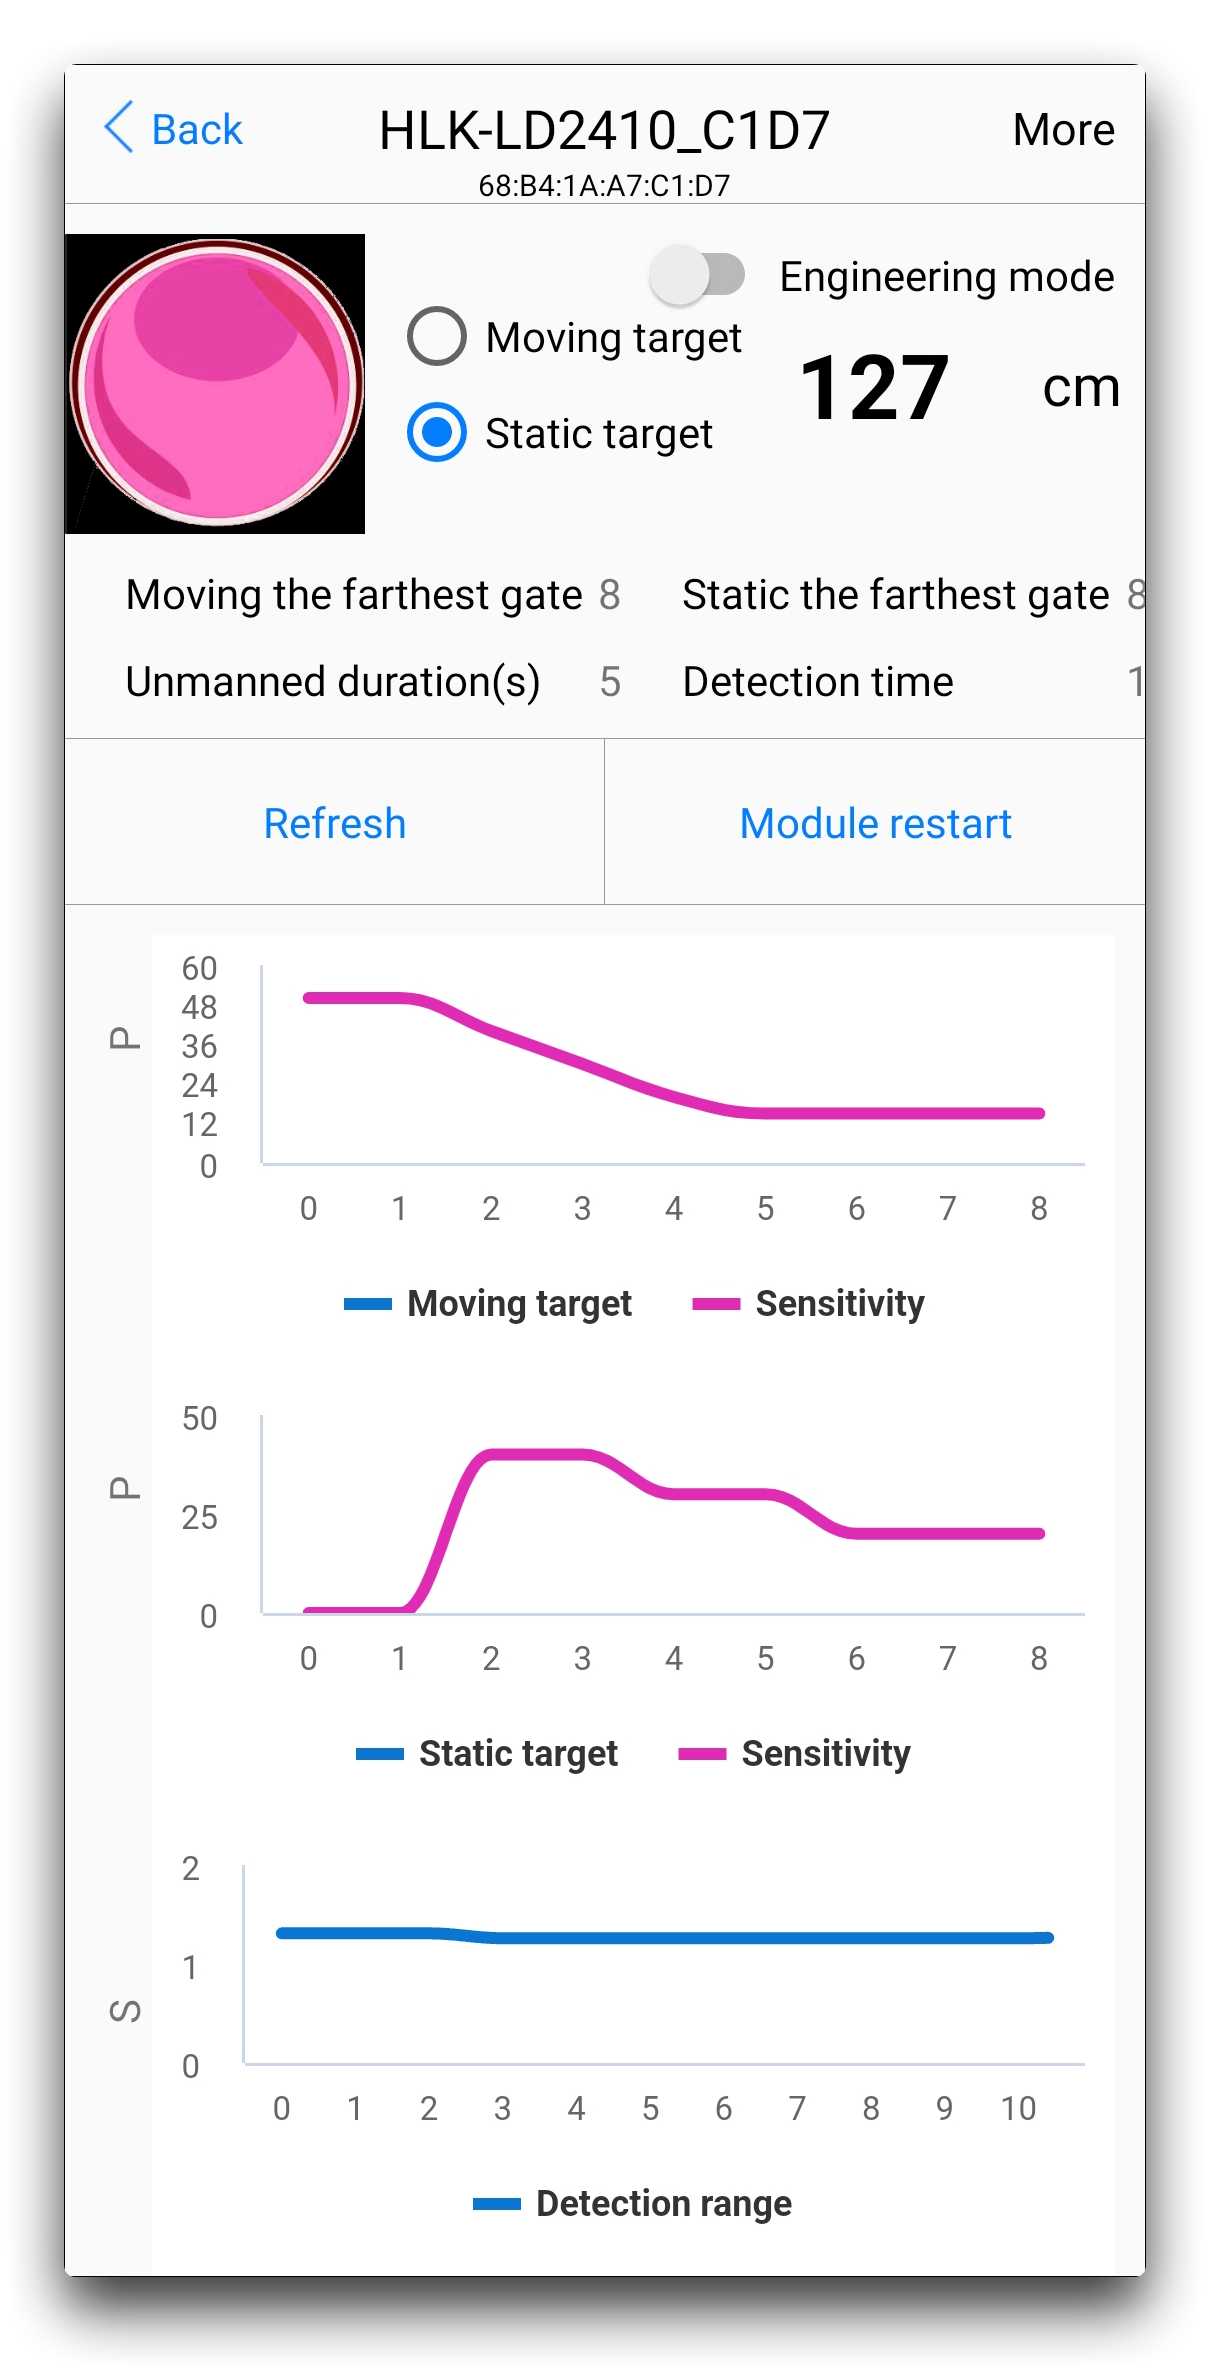
Step 3. In the More option in the top right corner of the software, you can access the settings menu to set custom parameters and features for the sensor.
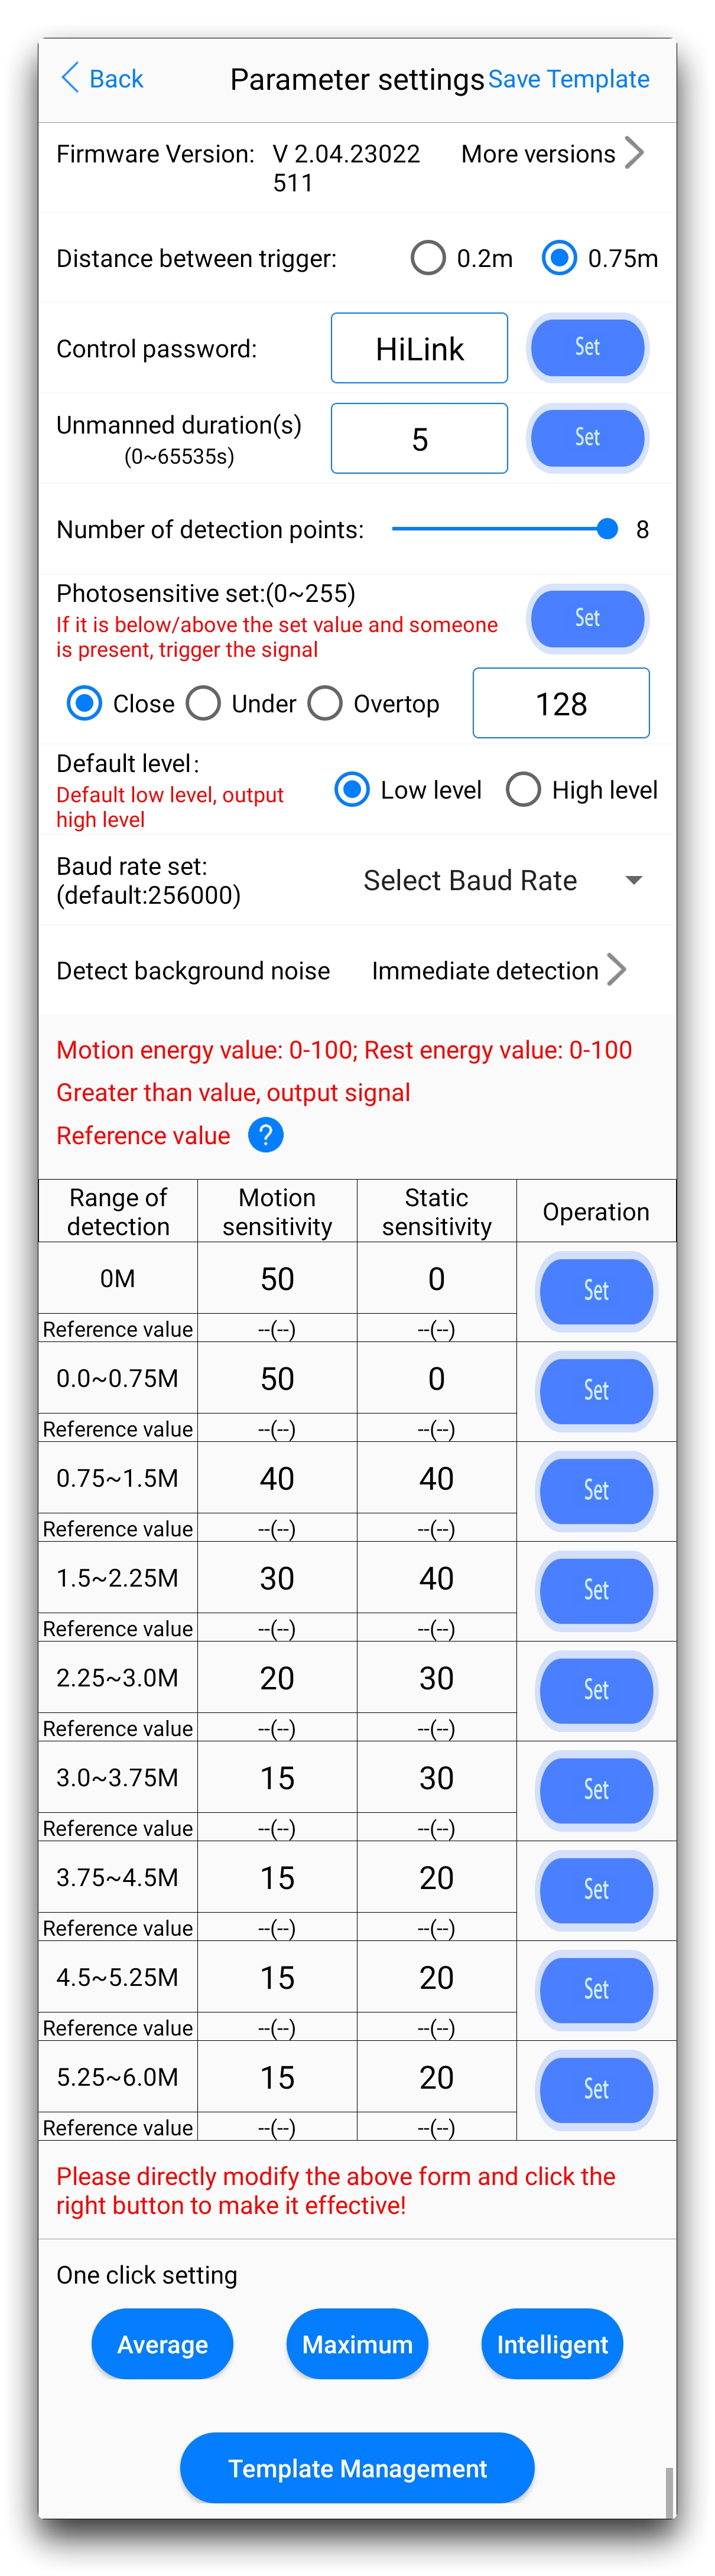
Before modifying these parameters and settings, we recommend that you read the User Protocol Manual carefully and refer to the manual's instructions for modifying these. For more details on the meaning of the values displayed by the software and the setting parameters please read the User Protocol Manual.
Windows Software Operation Guide
In order to facilitate the user to test and configure the module quickly and efficiently, a PC configuration tool is provided. The user can use this tool software to connect the serial port of the module, read and configure the parameters of the module, and receive the detection results reported by the module. Data, and real-time visual display, which greatly facilitates the use of users.
Step 1. Use the USB to serial port tool to connect the module serial port correctly.
| USB to serial port tool | mmWave Sensor | |
|---|---|---|
 | 3V3 | 3V3 |
| GND | GND | |
| RX | TX | |
| TX | RX |
Step 2. Select the corresponding serial port number in the host computer tool, set the baud rate to 256000, select the Engineering Mode, and click to Connect the device.
If you opened the software before connecting the sensor to your computer, you may need to click Refresh to refresh the port number.
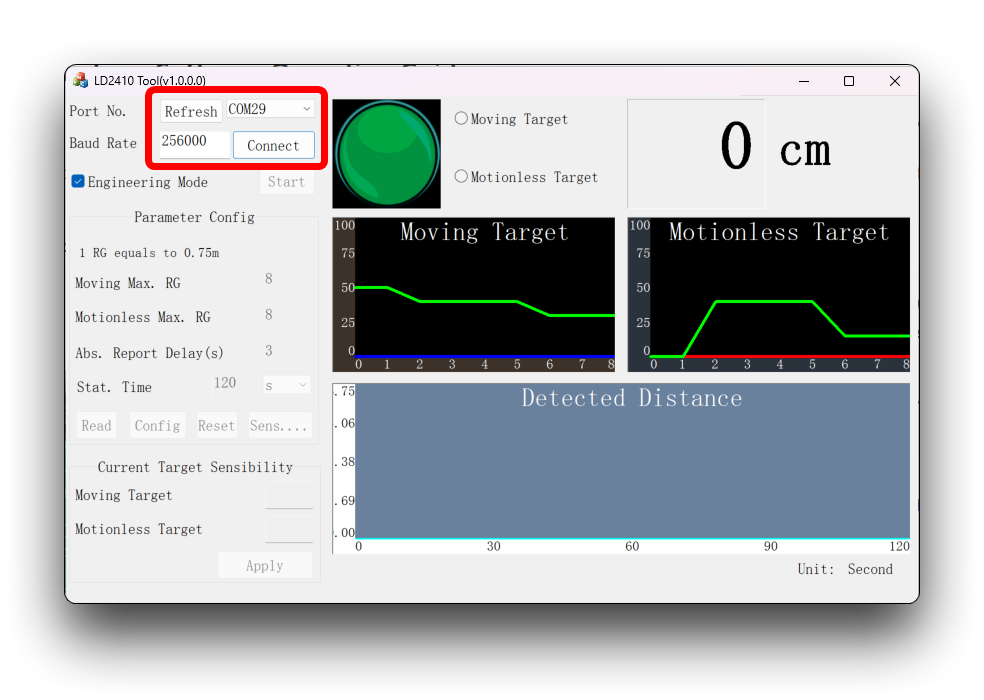
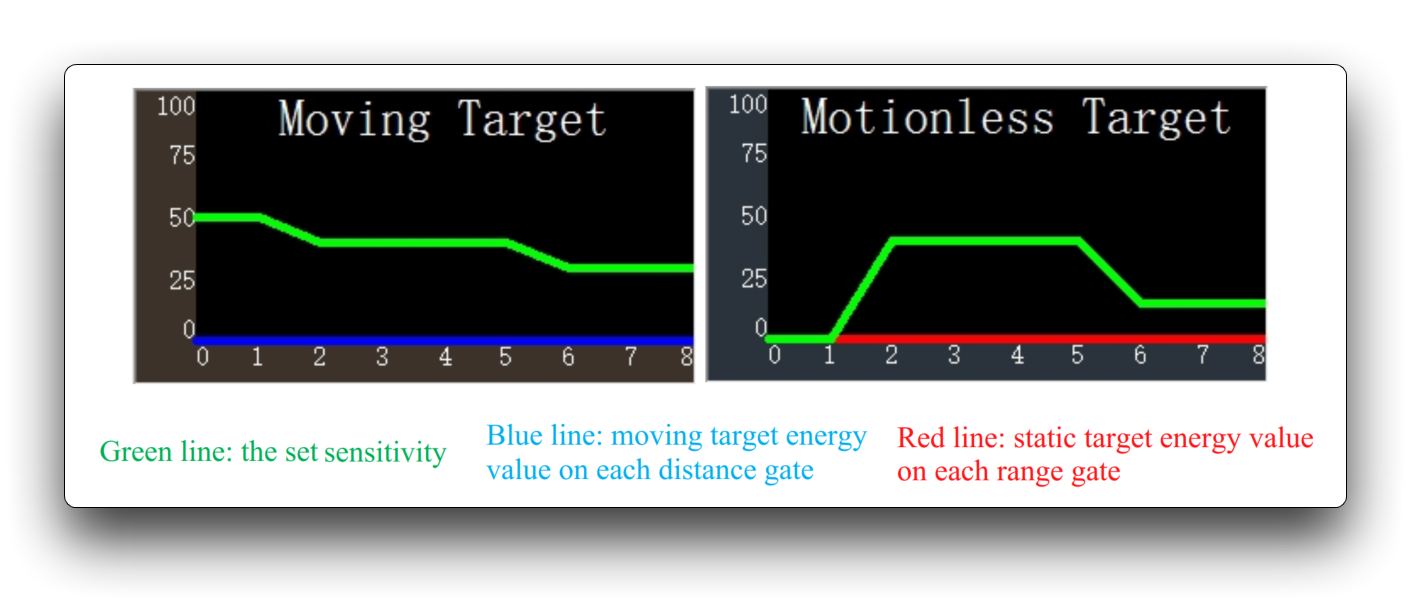
Step 3. After the connection is successful, click the Start button, and the graphical interface on the right will display the test results and data. After the connection is successful, click the Start button, and the graphical interface on the right will display the test results and data.
The parameters cannot be read and configured after clicking start, and configuration can only be performed after stopping.
The ball is the target status output indication: red means there is a movingtarget; purple means there is astationary target; green means no one.
Sensor Abnormal Recovery
If you have encountered radar anomalies in the process of using the sensor, such as data not reporting, downtime and so on. You can try to restore the sensor firmware according to here.
The method to recover the firmware is to use the mobile phone APP with Bluetooth function, in the upper right corner of the main interface of the software, select More, and then select Initialize.
OTA Upgrade
When the firmware of the device has been updated, the word upgradeable will appear on the firmware version, long press the version number to enter the upgrade interface; only V1.07.22091516 or newer versions support the upgrade.
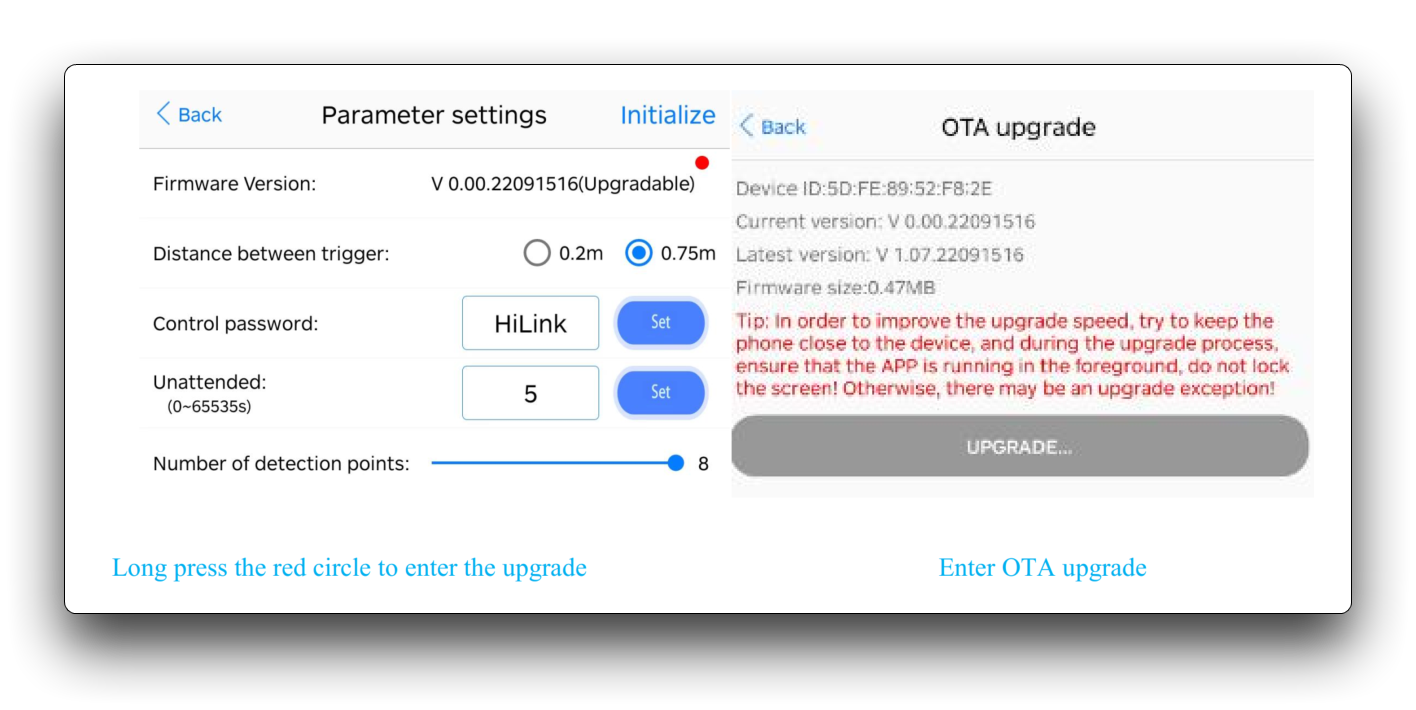
The overall upgrade time takes 1~3 minutes. The upgrade must be performed from the module, otherwise the upgrade will fail if the Bluetooth signal is poor.
Do not power off or restart the module before the upgrade is completed, and do not forcibly exit the APP, otherwise the upgrade will fail. If the upgrade fails, the sensor program will be disabled and sensor detection will not be possible. If the device upgrade fails, please restart the device and reconnect the APP, and a "waiting for upgrade" prompt will appear on the device list:
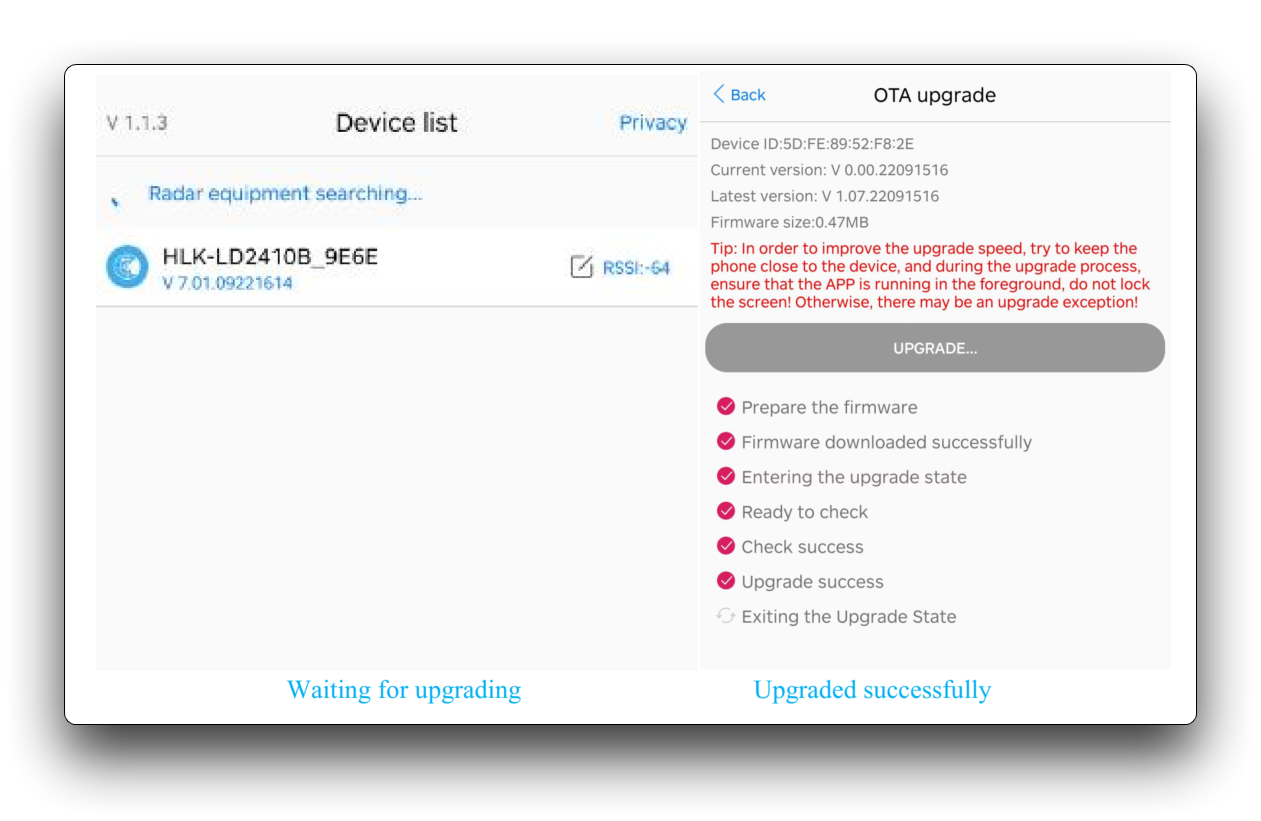
Click the device to be upgraded to re-upgrade, and the radar function can be restored only after the upgrade is successful.
Resources
- [PDF] 24GHz mmWave for XIAO Datasheet-V1.00
- [PDF] 24GHz mmWave for XIAO User Protocol Manual
- [PDF] 24GHz mmWave for XIAO SCH
Tech Support & Product Discussion
Thank you for choosing our products! We are here to provide you with different support to ensure that your experience with our products is as smooth as possible. We offer several communication channels to cater to different preferences and needs.